Crochet Car Mirror Charm

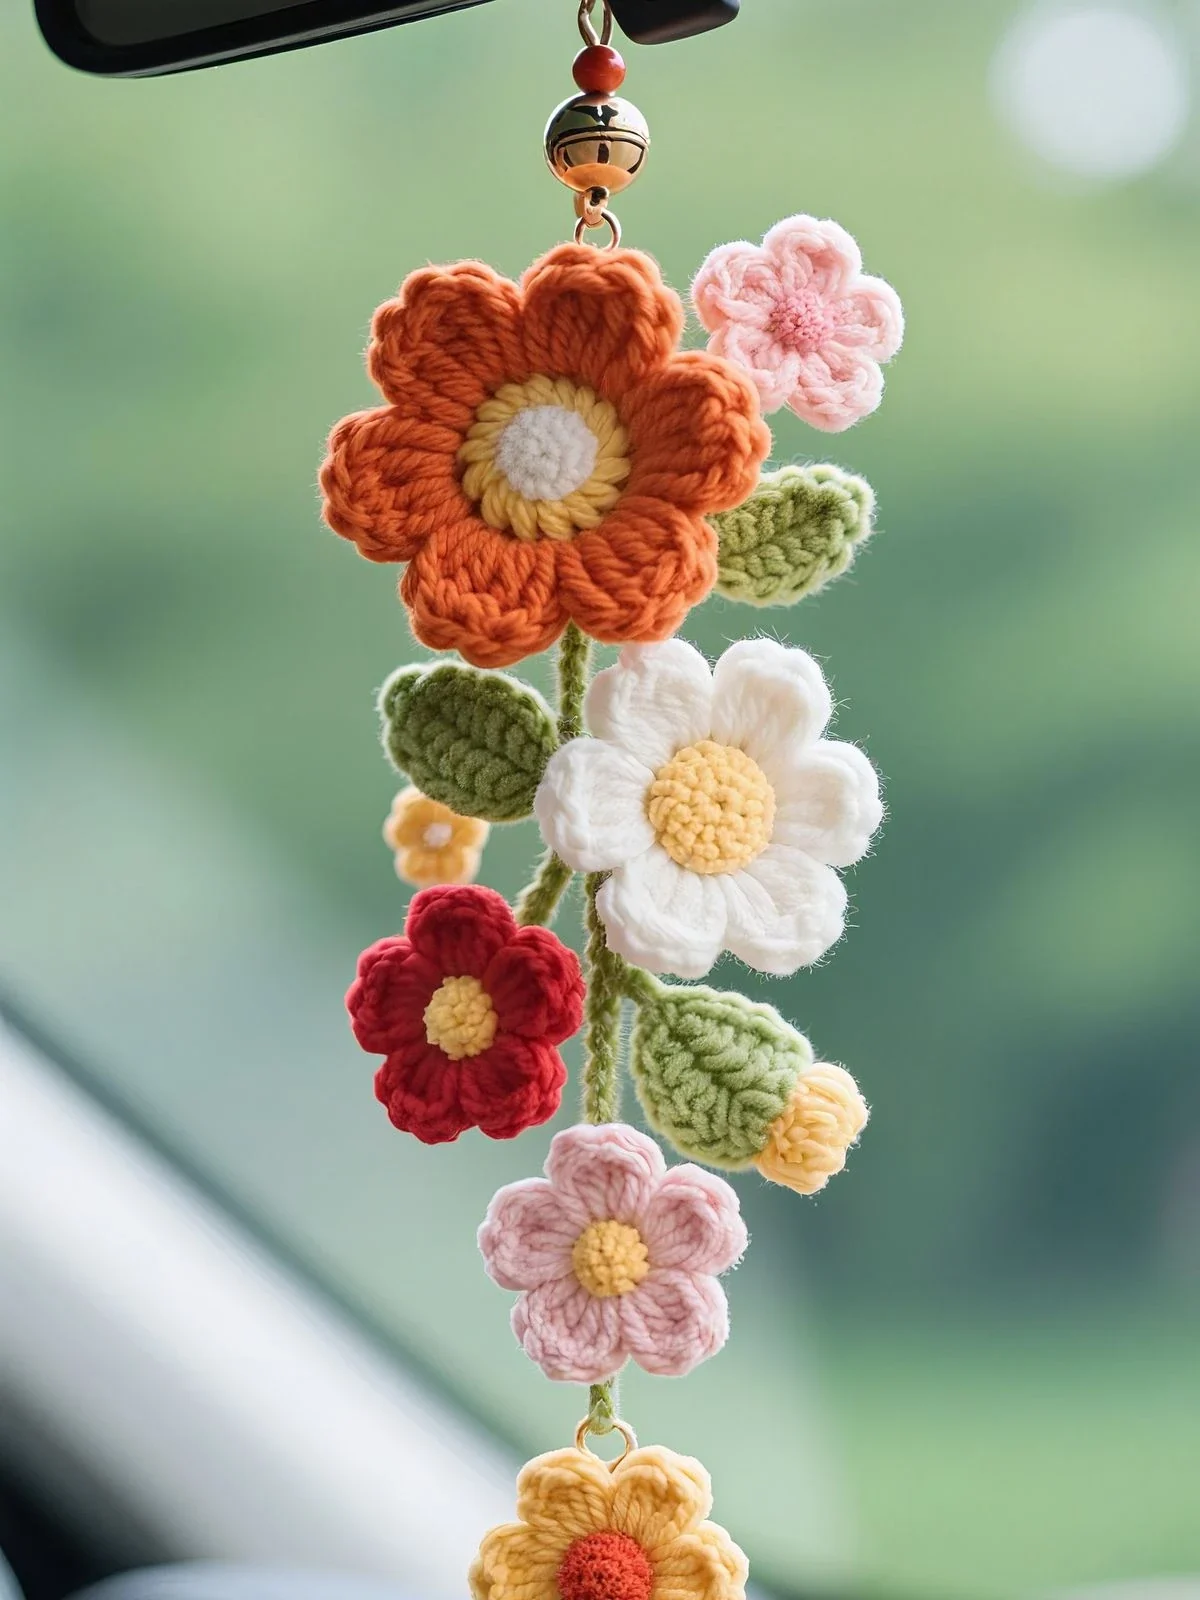
This crochet car mirror charm is a little hanging bouquet: a big orange flower at the top, then a pink blossom, a white daisy, a red flower, a pink flower, a tiny yellow bloom, a bud and four leaves, all on one green stem, with a yellow flower swinging at the bottom. It's DK cotton on a 3 mm hook, and every flower uses just a few yards. You'll need about 55 to 65 yards in total across seven colors. Plan on 4 to 5 hours, spread over two evenings.
Key Takeaways
- Four flower recipes (large, medium, small and mini) make all seven flowers. Only the colors change.
- One slip-stitch cord carries the weight. The flowers are sewn onto it, so no petal ever takes the pull when the car moves.
- The top flower is a sandwich: the cord's hanging loop is sewn between the flower and a backing disc, over-sewn twice.
- About 55–65 yd of DK #3 cotton. Metal hardware means it's not for children under 3. Keep it short so it never blocks your view.
Why I love this mirror charm
My car used to feel like a rental. Now there's a small garden swinging from the mirror, and it makes every red light a bit nicer. It's also the gift I make most often lately. New drivers, new car owners, a friend who just passed their driving test. Who wouldn't smile at flowers on the dashboard?
It looks complicated, but it isn't. All seven flowers come from four simple recipes. Once you've made one medium flower, you can make all four medium ones. Only the colors change. That's why it's such a good scrap project.
The part I care about most is hidden. Car charms swing, bump and bounce all day. If a flower hangs from another flower's petal, that petal stretches out within weeks. So this one has a spine. A firm slip-stitch cord runs from the hanging loop down to the bottom. Every flower and leaf is sewn onto it. The cord takes the load, and the flowers just sit pretty.
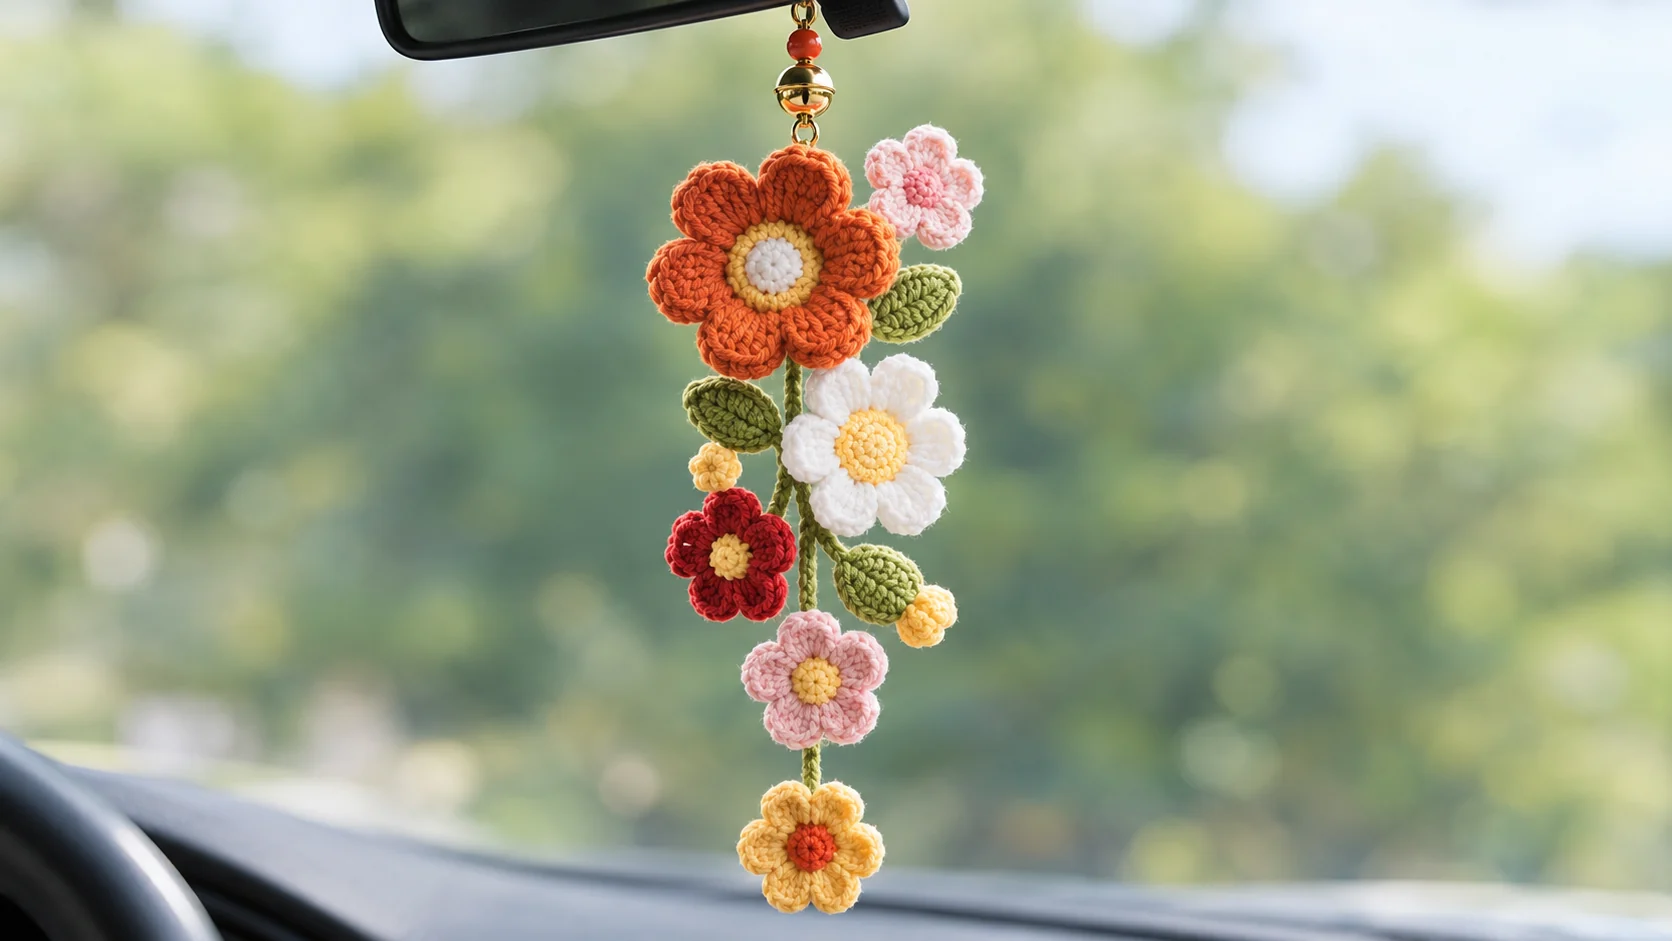
Pattern at a glance
- Stitches: single crochet, half double crochet, double crochet and slip stitch, in joined rounds.
- Yarn: DK #3 cotton, about 55–65 yd (50–60 m) total, in seven colors.
- Hook: 3 mm (US C/2–D/3). It's a little smaller than most DK ball bands suggest, so the petals stay crisp.
- Construction: 6 steps: flowers → leaves and bud → stem cord → top flower sandwich → build the bouquet → hardware.
- Finished size: about 9 in (23 cm) long from the top petal to the bottom flower, and 3½ in (9 cm) wide. The hardware adds 2–3 in. Tension will shift this a little.
- Time: 4–5 hours. Allow about 2½ hours for the flowers, 45 minutes for the leaves, bud and stem, and 1 hour for assembly.
- Skill level: advanced beginner. You should be comfortable with a magic ring, joining rounds and sewing small pieces.
What you'll need
Yarn (DK #3 cotton, ~55–65 yd / 50–60 m total)
- Green (stem, branch, leaves, bud collar): 11–13 yd. An olive or moss green looks the most natural.
- Yellow (flower centers, bud, bottom flower, mini flower): 14–17 yd. A warm buttery yellow.
- Orange (large flower and its backing disc): 10–12 yd.
- Pink (two pink flowers): 6–7 yd. A soft candy pink.
- White or cream (large flower center, daisy petals, mini center): 6–8 yd.
- Red (red flower): 4–5 yd.
- Deep pink (one small flower center): 1 yd. The red works too if you don't have it.
These amounts come from the stitch counts in the pattern, plus sewing tails, with a little margin. Keep every color a true DK #3 cotton or milk-cotton blend, such as Paintbox Yarns Cotton DK. A worsted #4 cotton like Lily Sugar 'n Cream will make that flower noticeably bigger than the rest.
Hook and notions
- 3 mm crochet hook
- A tiny pinch of polyfil stuffing (for the bud)
- Tapestry needle
- 2 stitch markers
- A few pins
Hardware (gold tones match the photo)
- 1 lobster clasp or a small metal hanging hook
- 1 red bead connector, about 8 mm (a bead on a gold pin with a loop at each end)
- 1 jingle bell, 12–15 mm (optional). A bell connector with a loop at each end is easiest.
- 4 jump rings, 6–8 mm
- Flat-nose pliers
No-tools option: skip the metal and hang the charm from a 12-inch (30 cm) green slip-stitch cord or a satin ribbon, tied around the mirror arm. I explain both in Step 6.
Tension
You don't need a strict gauge. The petals should feel firm and bounce back when you press them. If they're floppy, drop to a 2.75 mm hook.
Abbreviations (US terms)
- MR: magic ring
- ch: chain
- sl st: slip stitch
- sc: single crochet
- hdc: half double crochet
- dc: double crochet
- inc: 2 sc in the same stitch
- dec: invisible decrease (sc2tog through the front loops)
- sp: space
- R: round
- st(s): stitch(es)
The flowers are worked in joined rounds, because each round is a new color. At the end of each round, sl st into the first stitch. The ch 1 at the start of a sc round doesn't count as a stitch. The bud is the only piece worked in a continuous spiral.
Step 1 — Crochet the flowers
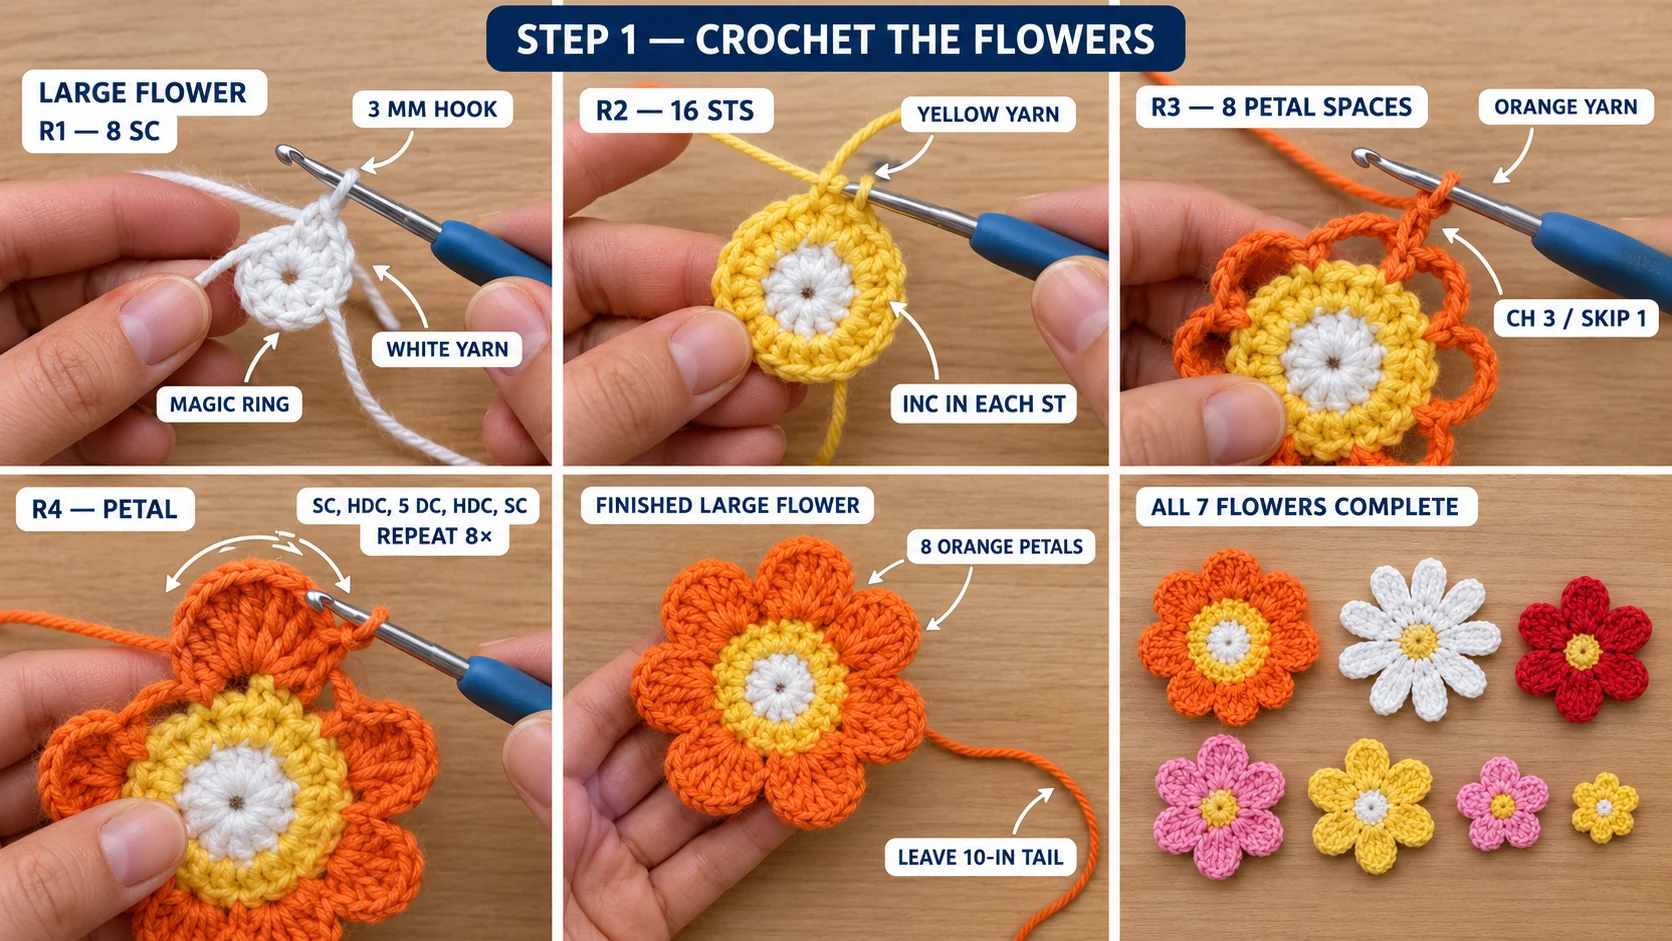
For every flower, the magic ring is the front center. Pull it tight and weave that tail to the back. Always fasten off the petal round leaving a 10-inch tail on the back. You'll sew the flower to the stem with it.
Large flower (make 1: white center, yellow ring, orange petals)
R1 (white): Ch 1, 8 sc in MR. Join. (8 sts) Fasten off white. R2 (yellow): Join yellow in any st. Ch 1, inc in each st around. Join. (16) Fasten off yellow. R3 (orange): Join orange in any st. Ch 1, sc in the same st, ch 3, skip 1 st, sc in the next st, ch 3, skip 1 st; repeat 7 more times. Join to the first sc. (8 sc and 8 ch-3 sps) R4 (orange): Sl st into the first ch-3 sp. In each ch-3 sp: (sc, hdc, 5 dc, hdc, sc). Join to the first sc. (8 petals)
Fasten off leaving a 10-inch tail. The petals cup forward a little, which gives the full, puffy look in the photo. The flower is about 2¼ in (5.5 cm) across.
Backing disc (make 1, in orange)
This plain disc goes behind the large flower in Step 4. It hides the tails and holds the hanging loop.
R1: Ch 1, 8 sc in MR. Join. (8 sts) R2: Ch 1, inc in each st around. Join. (16) R3: Ch 1, sc 1, inc; repeat 8 times. Join. (24)
Fasten off leaving a 20-inch tail. The disc is about 1½ in (4 cm) across.
Medium 8-petal flower (make 1: the daisy, yellow center, white petals)
R1 (yellow): Ch 1, 8 sc in MR. Join. (8 sts) R2 (yellow): Ch 1, inc in each st around. Join. (16) Fasten off yellow. R3 (white): Join white in any st. Sl st in the next st, (hdc, 3 dc, hdc) in the next st; repeat 8 times. Join. (8 petals)
Fasten off leaving a 10-inch tail. The daisy is about 2 in (5 cm) across.
Medium 6-petal flower (make 3)
Make one with a yellow center and red petals, one with a yellow center and pink petals, and one with an orange center and yellow petals for the bottom.
R1 (center): Ch 1, 6 sc in MR. Join. (6 sts) R2 (center): Ch 1, inc in each st around. Join. (12) Fasten off. R3 (petals): Join the petal color in any st. Sl st in the next st, (hdc, 3 dc, hdc) in the next st; repeat 6 times. Join. (6 petals)
Fasten off leaving a 10-inch tail. Each one is about 1¾ in (4.5 cm) across.
Small 5-petal flower (make 1: deep pink center, pink petals)
R1 (deep pink): Ch 1, 5 sc in MR. Join. (5 sts) Fasten off. R2 (pink): Join pink in any st. Ch 2, 2 dc in the same st, ch 2, sl st in the same st, sl st in the next st; repeat 5 times. (5 petals)
Fasten off leaving a 10-inch tail. It's about 1¼ in (3 cm) across.
Mini 5-petal flower (make 1: white center, yellow petals)
Work it exactly like the small flower, but with hdc instead of dc, and ch 1 instead of ch 2:
R1 (white): Ch 1, 5 sc in MR. Join. (5 sts) Fasten off. R2 (yellow): Join yellow in any st. Ch 1, 2 hdc in the same st, ch 1, sl st in the same st, sl st in the next st; repeat 5 times. (5 petals)
Fasten off leaving an 8-inch tail. It's under 1 in (2.3 cm) across.
Step 2 — Make the leaves and the bud
Leaves (make 4, in green)
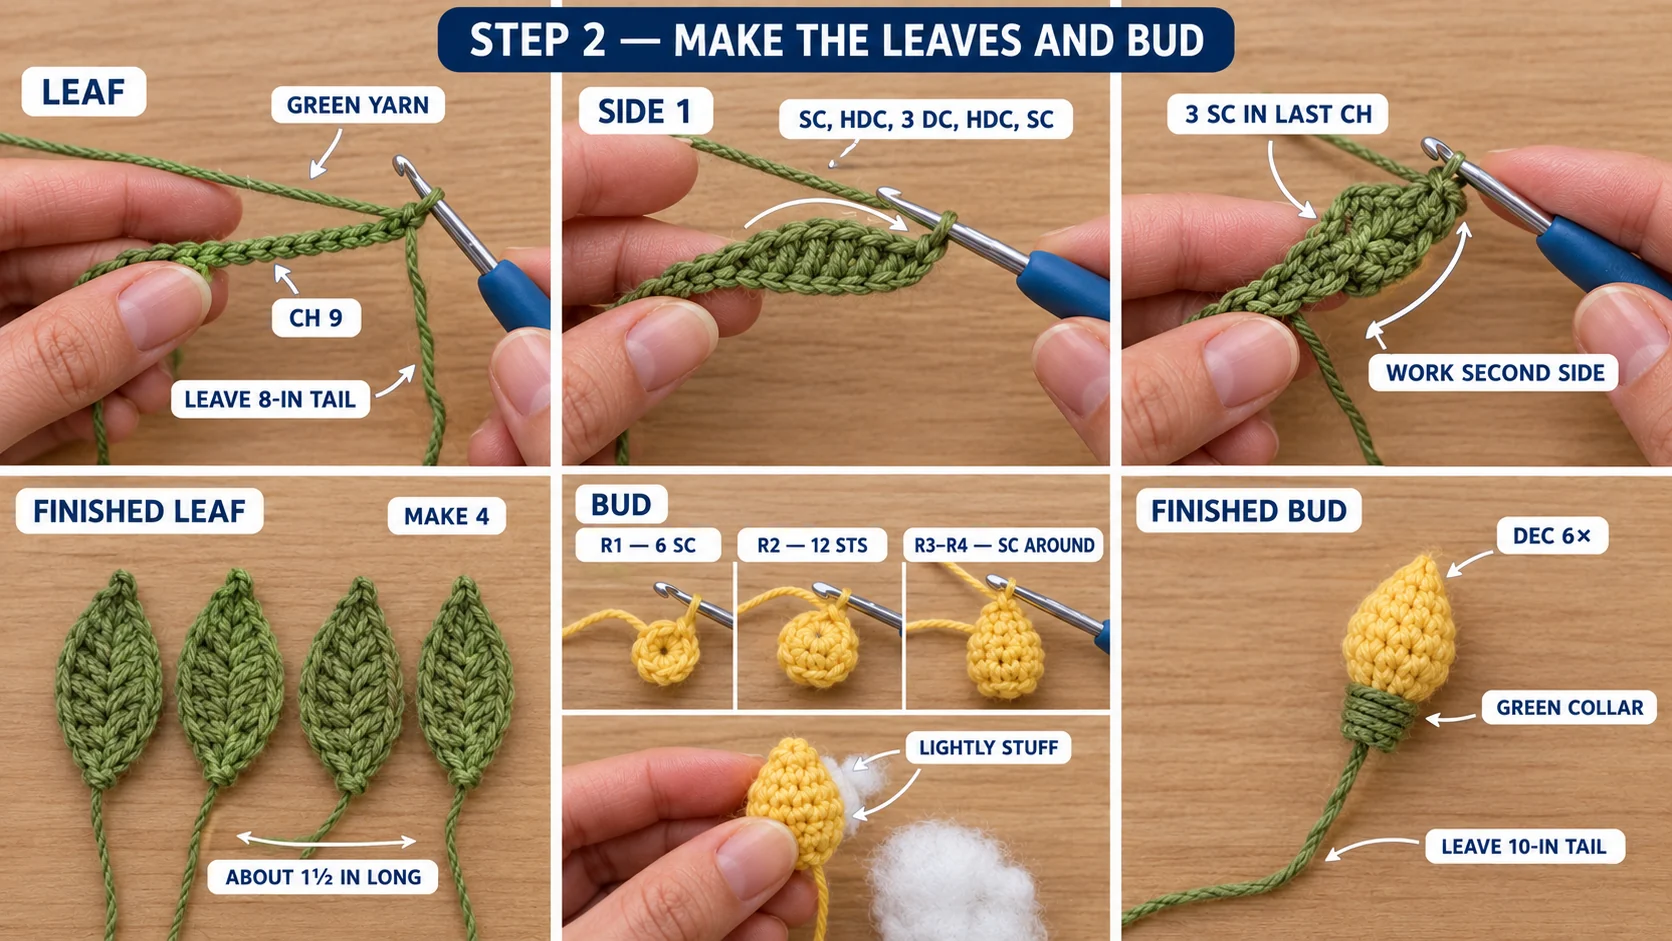
The leaf is worked around a foundation chain. Leave an 8-inch starting tail. That tail comes out at the rounded base of the leaf, right where you'll sew it. The tip is where the round ends.
Ch 9.
Side 1 (tip to base): Starting in the 2nd ch from the hook, sc in the first ch, hdc in the next ch, dc in each of the next 3 ch, hdc in the next ch, sc in the next ch, then 3 sc in the last ch (the base, next to your starting tail).
Side 2 (base to tip): Rotate and work along the other side of the chain. Sc in the next ch, hdc in the next ch, dc in each of the next 3 ch, hdc in the next ch, sc in the last ch.
Point: Ch 2, sl st in the 2nd ch from the hook, then sl st in the first sc of Side 1.
Fasten off and weave this short tail into the back. Each leaf is about 1½ in (3.8 cm) long. The stitches on the two sides lean toward each other, which makes that pretty chevron texture.
Bud (make 1, in yellow)
The bud is worked in a continuous spiral. The magic ring is the tip of the bud. The closing round is the base, where the green collar goes and where your sewing tail comes out.
R1: 6 sc in MR. (6 sts) R2: Inc in each st around. (12) R3–R4: Sc in each st around. (12)
Stuff it lightly, just enough to hold a plump teardrop.
R5: Dec 6 times. (6)
Fasten off leaving a 10-inch tail at the base. Thread it through the front loops of the last 6 sts and pull tight.
Optional petal lines: bring the tail up to the tip, then back down the side to the base, pulling gently. Do this 3 times around the bud. It makes the soft lobes you see in the photo.
Green collar: Thread an 18-inch length of green. Wrap it 5 or 6 times around the base of the bud, then stitch through the wraps twice to lock them. Leave the green tail hanging. You'll sew the bud on with both tails.
Step 3 — Crochet the stem cord (in green)
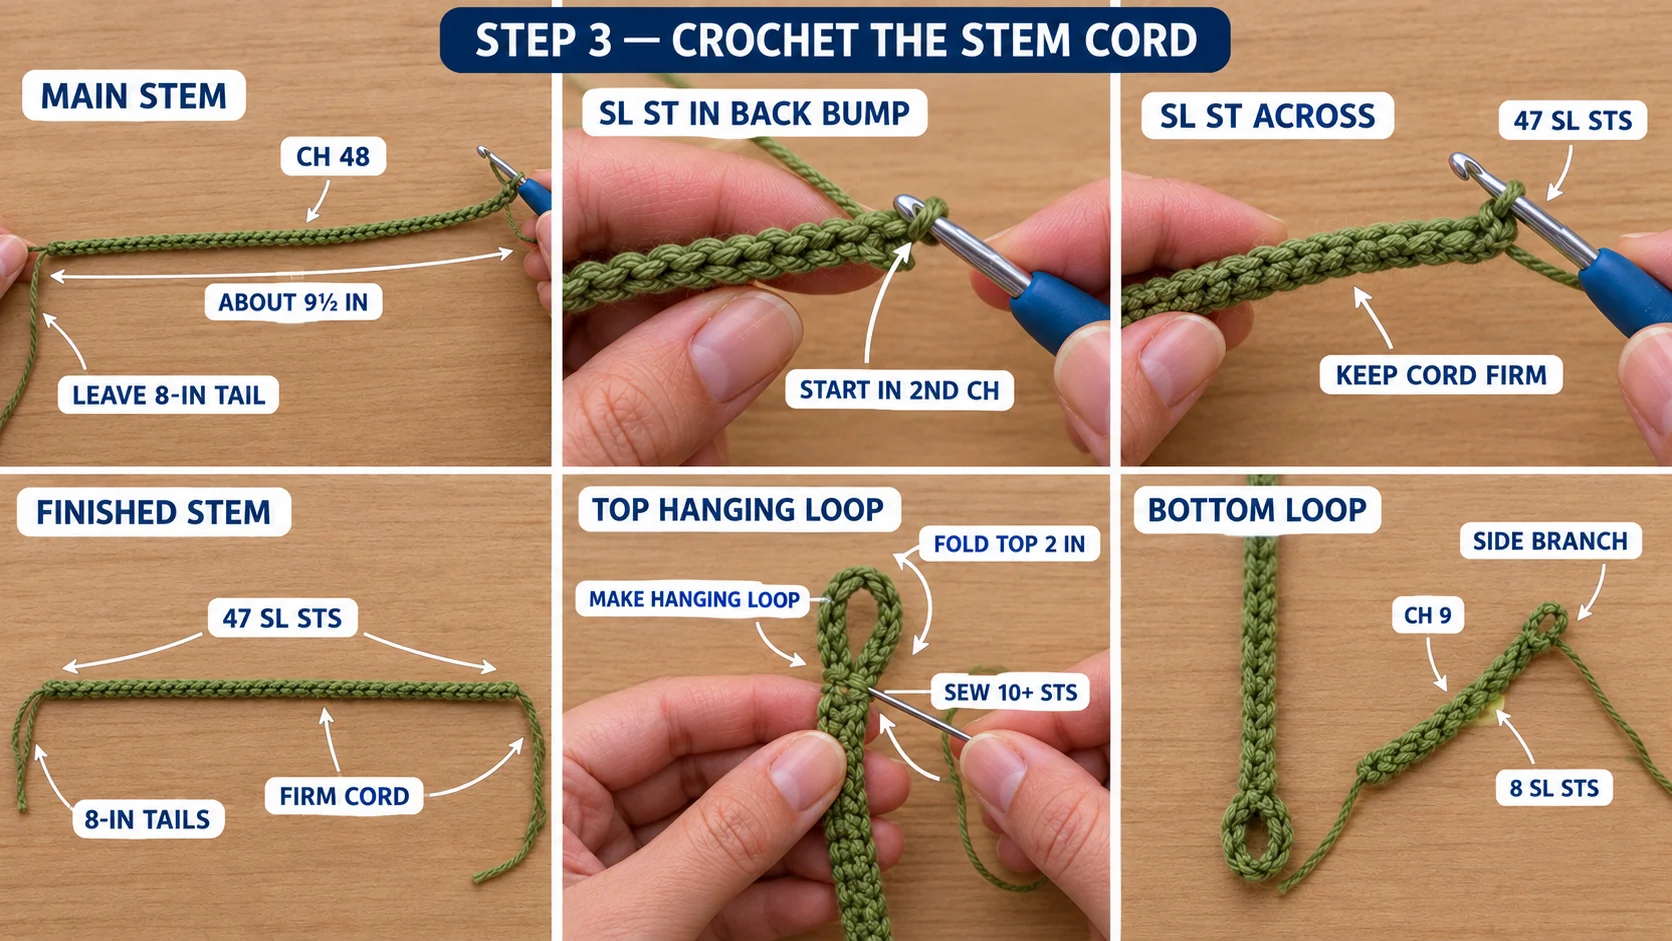
A plain chain stretches, and it would sag after a few weeks of swinging. A slip-stitch worked into the back bumps is much firmer. That's the cord this charm hangs from.
Main stem: Leave an 8-inch starting tail. Ch 48, or until the chain measures 9½ in (24 cm). Sl st in the back bump of the 2nd ch from the hook and in the back bump of each ch across. (47 sl sts) Fasten off leaving another 8-inch tail.
Both tails now sit at the same end. That end is the top of the stem.
Top loop: Fold the top 2 in (5 cm) of the cord back down onto itself, so it makes a loop about ½ in (1.3 cm) tall with a doubled section below it. Using both tails, sew the doubled part together with small stitches through both layers, 10 stitches or more. This loop carries the whole charm, so don't skimp. Leave the tails hanging.
Bottom loop: Fold the bottom ¾ in (2 cm) up to make a small loop about ⅜ in (1 cm) tall. Sew it down with a 12-inch length of green, 8 stitches or more. Weave the ends into the cord.
Side branch: Leave a 6-inch starting tail. Ch 9, then sl st in the back bump of the 2nd ch from the hook and each ch across. (8 sl sts) Fasten off leaving another 6-inch tail. Both tails are at one end. That end sews to the main stem.
Step 4 — Sandwich the top flower
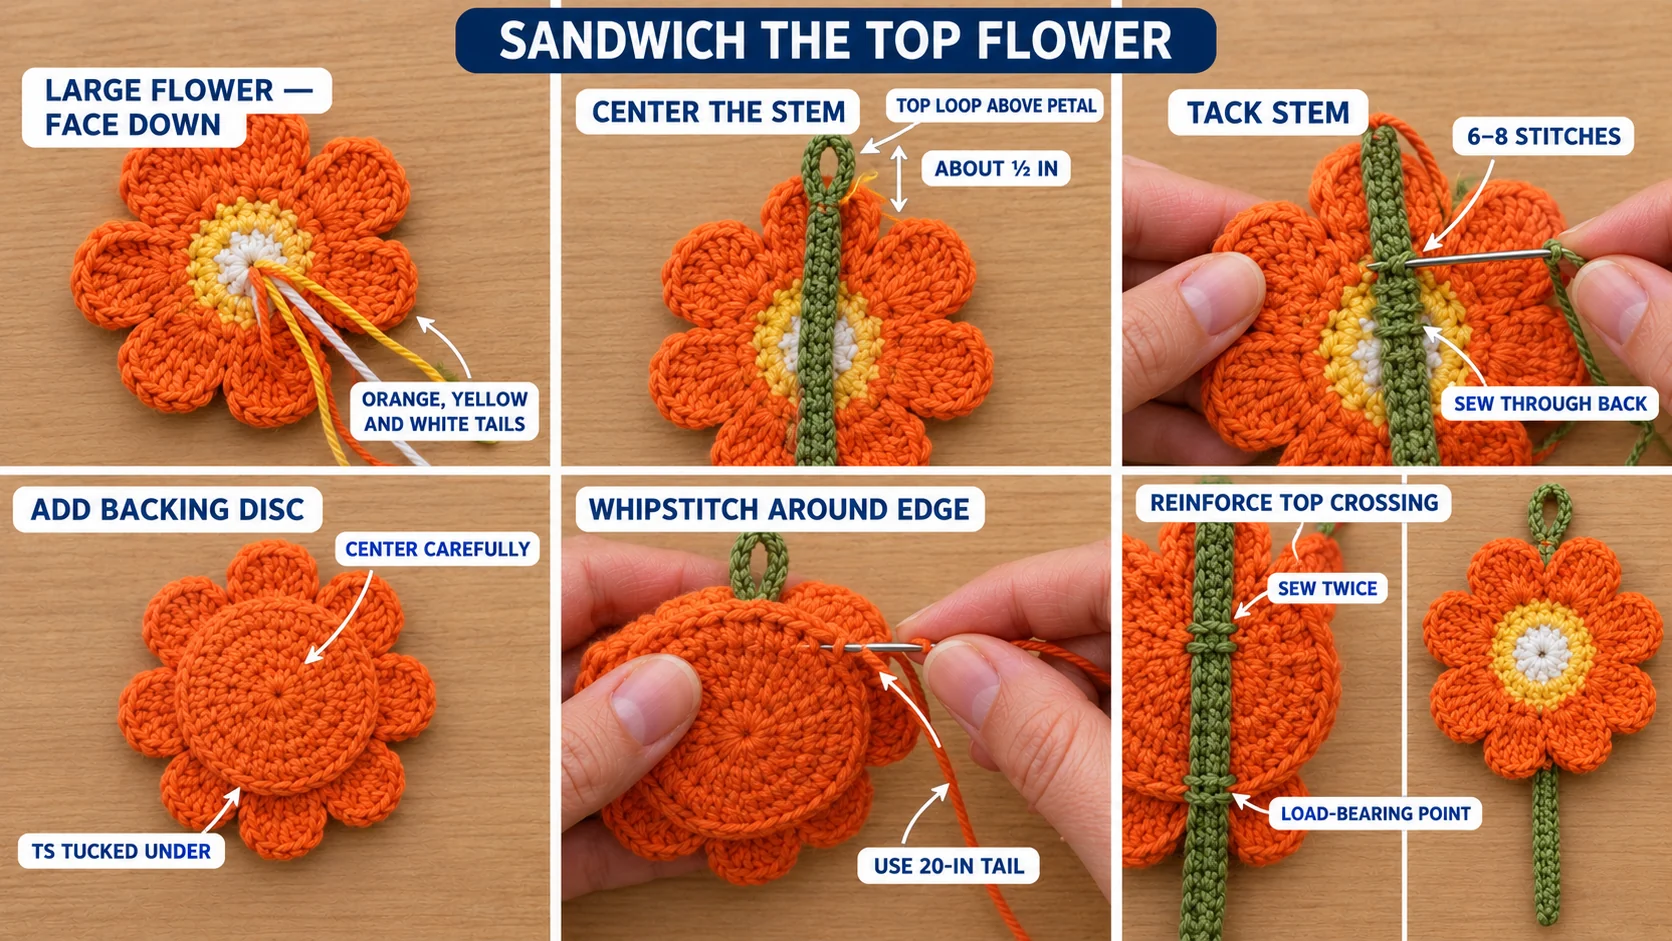
Place the stem. Lay the large flower face down. Lay the stem on its back, running straight down the middle, with the top loop sticking out above the top petal by about ½ in (1.3 cm). The rest of the stem runs down past the bottom petal.
Tack it to the flower. With the large flower's orange tail, sew the stem to the back of R2 and R3, through the stem and the flower, 6 to 8 stitches. Knot the tail on the back and leave it. Knot the yellow and white tails on the back too.
Add the backing disc. Place the backing disc over the back of the flower, centered, with every tail tucked under it. Using the disc's 20-inch tail, whipstitch its edge to the back of R3, all the way around. When you cross the stem at the top and bottom, go through the stem as well, twice at each crossing. The top crossing is the load-bearing point, so over-sew it.
Now the loop, the flower and the disc all hold the stem together. The front shows only the flower.
Step 5 — Build the bouquet
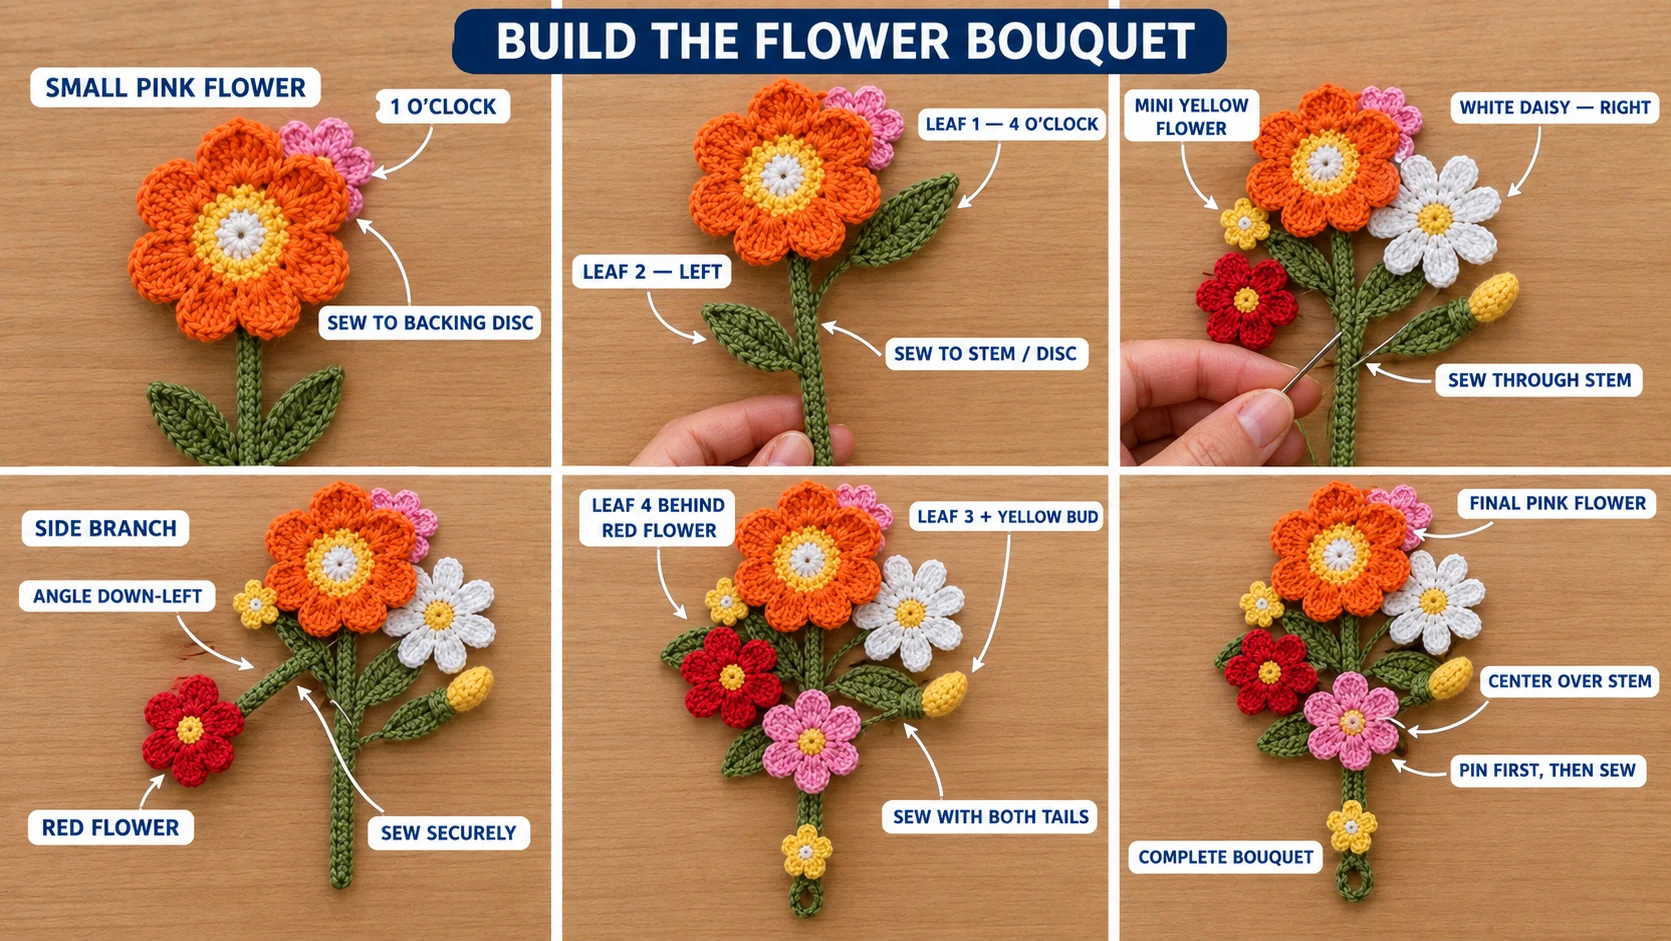
Lay the charm face up on the table, with the top loop at the top. Pin everything first, then sew. Measurements are from the bottom edge of the large flower, down the stem. Sew each piece with its own tail, going through the stem or the piece behind it. Knot every tail on the back and weave the end into the stem.
- Small pink flower (1 o'clock). Tuck it behind the upper right petals of the large flower, so about two thirds peeks out. Sew it to the backing disc, not to the petals.
- Leaf 1 (4 o'clock). Tuck its base behind the large flower's lower right edge, pointing out to the right. Sew the base to the backing disc.
- Leaf 2 (left, at 1 in / 2.5 cm). Sew its base to the stem, pointing left and slightly up.
- Mini yellow flower. Sew it just below the tip of Leaf 2, stitching through the leaf.
- Daisy (right, at 1½ in / 4 cm). Place it so its left petals overlap the stem. Sew through the stem at its center back, then tack two petals to the stem.
- Side branch and red flower (left, at 2 in / 5 cm). Sew the tailed end of the branch to the stem, angling down and to the left, 6 stitches or more. Sew the red flower onto the free end of the branch.
- Leaf 3 and the bud (right, at 2¾ in / 7 cm). Sew Leaf 3 to the stem, pointing down and to the right. Sew the bud at its tip with the yellow and green tails.
- Leaf 4 (left, at 3 in / 7.5 cm). Sew it behind the red flower, so it frames it from below.
- Pink 6-petal flower (center, at 3½ in / 9 cm). Center it right over the stem and sew through the stem at its back. The stem's bottom loop should peek out below it.
Lift the charm by the top loop and give it a gentle shake. Does anything flop forward? Add a tacking stitch behind it into the stem.
Step 6 — Add the hardware and hang it
The bottom flower
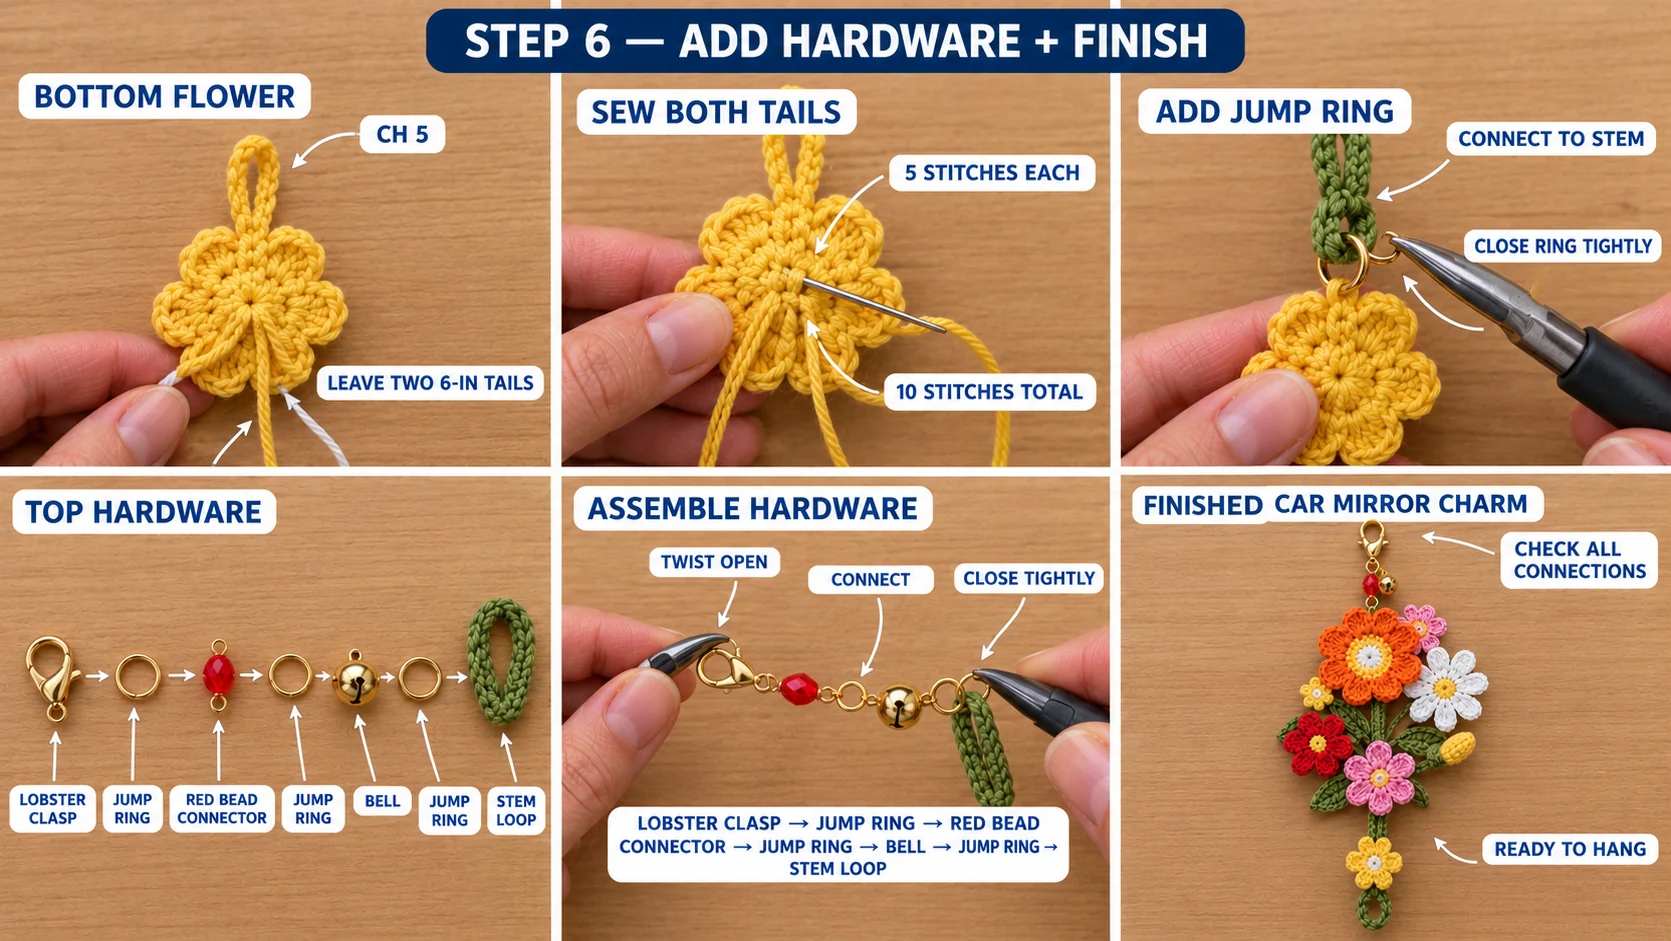
The yellow bottom flower needs its own hanging loop. A slip-stitched ring would give you only one tail, so work it as a plain chain.
In yellow, leave a 6-inch starting tail. Ch 5. Fasten off leaving a second 6-inch tail. Fold the chain in half. Sew both tails onto the back of the flower, behind one petal, 5 stitches per tail. That's 10 stitches in total. Knot and weave in.
Open a jump ring with your pliers. Thread it through the bottom loop of the stem and the yellow flower's loop. Close it tightly, with no gap.
The top hardware
From the mirror down, the order is: lobster clasp → jump ring → red bead connector → jump ring → bell → jump ring → stem top loop. Open each jump ring by twisting the ends sideways with your pliers, never by pulling them apart, and close it the same way with no gap.
- Join the lobster clasp to the top loop of the bead connector with a jump ring.
- Join the bead connector's bottom loop to the bell's top loop with a second jump ring.
- Join the bell's bottom loop to the stem's top loop with a third jump ring.
If your bell has only one loop, join the bead connector straight to the stem's top loop instead. Hang the bell from the bottom jump ring, beside the yellow flower.
No-tools option: crochet a 12-inch (30 cm) slip-stitch cord in green, the same way as the stem. Thread it through the top loop, slide the bead onto both strands, and tie the ends around the mirror arm in a double knot.
Safety and care
Clear view first. Keep the whole charm short enough that it sits above your line of sight, and take it down if it swings into view. Some US states and other countries restrict objects hanging from the rear-view mirror. Check the rules where you drive. If the bell is distracting on bumpy roads, leave it off.
Not a toy. This charm has metal hardware and lots of small sewn pieces. It isn't safe for children under 3, because the rings, bead and small parts are choking hazards. Hang it out of reach of little passengers.
Sun and care. Cotton fades in strong sun, especially reds and pinks. To keep the colors bright, use a sunshade when you park in full sun for long hours. Spot clean with a damp cloth. For a deeper clean, hand-wash in cool water with a drop of mild soap, press it in a towel and let it dry flat. Don't tumble-dry.
Wear. Check the top loop every few months. If it starts to stretch or look thin, sew a second green loop beside it, through the stem and both layers of the top flower.
Easy variations
- Sunflower drop: make the large flower with a brown center and yellow petals, and swap the daisy for a second medium flower in golden yellow.
- Soft pastels: use lavender, peach, baby pink and cream for a gentler bouquet.
- Bag charm size: stop after the bud and make the stem only 5 in (13 cm) long. With a lobster clasp, it becomes a bag or backpack charm.
- Mother's Day gift: make the large flower in her favorite color and tuck a small card behind the backing disc when you wrap it.
- Leaf veins: with a lighter green, work a line of surface slip stitches up the middle of each leaf.
Troubleshooting
The petals ruffle too much
Your tension is loose, or your cotton is on the heavy side of DK. Drop to a 2.75 mm hook. On the medium flowers, you can also swap (hdc, 3 dc, hdc) for (hdc, 2 dc, hdc).
The charm twists and hangs sideways
The heavier flowers are all on one side. Move the daisy a little closer to the stem, or add a tacking stitch behind it. The swivel in most lobster clasps also helps.
The stem sags between flowers
Your cord was worked into both loops of the chain, not the back bumps, or the slip stitches are too loose. Remake the cord into the back bumps, a little tighter. A 2.75 mm hook for the cord only also helps.
The daisy center looks flat
That's normal. For a domed center, work R2 of the daisy in the back loops only, then push a tiny pinch of stuffing behind the center before you sew it on.
Frequently asked questions
How much yarn does the car mirror charm use?
About 55–65 yd (50–60 m) of DK #3 cotton. That's roughly 11–13 yd of green, 14–17 yd of yellow, 10–12 yd of orange, 6–8 yd of white, 6–7 yd of pink, 4–5 yd of red and 1 yd of deep pink. Scraps are plenty.
Is it legal to hang a charm from my rear-view mirror?
It depends on where you drive. Some US states and other countries have rules against objects that block the driver's view. Keep the charm short and above your line of sight, and check your local rules. If you're unsure, hang it from a bag or a hook in your home instead.
How long does this crochet car charm take?
About 4 to 5 hours. Plan roughly 2½ hours for the seven flowers and the backing disc, 45 minutes for the leaves, bud and stem, and an hour for assembly and hardware. It fits nicely into two evenings.
Can I make it without the bell and metal hardware?
Yes. Skip the bell and use the no-tools option in Step 6: a green slip-stitch cord tied around the mirror arm. You can also sew the bottom flower straight onto the stem's bottom loop instead of using a jump ring.
Can I sell the finished mirror charms?
Yes. You're welcome to sell finished charms made from this free pattern at markets, on Etsy or as gifts. Please credit "Pattern by Wavode" and link back to this page. Please don't republish the written pattern or my photos as your own.
UK terms note
This pattern uses US terms. In UK terms, sc becomes double crochet (dc), hdc becomes half treble (htr) and dc becomes treble (tr). The other abbreviations don't change. DK is the same yarn weight on both sides of the Atlantic.
Related patterns on Wavode
- Crochet daisy potholder: a big, cheerful daisy for the kitchen.
- Crochet floral wreath: fifteen pastel flowers for your front door.
- Mini crochet cherry blossom bonsai: tiny five-petal blossoms on a bendable tree.
- Crochet mini bow bag: a small bag that looks sweet with this charm clipped to it.
Made a mirror charm? Tag #wavodecrochet on Pinterest. I re-pin every finished make and credit the maker.
Pattern by Clara Hartwell for Wavode. Questions? Email me at support@wavode.com.