Crochet Phone Bag Pattern

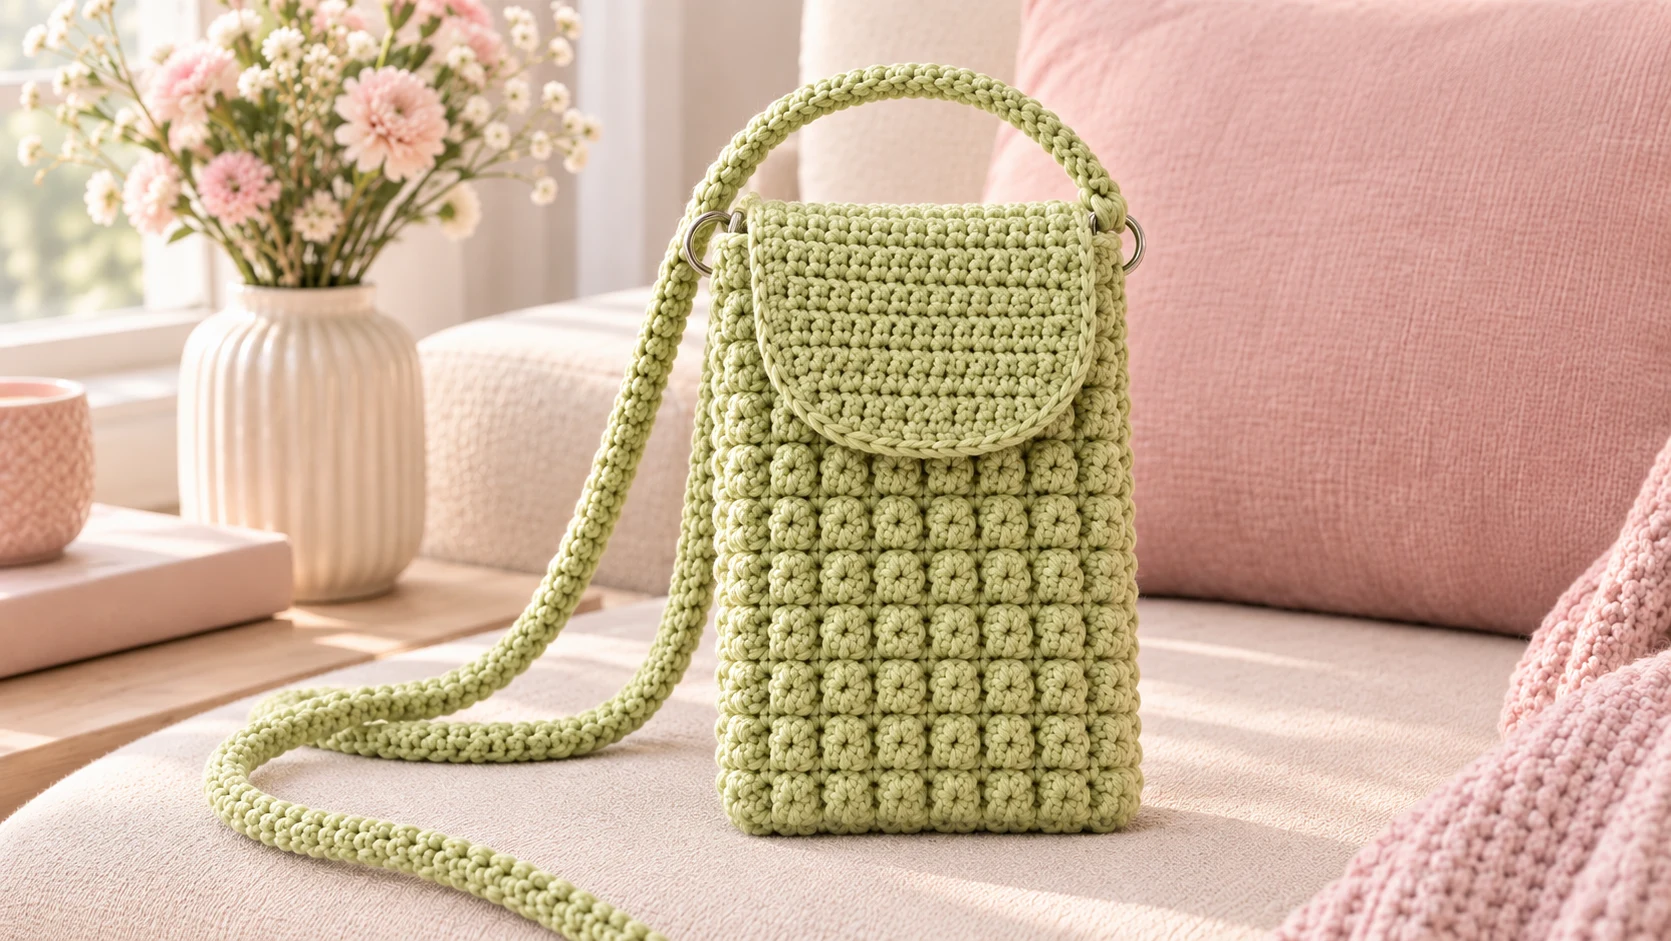
This free crochet phone bag pattern makes a small crossbody pouch, about 4.5 inches wide and 7 inches tall, in worsted cotton on a 4 mm hook. It's worked in one piece from the bottom up, with rounds of raised bobbles stacked into neat columns. A rounded flap with a magnetic snap closes the top, and a twisted cord strap hangs from two metal rings. It fits phones up to 6.7 inches, including most Pro Max and Ultra models in a slim case. You'll need about 180 yards of cotton, and it takes 5 to 6 hours.
Key Takeaways
- One piece, no side seams. The base, body and ring tabs are all worked straight onto the first round.
- Bobble rounds are worked from the wrong side, so every bobble pops out on the outside of the bag.
- Stitches: chain, single crochet, a 4-double-crochet bobble and slip stitch.
- Budget ~180 yd (165 m) of worsted #4 cotton. Two 120 yd balls cover it with room to spare.
About this crochet phone bag
I made the first one of these because I kept leaving the house with a phone, a card and a lip balm, and nowhere to put them. A tote felt silly for that much. A phone bag worn across the body keeps my hands free at the market and at concerts. My phone is also always right there, not at the bottom of a bigger bag.
The texture is the part people ask about. It's only two rounds, repeated. One round alternates a bobble with a single crochet, and the next is plain single crochet. The bobbles stack straight up in columns, so the pouch gets that padded, waffle-like grid. The padding matters, too. Bobble fabric is thick, and it softens the knocks when the bag swings against a door frame.
Cotton is the right yarn here. It doesn't stretch much, so the pouch keeps its shape with a phone inside. It's also washable and doesn't pill against your coat the way acrylic does.
Skill level. Advanced beginner. If you can crochet in the round and make a double crochet, you can make this. What's new is the bobble and the joined-and-turned rounds, and I explain both slowly below.
Want an even easier bag first? My chunky crochet handbag works up in about three hours. For more small projects, my roundup of free crochet bag patterns for beginners has six designs you can finish in a weekend.
What you'll need
Yarn
- ~180 yd (165 m) of worsted #4 100% cotton. I used a soft pistachio green. Any worsted kitchen cotton sold in 120 yd balls works, and two balls is plenty. About 110 yd goes into the pouch and flap, and about 40 yd into the strap. The rest covers tension differences.
- Why cotton: acrylic stretches under the weight of a phone, and the bag slowly gets longer. Cotton holds its size.
- Substitute: 3 mm cotton macramé cord gives a crisper, more structured bag. Check the gauge, because cord often runs slightly thicker than worsted.
Hook and notions
- 4 mm (US G-6) hook.
- 2 locking stitch markers.
- Tapestry needle and scissors.
- 1 sew-on magnetic snap, 14–18 mm, plus sewing thread in a matching color.
- 2 metal rings, D-rings or O-rings, about 15 mm (5/8 in).
- Optional: 2 swivel lobster clasps, if you want the strap to be removable.
- Optional: a piece of felt or cotton fabric, 9 × 7.5 in, for a lining.
Gauge
In the bobble pattern (alternating bobble and sc rounds): 17 sts × 18 rnds = 4 in (10 cm).
The easiest swatch is the pouch itself. Work Rounds 1–9 and flatten it. It should measure about 4.5 in wide and 2 in tall. If it's wider, go down to a 3.5 mm hook. If it's narrower, go up to 4.5 mm. A loose phone bag sags and shows the phone through the gaps between the bobbles, so a firm tension is better here.
Abbreviations (US crochet terms)
- ch = chain
- sc = single crochet
- dc = double crochet
- sl st = slip stitch
- st(s) = stitch(es)
- rnd(s) = round(s)
- RS / WS = right side / wrong side
- sc2tog = single crochet 2 together
- bobble = 4-dc bobble (see below)
UK crocheters: this pattern uses US terms. US single crochet = UK double crochet, and US double crochet = UK treble.
How to make the bobble
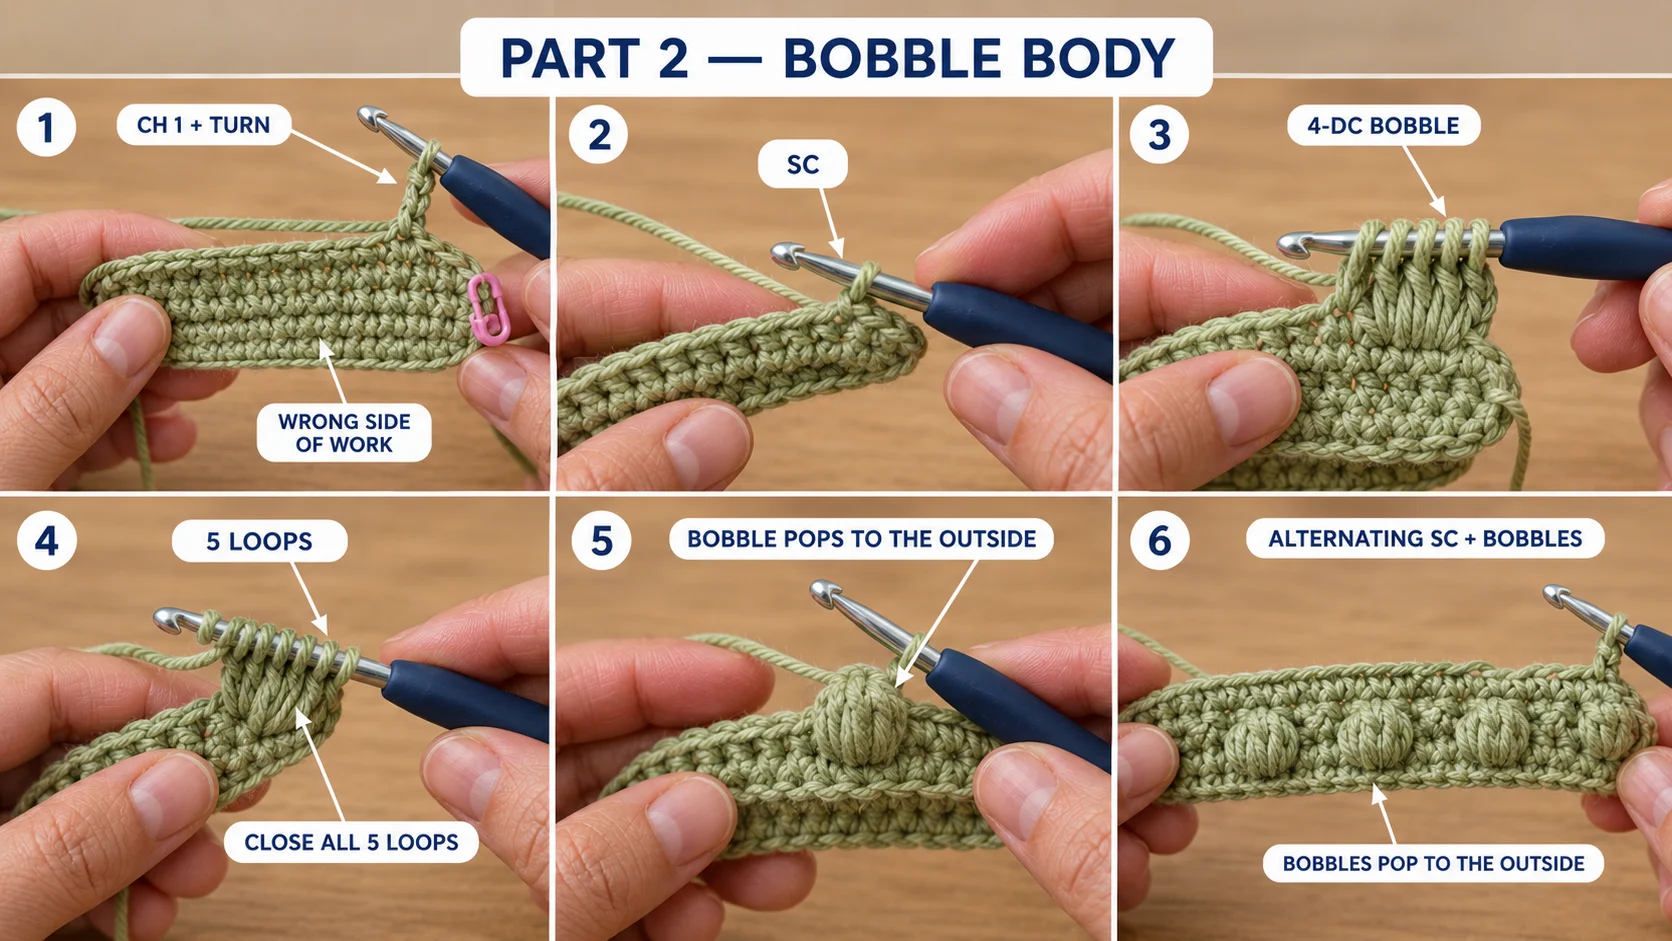
Yarn over, insert your hook in the stitch, yarn over and pull up a loop, yarn over and draw through 2 loops. Repeat from * to * three more times in the same stitch. You now have 5 loops on the hook. Yarn over and draw through all 5 loops.
That's four unfinished double crochets closed together. The single crochet you make right after it locks the bobble in place, so pull that one snug.
Finished size
- Width: approximately 4.5 in (11.5 cm), measured flat.
- Height: approximately 7 in (18 cm), from base to rim.
- Strap: approximately 50 in (127 cm) long, which hangs crossbody at hip height on most adults. You can adjust the length in Part 5.
Will my phone fit?
The inside of the pouch is roughly 4 × 6.75 in once you allow for the bobbles. Measure your phone in its case and check it against that:
- Standard phones (about 6.1 in screen): fit with room for a card and keys.
- Plus, Pro Max and Ultra phones (up to 6.7–6.9 in screen): fit in a slim case. A thick rugged case needs the wider version below.
- Wider phone or thick case: add 2 ch to the foundation chain for every extra half inch of width. Each 2 chains adds 4 stitches to the round, which is 2 more bobble columns.
- Taller phone: add 2 rnds (one bobble round and one sc round) for every extra half inch of height.
How the bag goes together
Here's the shape in plain words before you start. You crochet all the way around a foundation chain, so the chain becomes a flat seam across the bottom. The bag has no separate base. Then you work up the body in joined rounds, turning after every round. The bobble rounds are worked from the wrong side, and the plain rounds from the right side. After two plain rim rounds, you add a small tab at each side to hold the rings, and a flap at the back. Last, you make the twisted strap and sew on the snap.
The pattern — step by step
Part 1 — Base round
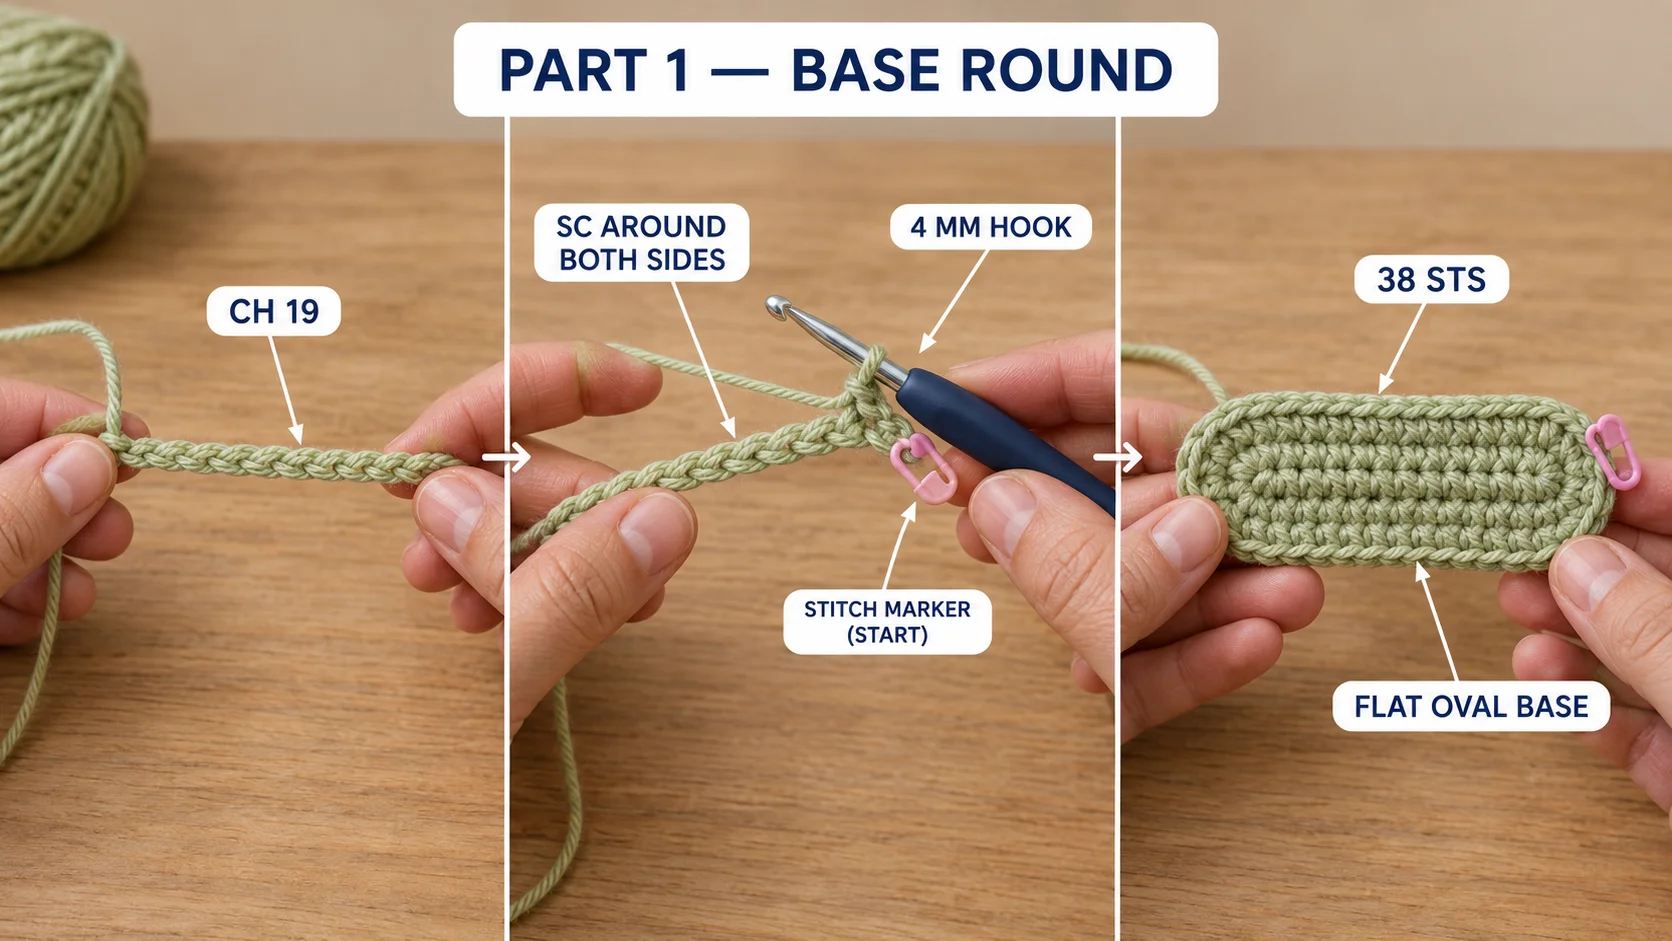
Foundation: Ch 19.
Rnd 1 (RS): Sc in the 2nd ch from the hook and in the next 16 ch (17 sc). 3 sc in the last ch. Rotate the chain and work along its other side: sc in the next 16 ch, 2 sc in the first ch (the same ch as your first sc). Join with a sl st to the first sc. (38 sts)
The side facing you now is the right side. Put a marker in the fabric so you don't lose track of it. The flat line of stitches along the chain becomes the bottom of the bag.
Part 2 — Bobble body
Every round now starts with ch 1 and a turn, and ends with a sl st into the first sc. The ch 1 doesn't count as a stitch.
Rnd 2 (WS): Ch 1, turn. [Sc in the next st, bobble in the next st] 19 times. Join with a sl st to the first sc. (19 sc, 19 bobbles)
Look at the right side now. Your bobbles are pushing out toward you.
Rnd 3 (RS): Ch 1, turn. Sc in each st around, including the top of each bobble. Join. (38 sts)
Rnds 4–29: Repeat Rnds 2 and 3 thirteen more times, ending with an RS round. (14 bobble rounds in total, 38 sts)
Keep the columns straight. Every bobble goes into the sc sitting directly on top of a bobble from two rounds below. If you ever find a bobble landing above a flat sc, you've lost a stitch at the join. Count to 38 before you go on.
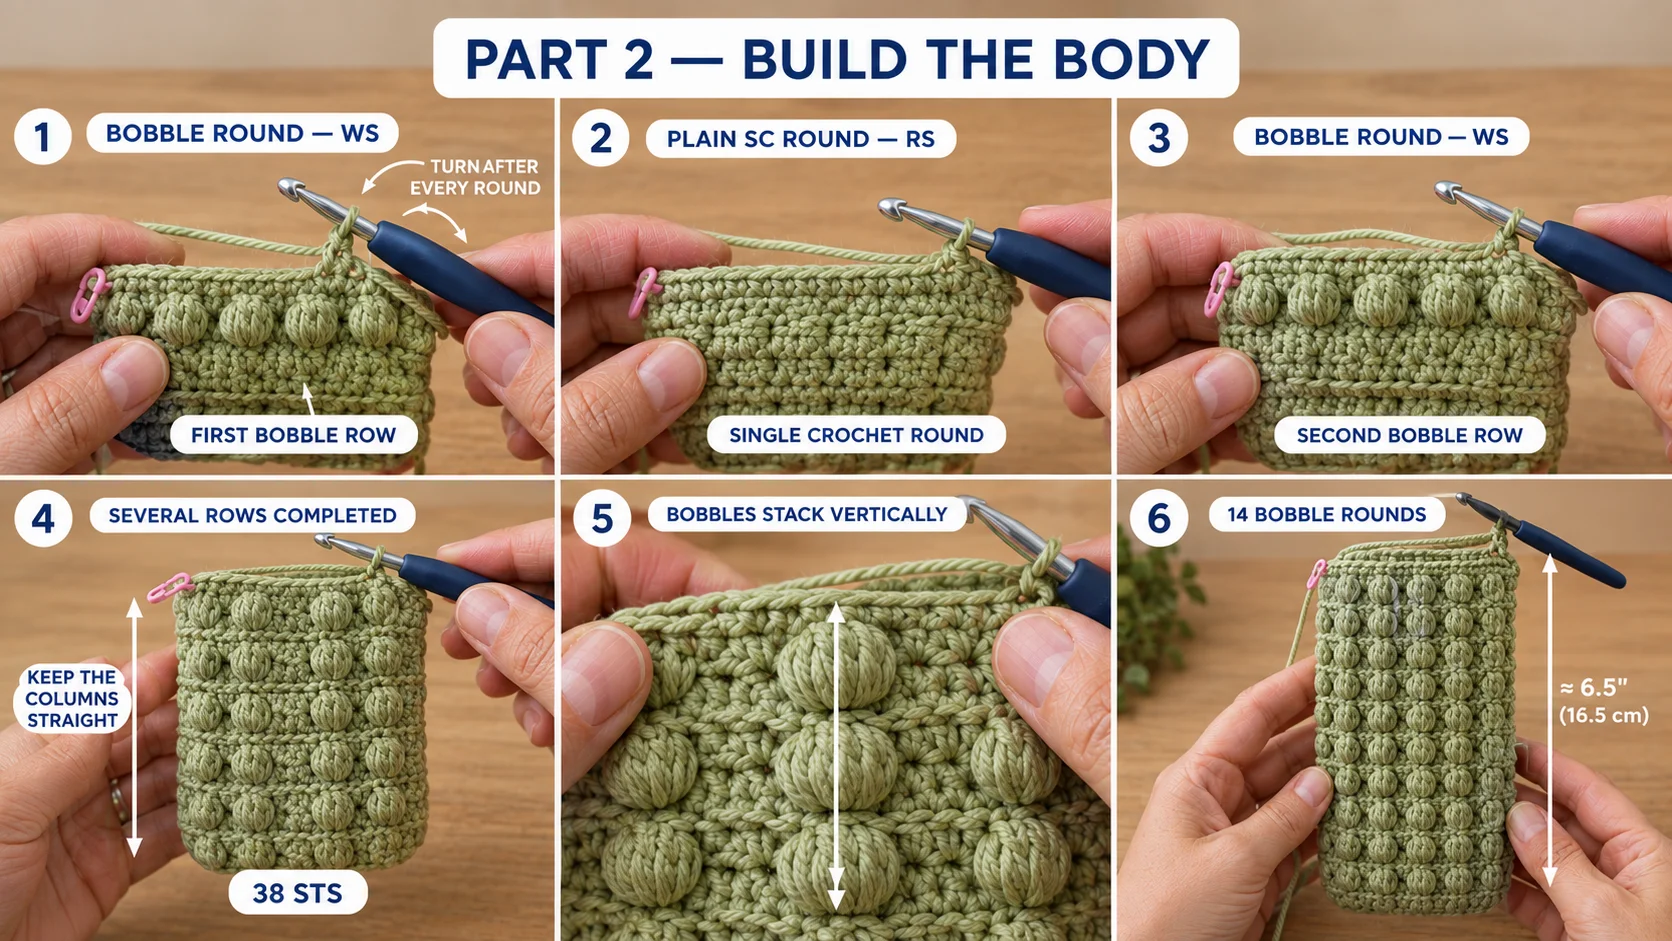
Why turn every round? A bobble always pushes away from you as you make it. If you worked every round from the right side, the bobbles would pop toward the inside of the bag. Turning lets you work bobble rounds from the wrong side, so they land on the outside. The plain sc round in between turns you back to face the right side.
Part 3 — Rim
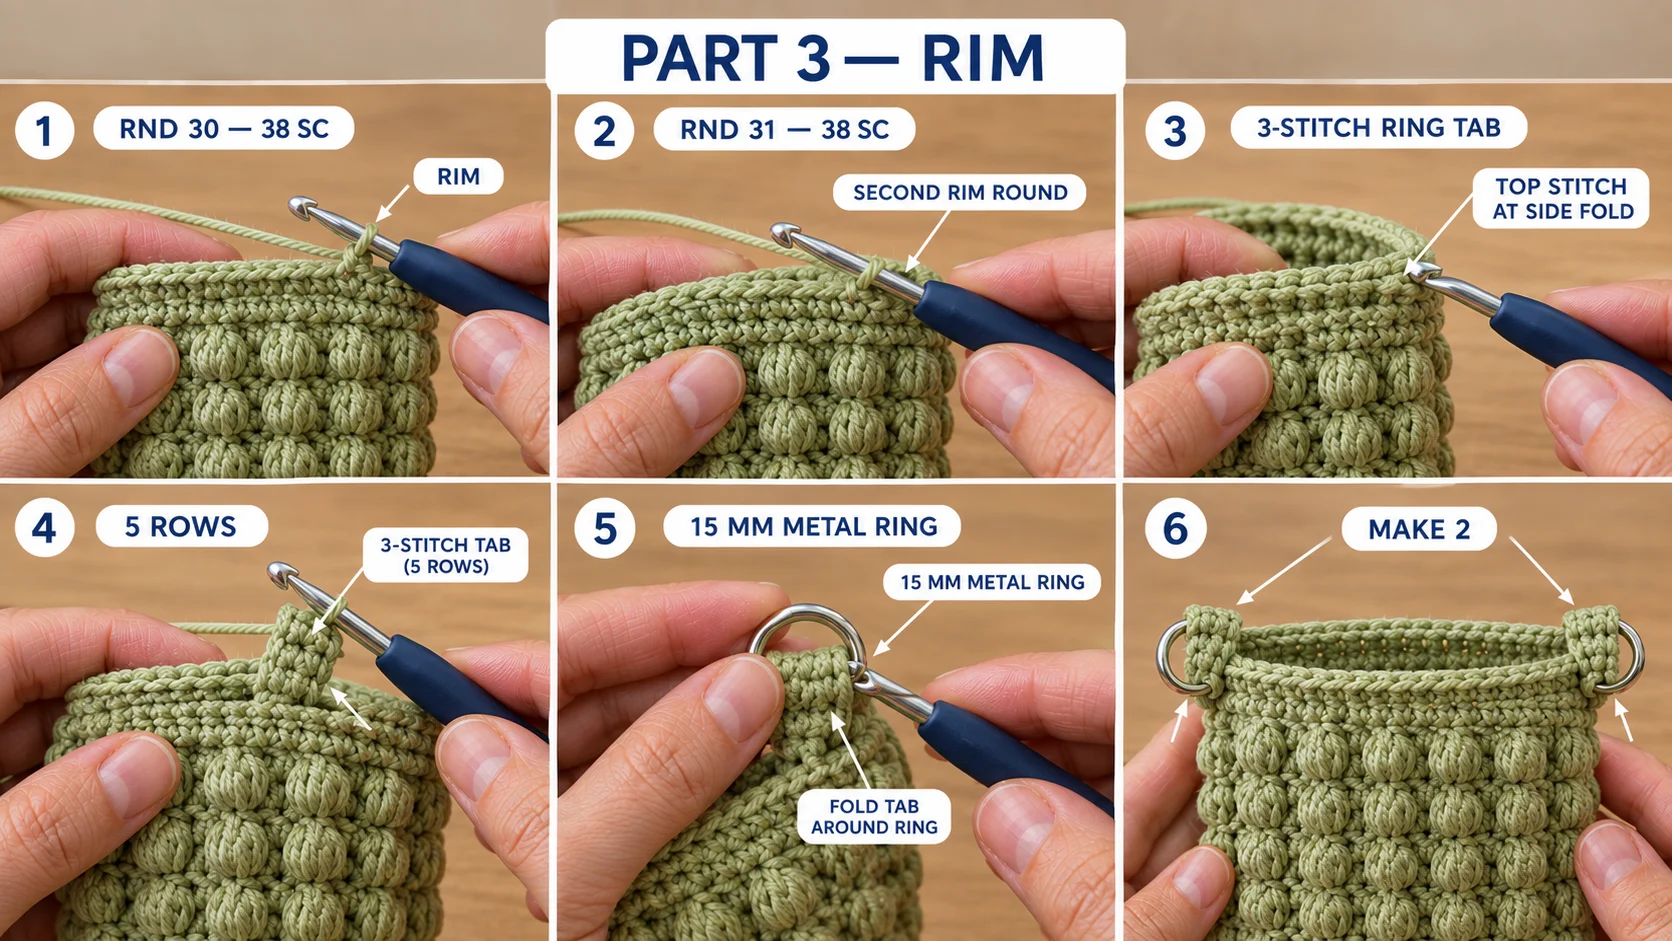
Rnd 30 (WS): Ch 1, turn. Sc in each st around. Join. (38 sts)
Rnd 31 (RS): Ch 1, turn. Sc in each st around. Join. Fasten off.
The two plain rounds give you a flat, firm band for the snap and the ring tabs.
Flatten the bag so the bottom seam lies straight and the join sits on one side edge. Decide which face is the front. Put a marker in the top stitch on each side fold.
Part 4 — Ring tabs and flap
Ring tabs (make 2): With the RS facing, join the yarn in the stitch just before one side marker.
- Row 1: Ch 1, sc in the same st, sc in the marked st, sc in the next st. (3 sts)
- Rows 2–5: Ch 1, turn, sc in each st. (3 sts)
Fasten off with a long tail. Slide a metal ring onto the tab. Fold the tab over the ring to the inside of the bag, then whipstitch the edge down just below the rim. Repeat on the other side.
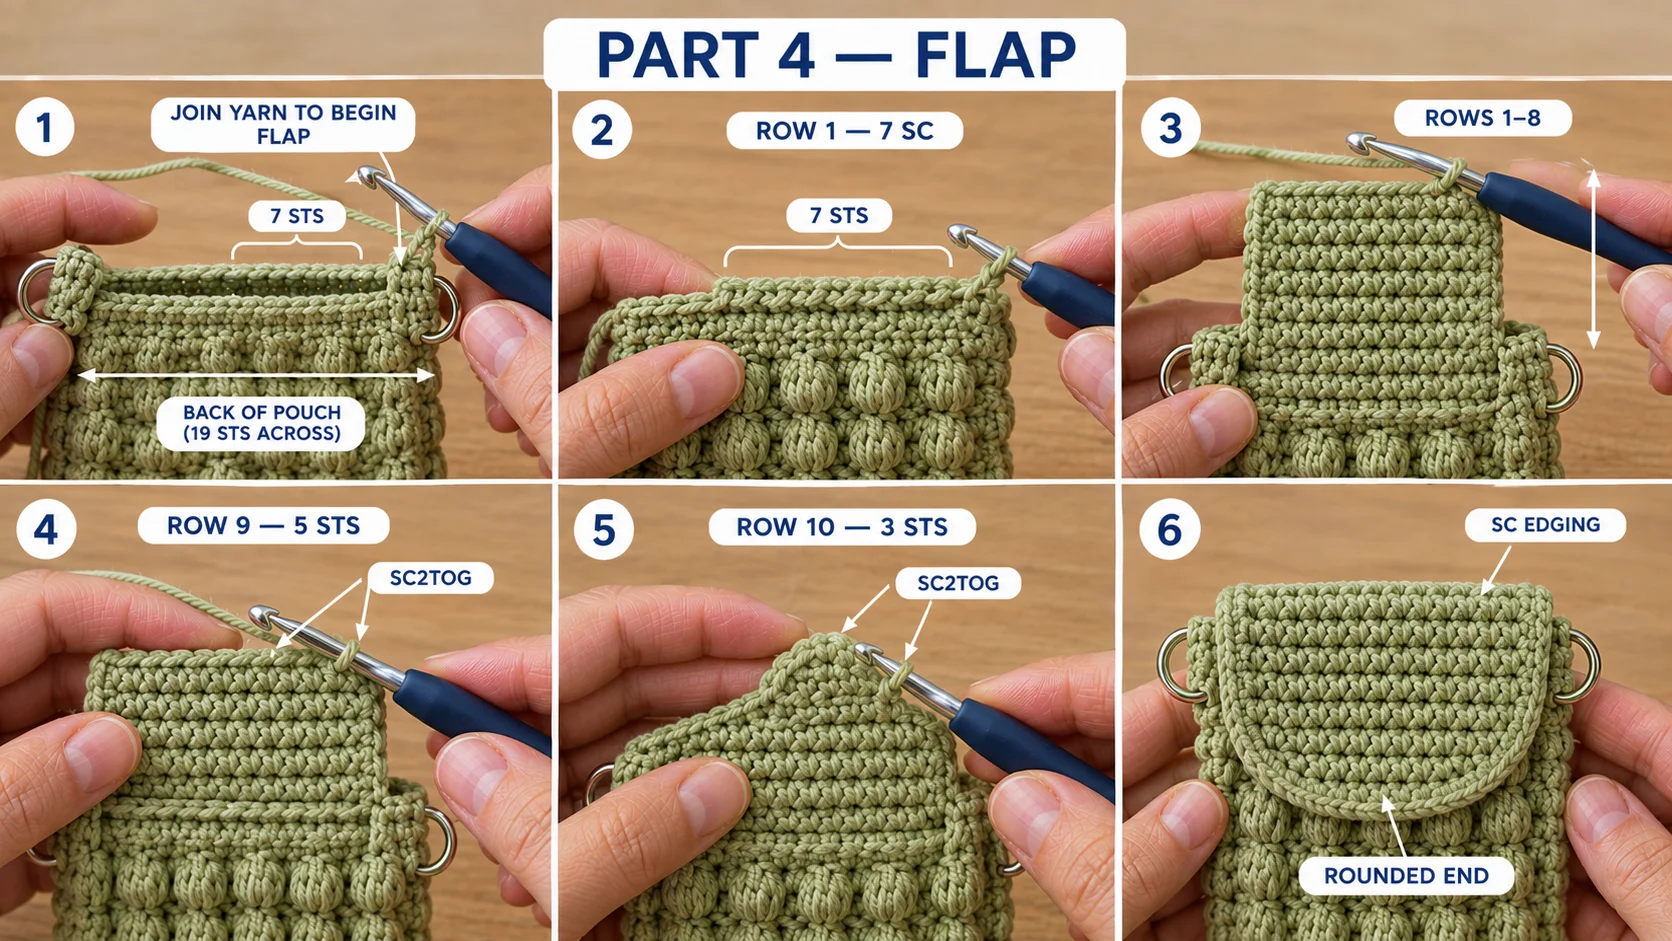
Flap: Turn the bag so the back faces you. There are 19 sts across the back between the two side folds. With the RS facing, join the yarn in the 7th stitch from the right-hand fold.
- Row 1: Ch 1, sc in the same st and in the next 6 sts. (7 sts, with 6 sts left free on each side)
- Rows 2–8: Ch 1, turn, sc in each st. (7 sts)
- Row 9: Ch 1, turn, sc2tog, sc in the next 3 sts, sc2tog. (5 sts)
- Row 10: Ch 1, turn, sc2tog, sc in the next st, sc2tog. (3 sts)
- Edging: Ch 1, do not turn. Sc evenly down the side of the flap, along its base and back up the other side, then sl st to the top of Row 10. Fasten off.
The flap folds over the rim and covers about 1.75 in of the front. The two decrease rows give it a soft, rounded end.
Part 5 — Twisted strap
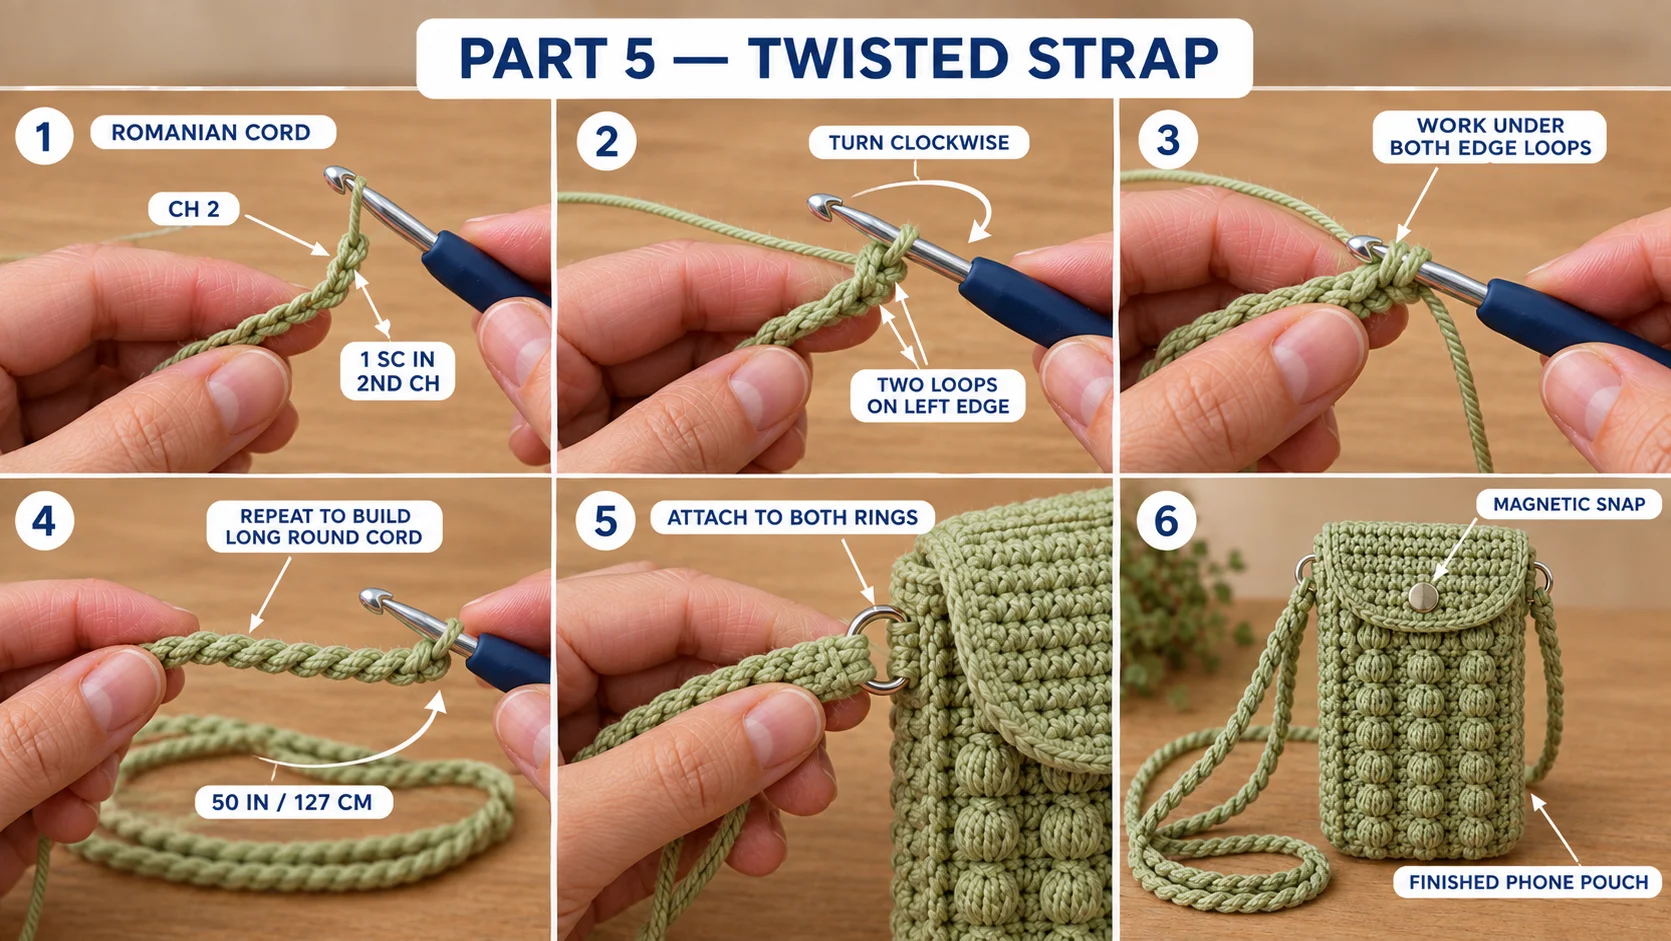
This strap is a Romanian cord. It looks braided, but it's really one single crochet worked again and again while you turn the piece. It's firm, round and barely stretches.
- Leave an 8 in tail. Ch 2, then sc in the 2nd ch from the hook.
- Turn the work clockwise, as if you're turning a page to the left. You'll see two loops running up the left-hand edge.
- Insert your hook under both of those loops, yarn over and pull up a loop. Yarn over and draw through both loops on the hook.
- Repeat steps 2 and 3 until the strap measures 50 in (127 cm), or your chosen length. Fasten off and leave an 8 in tail.
To find your length, hang a tape measure from one shoulder across your body to the opposite hip. Take that number and subtract 7 in, which is the height of the bag.
Attach it: Thread each end through a ring, fold 1 in back on itself, and stitch it down firmly with the tail. Wrap the tail tightly around the joint a few times to hide the fold. If you'd like the strap to come off, sew each end onto a lobster clasp and clip the clasps onto the rings.
Part 6 — Snap and finishing
- Snap: Close the flap over the front. Mark where the flap's center sits, about 0.5 in above its rounded tip. Sew one half of the magnetic snap to the underside of the flap there. Sew the other half to the front of the bag where it meets the first. Work through the base of the stitches, not the bobbles, so the snap sits flat.
- Weave in every end for at least 2 in, then turn back and go through the stitches the other way. Cotton ends can slip, so be thorough near the strap joints.
- Optional — lining. Cut felt or cotton fabric into a 9 × 7.5 in rectangle. Fold it in half to 4.5 × 7.5 in and sew the side and bottom. Drop it inside, fold the top edge under and slipstitch it just below the rim. It stops a card or earbuds from catching on the backs of the bobbles.
- Block it: Put the phone (in a plastic bag) inside, mist the pouch with water and let it dry. It sets the shape and evens out the columns.
Make it yours — quick variations
- Two-tone: Work the plain sc rounds in cream and the bobble rounds in green for a checkerboard look. Carry the unused color up inside the bag at the join.
- Wristlet: Skip the rings and strap. Make an 18 in Romanian cord and sew both ends to one side tab to make a wrist loop.
- Card pocket: Before the lining goes in, sew a 3.5 × 3 in sc rectangle to the inside back for a card and a key.
- Chunky cord version: Use 4 mm polyester cord and a 5 mm hook, with a 15-ch foundation. The bag comes out about the same size, with bigger, rounder bobbles. My crochet hobo bag is a good guide to working with cord.
Troubleshooting the three things that go wrong
The bobbles are on the inside
You worked a bobble round with the right side facing. Check that you turned after the sc round. Every bobble round must be worked with the wrong side facing you. If only one round is wrong, rip it back. It's quicker than it sounds, because bobbles pull out cleanly.
The columns are drifting sideways
The joins are adding or losing a stitch. The most common mistake is working into the slip stitch or the ch 1 as if it were a stitch. After each join, your first sc goes into the same stitch as the join, not the one next to it. Count to 38 every few rounds.
The bag is flaring at the top
Your plain rounds are looser than your bobble rounds. That's common, because bobbles pull the fabric in. Work Rnds 30 and 31 with a 3.5 mm hook to tighten the rim, or add a round of sl st around the top edge.
Frequently asked questions
How long does this crochet phone bag take to make? About 5 to 6 hours in total. That's roughly 3.5 hours for the bobble body, 1 hour for the rim, tabs and flap, and 1 hour for the strap and finishing. Bobble rounds are slower than plain rounds, so the body takes the longest.
How much yarn do I need? About 180 yd (165 m) of worsted #4 cotton for the size shown. The pouch and flap take roughly 110 yd, and the 50 in strap takes about 40 yd. Two 120 yd balls are enough with some left over.
Will an iPhone Pro Max or Samsung Ultra fit? Yes, in a slim case. The inside is about 4 × 6.75 in. For a thick protective case, add 2 chains to the foundation for each extra half inch of width. The bag keeps its bobble columns because the stitch count stays even.
Can I use acrylic yarn? You can, but I don't recommend it for this bag. Acrylic stretches under the phone's weight, so the pouch gets longer and the snap stops lining up. If acrylic is all you have, go down a hook size and add the fabric lining.
How do I wash a cotton phone bag? Take out the lining if it's removable. Hand wash the bag in cool water with mild soap, squeeze it gently in a towel, and dry it flat in shape. Keep the magnetic snap out of hot water and away from the dryer.
Can I sell bags made from this pattern? Yes, you're welcome to sell finished phone bags made from this free pattern at markets, on Etsy or as gifts. Please credit "Pattern by Wavode" on your listing and link back to this page. What you can't do is republish this write-up or my photos as your own pattern.
Related patterns on Wavode
- Crochet hobo bag: a ribbed mocha shoulder bag in polyester cord.
- Crochet shopper bag: a mustard cord tote with built-in handles.
- Chunky crochet handbag: a three-hour top-handle tote in tube yarn.
- Free crochet bag patterns for beginners: six designs, starting with a mesh market tote.
Made this phone bag? Tag #wavodecrochet on Pinterest. I re-pin every finished make and credit the maker.
Pattern by Clara Hartwell for Wavode. Questions? Email me at support@wavode.com.