Crochet Hobo Bag Pattern

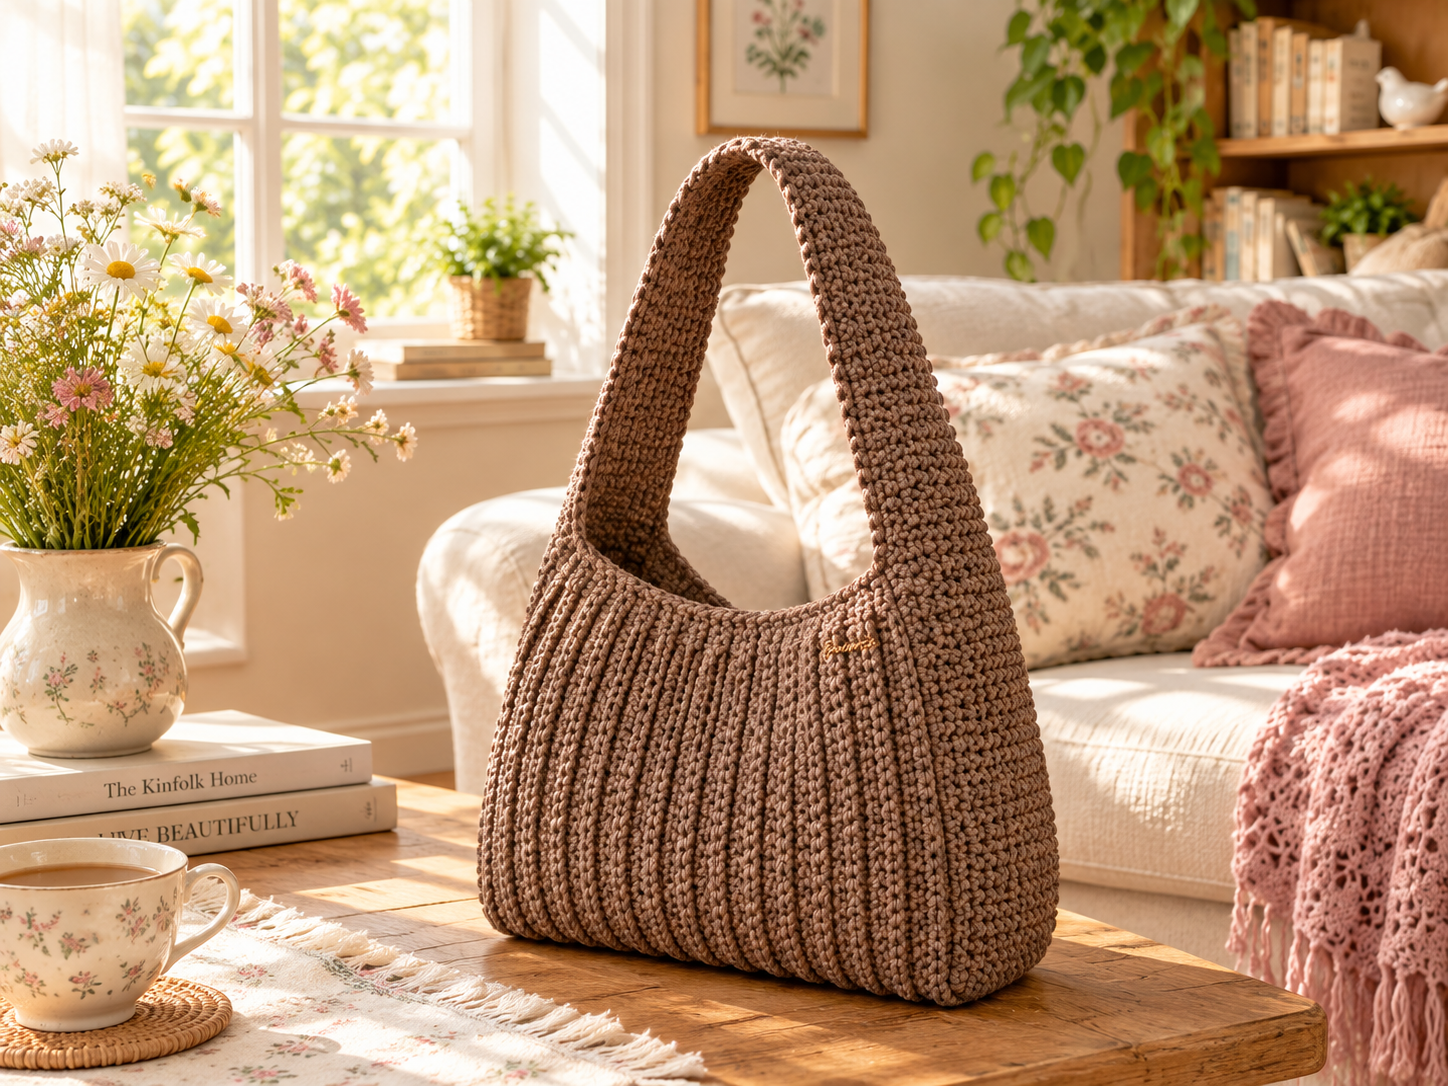
This free crochet hobo bag pattern makes a structured mocha shoulder bag, about 12 inches wide and 9 inches tall, in 3 mm polyester cord on a 4.5 mm hook. It's made of three flat pieces: two ribbed panels worked in the back loop only, and one long single-crochet strip that becomes the sides, the base and the strap in one go. You'll need about 480 yards of cord, and it takes 10 to 12 hours, so it's a solid weekend make.
Key Takeaways
- Three pieces, four stitches: chain, single crochet, single crochet in the back loop only, and slip stitch.
- One strip does three jobs. It forms both sides, the base and the strap, so there are no separate handles to attach.
- Polyester cord gives the bag its crisp, upright shape. Budget ~480 yd (440 m) of 3 mm cord.
- Finished size: about 12 × 9 × 4.5 in with a 10-in strap drop, so it fits a phone, wallet, keys and a paperback.
Why I love this crochet hobo bag
A hobo bag is the shape I reach for most, because it sits under the arm and just swallows everything. The trouble with most crochet versions is that they slump into a sad puddle the moment you put them down. Cord fixes that. Braided polyester cord makes a firm, almost leathery fabric that stands up on its own, wipes clean and doesn't fuzz.
The design trick is the gusset strap. Instead of making sides, a base and a handle separately, you crochet one long strip and join it into a ring. The lower part wraps around the panels, and the upper part arcs over your shoulder. That means the strap can't pull away from the bag, since it is the bag. If you've made my two-tone crochet tote bag, the ribbed panels will feel familiar. They're the same back-loop ribbing, just turned sideways and worked in cord.
Skill level. Advanced beginner. The stitches are basic. What's new is working with cord (it's stiffer than yarn) and joining pieces with single crochet. I walk through both slowly.
Looking for something quicker first? My roundup of free crochet bag patterns for beginners has a mesh market tote you can finish in an afternoon.
What you'll need
Cord
- ~480 yd (440 m) of 3 mm braided polyester cord in mocha or coffee brown. It's sold as "polyester cord for bags" or "crochet cord", usually on 100–200 m spools. The exact amount depends on your tension and the brand of cord, so plan on 450–550 yd (410–500 m). Three 200 m spools cover it with a little to spare.
- Check the label says polyester and braided. Cotton macramé cord in the same thickness is heavier, frays at the cut ends and makes a floppier bag.
- Substitute: two strands of worsted #4 cotton held together will work if you match the gauge below. You'll need about 1,000 yd of worsted in total, and the bag will be softer and slouchier.
Hook and notions
- 4.5 mm (US 7) hook. An ergonomic handle really helps, because cord is hard on the hands.
- 6 locking stitch markers and 10–12 sewing clips (the flat plastic kind sold for quilting).
- Large-eye tapestry needle and sharp scissors.
- A lighter or a dab of fabric glue to seal cord ends.
- Optional: a small metal "handmade" tag, a magnetic snap, and a cotton lining.
Gauge
- Single crochet, through both loops: 14 sts × 16 rows = 4 in (10 cm).
- Single crochet in BLO (ribbed panel): 14 sts × 14 rows = 4 in (10 cm), or 7 ridges.
Gauge matters more on a bag than on most projects. Loose cord fabric stretches, and a stretched bag sags. If your swatch is bigger, go down to a 4 mm hook. If the cord feels like it's fighting you and your wrist aches, go up to 5 mm and just check the size again.
Abbreviations (US crochet terms)
- ch = chain
- sc = single crochet
- sl st = slip stitch
- BLO = back loop only
- st(s) = stitch(es)
- RS / WS = right side / wrong side
UK crocheters: this pattern uses US terms. US single crochet = UK double crochet.
Finished size
- Width: approximately 12 in (30 cm) across the panel.
- Height: approximately 9 in (23 cm) from base to panel top.
- Depth: approximately 4.5 in (11 cm), which is the width of the strip.
- Strap drop: approximately 10 in (25 cm) above the panel top, depending on tension and how much the strap relaxes with wear.
How the bag goes together
Before you start, here's the shape in plain words. You make two panels (front and back) and one long strip. The strip's two short ends are joined into a ring, with the join at the center of the base. The front panel is crocheted to one long edge of the lower strip, and the back panel to the other. The part of the ring left over becomes the strap.
The ribs run up and down the finished bag. To get them vertical, each panel is worked sideways: the starting chain runs from the base to the top of the bag, and you add rows across the width.
The pattern — step by step
Part 1 — Front and back panels (make 2)
Work in flat rows with the 4.5 mm hook. The ch 1 at the start of each row doesn't count as a stitch.
Foundation: Ch 33. Row 1: Sc in the 2nd ch from the hook and in each ch across. Turn. (32 sts) Row 2: Ch 1, sc in BLO in each st across. Turn. (32 sts) Rows 3–42: Repeat Row 2. (32 sts)
Fasten off and seal the cord end. The panel should measure about 12 in wide (across the rows) × 9 in tall (along the stitches), with about 21 ridges on each face. In back-loop rows that you turn, each face shows one ridge for every 2 rows.
Which edge is which. Lay the panel with the ribs running up and down. The stitch edges (the foundation chain on one side, Row 42 on the other) are now the left and right sides of the panel. The row-end edges are the base and the top. Pick the neater row-end edge for the top, and put a marker there.
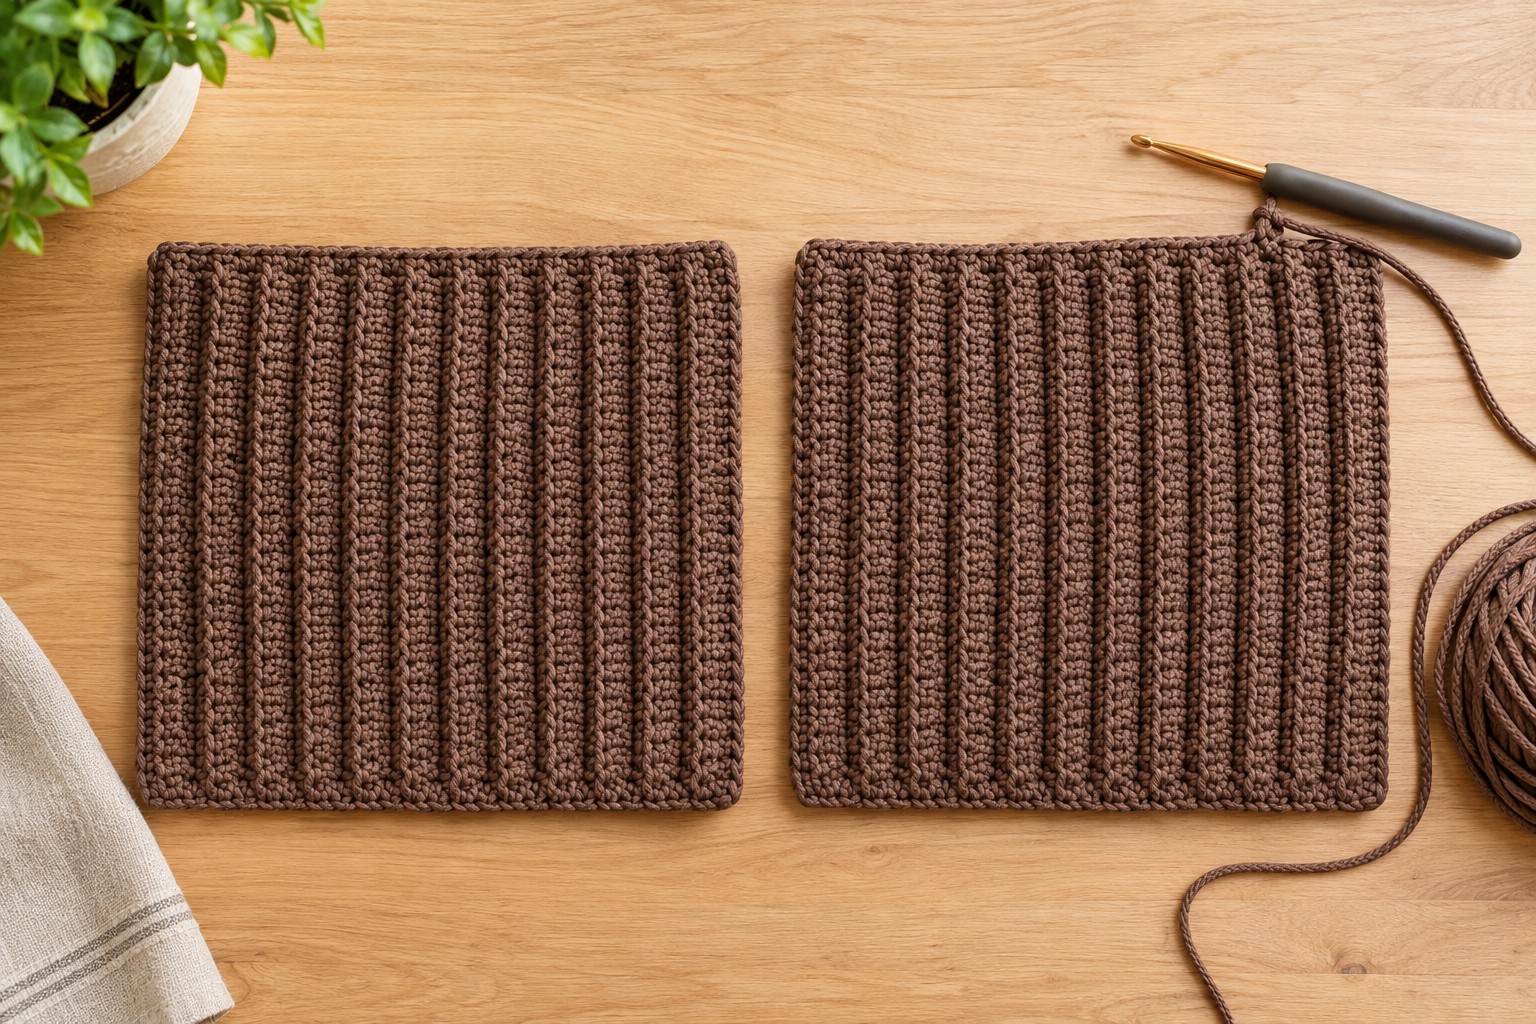
Why the ribs run vertically: If you worked the panels the usual way, the ribs would run sideways around the bag. Horizontal ribs make a squat bag look wider, and they stretch up and down, which is the direction the strap pulls. Vertical ribs make the bag look taller and stay firm under the strap's pull. They also give sideways, so the top edge eases a little when you tuck things in and then springs back.
Part 2 — The gusset strap (make 1)
This one piece becomes the sides, the base and the strap. Work in flat rows through both loops, which is firmer and stretches less than the ribbed panels.
Foundation: Leave a 12-in (30 cm) starting tail. Ch 17. Row 1: Sc in the 2nd ch from the hook and in each ch across. Turn. (16 sts) Row 2: Ch 1, sc in each st across. Turn. (16 sts)
Repeat Row 2 until the strip measures 52 in (132 cm) when laid flat without stretching. That's about 208 rows. Don't fasten off yet.
Why 52 inches? About 30 in wraps around the panel (9 in up each side plus 12 in across the base). The other 22 in forms the strap arc.
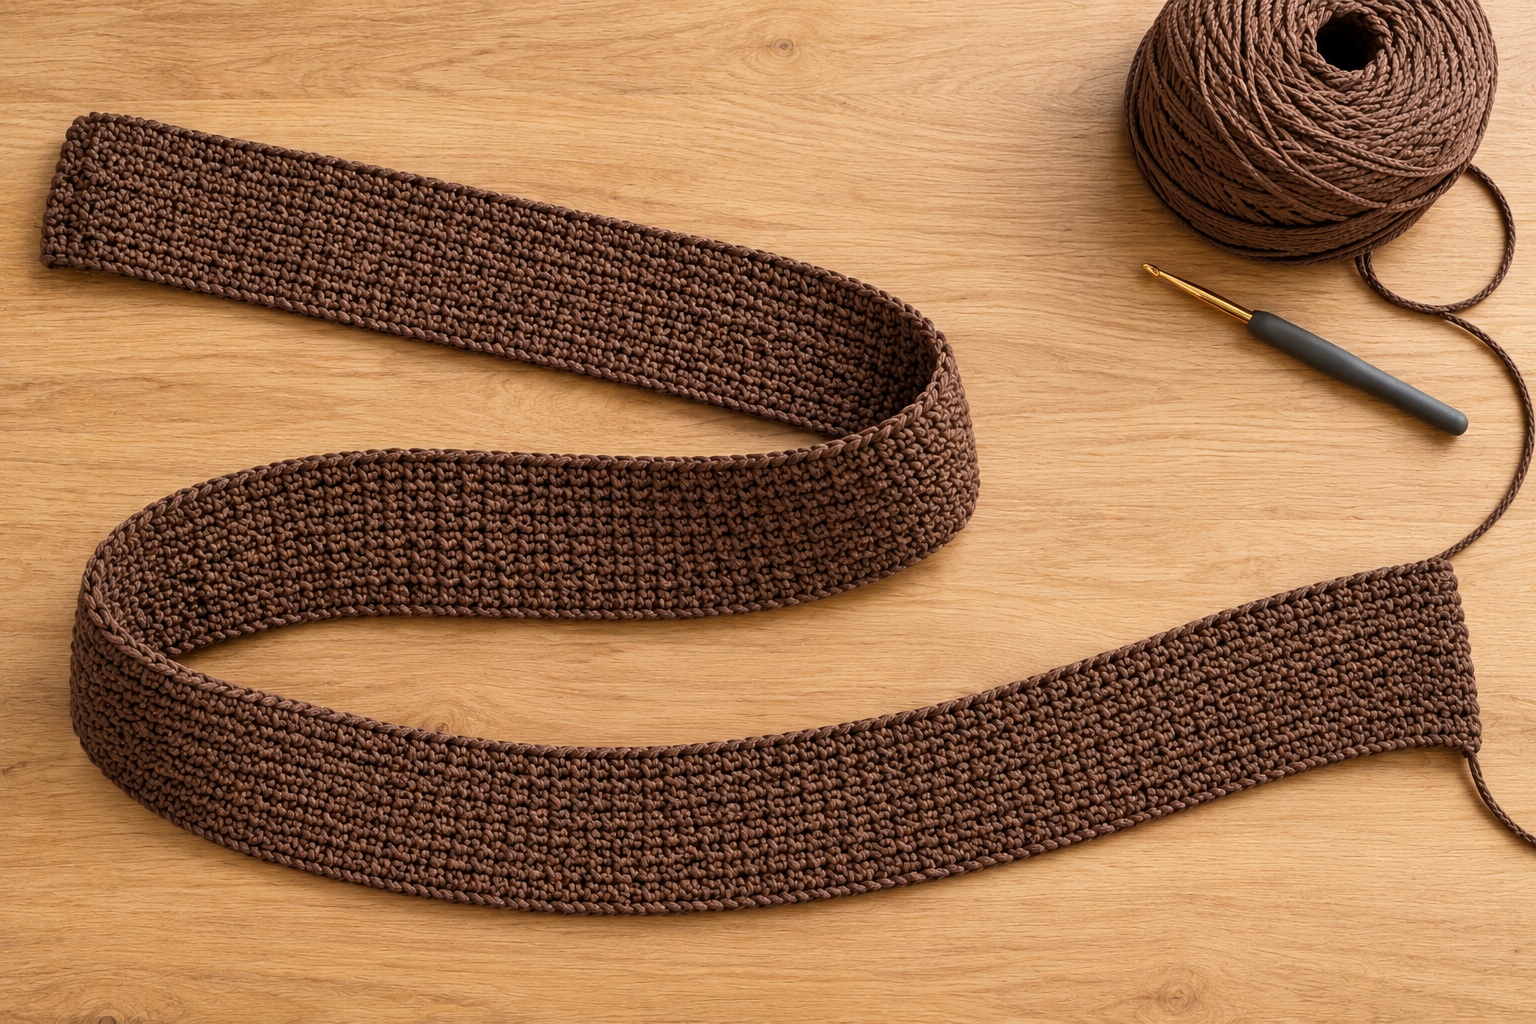
Check the fit before you join. Hold the strip up against one panel, from the top of one side, down and across the base, to the top of the other side. It should reach with about 22 in left over. If you'd like a longer drop for wearing it crossbody-short, add rows now: every extra 4 in of strip adds about 2 in of drop.
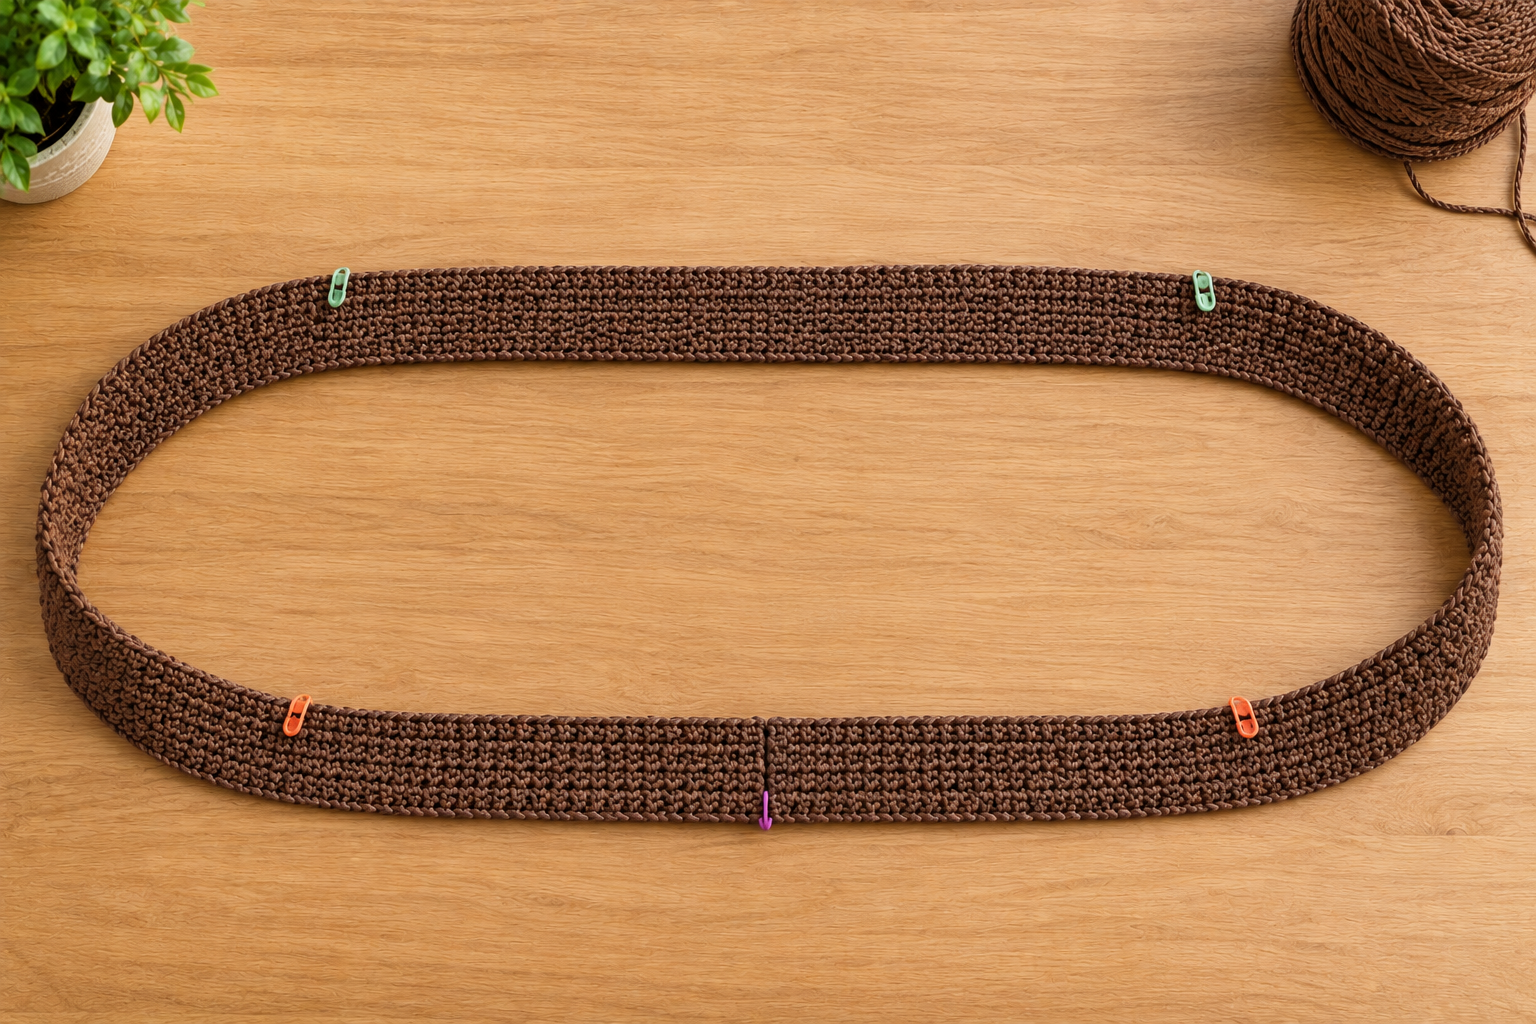
Join into a ring. Bring the last row and the foundation chain together, RS facing each other, and make sure the strip isn't twisted. Sl st through both layers across all 16 sts. Fasten off, leaving an 8-in tail. Weave both tails into the seam.
This seam sits at the center of the base, where nobody sees it and it takes weight evenly.
Part 3 — Mark the strip
Lay the ring flat with the base seam at the bottom, centered.
- From the seam, measure 6 in (15 cm) along the strip in each direction. Put a marker on both long edges at each spot. These are the base corners.
- From each base corner, measure 9 in (23 cm) further up. Put a marker on both long edges again. These are the top corners, where the strap begins.
- The 22 in between the two top corners is the strap. Leave it free.
Part 4 — Join the front panel
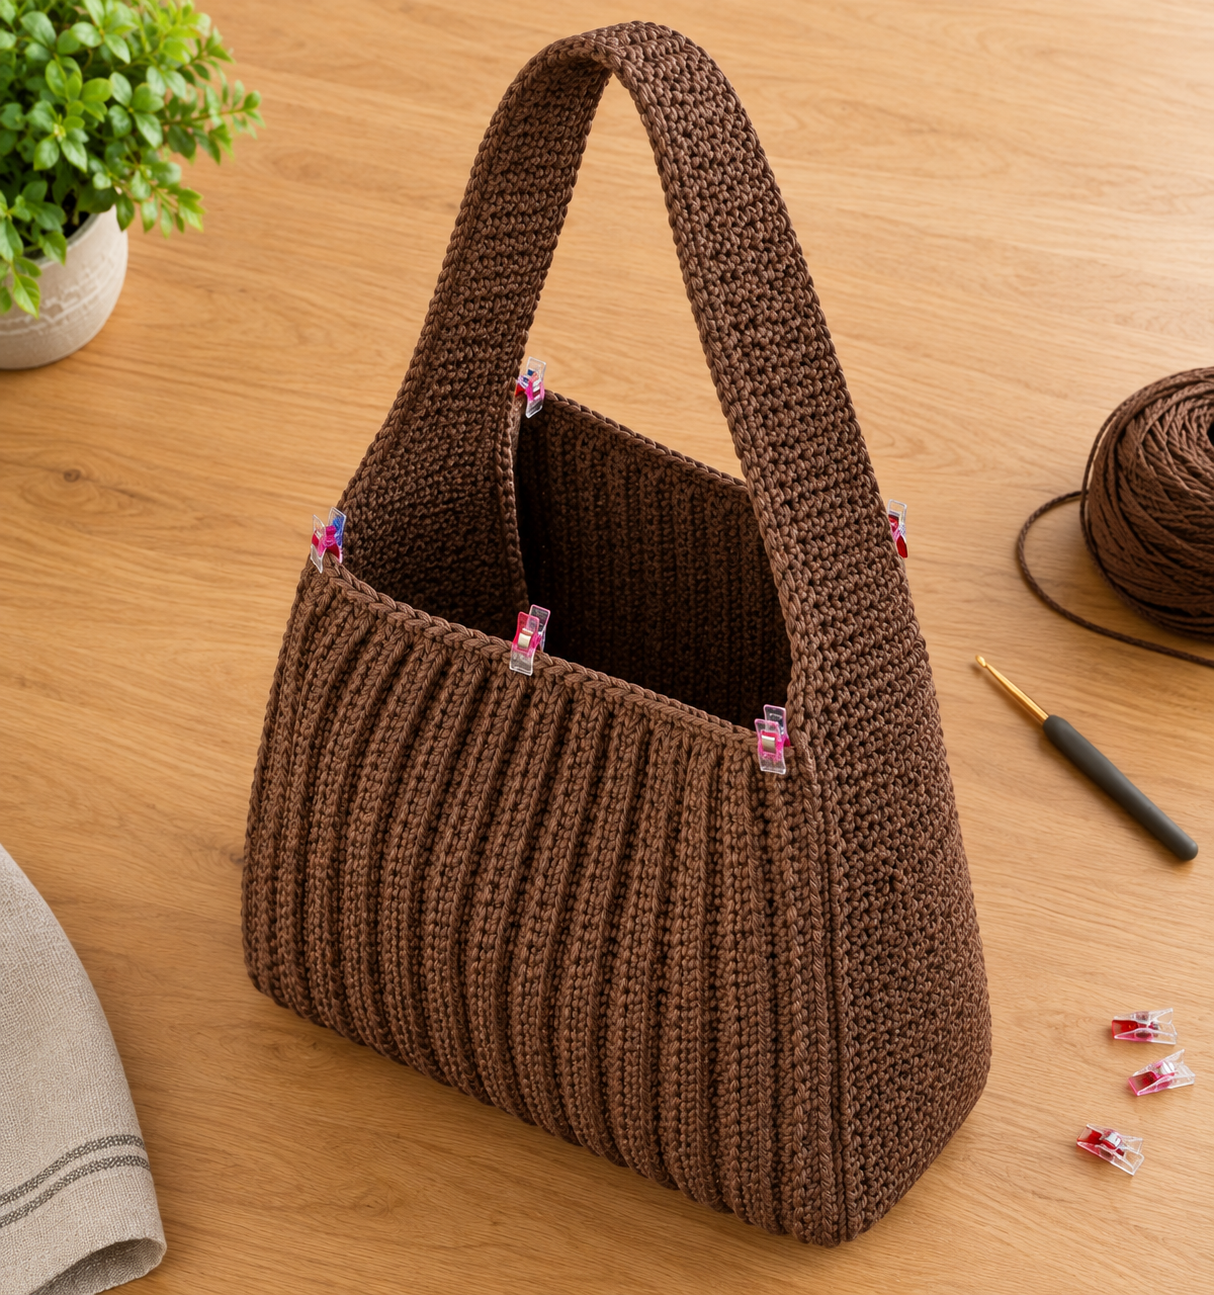
The front panel is joined to one long edge of the strip, from top corner to base corner to base corner to top corner. I join with single crochet on the outside, which makes a neat raised ridge that frames the bag and helps it hold its shape.
- Hold the front panel and the strip WS together, with the panel facing you and its marked top edge up.
- Line up the panel's top-right corner with a strip top-corner marker. Line up the panel's bottom corners with the strip's base-corner markers. Clip every 2 in or so in between.
- Join the cord at the top-right corner, through both layers. Ch 1.
- Sc down the right side through one panel st and one strip row-end each time.
- At the bottom-right corner, work 3 sc into the corner to turn it.
- Sc across the base, through one panel row-end and one strip row-end each time. Work 3 sc in the bottom-left corner.
- Sc up the left side to the top-left corner. Fasten off, leaving an 8-in tail.
The strip has a few more row-ends than the panel has stitches (4 per inch versus about 3.5). Don't worry about matching one-to-one. About every 7th or 8th stitch, insert your hook through 2 strip row-ends at once instead of one. The clips keep everything lined up, so both edges finish together at the top corner.
Part 5 — Join the back panel
Turn the bag over. Join the back panel to the other long edge of the strip, exactly as in Part 4. Keep the ribs running vertically and the panel's marked top edge up.
Part 6 — Reinforce the four stress points
The four top corners, where each panel meets the strap, carry nearly all the weight of whatever's in the bag. Thread each 8-in tail left from the joins onto the tapestry needle. Work 8 to 10 small whipstitches through the corner, going deep into both the panel and the strip. Then weave in the end. Do this at all four corners. It takes five minutes, and it's the difference between a bag that lasts a season and one that lasts years.
Part 7 — Edge the openings
Now the bag has two open edges, one on the front and one on the back. Here's why. The front panel is joined only to the strip's front edge. At each top corner, the front panel's top edge runs straight into the strap's front edge. So the front panel top and the front edge of the strap make one closed loop. The back panel top and the back edge of the strap make a second loop. The strap's 4.5-in width sits between them, so you can't travel from one to the other along an edge.
You'll edge each loop in its own continuous round. That firms the top of the bag and keeps the strap edges from stretching.
Round 1: Join the cord at one top corner of the front panel. Ch 1. Sc across the front panel top, working 1 sc in each row-end. At the far corner, carry on up the strap's front edge, over the arch and back down, working 1 sc in each row-end. You arrive back at the corner where you started. Sl st to the first sc. Don't worry about an exact count. Round 2: Ch 1, sl st loosely in each sc around. Sl st to the first st. Fasten off and weave in.
Repeat both rounds on the back loop: the back panel top plus the strap's back edge.
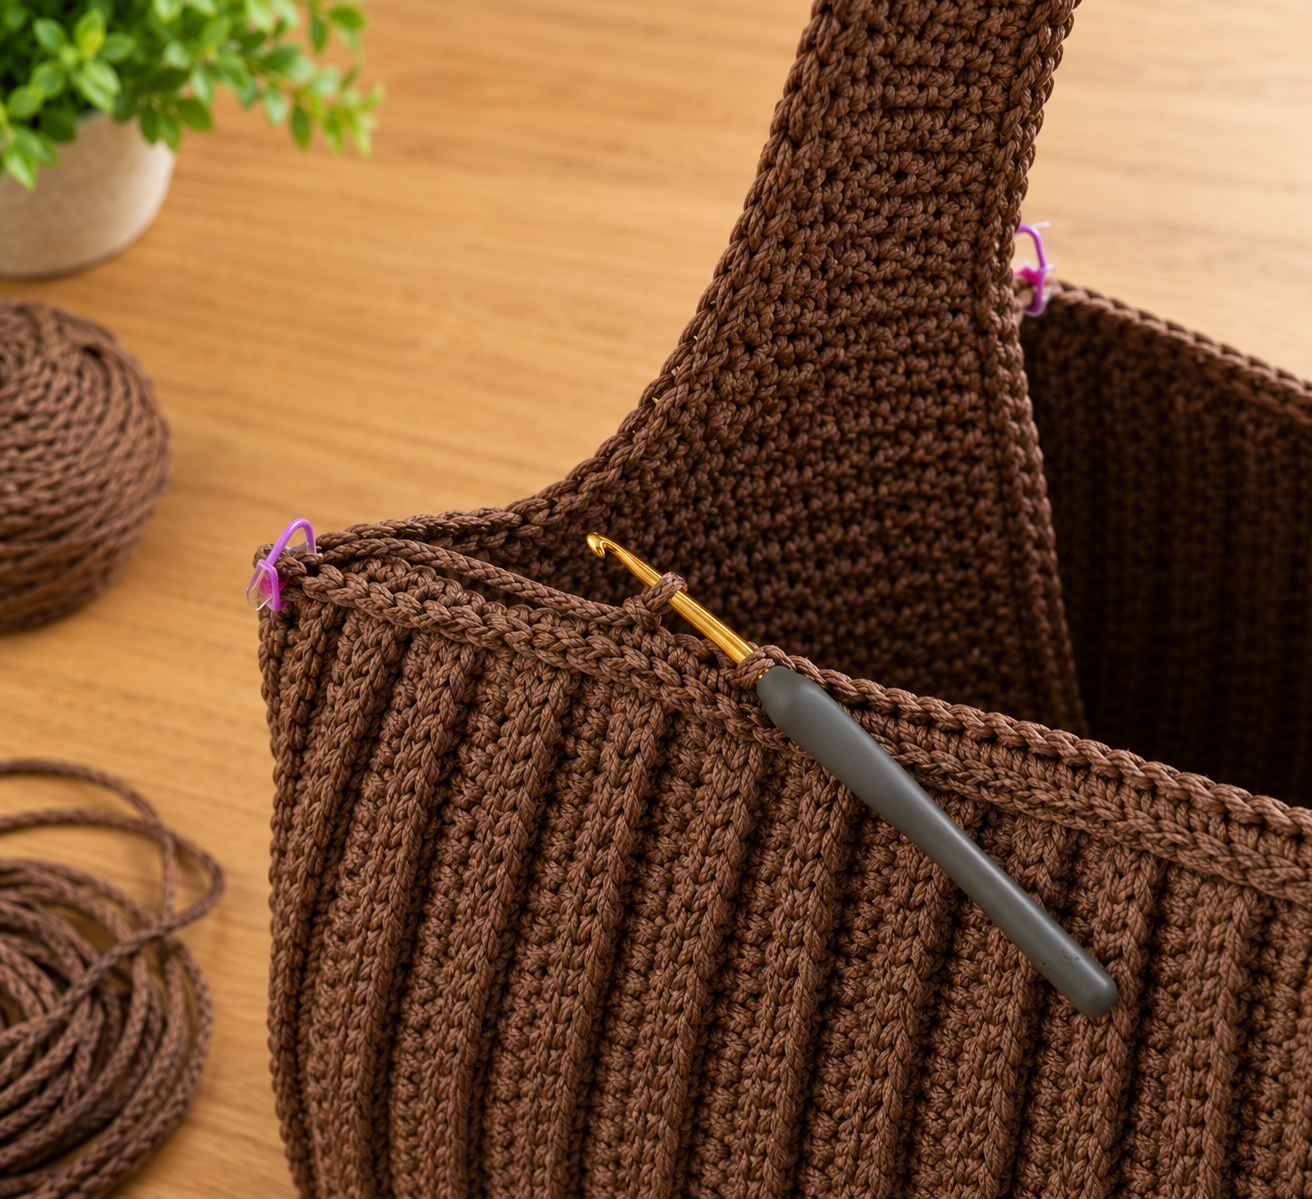
Don't skip Round 2. It looks fussy, but the strap edges are row-ends, which is the stretchiest part of any crochet fabric. Under the weight of a full bag, unbound row-ends slowly pull longer and go wavy. A round of slip stitches is almost stretch-free, so it works like a seam binding along the strap and holds it to its original length.
Part 8 — Finishing
- Weave in every end at least 2 in, going back through the stitches in a different direction. Polyester cord is slippery, so trim close and dab the cut end with fabric glue. If you prefer, you can melt it very briefly with a lighter, but keep the flame well away from the fabric.
- Optional — metal tag. Sew a small "handmade" tag to the front panel near the top-right corner, through the ribs, with sewing thread in a matching brown.
- Optional — magnetic snap. Sew one half of the snap inside each panel, centered, 1 in below the top edge. Back each half with a small square of felt so it doesn't pull through.
- Optional — lining. Skip this if you don't sew. A simple cotton lining sewn the size of the finished bag stops small items poking through the stitches and keeps the ribs from stretching over time.
Make it yours — quick variations
| Variation | Change from base pattern |
|---|---|
| Crossbody length | Make the strip 64 in (163 cm) instead of 52 in. That gives a drop of about 16 in. |
| Mini hobo | Panels: ch 25 and work 32 rows. Strip: ch 13 (12 sts), 42 in long, with base corners 4.5 in from the seam and top corners 7 in above them. The result is about 9 × 7 × 3.5 in. |
| Two-tone | Work the panels in cream cord and the gusset strap in mocha, for a color-blocked frame like my two-tone tote. |
| Top-handle | Want a handheld bag instead? My chunky crochet handbag uses a short top handle and works up in three hours. |
| Soft & coquette | For something smaller and sweeter, try my crochet mini bow bag. |
Troubleshooting the three things that go wrong
The bag sags or slumps sideways
Your fabric is too loose, or the cord is cotton rather than polyester. Check gauge first. If your panels came out more than 12.5 in wide, remake them on a 4 mm hook. A stiff base insert also helps: a piece of plastic canvas cut to 11.5 × 4 in slides into the bottom and props the whole bag up.
The strip ends up longer or shorter than the panel edge
It happens when the join is worked strictly one-to-one. Unpick back to the last clip, then re-work the section, putting two strip row-ends together (or two stitches into one row-end) every so often. Clip first, crochet second. Clipping the corners before you start is what keeps both edges finishing together.
The strap is twisting on my shoulder
The ring was twisted when you joined it, so one panel is sitting on the wrong edge of the strip. Undo the base seam, untwist the strip and rejoin it flat. That's another reason to put the seam at the base, where it's easy to reach. Always lay the ring flat and check it before the first panel goes on.
Frequently asked questions
How long does this crochet hobo bag take to make? About 10 to 12 hours in total. That's roughly 2 hours per panel, 4 to 5 hours for the 52-inch strip, 1.5 hours for the two joins and 30 minutes for edging and finishing. Cord is slower than yarn, so break it into short sessions and rest your hands.
How much cord do I need? About 480 yd (440 m) of 3 mm polyester cord for the size shown. The two panels take roughly 190 yd, the strip about 240 yd, and the joins and edging about 50 yd. Tension and cord brand shift this, so plan on 450–550 yd. For the crossbody length, add another 60 yd.
Can I use regular yarn instead of cord? Yes. Hold two strands of worsted #4 cotton together and match the gauge of 14 sc × 16 rows = 4 in. You'll need about 1,000 yd of worsted. The bag will feel softer and slouch more, so I'd add a lining and a base insert.
How do I wash a polyester cord bag? Spot clean with a damp cloth and a drop of mild soap for everyday marks. For a deeper clean, hand wash it in cool water, squeeze out the water gently in a towel, and let it dry flat, stuffed with a towel to hold its shape. Don't tumble dry or iron it.
Will the strap stretch? All crochet straps relax a little. Three things keep it to a minimum: polyester cord, single crochet through both loops on the strip, and the slip-stitch edging round. Skip that edging, or work the strip in BLO, and it will stretch noticeably more.
Can I sell bags made from this pattern? Yes, you're welcome to sell finished bags made from this free pattern at markets, on Etsy or as gifts. Please credit "Pattern by Wavode" on your listing and link back to this page. What you can't do is republish this write-up or my photos as your own pattern.
Related patterns on Wavode
- Free crochet bag patterns for beginners: six designs, starting with a mesh market tote.
- Two-tone crochet tote bag: the same back-loop ribbing in worsted cotton, as a roomy tote.
- Crochet backpack: a cream cotton backpack with a curved flap and adjustable straps.
- Granny square crochet bag: a boho cream tote with tassels.
Made this hobo bag? Tag #wavodecrochet on Pinterest. I re-pin every finished make and credit the maker.
Pattern by Clara Hartwell for Wavode. Questions? Email me at support@wavode.com.