Sunny the Yellow Duckling | 6-Piece Crochet Pattern + Cowboy Hat

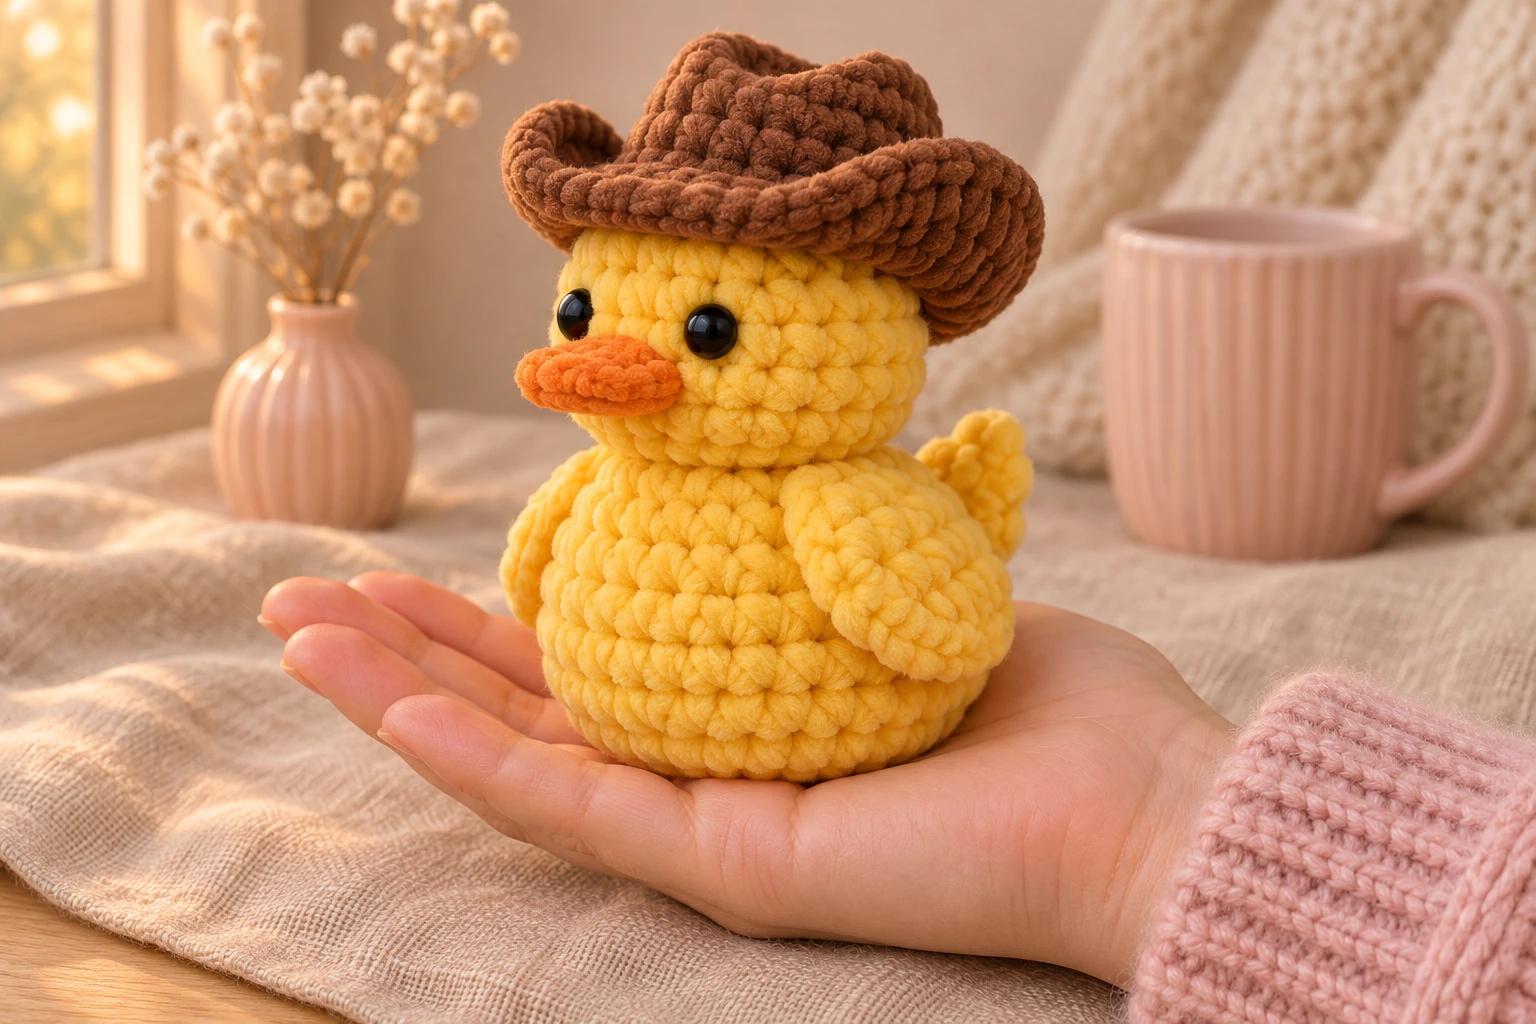
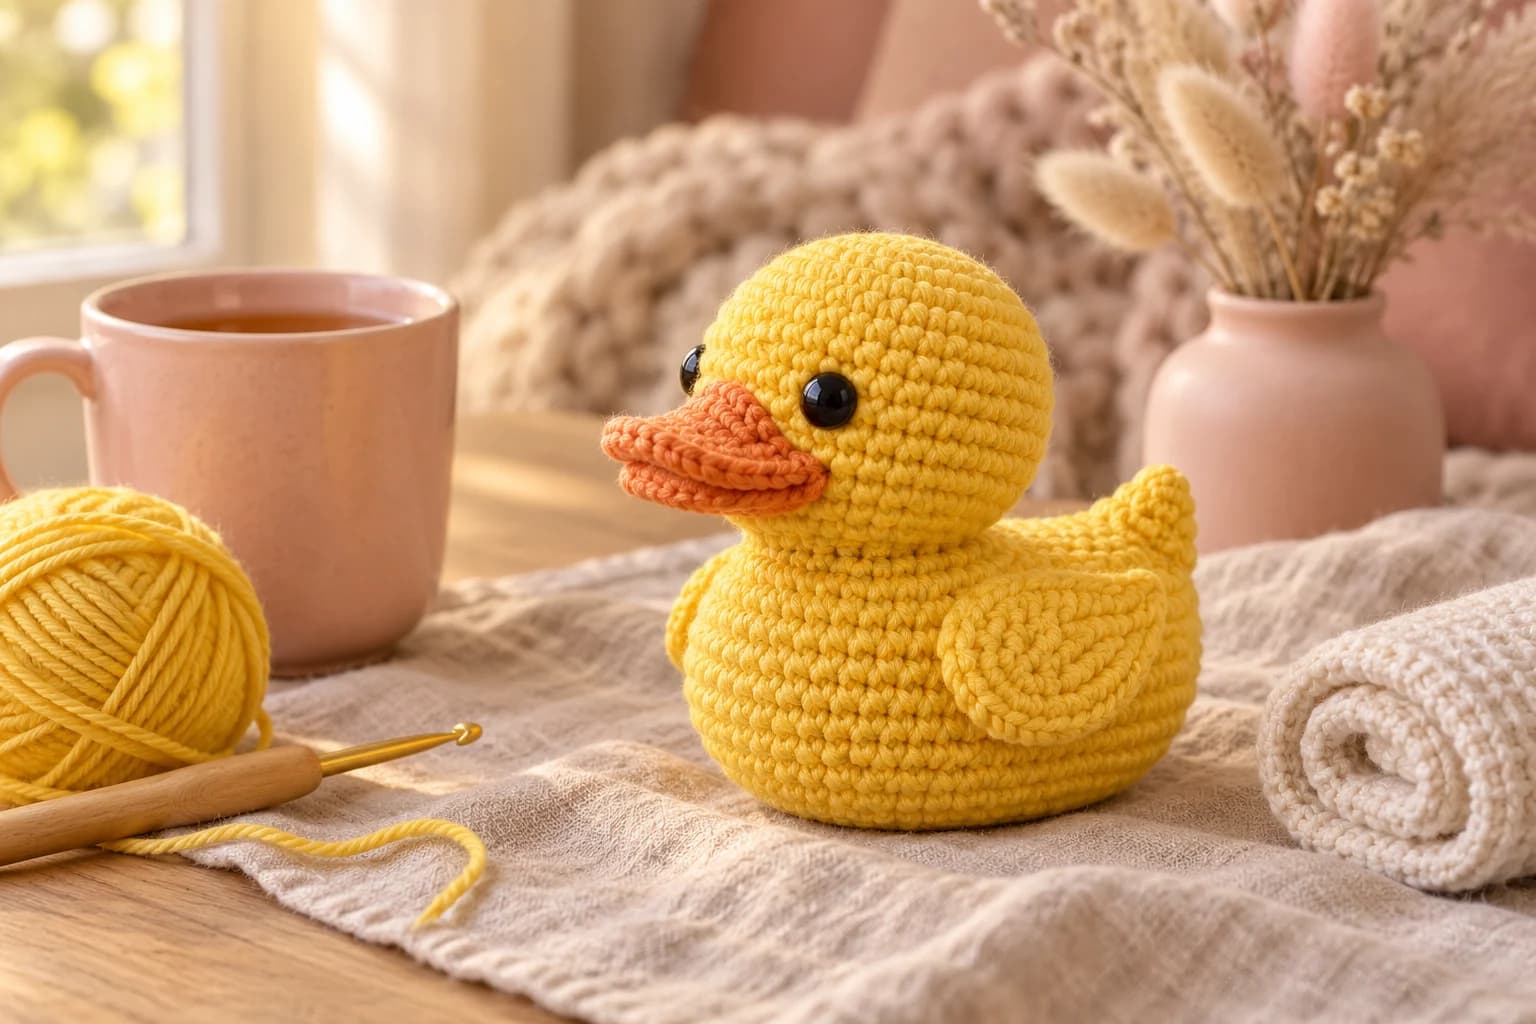
I have a soft spot for a duck in a hat. The brim can tip back just enough to show its eyes, and suddenly it looks ready to go somewhere. Sunny is a yellow chenille duckling about 4¾ in (12 cm) tall, with a squashy orange bill, little folded wings and a brown cowboy hat you can leave off.
Sunny comes together in six pieces, with the hat as a seventh if you fancy it. I fold his wings close to his sides, then give the hat its shape with a couple of tacks at each side and a thumbprint in the crown.
| At a glance | |
|---|---|
| Finished size | About 4¾ in (12 cm) tall without the hat and 3¾ in (9.5 cm) across the body |
| Yarn | Super bulky #6 polyester chenille in yellow and orange, plus brown for the optional hat |
| Hook | 5 mm (H/8) |
| Pieces | 6 without the hat, 7 with it |
| Time | About 3–4 hours, plus about 1 hour for the hat |
| Skill | Easy, with single crochet in a spiral, an oval worked around a chain and simple sewing |
What You’ll Need for the Yellow Duckling
- Yarn: Super bulky #6 polyester chenille, about 131 yd (120 m) per 100 g, such as Premier Parfait Chunky. Set aside about 50 yd yellow, 4 yd orange and 19 yd brown if you're making the hat.
- Hook: 5 mm (H/8) for every piece.
- Eyes and stuffing: Two 10 mm black safety eyes with washers and polyester fiberfill. For embroidered eyes, use about 1 yd of smooth black yarn.
- For assembly: A blunt large-eye needle, scissors, locking stitch markers, pins and a little contrast scrap yarn. A few yards of smooth matching yarn are handy if the chenille frays while sewing.
Tension. I like the stitches snug enough to hide the stuffing. Look for 2.5 sc per inch (2.5 cm) and about 2.5 rounds per inch. At that tension, the size estimates are about 4¾ in (12 cm) tall without the hat and 3¾ in (9.5 cm) across the body. Measure yours after stuffing, since the crown and belly round out.
Duckling Stitches and Abbreviations
US terms: MR (magic ring), ch (chain), sc (single crochet), inc (2 sc in one stitch), dec (invisible decrease over the next 2 stitches, using their front loops), sl st (slip stitch), BLO (back loop only), R (round), st (stitch) and sts (stitches).
Work in a continuous spiral. Put a marker in the first stitch of each round and move it up as you go. The number in parentheses is the stitch count at the end of the round.
Tip. Ease the magic ring closed a little at a time. If the chenille starts to strip, thread a smooth matching strand through the bases of the first stitches and draw them together with that strand.
Making the Duckling’s Head and Setting the Eyes
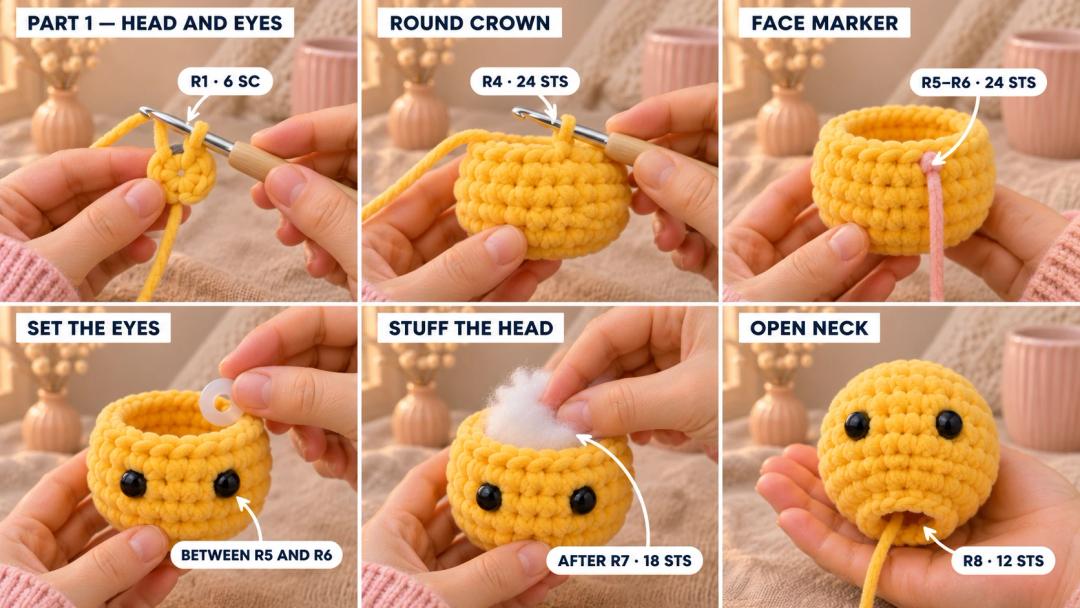
Head (yellow, 5 mm, Make 1). The ring sits at the crown. The last round is the neck opening.
- R1: MR, 6 sc in the ring. (6)
- R2: inc × 6. (12)
- R3: (sc, inc) × 6. (18)
- R4: (sc 2, inc) × 6. (24)
- R5–R6: sc around. (24) 2 rounds.
Mark the face. Count from the first marked stitch of R5. Slip a contrast strand into the gap after st 12. Run it straight down through the gap after st 12 on R6 as well. Keep this strand in place until the bill is sewn on.
Set the eyes now. Between R5 and R6, place one eye after st 9 of R5 and the other after st 15, three stitch spaces out from the center on each side. Look at Sunny face-on to check the level, then press the washers on from inside.
Safety. With plastic eyes, Sunny is for ages 3 and up. For a younger child, embroider each eye now with four short black stitches side by side across one round at the marked spot. Knot the ends inside.
- R7: (sc 2, dec) × 6. (18)
Push fiberfill into the crown and cheeks after R7. I like the head springy under a thumb, with room to add a pinch at the neck.
- R8: (sc, dec) × 6. (12)
Top up the head through the neck opening. Sl st in the next st and fasten off with an 18 in (46 cm) tail at the neck. Leave the opening ready for sewing.
Shaping the Duckling’s Body and Tail
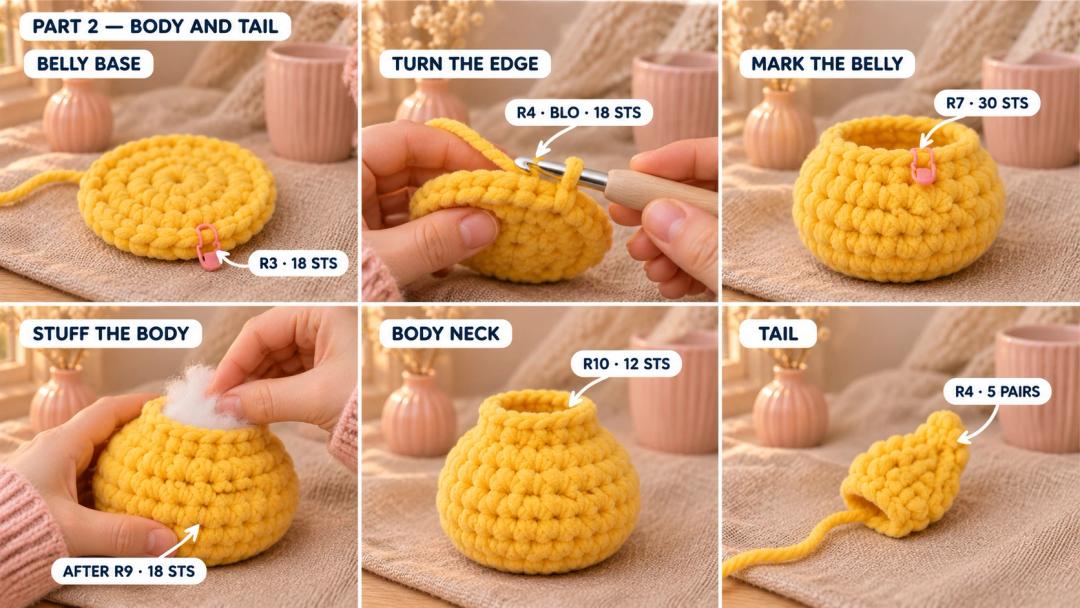
Body (yellow, 5 mm, Make 1). The ring is under the belly. The last round sits against the head.
- R1: MR, 6 sc in the ring. (6)
- R2: inc × 6. (12)
- R3: (sc, inc) × 6. (18)
- R4: in BLO, sc around. (18)
The loop you leave at the front of each stitch makes a small ridge under the belly. Rest the body on that ridge when you check how Sunny sits.
- R5: (sc 2, inc) × 6. (24)
- R6: (sc 3, inc) × 6. (30)
- R7: sc around. (30)
Mark the body. Lay the base on the table. On R7, mark the gap after st 15 for center front. The gap between the last and first stitches of R7 is center back. Keep both markers in for sewing.
- R8: (sc 3, dec) × 6. (24)
- R9: (sc 2, dec) × 6. (18)
Stuff the belly after R9. Press the base gently against the table and keep it flatter than the sides.
- R10: (sc, dec) × 6. (12)
Add a pinch of filling at the neck. Sl st in the next st and fasten off with a 6 in (15 cm) tail at the neck. Leave the neck open and tuck that short tail inside when you join the head.
Tail (yellow, 5 mm, Make 1). The ring is the tip. The last round is the edge you'll sew to the back.
- R1: MR, 4 sc in the ring. (4)
- R2: (sc, inc) × 2. (6)
- R3: (sc 2, inc) × 2. (8)
- R4: (sc 3, inc) × 2. (10)
Sl st in the next st and fasten off with a 12 in (30 cm) tail at the wide end. Leave the tail piece empty. Flatten R4 into two layers of five stitches.
Crocheting the Orange Bill and Little Wings
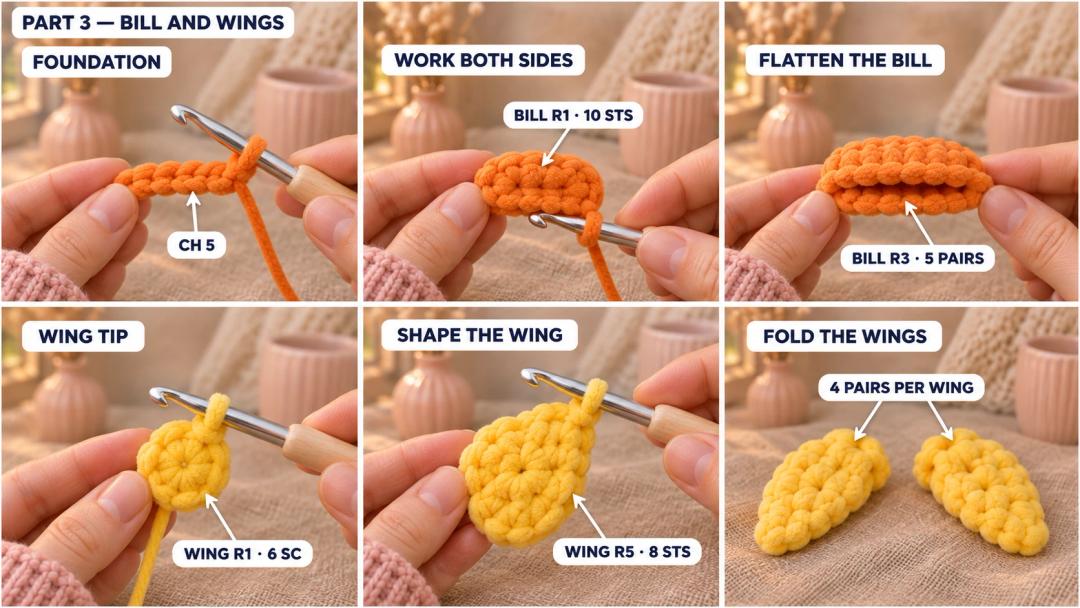
Bill (orange, 5 mm, Make 1). The chain runs across the front edge of the bill. The last round is the edge that goes against the face. Ch 5.
- R1: sc in the 2nd ch from the hook, sc in each of the next 2 ch, 3 sc in the last ch, then work along the other side of the chain: sc in each of the next 2 ch, 2 sc in the same ch as the first sc. (10)
- R2–R3: sc around. (10) 2 rounds.
At the far end of the chain, roll it toward you to find the unused loops underneath. The three stitches at either end make the bill round off like the toe of a slipper.
Sl st in the next st and fasten off with a 12 in (30 cm) tail at the open edge. Leave the bill empty. Flatten R3 into two layers of five stitches with the starting chain lying flat across the front.
Wings (yellow, 5 mm, Make 2). The ring is the tip of each wing. The last round is the edge that goes against the body.
- R1: MR, 6 sc in the ring. (6)
- R2: (sc, inc) × 3. (9)
- R3: (sc 2, inc) × 3. (12)
- R4: sc around. (12)
- R5: (sc, dec) × 4. (8)
Sl st in the next st and fasten off with a 12 in (30 cm) tail at the open edge of each wing. Leave the wings empty. Flatten each opening into two layers of four stitches and fold the tips down with your thumbs.
Putting the Yellow Duckling Together
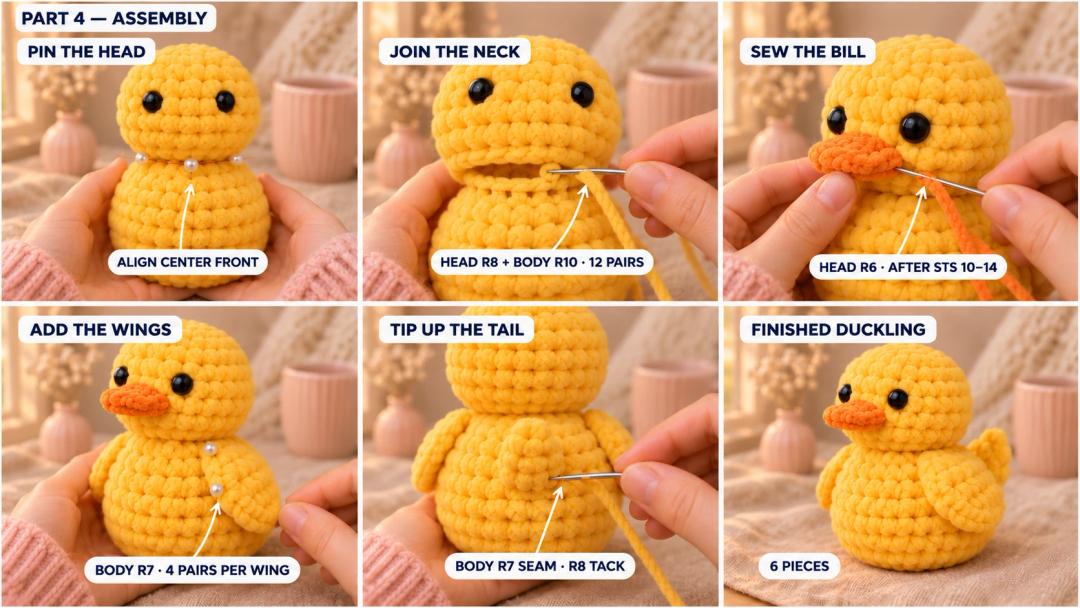
- Join the neck. Sit the body on its base. Set the head on top with the face strand above the front marker on R7. Pin the front and back of the neck first. With the long yellow tail, whipstitch the 12 sts of head R8 to the 12 sts of body R10, one pair at a time. Before the last few stitches, tuck in enough filling to keep the head upright. Go around once more with the same tail and hide the end.
- Set the bill just below the eyes. Hold it flat like a little shelf, with the chain edge pointing out. Pin the center pair of the opening at the face strand on the lower edge of head R6, after st 12. Sew the five pairs to the gaps after sts 10–14 of R6, catching both layers each time. Pull the face strand out when the bill is secure.
- Lay a wing along each side. Point the tips down toward the belly. At the lower edge of body R7, sew the four pairs of one wing into the gaps after sts 6–9, and the other into the gaps after sts 21–24. Catch both layers of each wing. Look at Sunny from the front. Both wing tips should sit at the same height.
- Tip the tail up at the back. Pin its center pair over the back marker at the lower edge of body R7. Sew the five pairs into the gaps after sts 28, 29, 30, 1 and 2, in that order around the marker. Catch both layers. For the tilt, bring the needle out at the middle of body R8, above the back marker. Take two small stitches into the upper face of the tail, about one tail round from the seam. Pull just enough to raise the tip, then hide the end.
Making the Optional Cowboy Hat
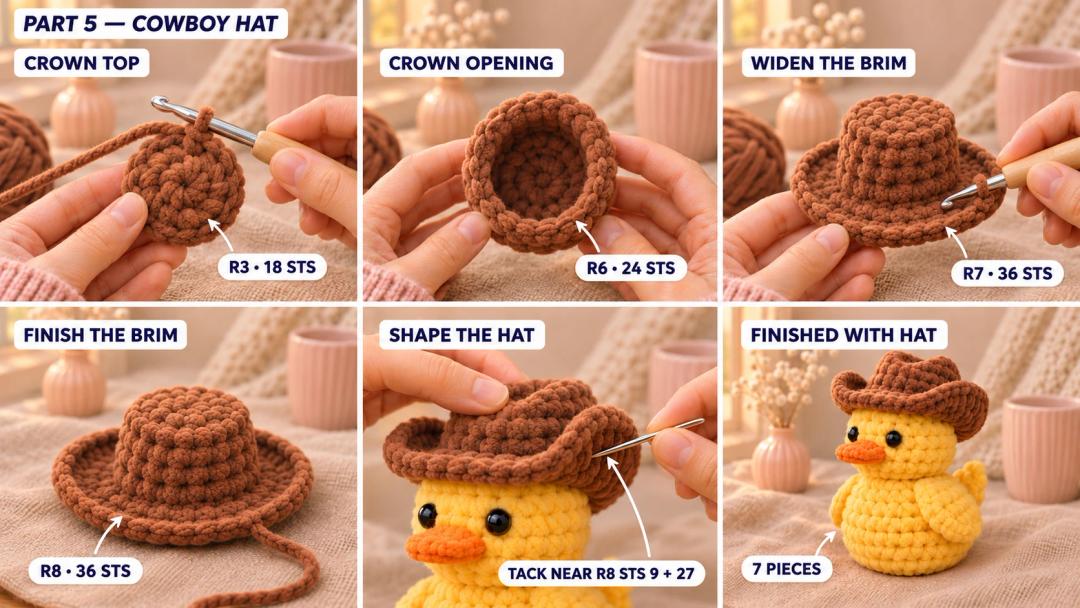
Cowboy hat (brown, 5 mm, Make 1). The ring is the top of the crown. The last round is the outer edge of the brim.
- R1: MR, 6 sc in the ring. (6)
- R2: inc × 6. (12)
- R3: (sc, inc) × 6. (18)
- R4–R5: sc around. (18) 2 rounds.
- R6: (sc 2, inc) × 6. (24)
- R7: (sc, inc) × 12. (36)
- R8: sc around. (36)
Sl st in the next st and fasten off with a 24 in (61 cm) tail at the brim. Leave the crown empty.
Shape the hat. Set it on Sunny with the last stitch at the back and the crown opening resting around head R4. Press the top gently with your thumb to make a shallow dip. Curl the left and right brim edges up with your fingers. On the brim, the two side folds sit near sts 9 and 27 of R8, counting from its marker. With the brown tail, take two small tacking stitches from each fold to the crown at R6, straight above it. Carry the yarn through the inside between the tacks and bury the end.
The hat can sit loose. If you want it fixed, use a fresh brown strand and tack the opening at the front and back to head R4, two stitches at each point.
UK terms: US sc is UK dc. Chain and slip stitch use the same names.
I like Sunny on a bookshelf with his hat pushed back and his bill peeking over the edge. If you'd like a duck for the same shelf in smooth yarn, there's also my classic yellow rubber duck.
Made your own Sunny? Tag #wavodecrochet on Pinterest so I can see where he ends up.