Free Crochet Rubber Duck Pattern

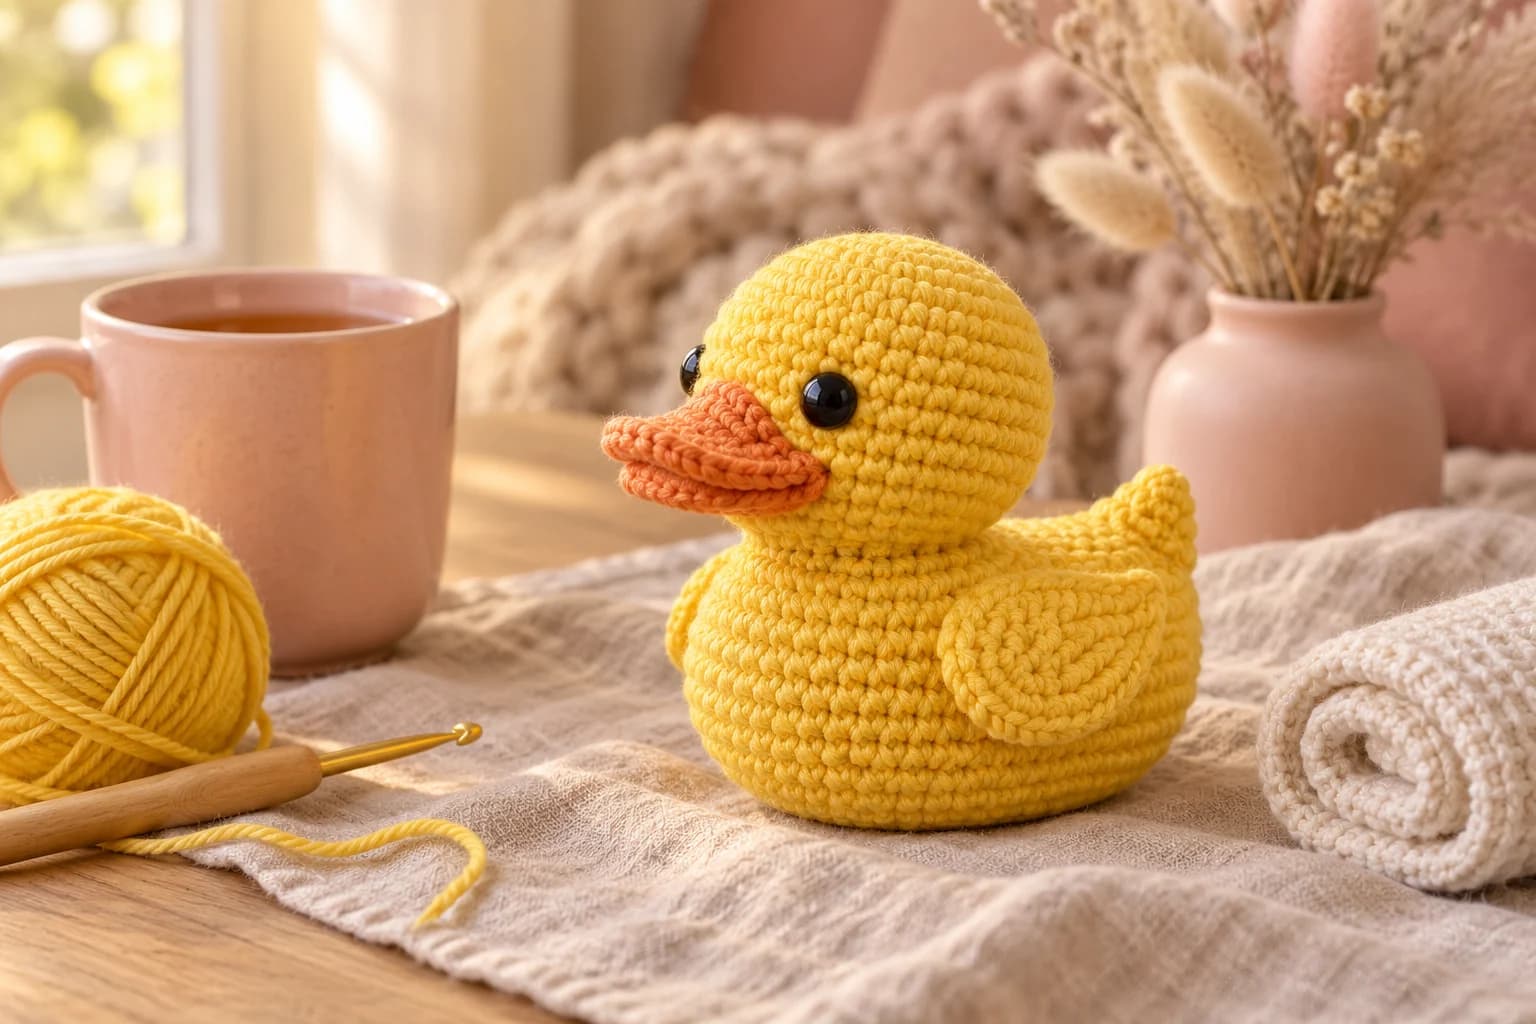
This free crochet rubber duck pattern makes a classic yellow bath duck, about 3.5 inches tall, with a wide orange bill, two little wings and a perky tail. The body is an oval worked from a chain, with a flat base so the duck sits up straight on a shelf. Everything is single crochet in the round. You'll need about 70 yards of worsted yarn, a 3.5 mm hook and 3 to 4 hours.
Key Takeaways
- Six small pieces: head, oval body, bill, two wings and a tail, all in single crochet.
- The flat base is one back-loop round, so the duck sits without wobbling.
- The bill is a flattened tube, sewn on flat for that wide rubber duck smile.
- Budget about 70 yd (64 m) of worsted #4: about 65 yd of yellow and 5 yd of orange.
Why I love this little duck
A rubber duck is the happiest shape I know. Everyone recognizes it at once, and almost everyone smiles. This one sits on a bathroom shelf, tops a baby shower gift or rides along on a desk. It's small, quick and very satisfying to finish.
The pattern keeps the classic look: a big round head, a plump body, a wide flat bill and a tail that tips up at the back. The body starts on a short chain, so it grows into an oval instead of a ball. That's what makes it read as a duck and not a chick.
There's no tricky shaping. If you can work a magic ring and increase and decrease in the round, you can make this duck in an afternoon. Who doesn't need a little yellow duck on the edge of the tub?
Skill level. Easy. You need a magic ring, a foundation chain worked on both sides, sc, inc and dec in the round, and one round in the back loops. The rest is sewing.
What you'll need
Yarn: worsted #4 acrylic, such as Red Heart Super Saver or Lion Brand Basic Stitch. Acrylic keeps its shape and its bright color.
| Color | Used for | Amount |
|---|---|---|
| Bright yellow | Head, body, wings, tail | about 65 yd |
| Orange | Bill | about 5 yd |
I worked those amounts out from the stitch counts: the yellow pieces take about 900 single crochet, at about 2.2 inches of yarn each, plus tails for sewing.
Hook and notions
- 3.5 mm (US E-4) hook. It's smaller than the yarn label suggests, so the stuffing doesn't show through.
- 8 mm black safety eyes, or black yarn to embroider them.
- About 0.5 oz (15 g) of polyester fiberfill.
- A stitch marker, a tapestry needle, a few pins and scissors.
Gauge and finished size
Gauge isn't critical, but tension is. Your stitches should be tight enough that the stuffing doesn't peek through. As a check, Rnd 5 of the head (30 sc) should measure about 2 in (5 cm) across lying flat. If it's bigger, go down to a 3.25 mm hook.
Finished duck: about 3.5 in (9 cm) tall and 3.5 in (9 cm) long from bill to tail. Stuffing changes the size a little, so measure your first one.
Abbreviations (US crochet terms)
- ch = chain
- sl st = slip stitch
- sc = single crochet
- inc = 2 sc in the same stitch
- dec = single crochet two together (I use the invisible decrease through the front loops)
- BLO = back loop only
- MR = magic ring
- st(s) = stitch(es)
- rnd(s) = round(s)
UK crocheters: this pattern uses US terms. US single crochet = UK double crochet.
Work every piece in continuous spiral rounds. Move your marker up to the first stitch of every new round.
The pieces at a glance
| Piece | Color | Make | Stuffing |
|---|---|---|---|
| Head | Yellow | 1 | Firm |
| Body | Yellow | 1 | Firm |
| Bill | Orange | 1 | None, flattened |
| Wing | Yellow | 2 | None, flattened |
| Tail | Yellow | 1 | A little |
The pattern — step by step
Part 1 — The head
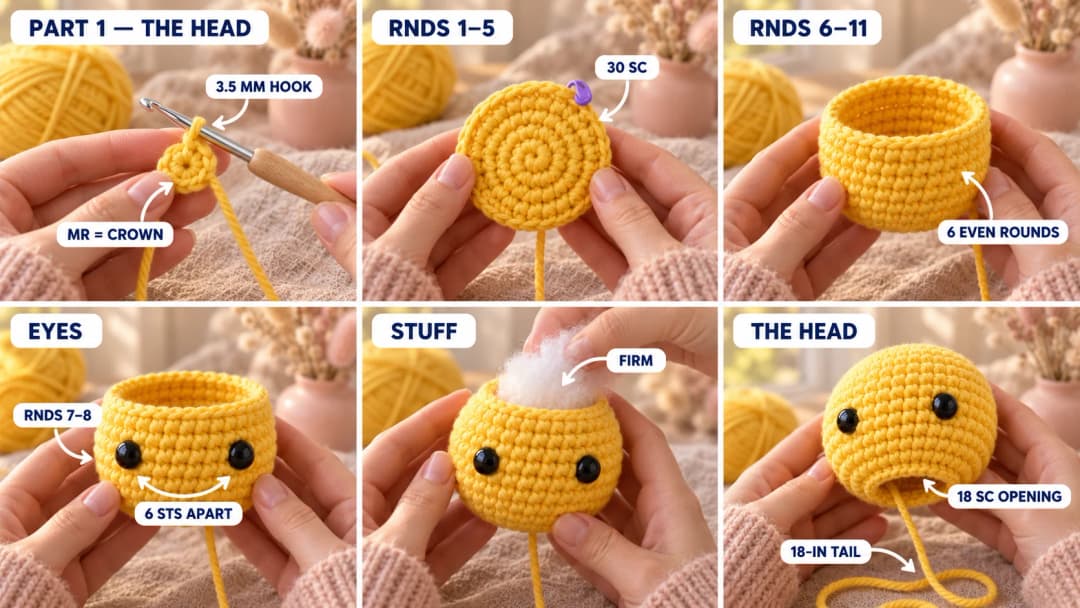
With yellow. The magic ring is the crown of the head. The last round is the neck opening, which you'll sew to the body.
- Rnd 1: MR, 6 sc in the ring. Pull it closed tight. (6)
- Rnd 2: Inc in each st around. (12)
- Rnd 3: (Sc, inc) × 6. (18)
- Rnd 4: (2 sc, inc) × 6. (24)
- Rnd 5: (3 sc, inc) × 6. (30)
- Rnds 6–11: Sc in each st around, 6 rounds. (30)
Place the eyes between Rnds 7 and 8, with 6 sts between them, on the side opposite the start of your rounds. Fix the backs on now.
- Rnd 12: (3 sc, dec) × 6. (24)
- Rnd 13: (2 sc, dec) × 6. (18)
Stuff the head firmly, filling the neck opening too. Sl st in the next st and fasten off, leaving an 18-in (45 cm) tail for sewing the head to the body. Leave the neck open.
Part 2 — The body
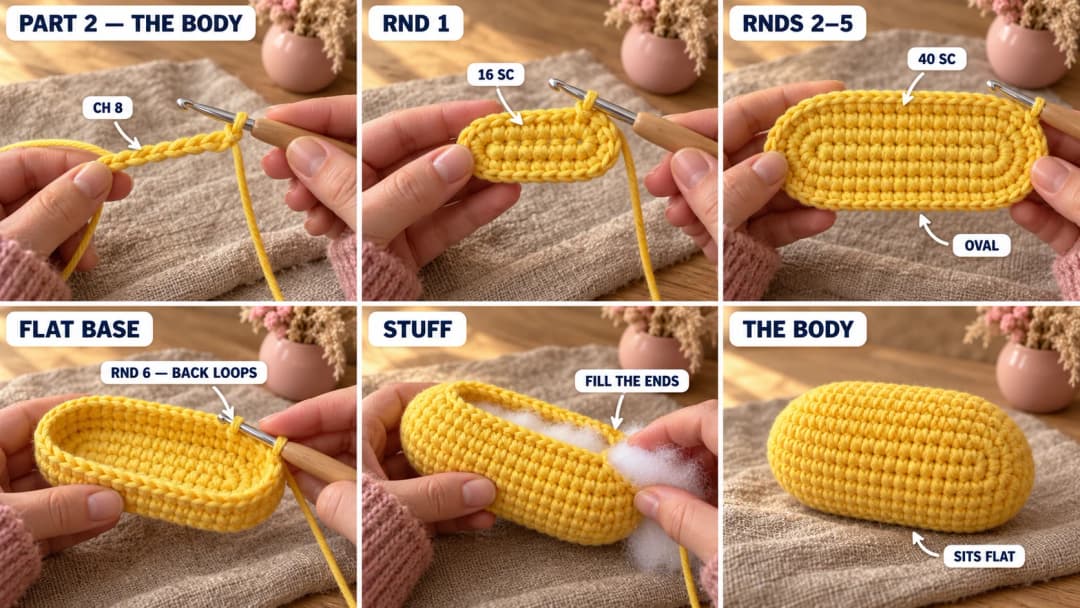
With yellow. The body starts on a short chain, so it grows into an oval. The chain is the base of the duck. The last round closes the top of the body, under the head.
The round starts at one end of the oval. That end is the tail end. The other end is the chest.
- Ch 8.
- Rnd 1: Sc in the 2nd ch from the hook, sc in the next 5 ch, 3 sc in the last ch. Rotate the work to crochet along the other side of the chain: sc in the next 5 ch, 2 sc in the last ch (the same one as the first sc). (16)
- Rnd 2: Inc, 5 sc, inc × 3, 5 sc, inc × 2. (22)
- Rnd 3: Sc, inc, 5 sc, (sc, inc) × 3, 5 sc, (sc, inc) × 2. (28)
- Rnd 4: 2 sc, inc, 5 sc, (2 sc, inc) × 3, 5 sc, (2 sc, inc) × 2. (34)
- Rnd 5: 3 sc, inc, 5 sc, (3 sc, inc) × 3, 5 sc, (3 sc, inc) × 2. (40)
You now have a flat oval: the 5 plain sc on each side are the straight sides, and all the increases sit at the two ends.
- Rnd 6: Sc in the back loop only of each st around. (40) This makes the edge of the flat base.
- Rnds 7–10: Sc in each st around, 4 rounds. (40)
- Rnd 11: (3 sc, dec) × 8. (32)
- Rnd 12: (2 sc, dec) × 8. (24)
Stuff the body firmly. Push the stuffing out into the ends, so the oval stays long, and keep the base flat.
- Rnd 13: (Sc, dec) × 8. (16)
- Rnd 14: Dec × 8. (8)
Top up the stuffing. Fasten off, leaving a 6-in tail. Thread it through the front loops of the last 8 sts, pull closed and weave it in.
Part 3 — The bill, wings, tail and assembly
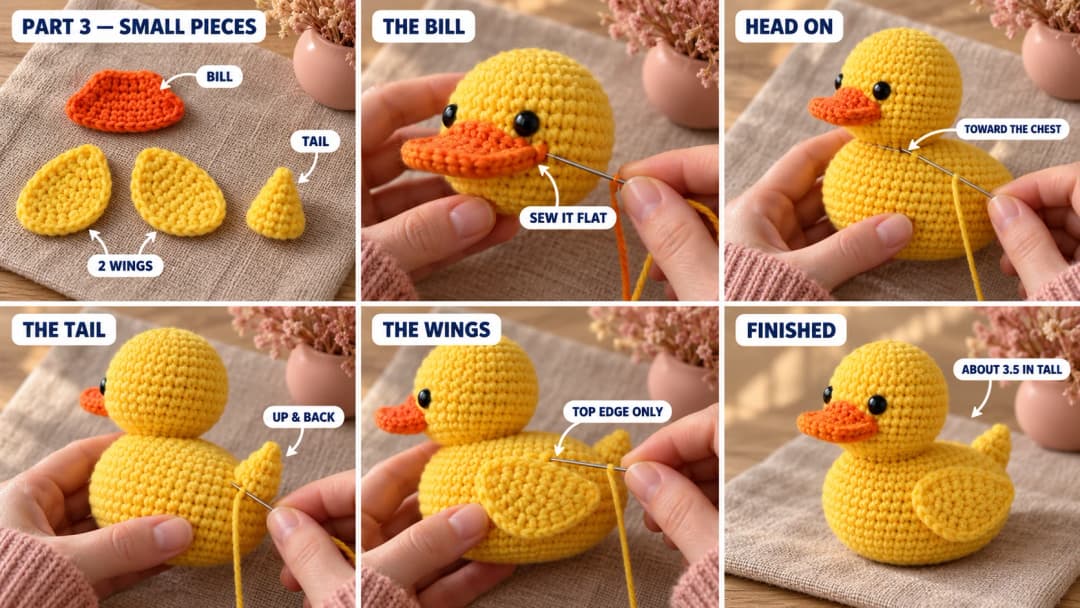
Bill (orange). The magic ring is the tip of the bill. The last round is the open edge you sew on.
- Rnd 1: MR, 6 sc in the ring. (6)
- Rnd 2: (Sc, inc) × 3. (9)
- Rnd 3: (2 sc, inc) × 3. (12)
- Rnd 4: Sc in each st around. (12)
Fasten off, leaving a 12-in tail. Don't stuff it. Press it flat, so it's 6 sts wide.
Wings (make 2, yellow). The magic ring is the rounded front of the wing. The last round is the pointed tip.
- Rnd 1: MR, 6 sc in the ring. (6)
- Rnd 2: Inc in each st around. (12)
- Rnd 3: Sc in each st around. (12)
- Rnd 4: (2 sc, dec) × 3. (9)
- Rnd 5: Sc in each st around. (9)
- Rnd 6: (Sc, dec) × 3. (6)
- Rnd 7: Sc in each st around. (6)
Fasten off, leaving a 12-in tail. Don't stuff it. Press it flat and sew the last round closed.
Tail (yellow). The magic ring is the tip of the tail. The last round is the open edge you sew on.
- Rnd 1: MR, 4 sc in the ring. (4)
- Rnd 2: (Sc, inc) × 2. (6)
- Rnd 3: (2 sc, inc) × 2. (8)
- Rnd 4: (3 sc, inc) × 2. (10)
- Rnd 5: Sc in each st around. (10)
Fasten off, leaving a 12-in tail. Push in a pinch of stuffing.
Assembly
- Bill. Hold the flattened bill sideways, so it's wider than it is tall. Center it under the eyes, on Rnds 9 and 10 of the head. Sew the open edge flat to the face, top layer and bottom layer, so the bill sticks straight out.
- Head. Pin the head on top of the body, shifted toward the chest, so the back of the neck opening sits right over the body's closing point. The eyes face the chest end. Using the 18-in tail, sew the neck opening to the body all the way around. Go around a second time for a firm neck. Add a little stuffing before you close the last inch if the neck feels soft.
- Tail. Pin the tail at the back of the body, on Rnds 10 to 13, pointing up and back at about 45 degrees. Sew the open edge on all the way around.
- Wings. Pin one wing on each side of the body, on Rnds 9 and 10, with the rounded front toward the chest and the tip toward the tail, angled slightly up. Sew along the top edge of each wing only, so the bottom edge stays loose.
- Weave in all the ends and hide them inside the body.
Set the duck on the table. It should sit up straight on its flat base, with the tail tipped up behind.
Safety and the bath. This duck is a plush, not a bath toy. Yarn and stuffing soak up water and stay wet inside, so keep it out of the tub. It also has safety eyes, so it isn't a toy for children under 3. For a baby, embroider the eyes with black yarn instead. To clean it, spot wash with a damp cloth and let it air dry.
Make it yours — quick variations
| Variation | Change from base pattern |
|---|---|
| Blush pink duck | Work the yellow pieces in blush pink and the bill in cream or soft orange. |
| Duck family | Make a big duck and two small ones: for the ducklings, use DK yarn and a 2.75 mm hook. |
| Duck keychain | Use DK yarn and a 2.75 mm hook, and add a jute or chain loop through the top of the head. |
| Rosy cheeks | Brush a little blush on the cheeks, or stitch two tiny pink "x" marks under the eyes. |
| Hair tuft | Knot three 2-in yellow strands into the crown, then trim and brush them out. |
Troubleshooting the three things that go wrong
The body comes out round, not oval
You let the ends fill up too much and squashed the sides. Stuff from the ends toward the middle, and keep the base flat as you go. Also check that you have exactly 5 plain sc on each straight side in Rnds 2 to 5.
The duck tips backward
The head is sitting too far back. Move it toward the chest until the duck balances, then pin and sew. A tail that's stuffed too firmly can also pull it back: take a little stuffing out.
The bill droops
The bill wasn't sewn flat enough. Sew both the top and the bottom layer of the open edge to the face, with small stitches, so it can't fold down.
Frequently asked questions
How long does the rubber duck take? About 3 to 4 hours. The head and body take about two hours together. The bill, wings and tail take about 40 minutes, and the assembly takes another 40 minutes or so.
How much yarn do I need? About 70 yd (64 m) of worsted #4 yarn: about 65 yd of yellow and 5 yd of orange. A single ball of yellow makes several ducks.
Can I put the crochet duck in the bath? No. Yarn and fiberfill soak up water and take a long time to dry, so the duck can get musty. It's a shelf duck, a nursery decoration or a gift topper. Keep it near the bath, not in it.
Can I make it without safety eyes? Yes. Embroider each eye as a small black oval, about 1 st wide and 2 rounds tall, in the same place: between Rnds 7 and 8, 6 sts apart. That's also the safest option for a baby.
Can I sell ducks made from this pattern? Yes, you're welcome to sell finished ducks made from this free pattern at markets, on Etsy or as gifts. Please credit "Pattern by Wavode" in your listing and link back to this page. What you can't do is republish this write-up or my photos as your own pattern.
Related patterns on Wavode
- Piko the pond turtle: another little water friend, with no sewing.
- Bee plush: a round yellow bee with stripes.
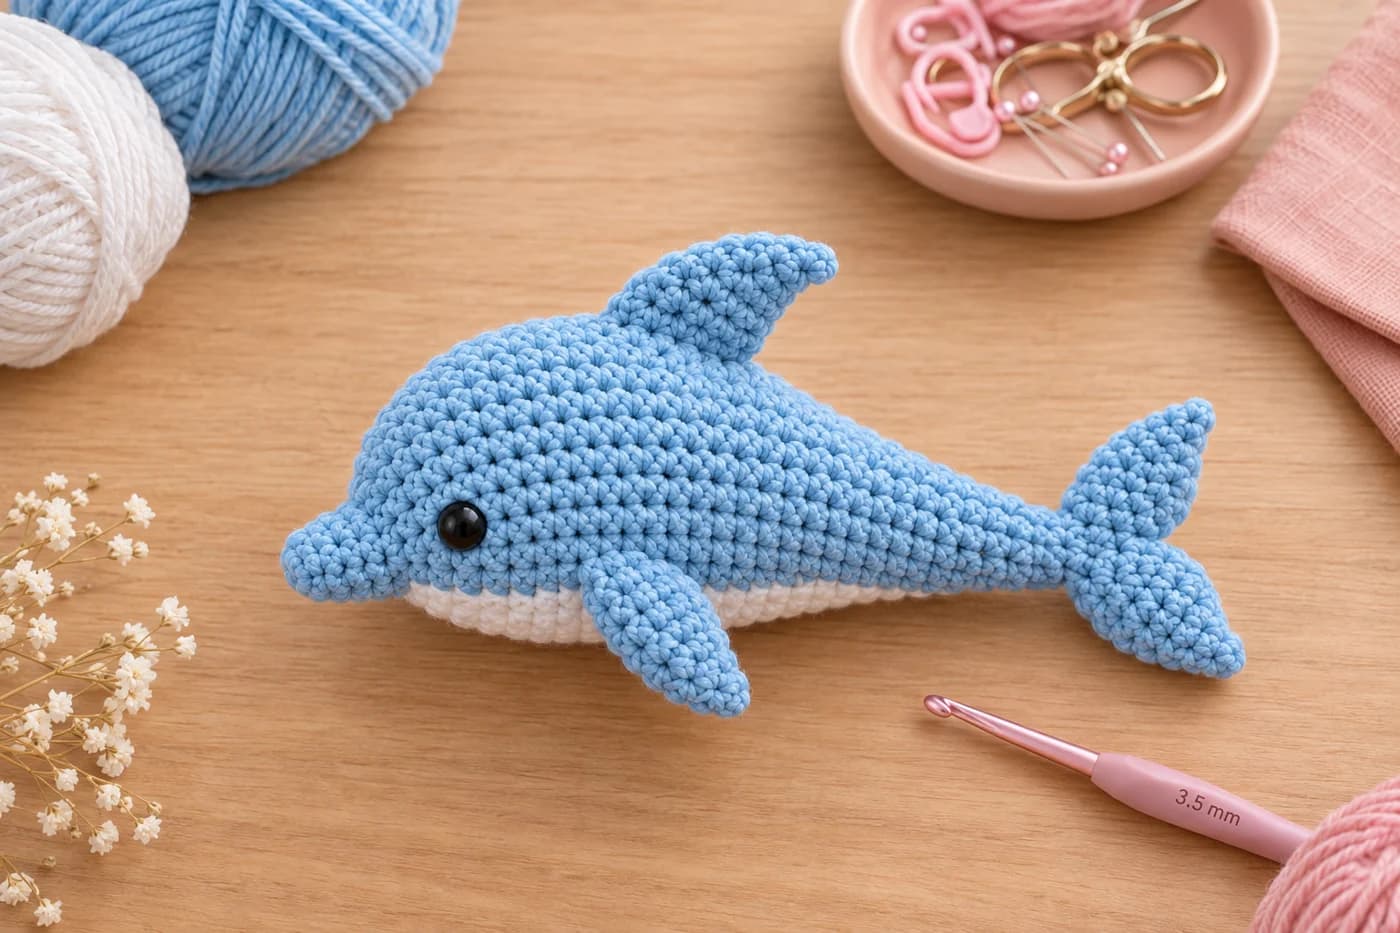
- Soft baby dolphin: a gentle sea friend for the nursery.
- Chunky lamb plush: a cuddly lamb in chunky yarn.
- Crochet lion plush: a cream lion with a scalloped mane.
Made a duck? Tag #wavodecrochet on Pinterest. I re-pin every finished make and credit the maker.
Pattern by Clara Hartwell for Wavode. Questions? Email me at support@wavode.com.