Mini Floral Drawstring Bag Crochet Pattern

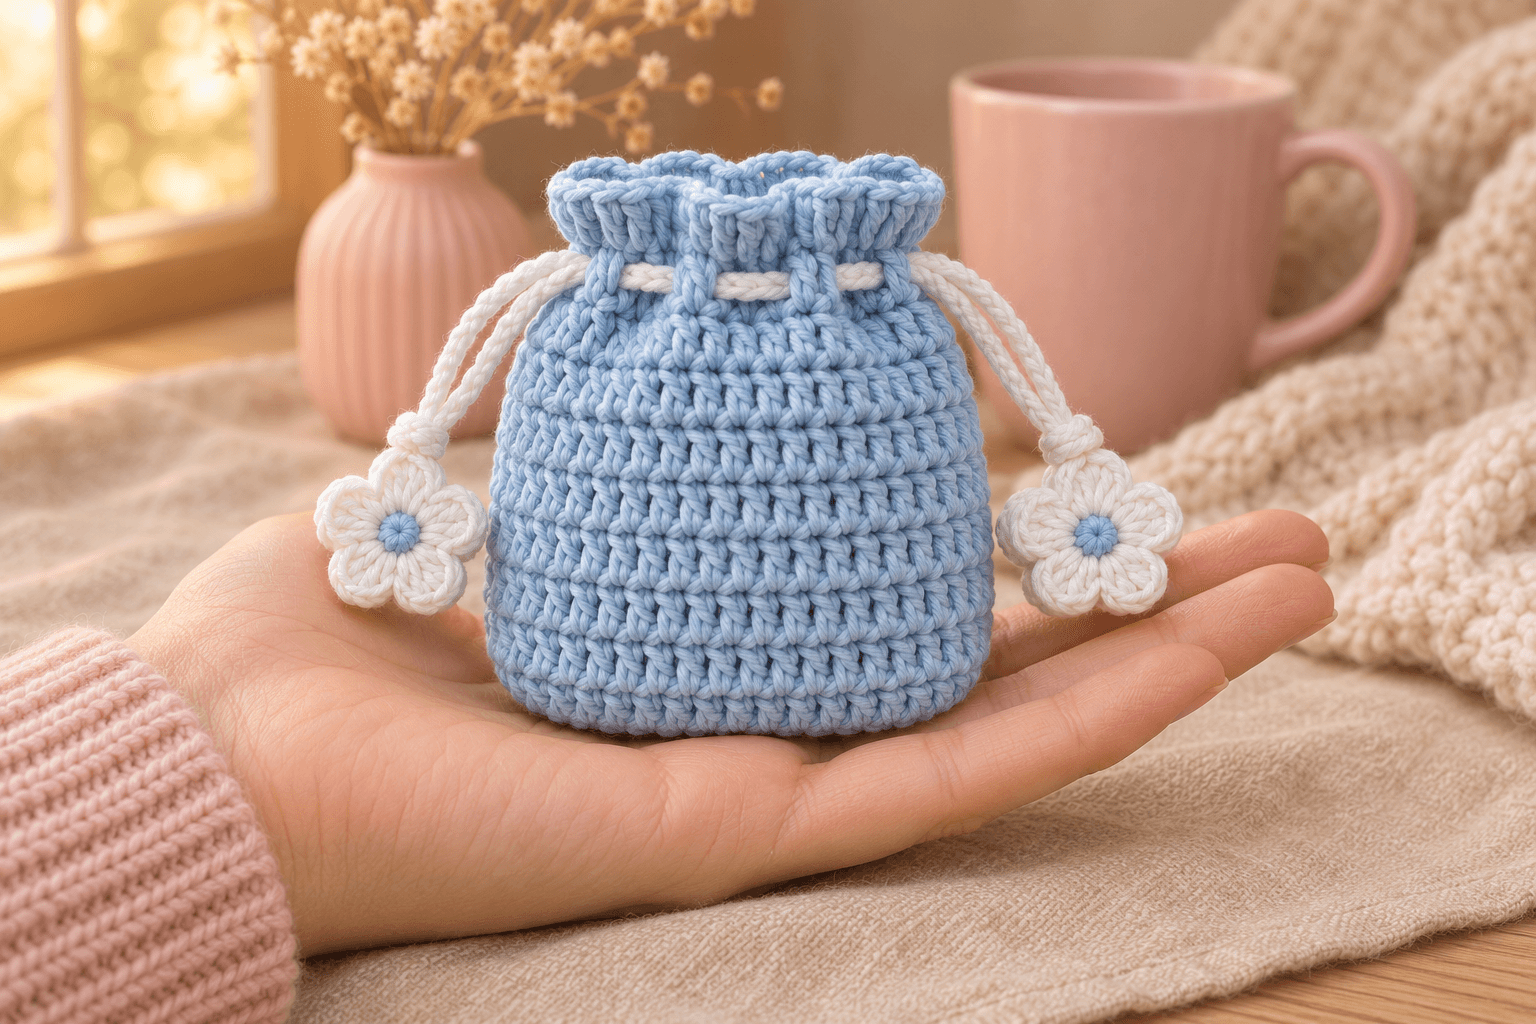
I like a little pouch with something cheerful at the ends of its cords. This mini floral drawstring bag has a blue double crochet body and white flowers with blue centers. The tutorial's example measures about 3⅛ in (8 cm) wide and 3⅜ in (8.5 cm) tall, small enough to sit in your palm.
The flowers are what caught my eye. A second flower sits behind each one, hiding the cord knot between their blue centers. Pull the white cords apart and the opening gathers under the blue rim, leaving a little flower on either side.
| At a glance | |
|---|---|
| Finished size | Tutorial example: about 3⅛ in (8 cm) wide × 3⅜ in (8.5 cm) tall |
| Yarn | Blue and white yarn described in the tutorial as 4 ply |
| Hook | 3 mm for every piece |
| Pieces | 7 |
| Construction | Oval foundation, joined double crochet rounds, chain drawstrings, glued flower pairs |
| Skills | Chains, sc, dc, sl st, magic ring, changing color |
The mini floral bag: size and what fits inside
Think of this as a little pouch for a small earbud case, rather than a handbag. The tutorial shows it as an AirPods-size bag, but earbud cases vary. Check your own case against the inside of the pouch before attaching the flowers, with enough room left above it for the opening to gather.
The stated measurements belong to the tutorial's example. Your yarn and tension decide the size of yours. Measure the bag laid flat, without stretching it, from side to side and from the bottom edge to the top rim.
Blue and white yarn for the bag and flowers
- Blue yarn: for the body and the flower centers.
- White yarn: for the drawstrings and petals. Use the same yarn type and thickness as the blue.
- Hook: 3 mm.
- Small tools: a locking stitch marker, two spare markers, a yarn needle and scissors.
- Flower attachment: a hot glue gun and glue suitable for the yarn you use.
The tutorial identifies its yarn as 4 ply, without a brand, fiber content or length per ball. Check the label of your chosen yarn: the number of plies alone doesn't tell you how thick it is. Keep both colors together while choosing, so the flowers and cords have the same texture as the bag.
Tension and yarn quantity. The tutorial gives neither a measured gauge nor a yarn quantity. Work a small double crochet swatch with your 3 mm hook and check that the fabric suits what you want to carry. For a particular case, check the fit again while the body is still on the hook.
Stitches, in US terms: chain (ch), stitch (st), single crochet (sc), double crochet (dc), slip stitch (sl st) and magic ring (MR). R means round. The number in parentheses is the stitch count; the flower's last round gives the petal count.
Round convention. Join each body round with a sl st to the first dc and keep the same side facing you. The beginning ch 2 does not count as a dc. Put the marker into the first actual dc, then move it up each round. Work into the stitches, leaving the beginning chains and joining slip stitch out of the count.
Part 1 — Making the oval base of the mini bag
Body — blue, 3 mm hook, Make 1. The foundation chain runs across the bottom of the bag. The last round will be the open top.
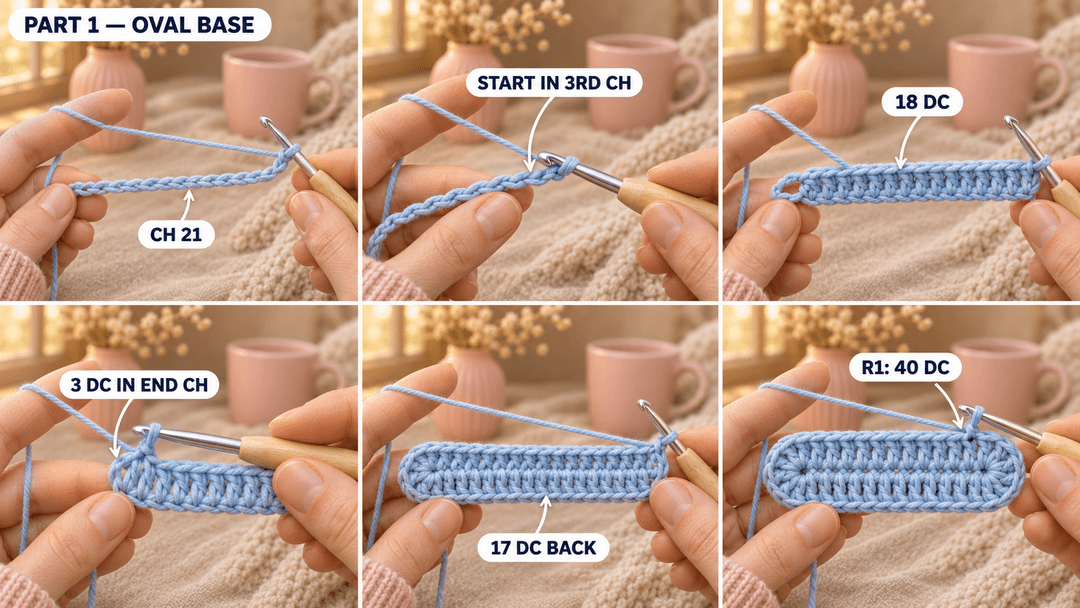
Make a slip knot and ch 21. Keep the chain relaxed enough to insert the hook along both sides.
- R1: dc in the 3rd ch from the hook and in each of the next 17 ch, 3 dc in the last ch, then along the opposite side of the foundation chain dc in the next 17 ch, 2 dc in the same foundation ch as the first dc. Join with a sl st to the first dc. (40)
Here's the turn around the chain slowly:
- Put the marker into your first dc. Work along the chain until just one chain remains.
- Make 3 dc in that last chain. Let the work turn around its end like a little racetrack.
- Follow the unused side of the foundation chain back toward your starting end, making 17 dc.
- Make 2 dc in the chain where your first dc sits. Join to the marked dc.
Tip. The starting end can look crowded. Find the foundation chain holding the marked dc, rather than working into the top of that dc.
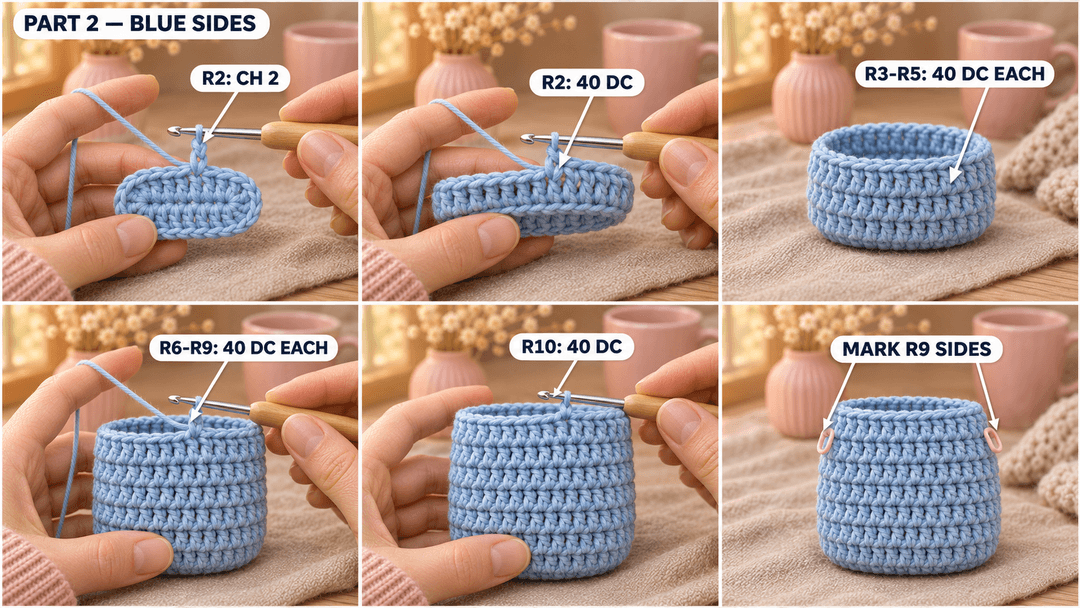
Part 2 — Building the double crochet sides
Keep the blue yarn on your 3 mm hook and work up from the little oval.
- R2–R9: ch 2, dc in each st around. Join with a sl st to the first dc. (40) 8 rounds.
- R10: ch 2, dc in each st around. Join with a sl st to the first dc. (40)
Ch 1 and cut the yarn, leaving a 6 in (15 cm) tail. Pull the tail through the loop. Turn the bag inside out, weave both blue ends through the backs of several stitches, then turn it right side out again.
Flatten the pouch gently, with its foundation chain running across the bottom. Put a spare marker at each side fold on R9. These are the two sides where the drawstring ends will come out.
Tip. Count your dc before joining each round. An extra stitch often comes from working into the joining sl st or the beginning ch 2.
Two chain drawstrings and four little flowers
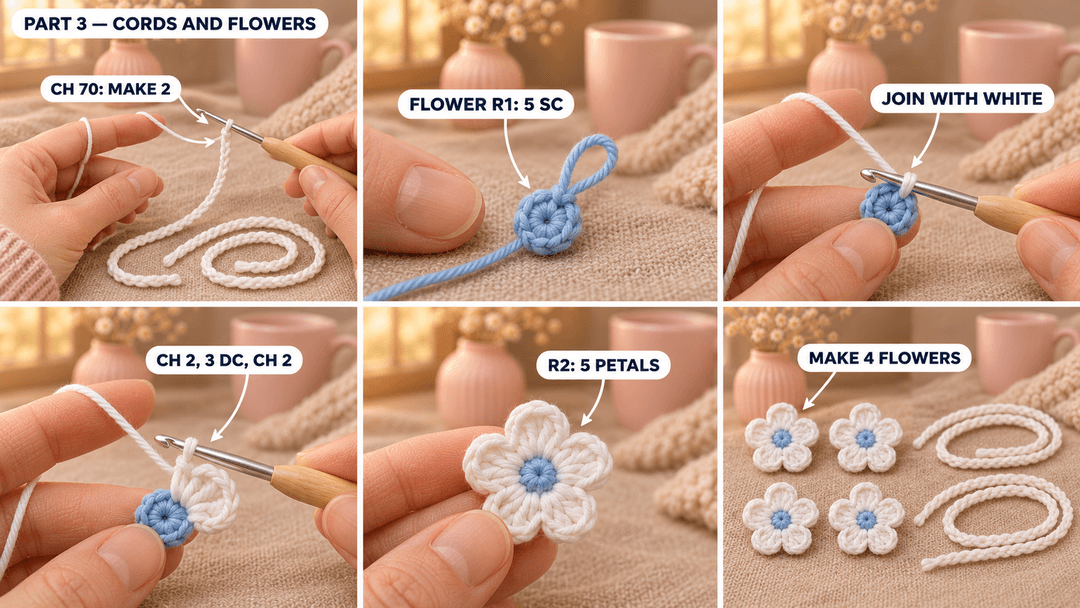
White chain drawstrings
Drawstrings — white, 3 mm hook, Make 2. Each cord stays open, with a free end at either side of the chain.
Leave a 6 in (15 cm) starting tail, make a slip knot and ch 70. Cut the yarn with another 6 in (15 cm) tail and fasten off. Make the second cord the same way. Keep the chains smooth and relaxed so they can slide through the bag.
White flowers with blue centers
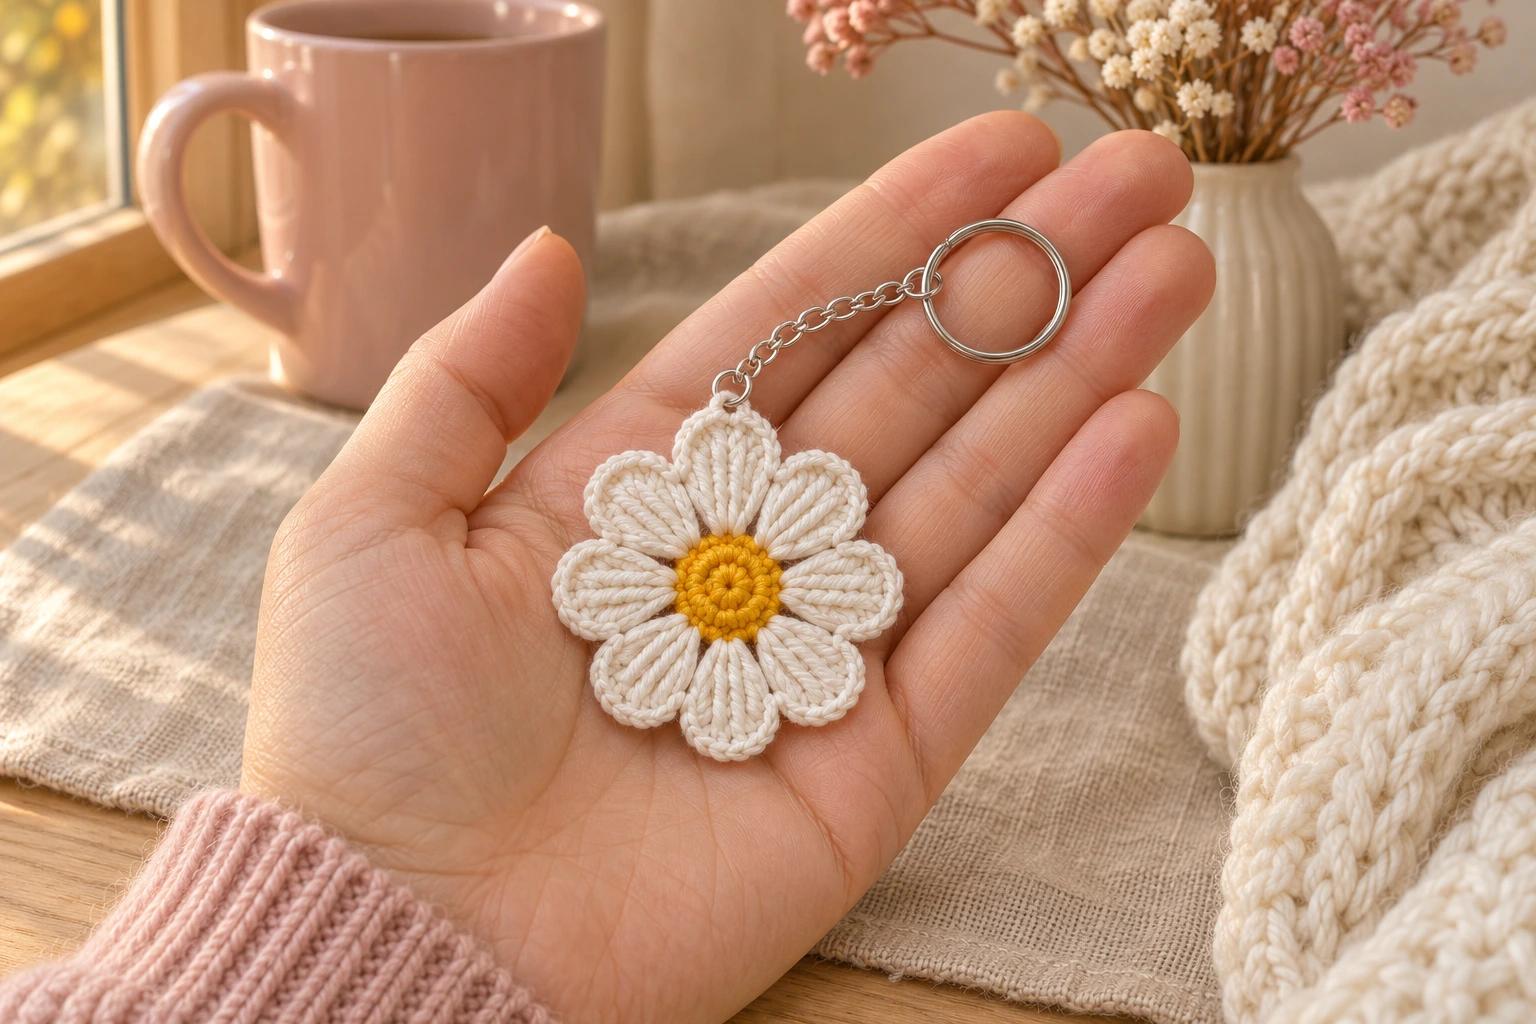
Flowers — blue centers and white petals, 3 mm hook, Make 4. The magic ring is the middle of each flower. The petals form its outside edge.
Start with blue.
- R1: MR, 5 sc in the ring. (5)
Pull the ring closed. Insert the hook into the first sc and join with a sl st, using white to draw through the stitch and the loop on the hook. Cut blue, leaving a 6 in (15 cm) tail. Continue with white.
- R2: (ch 2, 3 dc in the same center st, ch 2, sl st in the next center st) × 5, working the final sl st into the starting center st. (5 petals)
After each slip stitch, stay in that blue stitch to make the next petal. For the last petal, slip stitch back to the blue stitch where your first petal began.
Ch 1 and fasten off, leaving a 6 in (15 cm) tail. Turn the flower over and weave the ends into its back. Spread the five petals gently with your fingers, keeping the blue center visible.
Threading the drawstrings and gluing the flower pairs
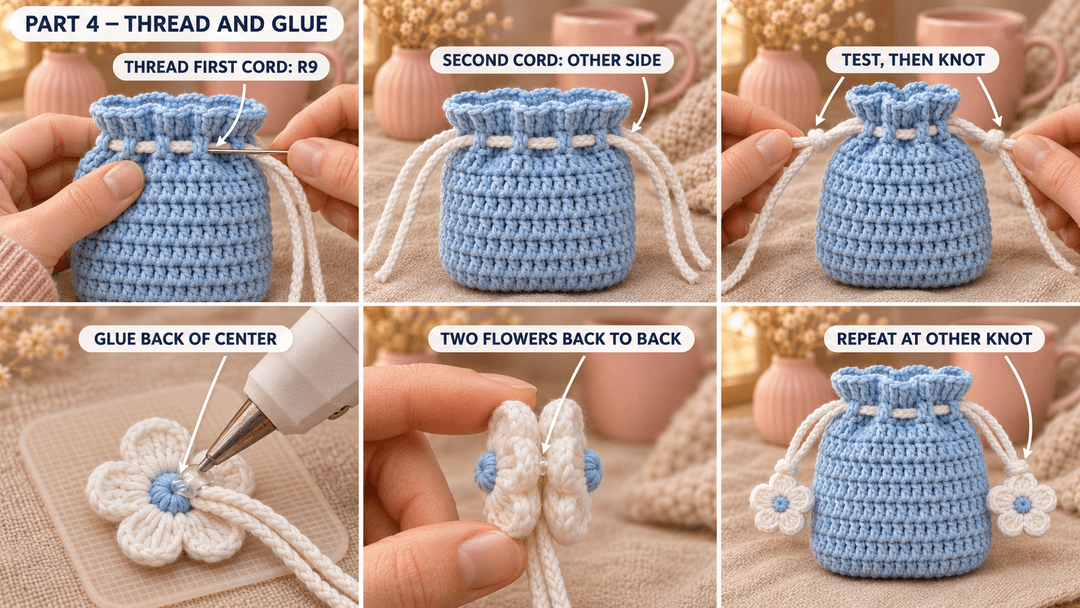
Thread both cords before tying the knots or attaching the flowers. The drawstrings run through R9, with the last round sitting above them as a small rim.
- First cord. Thread a tail onto the yarn needle. Starting at one marked side fold, weave the cord in and out through the gaps between the dc posts of R9, at even intervals. Travel across the front, around the other side and across the back, until both ends come out beside the starting marker.
- Second cord. Start at the opposite side marker and follow the same route around R9. Bring both ends out at that second marker. Keep the needle between the posts so it doesn't split the first cord.
- Check the closure. Hold the two ends on one side together and pull them away from the two ends on the other side. The opening should gather. Open the pouch again and adjust the cords so their ends sit evenly.
- Tie each side. Tie the two ends of each cord together in an overhand knot. Trim the loose tails, keeping the knot secure and small enough to hide behind a flower center.
- First flower pair. Place a flower right side down on a heat-resistant surface. Add a small dot of hot glue to the back of its blue center and set one cord knot into it. Add a second flower with its wrong side facing the first, sandwiching the knot between the centers.
- Close the petal edges. Line up the white petals. Add tiny dots of glue between their backs and press them together carefully, keeping the flower faces clean. Let the glue cool fully before pulling the cord.
- Other side. Attach the remaining flower pair around the other cord knot in the same way. Remove the side markers and open and close the bag gently.
Safety. Hot glue can burn through crochet fabric. Keep your fingers away from fresh glue and let it cool before handling. This little bag has drawstrings and glued decorations; keep it away from children under three.
I like the flowers spread flat, with the blue centers facing out whichever way the bag turns. Tuck a small wrapped gift inside and let the flowers sit just outside the gathered opening. The pouch becomes part of the wrapping.
UK terms: US sc = UK dc; US dc = UK tr. Chain and slip stitch keep the same names.
Made a little floral pouch? Tag #wavodecrochet on Pinterest so I can see your colors.