Crochet Mini Lemon

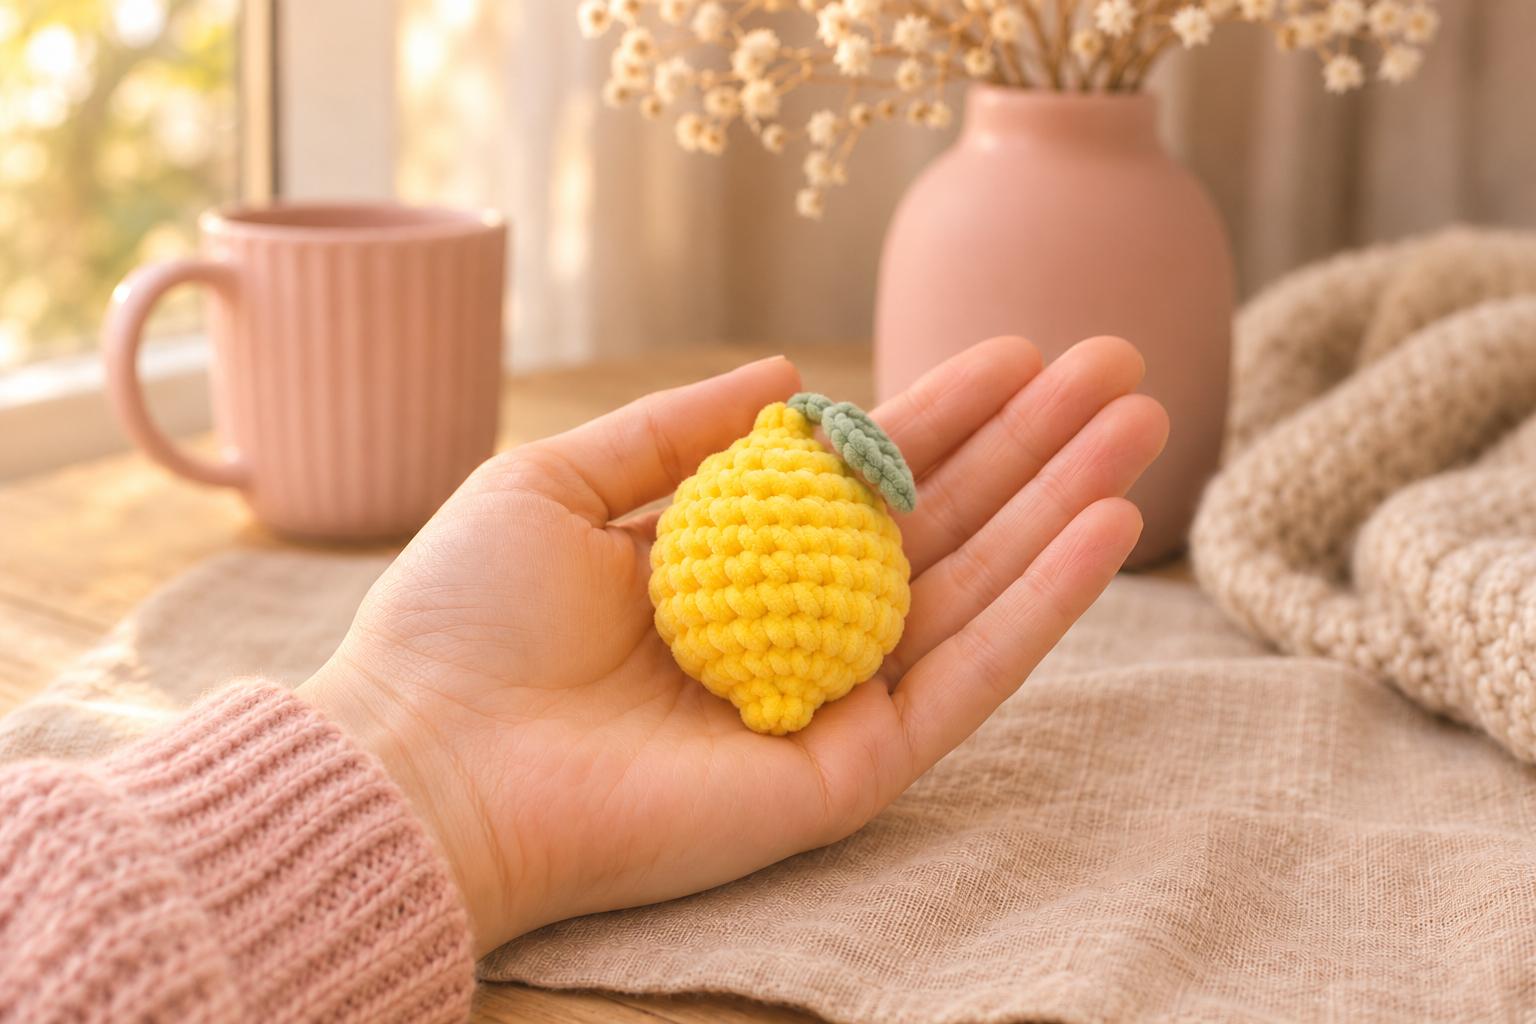
I love a tiny fruit bowl on a kitchen shelf. Zest is my crochet mini lemon, about 3 in (7.6 cm) long, with a squishy yellow middle, gently pointed ends and a soft green leaf tucked over the top. That bright little splash of yellow makes me smile.
The lemon grows from its lower point up to the leafy end. I keep the filling firm in the middle and light at the tips, then curve the leaf down one side. The velvet pile makes the whole thing feel soft as a peach.
| At a glance | |
|---|---|
| Finished size | lemon body about 3 in (7.6 cm) long and 2½ in (6.4 cm) wide, excluding the leaf |
| Yarn | bulky #5 yellow and green chenille; smooth matching cotton for sewing |
| Yarn amounts | about 10 yd yellow chenille, 2 yd green chenille, 1 yd yellow cotton and 1 yd green cotton |
| Hook | 4 mm (G/6) for both crocheted pieces |
| Pieces | 2, assembled into 1 lemon |
| Time | about 45–60 minutes |
| Skill | easy: magic ring, sc, increases, decreases and one short leaf worked in rows |
Yarn and tools for your mini lemon
- Chenille: Bernat Velvet, bulky #5, 100% polyester, 315 yd (288 m) per 300 g ball, in yellow and green. Soft Sunshine and Smokey Green give a gentle fruit-bowl palette. Allow about 10 yd yellow and 2 yd green. Scraps are plenty for this little fruit.
- Sewing yarn: smooth DK #3 cotton, about 137 yd (125 m) per 50 g, about 1 yd yellow and 1 yd green. I use the cotton for drawing the lemon closed and sewing on the leaf; it holds up better to repeated trips through the fabric.
- Hook: 4 mm (G/6) for the yellow body and green leaf.
- Small things: fiberfill, a stitch marker, contrasting scrap yarn, a blunt tapestry needle, sewing pins and scissors.
Tension. Use about 3 sc per inch (2.5 cm), with about 3 rounds or rows per inch, measured without stretching. Keep the yellow stitches snug enough that the stuffing doesn't show. At that tension, the body is about 3 in (7.6 cm) long and 2½ in (6.4 cm) wide. Chenille varies between yarn ranges, so measure your stitches before starting another fruit.
Stitches, US terms: magic ring (MR), chain (ch), slip stitch (sl st), single crochet (sc), increase (inc, 2 sc in the same stitch), decrease (dec, single crochet 2 stitches together), single crochet 3 together (sc3tog). R means round; st means stitch. Work the lemon in a continuous spiral, moving the marker into the first stitch of each round. The leaf is worked back and forth. Its turning ch 1 never counts as a stitch. Counts appear in parentheses.
The pattern: shaping the little yellow lemon
Yellow lemon body
Yellow chenille, 4 mm hook. Make 1. Leave a 6 in (15 cm) starting tail. The magic ring is the little point at the bottom; the final round becomes the upper tip, underneath the leaf.
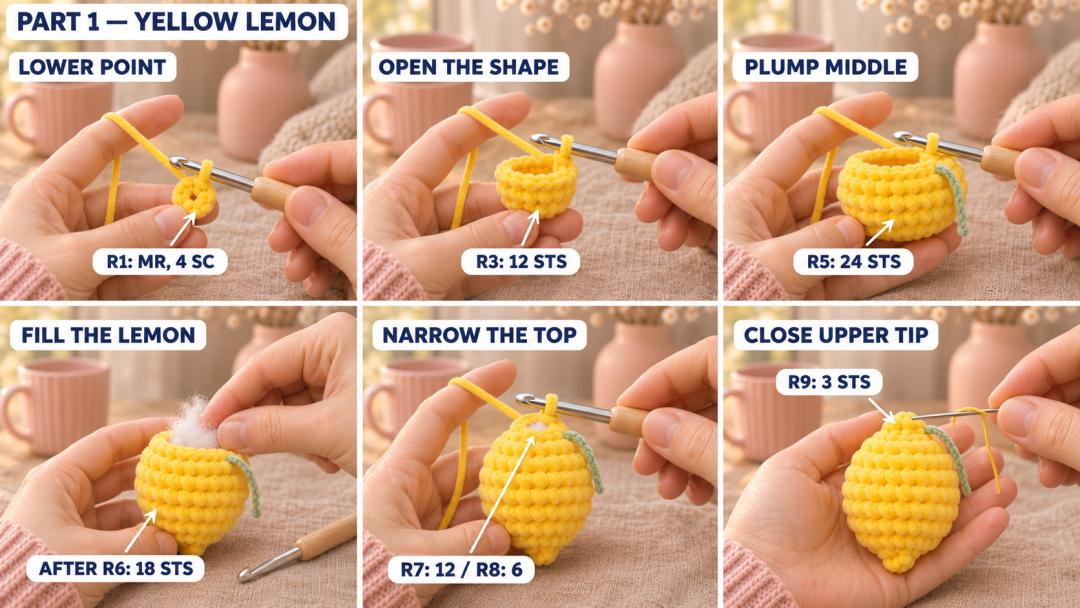
- R1: MR, 4 sc in the ring. (4)
- R2: (sc, inc) × 2. (6)
- R3: inc × 6. (12)
Pull the magic ring closed gently. Weave the starting tail through the stitch backs inside the lower tip while you can still reach it.
Tip. If the chenille starts shedding when you tighten the ring, stop pulling. Optional repair: cut 16 in (40 cm) of smooth yellow cotton, thread it through the bases of the 4 stitches of R1, draw them closed and secure the cotton ends inside.
- R4: (sc, inc) × 6. (18)
- R5: (sc 2, inc) × 6. (24)
At R5, place a contrasting scrap strand through stitch 1. Carry it up through stitch 1 of R6–R8 as you work. The green leaf will curl down this marked side.
- R6: (sc 2, dec) × 6. (18)
Stuff after R6. Push small wisps of filling into the lower point, then fill the middle firmly enough to hold its rounded shape. The lower point should give a little when you pinch it.
- R7: (sc, dec) × 6. (12)
Top up the middle through the opening after R7. Keep the filling below the next stitches so the hook can pass cleanly through them.
- R8: dec × 6. (6)
- R9: dec × 3. (3)
Sl st in the next stitch and fasten off, leaving an 8 in (20 cm) tail at the upper tip. Tuck that chenille end inside. With 16 in (40 cm) of smooth yellow cotton, thread the needle through the front loop of each of the 3 stitches of R9, draw the upper opening closed and secure it with two small stitches across the gathered center. Bury the cotton ends inside the lemon.
Roll the lemon gently between your palms, then pinch each end lightly. The middle should stay plump, with a soft little point at either end. Keep the side strand in place for attaching the leaf.
A soft green leaf for the lemon
Green leaf
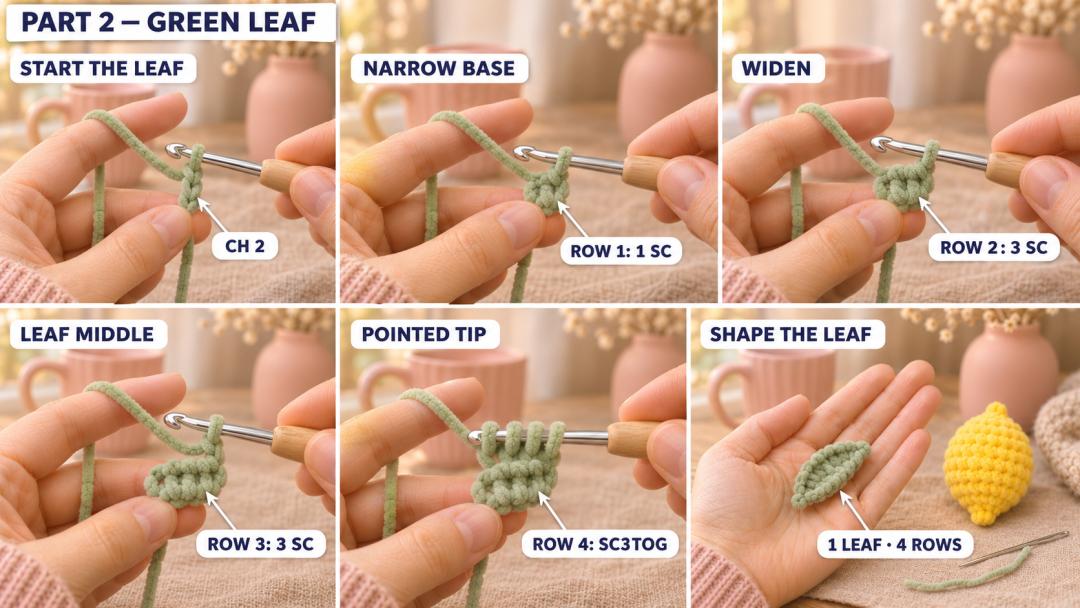
Green chenille, 4 mm hook. Make 1. Leave a 12 in (30 cm) starting tail and ch 2. Work from the narrow attachment end toward the pointed leaf tip. Keep the leaf unstuffed.
- Row 1: sc in the 2nd ch from the hook. (1)
- Row 2: ch 1, turn, 3 sc in the same st. (3)
- Row 3: ch 1, turn, sc 3. (3)
- Row 4: ch 1, turn, sc3tog. (1)
Closing the leaf’s pointed tip
For the sc3tog, insert the hook into the first stitch, yarn over and pull up a loop. Do the same in the second stitch, then the third. With 4 loops on the hook, yarn over and pull through all four.
Fasten off after Row 4, leaving a 6 in (15 cm) tail at the pointed tip. Weave that tail and the Row 1 starting tail under several stitches on the back of the leaf, spreading them along the fabric so they don't make a lump.
The leaf should be about 1⅓ in (3.4 cm) long and 1 in (2.5 cm) across its widest row. Stroke the leaf flat with your thumb, then cup it gently like a little boat.
Sewing the leaf onto the lemon’s top
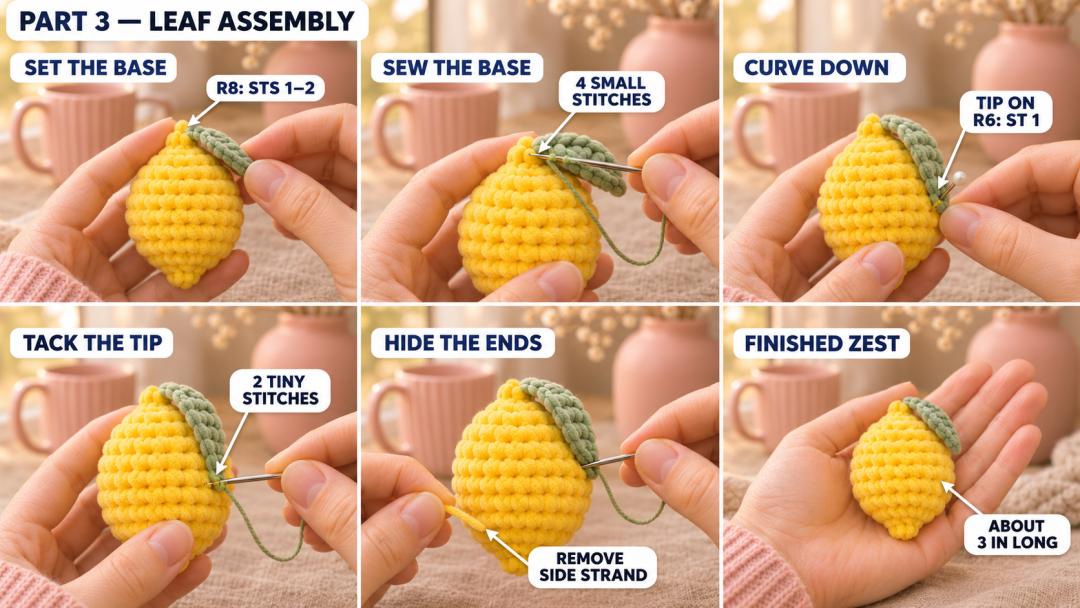
The narrow Row 1 end sits beside the closed upper tip. The Row 4 point faces down the marked side of the lemon. Pin the leaf in that position before sewing.
- Set the base. Place the underside of the leaf's Row 1 against stitches 1 and 2 of lemon R8, just below the gathered R9 tip. Let the rest of the leaf lean over the top and down toward the side strand.
- Sew with smooth green cotton. Cut 24 in (60 cm). Take 4 small stitches through the narrow Row 1 end and those two yellow stitches, two sewing stitches into each yellow stitch. Catch the yellow fabric beneath the pile, then pull just until the leaf sits snugly.
- Curve the leaf down. Lay its pointed Row 4 end over stitch 1 of lemon R6. Take 2 tiny stitches through the underside of that green tip and the yellow stitch beneath it. Leave the middle of the leaf softly arched.
- Hide the cotton. Secure it under the leaf with two small backstitches. Pass the needle through the lemon and out on the opposite side, trim the yarn and let the end slip back inside. Remove the side strand.
Hold Zest at eye level and turn him slowly. The leaf should curve over the yellow shoulder, with its point resting against the side.
Tip. If the leaf flares away from the lemon, move its tip pin a little around R6 before sewing those last two stitches. Keep the base fixed beside the upper point.
A little lemon for your crochet fruit bowl
I like Zest in a shallow wooden bowl on a shelf, with his green leaf facing out. A few little lemons together make a cheerful gift for someone who loves a yellow kitchen. Tuck them into tissue paper and let the leaves peek out.
For a small mark, dab the velvet gently with a damp cloth. Let the lemon dry on its side and turn it once so the underside dries too. Keep it away from heat and skip the iron.
UK terms: US sc = UK dc; US sl st = UK ss; US sc3tog = UK dc3tog; ch is the same.
Made your own little Zest? Tag #wavodecrochet on Pinterest so I can see your lemon.