Crochet Mini Mittens Keychain

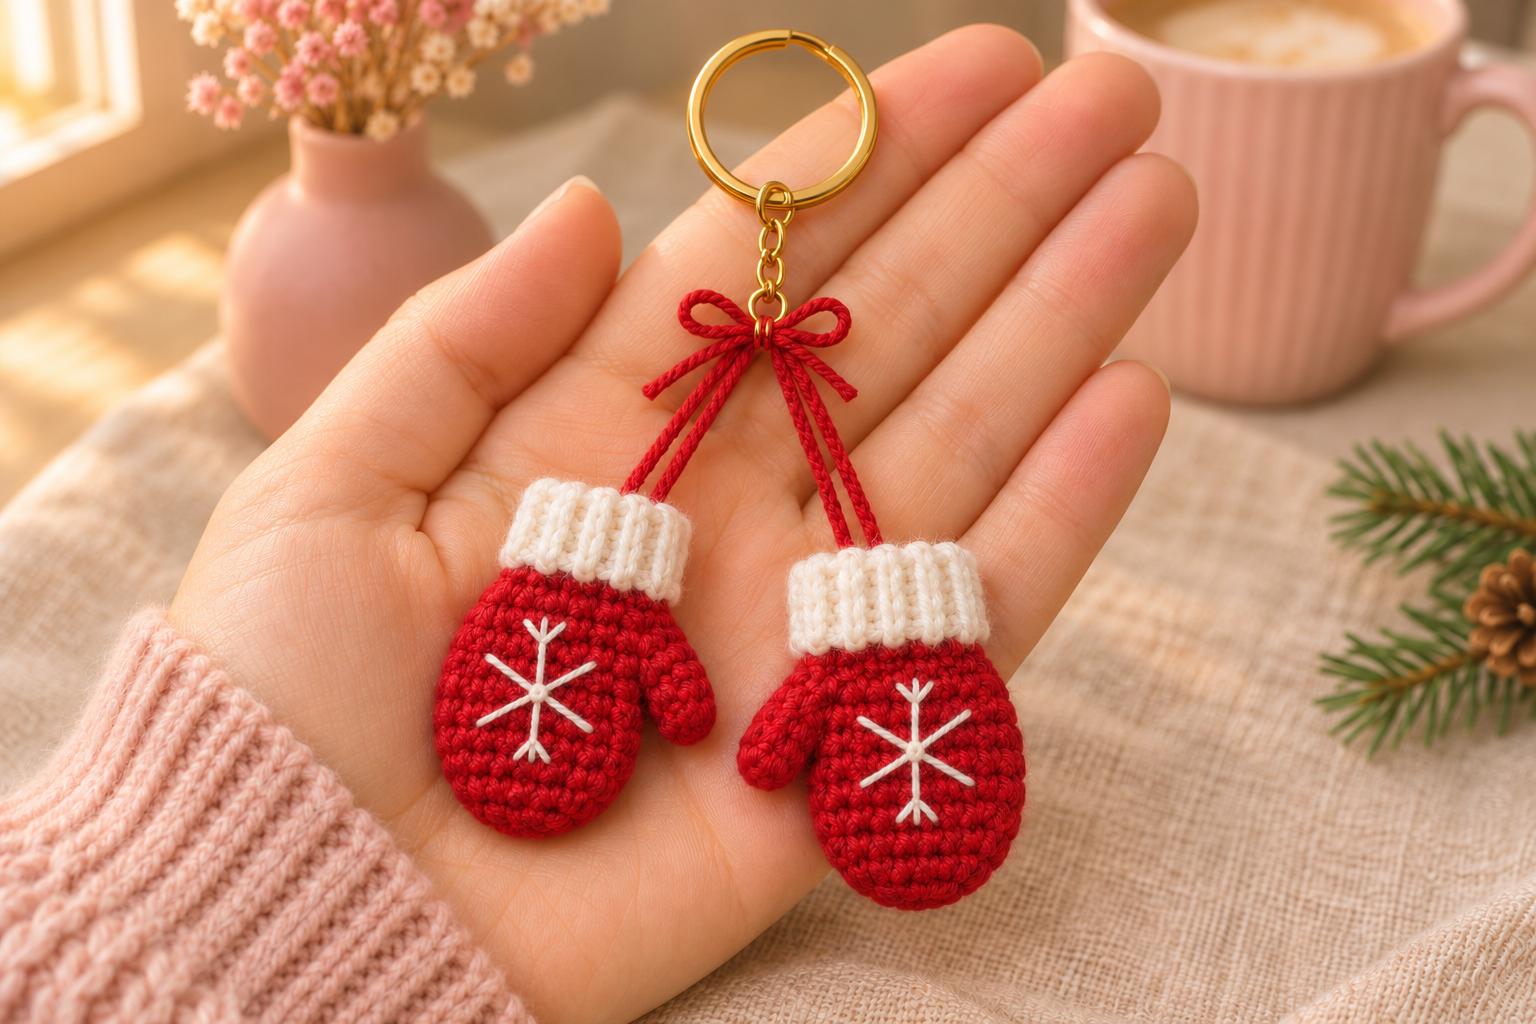
I love winter decorations that fit in the palm of my hand. These crochet mini mittens are about 2⅛ in (5.4 cm) tall each, with bright red palms, snowy white cuffs and a little stitched snowflake on the front. A tiny red bow sits just above them, under the gold key ring.
The cuffs are my favorite bit: soft little ridges that look like the ribbing on a full-size pair. I keep the filling light so the mittens stay gently flattened, and hang one a little lower than the other. They look sweet swinging from a winter bag.
| At a glance | |
|---|---|
| Finished size | each mitten about 2⅛ in (5.4 cm) tall; palm about 1½ in (3.8 cm) wide, excluding thumb, hanging loops and hardware |
| Yarn | DK #3 cotton in red and white; about 19 yd red and 8 yd white |
| Hook | 2.5 mm for every crocheted piece |
| Pieces | 6 crocheted pieces, assembled into 2 mittens on 1 keychain |
| Time | about 2 hours |
| Skill | easy: small rounds, decreases, back-loop ribbing, sewing and simple embroidery |
What you’ll need for the mini mittens
- Yarn: smooth, plied 100% cotton, DK #3, about 137 yd (125 m) per 50 g. Set aside about 19 yd red and 8 yd white, including the embroidery, seams, hanging loops and bow. Check that the yarn label says DK #3.
- Hook: 2.5 mm for the palms, thumbs and cuffs.
- Hardware: one gold-tone split key ring about 1 in (2.5 cm) across, with a short chain and a closing jump ring; two pairs of flat pliers.
- Small things: a little fiberfill, a tapestry needle, scissors, sewing pins, two stitch markers and contrasting scrap yarn for side markers.
Tension. Use 6 sc per inch (2.5 cm), with about 6 rounds per inch in the red fabric. Keep the stitches snug enough that the stuffing doesn't show. At that tension, each red palm is about 1⅔ in (4.2 cm) tall before the cuff. The cuff adds about ½ in (1.3 cm). For the ribbing, check about 6 stitches and 6 rows per inch, measured relaxed; change hook size if needed to match that fabric.
Stitches, US terms: magic ring (MR), chain (ch), slip stitch (sl st), single crochet (sc), increase (inc, 2 sc in one stitch), decrease (dec, sc 2 together), back loop only (BLO). R means round; st means stitch. Work the red pieces in a continuous spiral, without joining the rounds, and move a marker into the first stitch of each round. The number in parentheses is the stitch count. The white cuffs are worked back and forth in rows.
The pattern: two tiny red mittens
Red mitten palms
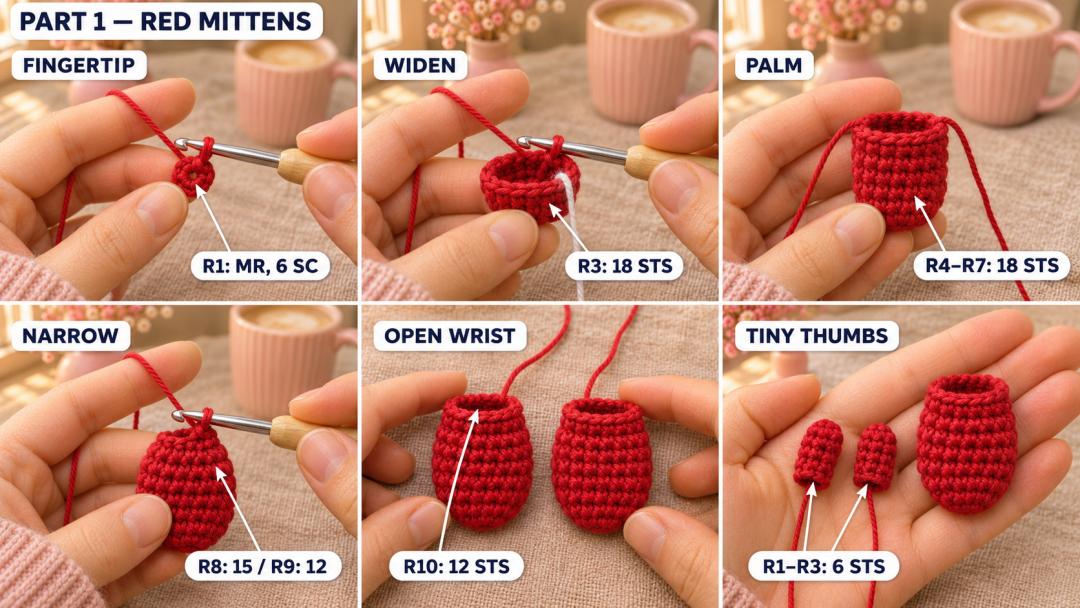
Red, 2.5 mm hook. Make 2. Leave a 6 in (15 cm) starting tail. The magic ring becomes the rounded fingertip. The last round is the wrist opening, where the white cuff will sit.
- R1: MR, 6 sc in the ring. (6)
- R2: inc × 6. (12)
- R3: (sc, inc) × 6. (18)
- R4–R7: sc around. (18) 4 rounds.
After R3, run a contrasting scrap strand up through stitch 1 of R3–R7 as you work. This is the first side of the mitten. Put a second scrap strand through stitch 10 of those same rounds for the other side. Keep both strands until the thumbs and snowflakes are placed. The front lies between those sides, across stitches 2–9.
- R8: (sc 4, dec) × 3. (15)
- R9: (sc 3, dec) × 3. (12)
- R10: sc around. (12)
Sl st in the next st and fasten off, leaving an 8 in (20 cm) tail at the wrist. Keep the wrist open and the palm empty for the embroidery.
Little red thumbs
Red, 2.5 mm hook. Make 2. Leave a 6 in (15 cm) starting tail. The magic ring is the thumb tip; the open last round is the end that gets sewn to the palm.
- R1: MR, 6 sc in the ring. (6)
- R2–R3: sc around. (6) 2 rounds.
Sl st in the next st and fasten off, leaving a 10 in (25 cm) tail at the open end. Leave the thumbs unstuffed, and set them beside the palms for assembly after the snowflakes.
Adding the white mitten cuffs
Ribbed cuff strips
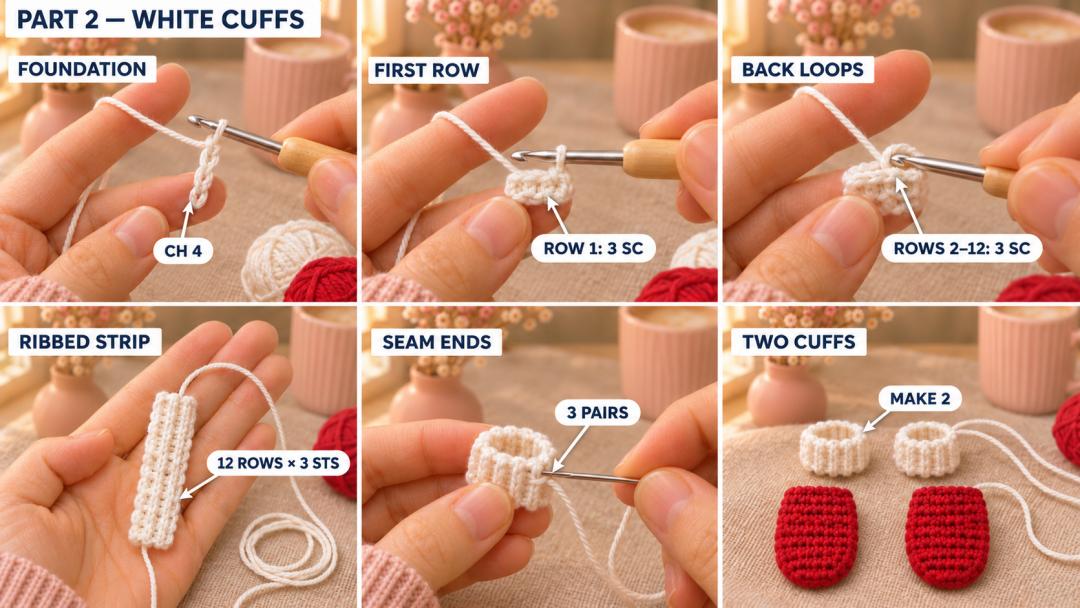
White, 2.5 mm hook. Make 2. Work flat. Leave an 8 in (20 cm) starting tail and ch 4. The turning ch 1 never counts as a stitch.
- Row 1: sc in the 2nd ch from the hook and in each ch across. (3)
- Rows 2–12: ch 1, turn, in BLO, sc 3. (3) 11 rows.
Fasten off, leaving a 16 in (40 cm) finishing tail. Each strip should measure about ½ in (1.3 cm) across its 3 stitches and 2 in (5 cm) along its 12 rows, relaxed. Those little ridges run from the red wrist up to the cuff's top edge.
Fold the strip into a ring with its ridges facing out. Using the starting tail, whipstitch the 3 foundation stitches to the 3 stitches of Row 12, one stitch per pair. Weave that tail through the inside of the cuff. Keep the long finishing tail for attaching the cuff after the embroidery.
Tip. Keep the cuff seam loose enough to bend. Pin the ring around the red wrist and check that its long edge meets the wrist without gathering, then lift it off for the next step.
Embroidering the snowflakes
Keep the red palms empty and open. Slide a fingertip through each wrist so the needle catches only the front wall. I find the little white stitches much easier to place this way.
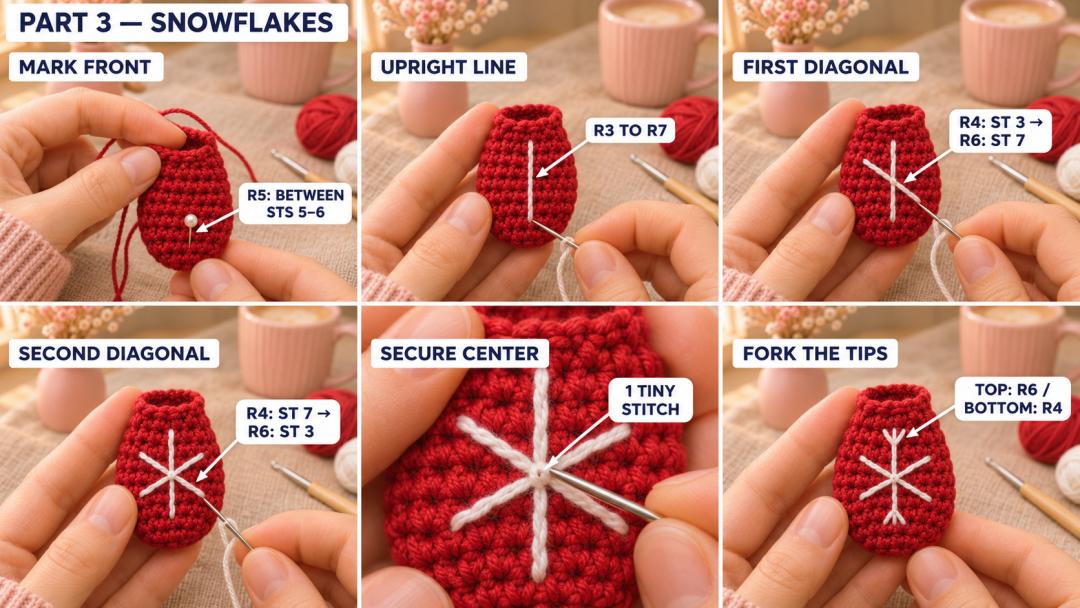
Cut 18 in (46 cm) of white yarn for each mitten. With the fingertip pointing down and the wrist up, find the middle of the front: the gap between stitches 5 and 6 of R5. Put a pin there. For the points below, insert the needle just above the named round, in the gap after the named stitch; count from that round's stitch-1 marker.
- The upright line. Stitch from the gap after stitch 5 of R3 to the gap after stitch 5 of R7.
- The first diagonal. Stitch from the gap after stitch 3 of R4 to the gap after stitch 7 of R6.
- The second diagonal. Stitch from the gap after stitch 7 of R4 to the gap after stitch 3 of R6. The three lines cross at the center pin, like a little six-point star.
- Catch the middle. Make one tiny white stitch across the crossing to hold the strands together.
- Fork the upright tips. At the top end, add one short stitch to each side, ending after stitches 4 and 6 of R6. At the bottom end, add the matching pair, ending after stitches 4 and 6 of R4.
Secure the beginning and ending strands under several stitches inside the front wall. Pull out the center pin and stroke the red palm flat with your thumb.
Tip. Let the white yarn rest on the red stitches. If the front puckers, ease a little yarn back through the last stitch before securing it.
Joining the mittens with a bow and key ring
Shape the palms and sew on the thumbs
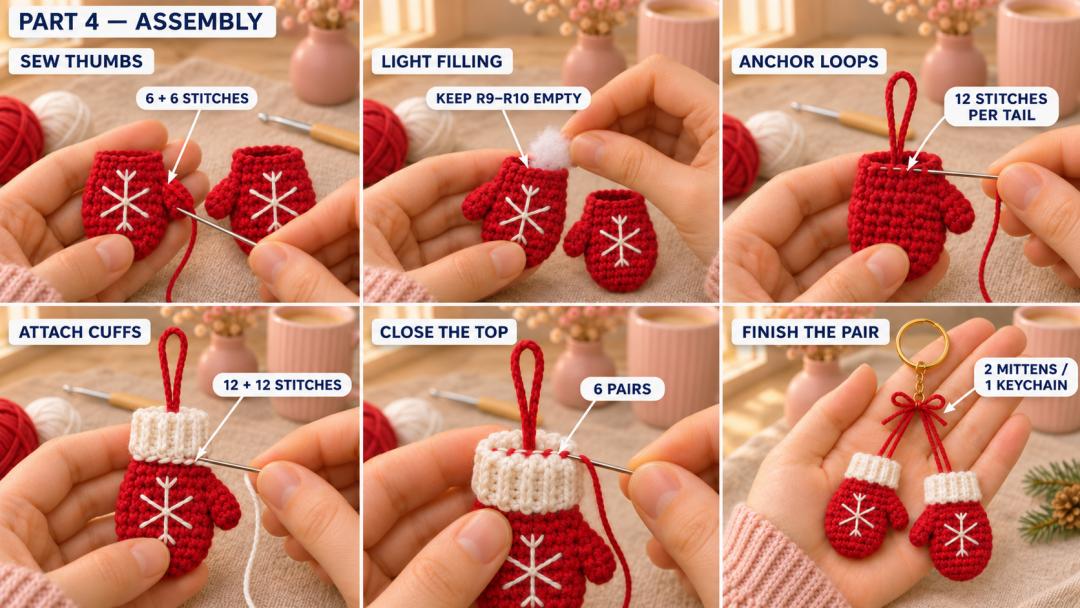
- Thumb positions. Lay both mittens snowflake-side up, wrists at the top, with the thumbs pointing toward each other. Pin one thumb over the stitch-1 side strand at R7 of the left mitten and the other over the stitch-10 side strand at R7 of the right mitten. Keep each thumb's open edge against the palm, spanning R6–R8, and tilt its rounded tip slightly toward the wrist.
- Thumb seams. Using each thumb's long tail, sew its 6 open-edge stitches to the palm around the pinned patch. Catch only the nearby wall. Go around once more, another 6 stitches, then weave the tail into the inside through the wrist opening.
- Light filling. After the embroidery and thumb seams, with the palm finished through R10, add a small pinch of fiberfill through the wrist. Spread it down to the fingertip and keep the last two rounds empty. Press gently between finger and thumb: the mitten should be softly padded and flatter on its snowflake side. Remove the side strands.
Anchor the hanging loops while the wrists are open
Cut two 18 in (46 cm) lengths of red yarn. Fold each length in half to make a doubled loop with two free tails. With the snowflake facing away from you, pin the loop at the center back of R10, opposite the snowflake. Let one loop stand 1 in (2.5 cm) above the red wrist and the other 1¼ in (3.2 cm) above it.
Thread one tail at a time through the back wall at that spot. Sew 12 small backstitches with each tail, working through the red fabric over R8–R10 and spreading the stitches across the 6 center-back stitch columns, six stitches down and six back up. Reach through the open wrist to keep the front wall free. Secure and weave both ends inside.
Tip. Pull each loop firmly before adding the cuff. If the cotton loop lengthens or its anchor shifts, sew a second doubled strand alongside it and repeat the anchoring stitches.
Sew the cuffs around the wrists
The white ridges face out, and the cuff seam sits at center back. Slide each cuff over its hanging loop and set its lower edge against R10 of the red wrist, with the rest of the cuff standing above the wrist.
With the long white finishing tail, sew one row-end of the cuff to each of the 12 red wrist stitches, working through both edges. Go around again with 12 more stitches. Keep the red hanging loop clear of the seam. Weave the white end into the inside of the cuff.
Flatten the top of each cuff so its opening lies in two layers of 6 row-ends. With the red wrist tail, sew across the opening just inside the top edge, one small stitch through each of the 6 pairs. Catch the hanging loop securely at center back, secure the tail inside the cuff, and weave it in. Let the white ribs puff up a little under your fingers as you sew.
Add the hardware and tie the bow
Open the chain's closing jump ring sideways with two pairs of pliers. Slip both red hanging loops onto it, then twist it closed until the ends meet snugly. Hold up the key ring with the snowflakes facing you; one mitten should hang about ¼ in (0.6 cm) below the other.
Cut 12 in (30 cm) of red yarn and tie it around both hanging loops, just below the jump ring. Tie a small bow with wings about ⅜ in (1 cm) long and trim the tails to about ½ in (1.3 cm). Using one trimmed yarn offcut on the needle, take 4 small stitches through the bow's center knot and around both hanging loops. Secure and hide the ends behind the bow.
Safety. The metal hardware and hanging loops make this a decorative keychain for adults, not a toy for children under 3. Keep it away from babies, cots and prams.
A little winter gift, ready to wrap
I like the red pair against plain kraft paper, with the ring slipped over a ribbon on the parcel. The snowflakes do all the decorating. For a gentler winter palette, try dusty rose palms with the same white cuffs and embroidery.
Spot-clean the mittens with a damp cloth and let them dry flat. Keep the metal hardware out of the water.
UK terms: US sc = UK dc; US sl st = UK ss; ch is the same.
Made your own mini mittens? Tag #wavodecrochet on Pinterest so I can see them.