Crochet Coffee Cup Keychain

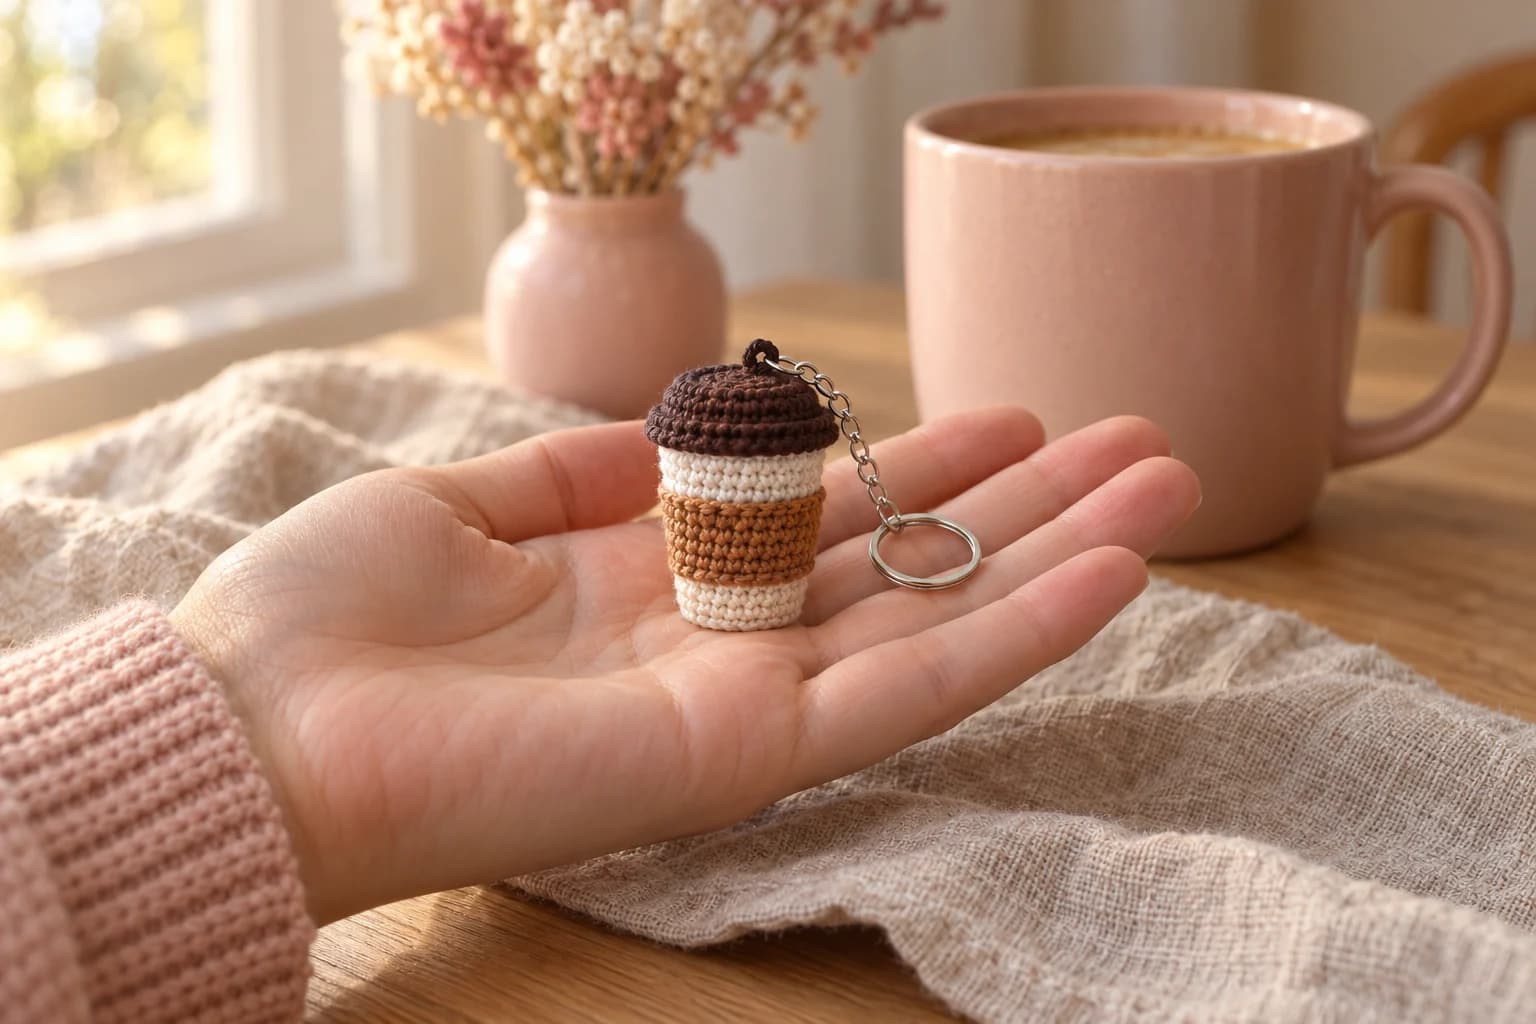
This crochet coffee cup keychain is a mini takeaway cup with a caramel sleeve and a dark brown lid. The cup is worked in one piece from the base up, with the sleeve in the middle, and closed flat at the top. The lid is a little cap with an overhanging rim that you sew over the top. You'll need DK cotton in white, caramel and dark brown, a 2.5 mm hook and about 2 hours.
Key Takeaways
- Two pieces: the cup (base, sleeve and closed top in one piece) and the lid.
- It stands up: one round in the back loops makes a flat base.
- A real sleeve edge: one back-loop round leaves a little caramel ridge at the top of the sleeve.
- Hangs upright: the key ring loop sits at the top of the lid.
Why I love this keychain
Who doesn't know someone who can't start the day without a coffee? This is the keychain for them. It's small, it's quick, and the caramel sleeve and the overhanging lid are what make it read as a takeaway cup from across the room.
It's also a good one for markets and party favors. Change the sleeve color and you have a whole café menu. Make a few in a row and they look great on a stall.
Skill level. Easy. You need a magic ring, sc, inc and sc2tog, rounds in the back loops only, and a little sewing for the lid. I explain each part step by step.
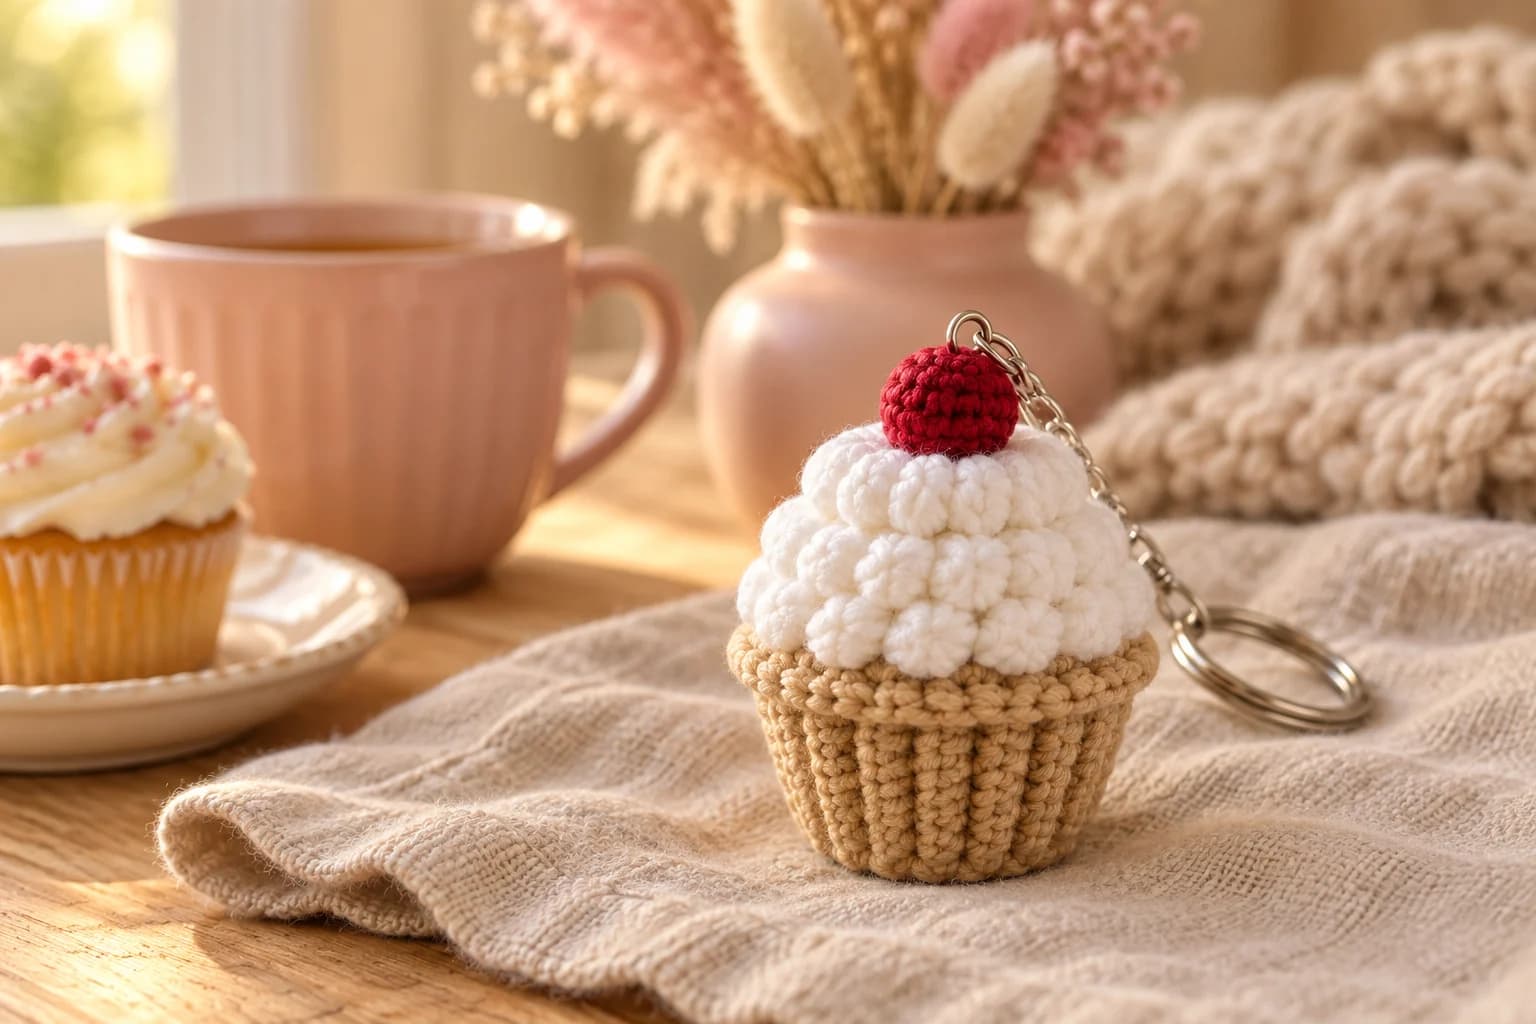
More tiny treats? My cupcake crochet keychain makes a sweet pair with this cup.
What you'll need
Yarn (DK #3 cotton)
| Color | Used for | Amount |
|---|---|---|
| White | The cup, below and above the sleeve | about 12 yd |
| Caramel | The sleeve | about 6 yd |
| Dark brown | The lid and the key ring loop | about 9 yd |
- I like Paintbox Yarns Cotton DK. It's smooth and the stitches stay crisp at this size. Any DK cotton works: check your size against the gauge below.
- I've worked these amounts out from the stitch count, with tails for sewing. They're estimates.
Hook
- 2.5 mm. It's a small hook for DK on purpose: the cup comes out firm and the stuffing doesn't show.
Notions
- A little fiberfill, a stitch marker, a tapestry needle and scissors.
- A split key ring with a short chain (most keychain rings come with one).
Gauge
Gauge isn't critical. Crochet tightly enough that the stuffing doesn't show between the stitches. With DK cotton and a 2.5 mm hook, that's about 6 sc per inch (2.5 cm). The sizes below are calculated from that, with rounds about as tall as the stitches are wide. At that tension, the cup should come out about 1 in (2.5 cm) across the base, 1¼ in (3 cm) across the top and 2½ in (6.5 cm) tall with the lid. Those sizes are estimates, so measure yours.
Abbreviations (US crochet terms)
- MR: magic ring
- ch: chain
- sc: single crochet
- inc: 2 sc in the same st
- sc2tog: single crochet 2 together (a decrease)
- BLO: back loop only
- R: round
- st(s): stitch(es)
Work in continuous spiral rounds. Don't join, and move your marker up at the start of each round. The number in parentheses at the end of each round is the stitch count.
How the cup is built
Here's the whole thing in one sentence. The cup starts with a magic ring at the center of the base and ends with a flat closed top, and the lid is a separate cap sewn over that top. The cup widens a little as it goes up, like a real takeaway cup. The key ring loop is knotted inside the lid, at its very top, so the cup hangs upright.
Changing color. Work the last sc of the round until 2 loops are left on the hook, then finish it with the new color. Cut the old color, leaving a 3 in (7.5 cm) tail, and tie the two tails together loosely on the inside. Keep the color changes in a line at the back of the cup.
The pattern, step by step
Part 1: The cup
Make 1, in white and caramel.
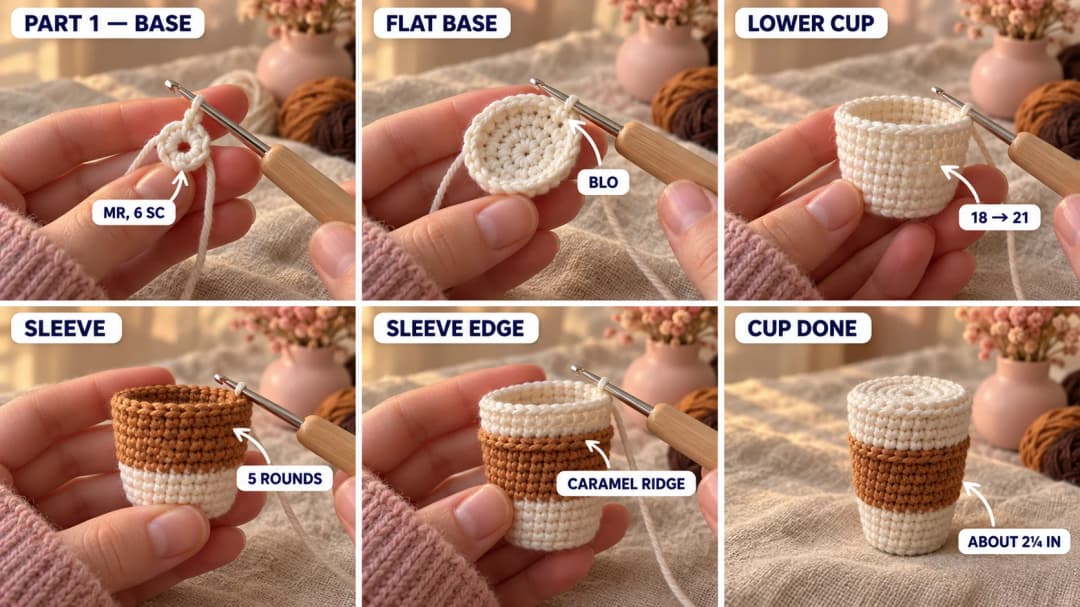
Base (white).
- R1: MR, 6 sc in the ring. (6) Pull the ring closed. This is the center of the base.
- R2: inc × 6. (12)
- R3: (sc, inc) × 6. (18)
- R4: in BLO, sc around. (18) The free front loops make a neat edge, and the base stays flat so the cup can stand.
Lower cup (white).
- R5–R6: sc around. (18)
- R7: (sc 5, inc) × 3. (21) The cup starts to widen. Change to caramel in the last st.
Sleeve (caramel).
- R8–R9: sc around. (21)
- R10: (sc 6, inc) × 3. (24)
- R11–R12: sc around. (24) Change to white in the last st of R12.
Upper cup (white).
- R13: in BLO, sc around. (24) The free front loops of R12 stay on the outside as a little caramel ridge: the top edge of the sleeve.
- R14–R16: sc around. (24)
Stuff the cup firmly now, right down into the base, so it keeps its shape.
Closed top (white). This part is hidden under the lid.
- R17: in BLO, (sc 2, sc2tog) × 6. (18) The back loops make a crisp top edge.
- R18: (sc, sc2tog) × 6. (12) Top up the stuffing.
- R19: sc2tog × 6. (6)
Fasten off. Thread the tail through the front loops of the last 6 sts, pull tight to close the top, and bury the end inside the cup.
The cup is about 2¼ in (5.5 cm) tall without the lid.
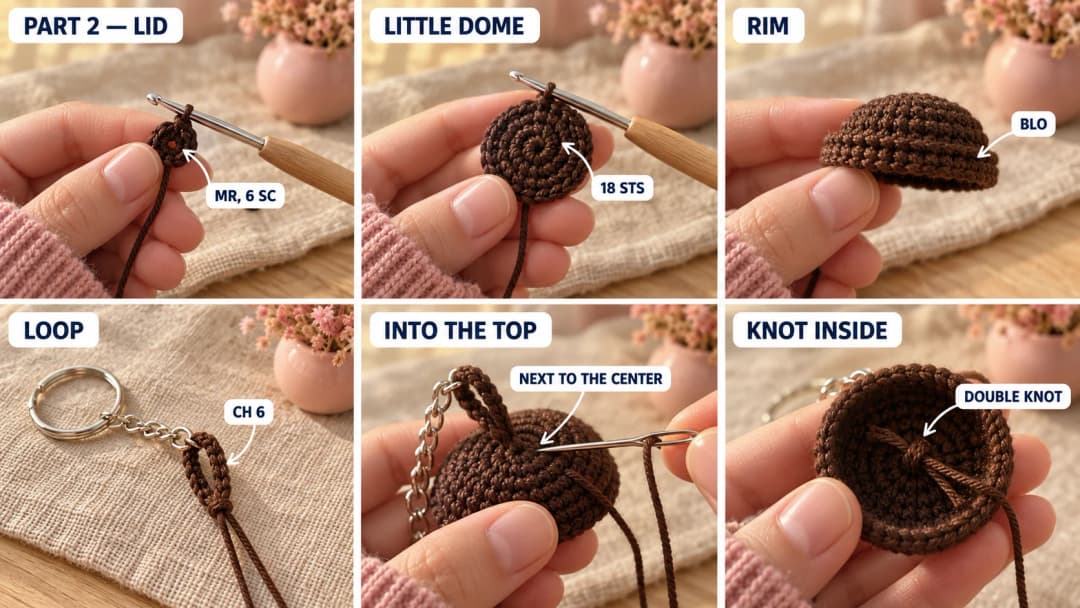
Part 2: The lid and the key ring loop
Make 1, in dark brown. The lid is a shallow cap: a slightly domed top, then a rim that turns down over the cup.
- R1: MR, 6 sc in the ring. (6) Pull the ring closed. This is the very top of the lid, where the key ring goes.
- R2: inc × 6. (12)
- R3: (sc, inc) × 6. (18)
- R4: sc around. (18) This plain round gives the lid its little dome.
- R5: (sc 2, inc) × 6. (24)
- R6: (sc 7, inc) × 3. (27) The lid is now a little wider than the cup, so it overhangs.
- R7: in BLO, sc around. (27) The edge turns down and leaves a ridge: the rim of the lid.
- R8: sc around. (27)
Sl st in the next st and fasten off, leaving a 16 in (40 cm) tail for sewing.
Key ring loop. Add it now, while you can reach inside the lid.
- With dark brown, leave a 6 in (15 cm) tail, ch 6, and fasten off leaving a second 6 in tail. You have a short chain with a tail at each end.
- Slide the chain through the end link of the keychain's short chain and fold it in half. Both tails hang together.
- With the tapestry needle, take one tail from the outside into the lid between two sts of R1, next to the center. Take the other tail in between the two sts of R1 on the opposite side of the center. The loop now straddles the magic ring.
- Inside the lid, pass each tail under 2 sts of R2, on its own side, then tie the two tails together in a tight double knot. Weave each end through 3 or 4 more sts inside the lid before you trim it, so the knot can't work loose.
Part 3: Putting the lid on
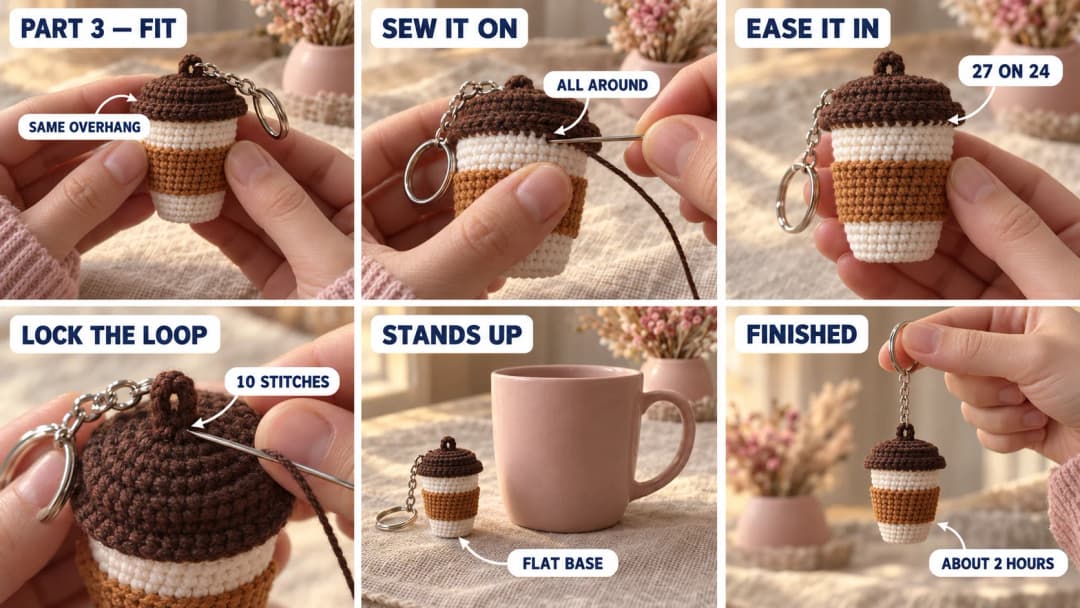
- Fit the lid. Put a small pinch of stuffing inside the dome of the lid, then set the lid on the cup, with the key ring loop at the top. The rim should hug the top of the cup and come down to about R15, covering the closed top and the ridge of R17.
- Line it up. Turn the cup so the color-change line is at the back, and check from the front that the lid sits straight, with the same overhang all around.
- Sew it on. With the lid's long tail, whipstitch the last round of the lid (R8) to the cup, between R15 and R16, all the way around. The lid has 27 sts and the cup 24, so sew 1 lid st to each cup st and ease the 3 extra sts in as you go, one every 8 sts or so. Keep the stitches small and snug so the rim doesn't gape.
- Lock the loop. With a short length of dark brown, sew 10 or more small stitches through the base of the folded chain and the top of the lid, going deep each time. Hide the ends inside. A keychain gets pulled every day, so be generous here.
Hold the cup up by its ring: it hangs upright, lid on top. Give the loop a few firm tugs. It shouldn't move. Cotton chain can stretch over time: if it does, sew over it with a second strand of brown.
Safety. This keychain has a metal key ring, so it isn't a toy for children under 3. For a little one, leave off the ring and loop and give it as a play-café cup instead.
Make it yours — quick variations
| Variation | Change from base pattern |
|---|---|
| Blush latte | Work the sleeve (R8–R12) in blush pink and the lid in cream. |
| Iced coffee | Work the whole cup from R5 to R16 in light brown, like coffee through a clear cup, and make the lid in white. |
| Heart sleeve | Embroider a tiny heart on the front of the sleeve with 4 or 5 straight stitches in white. |
| Bag charm | Swap the split ring for a lobster clasp so it clips onto a bag handle. |
| Standing mini | Leave off the loop and keep the cup on a desk: the flat base lets it stand. |
Troubleshooting the three things that go wrong
The cup won't stand up
The base isn't flat. Check that R4 was worked in the back loops, and push the stuffing into the edges of the base rather than the middle, so the bottom stays flat.
The lid slips around
Its rim is looser than the cup. Sew it a little higher, between R16 and R17, where the cup is closing in, or work R6–R8 with a firmer tension so the rim hugs the cup.
The sleeve ridge doesn't show
R13 has to be worked in the back loops, with the outside of the cup facing you. The caramel front loops left behind are the ridge. If it's still faint, give the ridge a gentle pinch outward with your fingers.
Frequently asked questions
How long does this keychain take? About 2 hours if you're used to small amigurumi: about an hour for the cup, 30 minutes for the lid and 30 for the finishing. Give yourself longer for your first one.
Can I use worsted yarn? Yes, with a 3.5 mm hook. The cup comes out about a third bigger, closer to 3¼ in tall, which makes a nice bag charm.
Can I leave off the sleeve? Yes. Work R8–R12 in white for a plain cup, or in a second color all the way up for a two-tone cup. The counts don't change.
Can I sell keychains made from this pattern? Yes, you're welcome to sell finished keychains made from this free pattern at markets, on Etsy or as gifts. Please credit "Pattern by Wavode" in your listing and link back to this page. What you can't do is republish this write-up or my photos as your own pattern.
Related patterns on Wavode
- Cupcake crochet keychain: a tiny cupcake with a cherry on top.
- Crochet hat keychain: a mini straw hat with a red band.
- Pumpkin keychain: a ribbed mini pumpkin in about an hour.
- Crochet lip balm holder keychain: a little sleeve for your lip balm.
- Cute crochet panda coaster: somewhere to put the real coffee.
Made a coffee cup? Tag #wavodecrochet on Pinterest. I re-pin every finished make and credit the maker.
Pattern by Clara Hartwell for Wavode. Questions? Email me at support@wavode.com.