Crochet Gingerbread Man

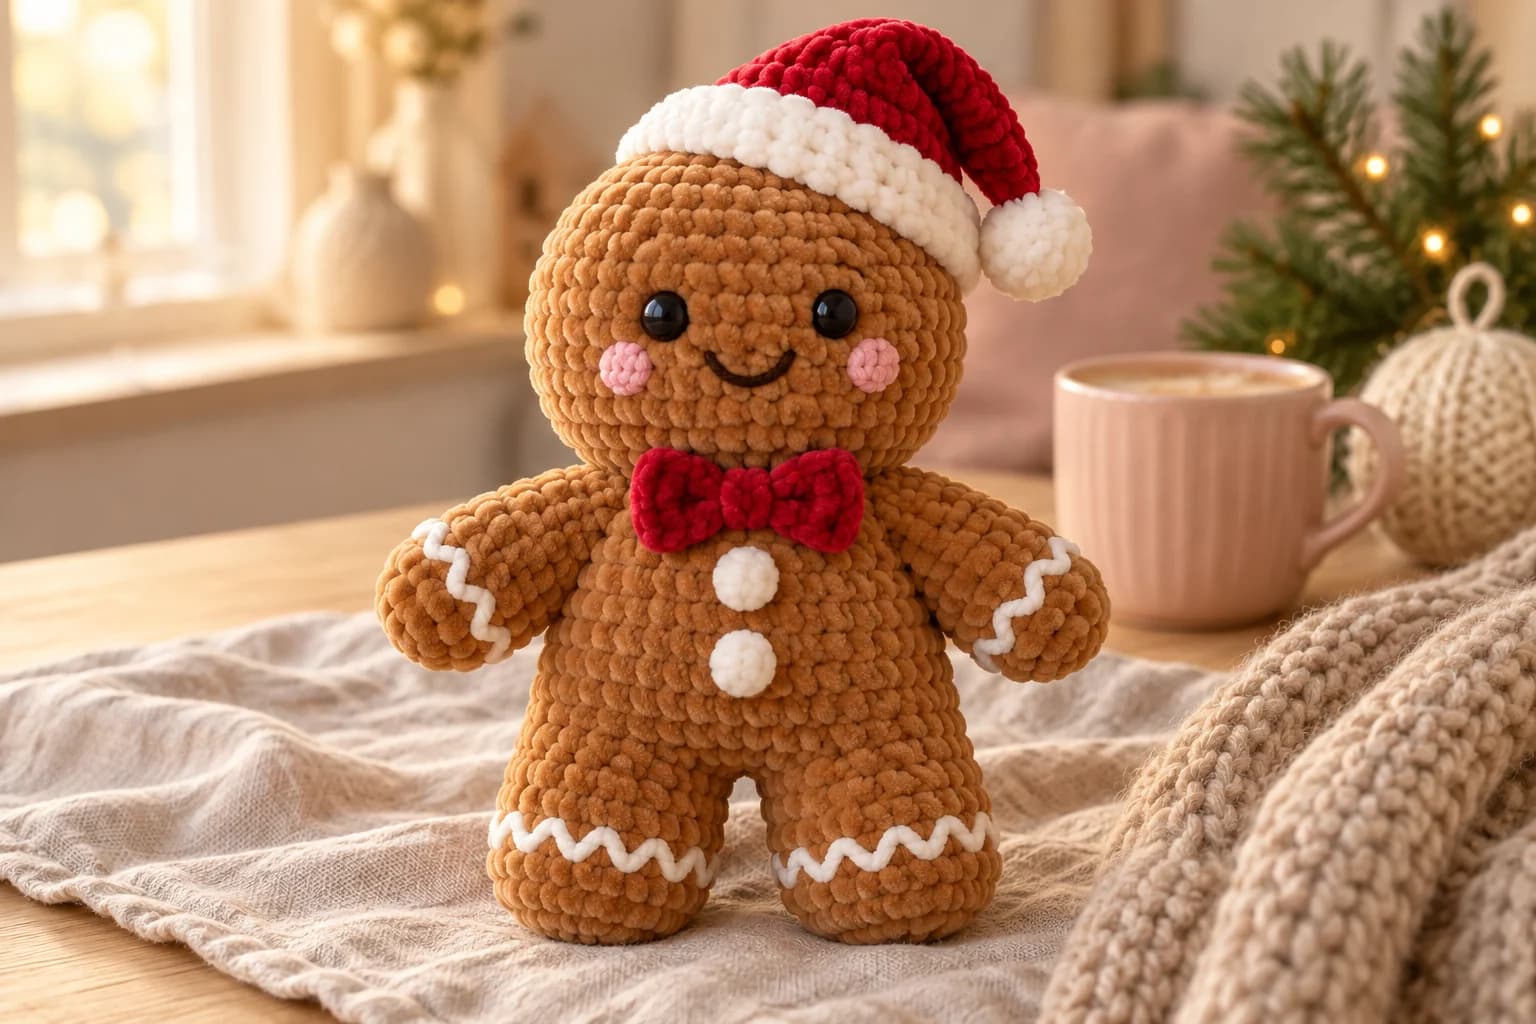
Every December I bake one tray of gingerbread men and eat about half of them before the icing sets. This one lasts longer. Nutmeg is a crochet gingerbread man in soft caramel velvet yarn, about 8½ in tall, with a big round head, chubby legs, two white buttons, a red bow and white zigzag icing around his hands and feet, just like the piped kind.
The velvet yarn is what makes him look like a cookie and feel like a cushion. It works up fast, so he's a good one-evening project if you start after dinner, and the legs are joined straight into the body, so there's no sewing at the hips. If you want the little one too, the same counts in worsted cotton make a mini Nutmeg for the tree, and there's a floppy Santa hat for either size.
| At a glance | |
|---|---|
| Finished size | about 8½ in (22 cm) tall, 7 in (18 cm) across the arms |
| Yarn | bulky #5 chenille velvet yarn in caramel, red and white, plus a little white worsted for the icing |
| Hook | 4 mm (G/6) |
| Pieces | 13 (11 without the Santa hat) |
| Time | about 4 hours |
| Skill | easy: magic ring, sc, inc, dec, joining two legs, simple embroidery |
Why the icing is worsted and the cookie is velvet
Velvet yarn is perfect for the body. The pile hides the stitches, so the gingerbread man reads as one soft, rounded cookie shape instead of a grid of rounds. It's terrible for embroidery, though. A chenille strand pulled through chenille fabric again and again sheds, frays and can snap, and the zigzags come out fat and blurry.
So the icing is a plain white worsted yarn, and so is the mouth. A thin, smooth strand sits on top of the pile and stays crisp, like a line of royal icing on a cookie. The buttons and the hat brim are worked in white velvet, because they're crocheted pieces, not stitches.
The same reasoning applies to sewing the head on: velvet yarn shreds if you whipstitch a long seam with it. I sew every seam on Nutmeg with a strand of caramel worsted, which disappears into the pile.
Nutmeg's supplies: velvet yarn, icing yarn and eyes
- Velvet yarn: a bulky #5 chenille "velvet" yarn, the kind used for plush toys, such as Himalaya Dolphin Baby (100 g, 120 m / 131 yd). By my estimate from the stitch count, with tails: about 100 yd of caramel, 18 yd of red and 11 yd of white. One ball of caramel should cover him; if you crochet loosely, keep a second ball at hand.
- Icing and face yarn: about 4 yd of white worsted (any smooth acrylic or cotton) for the zigzags, a little black or dark brown worsted for the smile and a little soft pink worsted for the cheeks.
- Seaming yarn: a few yards of caramel or light brown worsted, close to the velvet color.
- Hook: 4 mm (G/6). That's small for this yarn on purpose: the fabric has to be tight enough that the stuffing doesn't show.
- Eyes: two 10 mm black safety eyes with their washers.
- Small things: fiberfill, 3 stitch markers (one in a contrast color), a strand of contrast scrap yarn, sewing pins, a tapestry needle with a large eye and scissors.
Tension. Aim for about 3 sc per inch (2.5 cm), with rounds about as tall as the stitches are wide. At that tension Nutmeg comes out about 8½ in (22 cm) tall and 7 in (18 cm) across the arms. Those sizes are estimates from the counts, so measure yours.
Stitches (US terms): magic ring (MR), chain (ch), slip stitch (sl st), single crochet (sc), increase (inc, 2 sc in the same st), decrease (dec, sc 2 together; with velvet yarn I use the invisible decrease, through the front loops only). R stands for round, st for stitch. Every piece in the round is a continuous spiral: don't join, and move your marker up at the start of each round. The number in parentheses is the stitch count.
Tip. Velvet yarn can "worm": a loop of the chenille pops out of the stitch. It happens most when the tension is loose or when you rip back the same yarn twice. Crochet snugly, and if a section has to come out, cut a fresh length rather than reusing the crinkled one.
Making the legs, iced while they're still open
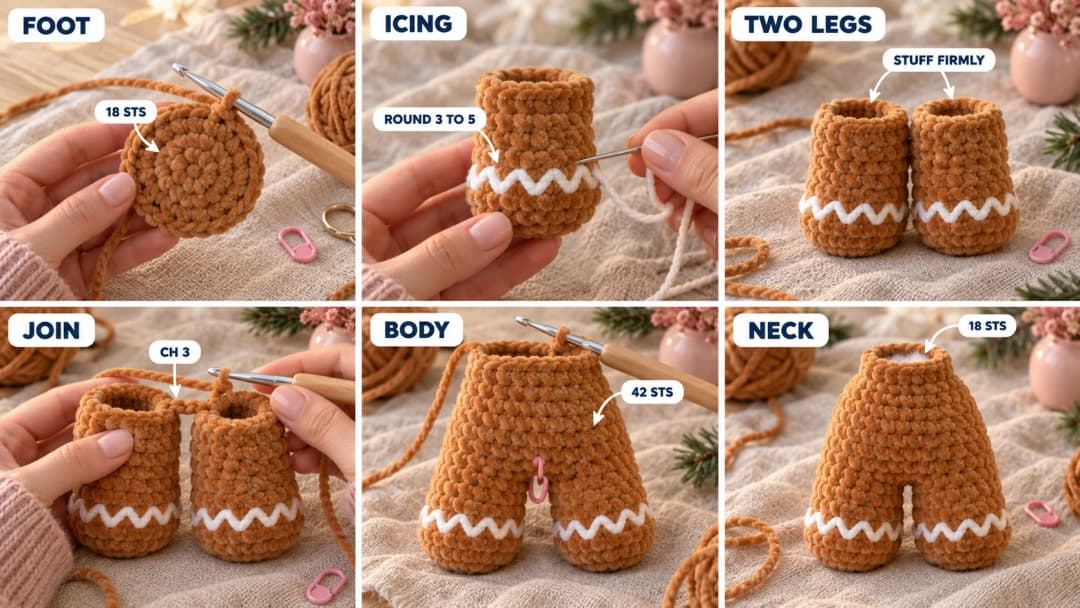
Make 2, in caramel velvet. The magic ring is the sole of the foot, and the open end becomes the top of the leg, where it joins the body.
- R1: MR, 6 sc in the ring. (6)
- R2: inc × 6. (12)
- R3: (sc, inc) × 6. (18)
- R4–R7: sc around. (18) 4 rounds: the leg.
Leg 1: sl st in the next st and fasten off, leaving a 6 in (15 cm) tail. Leg 2: don't fasten off. Slip the live loop onto a marker so it can't unravel.
Ice both legs now, while you can still reach inside. With white worsted on the needle, knot the end inside the leg and come out between R3 and R4. Make a zigzag all the way around the leg: one slanted stitch from R3 up to R5 across 1 st, then one from R5 back down to R3 across the next st, and so on. That's 18 slanted stitches, one per st, making 9 little V's around the foot. Knot the end inside. Keep the stitches just snug: if you pull, the velvet puckers.
Stuff both legs firmly, pushing the fiberfill well into the feet. Leave the top round open.
Joining the legs into the gingerbread body
The body grows straight out of the two legs in one round, with a short chain between them for the crotch. The jog of the legs (where their rounds meet) should face the inside, toward the other leg, so it disappears between them.
Body (caramel velvet, Make 1). Work it straight on from Leg 2's live loop.
- R1: ch 3, sc 18 around Leg 1, sc 3 along the chain, sc 18 around Leg 2, sc 3 along the other side of the chain. (42)
Here's that round slowly:
- Put Leg 2's live loop back on your hook and ch 3.
- Hold Leg 1 next to Leg 2, both feet pointing the same way. Insert the hook into the st of Leg 1 that faces Leg 2 and make a sc. Put a marker in this st: it's st 1 of the body.
- Sc 17 more around Leg 1, all the way around its outside, back to the inside. (18)
- Sc 1 in each of the 3 ch. (21) Put the contrast marker in the middle one, st 20. This side of the chain is the front of Nutmeg, and that marker is center front.
- Sc 18 around Leg 2, starting in the st right after the one the chain came out of. (39)
- Sc 1 in each of the 3 ch on the other side of the chain, the back. (42)
Move the st 1 marker up and keep going in a spiral. The jog of the body sits at the back, right next to the chain.
- R2: sc around. (42)
- R3: (sc 5, dec) × 6. (36)
- R4–R5: sc around. (36)
- R6: (sc 4, dec) × 6. (30)
- R7–R8: sc around. (30)
- R9: (sc 3, dec) × 6. (24)
- R10: (sc 2, dec) × 6. (18)
The center-front line. Before you go further than R2, tie your contrast scrap strand to the contrast marker. Every time you pass the front on a later round, flip the strand to the other side of your work between the st above the marker and the next one. When the body is done, the strand runs in a straight line up the tummy: it's where the buttons, the bow and the face line up. Pull it out at the very end.
Stuff the body firmly as you go from R6, and keep stuffing through the neck opening after R10. Press him gently between your palms so the tummy is a little flatter front to back, like a cookie.
Sl st in the next st and fasten off, leaving a 6 in (15 cm) tail. Don't close the neck: the head goes on here.
Close the crotch. With Leg 1's tail, sew up the little gap where the chain meets each leg with 2 or 3 small stitches, then hide the end inside.
Tip. If the chain makes a hole between the legs, your ch 3 was loose. Sew it closed now, from the outside, before the body is stuffed hard: it's easier to reach.
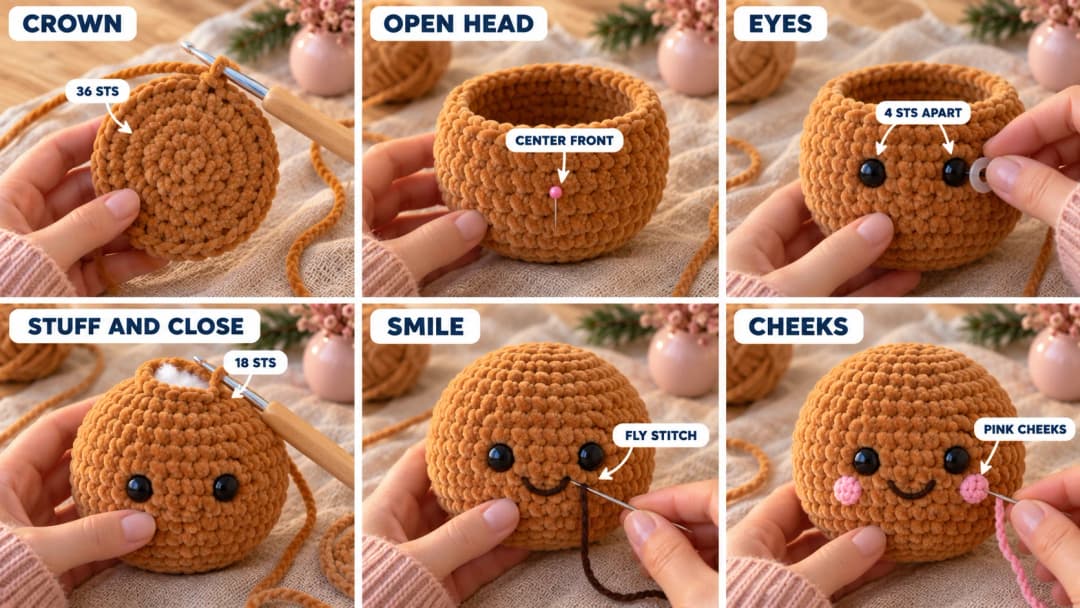
A big round head, with the face set early
Make 1, in caramel velvet. The magic ring is the crown, and the last round is the neck opening, which sits on top of the body. The jog of the rounds goes at the back.
- R1: MR, 6 sc in the ring. (6)
- R2: inc × 6. (12)
- R3: (sc, inc) × 6. (18)
- R4: (sc 2, inc) × 6. (24)
- R5: (sc 3, inc) × 6. (30)
- R6: (sc 4, inc) × 6. (36)
- R7–R12: sc around. (36) 6 rounds: the widest part of the face.
Don't fasten off. Slip the live loop onto a marker.
Setting the eyes while the head is open
- Find center front. Count 18 sts along R9 from the last st of the round (the back) and put a pin in the 18th st. That's the center of the face. Everything on the face starts from this pin.
- Eyes. Push a safety eye in between R8 and R9, 2 sts to the left of the pin, and the other one 2 sts to the right of the pin. That leaves 4 sts between the two posts. Look at the head from arm's length: the eyes should sit level and just above the middle of the face. Then push the washers on from the inside until they click.
Safety eyes can't come out once they're locked, so take your time with the pins first. The smile and cheeks come later, once the head is stuffed, because the stuffing stretches the face.
Closing to the neck
Put the live loop back on your hook.
- R13: (sc 4, dec) × 6. (30)
- R14: (sc 3, dec) × 6. (24)
Stuff the head now, firmly, so it's round and doesn't dent when you squeeze it.
- R15: (sc 2, dec) × 6. (18)
Top up the stuffing. Sl st in the next st and fasten off, leaving a 6 in (15 cm) tail. The neck opening has 18 sts, the same as the body's R10.
The smile and the pink cheeks
Smile. With black or dark brown worsted, knot the end inside the head and come out on R10, 1 st to the left of the pin. Go back in on R10, 1 st to the right of the pin, leaving the strand a little slack. Come out on R11, right at the pin, catch the slack strand, pull it down into a small U, and go back in just below it. That's a fly stitch: one smile about ⅔ in (1.7 cm) wide.
Cheeks (pink worsted, Make 2). Two tiny circles:
- R1: MR, 6 sc in the ring. (6)
Sl st in the first sc and fasten off, leaving an 8 in (20 cm) tail, and pull the ring closed tight. Pin one centered on R10, 4 sts to the left of the pin, and the other 4 sts to the right of the pin, so they sit just below and outside the eyes. Sew each one with 6 small stitches around its edge.
Pull every face thread just snug and knot it inside, then come out somewhere hidden at the back and trim.
Arms with zigzag icing cuffs
Make 2, in caramel velvet. The magic ring is the hand.
- R1: MR, 6 sc in the ring. (6)
- R2: inc × 6. (12)
- R3–R7: sc around. (12) 5 rounds: the arm.
Sl st in the next st and fasten off, leaving a 6 in (15 cm) tail. Stuff only the hand end lightly, up to about R5, and leave the top empty so it flattens.
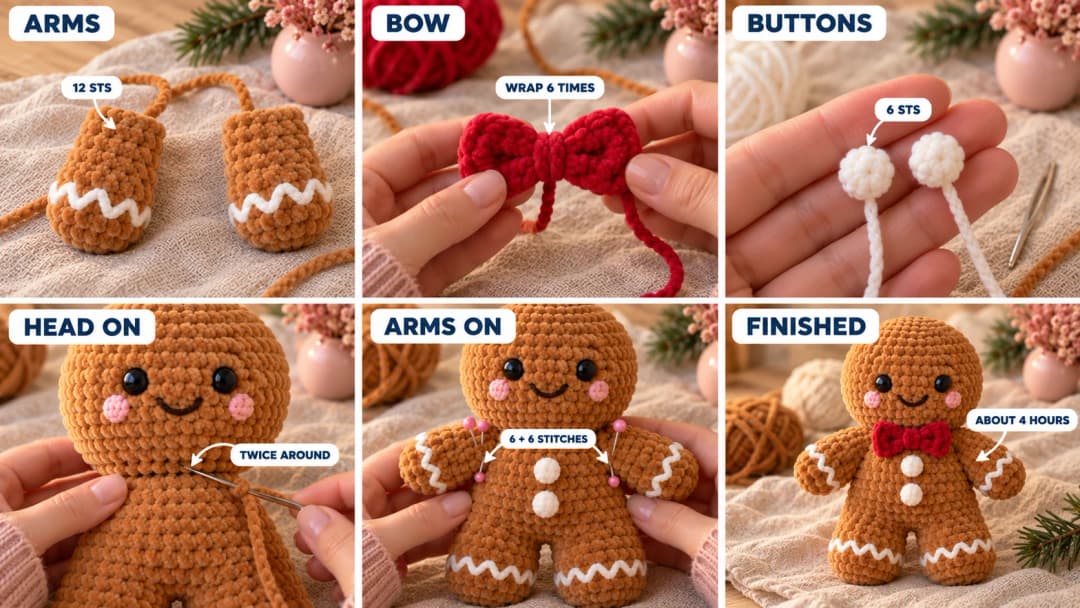
Ice the cuffs exactly like the feet: with white worsted, a zigzag from R3 up to R5 and back, one slanted stitch per st, 12 slanted stitches around each arm. Knot the ends inside through the open top.
Flatten the top of the arm, so the 12 sts of R7 lie in two layers of 6.
Bow and buttons
Bow (red velvet, Make 1). Worked flat, in rows. Ch 9.
- Row 1: sc in the 2nd ch from the hook and in each ch across. (8)
- Rows 2–4: ch 1, turn, sc 8. (8)
Fasten off, leaving a 12 in (30 cm) tail. Pinch the rectangle in the middle, from top to bottom, and wrap the tail 6 times around the pinch, pulling tight, so it puffs into a bow. Knot the tail at the back of the wrap and keep it for sewing.
Buttons (white velvet, Make 2).
- R1: MR, 6 sc in the ring. (6)
Sl st in the first sc and fasten off, leaving an 8 in (20 cm) tail. Pull the ring closed tight. Each button is a little puffy dot.
Putting the gingerbread man together
Seam with caramel worsted rather than the velvet tails: it's stronger and it doesn't shred. To hide each end, knot it against the body, push the needle in next to the knot and out somewhere else, pull until the knot pops inside, and trim.
- Head. Set the head on the neck opening, its pin straight above the center-front line of the body and the jogs of both pieces at the back. The head's R15 and the body's R10 both have 18 sts, so they match one to one. Whipstitch them together through both edges, one stitch in each of the 18 sts. Before the last few stitches, push a little more stuffing into the neck so the head doesn't wobble. Then go around a second time, another 18 stitches.
- Arms. Lay Nutmeg on his back with the center-front line up and press him flat gently: the folds on each side are where the arms go. Pin each flattened arm along a side fold, its top edge on R9 and its bottom edge on R4, hand pointing out and a little down. Sew through both layers of the flattened edge, one stitch per pair of sts, 6 stitches, then back along the same line, 6 more.
- Buttons. Pin the two buttons on the center-front line, one on R3 and one on R6. Sew each one with 6 small stitches around its edge.
- Bow. Pin the bow on the center-front line, its top edge right under the neck seam, so it sits under the chin. Sew it through the wrapped middle with its red tail, 4 or 5 stitches, then tack each wing with one small stitch so it doesn't flop forward.
Now pull out the center-front strand. Sit him up: he should lean back a little on his legs, with his arms out and his head tilted just slightly forward.
The floppy Santa hat (optional)
Make 1, in red and white velvet. Worked from the tip down.
- R1: MR, 6 sc in the ring. (6)
- R2: (sc, inc) × 3. (9)
- R3: (sc 2, inc) × 3. (12)
- R4: sc around. (12)
- R5: (sc 3, inc) × 3. (15)
- R6: (sc 4, inc) × 3. (18)
- R7: (sc 2, inc) × 6. (24)
- R8: (sc 3, inc) × 6. (30)
- R9: sc around. (30) Change to white in the last st.
- R10–R11: sc around. (30) 2 rounds: the thick white brim.
Sl st in the next st and fasten off, leaving a 24 in (60 cm) tail.
Changing color. Work the last sc of R9 until 2 loops are left on the hook, then finish it with white. Cut the red, leaving a 6 in (15 cm) tail, and tie the two tails together loosely inside the hat.
Pompom (white velvet, Make 1).
- R1: MR, 6 sc in the ring. (6)
- R2: inc × 6. (12)
- R3: sc around. (12)
- R4: dec × 6. (6)
Push a little stuffing in, fasten off, leaving an 8 in (20 cm) tail, and pass it through the front loop of each of the 6 sts. Pull tight to close and sew the pompom on the tip of the hat.
Sew the hat on. The hat's last round has 30 sts, the same as R5 of the head, so it covers the top of the head down to just above the eyes. Set it on the head with the color change at the back, and whipstitch the last round of the brim to R5 with the white tail, one stitch in each of the 30 sts. Leave the cone empty, bend the tip over to one side so the pompom hangs beside the head, and tack the cone to the brim there with one stitch so it stays flopped.
If you'd like the hat to come off, skip the seam and tack it at the front and back with a single stitch each instead.
A mini Nutmeg for the tree
The small one is the same pattern, stitch for stitch, in worsted #4 cotton with a 3.5 mm (E/4) hook. At about 5 sc per inch, he comes out roughly 5 in (13 cm) tall, about 70 yd of caramel cotton by the same stitch count. Use 6 mm safety eyes, and work the icing and face in the same worsted.
To hang him, thread a 6 in (15 cm) length of thin red ribbon through the top of the head, or through the tip of the hat, and knot the ends. A little group of three on a branch, big and small, looks just like a cookie tray.
Safety. Nutmeg has plastic safety eyes, so he isn't a toy for children under 3. For a little one, embroider the eyes instead: 4 or 5 short black worsted stitches, side by side, over 1 round in each eye spot, and sew the buttons and bow down extra firmly.
Christmas morning, wrapped in a cookie tin
I like to tuck the big one into a round cookie tin lined with tissue paper, with a real gingerbread cookie in a bag next to him. Somebody always tries to bite the wrong one.
If you'd like more ideas for the same tree, my list of free crochet Christmas patterns has ornaments, a gnome and a little snowman who'd get along with him nicely.
Made a gingerbread man? Tag #wavodecrochet on Pinterest so I can see him.
Pattern by Clara Hartwell for Wavode. Questions? Email me at support@wavode.com.