Christmas Tree Granny Square

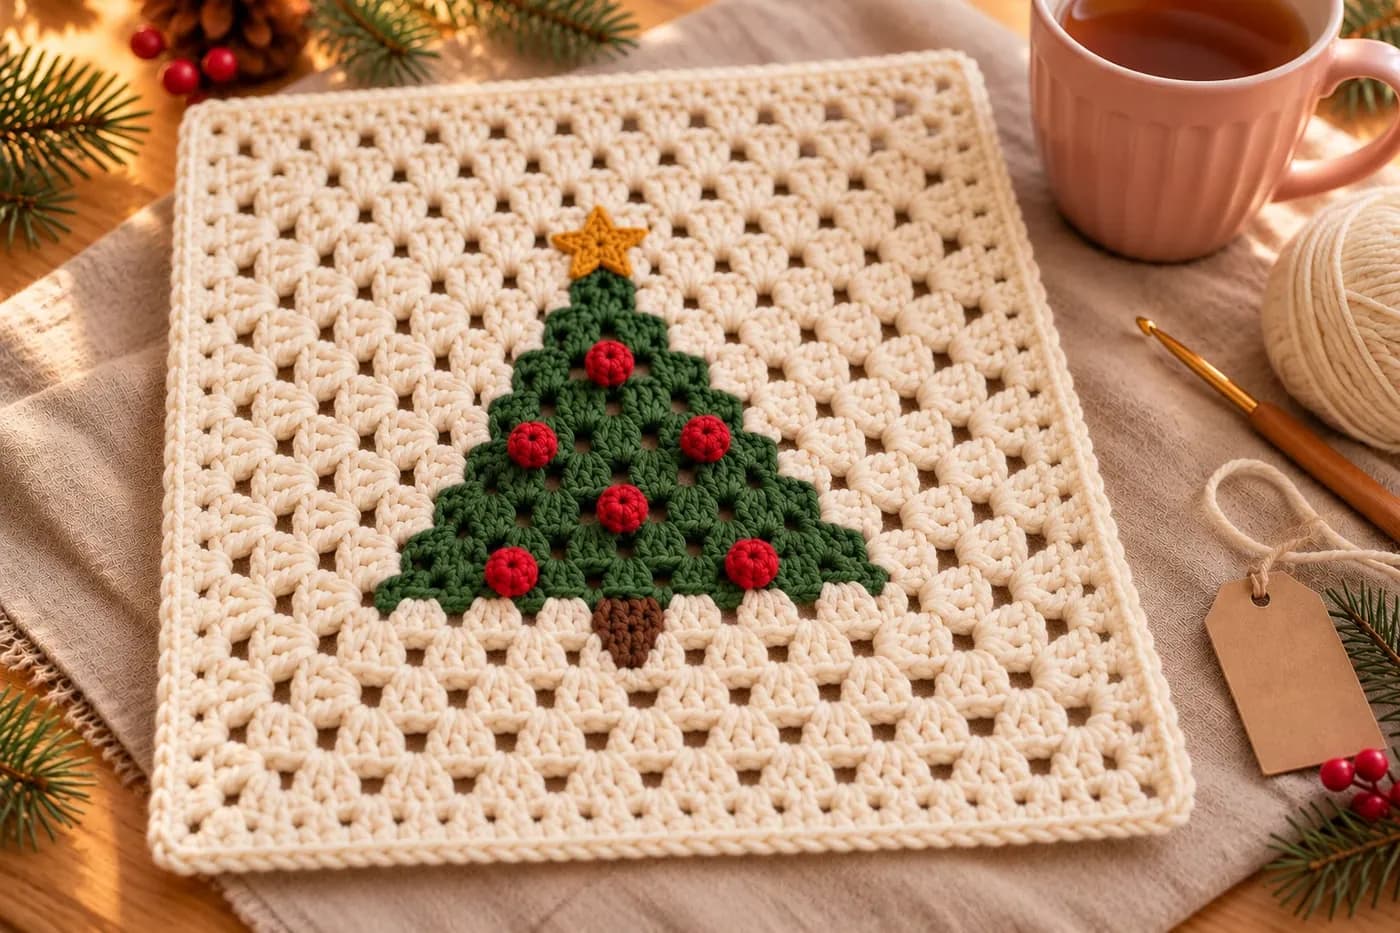
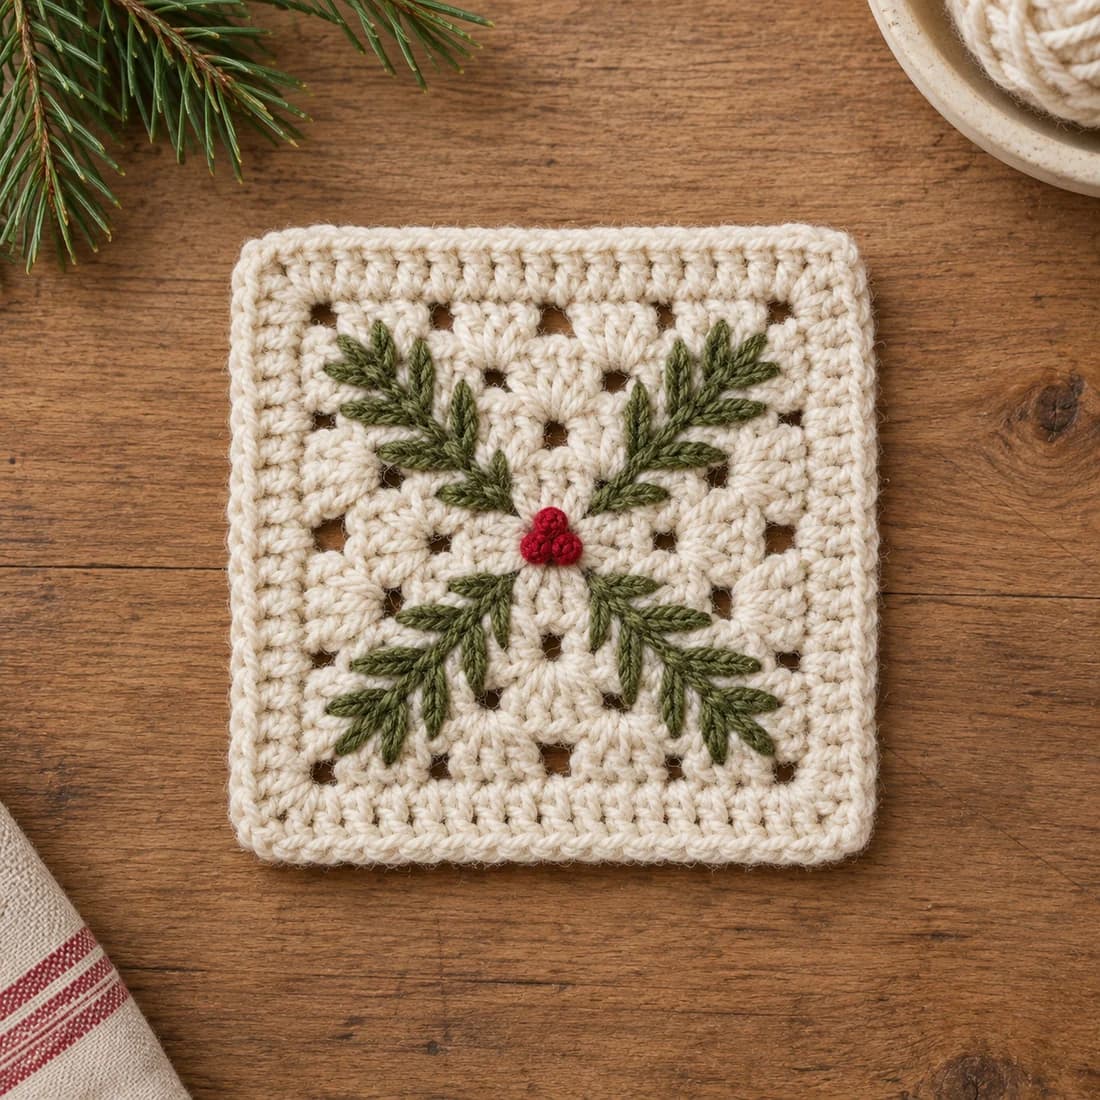
The first time I worked granny stitch in rows with two colours, I noticed something I'd never paid attention to: each row of clusters sits half a cluster over from the row below, so a green patch shrinks by exactly one cluster per row, on both sides at once. That's a Christmas tree, drawn by the stitch itself. This free Christmas tree granny square crochet pattern turns that into a cream square with a green tree of granny clusters, a brown trunk, six red popcorn baubles and a gold star. You'll need worsted yarn, a 5 mm hook and 3 to 4 hours.
Key Takeaways
- The tree is worked into the fabric, not sewn on: 21 green clusters over 6 rows (6, 5, 4, 3, 2, 1), above a single brown trunk cluster.
- The panel is 13 granny-stitch rows, then a three-round cream granny border squares it up to about 9½ in.
- Six popcorn baubles and a five-point star are made separately and sewn on at the end.
- About 93 yd of worsted in total, most of it cream (about 75 yd).
| At a glance | |
|---|---|
| Finished size | about 9½ in (24 cm) square, after blocking |
| Yarn | worsted #4: cream, green, red, gold, brown |
| Hook | 5 mm (US H-8) |
| Stitches | ch, sl st, sc, dc, popcorn |
| Pieces | 1 square, 6 baubles, 1 star |
| Time | about 3–4 hours |
Why granny rows step a tree in by themselves
In a granny-stitch row, every cluster goes into a space between two clusters of the row below. So if Row 5 has six green clusters side by side, there are only five spaces between them for Row 6. Five green clusters, then four, then three, and so on up to a single cluster at the tip. You never count a decrease: the tree narrows on its own, and it stays centred.
That's also why this square looks so different from my Christmas granny square with embroidered pine sprigs. That one is a classic round granny with straight stitches sewn on top. Here, the green is part of the fabric, so the tree has the same chunky cluster texture as the rest of the square. The baubles and the star are the only things you sew.
The trunk works the same way, in reverse. A single brown cluster sits in the middle of Row 4, and the six green clusters of Row 5 spread out above it, three on each side of its centre. Who knew the humble granny stitch could do all that?
Materials for the tree square
Yarn, worsted #4. I like a soft acrylic such as Red Heart Super Saver or Lion Brand Basic Stitch: the colours stay bright and the square goes in the washing machine. The amounts below are estimates worked out from the stitch counts, with a little extra for tails.
| Colour | Used for | Amount |
|---|---|---|
| Cream | Panel and border | about 75 yd (69 m) |
| Forest green | Tree | about 9 yd (8 m) |
| Cherry red | Popcorn baubles | about 6 yd (5.5 m) |
| Gold or mustard | Star | about 2 yd (2 m) |
| Brown | Trunk | about 1 yd (1 m) |
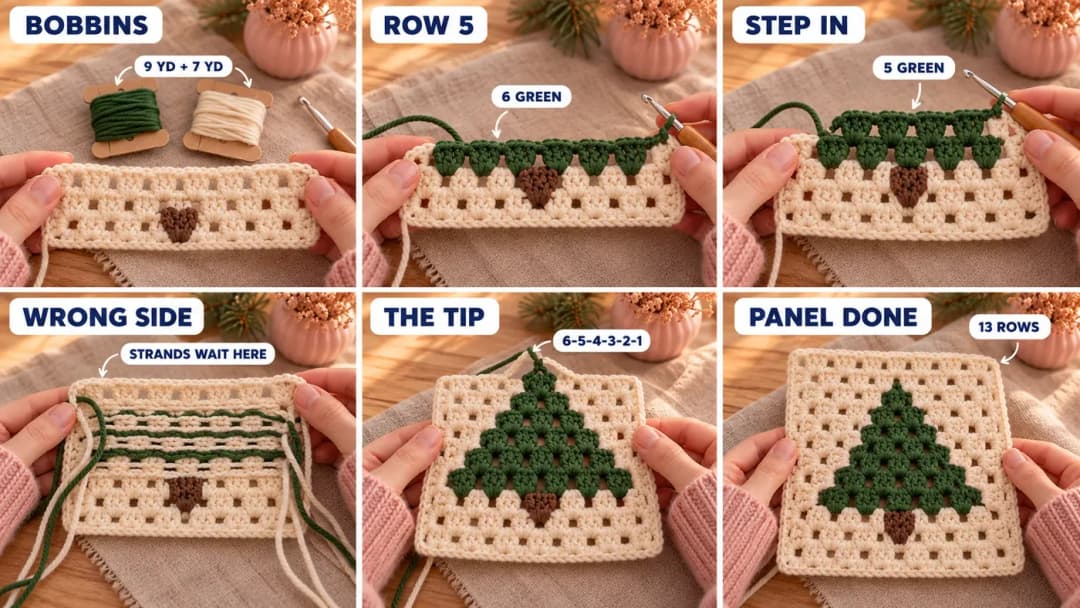
Before you start, wind two small bobbins: 9 yd of green and 7 yd of cream. The rest of the cream stays on the ball. A strip of cardboard or a clothes peg works as a bobbin.
Hook and notions
- 5 mm (US H-8) hook.
- A tapestry needle, scissors and a few pins for blocking.
Tension. After Row 4, the panel should measure about 7 in (18 cm) wide and 2¼ in (5.5 cm) tall. If it's wider, go down to 4.5 mm. If it's narrower, go up to 5.5 mm. The tension decides the finished size, so measure your first square before you plan a blanket.
Stitches (US terms): ch = chain, sl st = slip stitch, sc = single crochet, dc = double crochet, sp = space, st = stitch, MR = magic ring. A cluster is 3 dc worked into the same space. A half cluster is 2 dc at the edge of a row. The ch 3 at the start of a row or round counts as a dc.
UK crocheters: US sc = UK double crochet, and US dc = UK treble crochet.
The pattern: a tree panel in 13 granny rows
The panel is worked flat, turning at the end of every row. Odd rows are right-side (RS) rows, even rows are wrong-side (WS) rows. The odd rows have a half cluster at each edge and 28 dc. The even rows have 9 full clusters and 27 dc.
Rows 1–3, the cream base
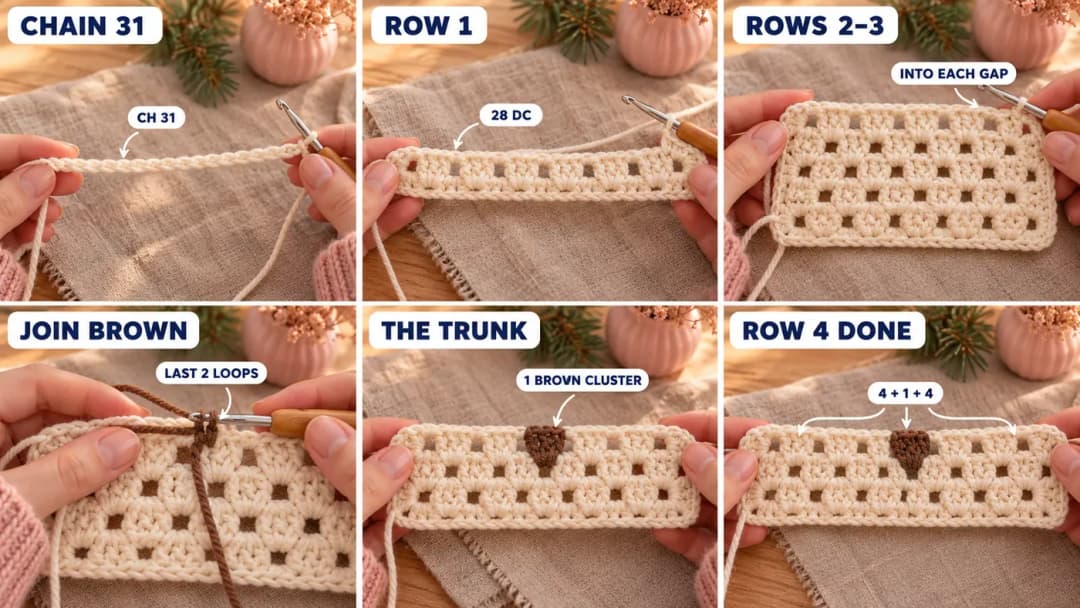
With cream, ch 31.
- Row 1 (RS): Dc in the 4th ch from the hook (the skipped ch count as a dc). Then (skip 2 ch, 3 dc in the next ch) 8 times in total. Skip 2 ch, 2 dc in the last ch. Turn. (28 dc: 1 half cluster, 8 clusters, 1 half cluster)
- Row 2 (WS): Cream (ball): ch 3, 2 dc in the first sp, 3 dc in each of the next 8 sps. Turn. (27 dc)
- Row 3 (RS): Cream (ball): ch 3, dc in the same st, 3 dc in each of the next 8 sps, 2 dc in the top of the turning ch. Turn. (28 dc)
The "sps" are the gaps between two groups of the row below. In Row 2, the first sp is the one between the half cluster and the first full cluster. In Row 3, "the same st" is the last dc of Row 2, right at the base of your ch 3.
How the colour changes work
Every colour section in this square has its own strand. You never carry a colour across a gap between clusters, because a strand lying across a granny gap shows on the right side.
- To change colour, work the last dc of the old colour until 2 loops are left on the hook. Finish that dc with the new colour: yarn over with it and pull it through the 2 loops.
- Leave the old colour on the wrong side: behind the work on RS rows, toward you on WS rows. Don't cut it unless the pattern says so. It waits there for the next row.
- When you pick a strand back up, it's always hanging next to its section, half a cluster away. Let it lie loosely across the back. A tight strand puckers the tree.
- When you join a new strand, leave a 6-in (15 cm) tail on the wrong side. You'll weave all the tails in at the end.
Tip: I label the work in my head as "ball side" and "bobbin side". The cream ball always works the side of the square where the RS rows begin, and the cream bobbin works the other side. If you're ever unsure, follow the strand back to where it hangs.
Row 4, the trunk
- Row 4 (WS): Cream (ball): ch 3, 2 dc in the first sp, 3 dc in each of the next 3 sps. Brown: 3 dc in the next sp (work over the cream). Cream (ball): 3 dc in each of the next 4 sps. Turn. (27 dc: 4 cream clusters, 1 brown, 4 cream)
Working over the cream. Join brown on the last dc of the 4th cream cluster. Before you make the brown cluster, lay the cream strand along the top of Row 3, then work the 3 brown dc over it, so it's hidden inside them. Finish the last brown dc with the cream, then cut brown, leaving a 6-in tail. The trunk is the only place where a strand travels, and it's hidden inside a single cluster.
Rows 5–10, the tree
The green starts here. Join the green bobbin in Row 5, and join the cream bobbin when you reach the last cream section of Row 5.
- Row 5 (RS): Cream (ball): ch 3, dc in the same st, 3 dc in the next sp. Green: 3 dc in each of the next 6 sps. Cream (bobbin): 3 dc in the next sp, 2 dc in the top of the turning ch. Turn. (28 dc: 6 green clusters)
- Row 6 (WS): Cream (bobbin): ch 3, 2 dc in the first sp, 3 dc in the next sp. Green: 3 dc in each of the next 5 sps. Cream (ball): 3 dc in each of the next 2 sps. Turn. (27 dc: 5 green clusters)
- Row 7 (RS): Cream (ball): ch 3, dc in the same st, 3 dc in each of the next 2 sps. Green: 3 dc in each of the next 4 sps. Cream (bobbin): 3 dc in each of the next 2 sps, 2 dc in the top of the turning ch. Turn. (28 dc: 4 green clusters)
- Row 8 (WS): Cream (bobbin): ch 3, 2 dc in the first sp, 3 dc in each of the next 2 sps. Green: 3 dc in each of the next 3 sps. Cream (ball): 3 dc in each of the next 3 sps. Turn. (27 dc: 3 green clusters)
- Row 9 (RS): Cream (ball): ch 3, dc in the same st, 3 dc in each of the next 3 sps. Green: 3 dc in each of the next 2 sps. Cream (bobbin): 3 dc in each of the next 3 sps, 2 dc in the top of the turning ch. Turn. (28 dc: 2 green clusters)
- Row 10 (WS): Cream (bobbin): ch 3, 2 dc in the first sp, 3 dc in each of the next 3 sps. Green: 3 dc in the next sp. Cream (ball): 3 dc in each of the next 4 sps. Turn. (27 dc: 1 green cluster, the tip)
Cut the green and the cream bobbin now, leaving 6-in tails on the wrong side. Row 10 ends with the ball, so the ball carries on alone.
Check the tree after Row 7. Each green cluster should sit right in the middle of two green clusters below it. If one side has an extra cream cluster, count the sps of that row again. A miscounted sp shifts the whole tree by half a cluster.
Rows 11–13, above the tip
- Row 11 (RS): Cream (ball): ch 3, dc in the same st, 3 dc in each of the next 8 sps, 2 dc in the top of the turning ch. Turn. (28 dc)
- Row 12 (WS): Cream (ball): ch 3, 2 dc in the first sp, 3 dc in each of the next 8 sps. Turn. (27 dc)
- Row 13 (RS): Cream (ball): ch 3, dc in the same st, 3 dc in each of the next 8 sps, 2 dc in the top of the turning ch. (28 dc)
Fasten off. Weave in every colour tail now, through the backs of stitches of its own colour, so no green or brown shows through the cream. The panel is about 7 in (18 cm) square.
A cream granny border to square it up
The border frames the tree and turns the slightly stepped edges of the rows into straight sides.
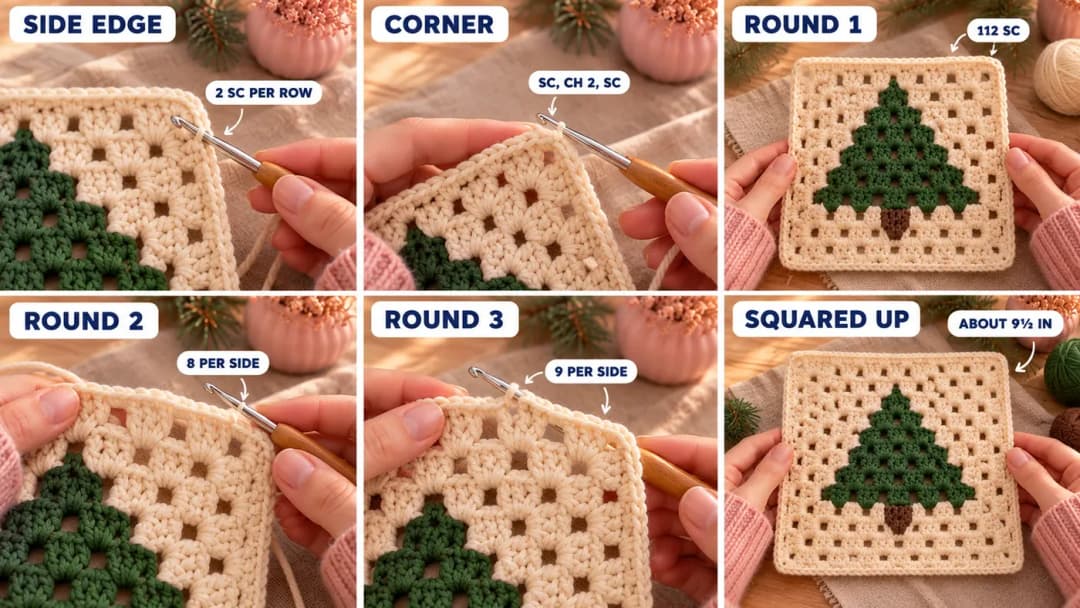
- Rnd 1 (RS): Hold the panel with the RS facing and Row 13 at the top. Join cream in the last dc of Row 13 (top left corner). Ch 1. Work down the side, with 2 sc around the post of each row-end stitch (the ch 3 or the edge dc): 26 sc. (Sc, ch 2, sc) in the first free loop of the foundation ch. Sc in each of the next 26 free loops. (Sc, ch 2, sc) in the last free loop. Work up the other side with 26 sc. (Sc, ch 2, sc) in the top of the ch 3 at the start of Row 13. Sc in each of the next 26 dc. (Sc, ch 2, sc) in the last dc, the one you joined in. Sl st into the first sc. Fasten off. (112 sc: 28 sc per side between the ch-2 corners)
- Rnd 2: Join cream in any corner ch-2 sp. Ch 3, (2 dc, ch 2, 3 dc) in the same sp. Skip 3 sc, (3 dc in the next sc, skip 2 sc) 7 times in total, 3 dc in the next sc, skip 3 sc. (3 dc, ch 2, 3 dc) in the next corner sp. Work from * to * 3 times in total, then work the last side the same way, without the corner. Sl st into the top of the ch 3. (120 dc: 8 clusters per side, plus the corners)
- Rnd 3: Sl st in the next 2 dc and into the corner sp. Ch 3, (2 dc, ch 2, 3 dc) in the same sp. 3 dc in each of the 9 sps along the side, (3 dc, ch 2, 3 dc) in the next corner sp. Work from * to * 3 times in total, then 3 dc in each of the 9 sps of the last side. Sl st into the top of the ch 3. Fasten off and weave in the ends. (132 dc: 9 clusters per side, plus the corners)
Counting the sps on Rnd 3: there's one sp after the corner group, seven between the 8 clusters of Rnd 2, and one before the next corner. That's 9.
Tip: the bottom free loops and the side row ends are where borders go wavy. If Rnd 1 ruffles on a side, you're putting the 2 sc into the same spot twice. Each row end gets its own pair.
Popcorn baubles and a five-point star
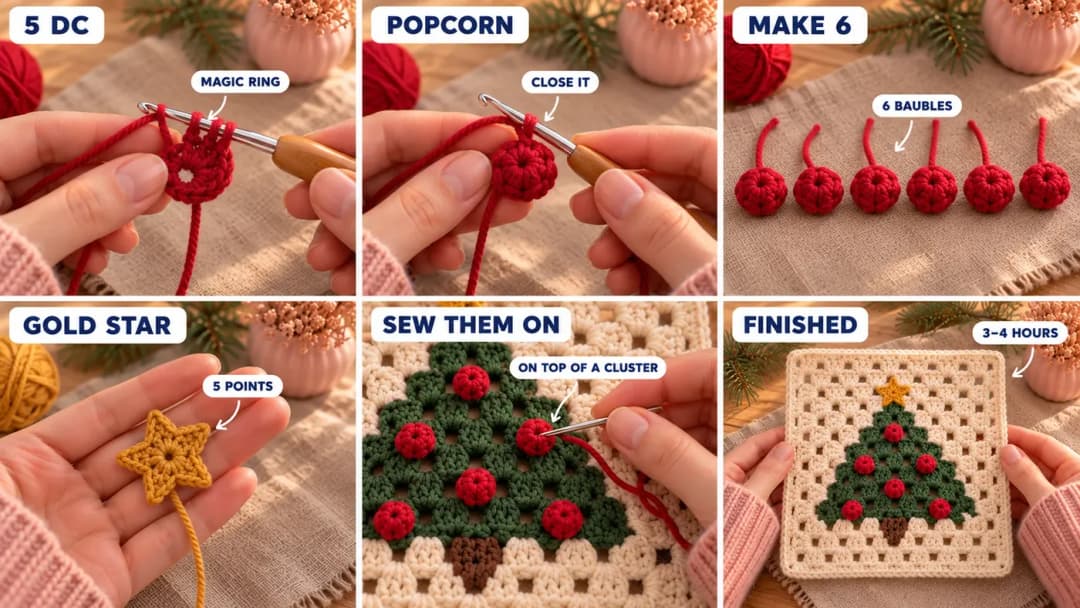
Popcorn bauble (red, make 6). MR. Ch 2 (doesn't count as a st), 5 dc in the ring. Take the hook out of the loop. Insert it from front to back into the top of the first dc, pick up the dropped loop and pull it through. Ch 1 to lock it. Pull the ring tail tight, so the 5 dc fold into a little round ball. Fasten off, leaving an 8-in (20 cm) tail. (5 dc)
Star (gold, make 1). MR. (Ch 3, sl st in the 2nd ch from the hook, sc in the next ch, sl st in the ring) 5 times in total. Pull the ring tight. Fasten off, leaving a 10-in (25 cm) tail. (5 points)
The star comes out about 1¼ in (3 cm) across in worsted. If your points curl, pin the star flat and steam it before you sew it.
Blocking the square, then sewing on the baubles
Block first. Pin the square to about 9½ in (24 cm), RS up, with straight sides and square corners. Hold a steam iron about 1 in above it, let the steam soak in, and let it dry. Don't touch the iron to the yarn. Blocking first means the baubles stay round and plump: you won't flatten them with steam.
Placing the baubles. Hold the square with the trunk at the bottom. Each bauble sits on the top of one green cluster. Count the green clusters of each row from either side: the layout is the same both ways.
| Row | Green clusters | Baubles on green cluster |
|---|---|---|
| 5 | 6 | 2nd and 5th |
| 6 | 5 | 3rd (the middle) |
| 7 | 4 | 1st and 4th (the ends) |
| 8 | 3 | 2nd (the middle) |
That's 6 baubles. They fall into an even diamond pattern: the two baubles of Row 7 sit right above the two of Row 5, and the one of Row 8 right above the one of Row 6.
Sewing. Thread a bauble's tail on the needle and push it through the middle of its cluster to the wrong side. Bring it back up through the base of the bauble, and down again on the other side, three or four times around. Tie the tail to the ring tail on the wrong side, then weave both ends into the green.
The star. Place it centred over the single green cluster of Row 10, with one point straight up. The two lower points rest on the top of that cluster, and the star covers the middle of Row 11. Sew a few stitches around the centre ring, then one small stitch at the tip of each point so they stay flat.
Hanging, framing or stitching the tree square into a pillow
One square makes a sweet wall hanging: sew three small cream loops along the back of the top border, slide a 12-in (30 cm) wooden dowel through them and tie a length of twine to both ends. It also fits a 10 × 10 in (25 × 25 cm) shadow box frame with a little room around it.
For a pillow, make four squares and join them two by two for a front of about 19 in (48 cm). Back it with fabric or four plain granny squares. A blanket of 6 × 7 squares comes to about 57 × 66 in (145 × 168 cm). I'd alternate tree squares with plain cream ones of the same size: same 13 rows, no colour changes. Join them with a whipstitch through the back loops of Rnd 3.
This square is big and bold. If you want something calmer next to it, my pine sprig granny square is a smaller, quieter design for coasters and table runners. For more ideas for the season, browse my free crochet Christmas patterns.
Tree square questions
Can I carry the colours instead of using bobbins? Not across the granny gaps: a carried strand shows on the right side as a line through every gap. The only carry in this pattern is inside the single brown cluster, where the 3 dc hide it completely.
Can I make a smaller square? Yes. Work the same rows in DK yarn with a 4 mm hook, and the square comes out around 8 in (20 cm). Measure your panel after Row 4 to be sure, and wind smaller bobbins.
Can I sell the squares I make? Yes, you're welcome to sell finished squares, pillows or blankets made from this free pattern. Please credit Wavode and link back to this page. Please don't republish the pattern text or my photos.
A tree square folded around a gift card, with a red ribbon through the border, is my favourite last-minute present. Made one? Tag #wavodecrochet on Pinterest: I love seeing them.