Solid Granny Square Blanket

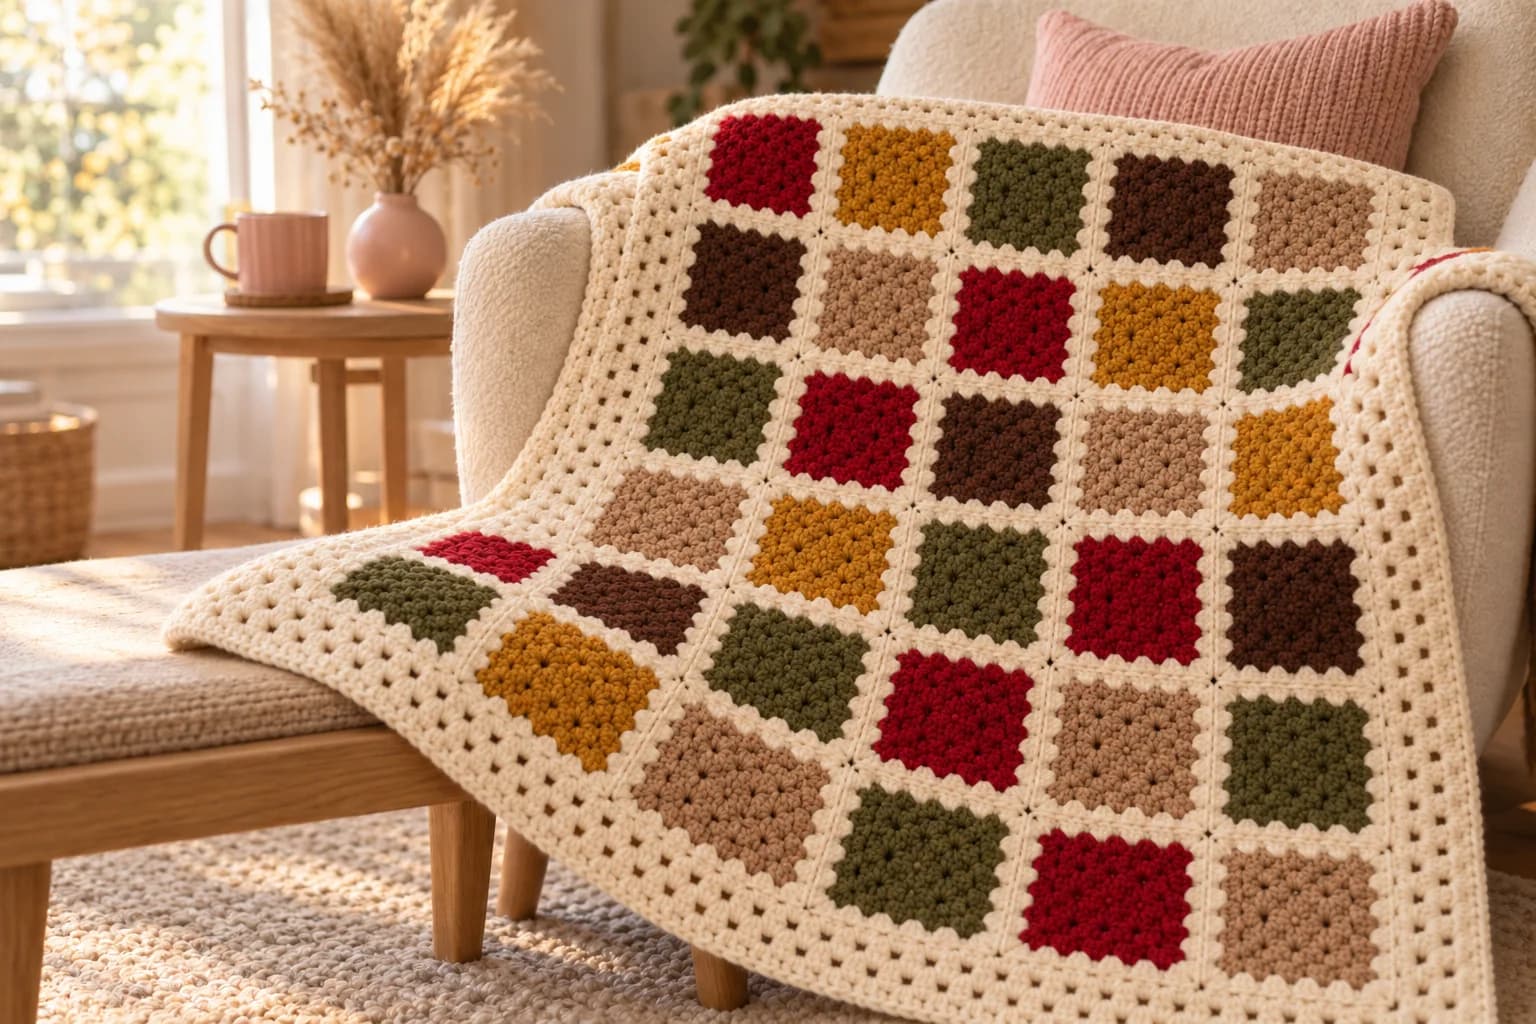
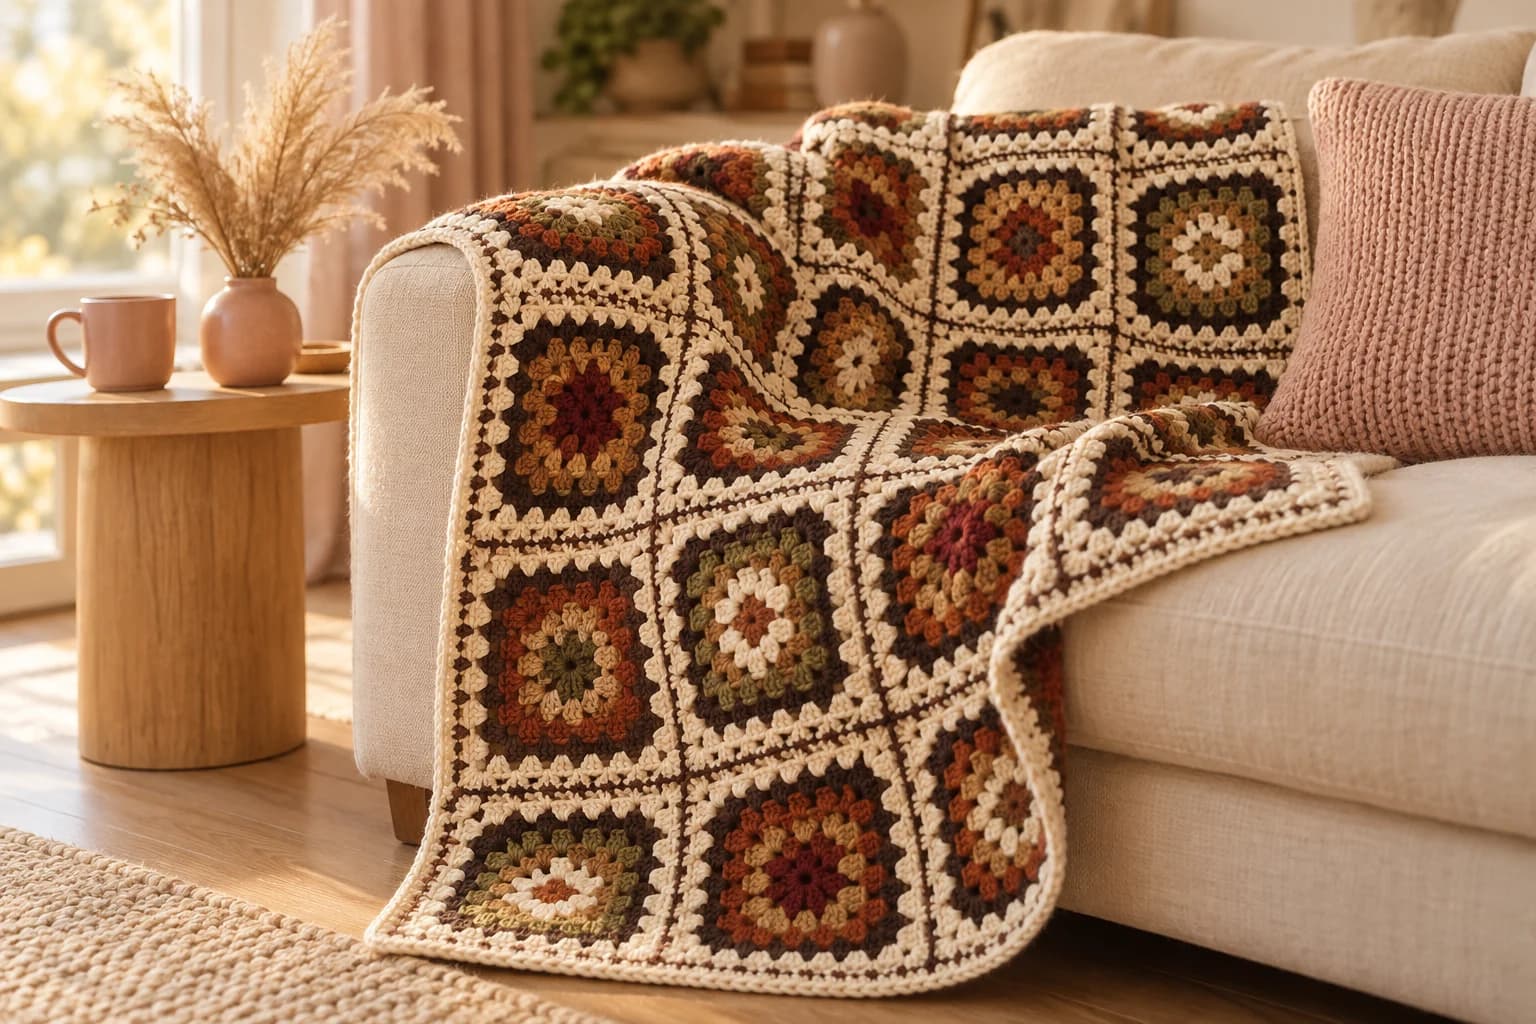
This solid granny square blanket is made of 80 dense squares in cranberry, mustard, olive, chocolate and tan, each framed in cream and finished with a wide cream granny border. A solid granny has no chain spaces between its clusters, so the squares are thick and warm, with almost no holes. It's worked in worsted yarn on a 5 mm hook, measures about 52 × 64 inches and takes about 2,900 yards.
Key Takeaways
- Solid granny squares: each cluster sits in the gap between two clusters below, with no chain 1, for a dense, warm fabric.
- Five rounds of color, one round of cream on every square.
- An almost invisible whipstitch seam in cream, so the frames flow into each other.
- A four-round cream granny border frames the whole blanket, like a picture mat.
Why I love this solid granny square blanket
A classic granny square is lacy; a solid granny is cozy. Because there's no chain between the clusters, every round fills in the holes of the one below, and the square comes out thick and almost closed. On a blanket that means real warmth, and nothing for fingers or toes to catch in.
The color plan is simple: five warm, deep colors for the centers and one cream for everything else. The cream frames, the cream seams and the wide cream border make a calm grid, so the cranberry and mustard squares glow inside it.
Skill level. Easy. You need a magic ring, chains, double crochet and slip stitches, plus a tapestry needle for the seams. The only difference from a classic granny is where you put each cluster, and Part 1 shows exactly where.
Looking for a lacier look? My granny square blanket uses classic open squares with a stripe in every round, and my fall granny square blanket joins small solid-color squares as you go.
What you'll need
Yarn: a soft worsted #4 acrylic, such as Lion Brand Vanna's Choice (170 yd / 156 m per 100 g ball).
| Color | Used for | Amount (estimate) | Balls (170 yd) |
|---|---|---|---|
| Cream | Round 6 of every square, the seams and the border | about 1,150 yd | 8 |
| Cranberry | 16 square centers | about 350 yd | 3 |
| Mustard | 16 square centers | about 350 yd | 3 |
| Olive | 16 square centers | about 350 yd | 3 |
| Chocolate | 16 square centers | about 350 yd | 3 |
| Tan | 16 square centers | about 350 yd | 3 |
I worked these amounts out from the stitch counts, with a margin for tails, so treat them as estimates. A solid granny uses more yarn than a lacy one of the same size, because there are no chains. Buy all the cream at once, from the same dye lot if your yarn has one.
Hook and notions
- 5 mm hook (US H/8).
- A tapestry needle and scissors.
- A tape measure.
Gauge and finished size
With worsted yarn and a 5 mm hook, your square should measure about 3 in (7.5 cm) across after Round 3, and about 6 in (15 cm) after Round 6. If it's bigger, go down half a hook size; if it's smaller, go up half a size. All 80 squares have to match, so measure every tenth one.
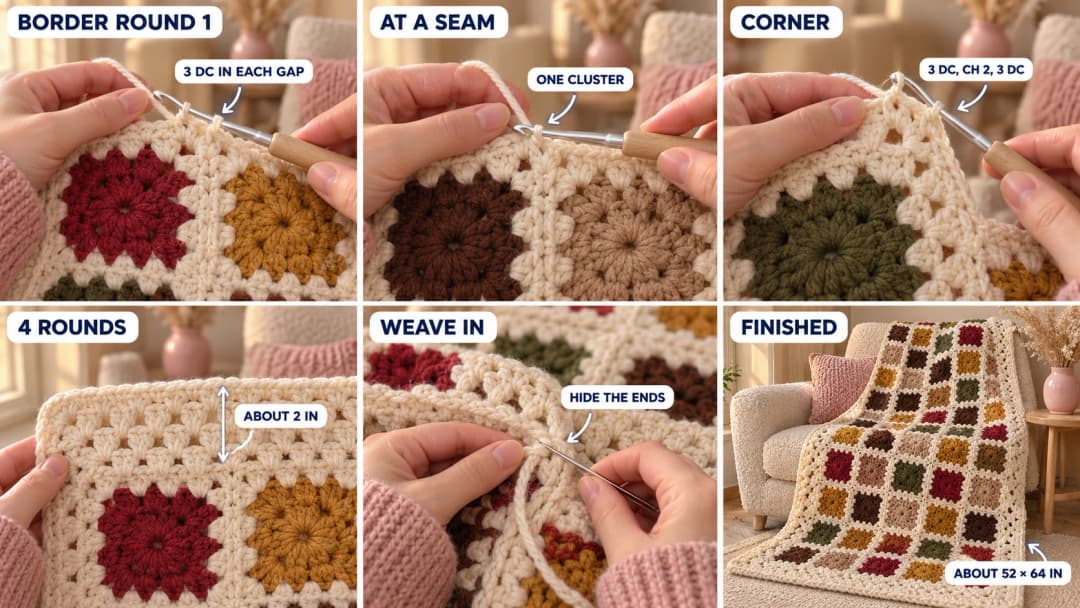
With 8 squares across and 10 down, the blanket is about 48 × 60 in before the border and about 52 × 64 in (132 × 163 cm) after it. These sizes are estimates from the gauge: measure your first square and multiply.
Abbreviations (US crochet terms)
- MR: magic ring
- ch: chain
- sl st: slip stitch
- dc: double crochet
- sp(s): space(s)
- st(s): stitch(es)
- R: round
A cluster is 3 dc in the same place. A corner group is (3 dc, ch 2, 3 dc) in the same corner space. A gap is the little space between two clusters that sit side by side: you work the next cluster down into it. All rounds are joined rounds worked on the right side.
The pattern, part 1: one solid granny square (make 80)
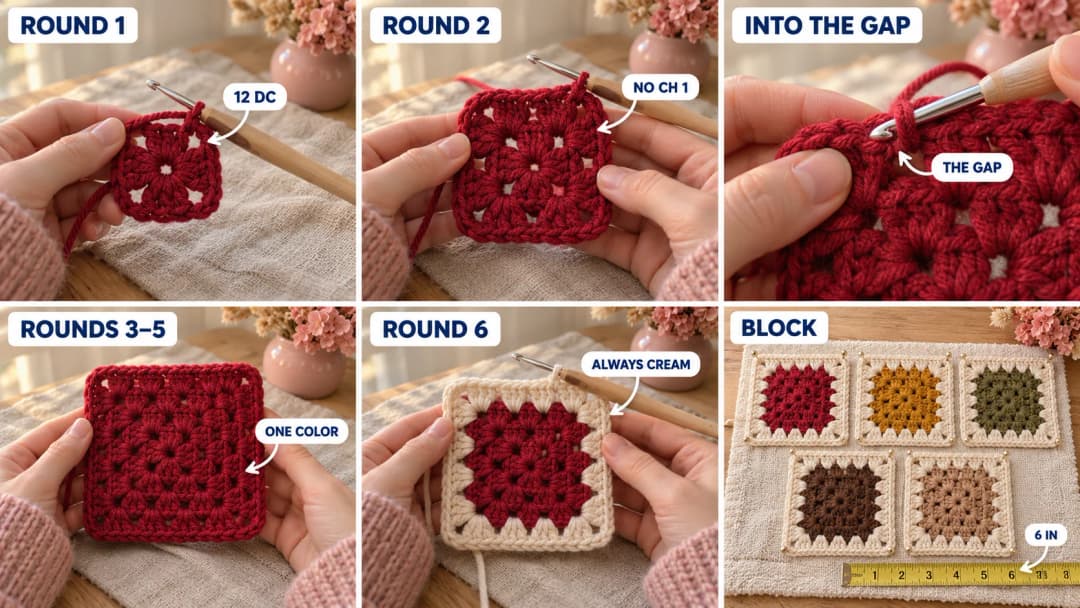
Rounds 1 to 5 are worked in one center color without fastening off: you move to the next corner with slip stitches. Round 6 is always cream.
- R1: with the center color, make a MR. Ch 3 (counts as a dc), 2 dc in the ring, ch 2, (3 dc in the ring, ch 2) 3 times in total. Pull the ring tight and sl st in the top of the ch 3. (12 dc: 4 clusters and 4 ch-2 corner sps)
- R2: sl st in each of the next 2 dc and in the corner sp. Ch 3 (counts as a dc), (2 dc, ch 2, 3 dc) in the same sp. Then work a corner group in each of the next 3 corner sps, with no chain between them. Sl st in the top of the ch 3. (24 dc: 8 clusters)
Now each side has two clusters side by side with a gap between them. That gap is where the solid granny grows.
- R3 to R5: sl st in each of the next 2 dc and in the corner sp. Ch 3, (2 dc, ch 2, 3 dc) in the same sp. On each side: 3 dc in each gap along that side, then a corner group in the next corner sp. Work the side and corner 3 times in total, then the fourth side, and sl st in the top of the ch 3.
Fasten off the center color after R5.
- R6 (cream): join cream with a sl st in any corner sp. Ch 3, (2 dc, ch 2, 3 dc) in the same sp, and work the round the same way as R3 to R5. Fasten off, leaving a 6-in tail to weave in.
There's never a chain between clusters, only the ch 2 in the corners. Every round has one more cluster on each side:
| Round | Color | Clusters per side, counting the half of each corner group | Gaps per side | dc in the round |
|---|---|---|---|---|
| R1 | center | 1 | 0 | 12 |
| R2 | center | 2 | 1 | 24 |
| R3 | center | 3 | 2 | 36 |
| R4 | center | 4 | 3 | 48 |
| R5 | center | 5 | 4 | 60 |
| R6 | cream | 6 | 5 | 72 |
So each side of R6 has 18 dc between the two corner sps. You'll use that number for the seams.
Keep the squares square. Solid grannies like to twist a little, because you always move to the corner the same way. Block each finished square flat to 6 in: pin it on a towel, mist it or hover a steam iron over it, and let it dry.
Part 2: the layout and the whipstitch seams
The layout
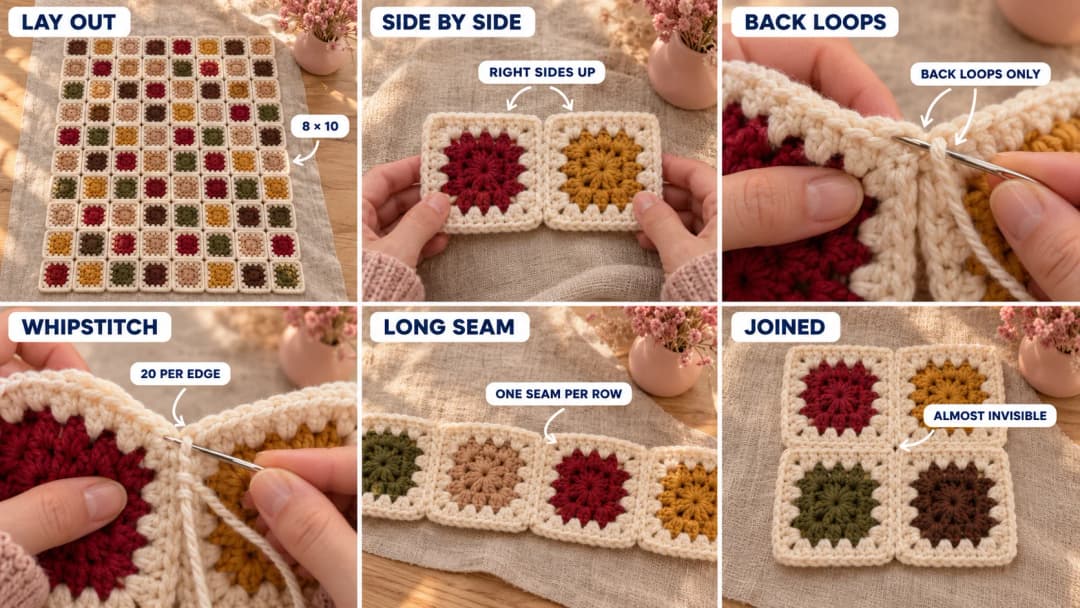
Lay out the 80 squares, 8 across and 10 down, using this color key: 1 cranberry, 2 mustard, 3 olive, 4 chocolate, 5 tan.
| Rows | Squares 1 to 8 |
|---|---|
| Rows 1 and 6 | 1 2 3 4 5 1 2 3 |
| Rows 2 and 7 | 3 4 5 1 2 3 4 5 |
| Rows 3 and 8 | 5 1 2 3 4 5 1 2 |
| Rows 4 and 9 | 2 3 4 5 1 2 3 4 |
| Rows 5 and 10 | 4 5 1 2 3 4 5 1 |
Each row starts two colors further along than the row above. Two squares of the same color never touch, side by side or one above the other, and you use exactly 16 of each color. Take a phone photo of the layout: it's your map.
How the whipstitch seam works
Lay two squares side by side, right sides up, with the edges to be joined touching and the corners lined up. Thread a long length of cream on the tapestry needle. Working through the back loops only of both edges (the loop of each top stitch that sits toward the wrong side, under the front loop), whipstitch from one corner to the other:
20 stitches per edge: 1 through the two corner sps, 1 through each of the 18 pairs of dc, and 1 through the next two corner sps.
The front loops stay on top as a neat cream line, so the seam almost disappears into the cream frames. Pull each stitch snug but not tight: the edge should stay as long as the square.
Seam order: long seams
- Horizontal seams (9 of them). Join Row 1 to Row 2 in one long seam: seam the first pair of squares, then carry on into the next pair without cutting the yarn. 8 pairs, 160 stitches per long seam. Then join Row 3 to Row 2, and so on down to Row 10.
- Vertical seams (7 of them). Now the rows are joined into 8 columns. Seam the columns together the same way, from top to bottom: 10 pairs, 200 stitches per long seam. Where you cross a horizontal seam, take one stitch through all four corner sps.
That's 16 long seams and 32 ends to weave in. Weave each end into the seam itself.
Part 3: the wide cream border
Four cream rounds of solid granny clusters go all around the blanket. They're worked exactly like the rounds of a square, only longer.
- Border R1: join cream with a sl st in the corner sp at any corner of the blanket. Ch 3 (counts as a dc), (2 dc, ch 2, 3 dc) in the same sp. Work along each side: 3 dc in each of the 5 gaps of every square edge, and where two squares meet, 3 dc in the two joined corner sps, worked together as one space. Work a corner group at each corner of the blanket. Sl st in the top of the ch 3. (220 clusters: 49 along each short side and 61 along each long side, counting the half of each corner group; 660 dc)
- Border R2 to R4: sl st in each of the next 2 dc and in the corner sp. Ch 3, (2 dc, ch 2, 3 dc) in the same sp. On each side, 3 dc in each gap, then a corner group in the next corner sp. Sl st in the top of the ch 3. (R2: 224 clusters, R3: 228 clusters, R4: 232 clusters, so 672, 684 and 696 dc)
Fasten off and weave in the ends. Give the whole blanket a last light block to straighten the border.
Make it yours — quick variations
| Variation | Change from the base pattern |
|---|---|
| Lap blanket | 6 × 8 squares (48), about 40 × 52 in. Border R1: 37 clusters along each short side and 49 along each long side (172 clusters), then 176, 180 and 184. Use colors 1 to 5 in the same repeat, 9 or 10 of each. |
| Bed throw | 10 × 12 squares (120), about 64 × 76 in. You'll need about 1.5 times the yarn. |
| Holiday version | Cranberry, deep green, gold and cream: keep cream for the frames and border. |
| Lacy frame | Work R6 as a classic granny round, with ch 1 between the clusters, for a lighter frame. Then seam through the dc only and skip the ch 1s. |
| Narrow border | Stop after Border R2 for a frame of about 1 in. |
Troubleshooting the three things that go wrong
My square has holes like a classic granny
You're chaining between clusters out of habit. In a solid granny, the only chains are the ch 2 in the corners. Each new cluster goes straight into the gap between two clusters of the round below.
The square twists or slants
A slight twist is normal with solid grannies. Block each square flat before seaming. If it's strong, your clusters are pulled tight: relax your tension, or go up half a hook size for the next squares, and keep the slip stitches to the corner loose.
The whipstitch seam shows or puckers
If you see the seam, you're stitching through both loops: catch only the back loops. If the seam puckers, the stitches are tight. Lay the first long seam flat to check it's as long as the squares.
Frequently asked questions
What's the difference between a solid granny square and a classic one? A classic granny has a ch 1 between clusters, so it's lacy. A solid granny has no chains between clusters, only in the corners, so it's dense and warm. The stitch counts are the same: 12 more dc in every round.
How long does it take? About 30 minutes per square, so 40 hours for the 80 squares, plus about 5 hours of seaming and 3 hours for the border.
Can I join the squares as I go instead of sewing them? Yes. Work the join on the cream R6, like in my fall granny square blanket: replace the ch 2 of joined corners with (ch 1, sl st in the neighbor's corner sp, ch 1), and sl st into the matching gap of the neighbor between clusters.
Is it heavy? It's warmer and a little heavier than a lacy granny blanket of the same size, because a solid granny uses more yarn. In acrylic, it's still light enough for the sofa.
Can I sell blankets made from this pattern? Yes, you're welcome to sell finished blankets made from this free pattern at markets, on Etsy or at a craft fair. Please credit "Pattern by Wavode" in your listing and link back to this page. What you can't do is share or sell the pattern itself, or republish my photos as your own.
Related patterns on Wavode
- Granny square blanket: classic open squares in earth tones, framed in chocolate and cream.
- Fall granny square blanket: small solid-color squares joined as you go in olive.
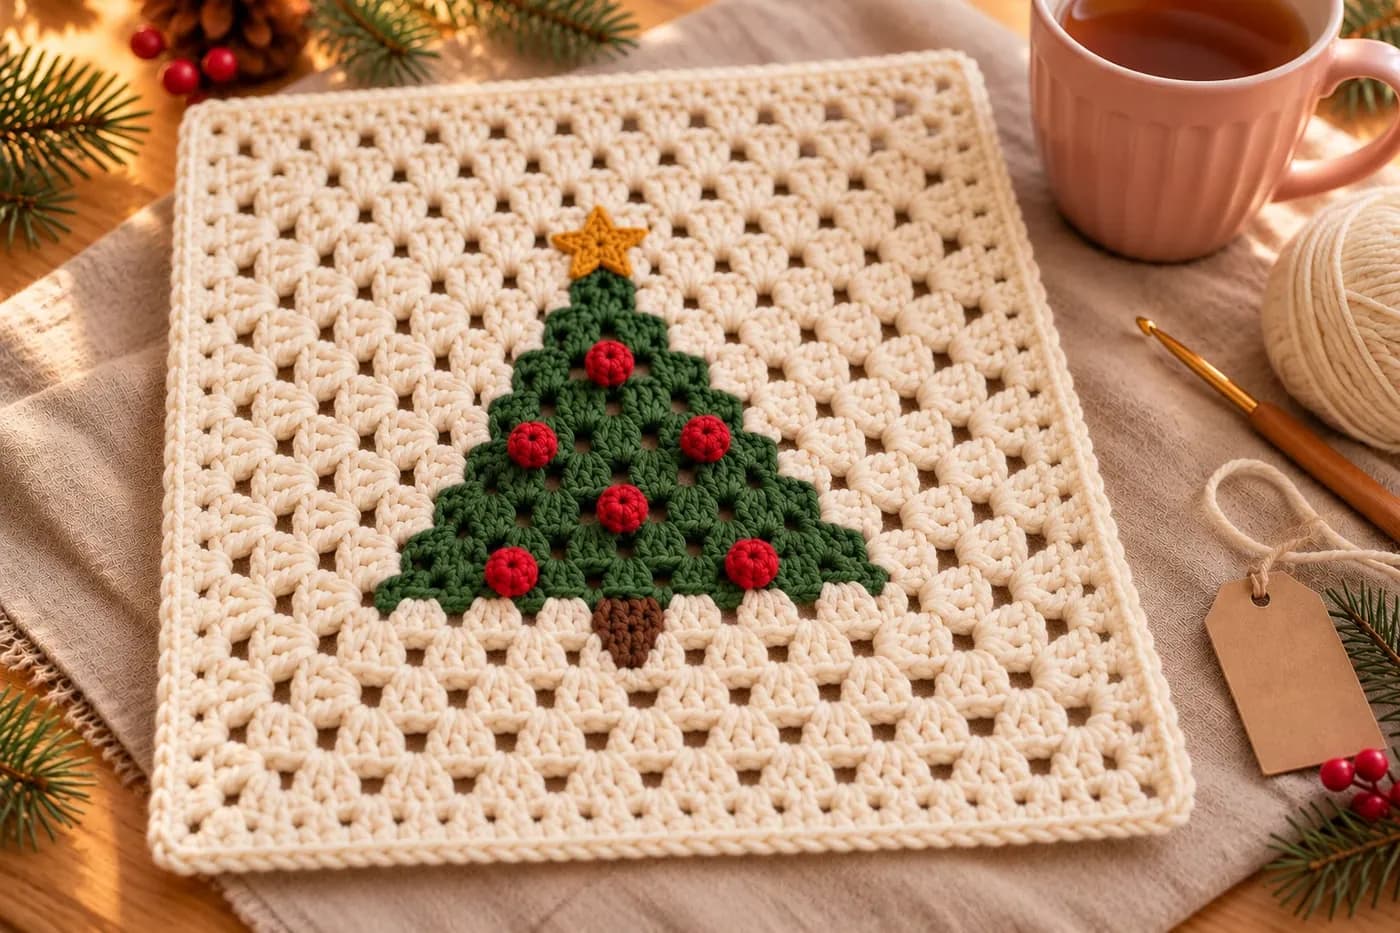
- Christmas granny square: a single cream square with embroidered pine sprigs.
- Free crochet flower blanket: another throw for the sofa.
Made a solid granny square blanket? Tag #wavodecrochet on Pinterest. I re-pin every finished make and credit the maker.
Pattern by Clara Hartwell for Wavode. Questions? Email me at support@wavode.com.