Free Crochet Flower Blanket Pattern


This free crochet flower blanket pattern makes a cozy cream throw, about 31 × 41 inches, with a garden of 30 rolled roses and 20 leaves at the top. Fold the sides back, gather it under the flowers and it turns into a giant bouquet. Untie it and it's a blanket. The body is plain half double crochet in super bulky chenille on an 8 mm hook. The roses are two-row strips you roll up and sew on. Plan on about 1,000 yards in total and 18 to 22 hours.
Key Takeaways
- One blanket, two lives: a bouquet you can hand over, then a throw for the sofa.
- Every rose is a two-row strip: a row of V-stitches, a row of shells, then roll and sew.
- 50 flower pieces: 20 roses, 10 rosebuds and 20 leaves, in a patch about 20 in wide at the top center.
- About 1,000 yd: ~520 yd cream super bulky, ~390 yd bulky in three pinks, ~85 yd green.
Why I love this bouquet blanket
A bouquet of real roses is lovely for a week. This one gets handed over as flowers and then lives on the sofa for years. That double life makes it a wonderful big gift for a birthday, a graduation or Mother's Day.
The secret is that nothing here is hard. The blanket is one stitch, row after row, in a yarn so thick it grows fast. Each rose is a short chain with two rows on it, rolled up like a cinnamon bun. Once you've made three, your hands know the rhythm, and the rest is good TV-watching work.
Have you ever wanted a project you can pick up in ten-minute pockets? Roses are exactly that. Make one with your morning coffee, and the pile grows faster than you'd think.
Skill level. Easy stitches, with a little patience at the end. You need a chain, sc, hdc, dc and tr, plus basic sewing with a tapestry needle. The blanket has no shaping and no colorwork. The one step that takes care is placing the flowers, and Part 3 gives you a pin-and-fold check before you sew anything.
New to chunky throws? My chunky moss stitch blanket uses the same thick yarn and is a good warm-up.
What you'll need
Blanket yarn: super bulky #6 chenille, such as Bernat Blanket, in cream: about 520 yd (475 m). That's usually 3 big balls, but check the yardage on your label.
Rose and leaf yarn: bulky #5 smooth acrylic, such as Lion Brand Hue + Me or Bernat Softee Chunky:
- Coral pink: about 140 yd (128 m) for 7 roses and 4 rosebuds.
- Soft peach: about 130 yd (119 m) for 7 roses and 3 rosebuds.
- Raspberry pink: about 120 yd (110 m) for 6 roses and 3 rosebuds.
- Sage green: about 85 yd (78 m) for 20 leaves and 10 optional bud caps.
I worked these amounts out from the stitch counts: roughly 6 inches of chenille per hdc in the blanket, about 14 yd per rose, 9 yd per rosebud, 3 yd per leaf and 1½ yd per bud cap, including sewing tails. Treat them as estimates. Make your first rose, see how much of the ball it took, and buy an extra ball of the color you love most.
Hooks and notions
- 8 mm (US L-11) hook for the blanket.
- 6 mm (US J-10) hook for the roses and leaves.
- A large-eye tapestry needle, about 50 long pins or locking stitch markers, a tape measure and scissors.
- About 2 yd (1.8 m) of 1½ in (4 cm) blush satin ribbon for the neck of the bouquet. To check, measure around the gathered blanket in Part 4: you need twice that, plus about 30 in (75 cm) for the bow.
- About 30 in (75 cm) of narrow cream ribbon, ¼ in (6 mm) wide, or a length of the cream yarn, for the removable back tie.
Gauge and finished size
Blanket gauge: about 7 hdc and 5 rows = 4 in (10 cm) with the 8 mm hook, measured flat and unstretched. Chenille stretches, so lay your swatch on a table and don't pull it. If you have more stitches, go up a hook size; fewer, go down.
Blanket size, approximately: the body is about 30 × 40 in (76 × 102 cm) before the border. The single crochet border adds roughly ½ in all around, so the finished blanket is about 31 × 41 in (79 × 104 cm). Measure after the first 10 rows: the width won't change after that.
Rose size: measure your first finished rose across the top before you make the other 19. The layout is planned for roses about 3½ in (9 cm) across and rosebuds about 2 in (5 cm). Your yarn and tension change this, and that's fine: Part 3 tells you how to adjust the spacing to your own rose's width.
Abbreviations (US crochet terms)
- ch = chain
- sl st = slip stitch
- sc = single crochet
- hdc = half double crochet
- dc = double crochet
- tr = treble crochet
- V-st = (dc, ch 1, dc) in the same stitch
- sp = space
- st(s) = stitch(es)
- RS = right side
The pieces at a glance
| Piece | Yarn | Make | Size (approx.) |
|---|---|---|---|
| Blanket | Cream super bulky | 1 | 31 × 41 in with border |
| Rose | Coral / peach / raspberry bulky | 20 (7 / 7 / 6) | 3½ in across |
| Rosebud | Coral / peach / raspberry bulky | 10 (4 / 3 / 3) | 2 in across |
| Leaf | Sage green bulky | 20 | 3½ in long |
| Bud cap (optional) | Sage green bulky | 10 | 5 small points |
That's 30 flowers and 20 leaves in total. Make the blanket first, then one rose to measure, then the rest.
The pattern — step by step
Part 1 — The blanket
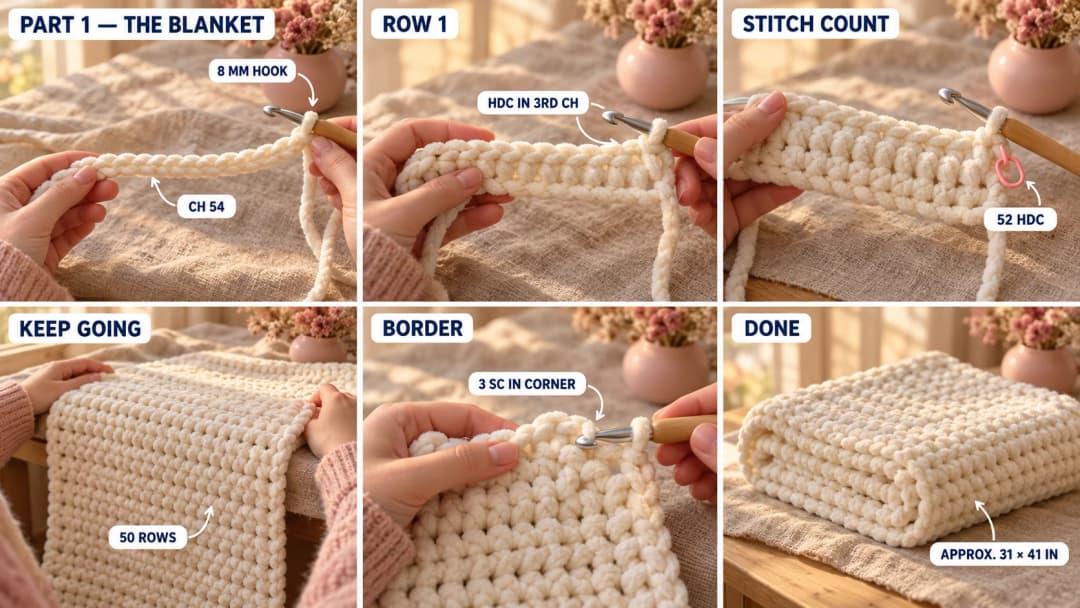
With the 8 mm hook and cream, ch 54.
Row 1 (RS): hdc in the 3rd ch from the hook and in each ch across. (52 hdc. The skipped 2 ch don't count as a stitch.) Put a marker on this side: it's the RS.
Row 2: ch 2 (doesn't count), turn, hdc in each st across. (52 hdc)
Rows 3–50: repeat Row 2. (50 rows in total, about 40 in long.)
Row 50 is a wrong-side row, so when you finish it the RS is on the back. Don't fasten off. Ch 1 and turn: the RS now faces you, and your hook sits at the top corner, ready for the border. This last edge is the top of the blanket, where the flowers go.
Border round:
- Top edge: 3 sc in the first st (corner), sc in each of the next 50 sts, 3 sc in the last st (corner). (56 sc along this edge)
- Side: work down the row ends. *1 sc in the next row end, 2 sc in the following row end. Repeat from * 25 times in total. (75 sc)
- Bottom edge: working into the other side of the foundation chain, 3 sc in the first ch (corner), sc in each of the next 50 ch, 3 sc in the last ch (corner). (56 sc)
- Second side: work up the row ends the same way, 1 sc then 2 sc, 25 times in total. (75 sc)
- Sl st into the first sc. (262 sc planned)
Lay the blanket flat before you fasten off. If the sides ripple, the border is too full: undo the side and work 1 sc in every row end, with 2 sc in every third one instead. Fasten off and weave in the ends, going back and forth through 3 or 4 stitches. Chenille ends love to work loose, so weave them longer than you would with wool.
Part 2 — Roses and rosebuds
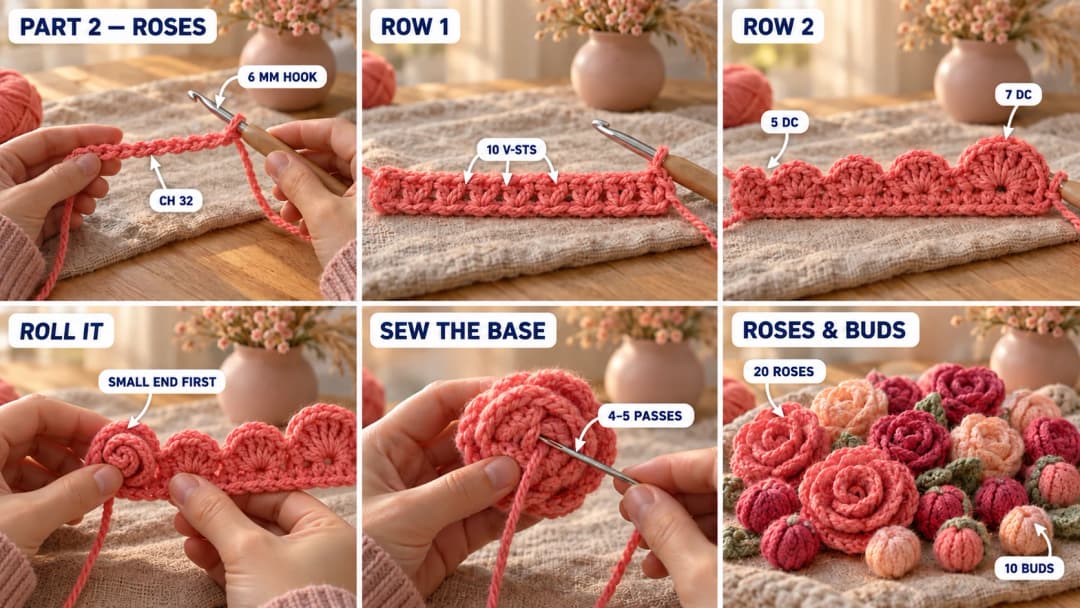
Every rose is a strip of V-stitches with a row of shells on top. The shells are smaller at the start, so the center of the rose stays tight.
Rose (make 20: 7 coral, 7 peach, 6 raspberry)
With the 6 mm hook, ch 32.
Row 1: (dc, ch 1, dc) in the 5th ch from the hook. *Skip 2 ch, V-st in the next ch. Repeat from * across. (10 V-sts in total, the last one in the very first chain you made.)
Row 2: turn, ch 1, sc in the first dc.
- [5 dc in the next ch-1 sp, sc in the gap between this V-st and the next] 3 times.
- [7 dc in the next ch-1 sp, sc in the gap between this V-st and the next] 6 times.
- 7 dc in the last ch-1 sp, sc in the top of the 4 skipped chains.
(10 shells: 3 small, 7 big.) Fasten off, leaving a 24-inch tail. This tail is at the big-shell end, and it does two jobs: it holds the coil together, then it sews the rose to the blanket.
Rosebud (make 10: 4 coral, 3 peach, 3 raspberry)
With the 6 mm hook, ch 20.
Row 1: (dc, ch 1, dc) in the 5th ch from the hook. *Skip 2 ch, V-st in the next ch. Repeat from * across. (6 V-sts in total.)
Row 2: turn, ch 1, sc in the first dc.
- [5 dc in the next ch-1 sp, sc in the gap between this V-st and the next] 2 times.
- [7 dc in the next ch-1 sp, sc in the gap between this V-st and the next] 3 times.
- 7 dc in the last ch-1 sp, sc in the top of the 4 skipped chains.
(6 shells: 2 small, 4 big.) Fasten off, leaving an 18-inch tail.
Rolling a rose
- Weave in the short starting tail at the small-shell end.
- Hold the strip with the shells on top. Starting at the small-shell end, roll the strip around itself. Keep the bottom edge (the foundation chain) level, so the rose has a flat base.
- Roll the small shells tightly for the center. Roll the big shells a little looser and fold their tops slightly outward, so the outer petals open.
- Thread the long tail on the needle. Sew straight through all the layers at the base, 4 or 5 times, crossing each pass. The coil shouldn't be able to unroll.
- Leave the rest of the tail hanging for the sewing in Part 3. If it's shorter than about 10 in by now, sew the rose on later with a separate length of matching yarn instead.
Closing a rosebud
Roll the rosebud as tight as you can, with the big shells standing straight up instead of folding out. Sew the base the same way. Then bring the needle up through the side of the bud, pinch the top edges of the last two shells together over the center, and tack them with 2 small stitches. The bud closes into a little round ball, with just a hint of spiral on top. Take the needle back down to the base.
Bud cap (optional, make 10 in sage green)
A little green star under each rosebud makes it look like a real bud about to open, as in the photo at the top.
With the 6 mm hook, ch 4 and sl st into the first ch to make a small ring. *Ch 4, sl st in the 2nd ch from the hook, sc in each of the next 2 ch, sl st into the ring. Repeat from * 5 times in total. (5 pointed sepals.) Fasten off, leaving a 10-inch tail.
Set the closed rosebud in the center of the star, with the points cupping up around its sides. With the green tail, sew the ring to the base of the bud, then tack the tip of each point to the bud with 1 small stitch. Sew the bud to the blanket with its own tail as usual.
Part 3 — Leaves and the flower garden
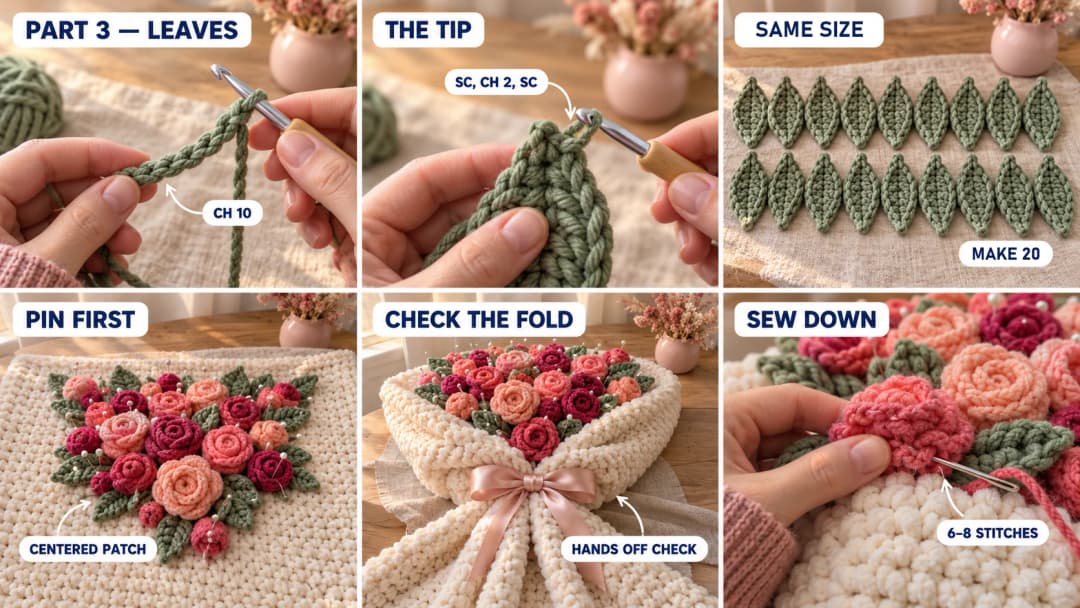
Leaf (make 20 in sage green)
With the 6 mm hook, ch 10. Leave a short starting tail.
Side 1: starting in the 2nd ch from the hook (the one next to the hook) and working toward the slip knot: sc, dc, tr, tr, dc, dc, hdc, sc. (8 sts) In the last ch (the first chain you made, right beside the slip knot, not the knot itself), work (sc, ch 2, sc) for the tip.
Side 2: turn the work and continue along the other side of the same chains, back toward the hook end: sc, hdc, dc, dc, tr, tr, dc, sc. Sl st into the first sc.
Fasten off, leaving a 12-inch tail. That tail is at the base of the leaf, where the tall stitches make it widest. The short starting tail hangs beside that first chain, so it sits at the tip: weave it in there.
Lay your finished leaves side by side as you go: they should all come out the same size, so the fringe around the flowers looks even.
Optional vein: with a strand of the same green, work a line of surface slip stitches up the middle of the leaf, from the base to the tip. It gives the leaf a midrib, like a real rose leaf.
Planning the flower patch
The flowers sit in a patch centered across the width, at the top of the blanket. It's about 20 in wide, leaving about 5 in plain at each side. Those plain sides fold to the back later, like bouquet paper.
Lay the blanket flat, RS up, top edge away from you. Put a pin at the top edge in the exact center: that's your center line. Every measurement below is the position of a flower's center, measured down from the top edge and out from that center line. "Rose width" means the width of your own finished rose (about 3½ in).
- Row 1, centers 2 in below the top edge: 5 roses. One on the center line, then one every rose width out to each side.
- Row 2, centers 4½ in down: 4 roses, each one centered under a gap of Row 1. Then 1 rosebud at each end, just outside the last rose.
- Row 3, centers 7 in down: 5 roses, placed like Row 1.
- Row 4, centers 9½ in down: 4 roses and 2 rosebuds, placed like Row 2.
- Row 5, centers 11½ in down: 2 roses, their inner petal edges just touching at the center line. Then 3 rosebuds outward from each rose, each one's petals just touching its neighbor. The row is about 19 in wide, centered on the blanket.
That's 5 + 4 + 5 + 4 + 2 = 20 roses and 2 + 2 + 6 = 10 rosebuds. The rows overlap a little, so the petals touch and the patch looks full. The flowers themselves end about 13 in below the top edge. Mix the colors so no two of the same pink touch.
If your roses aren't 3½ in wide. The row positions above are starting points for 3½-in roses. If your flowers are smaller or larger, adjust the distance between rows too, not just the spacing across: neighboring rows should overlap slightly without crushing the petals. Then recheck where the bottom leaf tips land, and move the gathering line in Part 4 to about 2 in below them.
Then pin the leaves:
- 12 leaves along the bottom, tucked under the Row 5 flowers, pointing down and slightly out. Their tips reach about 16 in below the top edge.
- 4 leaves on each side, tucked under the end flowers of Rows 2 to 4, pointing out toward the sides.
Check the bouquet before you sew. With everything pinned, follow steps 2 to 6 of Part 4: fold, gather, tie the neck, shape and tie the back. Let go, then check the bouquet from the front and from the side. From the front, no cream should show between the flowers. From the side, the flowers should lean forward and around, not stand flat like a fan. If there's a bare spot, slide the nearest flowers toward it. If the patch is too wide for the fold, move the end rosebuds of Rows 2 and 4 in by an inch. If the sides flare out, pull the back tie tighter or move the fold lines a little closer to the flowers. Then untie it, unfold it and lay it flat again.
Sewing it all down
- Roses and rosebuds first. With each flower's tail, sew its base to the blanket with 6 to 8 stitches all the way around. Go through the bottom of every layer of the coil and through the full thickness of the chenille.
- Tie the tail off on the WS with a double knot, close to the fabric, then weave it in for 3 or 4 inches. Small, flat knots keep the back comfortable when you use it as a blanket.
- Leaves next. Sew each leaf's base under the edge of its flower with 4 or 5 stitches. Add one small tack stitch halfway up each bottom leaf so it doesn't flop over. The side leaves are tacked at the base only, so their tips can bend freely when the sides fold back.
- Turn the blanket over and check the back. Every knot should be tied and every end woven in.
Part 4 — Folding it into a bouquet
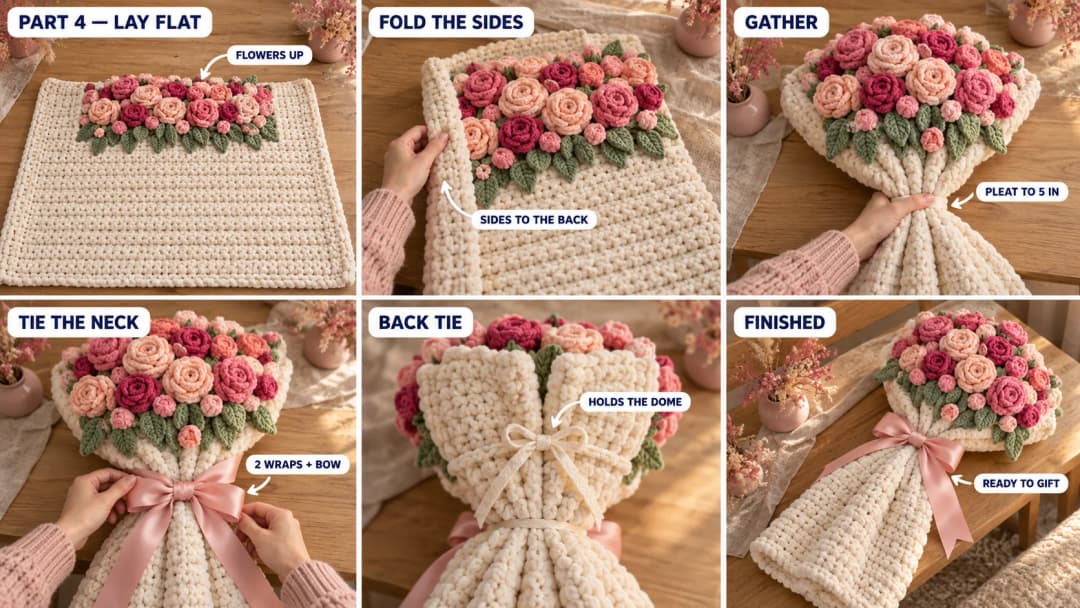
- Lay the blanket flat, flowers up, with the flower patch at the top.
- Fold the sides back. Fold each plain side to the back, WS to WS, along a line just outside the flowers. The front is now about 20 in wide, all flowers.
- Gather. About 2 in below the bottom leaves, pinch the width of the blanket together in loose pleats, from both sides toward the middle, until it's about 5 in wide. Hold it there with one hand. Gathering makes the flower patch flare out like a fan.
- Tie the neck. Wrap the long ribbon twice around the gathered part, pull it snug and tie a big bow at the front. Your hands are free now.
- Shape the dome. Gently cup the top of the patch forward, and bring its outer edges around toward the back. The exact shape depends on your fabric and your flower sizes, so adjust the pleats under the ribbon until it looks right.
- Tie the back. Turn the bouquet around. With the sides folded, the two side edges of the blanket lie behind the flowers, about 10 in apart. About 7 in below the top edge, thread the narrow ribbon through a border stitch on one side edge, then through the matching border stitch on the other. Pull the edges toward each other until the flowers wrap around the front, and tie a bow. This is what holds the dome: the neck ribbon holds the bottom, the back tie holds the top. It slides out when you untie it.
- Finish the shape. Let go and check it from the front and the side. If the top relaxes into a fan, pull the back tie a little tighter. Fluff the outer roses so the dome looks round and full. The plain chenille below the neck ribbon hangs like bouquet paper. For a shorter bouquet, fold the bottom half of it up behind, under the ribbon.
To use it as a blanket, untie both ribbons, slide the back tie out and lay it flat. Fold it back into a bouquet whenever you want it on display, on a bed or an armchair.
Washing and care
Follow the care labels of both yarns, and use the gentler method either one allows. A cold, gentle cycle inside a large mesh laundry bag, or a hand wash in a tub, keeps the roses from being pulled around. Never wring it: press the water out in a towel. Dry it flat, flowers up, and reshape the roses and buds with your fingers while they're damp. After the first wash, check that every flower is still sewn all the way around, and add a few stitches wherever one has loosened.
Make it yours — quick variations
- One-color bouquet. All 30 flowers in one shade, like soft peach, look very elegant. Buy about 390 yd of that color.
- Baby-room version. Make the blanket in white and the flowers in pale pink and cream. It's a display piece for the nursery, not for sleep (see the FAQ).
- Smaller bouquet throw. Ch 40 for 38 hdc (about 22 in wide) and work 40 rows (about 32 in long). Use a 4-row patch: Row 1, 4 roses; Row 2, 3 roses and 2 rosebuds at the ends; Row 3, 4 roses; Row 4, 3 roses and 2 rosebuds at the ends, plus 2 more rosebuds tucked between its roses. That's 14 roses, 6 rosebuds and about 12 leaves, in a patch about 15 in wide. Space the rows so neighboring flowers overlap slightly, put the gathering line about 2 in below the lowest leaf tips, and do the same pin, fold and tie check before you sew.
- Golden bouquet. Make the roses in mustard and honey yellow and the rosebuds in cream for a sunny version. They're still roses, just in yellow.
Troubleshooting the three things that go wrong
My roses look flat, not rolled
The strip was rolled too loosely at the center. Roll the 3 small shells as tightly as you can, then let the big shells open around them. Sew the base before you let go.
There's cream showing between the flowers in the bouquet
Your roses came out smaller than the spacing. The layout uses your own rose width, so re-measure a finished rose and pin the centers that far apart. If gaps remain, add a rosebud or a leaf in each gap.
The blanket edges ripple
The border has too many stitches on the sides. Work 1 sc in every row end, with 2 sc in every third one, and lay the blanket flat to check before you fasten off.
Frequently asked questions
How long does the flower blanket take? About 18 to 22 hours. The blanket body is about 7 to 8 hours of hdc. Each rose takes 15 to 20 minutes, each rosebud about 10 and each leaf about 5. Pinning, the fold check and sewing everything down take another 2 to 3 hours.
How much yarn do I need? About 1,000 yd in total: around 520 yd of cream super bulky chenille for the blanket, about 140 yd coral, 130 yd peach and 120 yd raspberry bulky for the 30 flowers, and about 85 yd sage green for the 20 leaves and the optional bud caps.
Can I make the roses in worsted yarn? Yes, with a 4.5 mm hook. Worsted roses are smaller, so measure one and follow the "If your roses aren't 3½ in wide" step in Part 3: adjust the spacing across and between rows. The 30 flowers then make a smaller patch, so fold the plain sides further back. You'll need less yarn than the bulky amounts; weigh your first rose to estimate the rest.
Is this blanket safe for a baby? Not for sleep. Babies under 12 months shouldn't sleep with any loose blanket, and the 3D roses are not a sleep surface. For a nursery, use it as a decoration or a throw for older kids, and sew every rose all the way around.
Can I sell blankets made from this pattern? Yes, you're welcome to sell finished blankets made from this free pattern at markets, on Etsy or as gifts. Please credit "Pattern by Wavode" in your listing and link back to this page. What you can't do is republish this write-up or my photos as your own pattern.
Related patterns on Wavode
- Crochet mini rose: a tiny rose for gifts and tags.
- Crochet lily bouquet: a bouquet of lilies that never wilts.
- Crochet poppy flower: a bright single bloom for a vase.
- Chunky striped crochet blanket: another fast throw in Bernat chenille.
Made a flower blanket? Tag #wavodecrochet on Pinterest. I re-pin every finished make and credit the maker.
Pattern by Clara Hartwell for Wavode. Questions? Email me at support@wavode.com.