Crochet Poppy Flower

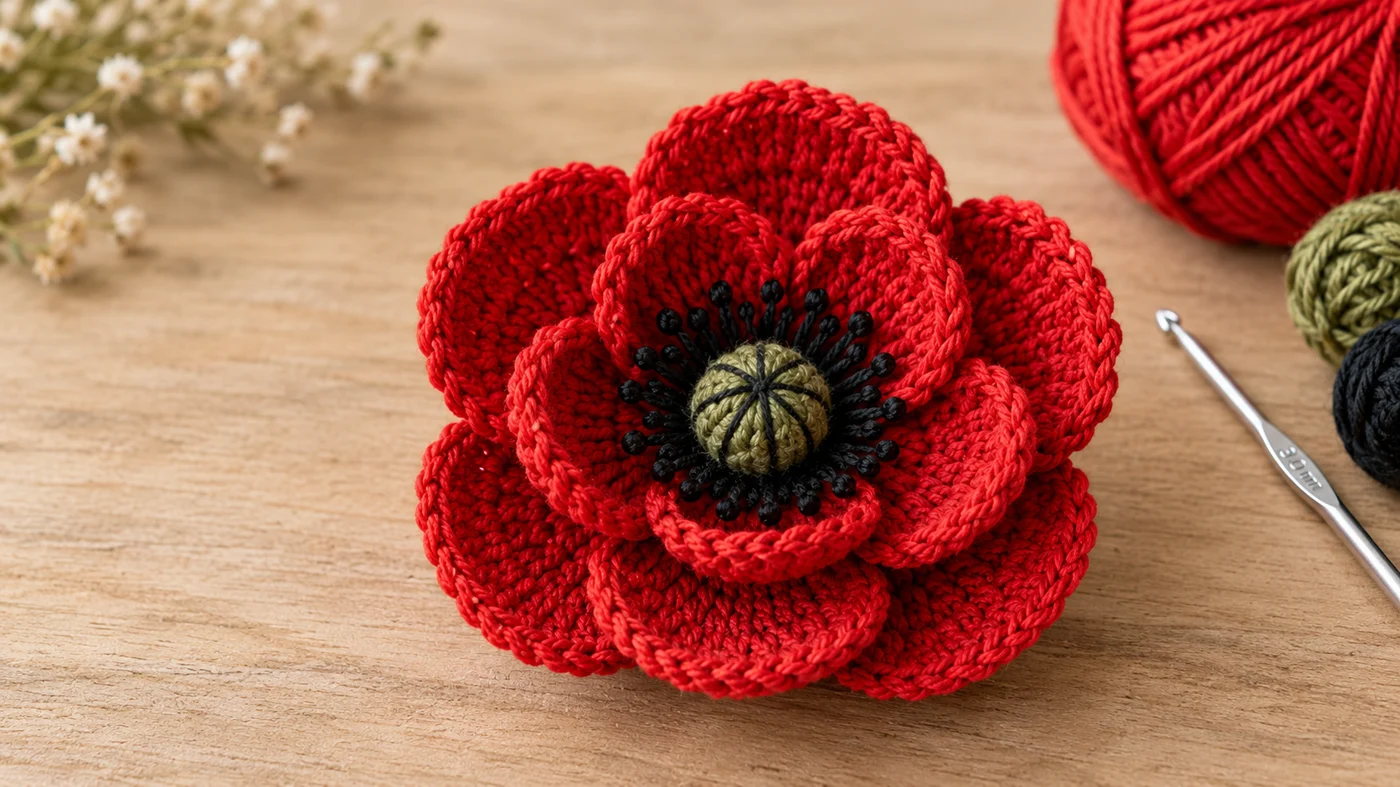
This free crochet poppy flower pattern makes a 3.5-inch layered red poppy with ten petals, a ring of black stamens and a little green seed-pod center. It's worked in one piece from the center out, in 8 rounds plus a round of stamen spikes. You'll need about 20 yards of DK cotton in three colors and a 3 mm hook, and it takes 45 minutes to an hour.
Key Takeaways
- One piece, no sewing. The two petal layers come from the front and back loops of the same rounds.
- Basic stitches only: sc, hdc, dc and tr, plus slip-stitch spikes for the stamens.
- About 20 yd (18 m) of DK cotton: mostly red, with a little black and green.
- Wear it or display it. Add a pin back for a brooch, or a clip for your hair.
Why I love this poppy
A poppy is the flower I get asked for most in the fall. Around Remembrance Day on November 11, people in the UK, Canada, Australia and New Zealand wear poppies. Many Americans wear one on Memorial Day in May. A handmade poppy lasts for years, and it looks lovely on a coat collar.
It's also one of the most satisfying flowers to crochet. There are no separate petals to sew on. Every layer grows out of the round before it, so the flower builds itself in front of you. The first time you see the outer petals appear behind the inner ones, it feels like a small magic trick.
How does one piece get two layers? It's all about the loops. The inner petals are worked into the front loops of one round. The next round goes into the back loops of that same round, behind the first petals. That gives the outer petals a base of their own, one layer back.
Skill level. Beginner. You'll need a magic ring, single crochet, half double, double and treble crochet, and working in the front or back loop only. Each technique is explained where it comes up.
If you're new to crochet flowers, my 15-minute mini rose is a lovely warm-up. For another fall piece, try my crochet maple leaf.
What you'll need
Yarn (DK #3 cotton)
- Poppy red for the petals: about 15 yd (14 m).
- Black for the stamens: about 4 yd (3.5 m).
- Olive or moss green for the seed-pod center: about 2 yd (2 m).
- Paintbox Yarns Cotton DK or Scheepjes Catona (both DK #3) are good matches. A mercerized cotton gives the crisp petal edges and slight sheen in the photos. In total, plan on 18–25 yd (16–23 m).
Hook and notions
- 3 mm (US C-2/D-3) hook.
- A tapestry needle and scissors.
- Optional: a brooch pin back or a hair clip, and a little fabric glue or a needle and red thread to attach it.
Gauge and finished size
Gauge isn't critical for a flower. What matters is tension firm enough that the petals hold their cupped shape. If your petals flop open, go down to a 2.75 mm or 2.5 mm hook.
Finished size: about 3.5 in (9 cm) across. The inner petal layer is about 2.75 in (7 cm) across. A thicker yarn makes a bigger poppy, and that's fine.
Abbreviations (US crochet terms)
- MR = magic ring
- ch = chain
- sl st = slip stitch
- sc = single crochet
- hdc = half double crochet
- dc = double crochet
- tr = treble crochet (yarn over twice, then work off the loops in pairs)
- inc = 2 sc in the same st
- FLO / BLO = front loop only / back loop only
- st(s) = stitch(es)
- Rnd = round
- ( ) x5 = repeat what's in the brackets 5 times
UK crocheters: this pattern uses US terms. US single crochet = UK double crochet, US double = UK treble, and US treble = UK double treble.
How the poppy is built
Here's the whole flower in plain words:
- Rnds 1–3 (green) make the small domed seed pod. The magic ring is the very center of the flower, on the front.
- Rnd 4 (black) widens the base to 20 sts.
- The stamen round (black) goes into the front loops of Rnd 4 and makes 20 little spikes. It's a decorative round, so it doesn't get a number.
- Rnd 5 (red) goes into the back loops of Rnd 4, behind the stamens, and widens to 30 sts.
- Rnd 6 goes into the front loops of Rnd 5 and makes the 5 inner petals.
- Rnd 7 goes into the back loops of Rnd 5, behind the inner petals, and widens to 40 sts.
- Rnd 8 makes the 5 outer petals. They sit between the inner ones, so you get 10 petals in all.
All the red rounds are joined with a slip stitch. The last round ends on the back of the flower, where your tails and any pin back go.
The pattern — step by step
Part 1 — The green seed pod
With green, make a magic ring.
Rnd 1: ch 1, 5 sc in the MR. Pull the ring closed. (5)
Rnd 2: inc x5. (10)
Rnd 3: sc in each st around. (10)
Without increasing, the edge curls up a little, and the center pops into a small dome. That's the seed pod.
Pull the magic ring tail through to the back. Change to black in the last st: work it until 2 loops are left, then pull black through. Cut the green, leaving a 4-in tail.
Part 2 — The black stamens
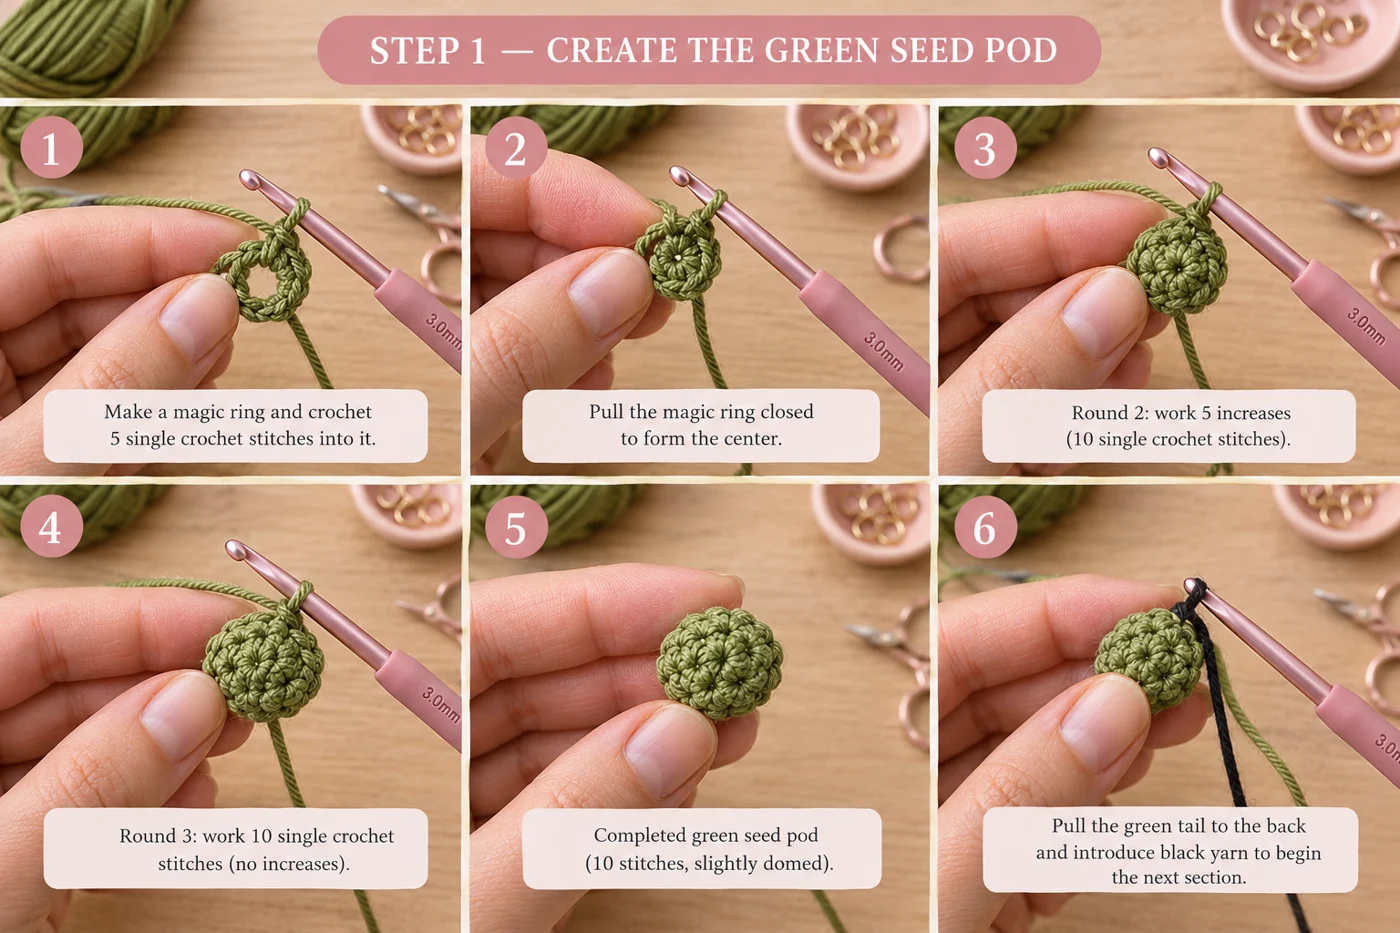
Rnd 4: with black, inc x10. (20)
Sl st into the first sc to join.
Stamen round, working in FLO of Rnd 4: (sl st in the front loop of the next st, ch 3, sl st in 2nd ch from hook, sl st in the next ch) x20. That's 20 little spikes. Sl st into the first sl st, then fasten off the black, leaving a 4-in tail.
Push the spikes forward so they lie toward the center. Behind them, you'll see a ring of 20 empty back loops. That's where the red starts.
Why the spikes point in. Each spike is a 2-chain bar anchored in a front loop. After you add the red rounds behind them, press them gently with your fingers. They'll fan out over the base of the red petals, just like real poppy stamens.
Part 3 — The red base
Rnd 5 (red), working in BLO of Rnd 4: join red with a sl st in the back loop of any st of Rnd 4. Ch 1. (sc, inc) x10, working every st in the back loops only. Sl st into the first sc to join. (30)
Put a stitch marker in the first sc of this round. You'll come back to this spot twice.
Part 4 — The 5 inner petals
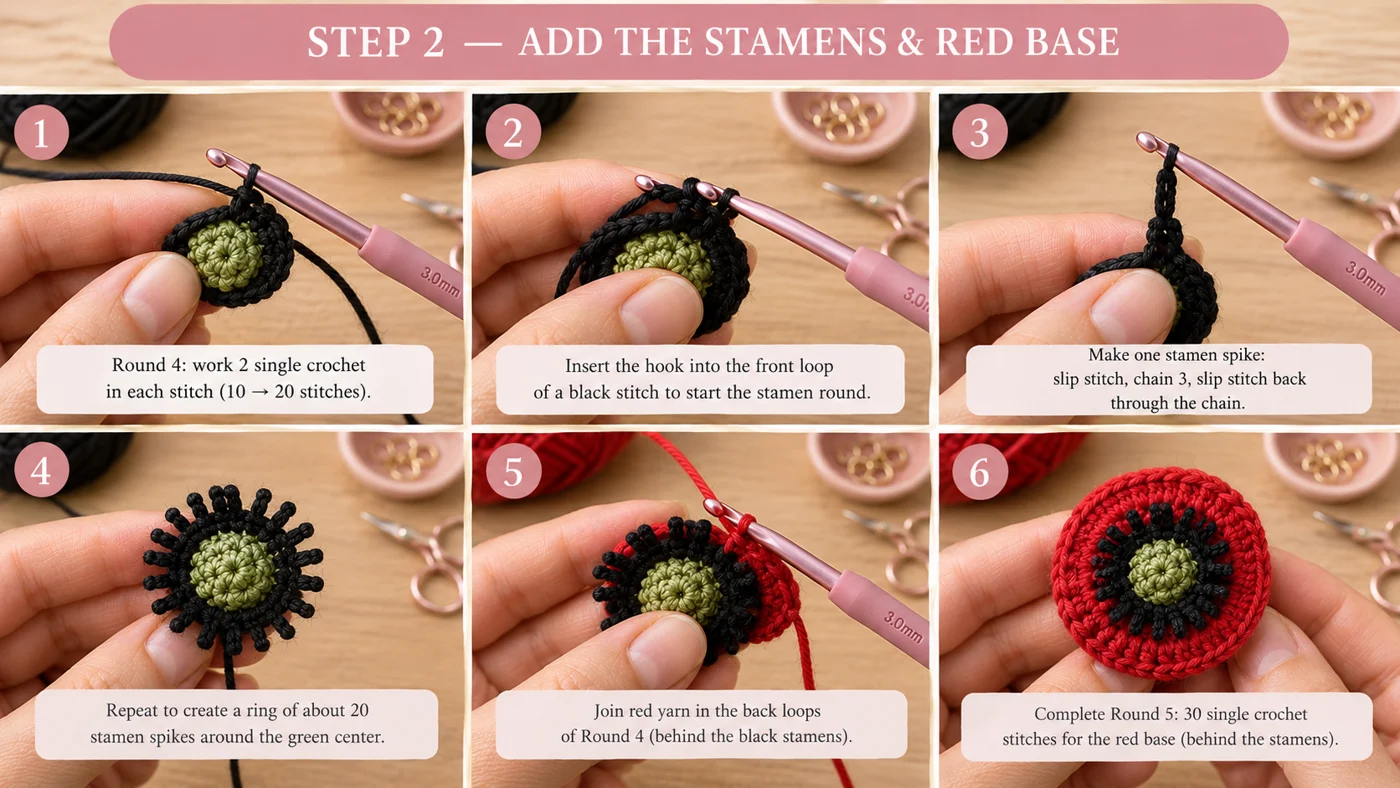
Rnd 6, working in FLO of Rnd 5: ch 1. Starting in the marked st:
(sc in next st, hdc in next st, [dc, tr] in next st, [tr, dc] in next st, hdc in next st, sc in next st) x5.
Sl st into the first sc to join. You've made 5 petals over the 30 sts of Rnd 5, 6 sts each. (5 petals)
Each petal is small and cupped. Don't flatten them. The cup is what makes it look like a poppy.
Part 5 — The base for the outer petals
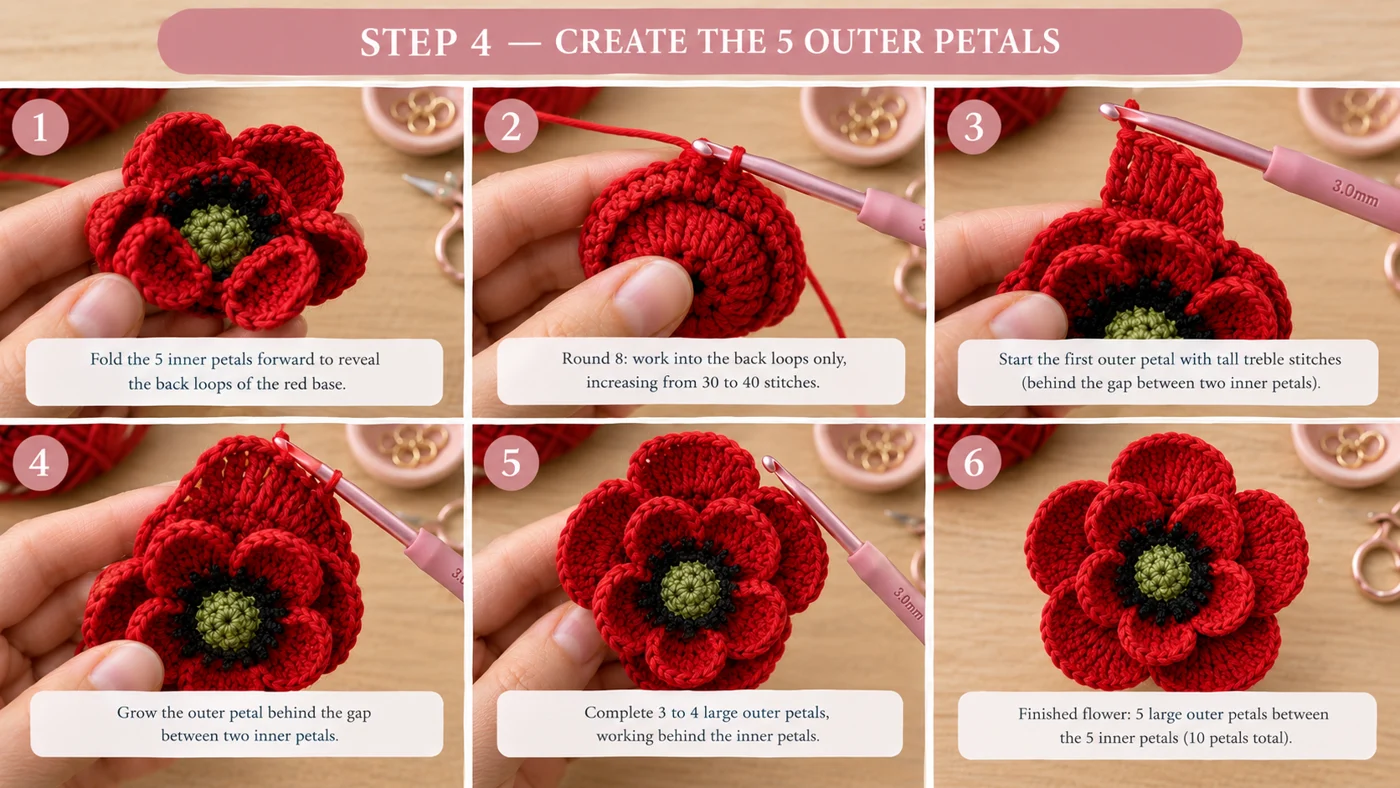
Rnd 7, working in BLO of Rnd 5: fold the inner petals forward so you can see the back loops of Rnd 5 behind them. Ch 1. Starting in the back loop of the marked st, work (2 sc, inc) x10 into the back loops only. Sl st into the first sc to join. (40)
Move the marker to the first sc of this round.
Part 6 — The 5 outer petals
Rnd 8: ch 4 (counts as the first tr), tr in the same st (the marked st). Then:
2 dc in next st, hdc in next st, sc in next 2 sts, hdc in next st, 2 dc in next st, 2 tr in next st.
Now repeat this sequence 4 more times: 2 tr in next st, 2 dc in next st, hdc in next st, sc in next 2 sts, hdc in next st, 2 dc in next st, 2 tr in next st. Sl st into the top of the beginning ch-4 to join. (5 petals)
Each repeat covers 8 sts, so the 5 repeats use all 40. Starting on a treble means each outer petal is centered behind a gap between two inner petals. The low sc stitches sit behind the middle of each inner petal. That's the offset that gives the flower its full, layered look.
Fasten off, leaving a 6-in tail on the back.
Part 7 — Finish and shape
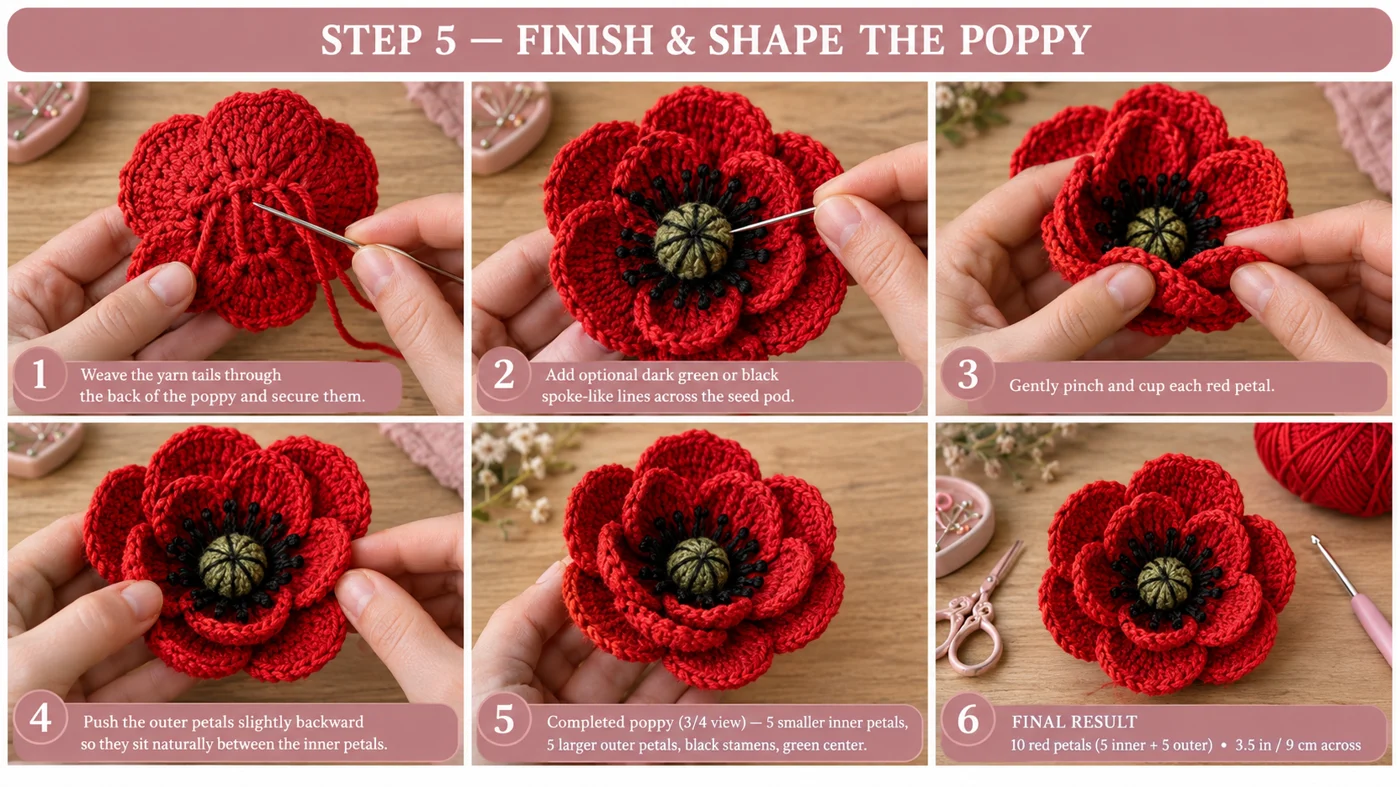
- Weave in the tails on the back of the flower. Go through a few stitches in one direction, then back the other way, and trim. Use the red tail to close any small gaps between the base rounds.
- Seed-pod lines (optional). Thread about 12 in of dark green or black onto your needle. Make 5 or 6 straight stitches from the top of the dome down to its edge, like the spokes of a wheel. That gives the ridged look of a real poppy seed head.
- Shape the petals. Pinch each petal gently between your fingers to cup it. Push the outer petals back a little so they show between the inner ones.
- Steam (optional). Skip this if you don't own a steamer or steam iron. Hold it an inch or two above the flower, not touching it, for a few seconds. Then shape the petals again and let it dry.
That's it! Pin it on a coat or tuck it into a vase. Or make five more for a Remembrance wreath.
Make it yours — quick variations
| Variation | Change from base pattern |
|---|---|
| Poppy brooch | Sew a 1-in brooch pin back across the center back with red thread, going through the Rnd 5 stitches several times. Pins aren't safe for children under 3. |
| Hair clip | Sew or glue a small snap clip or alligator clip across the back. Glue is fine for adults. For a child's clip, sew it on, too. |
| Bigger poppy | Use worsted #4 cotton and a 4 mm hook with the same rounds. It comes out about 4.5 in across. You'll need about 25–30 yd in total. |
| Smaller poppy | Use sport or fingering-weight cotton and a 2.25 mm hook. It comes out about 2.5 in across, a nice size for a lapel. |
| Other colors | Try a white poppy, a soft orange Californian poppy or a purple poppy, and keep the black stamens and green center. |
| Poppy wreath | Make 12 to 16 poppies and sew or glue them around a 10-in grapevine wreath. Tuck a few crochet leaves in between. |
| Garland | Make 8 poppies and sew them along a 1.5-yd red chain, about 6 in apart. It's lovely on a mantel. |
Troubleshooting the three things that go wrong
The petals are flat instead of cupped
Your tension on the tall stitches is loose, or the yarn is too soft. Try going down half a hook size. Then shape the petals by hand at the end. A light steam also helps them hold their shape.
The outer petals line up behind the inner ones
That happens when Rnd 7 or Rnd 8 starts in the wrong spot. The fix is the marker. Rnd 5, Rnd 6 and Rnd 7 all start in the same stitch, and Rnd 8 starts with a treble in that spot. If you lost the marker, count the sts again. In Rnd 8, the sc stitches should sit right behind the middle of each inner petal.
The flower ruffles or won't lie flat
Check your stitch counts: 20 in Rnd 4, 30 in Rnd 5 and 40 in Rnd 7. Extra stitches make a ruffle, and missing ones make the flower cup like a bowl. Also make sure Rnds 5 and 7 are worked in the back loops only.
Frequently asked questions
How long does the crochet poppy take? About 45 minutes to an hour for your first one. There are only 8 rounds plus the stamens, and the petal rounds go quickly once you know the sequence. The stamens take the longest, because there are 20 spikes. By your third poppy, it'll take about 30 minutes.
How much yarn do I need? About 20 yd (18 m) of DK cotton for one poppy. That's about 15 yd of red, 4 yd of black and 2 yd of green. One 50 g ball of red is enough for about 8 poppies, so it's easy to make a whole wreath from a single ball.
Can I make this poppy for Remembrance Day? Yes, that's exactly what I make mine for. It's a lovely, lasting alternative to a paper poppy, and it looks great on a coat or bag. If you'd like it to support a cause, many local groups welcome handmade poppies for displays. Check with your local veterans' association.
Is this poppy safe for children? The flower itself has no small parts. It's safe once you weave in the tails securely. A brooch pin or hair clip, though, isn't safe for children under 3. For a small child, skip the hardware and sew the poppy onto a hat or a blanket instead.
Can I sell poppies made from this pattern? Yes, you're welcome to sell finished poppies made from this free pattern at markets, on Etsy or as gifts. Please credit "Pattern by Wavode" in your listing and link back to this page. What you can't do is republish this write-up or my photos as your own pattern.
Related patterns on Wavode
- Crochet mini rose: a 15-minute rose with a three-leaf base.
- Crochet maple leaf: a 20-minute fall appliqué in rust and mustard.
- Crochet floral wreath: a door wreath with 15 pastel flowers.
- Crochet flower bouquet bag charm: a daisy, a tulip and a rose on wrapped stems.
- Crochet car mirror charm: a hanging bouquet of flowers for your car.
Made a poppy? Tag #wavodecrochet on Pinterest. I re-pin every finished make and credit the maker.
Pattern by Clara Hartwell for Wavode. Questions? Email me at support@wavode.com.