Fall Granny Square Blanket

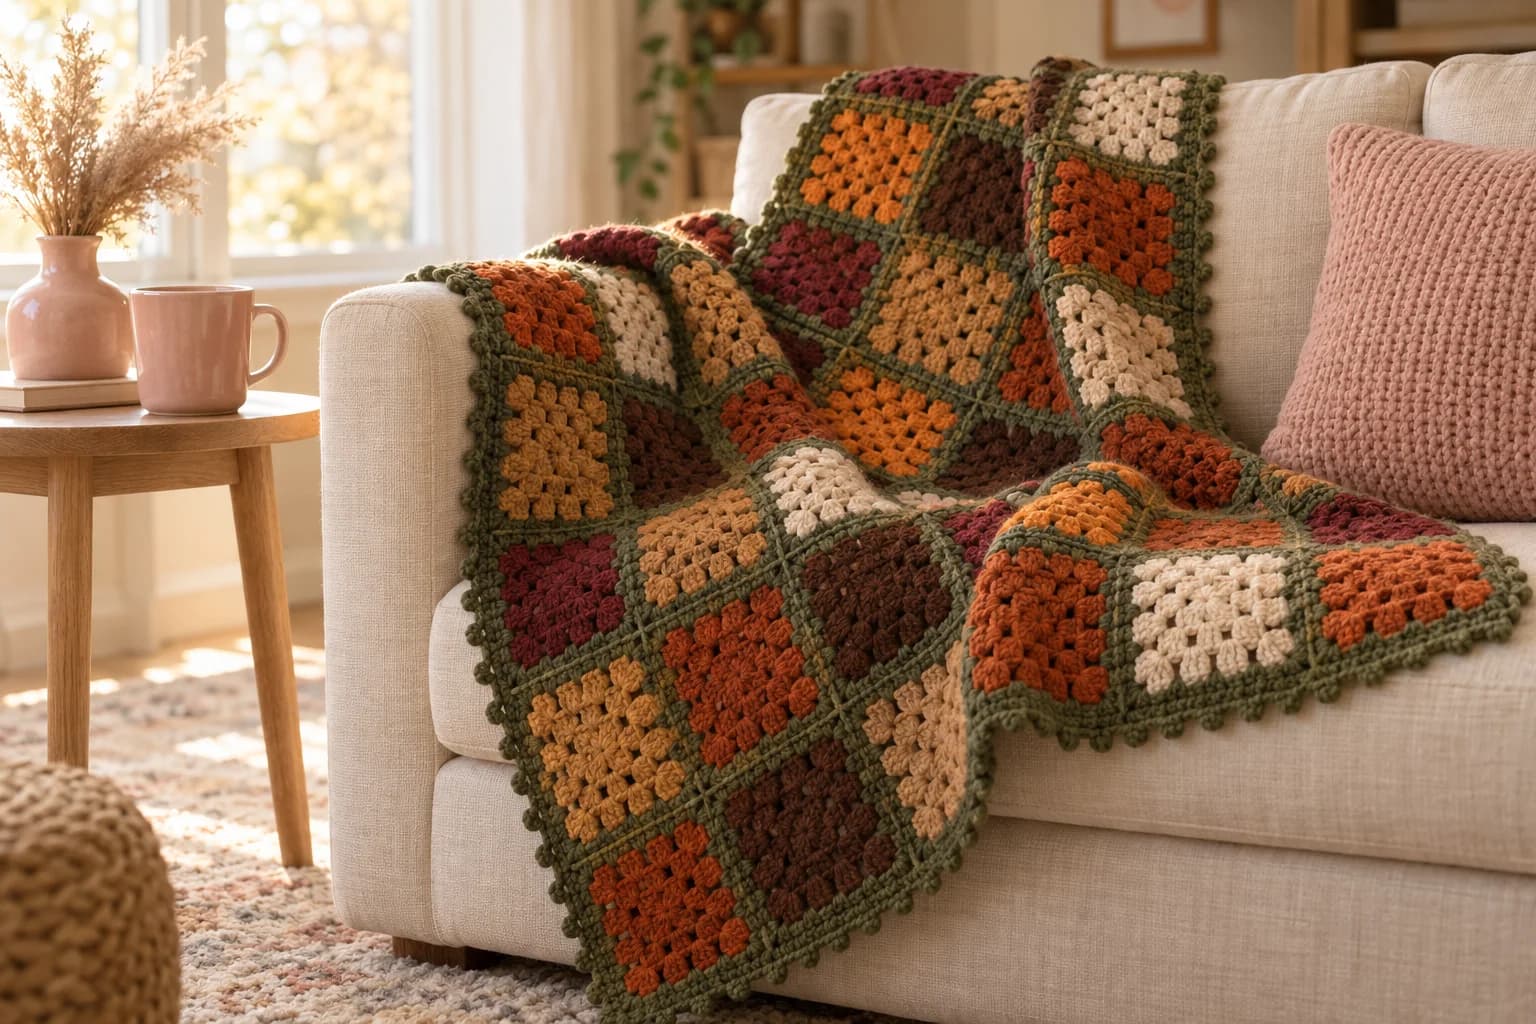
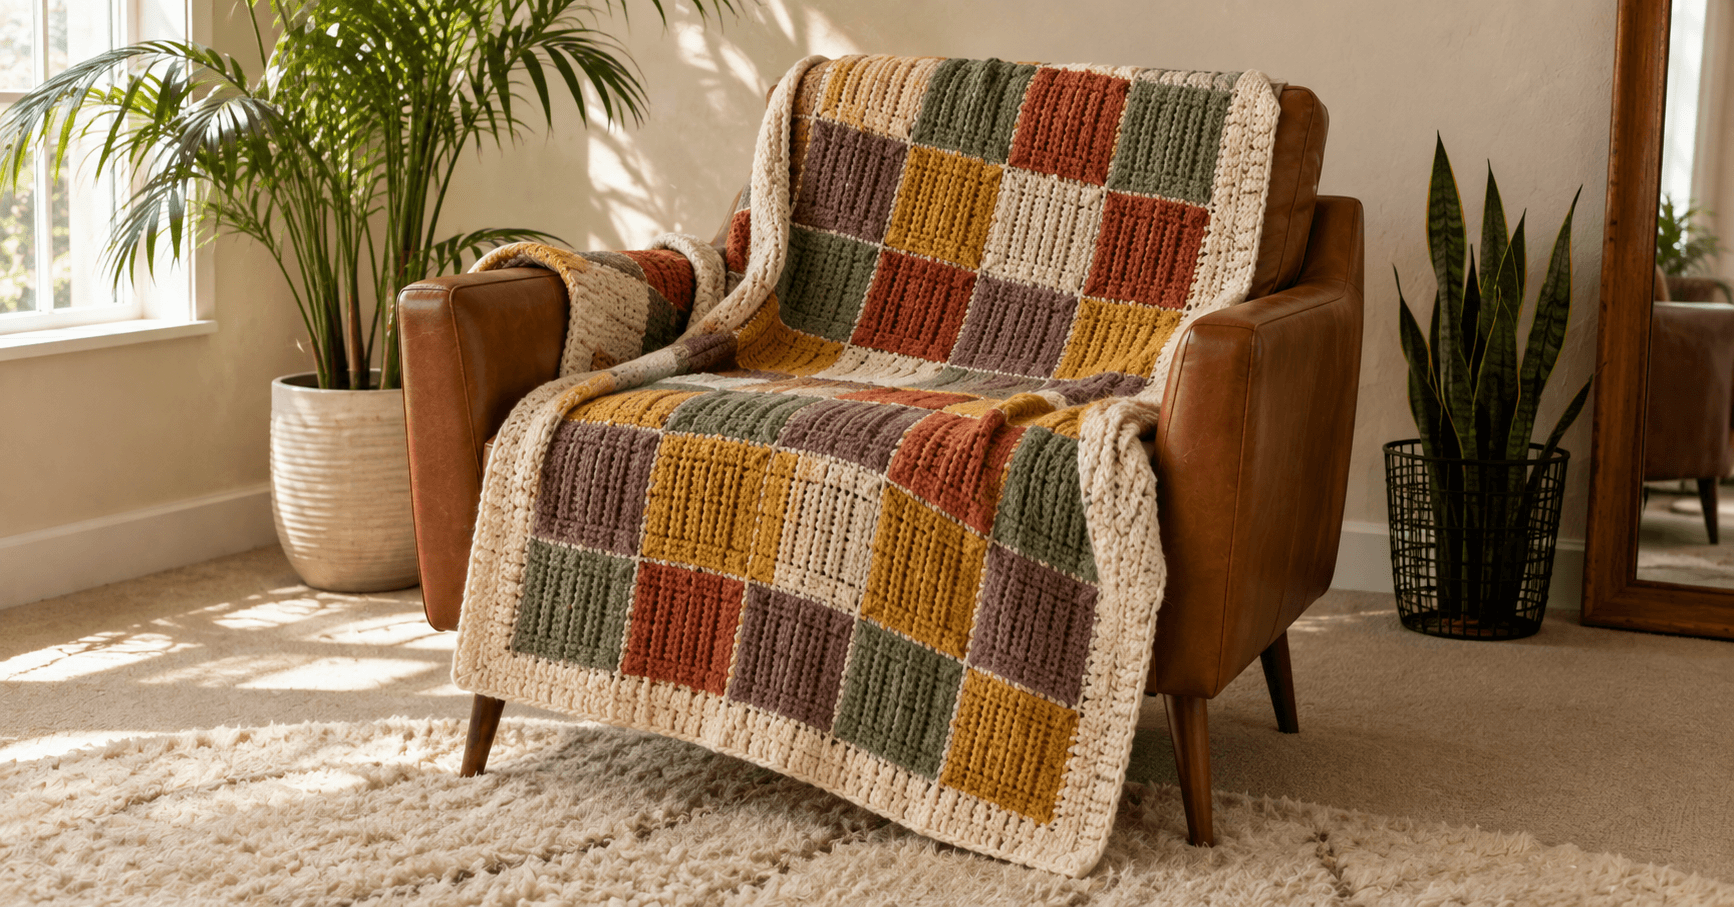
This fall granny square blanket is a patchwork of 108 small solid squares in rust, pumpkin, camel, chocolate, burgundy and oatmeal, framed and joined in olive green, with a little picot edge. The olive last round of each square joins it to its neighbors as you go, so there's no sewing at the end. It's worked in worsted yarn on a 5 mm hook, measures about 46 × 61 inches and takes about 2,700 yards.
Key Takeaways
- Solid squares, one frame: Rounds 1 to 4 in one autumn color, Round 5 always olive.
- Join as you go: the olive round of each new square is slip-stitched to the squares already joined. No seams to sew.
- 18 squares in each of 6 colors, laid out so two squares of the same color never touch.
- A three-round olive border ends in a picot round that gives the edge its little bumps.
Why I love this fall granny square blanket
Solid granny squares are the calmest way to play with color. Each square is one color, so you're never weaving in ends mid-square, and the olive frame ties all six autumn shades together, like leaves on a forest floor.
The other thing I love is joining as you go. With a big blanket, sewing a hundred squares together at the end is the part that stalls most projects. Here, every square after the first is joined during its own last round. When you finish the last square, the blanket is done, apart from the border.
Skill level. Easy, with one new technique. You need a magic ring, chains, double crochet, single crochet and slip stitches. Joining as you go is explained step by step in Part 2. If you've made a granny square before, you'll pick it up on the second square.
Prefer a bigger square and a seamed finish? My granny square blanket uses seven-round squares framed in chocolate and cream, joined with slip stitch seams.
What you'll need
Yarn: a soft worsted #4 acrylic, such as Lion Brand Vanna's Choice (170 yd / 156 m per 100 g ball).
| Color | Used for | Amount (estimate) | Balls (170 yd) |
|---|---|---|---|
| Olive green | Round 5 of every square and the border | about 1,000 yd | 7 |
| Rust | 18 square centers | about 290 yd | 2 |
| Pumpkin | 18 square centers | about 290 yd | 2 |
| Camel | 18 square centers | about 290 yd | 2 |
| Chocolate | 18 square centers | about 290 yd | 2 |
| Burgundy | 18 square centers | about 290 yd | 2 |
| Oatmeal | 18 square centers | about 290 yd | 2 |
I worked these amounts out from the stitch counts, with a margin for tails, so treat them as estimates. Buy all the olive at once, from the same dye lot if your yarn has one: it's in every square and in the border.
Hook and notions
- 5 mm hook (US H/8).
- A tapestry needle and scissors.
- A tape measure.
Gauge and finished size
Gauge matters, because 108 squares have to line up. With worsted yarn and a 5 mm hook, your square should measure about 3½ in (9 cm) across after Round 3, and about 5 in (13 cm) after Round 5. If it's bigger, go down half a hook size; if it's smaller, go up half a size.
With 9 squares across and 12 down, the blanket is about 45 × 60 in before the border and about 46 × 61 in (117 × 155 cm) after it. These sizes are estimates from the gauge: measure your first square and multiply.
Abbreviations (US crochet terms)
- MR: magic ring
- ch: chain
- sl st: slip stitch
- sc: single crochet
- dc: double crochet
- sp(s): space(s)
- st(s): stitch(es)
- R: round
A cluster is 3 dc in the same space. A corner group is (3 dc, ch 2, 3 dc) in the same corner space. All rounds are joined rounds worked on the right side.
The pattern, part 1: one solid granny square (make 108)
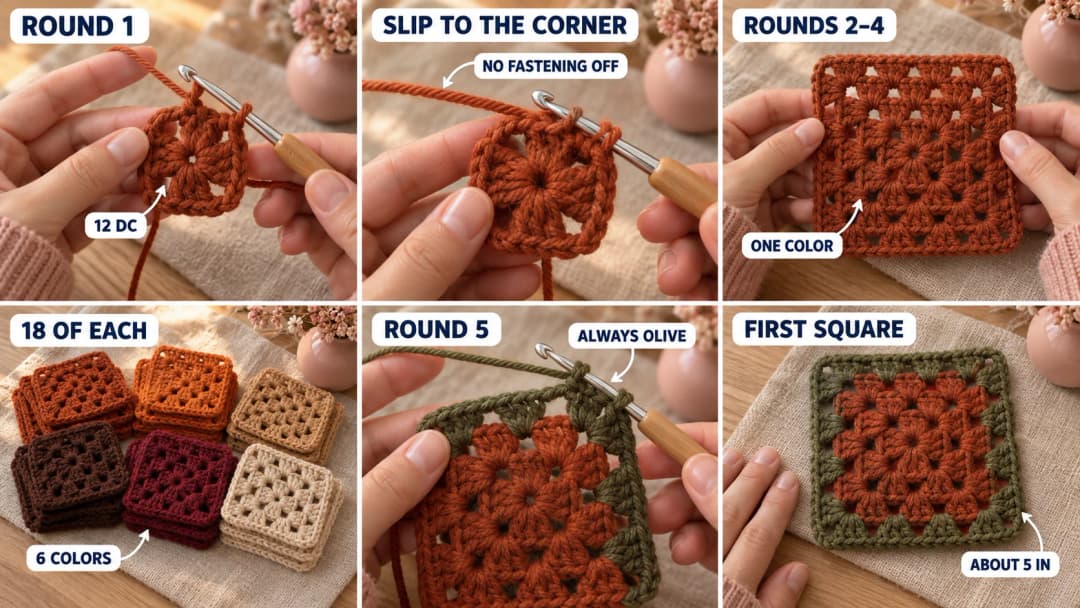
Rounds 1 to 4 are worked in one center color without fastening off: you move to the next corner with slip stitches. Round 5 is always olive.
- R1: with the center color, make a MR. Ch 3 (counts as a dc), 2 dc in the ring, ch 2, (3 dc in the ring, ch 2) 3 times in total. Pull the ring tight and sl st in the top of the ch 3. (12 dc: 4 clusters and 4 ch-2 corner sps)
- R2: sl st in each of the next 2 dc and in the ch-2 corner sp. Ch 3 (counts as a dc), (2 dc, ch 2, 3 dc) in the same sp. Then (ch 1, corner group in the next corner sp) 3 times in total. Ch 1 and sl st in the top of the ch 3. (24 dc: 8 clusters, 4 corners and 4 ch-1 sps)
- R3 and R4: sl st in each of the next 2 dc and in the corner sp. Ch 3, (2 dc, ch 2, 3 dc) in the same sp. On each side: ch 1, (3 dc in the next ch-1 sp, ch 1) in each ch-1 sp of that side, then a corner group in the next corner sp. Work the side and corner 3 times in total, then the fourth side without its corner, and sl st in the top of the ch 3. (R3: 36 dc and 8 ch-1 sps. R4: 48 dc and 12 ch-1 sps)
Fasten off the center color after R4.
- R5 (olive): join olive with a sl st in any ch-2 corner sp and work R5 the same way as R3 and R4. Fasten off. (60 dc and 16 ch-1 sps: 5 clusters along each side, counting the half of each corner group)
That R5 is for the first square only. On every other square, you work R5 and join it to its neighbors at the same time, as explained in Part 2. Make all the centers first (Rounds 1 to 4, 18 in each color), then add the olive round square by square as you join.
So each side of R5 has 15 dc and 4 ch-1 sps between the two corner sps, 19 stitches in all. You'll use these numbers for the joins and the border.
Part 2: the layout and joining as you go
The layout
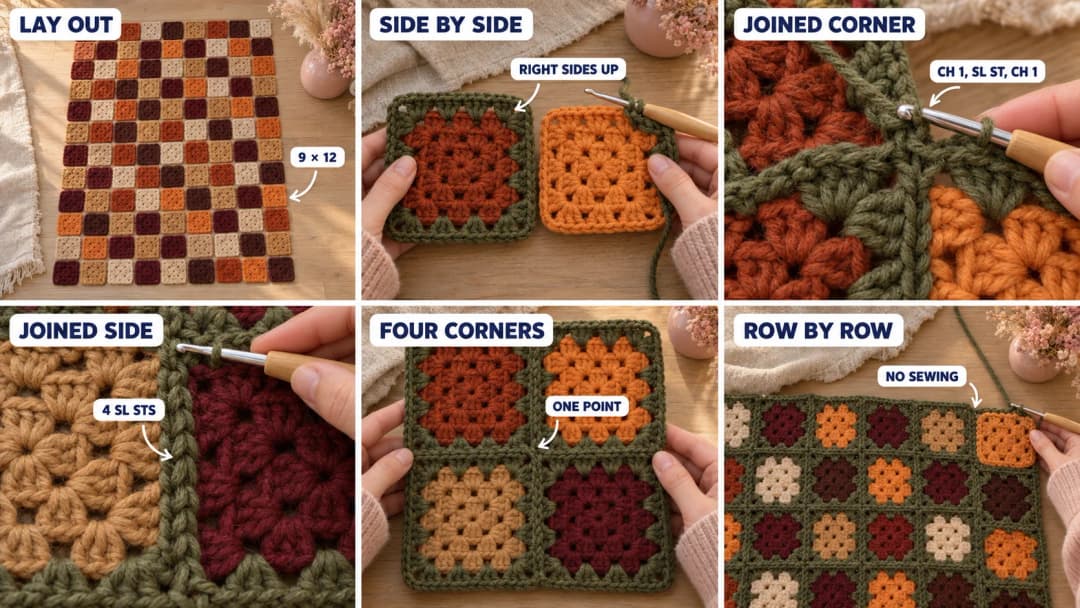
Lay out the 108 centers, 9 across and 12 down, using this color key: 1 rust, 2 pumpkin, 3 camel, 4 chocolate, 5 burgundy, 6 oatmeal.
| Rows | Squares 1 to 9 |
|---|---|
| Rows 1, 3, 5, 7, 9 and 11 | 1 2 3 4 5 6 1 2 3 |
| Rows 2, 4, 6, 8, 10 and 12 | 4 5 6 1 2 3 4 5 6 |
Two squares of the same color never touch, side by side or one above the other, and you use exactly 18 of each color. If you'd rather have a random patchwork, just keep the same rule: no two identical colors touching. Take a phone photo of the layout: it's your map.
How to join as you go
Work in rows, from left to right, starting at the top left. The first square gets a plain olive R5. Every other square is joined to the square on its left, the square above it, or both, during its own R5.
On a side that's being joined, hold the new square next to its neighbor, right sides up, and change two things:
- At a joined corner, work (3 dc, ch 1, sl st in the neighbor's corner sp, ch 1, 3 dc) instead of (3 dc, ch 2, 3 dc).
- Along a joined side, work a sl st in the neighbor's matching ch-1 sp instead of each ch 1 between clusters: 4 sl sts per side.
Everything else stays the same. Work the free sides normally.
Order of the joins.
- Row 1: squares 2 to 9 join on their left side only (the corner at each end of that side, and the 4 sts in between).
- Rows 2 to 12, first square: joins on its top side only.
- Rows 2 to 12, squares 2 to 9: join on the top side and the left side.
Always start R5 in the bottom right corner sp of the new square: that corner is never joined yet. Working around on the right side, you go up the free right side first, then join the top side and the left side, and finish with the free bottom side. (If you crochet left-handed, your rounds go the other way: the bottom side comes first, then the left and top sides, then the right side.)
Where four squares meet, two or three corners are already joined. Make your sl st in the same place, around the earlier joins, so all four corners meet in one neat point.
Weave in the olive tails along the edge of the square you just joined, through the backs of the olive stitches.
Part 3: the picot border (olive)
Three olive rounds finish the edge: two of single crochet and one with little picots.
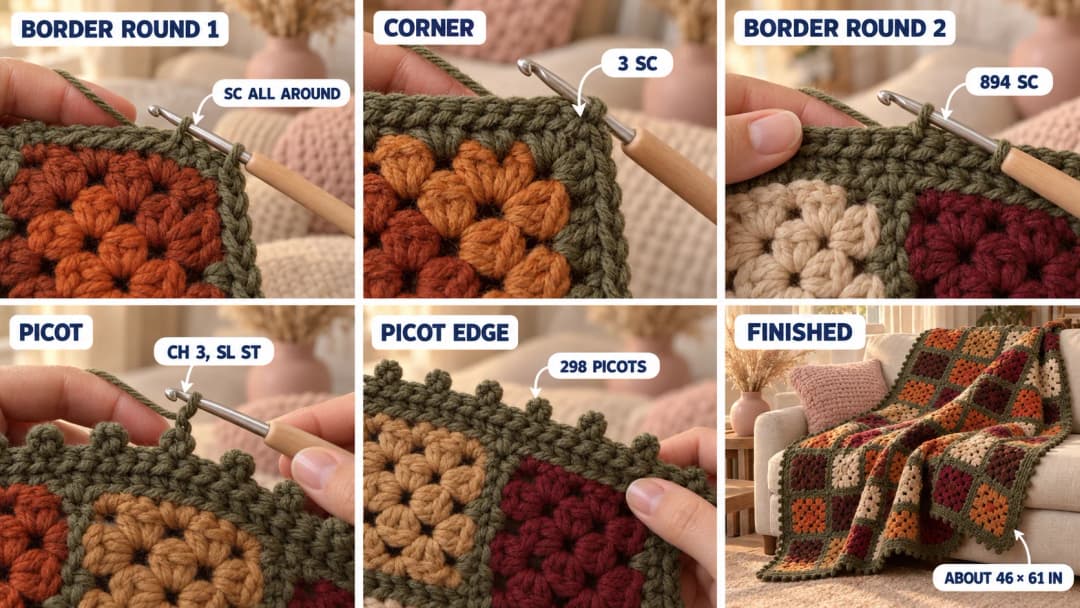
- Border R1: join olive with a sl st in the corner sp at any corner of the blanket. Ch 1, 3 sc in the same sp. Work along each side: sc in each of the 15 dc and 4 ch-1 sps of every square edge, and where two squares meet, 1 sc in the ch-1 sp on each side of the joining sl st. At each corner of the blanket, work 3 sc in the corner sp. Sl st in the first sc. (886 sc: 187 along each short side and 250 along each long side, plus 3 at each corner)
- Border R2: ch 1, sc in each sc around, working 3 sc in the center sc of each 3-sc corner. Sl st in the first sc. (894 sc)
- Border R3 (picots): ch 1. Starting in the same sc, (sc in the next sc, ch 3, sl st in the top of the sc you just made, sc in each of the next 2 sc) 298 times in total. Sl st in the first sc. Fasten off. (298 picots)
The picot count works for any size of blanket, because Border R2 always ends up a multiple of 3. Weave in the ends and give the blanket a light block: lay it flat, mist it or hover a steam iron over it, and pat the edges straight.
Make it yours — quick variations
| Variation | Change from the base pattern |
|---|---|
| Lap blanket | 7 × 9 squares (63), about 36 × 46 in. Border R1: 145 sc on each short side and 187 on each long side, plus 3 at each corner (676 sc); R2 684 sc; R3 228 picots. Use colors 1 to 6 in the same repeat, 10 or 11 of each. |
| Baby blanket | 6 × 8 squares (48), about 31 × 41 in, in a soft worsted baby acrylic or cotton. Border R1 592 sc; R2 600 sc; R3 200 picots. |
| Bed throw | 11 × 14 squares (154), about 56 × 71 in. You'll need about 1.4 times the yarn. |
| Two-tone centers | Work R1 and R2 in oatmeal and R3 and R4 in the square's color, for a little light center in every square. |
| Different frame | Swap olive for chocolate or charcoal: every other color stays the same. |
Troubleshooting the three things that go wrong
The joined squares pull or gape
If the joins pull the squares together, your sl sts are tight: make each one as tall as a ch 1. If there are gaps, you're skipping the sl st in a ch-1 sp: every ch 1 of a joined side becomes exactly 1 sl st, 4 per side.
The squares twist
Moving to the next corner with slip stitches in Rounds 2 to 4 can make a square twist slightly. Block the centers flat before you add the olive round, and keep the slip stitches loose.
The picots don't line up with the corners
They don't have to. Border R3 is worked evenly all around, so a picot may land just beside a corner instead of on it. It looks the same from the sofa.
Frequently asked questions
What's the difference between this and a classic granny square blanket? Here each square has a solid center in one color and a single olive frame, and the squares are joined as you go. My granny square blanket changes color every round and is seamed at the end.
How long does it take? About 25 minutes per square, joins included, so about 45 hours for the 108 squares, plus about 3 hours for the border.
Can I make the squares bigger? Yes. Add one more center round (R5 in the center color, 60 dc) and work the olive round as R6 (72 dc): squares about 6 in, and 7 × 10 of them make a similar throw. Each side then has 18 dc and 5 ch-1 sps, so redo the border counts with 23 sts per square edge.
Is acrylic okay for a blanket? Yes, and it's what I'd pick for a sofa throw: it's soft, light and goes in the washing machine. For a baby blanket, a soft cotton or a baby-weight acrylic is gentler.
Can I sell blankets made from this pattern? Yes, you're welcome to sell finished blankets made from this free pattern at markets, on Etsy or at a craft fair. Please credit "Pattern by Wavode" in your listing and link back to this page. What you can't do is share or sell the pattern itself, or republish my photos as your own.
Related patterns on Wavode
- Granny square blanket: seven-round squares framed in chocolate and cream.
- Autumn leaves crochet table runner: more fall colors for the table.
- Crochet maple leaf: a quick leaf appliqué to sew on a cushion.
- Chunky striped crochet blanket: a striped throw with no squares at all.
Made a fall granny square blanket? Tag #wavodecrochet on Pinterest. I re-pin every finished make and credit the maker.
Pattern by Clara Hartwell for Wavode. Questions? Email me at support@wavode.com.