Santa Claus Granny Square

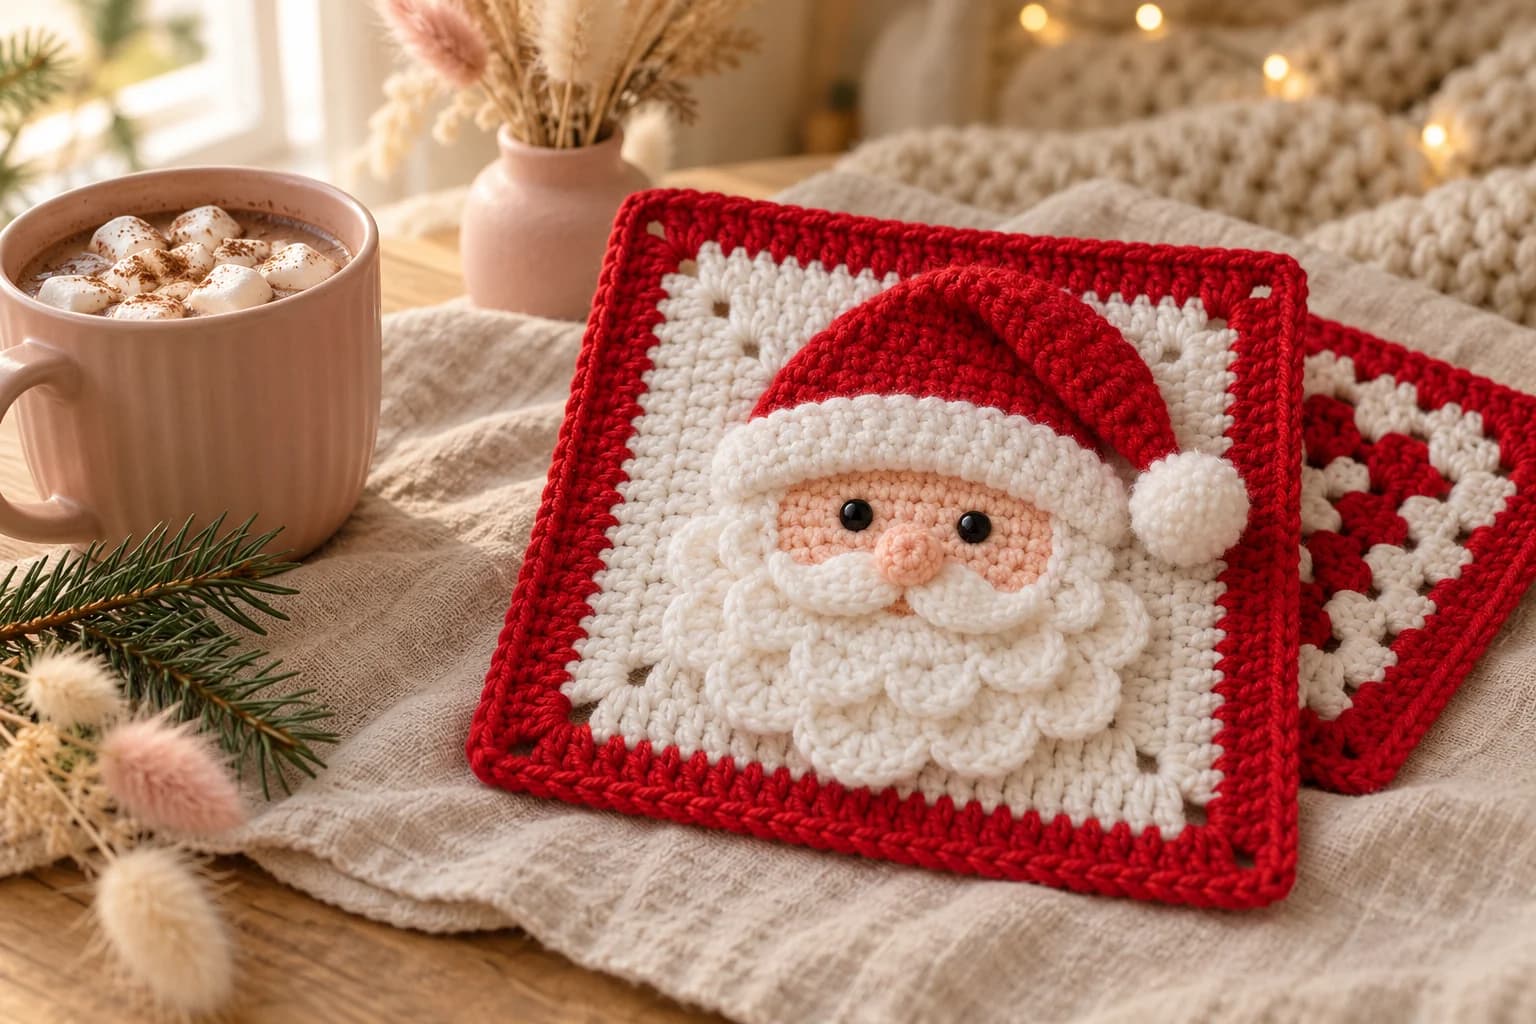
This free Santa Claus granny square crochet pattern makes a 6-inch square with Santa's face in the middle: rosy skin, a curly white beard, a little mustache and a floppy red hat with a pompom. The square itself is a white circle-to-square with a solid red border. Santa is made in small pieces that you sew on top. You'll need about 77 yards of worsted yarn, a 4 mm hook and 3 to 4 hours.
Key Takeaways
- The base is a circle that turns into a square, in white, framed by three red rounds.
- Santa is sewn on top: face, beard, mustache, nose, hat and pompom.
- The beard is worked right onto the face in two layers of shells, so it curls.
- About 77 yd (70 m) of worsted #4: 38 yd white, 33 yd red, 6 yd skin tone.
Why I love this Santa square
Every Christmas I want one project that makes people say "oh!" when they see it. This square does it every time: Santa's curly beard pops right off the surface. One square makes a sweet pot holder, ornament or card insert. Nine of them, with plain squares in between, make a cozy Christmas blanket or pillow.
The construction keeps it relaxed. The square is a simple circle-to-square, so it ends up perfectly flat and the same size as your other worsted granny squares. Santa is made separately, which means you can make the faces while watching a Christmas movie and sew them on later.
The beard is the fun part. You work it straight onto the edge of the face, in two rows of shells. The second row of bigger shells sits on the first, so the beard looks curly and full. Who could resist a square like that?
Skill level. Easy-intermediate. You need a magic ring, sc, hdc, dc and tr, shells, simple decreases, and some sewing.
What you'll need
Yarn: worsted #4 acrylic, such as Red Heart Super Saver or Lion Brand Basic Stitch. Acrylic keeps its bright red and survives the washing machine.
| Color | Used for | Amount |
|---|---|---|
| White | Square base, beard, mustache, hat brim, pompom | about 38 yd |
| Red | Border and hat | about 33 yd |
| Skin tone (light peach or tan) | Face and nose | about 6 yd |
I worked those amounts out from the stitch counts, plus about a yard of each color for sewing.
Hook and notions
- 4 mm (US G-6) hook.
- 6 mm black safety eyes, or black yarn to embroider them.
- A tiny pinch of polyester fiberfill (or yarn scraps) for the pompom.
- Optional: a little pink blush or pink yarn for rosy cheeks. Skip it if you don't have any.
- A tapestry needle, pins and scissors.
Gauge and finished size
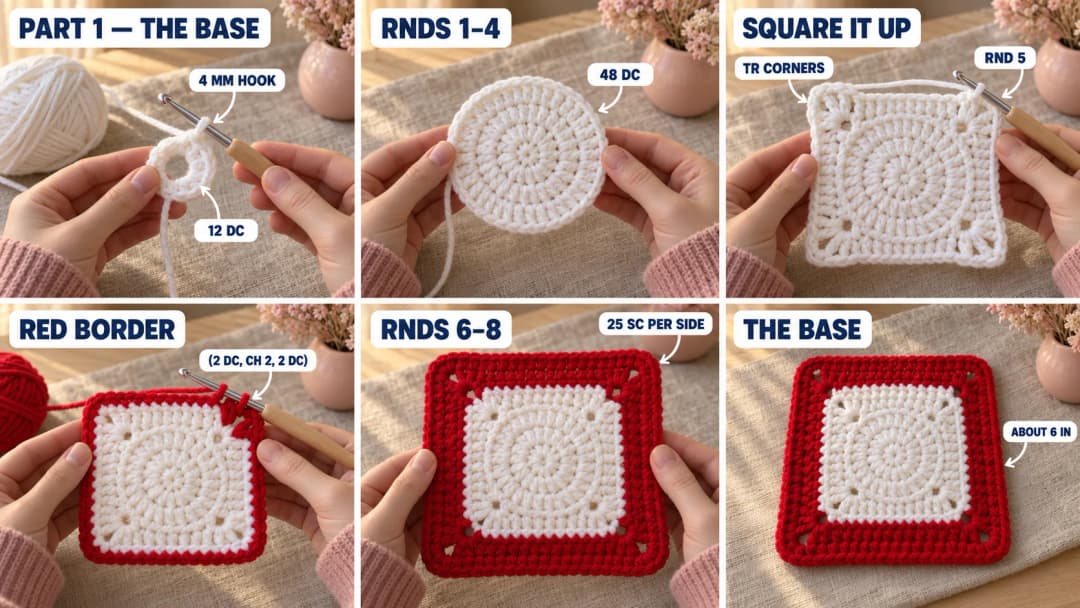
Gauge: the white circle after Rnd 4 (48 dc) should measure about 3.75 in (9.5 cm) across. If yours is bigger, go down to a 3.75 mm hook. If it's smaller, go up to 4.5 mm.
Finished square: about 6 in (15 cm) on each side. Blocking evens it out, so measure your first one before you plan a blanket.
Abbreviations (US crochet terms)
- ch = chain
- sl st = slip stitch
- sc = single crochet
- hdc = half double crochet
- dc = double crochet
- tr = treble crochet
- sc2tog = single crochet two together
- sc3tog = single crochet three together
- sp = space
- MR = magic ring
- st(s) = stitch(es)
- rnd(s) = round(s)
UK crocheters: this pattern uses US terms. US single crochet = UK double crochet, US dc = UK treble, and US tr = UK double treble.
The beginning ch 3 counts as a dc, and the beginning ch 4 counts as a tr, in every round of the square.
The pieces at a glance
| Piece | Color | Make |
|---|---|---|
| Square base and border | White, then red | 1 |
| Face with beard | Skin tone, then white | 1 |
| Nose | Skin tone | 1 |
| Mustache | White | 1 |
| Hat with brim | Red, then white | 1 |
| Pompom | White | 1 |
The pattern — step by step
Part 1 — The square base
The white circle. Join every round with a sl st to the top of the beginning ch.
- Rnd 1: With white, MR, ch 3, 11 dc in the ring. Join. (12 dc)
- Rnd 2: Ch 3, dc in the same st, 2 dc in each st around. Join. (24 dc)
- Rnd 3: Ch 3, 2 dc in the next st, (dc, 2 dc in the next st) × 11. Join. (36 dc)
- Rnd 4: Ch 3, dc in the next st, 2 dc in the next st, (2 dc, 2 dc in the next st) × 11. Join. (48 dc)
Square it up (white). The 48 sts make four sides of 12 sts. Each side starts with a corner st.
- Rnd 5: Ch 4, (tr, ch 2, 2 tr) in the same st as the join (first corner). Then, along the side: tr, dc, dc, hdc, sc, sc, sc, hdc, dc, dc, tr, one in each of the next 11 sts. (2 tr, ch 2, 2 tr) in the next st (corner), then repeat the side sequence over the next 11 sts. Repeat from * to * twice more. Join to the top of the beginning ch 4. (15 sts per side, plus 4 corner ch-2 sps)
Fasten off white and weave in the end. The circle is now a square with a smooth white center.
The red border.
- Rnd 6: Join red in any corner ch-2 sp. Ch 3, (dc, ch 2, 2 dc) in the same sp. Dc in each st to the next corner, (2 dc, ch 2, 2 dc) in the corner sp. Repeat around and join. (19 dc per side)
- Rnd 7: Sl st to the corner sp. Ch 3, (dc, ch 2, 2 dc) in the same sp. Dc in each st to the next corner, (2 dc, ch 2, 2 dc) in the corner sp. Repeat around and join. (23 dc per side)
- Rnd 8: Sl st to the corner sp. Ch 1, (sc, ch 2, sc) in the same sp. Sc in each st to the next corner, (sc, ch 2, sc) in the corner sp. Repeat around and join. (25 sc per side)
Fasten off and weave in the ends.
Part 2 — The face, beard, nose and mustache
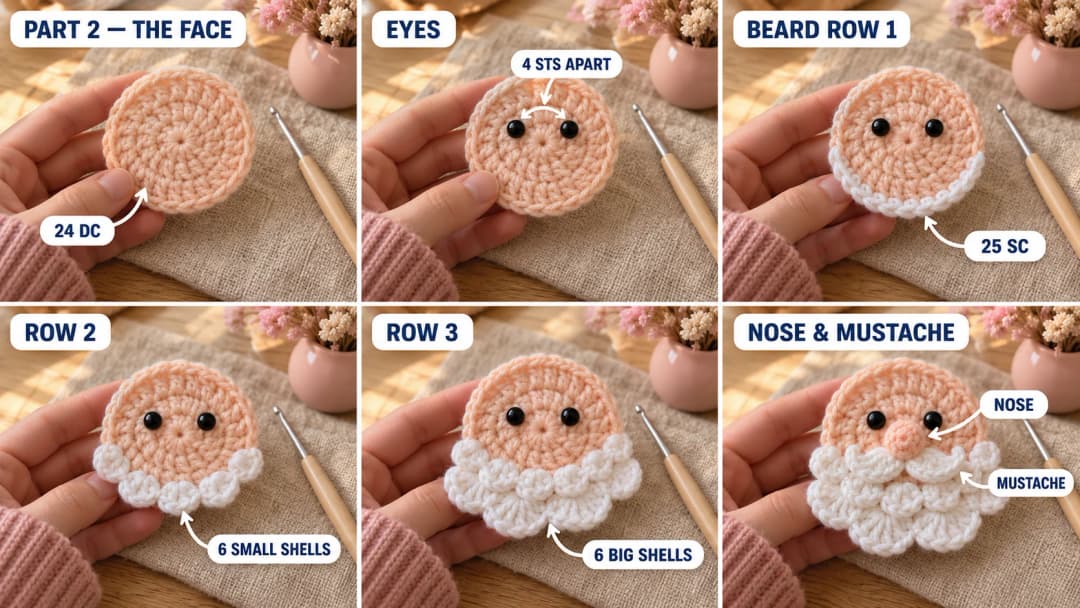
Face (skin tone). A small flat circle.
- Rnd 1: MR, ch 3, 11 dc in the ring. Join. (12 dc)
- Rnd 2: Ch 3, dc in the same st, 2 dc in each st around. Join. (24 dc)
Fasten off, leaving a 12-in tail. The face is about 2.25 in (5.5 cm) across.
Eyes. Hold the face with the join at the top. Insert the safety eyes between Rnds 1 and 2, in the upper half, with 4 sts of Rnd 2 between them. Fix the backs on now. The top of the face will be covered by the hat brim, so keep the eyes just above the center.
Beard (white), worked onto the face. Keep the eyes at the top. The beard goes around the lower half of the face, from the stitch at 3 o'clock to the stitch at 9 o'clock: that's 13 sts of Rnd 2.
- Row 1: Join white in the st at 3 o'clock. Ch 1, sc in the same st, 2 sc in each of the next 11 sts, 2 sc in the st at 9 o'clock. (25 sc)
- Row 2: Ch 1, turn. Sc in the first sc, (skip 1 sc, 5 dc in the next sc, skip 1 sc, sc in the next sc) × 6. (6 small shells)
- Row 3: Ch 1, turn. Sc in the first sc, (skip 2 dc, 7 dc in the center dc of the shell, skip 2 dc, sc in the next sc) × 6. (6 big shells)
Fasten off, leaving a 12-in tail. The big shells fan out below the small ones, like curls.
Nose (skin tone). MR, 6 sc in the ring. Pull the ring tight and fasten off, leaving an 8-in tail. The little disc cups into a round button.
Mustache (white). Ch 9. Working from the 2nd ch from the hook: sl st, hdc, 3 dc in the next ch, hdc, sl st (center), hdc, 3 dc in the next ch, hdc. Fasten off, leaving an 8-in tail. You have two curls joined at the center.
Put the face together. Sew the nose to the center of the face, over the magic ring. Sew the mustache right under the nose, with its center sl st in the middle and a curl on each side, overlapping the top of the beard a little. If you like, brush a little pink blush under each eye.
Part 3 — The hat, pompom and assembly
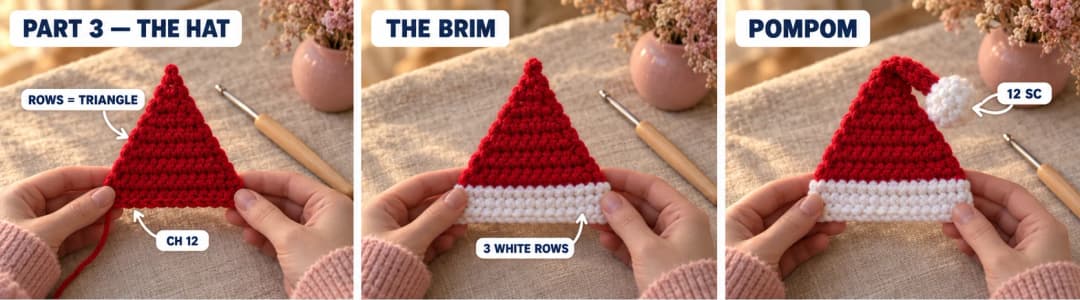
Hat (red), worked in rows. The foundation chain is the bottom edge of the hat, where the white brim goes. The last row is the tip.
- Ch 12.
- Row 1: Sc in the 2nd ch from the hook and in each ch across. (11)
- Row 2: Ch 1, turn. Sc2tog, sc to the last 2 sts, sc2tog. (9)
- Row 3: Ch 1, turn. Sc in each st across. (9)
- Rows 4–9: Repeat Rows 2 and 3 three more times. (7, 7, 5, 5, 3, 3)
- Row 10: Ch 1, turn. Sc3tog. (1)
Fasten off, leaving a 12-in tail at the tip.
Brim (white). Turn the hat upside down so the foundation chain is on top.
- Row 1: Join white in the first free loop of the foundation chain. Ch 1, sc in each free loop across. (11)
- Rows 2–3: Ch 1, turn. Sc in each st across. (11)
Fasten off, leaving a 12-in tail.
Pompom (white).
- Rnd 1: MR, 6 sc in the ring. (6)
- Rnd 2: Inc (2 sc) in each st around. (12)
- Rnd 3: Sc in each st around. (12)
- Rnd 4: Sc2tog × 6. (6)
Stuff it with a pinch of fiberfill or yarn scraps. Fasten off, leaving an 8-in tail, and pull the last round closed.
Assembly
- Pompom on the hat. Sew the pompom to the tip of the hat.
- Face on the square. Lay the square flat. Pin the face in the white center, a little below the middle, so there's room for the hat above. Sew around the edge of the face with the skin-tone tail. Then sew the top edge of the beard rows to the square with the white tail, leaving the big shells loose so they curl.
- Hat on the face. Lay the hat over the top of the face, with the white brim covering the top edge of the face, just above the eyes. Sew along the bottom edge of the brim and the two lower corners.
- Floppy tip. Fold the top third of the hat over to one side, so the pompom rests next to the face. Tack the pompom and the fold to the square with a few stitches.
- Weave in all the ends on the back.
Block it. Pin the square to 6 × 6 in (15 × 15 cm), mist the border with water, and let it dry. Don't press Santa: you want the beard to stay curly.
Safety and care. Safety eyes aren't safe for children under 3, so for a baby blanket, embroider the eyes with black yarn instead. Acrylic squares can go in the washing machine on a gentle cycle, in a mesh bag, and lie flat to dry.
Make it yours — quick variations
| Variation | Change from base pattern |
|---|---|
| Christmas blanket | Join 9 Santa squares with plain red and white granny squares in a checkerboard. |
| Pillow | Sew a Santa square to the front of a red pillow cover, or join 4 for a 12-in pillow. |
| Ornament | Skip Rnds 7 and 8 and add a 6-in ribbon loop at one corner. |
| Mrs. Claus | Skip the beard and mustache, add rosy cheeks, and sew on a tiny white bun with a red bow. |
| Cream Santa | Work the square base in cream instead of white, for a softer, vintage look. |
Troubleshooting the three things that go wrong
The square isn't flat
Your Rnd 5 corners are too tight, or your circle is too big. Check that each side has exactly 11 sts plus the corners, and that the circle measures about 3.75 in before you square it up.
The beard doesn't curl
The shells are too small or too tight. Make sure Row 3 has 7 dc in the center of each small shell, and work it a little looser. Don't sew the big shells down: they need to stay free to curl.
The hat covers the eyes
The face sits too high. Move it lower in the white center before you sew it. The brim should sit just above the eyes, covering only the top of the face.
Frequently asked questions
How long does one Santa square take? About 3 to 4 hours. The square base takes about an hour and a half. The face and beard take about an hour, and the hat, pompom and sewing take about another hour.
How much yarn do I need? About 77 yd (70 m) of worsted #4 yarn per square: about 38 yd of white, 33 yd of red and 6 yd of skin tone.
How many squares do I need for a blanket? At 6 in each, a 7 × 9 layout makes a throw of about 42 × 54 in (107 × 137 cm) before the border. Mix in plain squares so you don't have to make 63 Santas.
Can I make it without safety eyes? Yes. Embroider each eye as a small black oval, about 1 st wide, between Rnds 1 and 2 of the face, 4 sts apart. That's also the safest option for a baby blanket.
Can I sell Santa squares made from this pattern? Yes, you're welcome to sell finished squares, blankets or pillows made from this free pattern at markets, on Etsy or as gifts. Please credit "Pattern by Wavode" in your listing and link back to this page. What you can't do is republish this write-up or my photos as your own pattern.
Related patterns on Wavode
- Christmas granny square: a festive square to pair with Santa in a blanket.
- Snowman keychain: a mini snowman with a top hat and scarf.
- Crochet Christmas gnome: a cozy gnome with a long hat and a fluffy beard.
- Amigurumi Christmas stocking: a tiny stocking to fill with treats.
- Crochet spiral Christmas tree: a looped cord ornament with wooden beads.
Made a Santa square? Tag #wavodecrochet on Pinterest. I re-pin every finished make and credit the maker.
Pattern by Clara Hartwell for Wavode. Questions? Email me at support@wavode.com.