Snowman Crochet Pattern

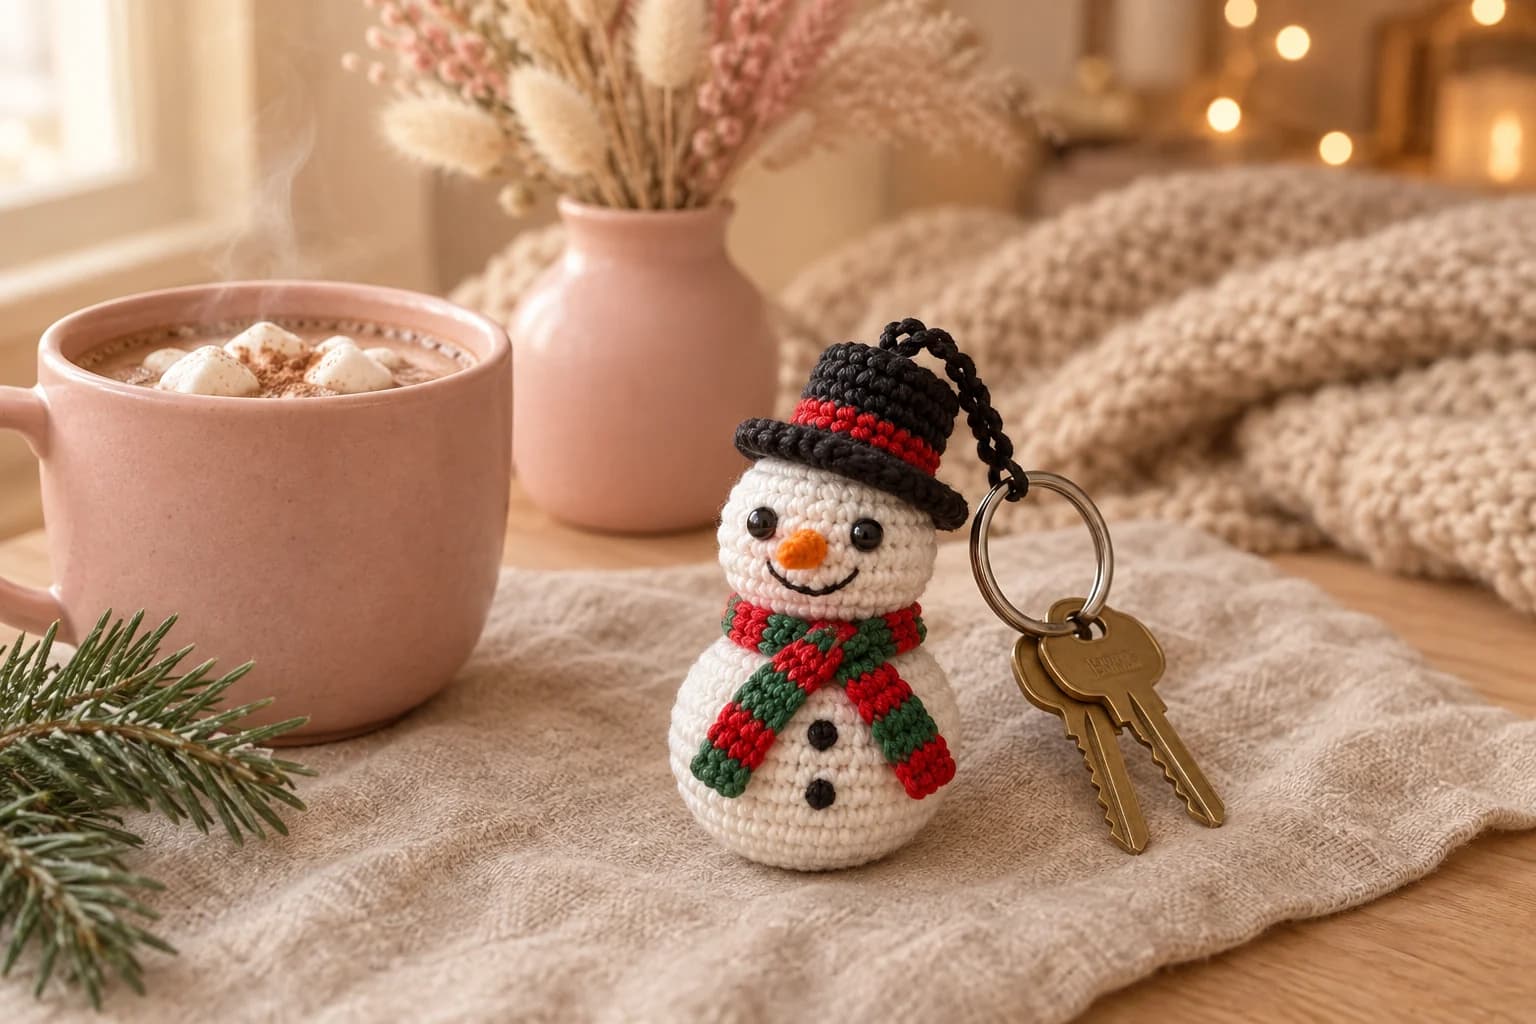
This free snowman crochet pattern makes a mini snowman keychain, about 3.5 inches tall, with a black top hat, a carrot nose and a red and green striped scarf. The body and head are one piece, worked in single crochet rounds. You'll use worsted scraps on a 3.5 mm hook, about 55 yards in five colors, and finish it in about 2 hours.
Key Takeaways
- Body and head in one piece: 20 rounds, from the bottom up, with a narrow neck in the middle.
- Five small extras: a top hat with a red band, a carrot nose, a striped scarf, two buttons and a smile.
- The loop goes all the way through the hat, head and body, and gets knotted at the bottom.
- Budget ~55 yd (50 m) of worsted #4 scraps: mostly white and black, plus a little red, green and orange.
Why I love this little snowman
Every December, I make a small batch of these for teachers, neighbors and friends. A snowman keychain is the perfect stocking stuffer: it's quick, it uses scraps, and everyone smiles when they see it. This one hangs from a bag zipper all winter, then comes back out the next year.
The construction keeps it fast. The body and head are one piece: you crochet a ball, narrow it to a neck, then grow a smaller ball on top. No sewing the head on, and no wobbly neck.
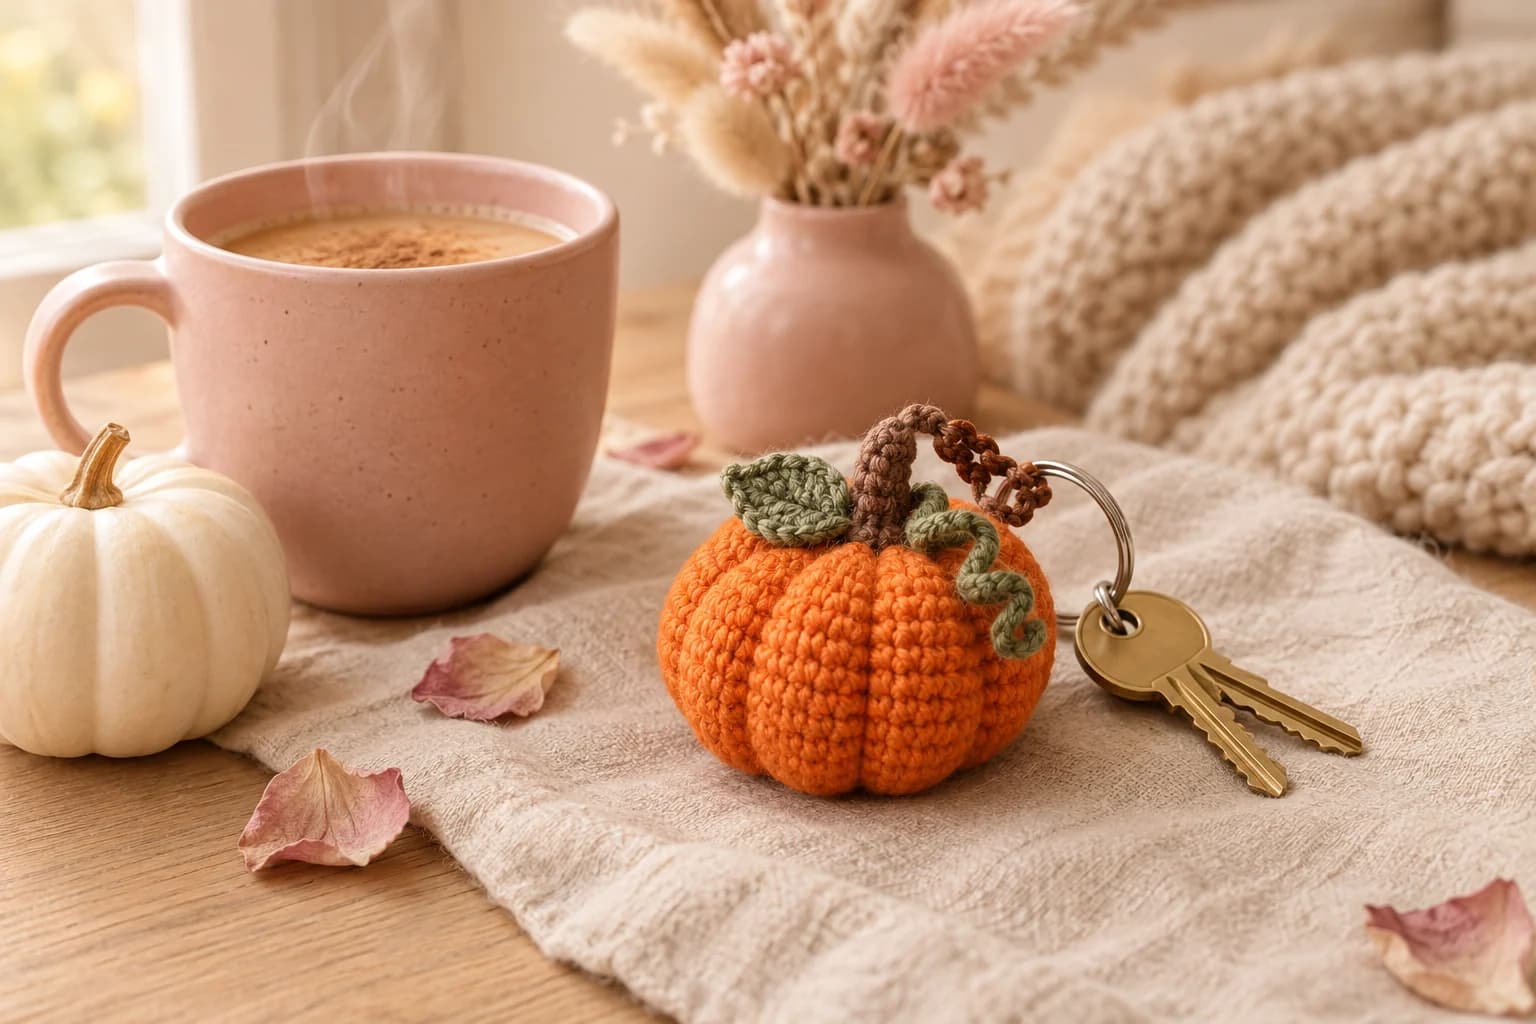
The hat is a mini top hat with a real flat brim and a red band. The scarf is a tiny striped strip, worked in rows. And the loop is anchored right through the snowman, like on my pumpkin keychain, so it can't pull out.
Is there a cuter way to use up Christmas yarn ends?
Skill level. Easy. You need a magic ring, sc, inc and dec in the round, color changes, working in back and front loops, and a few rows of sc. The rest is sewing and a little embroidery.
What you'll need
Yarn: worsted #4 acrylic, such as Red Heart Super Saver or Lion Brand Basic Stitch, or any scraps of the same weight. Acrylic keeps its shape on a keychain and doesn't mind snow.
| Color | Used for | Amount |
|---|---|---|
| White | Body and head | about 30 yd |
| Black | Hat, loop, smile, buttons | about 15 yd |
| Red | Hat band, scarf stripes | about 5 yd |
| Green | Scarf stripes | about 3 yd |
| Orange | Carrot nose | about 1 yd |
I worked those amounts out from the stitch counts: the body and head take about 414 single crochet, at about 2.2 inches of yarn each, plus tails.
Hook and notions
- 3.5 mm (US E-4) hook. It's smaller than the yarn label suggests, so the stuffing doesn't show through.
- 6 mm black safety eyes, or black yarn to embroider them.
- A small handful of polyester fiberfill, about 0.25 oz (7 g).
- A 25 mm (1 in) split key ring, or a keychain clip.
- A stitch marker, a tapestry needle, a long doll needle (about 4 in) and scissors.
Gauge and finished size
Gauge isn't critical, but tension is. Your stitches should be tight enough that the stuffing doesn't peek through. As a check, Rnd 5 (30 sc) should measure about 2 in (5 cm) across lying flat. If it's bigger, go down to a 3.25 mm hook.
Finished snowman: about 3.5 in (9 cm) tall with the hat, and 2 in (5 cm) wide at the body. The loop adds about 1 in.
Abbreviations (US crochet terms)
- ch = chain
- sl st = slip stitch
- sc = single crochet
- inc = 2 sc in the same stitch
- dec = single crochet two together (I use the invisible decrease through the front loops)
- BLO / FLO = back loop only / front loop only
- MR = magic ring
- st(s) = stitch(es)
- rnd(s) = round(s)
UK crocheters: this pattern uses US terms. US single crochet = UK double crochet.
Work the body, hat and nose in continuous spiral rounds. Move your marker up to the first stitch of every new round.
The pattern — step by step
Part 1 — The body and head (one piece)
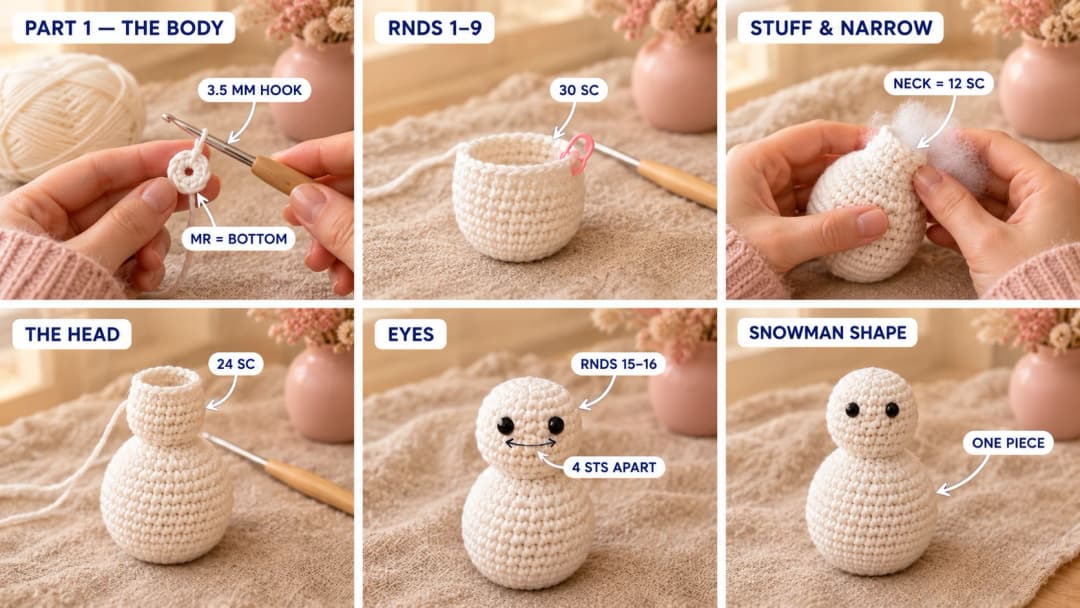
With white. The magic ring is the bottom of the snowman. The last round is the top of the head, under the hat.
Body
- Rnd 1: MR, 6 sc in the ring. Pull it closed tight. (6)
- Rnd 2: Inc in each st around. (12)
- Rnd 3: (Sc, inc) × 6. (18)
- Rnd 4: (2 sc, inc) × 6. (24)
- Rnd 5: (3 sc, inc) × 6. (30)
- Rnds 6–9: Sc in each st around, 4 rounds. (30)
- Rnd 10: (3 sc, dec) × 6. (24)
- Rnd 11: (2 sc, dec) × 6. (18)
Stuff the body firmly.
- Rnd 12 (neck): (Sc, dec) × 6. (12)
Head
- Rnd 13: (Sc, inc) × 6. (18)
- Rnd 14: (2 sc, inc) × 6. (24)
- Rnds 15–17: Sc in each st around, 3 rounds. (24)
Place the eyes between Rnds 15 and 16, with 4 sts between them, on the side opposite the start of your rounds. Fix the backs on now. Push a little stuffing into the neck so the head stays upright.
- Rnd 18: (2 sc, dec) × 6. (18)
Stuff the head firmly.
- Rnd 19: (Sc, dec) × 6. (12)
- Rnd 20: Dec × 6. (6)
Top up the stuffing. Fasten off, leaving a 6-in tail. Thread it through the front loops of the last 6 sts, pull closed, and weave it in. That point is the top center of the head.
Part 2 — The hat, nose and scarf
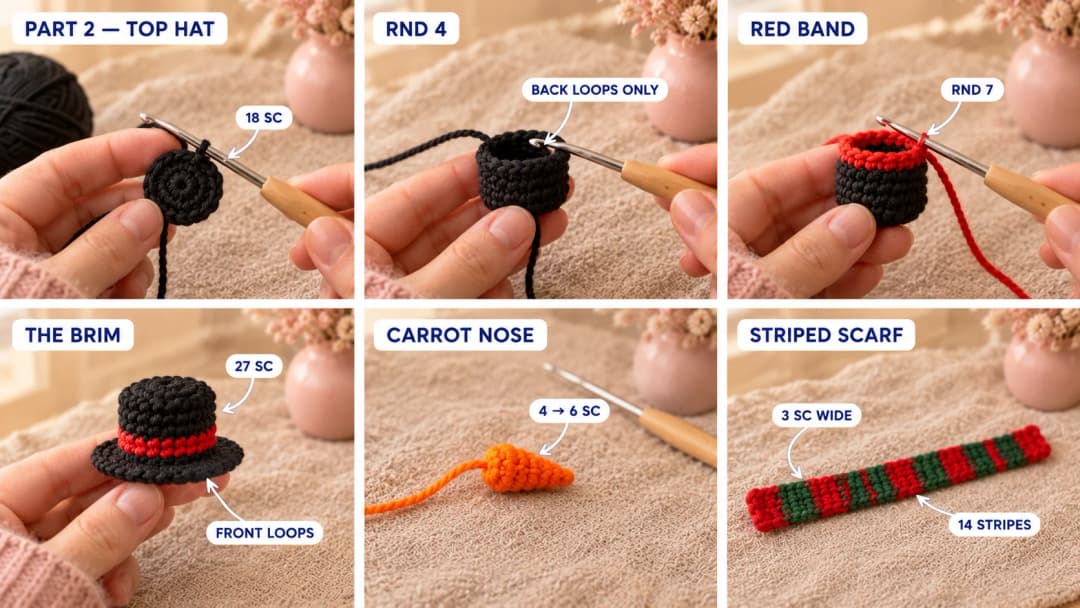
Top hat (black, with a red band). The magic ring is the top of the hat. The last round is the edge of the brim.
- Rnd 1: With black, MR, 6 sc in the ring. (6)
- Rnd 2: Inc in each st around. (12)
- Rnd 3: (Sc, inc) × 6. (18)
- Rnd 4: Sc in the back loop only of each st around. (18) This makes the sharp edge on top of the hat.
- Rnds 5–6: Sc in each st around, 2 rounds. (18)
- Rnd 7: Change to red. Sc in each st around. (18) This is the hat band.
- Rnd 8: Change to black. Working in the front loop only: (sc, inc) × 9. (27) The brim starts here.
- Rnd 9: Sc in each st around. (27)
Sl st in the next st and fasten off. Weave in the ends. The brim lies flat, and the back loops of Rnd 7 are left free inside the hat, ready for sewing.
Carrot nose (orange). The magic ring is the tip of the carrot.
- Rnd 1: MR, 4 sc in the ring. (4)
- Rnd 2: Sc in each st around. (4)
- Rnd 3: (Sc, inc) × 2. (6)
Fasten off, leaving an 8-in tail. Don't stuff it.
Striped scarf (red and green), worked in rows. With red, ch 4.
- Row 1: Sc in the 2nd ch from the hook and in the next 2 ch. (3 sc)
- Rows 2–28: Ch 1, turn, sc in each st across. (3 sc)
Change color every 2 rows: 2 rows red, 2 rows green, and so on, for 14 stripes in total (7 red and 7 green). Carry the unused color up the side instead of cutting it. Fasten off and weave in the ends. The scarf is about 5.5 in (14 cm) long.
Part 3 — Face, assembly and loop
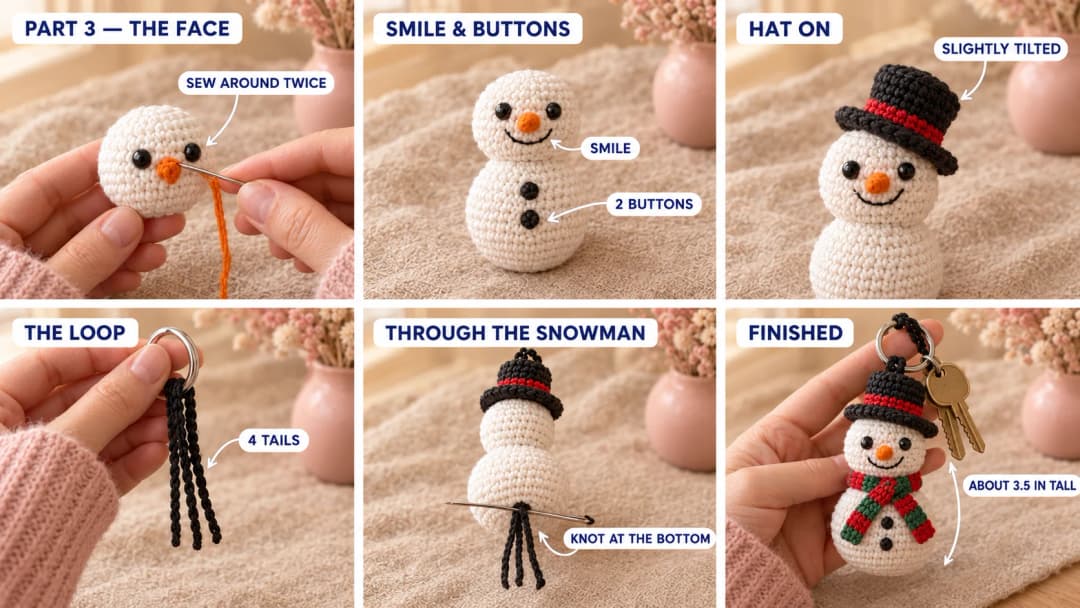
- Nose. Sew the open end of the carrot to the face, centered between the eyes and just below them, on Rnd 17. Go around it twice so it points straight out.
- Smile (black). Stitch a gentle curve about 4 sts wide on Rnd 18, under the nose. I make it with 3 short backstitches.
- Buttons (black). Make two small buttons on the front of the body, on Rnd 7 and Rnd 9, right under the face. Each one is 3 or 4 straight stitches over 1 st, piled on top of each other until they look round.
- Hat. Push a tiny bit of stuffing into the hat crown. Set the hat on top of the head, slightly tilted. With a 15-in black strand, sew the free back loops of Rnd 7 to the head all the way around. The brim sits above the eyes.
- Loop. Hold two strands of black together. Leave 8-in (20 cm) tails, ch 10, and fasten off, leaving another pair of 8-in tails. Slide the double chain onto the split ring and fold it in half: you have 4 tails together.
- Anchor the loop. Thread all 4 tails on the doll needle. Push it down through the top center of the hat, straight through the head, the neck and the body, and out at the bottom center. Pull until the chain sits snugly on the hat.
- Knot it. Tie the tails together in a tight double knot against the bottom center. Take each tail back into the body, bring it out at the side and trim it. Then add 3 or 4 stitches through the top of the hat and the chain, to lock the loop in place.
- Scarf. Wrap the scarf around the neck. Cross the ends at the front, a little to one side, and let them hang. Tack the scarf to the neck with a few small stitches at the back and where it crosses, so it can't slide off.
Give the loop a few firm tugs. It shouldn't move at all.
Safety and wear. This keychain has a metal split ring and safety eyes, so it isn't a toy for children under 3. If you're making it for a child, embroider the eyes and swap the ring for a sewn-on loop. To clean it, spot wash with a damp cloth and mild soap, and let it air dry.
Make it yours — quick variations
| Variation | Change from base pattern |
|---|---|
| Blush and cream snowman | Work the hat band and scarf in blush pink and cream for a soft, cozy look. |
| Earmuff snowman | Skip the hat. Make two tiny red balls (Rnds 1–3 of the nose, then dec × 3) and sew them to the sides of the head with a red chain across the top. |
| Christmas ornament | Swap the key ring for a 6-in ribbon loop and hang it on the tree. |
| Snowman family | Make three in different scarf colors for a set of stocking stuffers. |
| Fringed scarf | Knot two 1-in strands of the stripe color into each end of the scarf. |
Troubleshooting the three things that go wrong
The head tips to one side
The neck isn't stuffed enough. Before you close the head, push a little stuffing into the neck with the back of your hook. The loop tails running through the neck also help hold the head straight.
The hat brim curls up
Your Rnd 8 is too tight. Work it a little looser, or go up half a hook size for Rnds 8–9 only. A light steam from an iron held above the brim, without touching it, flattens it too.
The scarf stripes look uneven
You changed color at the wrong time. Always switch on the last yarn-over of the row before the new color, so each stripe has exactly 2 rows. Count 14 stripes before you fasten off.
Frequently asked questions
How long does the snowman keychain take? About 2 hours. The body and head take about an hour. The hat, nose and scarf take about 40 minutes, and the face and assembly take another 20 minutes or so.
How much yarn do I need? About 55 yd (50 m) of worsted #4 yarn: about 30 yd of white, 15 yd of black, 5 yd of red, 3 yd of green and a yard of orange. It's a great way to use up scraps.
Can I make it without safety eyes? Yes. Embroider each eye as a small black dot, 1 st wide and 1 round tall, with a few stitches on top of each other. Place them in the same spot, between Rnds 15 and 16, 4 sts apart.
How many can I make before Christmas? At about 2 hours each, a dozen takes a couple of weekends. I crochet all the bodies first, then all the hats and scarves, and assemble them in one evening. Batching saves a lot of color changes.
Can I sell snowman keychains made from this pattern? Yes, you're welcome to sell finished keychains made from this free pattern at markets, on Etsy or as gifts. Please credit "Pattern by Wavode" in your listing and link back to this page. What you can't do is republish this write-up or my photos as your own pattern.
Related patterns on Wavode
- Crochet Christmas gnome: a cozy gnome with a long hat and a fluffy beard.
- Crochet Christmas tree decorations: small ornaments for the tree.
- Amigurumi Christmas stocking: a tiny stocking to fill with treats.
- Christmas granny square: a festive square for blankets and pillows.
- Pumpkin keychain: the same strong loop, on a mini fall pumpkin.
Made a snowman? Tag #wavodecrochet on Pinterest. I re-pin every finished make and credit the maker.
Pattern by Clara Hartwell for Wavode. Questions? Email me at support@wavode.com.