Cupcake Crochet Keychain

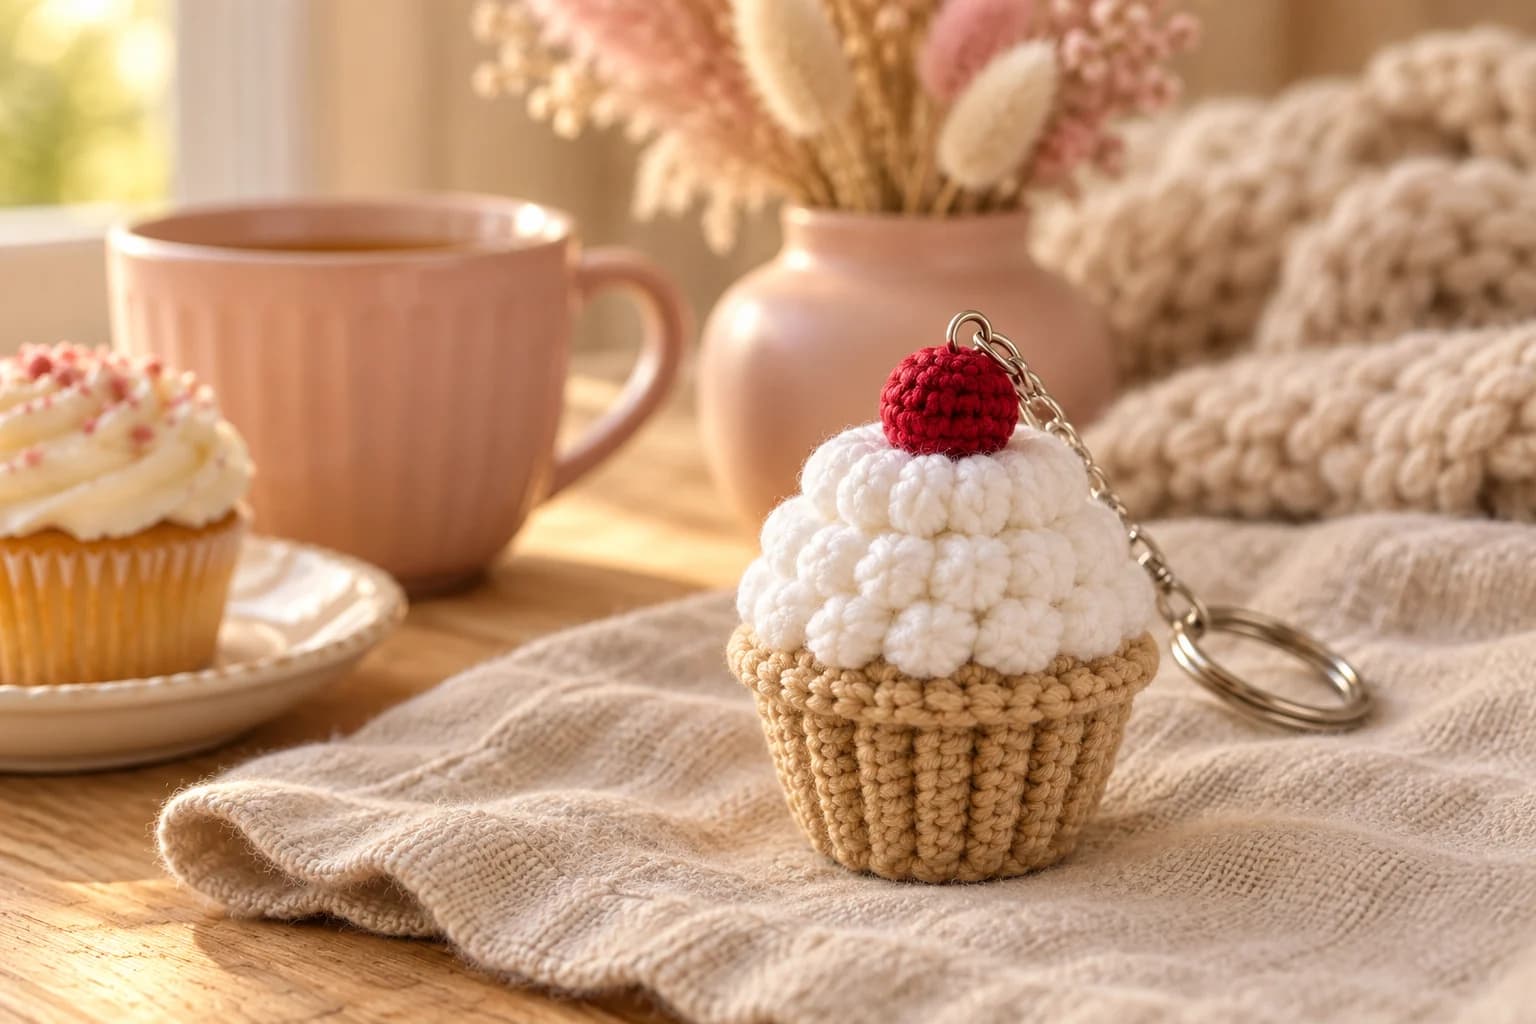
This free crochet cupcake keychain is a two-hour mini amigurumi with a cherry on top. The tan liner and the white frosting are one piece, worked from the base up. Waistcoat stitch gives the liner its pleated paper-cup look, and rounds of puff stitches make the frosting fluffy. You'll need about 35 yards of DK cotton in three colors and a 2.5 mm hook.
Key Takeaways
- Liner and frosting are one piece, so the only thing to sew on is the cherry.
- Waistcoat stitch makes the pleats: its V-columns stack straight up like a paper liner.
- The frosting starts in the free back loops, so it sits inside the rolled rim and spills over it.
- About 35 yd (32 m) of DK cotton, a jump ring and a split key ring.
Why I love this cupcake keychain
I wanted a sweet little charm that works up in one evening and still looks like real bakery food. This cupcake is it: it's small enough to clip anywhere, and it's one of those gifts people keep on their keys for years. It makes a lovely party favor, a bake-sale treat that lasts, or a thank-you for a teacher.
The whole cupcake comes off the hook in one piece. You start with a flat round base, turn the corner with a back-loop round, and stack waistcoat stitches up the sides. A rolled rim finishes the liner, then the frosting grows from the inside of that rim.
The cherry is a tiny ball, and the key ring hangs from a little jump ring on top, just like a stem. Isn't that the cutest finishing touch?
Skill level. Easy. You need a magic ring, sc, inc and dec in the round, working in back and front loops, waistcoat stitch and puff stitch. I explain both of the last two below.
What you'll need
Yarn: DK #3 cotton, such as Paintbox Yarns Cotton DK. Cotton keeps the pleats and puffs crisp, and it doesn't fuzz on a keychain.
| Color | Used for | Amount |
|---|---|---|
| Biscuit tan | Liner and rim | about 12 yd |
| White | Frosting | about 17 yd |
| Cherry red | Cherry and hanging strand | about 5 yd |
I worked those amounts out from the stitch counts: the liner takes about 216 stitches, and the frosting about 246 stitches plus the extra yarn in the puffs.
Hook and notions
- 2.5 mm (US B/1 or C/2) hook. Optional: a 2.75 mm hook for the waistcoat stitch rounds if they feel too tight.
- Polyester fiberfill.
- A silver split key ring (25 mm) with a short chain, and one 7 mm jump ring.
- Two pairs of flat-nose pliers (or one pair and your fingernail) to open and close the jump ring.
- A tapestry needle, a long doll needle (about 3 in), a stitch marker and scissors.
- Optional: a plastic circle about ¾ in (2 cm) wide, cut from a food lid, for an extra-flat base. Skip it if you don't have one.
Gauge and finished size
Gauge: tight enough that the stuffing doesn't show between the stitches. With DK cotton on a 2.5 mm hook, that's about 7 sc per inch.
Finished cupcake: about 2¼ in (5.5 cm) tall with the cherry, and 1½ in (4 cm) wide at the frosting. The jump ring and key ring add about 1¼ in. Measure your first one: a tighter or looser hand changes it a little.
Abbreviations (US crochet terms)
- MR = magic ring
- ch = chain
- sl st = slip stitch
- sc = single crochet
- inc = 2 sc in the same st
- dec = single crochet two together (I use the invisible decrease through the front loops)
- ws = waistcoat stitch (see below)
- ws-inc = 2 ws in the same st
- puff = puff stitch (see below)
- BLO / FLO = back loop only / front loop only
- st(s) = stitch(es)
- rnd(s) = round(s)
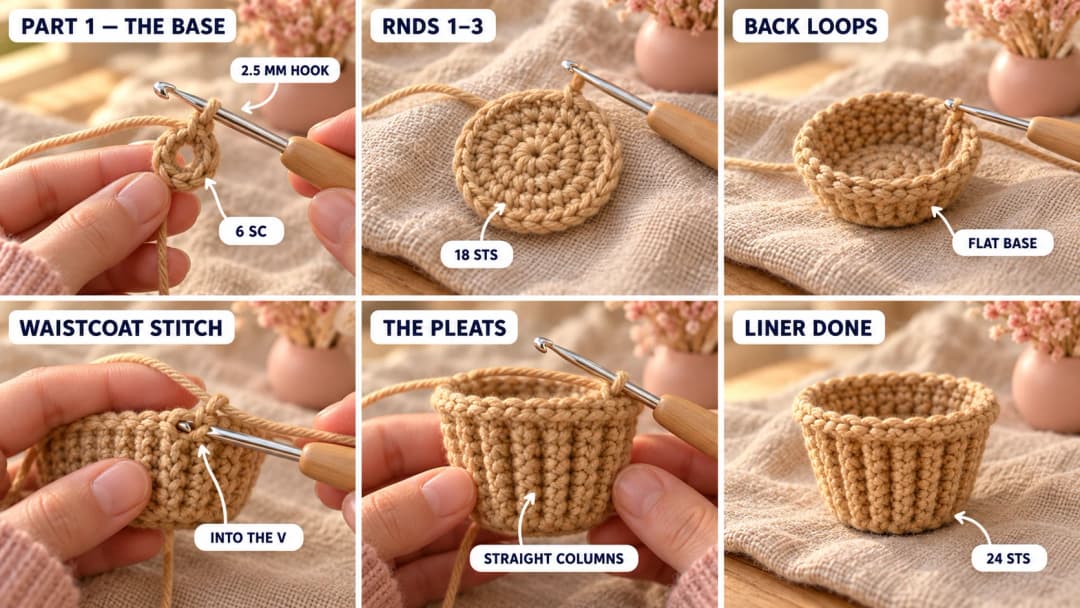
Waistcoat stitch (ws). Look at a stitch of the round below from the front: you'll see a V. Insert your hook through the middle of that V, between its two legs and under the bars at the back. Yarn over, pull up a loop, yarn over and pull through both loops. The new stitch sits straight on top of the old one, so the columns of Vs line up like pleats.
Puff stitch (puff). (Yarn over, insert the hook in the stitch, yarn over and pull up a loop to the height of a half double crochet) 3 times. You have 7 loops on the hook. Yarn over and pull through all 7. The puff pops out on the right side of the work.
Work in continuous rounds, without joining, unless the pattern says otherwise. Move the stitch marker up at the start of every round.
The pattern — step by step
Part 1 — The base and liner
The magic ring is the center of the base, the bottom of the cupcake. The liner grows straight up from it and gets a little wider toward the top, like a real paper cup.
With biscuit tan:
- Rnd 1: MR, 6 sc in the ring. (6)
- Rnd 2: Inc × 6. (12)
- Rnd 3: (Sc, inc) × 6. (18)
If you're using the plastic circle, keep it nearby: it goes in on top of the base before you stuff.
- Rnd 4 (BLO): Sc in the back loop only of each st. (18) This turns the corner, so the base stays flat.
- Rnd 5: Ws in each st around. (18)
- Rnd 6: (5 ws, ws-inc) × 3. (21)
- Rnd 7: Ws in each st around. (21)
- Rnd 8: (6 ws, ws-inc) × 3. (24)
- Rnds 9–10: Ws in each st around. (24)
Waistcoat stitch is tight by nature. If your hook starts to fight you, switch to the 2.75 mm hook for Rnds 5 to 10, then go back to the 2.5 mm.
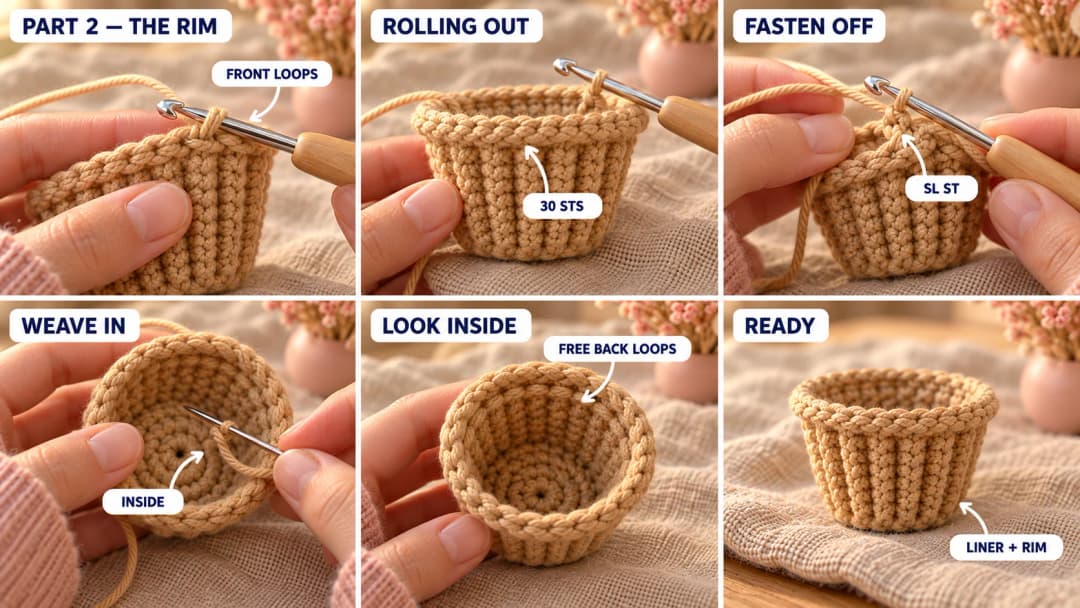
Part 2 — The rolled rim
The rim is worked in the front loops of Rnd 10. The back loops stay free on the inside: that's where the frosting will start.
- Rnd 11 (rim, FLO): Working in the front loops only: (3 sc, inc) × 6. (30)
Sl st in the next st and fasten off. Weave the tan tail in on the inside of the liner, and trim it.
The extra stitches make the rim roll outward a little, like the edge of a paper baking cup. Turn the liner and look inside: you should see a clean ring of free back loops, just under the rim.
Part 3 — The frosting
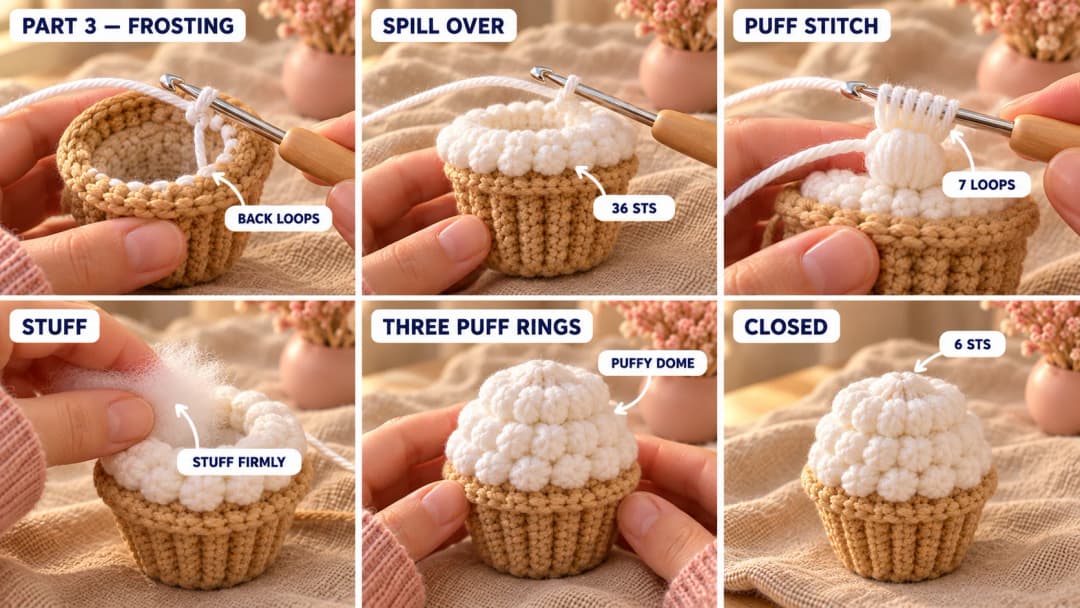
Join white in any free back loop of Rnd 10, on the inside of the rim. The frosting first grows wider than the rim, so it spills over it, then closes into a dome.
- Rnd 1 (in the back loops of Rnd 10): (3 sc, inc) × 6. (30)
- Rnd 2: (4 sc, inc) × 6. (36)
- Rnd 3: (Puff, sc) × 18. (36)
- Rnd 4: (4 sc, dec) × 6. (30)
Stuff the liner firmly now, with the plastic circle pressed flat on the base first if you're using it.
- Rnd 5: (Puff, sc) × 15. (30)
- Rnd 6: (3 sc, dec) × 6. (24)
- Rnd 7: (Puff, sc) × 12. (24)
- Rnd 8: (2 sc, dec) × 6. (18)
Stuff the frosting firmly, shaping it into a soft dome.
- Rnd 9: (Sc, dec) × 6. (12)
- Rnd 10: Dec × 6. (6)
Fasten off. Thread the tail through the front loops of the last 6 sts, pull the hole closed and weave the tail in. This closing point is the top center of the frosting, where the cherry goes.
On the puff rounds, give each puff a little push outward with your fingertip as you go. That's what makes the frosting look piped and fluffy.
Part 4 — The cherry and key ring
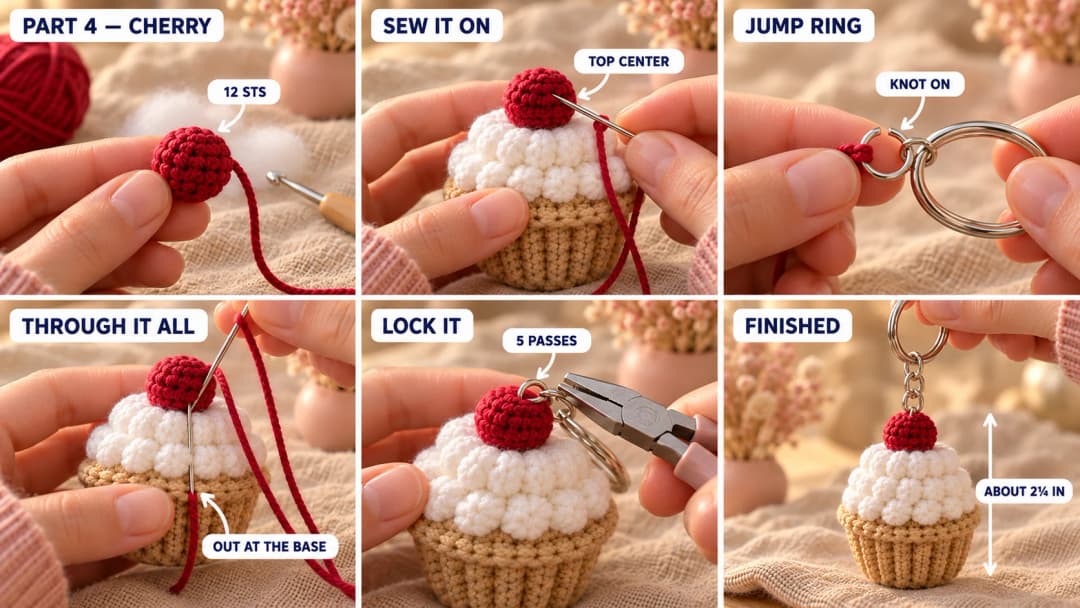
Cherry (cherry red). The magic ring is the top of the cherry, where the jump ring goes. The closing round is the bottom, where you sew it to the frosting.
- Rnd 1: MR, 6 sc in the ring. (6)
- Rnd 2: Inc × 6. (12)
- Rnds 3–4: Sc in each st around. (12)
Stuff it firmly.
- Rnd 5: Dec × 6. (6)
Fasten off, leaving a 10-in tail. Pull the last round closed, but keep the tail out.
Assembly:
- Sew the cherry on. Set the cherry on the top center of the frosting, magic ring facing up. With its tail, sew all around the bottom of the cherry into the frosting, about 10 small stitches. Push the needle down through the cupcake, bring it out at the side and trim the tail.
- Get the hardware ready. Open the jump ring with the pliers, twisting the ends sideways (never pull them apart). Slide it onto the last link of the key ring's chain, and leave it open for now.
- The hanging strand. Cut a 24-in (60 cm) piece of red yarn. Fold it in half and pull the fold through the jump ring. Pass both ends through the fold and pull tight: the strand is now knotted onto the jump ring.
- Anchor it through the cupcake. Thread both ends on the doll needle. Push the needle down through the magic ring at the top of the cherry, straight through the cherry, the frosting and the liner, and out through the center of the base. Pull until the jump ring sits snugly on top of the cherry.
- Lock it in place. Bring the needle back up from the base, just next to where it came out, through the jump ring, and down again through the cupcake. Repeat 4 more times, so about 10 strands of yarn hold the jump ring.
- Finish. Tie the ends in a tight double knot against the center of the base. Push the needle back into the base, bring it out at the side of the liner and trim the ends. Close the jump ring with the pliers, twisting the ends back until they meet.
Give the key ring a few firm tugs. The jump ring shouldn't pull away from the cherry. Cotton stretches a little over time, so if you ever see the ring loosen, add 2 or 3 more passes through the cupcake.
Safety and wear. This keychain has a metal jump ring and a key ring, so it isn't a toy and isn't safe for children under 3. For a little one, skip the hardware and sew on a short crochet chain loop instead, or leave the cupcake as a soft play-food mini. To clean it, spot wash with a damp cloth and mild soap, and let it air dry.
Make it yours — quick variations
| Variation | Change from base pattern |
|---|---|
| Strawberry frosting | Work the frosting in blush pink instead of white. |
| Chocolate cupcake | Use chocolate brown for the liner and keep the frosting white. |
| Sprinkles | Embroider tiny straight stitches in yellow, pink and blue on the frosting. |
| Bag charm | Swap the key ring and chain for a lobster clasp so it clips onto a bag strap. |
| Play food | Skip the hardware and the hanging strand, and make a set of three cupcakes. |
Troubleshooting the three things that go wrong
The pleats look twisted
The columns drift when the round marker moves around. Keep the marker in the first stitch of every round, and insert the hook right in the middle of each V. Waistcoat stitch should stack in straight lines, so a lean shows up fast.
The frosting doesn't cover the rim
The frosting was joined in the wrong loops, or the increases were skipped. Join it in the free back loops of Rnd 10, inside the rim, and work the 30 and 36-stitch rounds before the first puffs. Those two rounds make it spill over the edge.
The cupcake won't stand
The base isn't flat enough. Make sure Rnd 4 is worked in the back loops only, and press the base flat with your thumb as you stuff. The plastic circle fixes it every time.
Frequently asked questions
How long does this cupcake keychain take? About 2 hours. The liner and rim take about 45 minutes, the frosting about 45 minutes, and the cherry and key ring another 30 minutes or so.
How much yarn do I need? About 35 yd (32 m) of DK cotton in all: about 12 yd of tan, 17 yd of white and 5 yd of red. It's a great scrap-buster.
Can I use worsted yarn? Yes. With worsted cotton and a 3.5 mm hook, the cupcake grows to about 3 in tall with the cherry. Use a slightly bigger jump ring so it still looks in scale.
Can I skip the waistcoat stitch? Yes. Work Rnds 5 to 10 in plain sc instead, with the same counts. The liner will be smooth instead of pleated. For a ridged look without waistcoat stitch, work every round in the back loops only.
Can I sell keychains made from this pattern? Yes, you're welcome to sell finished keychains made from this free pattern at markets, on Etsy or as gifts. Please credit "Pattern by Wavode" in your listing and link back to this page. What you can't do is republish this write-up or my photos as your own pattern.
Related patterns on Wavode
- Crochet lip balm holder keychain: a handy little sleeve for your keys.
- Pumpkin keychain: a round mini pumpkin with a stem.
- Tiny crochet sushi roll: another cute play-food mini.
- Crochet mushroom keychain: a kawaii red-cap mushroom.
Made a cupcake keychain? Tag #wavodecrochet on Pinterest. I re-pin every finished make and credit the maker.
Pattern by Clara Hartwell for Wavode. Questions? Email me at support@wavode.com.