Pumpkin Keychain Crochet Pattern

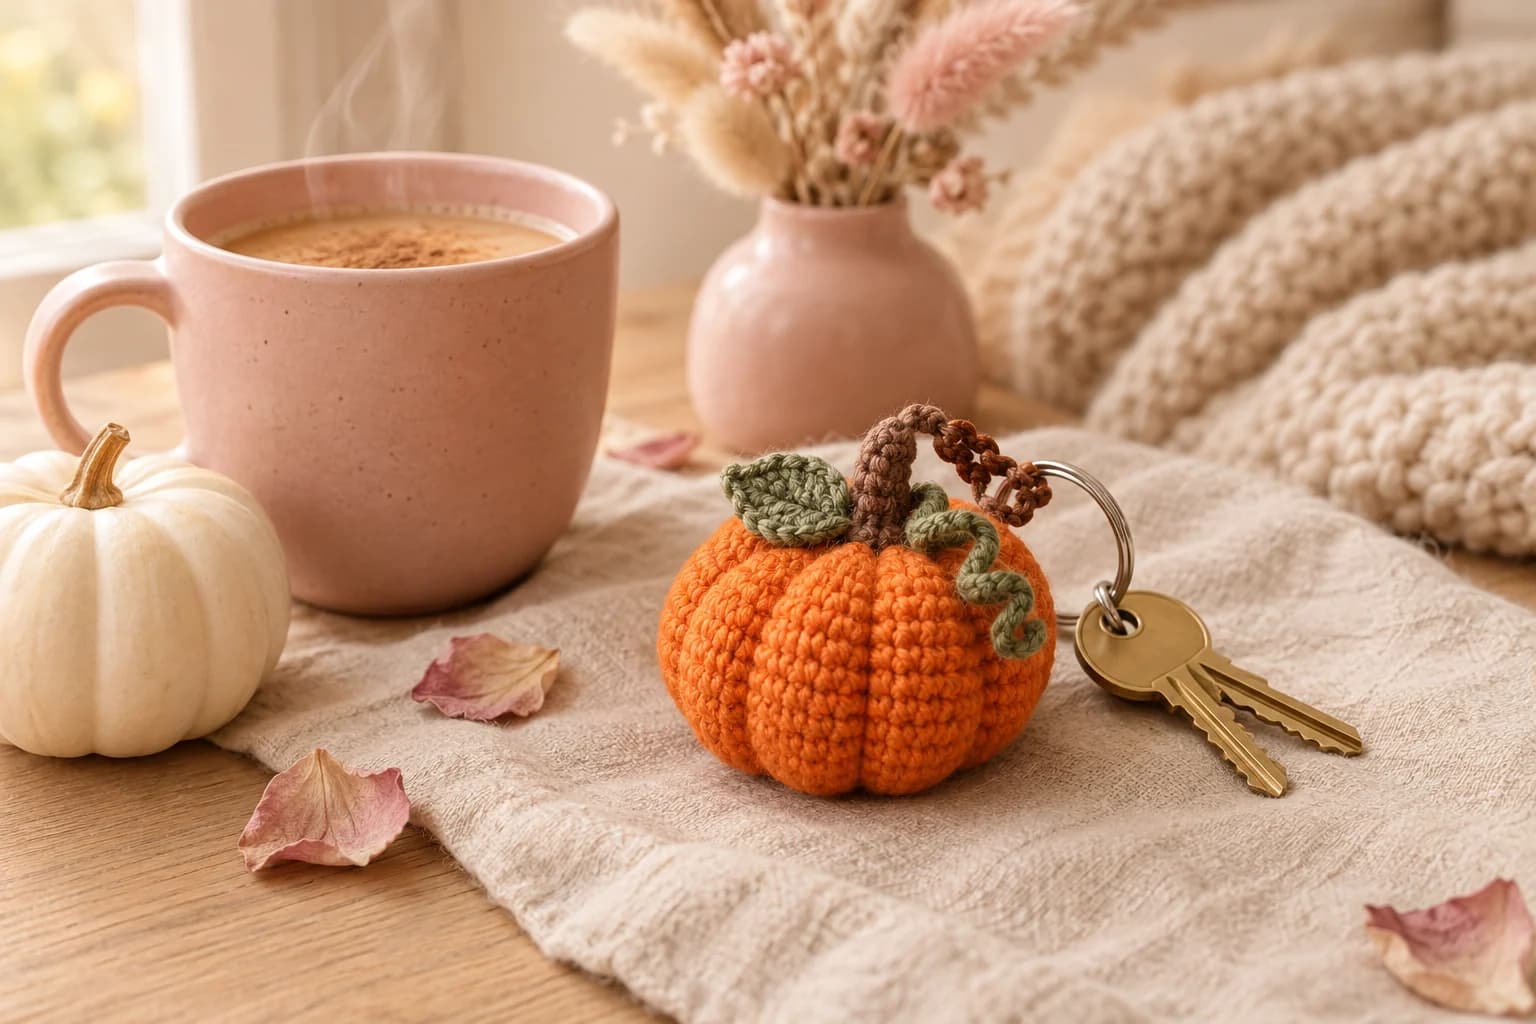
This free pumpkin keychain crochet pattern makes a plump little ribbed pumpkin, about 2 inches wide, with a stem, a leaf and a curly vine. It's worked in worsted yarn on a 3.5 mm hook, in single crochet rounds. The ribs aren't crocheted: you pull them in with the closing tail. You'll need about 30 yards of scraps and about an hour.
Key Takeaways
- One small ball, closed at the top: 13 rounds, 30 stitches at the widest.
- Six ribs, pulled in with the tail from top to bottom, squash it into a pumpkin shape.
- The loop is anchored all the way through the pumpkin and knotted at the bottom, so it can't pull out.
- Budget ~30 yd (27 m) of worsted #4: about 20 yd orange, 5 yd brown, 3 yd green.
Why I love this little pumpkin
My pumpkin cat takes a weekend. This is its one-hour cousin: the same ribbed pumpkin, small enough to hang from your keys. It's the project I make in batches every October, from the orange ends left over from bigger pumpkins.
It's also a great first keychain. The body is one simple ball: four increase rounds, four straight rounds and four decrease rounds. The stem and leaf are tiny, and you finish the whole thing with a needle, not more crochet.
The part I care about most is the loop. A keychain gets yanked out of bags and pockets all day. So the loop on this one isn't just stitched to the top. Its tails go straight through the pumpkin and get knotted at the bottom. Have you ever lost a crochet charm and found only the loop left on the ring? This fixes that.
Skill level. Easy. You need a magic ring, sc, inc and dec in the round, a chain, and basic sewing. If you've made one amigurumi ball, you can make this.
What you'll need
Yarn: worsted #4 acrylic, such as Red Heart Super Saver, Lion Brand Basic Stitch or any orange scraps of the same weight. Acrylic keeps its shape on a keychain and doesn't mind rain.
| Color | Used for | Amount |
|---|---|---|
| Orange | Pumpkin, rib lines | about 20 yd |
| Brown | Stem, hanging loop | about 5 yd |
| Olive green | Leaf, vine | about 3 yd |
I worked those amounts out from the stitch counts, at about 2.2 inches of worsted yarn per single crochet, plus tails. A pumpkin uses about 270 stitches of orange, so one skein makes dozens.
Hook and notions
- 3.5 mm (US E-4) hook. It's smaller than the yarn label suggests, so the stuffing doesn't show through.
- A small handful of polyester fiberfill, about 0.2 oz (5 g).
- A 25 mm (1 in) split key ring, or a keychain ring with a short chain and a lobster clasp.
- A stitch marker, a tapestry needle with a large eye and scissors.
Gauge and finished size
Gauge isn't critical, but tension is. Your stitches should be tight enough that the stuffing doesn't peek through. As a check, Rnd 5 (30 sc) should measure about 2 in (5 cm) across lying flat. If it's bigger, go down to a 3.25 mm hook.
Finished pumpkin: about 2 in (5 cm) wide and 1.5 in (4 cm) tall once the ribs are pulled in. The stem adds about 0.5 in, and the loop about 1 in.
Abbreviations (US crochet terms)
- ch = chain
- sl st = slip stitch
- sc = single crochet
- hdc = half double crochet
- dc = double crochet
- inc = 2 sc in the same stitch
- dec = single crochet two together (I use the invisible decrease through the front loops)
- MR = magic ring
- st(s) = stitch(es)
- rnd(s) = round(s)
UK crocheters: this pattern uses US terms. US single crochet = UK double crochet, US half double = UK half treble, US double crochet = UK treble.
Work the pumpkin and stem in continuous spiral rounds. Don't join at the end of each round. Move your marker up to the first stitch of every new round.
The pattern — step by step
Part 1 — The pumpkin and its ribs
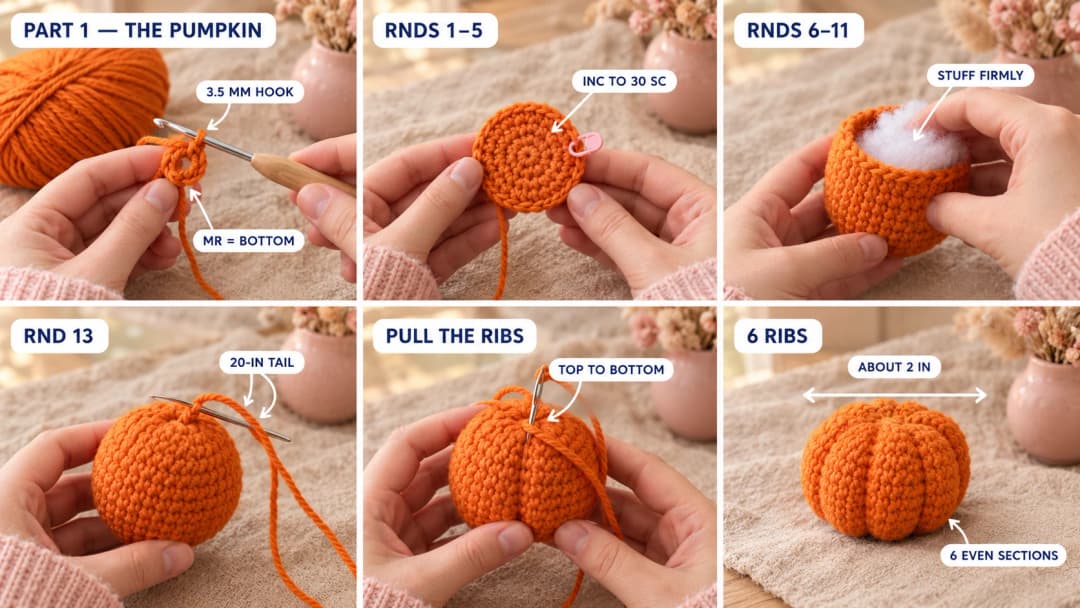
With orange. The magic ring is the bottom of the pumpkin. The last round is the top, where the stem goes.
- Rnd 1: MR, 6 sc in the ring. Pull it closed tight. (6)
- Rnd 2: Inc in each st around. (12)
- Rnd 3: (Sc, inc) × 6. (18)
- Rnd 4: (2 sc, inc) × 6. (24)
- Rnd 5: (3 sc, inc) × 6. (30)
- Rnds 6–9: Sc in each st around, 4 rounds. (30)
- Rnd 10: (3 sc, dec) × 6. (24)
- Rnd 11: (2 sc, dec) × 6. (18)
Stuff firmly now, while the opening is still wide. Then keep going:
- Rnd 12: (Sc, dec) × 6. (12)
- Rnd 13: Dec × 6. (6)
Top up the stuffing. Fasten off, leaving a 20-in (50 cm) tail. Thread it through the front loops of the last 6 sts and pull the hole closed. That point is the top center.
Pull in the ribs. Keep the tail on the needle. Push the needle down through the top center, straight through the middle of the pumpkin, and out at the bottom center (the magic ring). Bring the yarn up the outside of the pumpkin and back to the top center. Pull firmly: the pumpkin squashes and a dent forms along the yarn. Repeat for 6 lines, one at each of the 6 increase columns, about 5 sts apart around Rnds 6–9.
Pull each line with the same tension, so the six sections come out even. End at the top center, make a small knot close to the fabric, and push the needle into the pumpkin and out at the side. Trim the tail there, so it disappears inside.
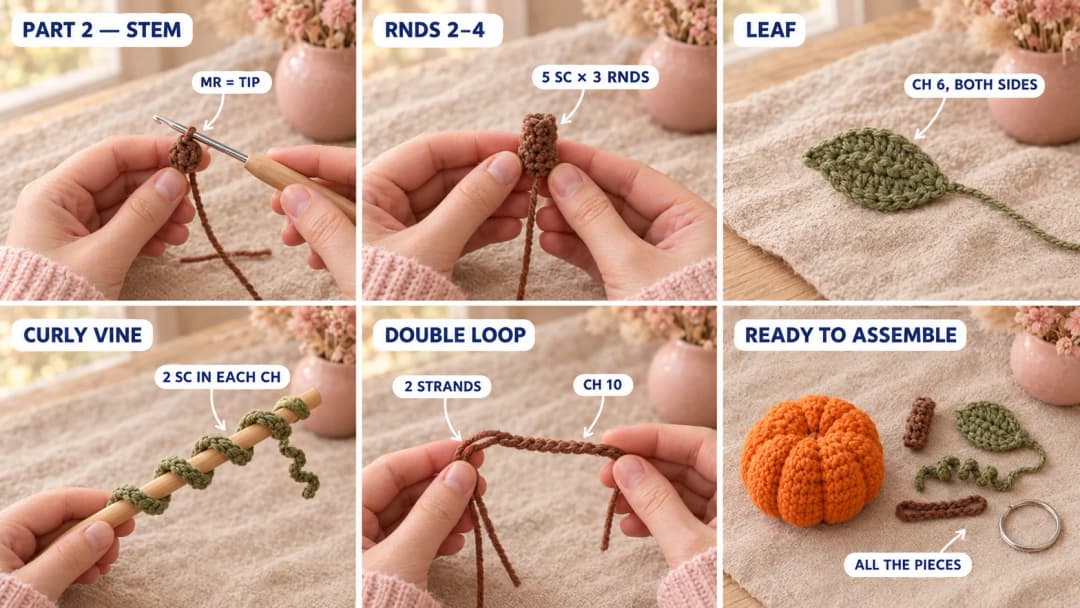
Part 2 — The stem, leaf, vine and loop
Stem (brown). The magic ring is the tip of the stem. The last round is its base.
- Rnd 1: MR, 5 sc in the ring. (5)
- Rnds 2–4: Sc in each st around, 3 rounds. (5)
Fasten off, leaving a 10-in tail. Don't stuff it. It's a small, firm tube about 0.5 in tall.
Leaf (olive green). Ch 6. Starting in the 2nd ch from the hook: sc, hdc, dc, hdc. Work 3 sc in the last ch. Now work along the other side of the chain: hdc, dc, hdc, sc. Sl st to the first sc. (11 sts) Fasten off, leaving an 8-in tail.
Vine (olive green). Ch 10. Work 2 sc in the 2nd ch from the hook and in each ch across. (18 sc) Fasten off, leaving an 8-in tail. The extra stitches make the strip twist into a corkscrew. Roll it around a pencil to set the curl.
Hanging loop (brown, 2 strands held together). Hold two strands of brown together. Leave 8-in (20 cm) tails, ch 10, then fasten off, leaving another pair of 8-in tails. You now have a short double chain with 2 tails at each end.
Working the loop with two strands makes it thicker and much harder to stretch than a single chain.
Part 3 — Put it together
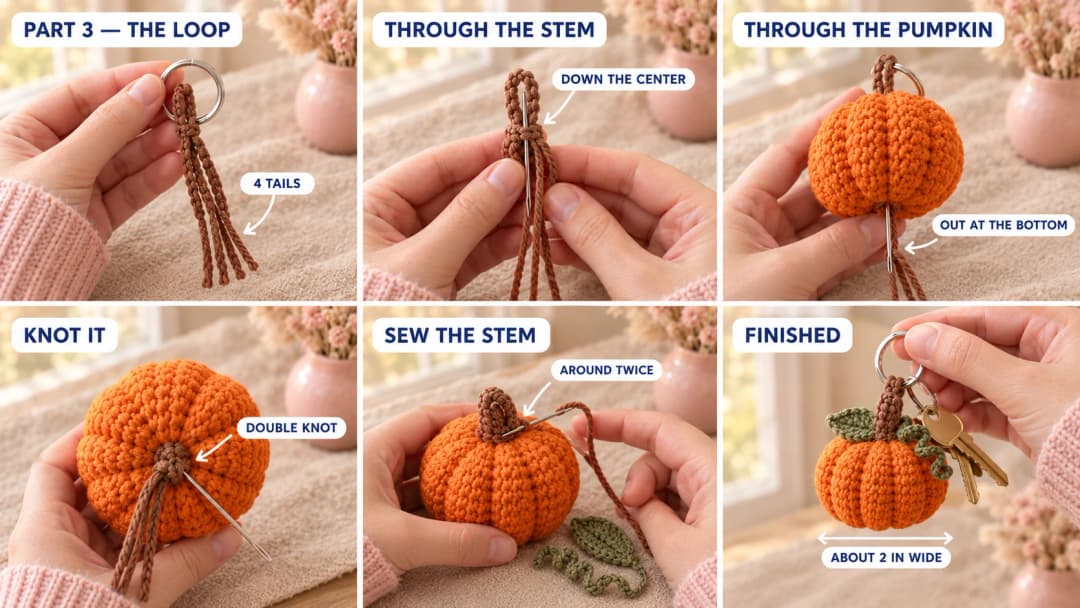
- Thread the loop onto the ring. Slide the double chain onto the split ring, then fold it in half so the ring sits at the fold. All 4 tails now hang together at the other end.
- Run the tails through the stem. Thread all 4 tails on the tapestry needle. Push it down through the center of the stem's magic ring, along the inside of the stem tube, and out of its open base. Pull until the folded chain sits snugly on the stem tip.
- Anchor them through the pumpkin. Push the needle into the top center of the pumpkin, straight down through the middle, and out at the bottom center. Pull the stem down firmly against the top.
- Knot at the bottom. Split the tails into two pairs and tie them together in a tight double knot, right against the bottom center. Then take each tail back into the pumpkin, bring it out at the side and trim it. The knot sinks into the bottom dent and the loop can't pull back out.
- Sew the stem down. With the stem's tail, sew its base to the top of the pumpkin, going all the way around twice, with at least 10 stitches that go deep into the pumpkin. Finish with 3 or 4 stitches through the stem tip and the chain, to lock the loop in place.
- Add the leaf and vine. Sew the leaf next to the stem, tilted to one side. Sew one end of the vine at the base of the stem, on the other side, and let its curl stand up. Weave in all the ends inside the pumpkin.
Give the loop a few firm tugs. It shouldn't move at all at the stem. If the chain stretches a little, that's normal for acrylic: just pull it a few times before you put your keys on.
Safety and wear. This keychain has a metal split ring, so it isn't a toy for children under 3. Check the loop now and then: on a bag that gets yanked a lot, a few extra stitches through the stem tip keep it solid for years. To clean it, spot wash with a damp cloth and mild soap, and let it air dry.
Make it yours — quick variations
| Variation | Change from base pattern |
|---|---|
| White pumpkin | Work the pumpkin in cream, with a sage green leaf. |
| Kawaii pumpkin | Embroider two small black eyes on Rnd 8, 4 sts apart, and a tiny smile between them. Add blush pink cheeks with a few straight stitches. |
| Bag charm | Swap the split ring for a lobster clasp, and clip it to a zipper pull. |
| Pumpkin trio | Make three in orange, cream and sage, and hang them from one ring. |
| Shelf pumpkin | Keep increasing to 48 sts (Rnd 8), work 6 rounds even, then decrease by 6 sts each round down to 6. About 3.5 in wide, no loop. |
Troubleshooting the three things that go wrong
The pumpkin looks like a ball, not a pumpkin
The ribs aren't pulled tight enough. Go over each line a second time, from top to bottom, and pull harder. The pumpkin should end up wider than it is tall. Firm stuffing also gives deeper ribs.
The stem leans or wobbles
The stem's base isn't sewn down enough. Go around the base again with a few more deep stitches. Running the loop tails through the stem, as in step 2, also keeps it standing straight.
The ribs are uneven
You didn't follow the increase columns. On Rnd 5, the 6 increases line up in 6 columns. Use them as guides, so each section has the same 5 stitches.
Frequently asked questions
How long does a pumpkin keychain take? About an hour. The pumpkin takes 30 to 40 minutes, and the stem, leaf, vine and loop take about 10 minutes. Pulling in the ribs and putting it together takes another 10 to 15 minutes.
How much yarn do I need? About 30 yd (27 m) of worsted #4 yarn in total: about 20 yd of orange, 5 yd of brown and 3 yd of green. It's a perfect scrap project, and one skein of orange makes a whole batch of pumpkins.
Can I use cotton yarn? Yes. Worsted cotton gives crisper stitches. Cotton stretches more than acrylic, though, so work the loop with two strands as written, and add a few extra stitches through the stem tip.
Is this a good first keychain? Yes. It's one ball in single crochet, with a few tiny pieces. If you'd like a similar make next, try my acorn keychain or the mushroom keychain.
Can I sell pumpkin keychains made from this pattern? Yes, you're welcome to sell finished keychains made from this free pattern at markets, on Etsy or as gifts. Please credit "Pattern by Wavode" in your listing and link back to this page. What you can't do is republish this write-up or my photos as your own pattern.
Related patterns on Wavode
- Pumpkin cat: a sleepy black cat peeking out of a big ribbed pumpkin.
- How to crochet a pumpkin: a shelf pumpkin made from a folded rectangle.
- Acorn keychain: another tiny fall charm for your keys.
- Mushroom keychain: a red-capped kawaii mushroom.
- Campfire keychain: a cozy little campfire with logs and flames.
Made a pumpkin keychain? Tag #wavodecrochet on Pinterest. I re-pin every finished make and credit the maker.
Pattern by Clara Hartwell for Wavode. Questions? Email me at support@wavode.com.