Crochet Spiral Sweater

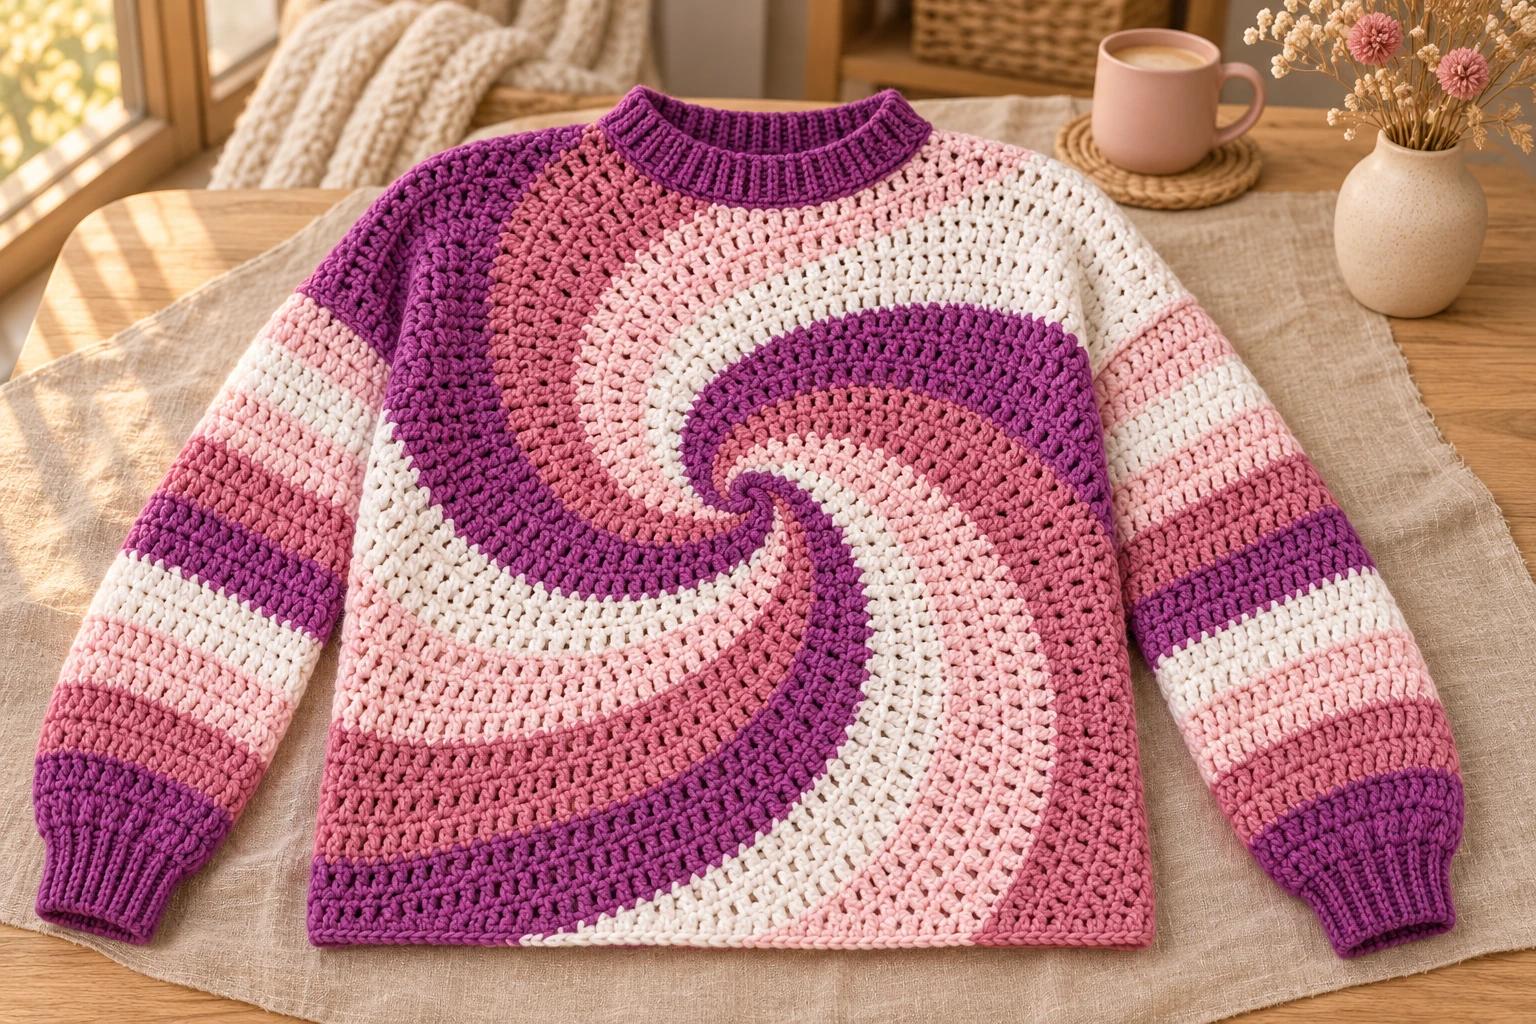
I love the way a white stripe makes pink look brighter. This crochet spiral sweater has an orchid, rose, blush and white swirl across the front, roomy striped sleeves and a close ribbed collar. The medium version starts with a spiral measuring about 19 in (48.3 cm) across before the edges are shaped.
Four colors stay attached while the spiral grows. Each takes a turn, then waits in a long loop while the next color catches up. Once that rhythm clicks, the center starts to look like a peppermint turning slowly under the hook.
These written instructions follow the medium demonstrated in the spiral sweater video tutorial. Keep the video nearby for the underarm joins and the places where the four colors meet.
| At a glance | |
|---|---|
| Size | Tutorial medium, checked against a well-fitting sweater |
| Spiral before shaping | About 19 in (48.3 cm) across |
| Yarn | Worsted #4 acrylic in orchid, rose, blush and white |
| Hook | 5 mm (H/8) |
| Separate pieces | 2 panels; sleeves and ribbing are worked onto the sweater |
| Sleeves | 27 dc rounds in the demonstrated version |
| Skills | Four-color spiral, dc increases, tr, seaming, hdc2tog and sc ribbing |
Sizing the medium spiral sweater
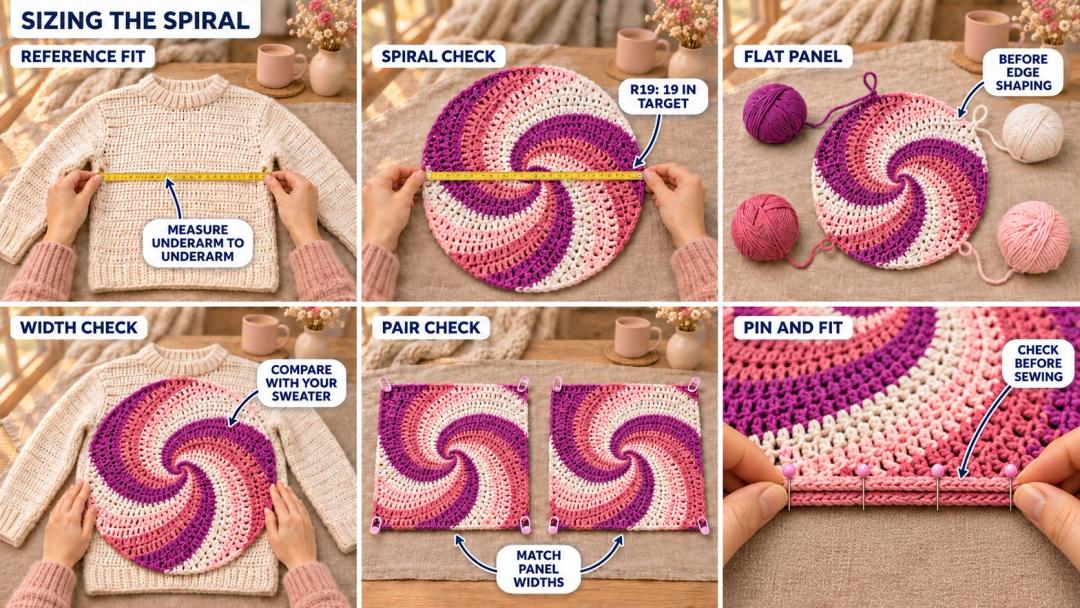
Lay a sweater with a comfortable fit flat and measure across the chest, from underarm to underarm. The tutorial's medium reference measures 22 in (55.9 cm) across. Its spiral reaches 19 in (48.3 cm) after R19, before the five shaping passes.
The tutorial allows another 1 in (2.5 cm) for shaping and 2 in (5.1 cm) for steaming. Treat those as the creator's allowances, rather than guaranteed growth in your yarn. Compare your panel with the sweater as you work, and check the width again before sewing.
The 19 in measurement describes the circular spiral, not the finished chest or sweater length. The squared edges, seams and blocking all affect the final fit. Pin the panels together and try them on before committing to the side and shoulder seams.
Yarn, hook and gauge for the four-color spiral
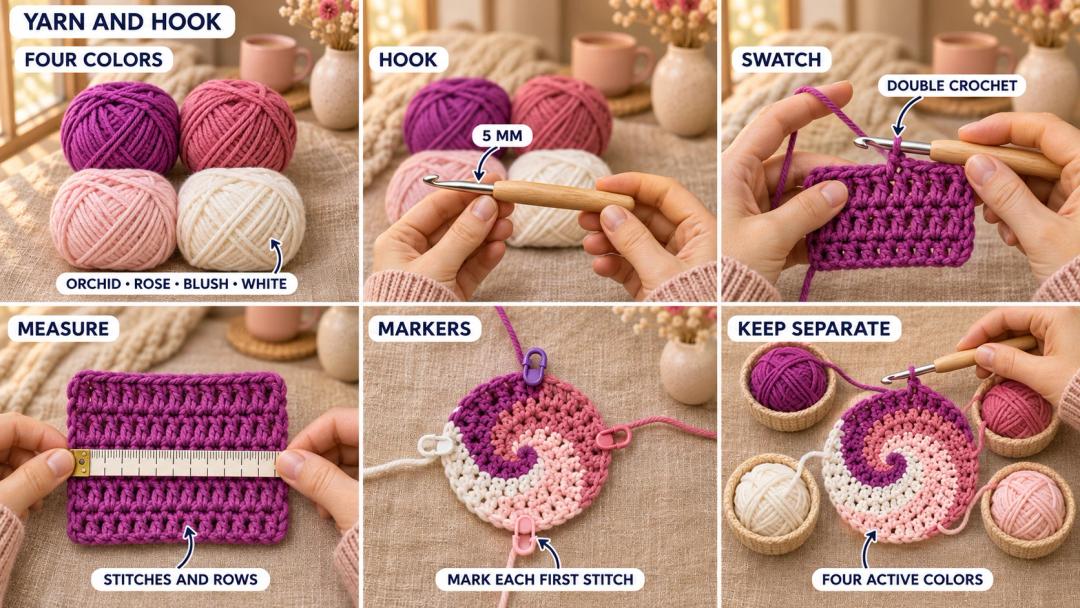
- A — rich orchid: Loops & Threads Impeccable acrylic.
- B — rose: Caron One Pound acrylic.
- C — blush: Loops & Threads Soft Classic acrylic.
- D — white: Loops & Threads Soft Classic acrylic.
- Hook: 5 mm (H/8), used throughout.
- Notions: four markers for the active sections, extra markers for seams, measuring tape, scissors and a yarn needle.
The creator reports using less than 200 g of each color for a medium. This is a source quantity by weight, rather than a yardage estimate. Check the length printed on your own balls before substituting another acrylic.
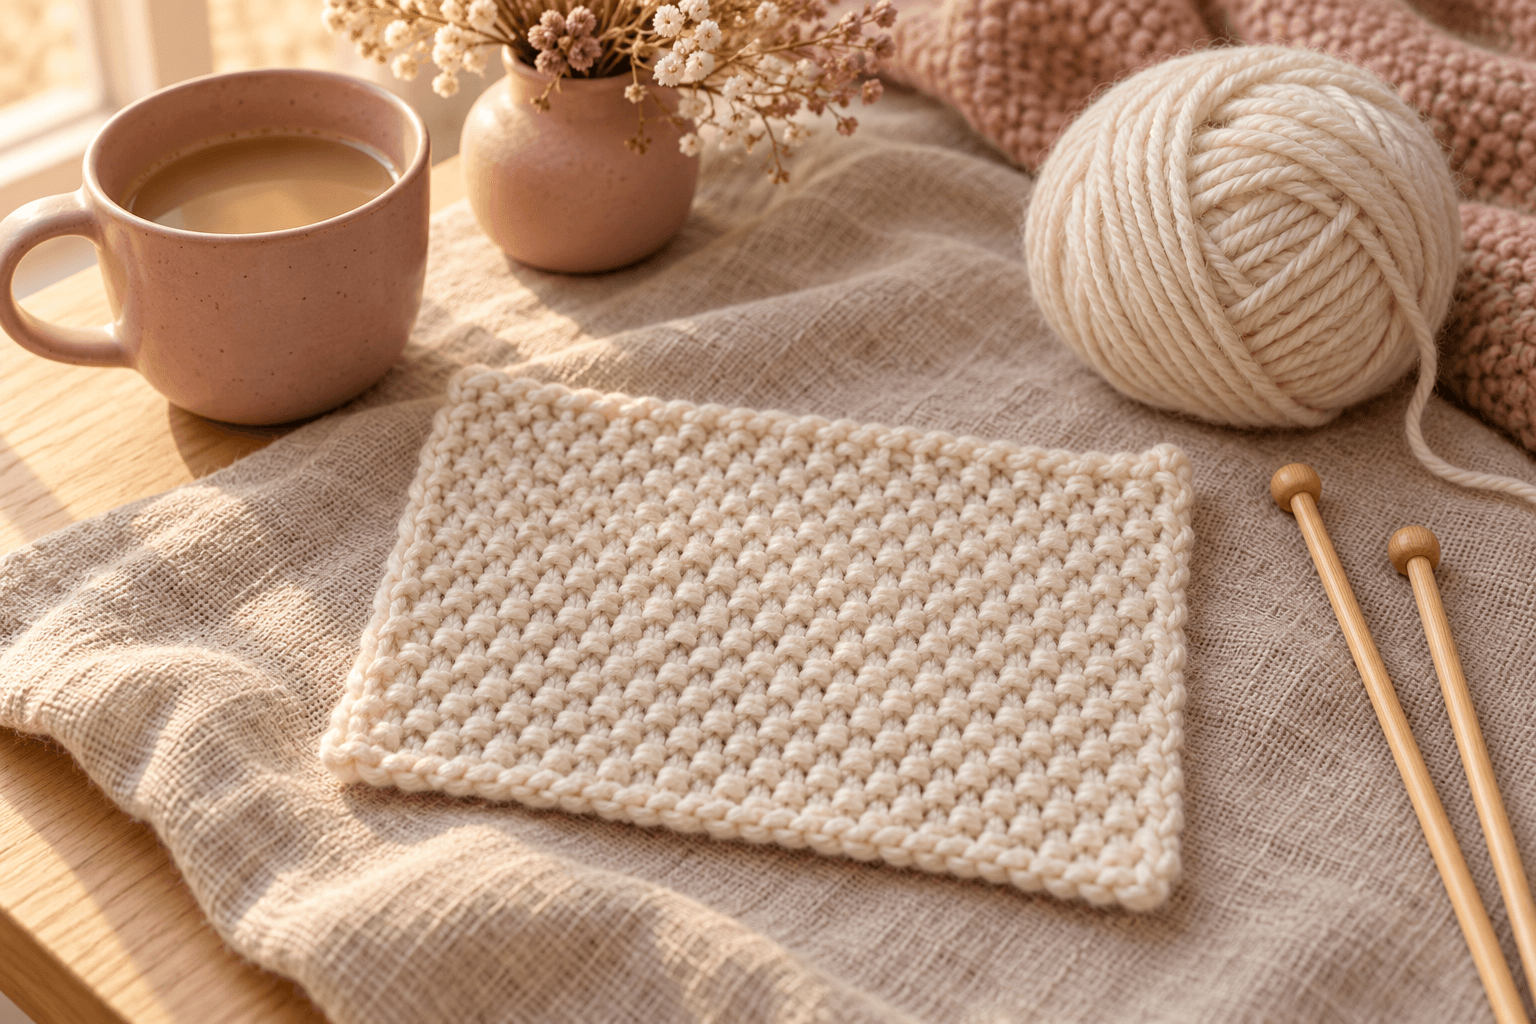
Make a double-crochet swatch with your yarn and hook, wash or block it as you intend to finish the sweater, and record both stitches and rows over 4 in (10.2 cm). The tutorial supplies its panel-diameter checkpoint rather than a measured stitch-and-row gauge. Use that checkpoint alongside your reference sweater.
Stitches, in US terms: magic ring (MR), chain (ch), stitch (st), slip stitch (sl st), single crochet (sc), half double crochet (hdc), double crochet (dc), treble crochet (tr), increase (inc: 2 dc in one st), half double crochet two together (hdc2tog), back loop only (BLO). R means the numbered spiral pass used in the tutorial.
The panels grow in a continuous spiral. Keep the right side facing you and leave the rounds unjoined. Mark the first stitch of each color's pass. Parentheses give the stitches made in that color during that numbered pass, rather than the whole panel's perimeter.
Tip. Put each ball in its own container. After a complete pass through all four colors, gently rotate the work back to loosen the strands before they twist into a rope.
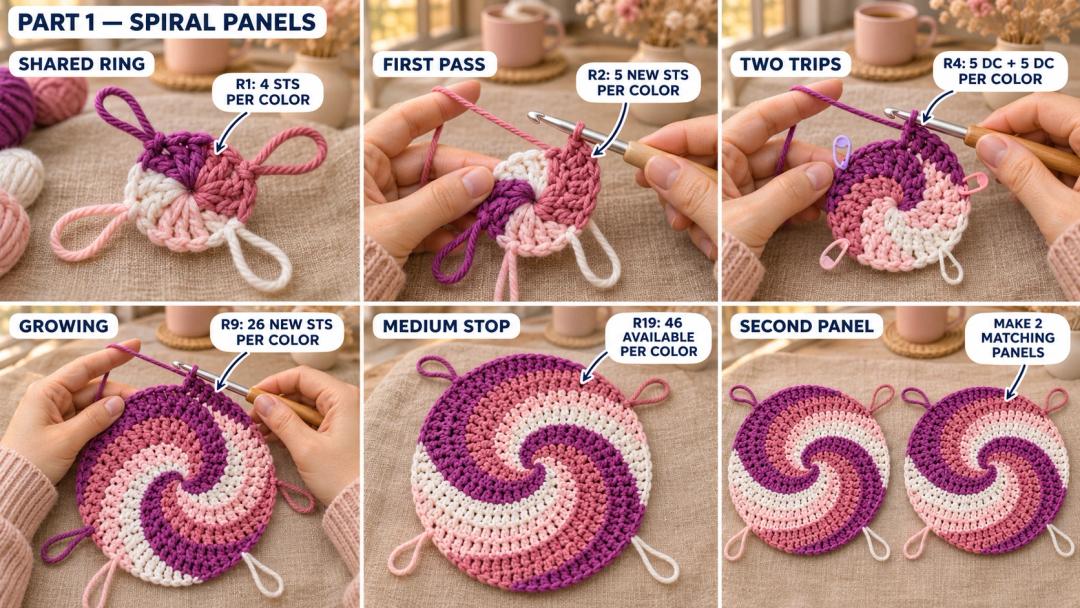
Part 1 — Making the front and back spiral panels
Panels (A, B, C and D; 5 mm hook; Make 2). The magic ring becomes the center of the front or back. Work each panel in the same color order.
Starting all four colors
With A, make a magic ring and ch 1. Work the first line below into the ring. Enlarge the active loop and secure it with a marker if needed.
- R1: in the shared magic ring, sc, hdc, 2 dc in color A; work the same sequence separately in B, C and D. (4)
Attach each new color to the ring with a sl st before working its sequence. Keep its starting tail behind the work and slide the new group beside the previous group. Mark each group's sc. Close the magic ring after D is complete. There are 16 working stitches around the shared center; attachment slip stitches are excluded.
Growing the spiral to the medium checkpoint
Resume A and work into the next available stitches along the shared edge, starting at B's marked sc. Then resume B, C and D in order. Let each color follow the stitches of the color ahead of it. Enlarge each active loop when you set it aside.
For every line below, work the stated sequence in each color before starting the next numbered pass. Some passes stop short of the next active loop; leave those stitches available for the following pass.
- R2: along the shared spiral edge, inc, dc, inc per color. (5)
- R3: along the shared spiral edge, (inc, dc) × 2, inc per color. (8)
- R4: along the shared spiral edge, work 5 dc per color in A–D order, then another 5 dc per color in A–D order. (10)
- R5: along the shared spiral edge, (inc, dc) × 4, inc per color. (14)
- R6: along the shared spiral edge, dc 14 per color. (14)
- R7: along the shared spiral edge, (inc, dc) × 6, inc per color. (20)
- R8: along the shared spiral edge, work 11 dc per color in A–D order, then another 11 dc per color in A–D order. (22)
- R9: along the shared spiral edge, (inc, dc 2) × 6, inc per color. (26)
- R10–R13: along the shared spiral edge, dc 26 per color. (26) 4 passes.
- R14: along the shared spiral edge, (inc, dc 4) × 5, inc per color. (32)
- R15: along the shared spiral edge, dc 34 per color. (34)
- R16: along the shared spiral edge, (inc, dc 7) × 4, inc per color. (38)
- R17: along the shared spiral edge, dc 38 per color. (38)
- R18: along the shared spiral edge, (inc, dc 5) × 6, inc per color. (44)
- R19: along the shared spiral edge, dc 46 per color. (46)
R4 and R8 take two trips through the colors. Keep the first-stitch markers in place between those trips. Work all four colors for the first half, then all four for the second half, so fresh stitches are available when you return to A.
After R19, each active loop has 46 available stitches ahead of it. Count these before beginning the square edges.
Measure across the center after R19. The demonstrated medium spiral measures about 19 in (48.3 cm). Keep all four colors attached for shaping.
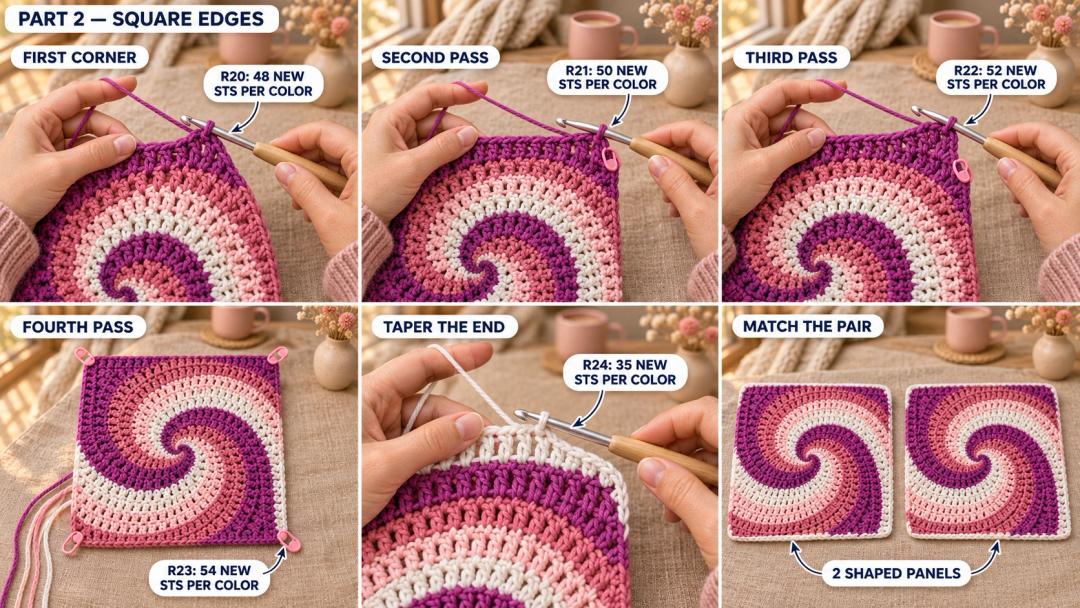
Shaping the spirals into square panels
Continue A, B, C and D in the same order. Each color begins with 46 available stitches. The tr in each shaping pass forms a corner; move a corner marker into each new tr as you make it.
Work each line below in all four colors before moving on. The final pass ends partway along each section, stepping down gently to a slip stitch.
- R20: along the shared spiral edge, inc, tr, inc, dc 8, hdc 9, sc 9, hdc 9, dc 8 per color. (48)
- R21: along the shared spiral edge, dc, inc, tr, inc, dc, dc 8, hdc 9, sc 9, hdc 9, dc 8 per color. (50)
- R22: along the shared spiral edge, dc 2, inc, tr, inc, dc 2, dc 8, hdc 9, sc 9, hdc 9, dc 8 per color. (52)
- R23: along the shared spiral edge, dc 3, inc, tr, inc, dc 3, dc 8, hdc 9, sc 9, hdc 9, dc 8 per color. (54)
- R24: partial round along the shared spiral edge, dc 4, inc, tr, inc, dc 4, dc 7, hdc 7, sc 7, sl st per color. (35)
After each color's R24, ch 1 and fasten off with an 8 in (20 cm) tail. Weave it through the back of the fabric. The final slip stitch finishes that color near the middle of an edge. Keep all four corner markers in place.
Keep the first panel beside you and match the second to it. Lay the two together before joining; their edges should match without pulling either panel into shape.
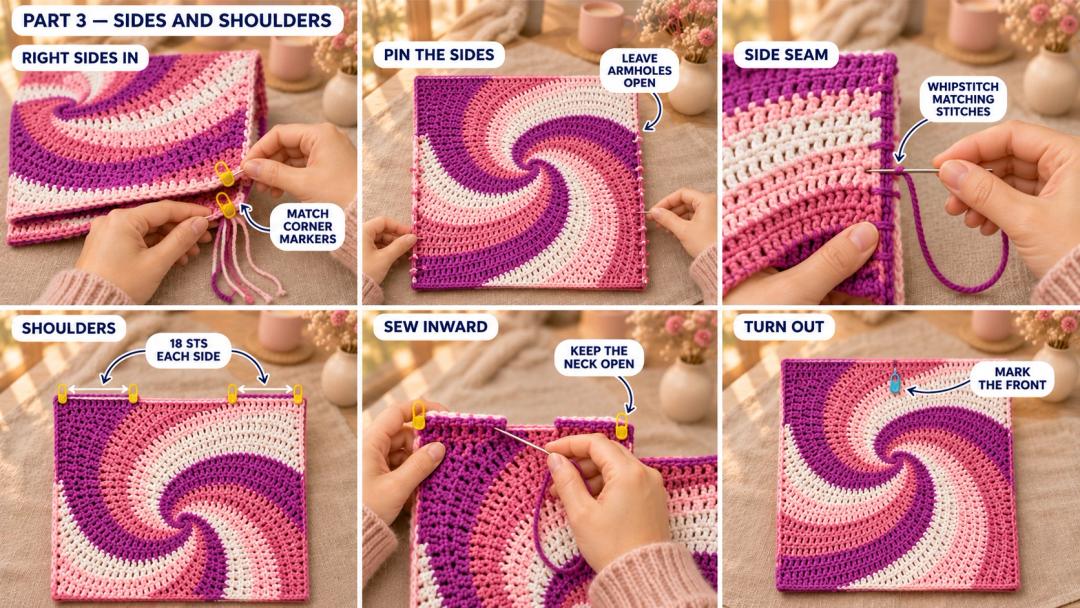
Sewing the sides and shoulders
Lay the panels right sides together, with the corners matched and your chosen top edge uppermost. Place markers through corresponding stitches every 5–10 stitches along each seam.
- Mark the armholes. Leave the upper portion of each side open for a sleeve. Pin the lower side seams, then try the sweater on carefully to check their depth. Match the seam endpoints on both sides.
- Sew the lower sides. Whipstitch corresponding edge stitches from the lower corner toward the underarm marker. At a tapered color ending, use the sc beneath the finishing slip stitch as shown in the video. Secure and weave in the sewing yarn.
- Mark the shoulders. Starting with the upper corner tr as stitch 1, count 18 edge stitches inward on each shoulder. Match the same 18 stitches on the other panel.
- Check the neck opening. Pin both shoulder seams and check that the opening passes comfortably over your head. Then sew each shoulder from its outer corner toward the neck. Secure the ends at the neckline.
Turn the sweater right side out. Choose the panel you want at the front and mark it near the hem. Follow this panel's color order when adding the sleeve stripes.
Tip. The armhole is chosen by fit in the tutorial. Count the opening on both sides before crocheting the sleeves, so the two sleeves begin with matching counts.
Crocheting the striped sleeves
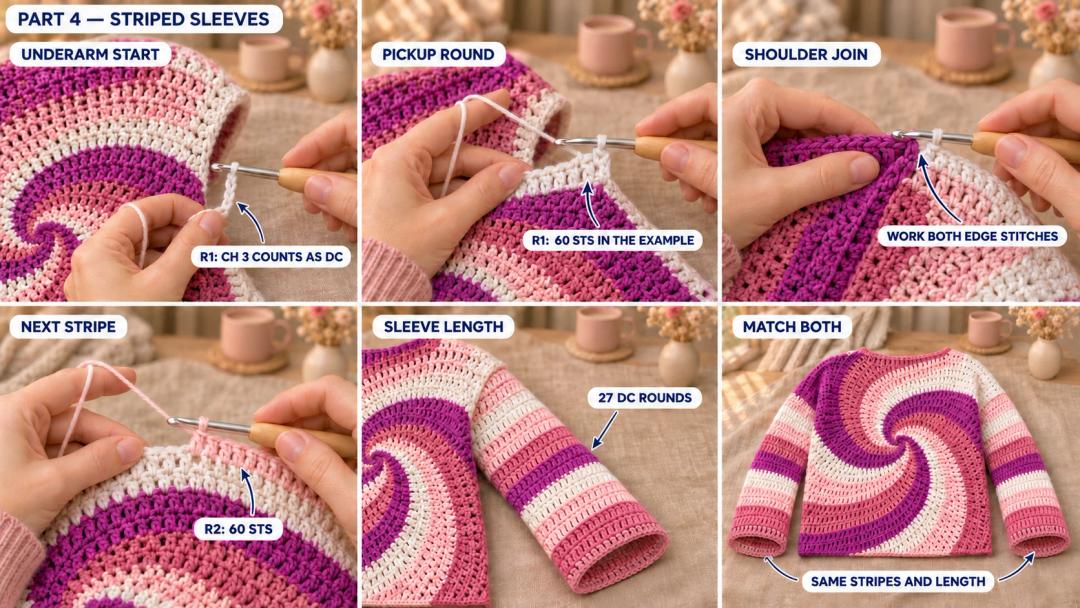
Sleeves (four stripe colors; 5 mm hook; work onto both armholes). Start at the underarm with the next color in the front panel's sequence. For the demonstrated sleeve, orchid is followed by white, then blush, rose and orchid.
Attach with a sl st and ch 3. This chain counts as the first dc. Mark its top chain.
- R1: pick up dc around the armhole, counting the starting ch 3 as one dc. (60)
The 60-stitch count is the tutorial's example. At the underarm, include the edge stitch on either side of the seam. At the shoulder, work into the edge stitch on each panel, even where those stitches were sewn together. Work the remaining opening one stitch at a time. Join to the marked third chain.
If your fitted armhole gives another count, record it and keep that count throughout the sleeve. Make the second sleeve match it. An even count is needed for the paired decreases at the cuff.
- R2–R27: ch 3 over the first stitch, counting as one dc, dc 59, sl st to the top of the starting ch 3. (60) 26 rounds, using the demonstrated count.
At each color change, fasten off the old color after joining and attach the next at the underarm. Alternate the starting point between two neighboring underarm positions, as demonstrated in the video, to keep the join from drifting sideways. Count the starting chain once and leave the joining slip stitch out of the count.
Try the sleeve on before making the cuff. The demonstrated version has 27 dc rounds; its physical length depends on your row gauge. Repeat the sleeve on the other armhole with the same stripe sequence.
Adding the ribbed cuffs and orchid collar
Narrow cuffs beneath the roomy sleeves
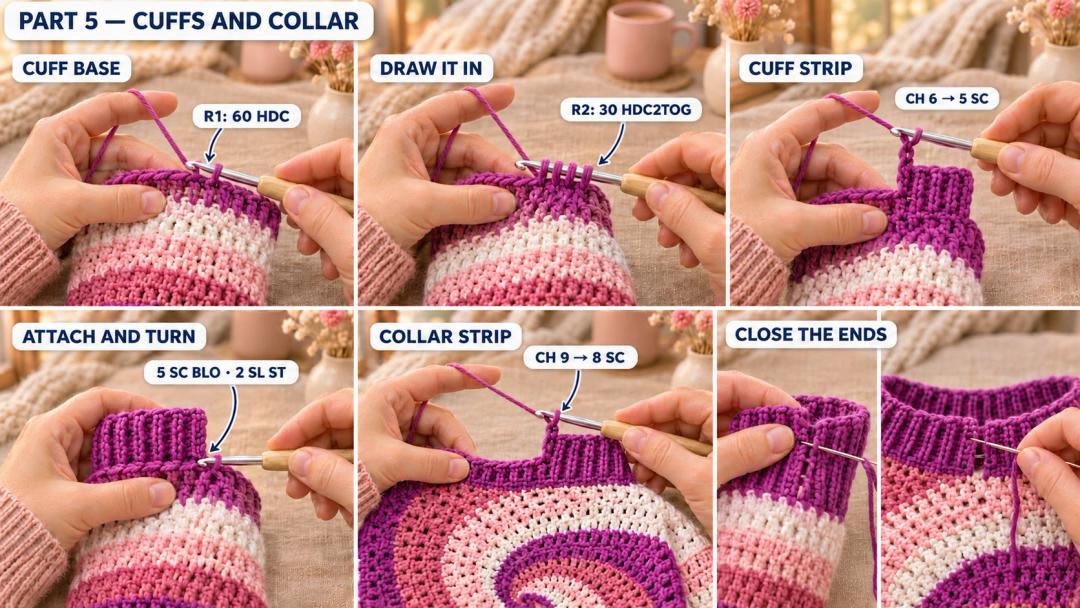
Cuff foundations (orchid; 5 mm hook; work onto both sleeves). Attach orchid at the sleeve join if needed.
- R1: ch 1, hdc 60, sl st to the first hdc. (60)
- R2: ch 1, hdc2tog × 30, sl st to the first decrease. (30)
The ch 1 is a turning-height chain and stays outside the stitch count. For a different even sleeve count, hdc once in every stitch in R1, then work hdc2tog around R2 to halve that count.
To work hdc2tog: yarn over, insert into the next stitch and pull up a loop. Yarn over, insert into the following stitch and pull up a loop. Yarn over and draw through all five loops.
For the attached ribbing, ch 6.
- Row 1: sc in the 2nd ch from the hook and in each ch across. (5)
Sl st into the next cuff-edge stitch, then the following cuff-edge stitch. Turn. Skip those two slip stitches.
- Row 2: sc 5 in BLO. (5)
- Row 3: ch 1, turn, sc 5 in BLO. (5)
Attach the end of Row 3 with a sl st into each of the next two cuff-edge stitches, then turn. Repeat Rows 2–3 around the cuff. Each inward row advances along two cuff-edge stitches. Keep the five ribbing stitches loose enough for your hook to enter easily.
At the free outer edge, work through both loops of the last sc if you prefer a tidier edge. Finish the final attachment at the starting point, ch 1 and fasten off with an 18 in (46 cm) sewing tail. Turn the cuff inside out and sew its five-stitch ends together. Weave the tail along the inside.
The close orchid collar
Collar (orchid; 5 mm hook; worked onto the neckline). Attach near a back shoulder corner and ch 9.
- Row 1: sc in the 2nd ch from the hook and in each ch across. (8)
Sl st into each of the next two neckline-edge stitches and turn. Skip those two slip stitches.
- Row 2: sc 8 in BLO. (8)
- Row 3: ch 1, turn, sc 8 in BLO. (8)
Continue the same attached-ribbing method as the cuffs, advancing along two neckline stitches on each inward row. At the shoulder seams and color endings, include the corresponding edge stitch on each panel. If one edge stitch remains at the end, attach to it and then to the starting attachment point. Keep trying the opening over your head while it is accessible.
Fasten off with an 18 in (46 cm) sewing tail. Turn the collar inside out and sew its eight-stitch ends together. Tuck the tail through the stitches inside the collar.
Blocking and caring for your sweater
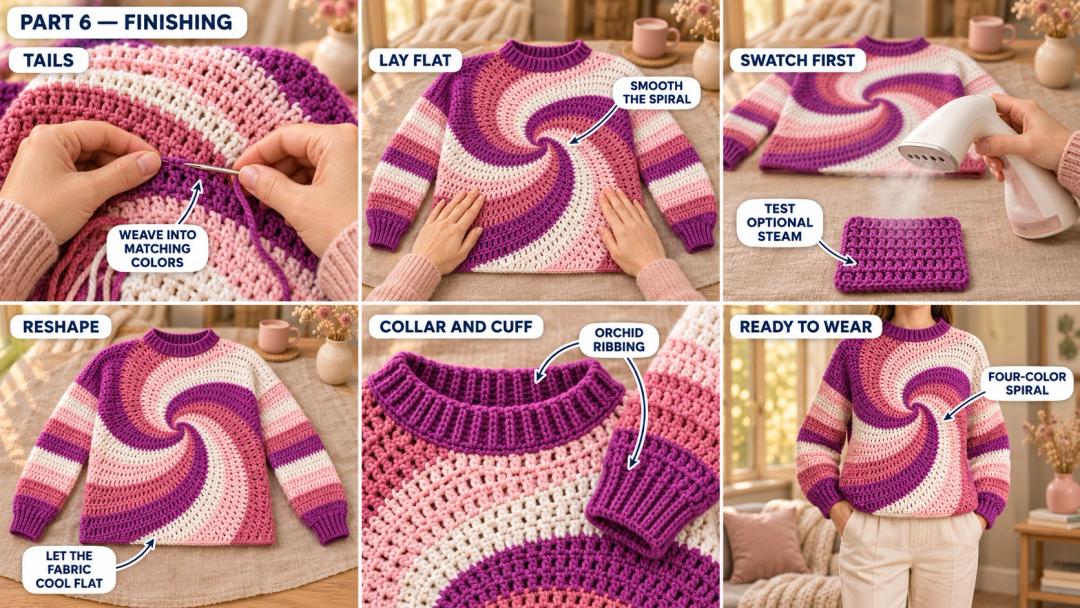
Weave in the remaining ends on the wrong side, following the backs of stitches in the matching color. Lay the sweater flat, straighten the sleeves and smooth the spiral with your palms.
Optional steaming: the tutorial uses steam for its acrylic sweater. Skip this if you prefer washing and drying according to the yarn label. Test steam on your swatch first, keep the appliance off the fabric and let the sweater cool flat before moving it. Heat can permanently change acrylic's drape.
For washing, follow the care instructions for all four yarns and use the gentlest shared method. Reshape the sweater while it dries. I like this pink swirl over a plain cream top, with the orchid collar folded softly at the neck.
UK terms: US sc = UK dc; US hdc = UK htr; US dc = UK tr; US tr = UK dtr.
Made a spiral sweater? Tag #wavodecrochet on Pinterest so I can see your colors.