Crochet Mesh Shrug with Bell Sleeves

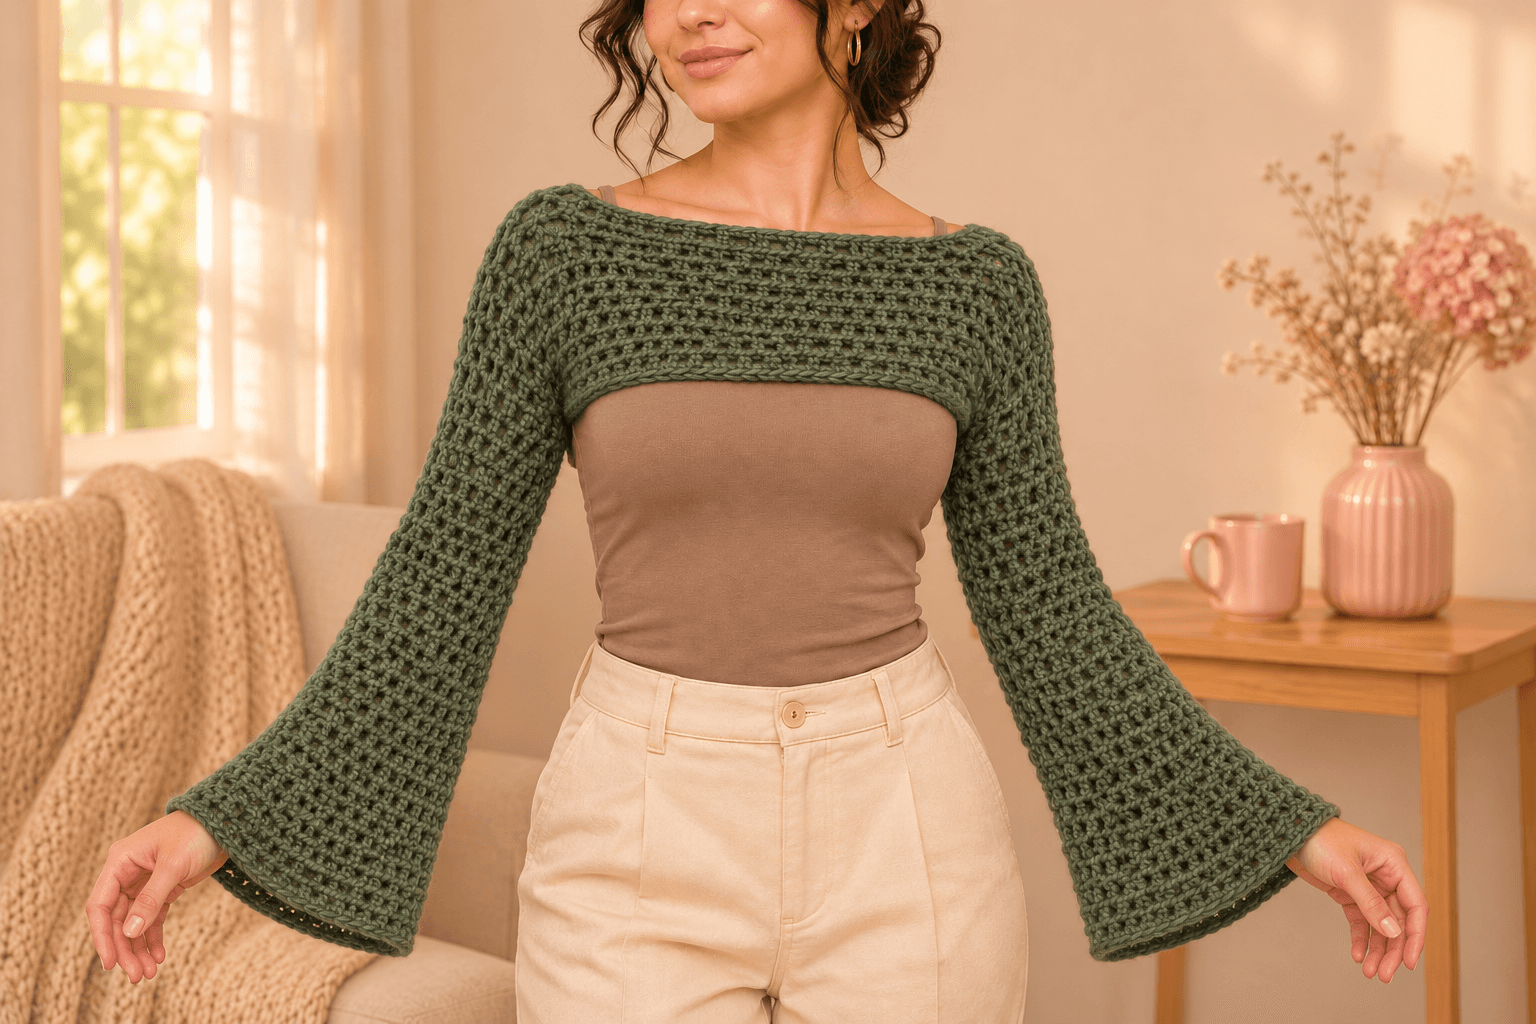
I love a sleeve that moves a little when I reach for something. This crochet mesh shrug with bell sleeves is fitted from shoulder to shoulder, with a cropped band across the chest and soft, widening cuffs. In moss green, the open squares have that leafy, woodland feel without hiding the top underneath.
The fit comes from trying it on as you go. The front reaches below the underarms, the back has the same number of rows, and the sleeves stay straight until the elbows. Then a few spaced increase rounds let the cuffs spread out gently.
The construction below follows the mesh shrug video tutorial. Its example begins with 60 chains and ten rows per panel. The accompanying sleeve notes use sixteen straight rounds before the bell shaping. Keep those as a guide while checking the fit on your own body.
| At a glance | |
|---|---|
| Fit | made to measure, with an open lower edge and sleeves fitted to the wearer |
| Yarn | Loops & Threads Facets, worsted #4 acrylic |
| Reference amount | about 150 g, approximately 420 yd (384 m) |
| Hook | 5 mm |
| Pieces | 1 garment, with both sleeves worked onto its edges |
| Example | 60 starting chains, 10 front rows, 10 back rows, 16 straight sleeve rounds |
| Skill | intermediate: mesh, chain bridge, row-end pickups and turned joined rounds |
Measuring for a shoulder-to-shoulder mesh shrug
Hold a relaxed foundation chain across the top of your chest near the collarbones, from one shoulder to the other. It should reach comfortably without pulling tight. Keep the chain in a multiple of three; the example uses 60 chains before the additional turning chains.
For the panel depth, measure from that upper edge down below the armpit. Hold the actual crochet against your body before deciding where to stop. The ten-row example is a fitting reference, rather than a numbered clothing size.
Measure each sleeve from the underarm to the elbow, then from the elbow to the cuff position you like. The mesh stretches, so support its weight while checking the length. I would rather pause with the hook still in the work than discover a cuff hanging over my hand after both sleeves are finished.
For a useful swatch, work the same dc-and-ch-2 mesh used in the shrug. Wash and dry it according to the yarn label, then measure an unstretched section. Record complete mesh spaces per inch and rows per inch separately. Use those measurements when choosing your foundation length and panel depth.
Tip. A single-crochet swatch cannot tell you how wide these open squares will be. Check the mesh itself, including its chain spaces.
Yarn and a 5 mm hook for flowing bell sleeves
The reference yarn is Loops & Threads Facets, a medium/worsted #4 yarn made from 100% acrylic, with 279 yd (256 m) per 100 g ball. About 150 g was reported for the example, equivalent to approximately 420 yd (384 m). The yarn reference is not sponsored or affiliated.
- Facets in the green shade you prefer, allowing more yarn for broader shoulders or longer sleeves. The exact green colorway is not specified.
- A 5 mm crochet hook.
- Two removable stitch markers, scissors, a tapestry needle and a tape measure.
Have two 100 g balls available if using this yarn. That gives more working room than the reference amount, but a larger shrug may need more. Keep enough yarn aside to match the second sleeve before lengthening the first one.
Lift the swatch and let it fall over your fingers. A much thicker strand can make the bells stiff and heavy. A cotton substitution needs its own mesh swatch and fitting check; equal yarn-weight labels do not guarantee equal drape or consumption.
The mesh stitch and turning chains
US terms: ch = chain; dc = double crochet; sl st = slip stitch; ch-sp = chain space; st = stitch. A mesh space is the opening between two neighboring dc posts, with two chains along its upper edge.
For ordinary mesh, work ch 2, dc into the next ch-2 space. The dc goes around the chain space, not into the top of the dc below. A flat row begins with ch 5, representing an edge dc and a ch-2 space. Turn before working back across the row.
For a mesh increase, work (dc, ch 2, dc) in one ch-2 space. Continue with ch 2 before entering the next space. The extra dc divides that space into an additional mesh opening on the new round.
The counts below refer to mesh spaces, not every individual chain and dc. The example front has 21 spaces after its foundation row. For sleeves, call the number counted at the end of the first pickup round S. Write that number down and use it for both sleeves.
Part 1 — The cropped front panel
Green, 5 mm hook. Make 1 garment. Work the front, shoulder bridge and back continuously. The foundation edge becomes the lower edge of the front panel.
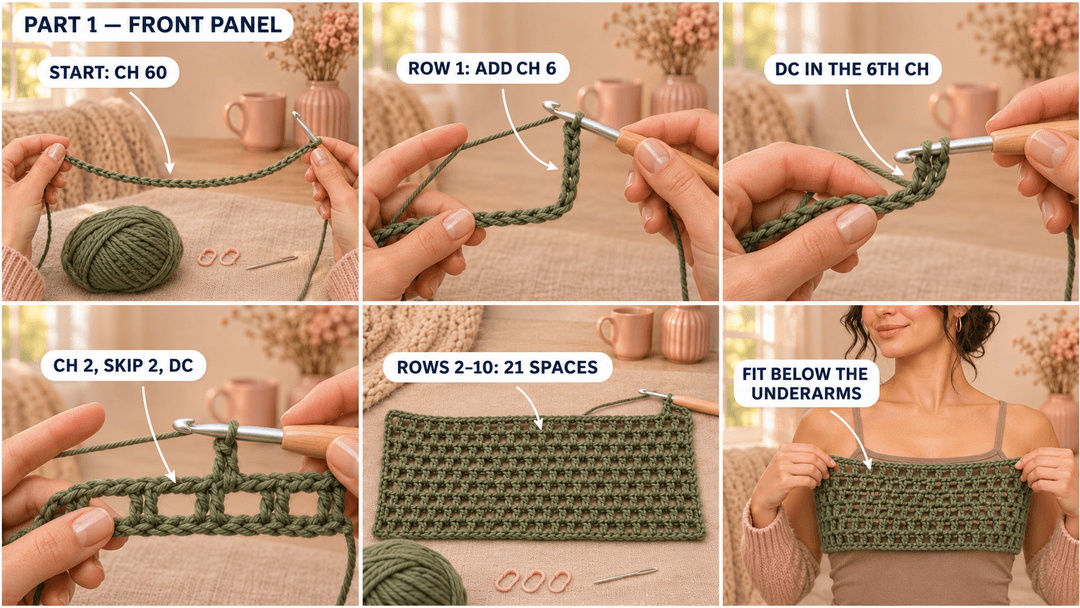
Ch a multiple of 3 to the shoulder-to-shoulder width established above. For the example, ch 60.
- Row 1: ch 6, dc in the 6th ch from the hook; repeat (ch 2, skip 2 foundation ch, dc in the next ch) to the end. (21) Mesh spaces for the 60-chain example.
- Rows 2–10: ch 5, turn, dc in the first ch-2 space; repeat (ch 2, dc in the next ch-2 space) across, including the final edge space. (21) Mesh spaces per row; 9 rows in the example.
Place a marker at each end of the final row. Leave those markers at the top, where the shoulders will sit. Hold the panel against the collarbones: its foundation edge should reach below the armpits. Work fewer or more ordinary rows if needed, and record the front row total as F.
Keep the working yarn attached. The example has F = 10.
The shoulder bridge and head opening
This row keeps a short mesh section at each shoulder and replaces the center with a loose chain bridge. Lay the panel flat with the working edge at the top. Count its spaces before placing the neckline marker.
For the 60-chain example:
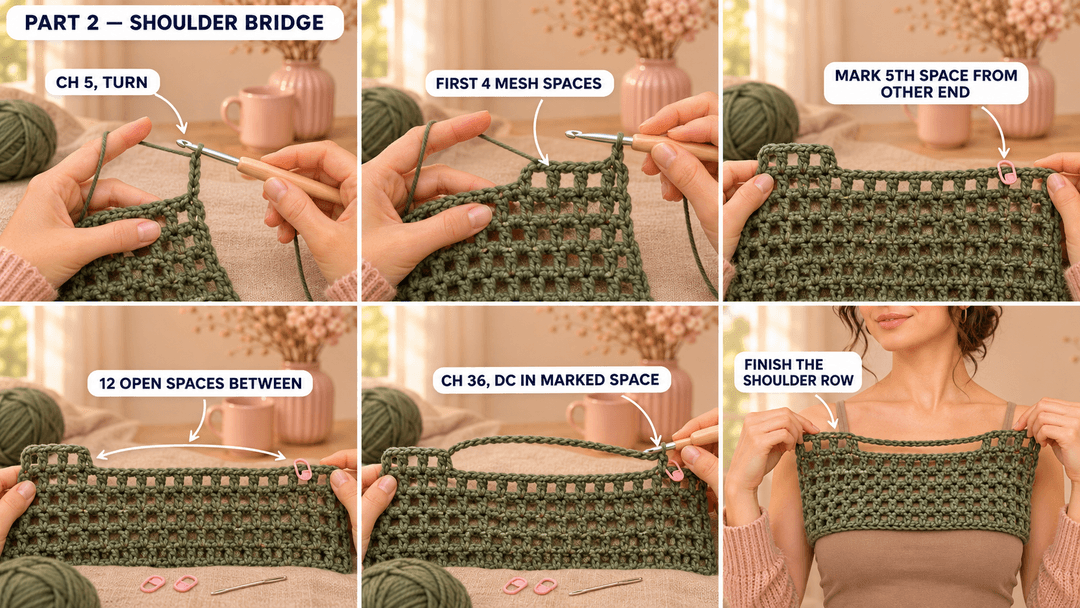
- Ch 5 and turn. Dc in the first ch-2 space, then work (ch 2, dc in the next ch-2 space) three times. Four small mesh spaces now sit beside the working edge.
- From the opposite end of the previous row, count five ch-2 spaces and mark the fifth.
- Count only the untouched spaces strictly between the last space worked and the marked space. The example has 12.
- Ch 36 loosely, then dc in the marked space. Remove that marker.
- Work (ch 2, dc in the next ch-2 space) across the four remaining spaces to the edge.
- Row 11: work the shoulder bridge as described above. (4 small mesh spaces, 1 long chain opening, 4 small mesh spaces)
For a different foundation, use the same counting method: make three chains for each untouched intermediate space. Check both shoulder sections on your body before continuing.
Try the opening over your head now, with the chain still easy to undo. The edge should slip over your head without tugging. Adjust the shoulder sections together if you need a wider or narrower head opening, then recount the intermediate spaces and remake the bridge.
Tip. Keep the bridge chains relaxed. A tight chain can pull across the neckline even when the mesh below feels loose enough.
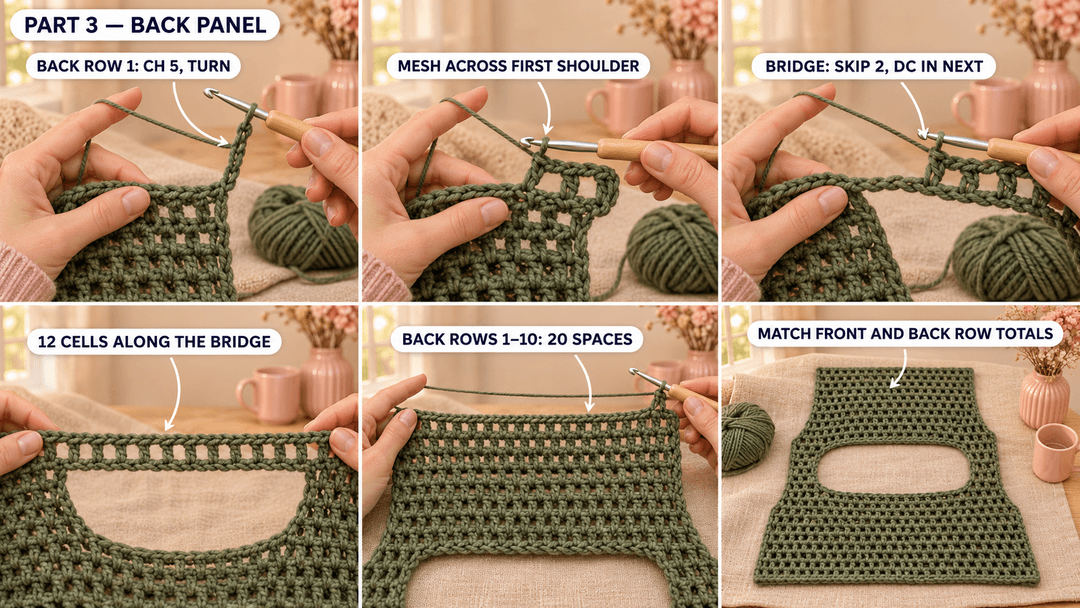
Working the back to match the front
Turn the work and begin the back along the shoulder row. The back will match the front's number of rows; the literal 36-chain bridge gives a back that is one mesh space narrower in this written arrangement.
- Row 1: ch 5, turn, work dc into the first small ch-2 space and continue the ordinary mesh across the four-space shoulder section; across the bridge, repeat (ch 2, skip 2 bridge chains, dc in the next bridge chain) 12 times; then work (ch 2, dc in the next small ch-2 space) across the other four-space shoulder section. (20) Mesh spaces for the example.
- Rows 2–10: ch 5, turn, dc in the first ch-2 space; repeat (ch 2, dc in the next ch-2 space) across, including the final edge space. (20) Mesh spaces per row; 9 more rows in the example.
Across the bridge, start counting chains from the end nearest the hook as you enter it. Place the twelve bridge dc in chains 3, 6, 9 and so on through chain 36. Then return to the small shoulder spaces. The chain bridge itself stays as the edge of the head opening.
If your front has F rows, work F back rows. The shoulder bridge row sits between the panels and is counted separately. Lay the front over the back with that row at the fold; compare the row ends down each side before starting a sleeve.
Keep the working yarn attached after the back.
Joining the underarms and starting the sleeves
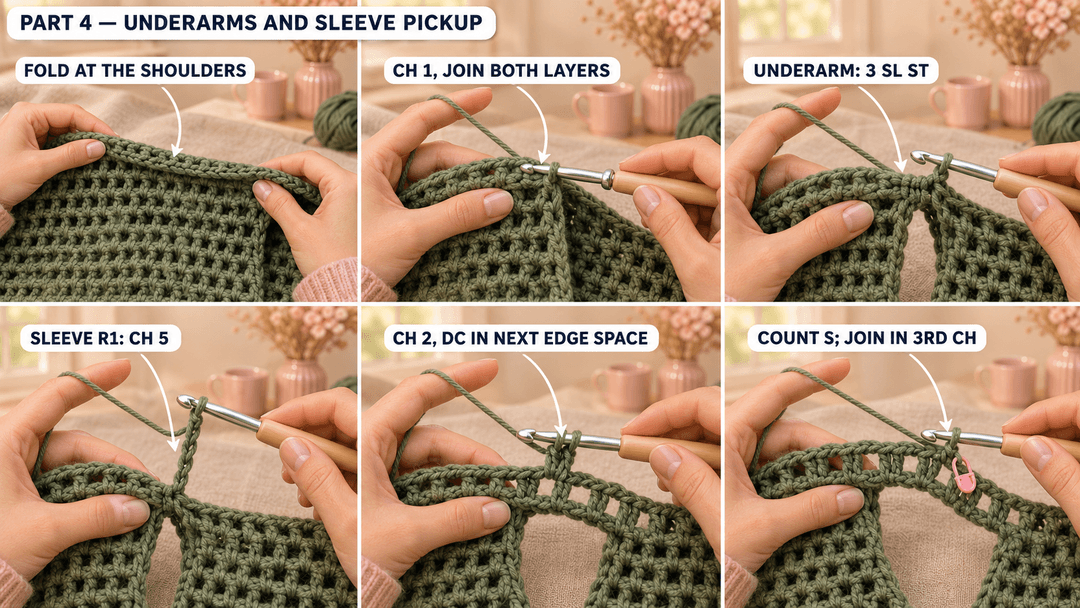
Fold the shrug at the shoulder bridge, with the front and back lying together and the open lower edges level. The side beside the hook becomes the first underarm join. Match the first row-edge dc on the front with the corresponding one on the back.
Ch 1. Work three sl st through both layers, placing them along the height of those first matching edge dc posts. Keep the joins loose enough that the edge stays flat. The remaining side-edge openings now form the armhole above the small join.
The first sleeve round picks up mesh around those row ends. The openings at the row edges act like ch-2 spaces even when they are formed by the side of a dc or a turning chain.
- R1: ch 5, dc into the first available row-edge opening; repeat (ch 2, dc into the next available opening) around the armhole; ch 2 and sl st in the 3rd ch of the starting ch 5. (S mesh spaces: count the completed openings and record S)
Mark the first mesh opening beside the join. Count each completed opening once, including the opening supplied by the starting chain. The joining sl st is not another mesh space.
Use that same pickup distribution on the second armhole. Each opening should lie flat around the arm without bunching. Slip the sleeve opening over the arm and move the shoulder before adding length.
Straight mesh sleeves down to the elbows
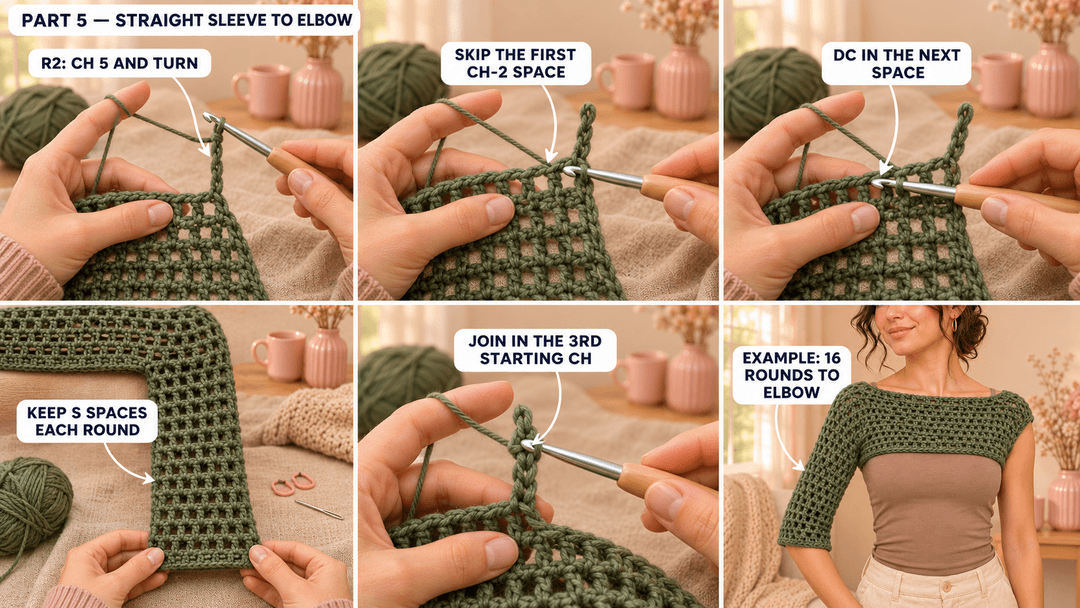
After the pickup round, every sleeve round is joined and turned. The skip at the beginning keeps the mesh from growing around the join.
- R2–R16: ch 5, turn, skip the first ch-2 space, dc in the next ch-2 space; repeat (ch 2, dc in the next ch-2 space) around; ch 2 and sl st in the 3rd ch of the starting ch 5. (S mesh spaces per round) 15 more rounds after R1 in the example.
Always skip the first ch-2 space after turning. Begin counting the spaces you work into at the first actual dc, rather than treating the starting chain as a worked dc in that count.
Try the sleeve on with your arm relaxed. Stop the straight section when its edge reaches the elbow. The example uses sixteen straight rounds including the pickup round; use the number that reaches your elbow and record it for the second sleeve.
Tip. If the straight sleeve gets wider, count its mesh openings before working another round. Check the space beside the turning chain first; it is easy to work into that space accidentally.
Shaping the bells with four increase rounds
Begin a separate round count at the elbow. Continue joining and turning each round as before. The first space after the turn is still skipped.
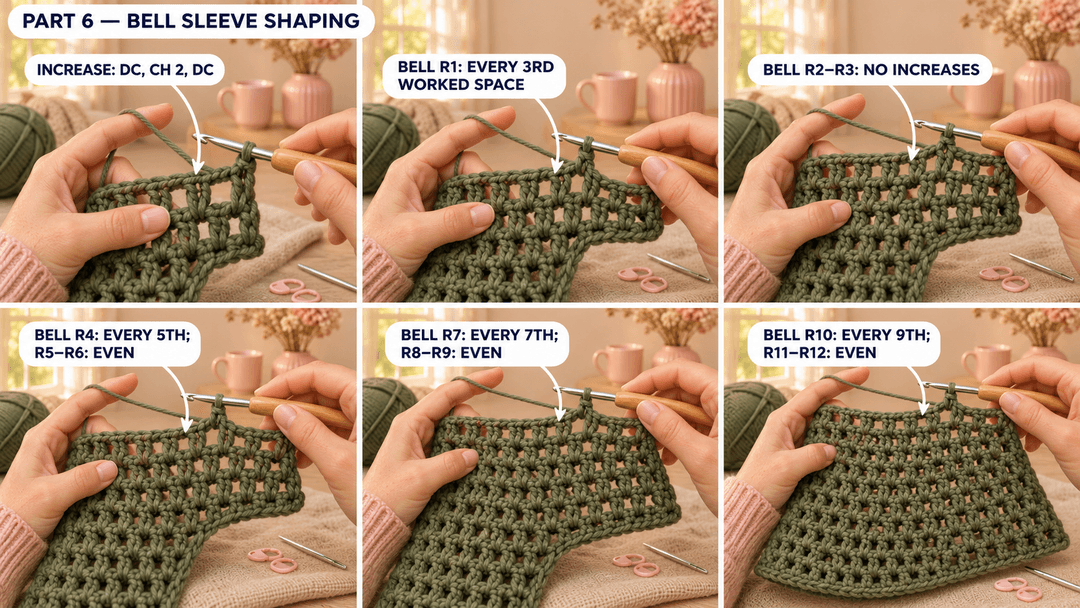
On an increase round, count the spaces actually entered after that skip. Work one dc in each ordinary space, with ch 2 between spaces. In the numbered increase space, work (dc, ch 2, dc), then ch 2 before moving on. Each increase adds one mesh opening.
- R1: ch 5, turn, skip the first space; work ordinary mesh in two spaces, then an increase in the third; repeat that spacing around and work any leftover spaces normally. Join as before. (S plus one space per completed group of 3 worked spaces)
- R2–R3: work ordinary joined, turned mesh without increases. (same space count as bell R1) 2 rounds.
- R4: work an increase in every fifth worked space, with four ordinary spaces between increases. Join as before. (previous count plus one space per completed group of 5 worked spaces)
- R5–R6: work ordinary joined, turned mesh without increases. (same space count as bell R4) 2 rounds.
- R7: work an increase in every seventh worked space, with six ordinary spaces between increases. Join as before. (previous count plus one space per completed group of 7 worked spaces)
- R8–R9: work ordinary joined, turned mesh without increases. (same space count as bell R7) 2 rounds.
- R10: work an increase in every ninth worked space, with eight ordinary spaces between increases. Join as before. (previous count plus one space per completed group of 9 worked spaces)
- R11–R12: work ordinary joined, turned mesh without increases. (same space count as bell R10) 2 rounds.
An incomplete group at the end stays ordinary mesh. It is fine for the last space to have a single dc rather than an increase. Record the new space count after each increase round and carry it unchanged through the following two ordinary rounds.
Stop at the cuff length you like. Sixteen straight rounds and all twelve bell rounds give 28 sleeve rounds in the example. For a longer sleeve, continue with increases in every eleventh worked space, two ordinary rounds, then every thirteenth worked space and two ordinary rounds.
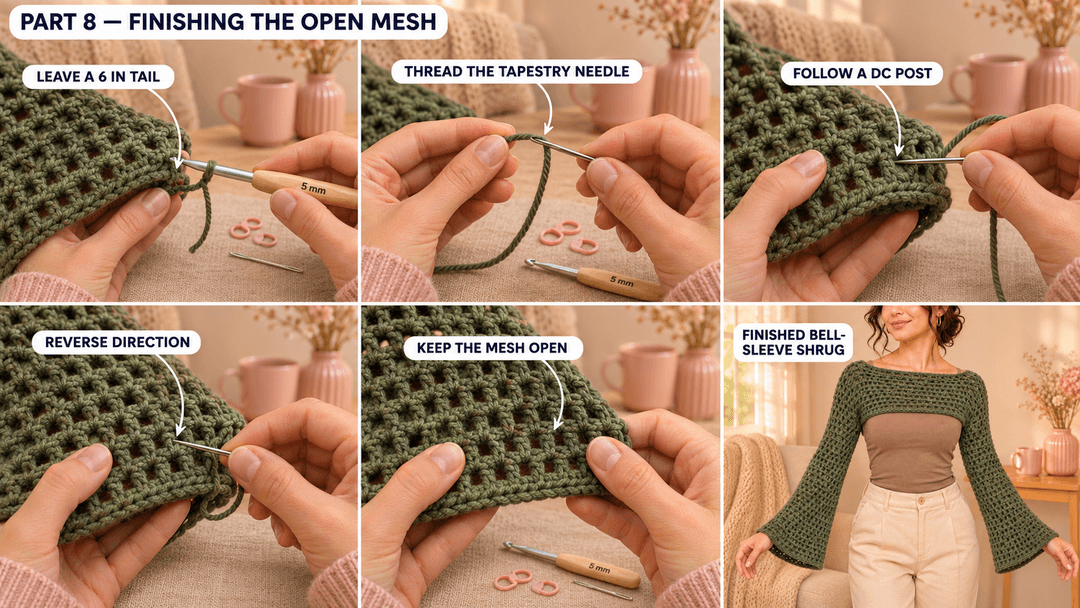
Join the final round, ch 1 and fasten off, leaving a 6 in (15 cm) tail at the cuff.
Matching the second sleeve
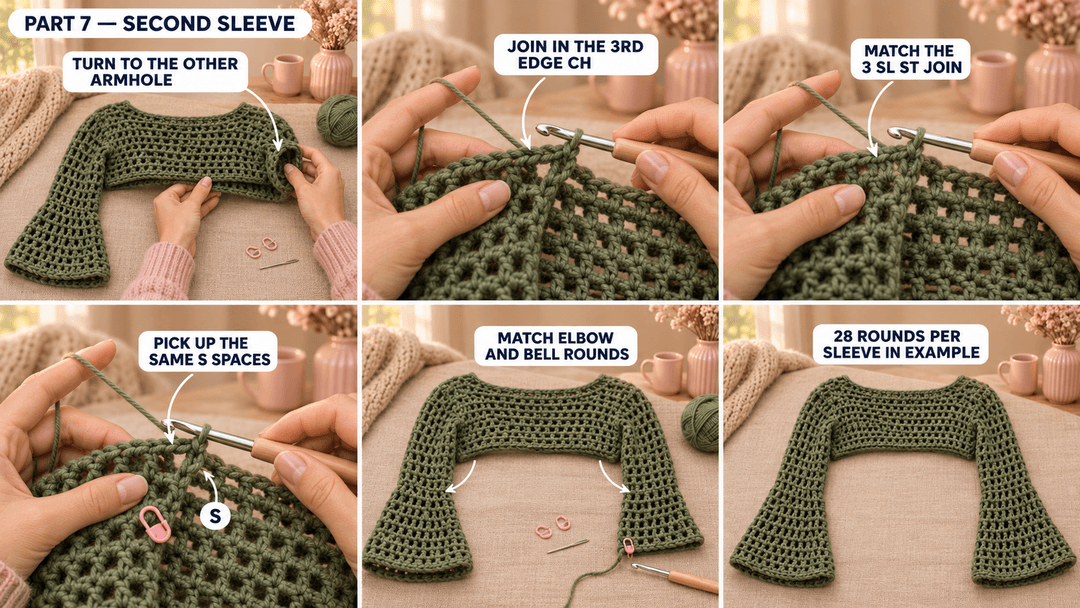
Turn the shrug so the untouched armhole faces you. Bring its front and back row edges together in the same way as the first underarm.
At an edge formed by ch 5, insert the hook through its third chain and the corresponding point of the opposite panel. Join a new strand with a sl st, ch 1 to secure it, then complete the small underarm join so it has three sl st through both layers, matching the first side.
Work the first pickup round in the same row-edge openings used on the first sleeve. Count its mesh spaces before continuing: it must have S, the number recorded for the first sleeve.
Follow the recorded straight-round total and bell sequence. Compare both sleeves laid flat before fastening off. Their elbow points and final cuffs should line up, with the same number of spaces on corresponding rounds. Leave a 6 in (15 cm) tail at the second cuff.
Weaving in ends through open mesh
Thread a tail through the tapestry needle and follow the denser part of a nearby dc post. Continue through several small loops along the fabric, then reverse direction through a different set of loops. Keep the end inside the yarn structure rather than stretching it across a mesh opening.
Spread a few squares gently between your fingers before trimming. The woven tail should move with the mesh without pulling a square shut. Repeat for the foundation end, second-sleeve join and both cuffs.
Wearing and caring for your finished shrug
I like this shape over a plain camisole: the open squares show clearly, and the green sleeves do most of the dressing up. Let the bells fall naturally below the elbows rather than stretching their lower edges into points.
Follow the actual yarn label for washing. Support the wet sleeves together and reshape the shrug flat while it dries. Check the neckline and sleeve lengths after that first wash; mesh needs room to settle without hanging from its shoulders.
UK terms: US dc = UK tr; ch and sl st keep the same names.
Made your own bell-sleeve shrug? Tag #wavodecrochet on Pinterest so I can see the color you chose.