Spiral Crochet Christmas Tree

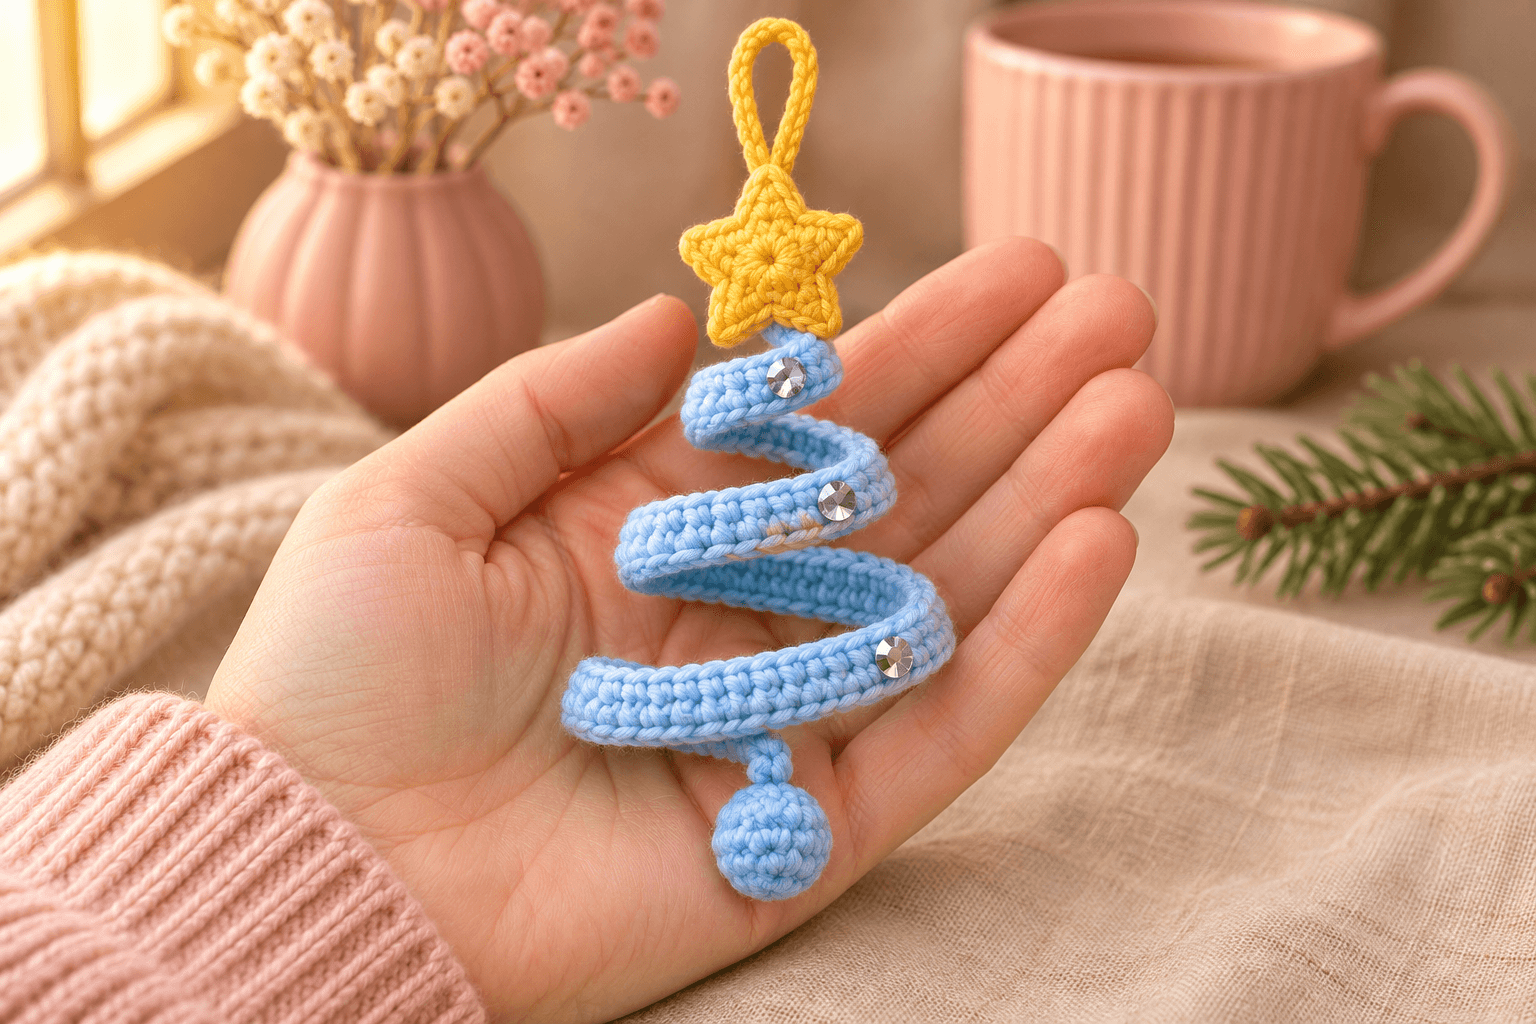
I like a little blue among the red and green on a Christmas tree. This spiral crochet Christmas tree begins as a narrow strip about 12 in (30.5 cm) long, then curls into an open tree shape. A yellow star brightens the top, and a small stuffed blue ball hangs from the lower end.
The shaping happens in your hands. I tuck the fine wire inside the second row, where the blue stitches hide it. Spread the lower turns and pinch a smaller curl at the top. I keep the spaces open enough to see a branch through them. The yellow loop carries the ornament from its stitched attachment beneath the stars.
| At a glance | |
|---|---|
| Strip before shaping | about 12 in (30.5 cm) long and ⅖ in (1 cm) wide |
| Hanging size | adjustable as you bend and spread the spiral |
| Yarn | worsted #4 smooth acrylic, about 16 yd blue and 6 yd yellow |
| Hooks | 3.5 mm for the strip and the ball's first four rounds; 3 mm for its decreases, stars and loop |
| Pieces | 5, including the separate hanging loop |
| Time | about 1–2 hours, plus glue-setting time if decorating |
| Skill | chains, single crochet, increases, decreases, double crochet and simple sewing |
The construction follows this spiral Christmas tree tutorial. This written version uses a 61-chain foundation and a 12-chain loop to give both starting points a clear count.
Blue yarn, yellow stars and the hidden wire
- Yarn: smooth worsted #4 acrylic in blue and yellow, approximately 200 m per 100 g. Set aside about 16 yd blue and 6 yd yellow, including the sewing ends. Use the same yarn thickness for both colors.
- Hooks: 3.5 mm and 3 mm.
- Armature: thin, flexible craft wire that holds a bend without springing straight. Cut it to match your actual strip, with about ¾ in (2 cm) extra at each end for folded tips.
- Finishing supplies: a small pinch of fiberfill, a tapestry needle, one removable marker, scissors, wire cutters and round-nose or flat-nose pliers.
- Optional sparkle: small flat-backed craft rhinestones and glue suitable for yarn. Skip them if you prefer the blue stitches plain.
Tension. Use about 5 sc per inch (2.5 cm), with about 5 rows per inch in the firm single crochet. The 60-stitch strip should be about 12 in (30.5 cm) long. Measure it flat before adding the wire. The ball should feel snug enough that its filling stays behind the stitches.
US stitches: chain (ch), slip stitch (sl st), single crochet (sc), double crochet (dc), magic ring (MR), increase (inc: 2 sc in one stitch), decrease (dec: sc 2 together), stitch (st). Starting ch 1 does not count as a stitch. The strip turns after its first row. The ball uses a joined first round, then a continuous spiral with a marker in the first stitch.
Safety. This ornament contains wire and may have glued rhinestones. Keep it on display, out of reach of children under three. Leaving off the rhinestones still leaves a wire-supported decoration.
Making the 60-stitch Christmas tree strip
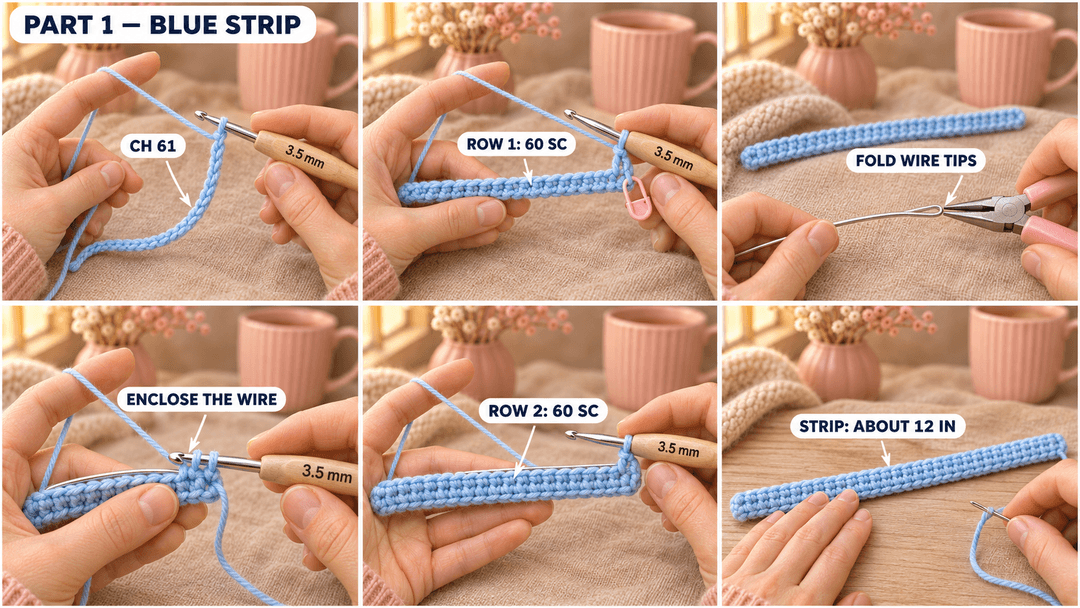
Blue, 3.5 mm hook. Make 1. Leave an 8 in (20 cm) starting tail and ch 61. The starting end will become the narrow treetop; the far end will carry the blue ball. Clip a marker beside the starting tail so you can find the top after turning.
- Row 1: sc in the 2nd ch from the hook and in each ch across. (60)
Lay the row flat beside the wire. Cut the wire to the row's length, with about ¾ in (2 cm) extra at each end. With the pliers, fold each extra end back into a small closed U. Press the cut tip against the wire, then lay the folded ends along the stitches, pointing inward.
Lay the wire against the tops of Row 1, like a little rail for the next stitches. Tuck the first folded end under the first few stitches as you turn.
- Row 2: ch 1, turn, sc in each st across, enclosing the wire beneath the stitches. (60)
Work through both top loops of each blue stitch and around the wire at the same time. At the far end, cover the second folded tip with the last few stitches. Ch 1, fasten off with an 8 in (20 cm) tail and weave it through the row beside the folded tip. Weave in the starting tail too, keeping the treetop marker in place.
Tip. Slide the stitches gently along the wire before hiding the last end. The fabric should sit smoothly. If it gathers into little pleats, spread it back out while the strip is straight.
Shaping the strip into a Christmas tree spiral
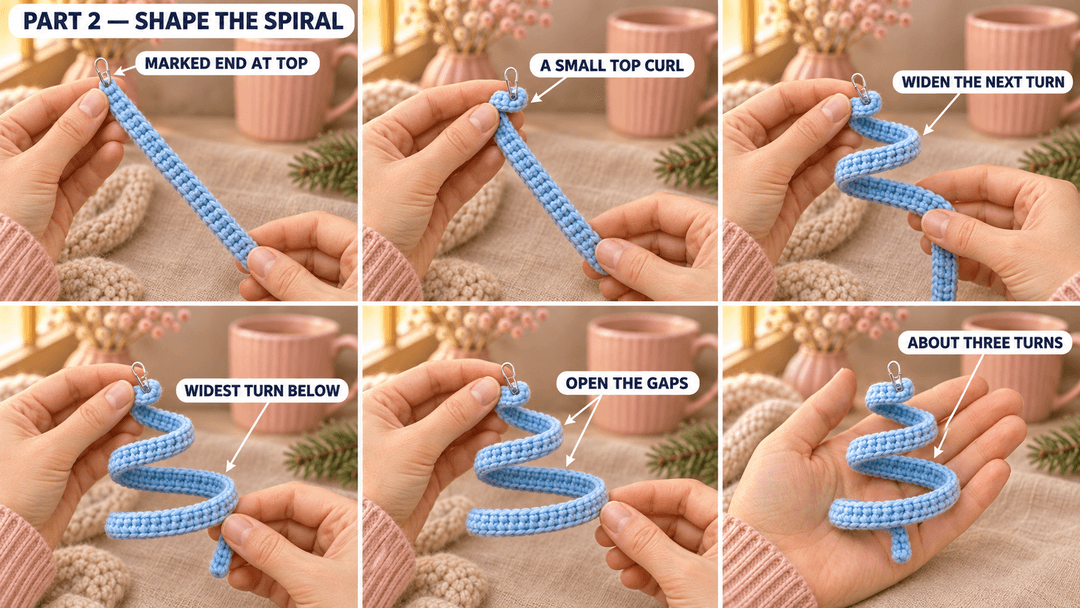
Keep the marked end at the top. Start there with a small curl, then bend the rest of the strip into roughly three widening turns. Let the final turn spread widest at the bottom, with its free end pointing slightly downward.
Lift the top and let the turns hang below it. Open the gaps a little at a time, like stretching a spring gently. Turn the ornament toward you and adjust each curl until the tree has a narrow crown and a broad lower sweep. The final hanging height and width depend on how tightly you bend the wire.
Set it down while making the ball. Keep the marker at the treetop; the ball goes at the opposite end.
The little stuffed ball beneath the tree
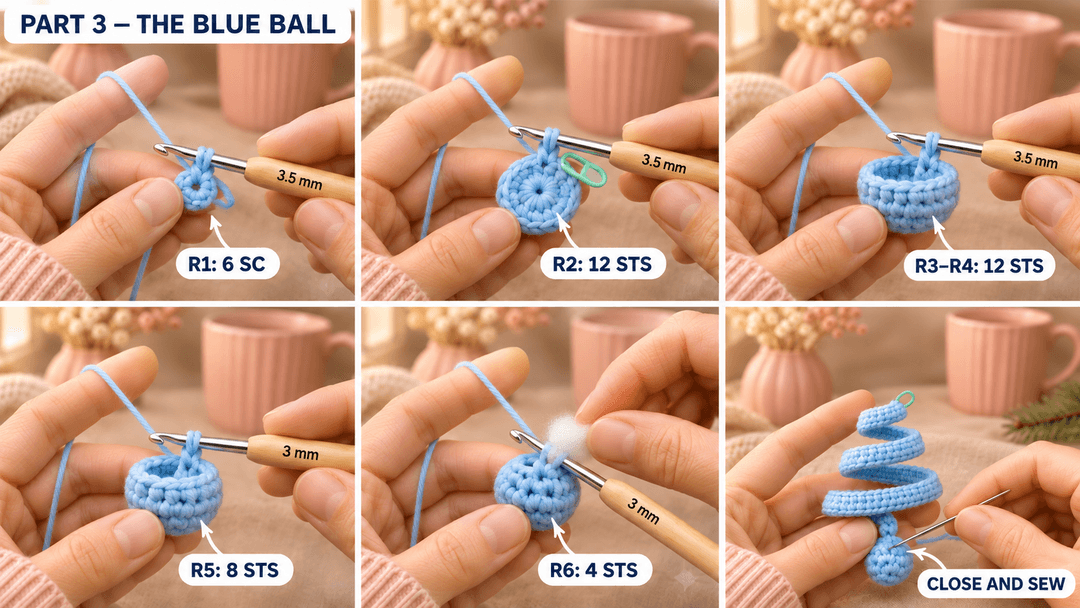
Blue, 3.5 mm hook for R1–R4; 3 mm for R5–R6. Make 1. The magic ring becomes the lower pole of the ball. The final opening is the attachment end, where its sewing tail sits.
- R1: MR, ch 1, 6 sc in the ring. (6)
Pull the ring closed and sl st in the first sc. Ch 1 for R2.
- R2: inc × 6. (12)
- R3–R4: sc around. (12) 2 rounds.
From R3 onward, keep going in a spiral and move the marker into the first stitch of each round. Change to the 3 mm hook before R5.
- R5: (sc, dec) × 4. (8)
- R6: dec × 4. (4)
After the first three decreases of R6, push a small pinch of filling into the ball, then work the final decrease. Keep it rounded but soft enough to squeeze. Fasten off with a 12 in (30 cm) tail. Pass the tail through the front loops of the four remaining stitches and pull the top opening closed. Keep the tail for attaching the ball.
With the narrow end of the tree still marked at the top, pin the ball's closed attachment end against the first two stitches of Row 2 at the lower end. Sew through the closed pole and those blue stitches 10 times, keeping the needle clear of the metal. Hide the tail in the ball.
Two yellow stars for the treetop
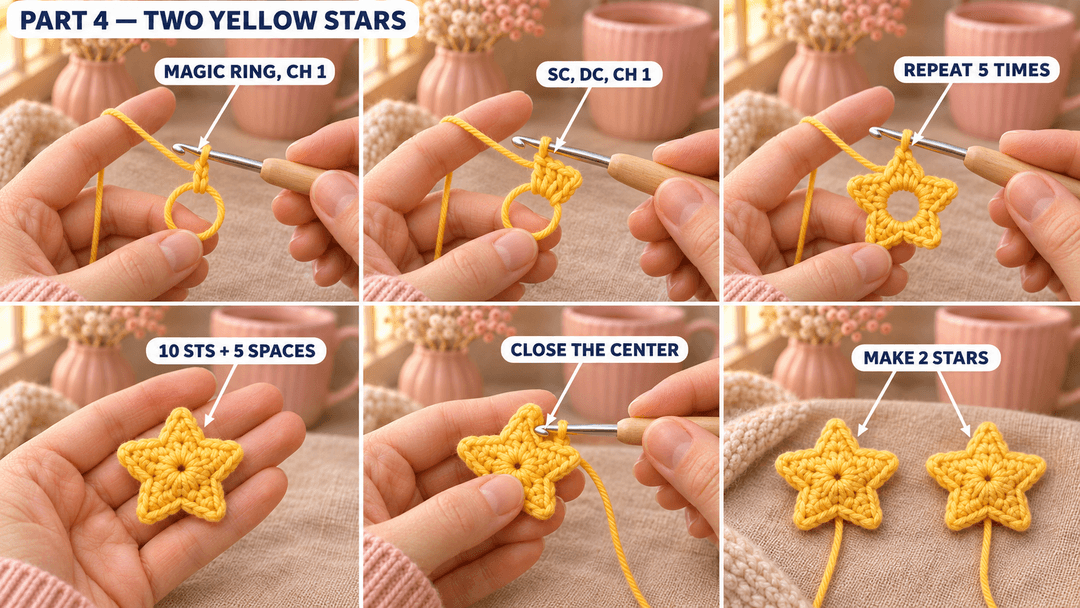
Yellow, 3 mm hook. Make 2. The magic ring is the middle of each star. Leave a 6 in (15 cm) starting tail, make the ring and ch 1.
- R1: (sc, dc, ch 1) × 5 in the ring. (10) Five ch-1 spaces form the tips.
Sl st into the first sc. Pull the working loop to the back through that join, tighten the magic ring and fasten off with a 12 in (30 cm) tail. The count of 10 includes the five sc and five dc; the five chain spaces sit between them.
Ease the five little points apart with your fingertips. Weave in each starting tail on the back, leaving the longer finishing tails for assembly. The stars will sit back to back over the marked treetop.
Adding the hanging loop, stars and sparkling details
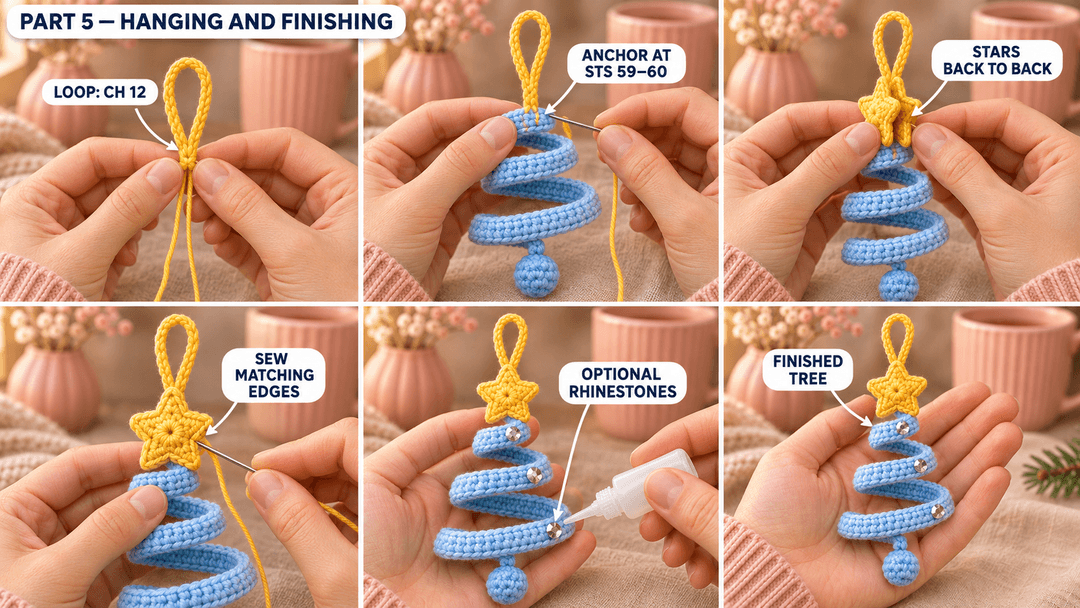
Hanging loop: yellow, 3 mm hook. Make 1. Leave a 12 in (30 cm) starting tail, ch 12, and sl st into the first ch. Fasten off with a second 12 in (30 cm) tail. This makes a closed loop with both tails beside its join.
- Anchor the loop. Set its join against the marked end of the blue strip. With the two yellow tails, take 10 small stitches through the blue fabric around the last two stitches of Row 2, stitches 59 and 60. Let the loop stand above the top. Knot the tails against the fabric and weave them back through several blue stitches.
- Place the stars. Put one yellow star on the front of this attachment and one behind it, right sides facing outward. Line up their five points and keep the loop emerging between the upper points.
- Secure the stars. With one yellow finishing tail, sew through both stars and the blue treetop beneath their centers five times. Then sew the stars' matching outer edges together, one small stitch through each matching sc and dc and one through each matching ch-1 space. Hide both remaining tails between the stars and remove the blue marker.
- Optional sparkle. Hang the tree briefly to find the sides that face the room. Lay it down and glue a small rhinestone onto the outside of each blue turn. Keep the glue and decorations clear of the folded wire ends. Let the glue set fully before hanging.
Hold the ornament by its yellow loop. If the blue turns touch, open the gaps gently with your fingertips. Keep the loop's stitched attachment carrying the weight beneath the stars.
A spiral tree for your Christmas branches
I like the pale blue against dark evergreen, with the yellow star turned toward the room. Hang it where the lower ball has a little space to swing. For a matching pair, use the same yellow stars and make the next spiral in soft green.
My crochet Santa ornament brings a little red to the same branch, with white scallops around his face.
UK terms: US sc = UK dc; US dc = UK tr.
Made a spiral tree? Tag #wavodecrochet on Pinterest so I can see its Christmas branch.
Questions? Email me at support@wavode.com.