Crochet Spiral Christmas Tree

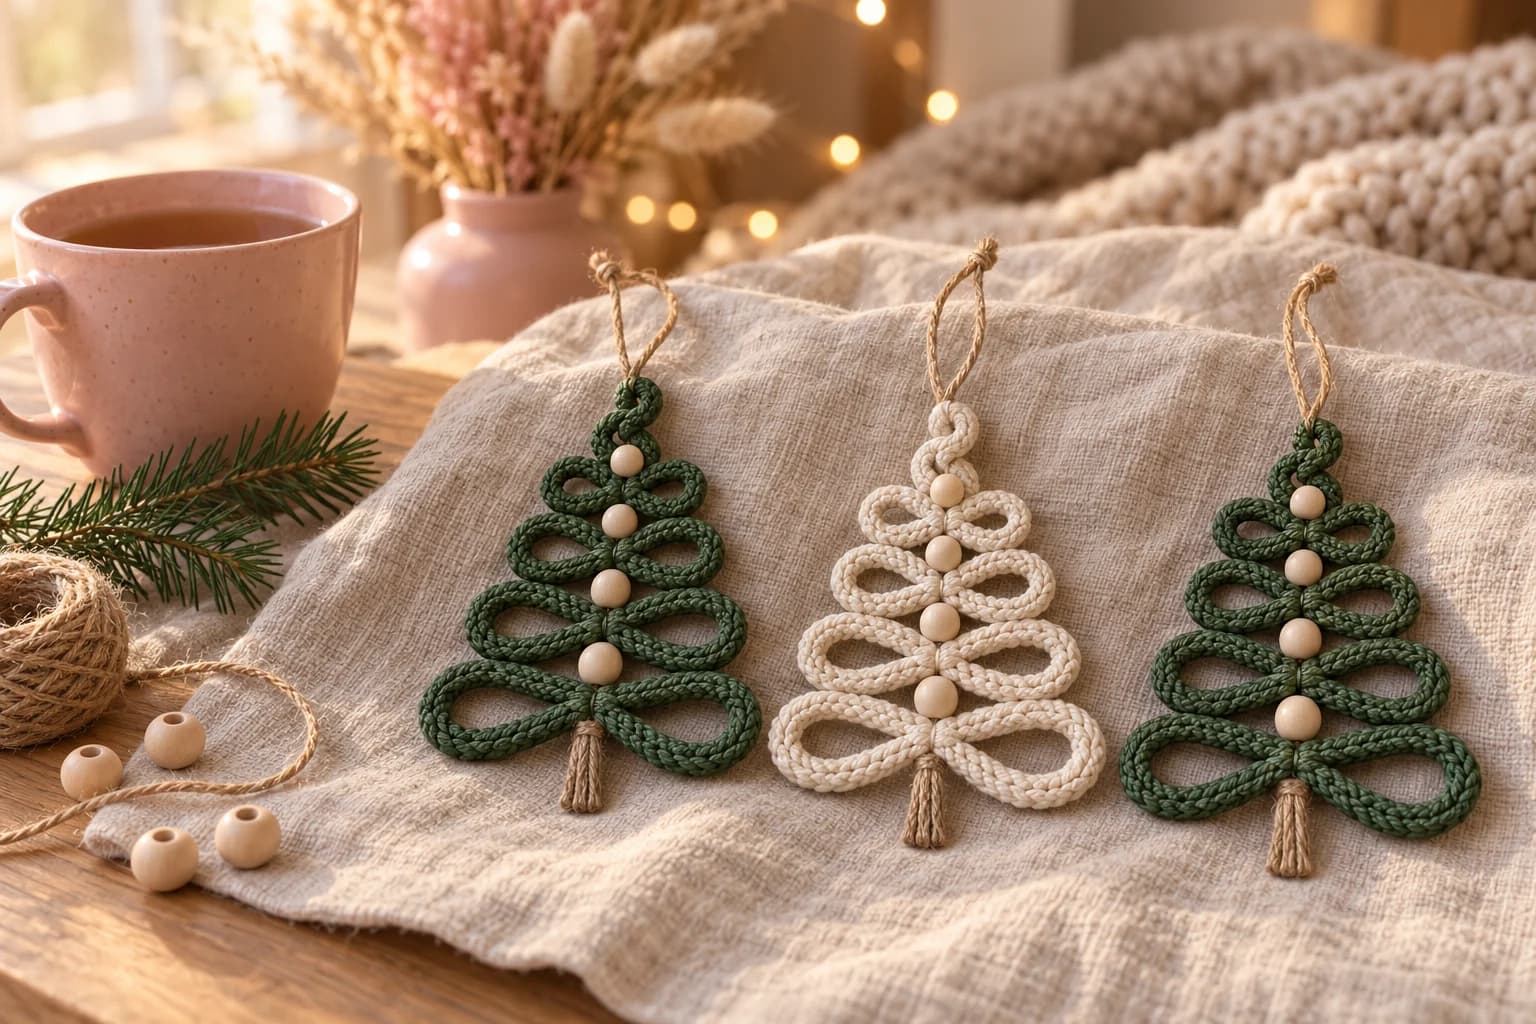
This free crochet spiral Christmas tree pattern turns one long crocheted cord into a hanging tree ornament: a small curl at the top, then five looped tiers that grow wider as the cord spirals down. A jute string runs through the center with five wooden beads, and ends in a little jute trunk. You need about 22 yards of worsted cotton, a 4 mm hook and about an hour and a half.
Key Takeaways
- One cord, no rounds: a single chain with sc on one side and sl st on the other. That's all the crochet there is.
- Stitch counts do the shaping. Each loop uses a set number of stitches, from 8 at the top to 20 at the bottom.
- A jute spine holds it together, with one wooden bead above each tier.
- About 22 yd (20 m) of worsted #4 cotton per tree, plus 16 in of jute and 5 beads.
Why I love this little tree
These trees are the kind of ornament I make in batches. The crochet part is one strip, so you can make the cord in front of a movie and shape the tree afterwards at the table. In deep green and natural cream, with wooden beads and jute, they look calm and Scandinavian on a pine branch, a peg rail or a gift.
The shaping is the fun part. You don't count rounds or increase anywhere. You fold the cord into loops of a set number of stitches, and each loop is a little bigger than the one above. The tree shape appears by itself.
They're also very forgiving. If your loops come out a little uneven, the tree just looks handmade, which is the whole point. Why not make one in every color you have left over?
Skill level. Easy. You need a chain, single crochet and slip stitch, plus a bit of sewing with a tapestry needle. Good as a first ornament.
What you'll need
Yarn: worsted #4 cotton, such as Lily Sugar 'n Cream or Bernat Handicrafter Cotton. Cotton holds the loops in shape better than acrylic, and the matte look goes well with jute and wood.
| Color | Used for | Amount |
|---|---|---|
| Deep moss green or natural cream | The cord | about 20 yd per tree |
| The same color | Tacking the center on the back | about 2 yd per tree |
I worked that out from the stitch count: the cord has 168 chains, 167 sc and 167 sl st, which comes to about 20 yd at worsted weight. One ball makes several trees.
Hook and notions
- 4 mm (US G-6) hook. A little smaller than the cotton label suggests, so the cord is firm and the loops hold their shape.
- 16 in (40 cm) of natural jute twine, about 2 mm thick, per tree.
- 5 natural wooden beads, about 14 mm (½ in), with a hole wide enough for your jute (3 mm or more).
- A large-eye blunt needle (bodkin) for the jute, and a tapestry needle for the yarn.
- 17 removable stitch markers, or short pieces of scrap yarn, and scissors.
- Optional: spray starch, if you want stiffer loops. Skip it if you don't have any.
Gauge and finished size
Gauge: about 4 sc per inch along the cord (16 sc = 4 in / 10 cm). It isn't critical. Because every loop is measured in stitches, a tighter or looser cord just makes a slightly smaller or bigger tree with the same shape.
Finished tree: about 4 in (10 cm) wide at the bottom tier and 5.5 in (14 cm) tall, plus a 1-in jute trunk and a 2.5-in hanging loop. Loops vary with how you shape them, so measure your first one before you plan a garland.
Abbreviations (US crochet terms)
- ch = chain
- sc = single crochet
- sl st = slip stitch
- st(s) = stitch(es)
UK crocheters: this pattern uses US terms. US single crochet = UK double crochet.
The pattern — step by step
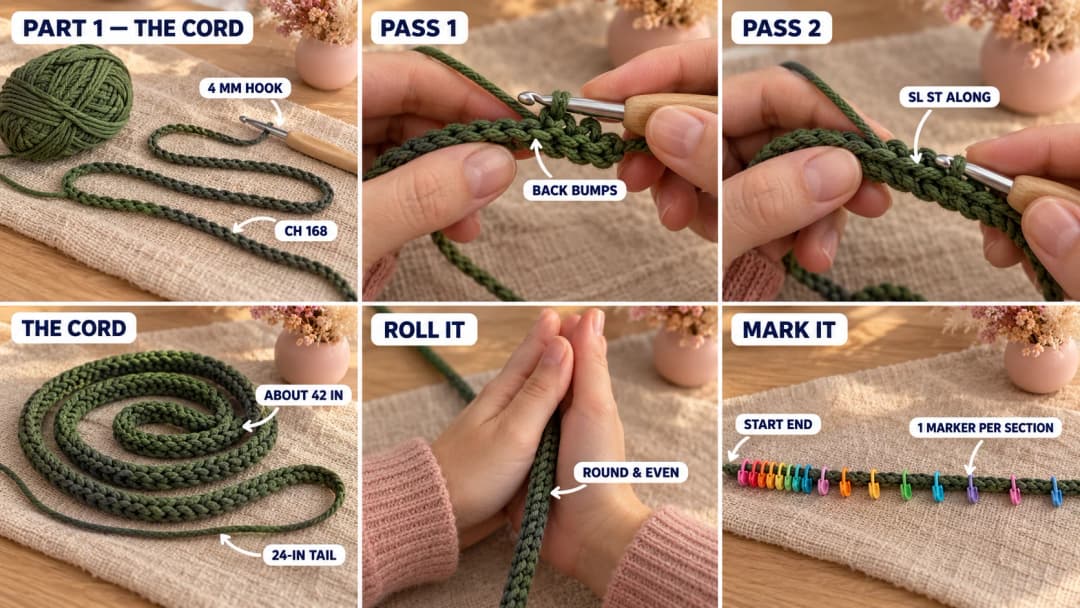
Part 1 — The cord
The cord is worked in two passes: sc into the back bumps of a chain, then sl st along the other side. The sl sts make the cord roll into a round, rope-like shape, about ⅜ in (1 cm) thick.
- Ch 168. Keep the chain relaxed. If it's tight, the cord will curl too much.
- Pass 1: Sc in the back bump of the 2nd ch from the hook and in the back bump of each ch across. (167 sc)
- Pass 2: Don't turn. Rotate the work so the free loops of the foundation chain are on top. Sl st in each free loop across, working loosely. (167 sl st)
Fasten off, leaving a 24-in (60 cm) tail. You'll use it to tack the tree together. Weave in the starting tail.
The cord should be about 42 in (107 cm) long. Roll it between your palms a few times so it settles into a round shape.
Mark the cord. Count the sc stitches from the starting end and place a marker in each stitch listed below. The marker always goes in the last stitch of a section.
| Section | Stitches | Marker in st |
|---|---|---|
| Starting tail | 3 | 3 |
| Top curl | 6 | 9 |
| Connector (behind bead 1) | 3 | 12 |
| Tier 1: left loop / right loop | 8 + 8 | 20 / 28 |
| Connector (behind bead 2) | 3 | 31 |
| Tier 2: left loop / right loop | 11 + 11 | 42 / 53 |
| Connector (behind bead 3) | 3 | 56 |
| Tier 3: left loop / right loop | 14 + 14 | 70 / 84 |
| Connector (behind bead 4) | 3 | 87 |
| Tier 4: left loop / right loop | 17 + 17 | 104 / 121 |
| Connector (behind bead 5) | 3 | 124 |
| Tier 5: left loop / right loop | 20 + 20 | 144 / 164 |
| Ending tail | 3 | — (sts 165–167) |
Check: the sections add up to 167 stitches. If your last marker lands somewhere else, recount before you go on.
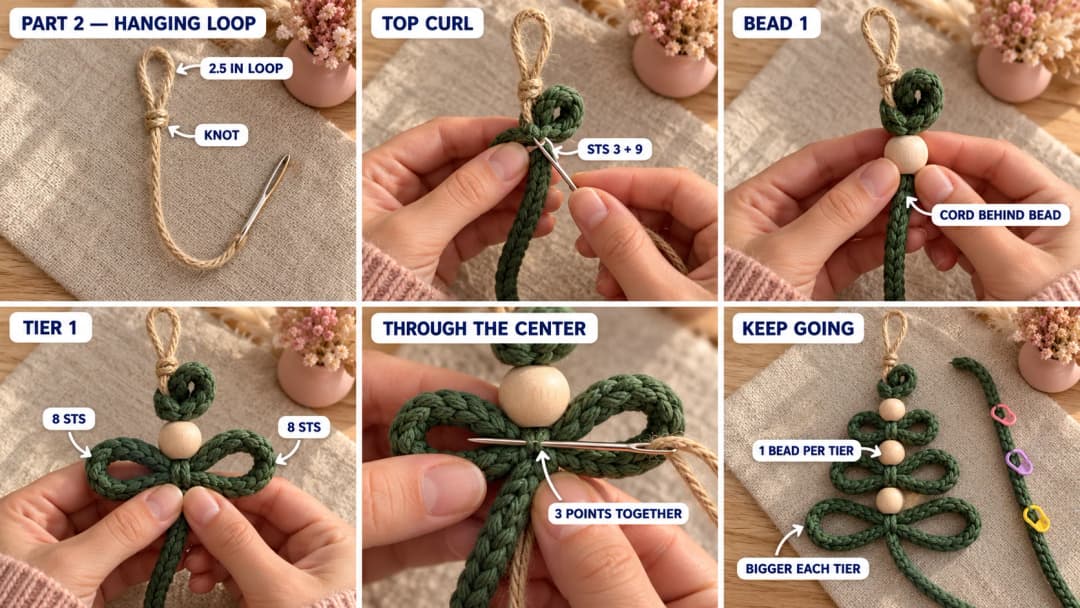
Part 2 — Build the tree on the jute
You build the tree from the top down. The jute is the spine: it goes through the center of every tier, and a bead sits on it above each tier.
- Hanging loop. Fold the top 6 in (15 cm) of the jute down. Tie both strands in a tight overhand knot, leaving a 2.5-in (6 cm) loop above it. Trim the short end ½ in below the knot. From here down, the spine is a single strand.
- Thread the bodkin with the long end of the jute.
- Top curl. Fold the cord so that st 3 and st 9 touch, with the 6 stitches between them forming a small loop that points up. Pinch the two touching points together. Push the bodkin through both, between the stitches rather than through the yarn. Slide the curl up to the knot.
- Bead 1. Thread a bead onto the jute and slide it down onto the curl. Let the 3-st connector (sts 10–12) run down behind the bead.
- Tier 1. With the cord at the center, under the bead:
- Make the left loop: take sts 13–20 out to the left, curving down a little, and back to the center. It's a teardrop that points out and slightly down.
- Make the right loop the same way with sts 21–28, out to the right and back.
- Pinch the three center points together (st 12/13, st 20/21 and st 28/29). Push the bodkin through all of them, between stitches, and slide them up snug under the bead.
- Beads 2 to 5 and tiers 2 to 5. Repeat steps 4 and 5 for each tier, using the stitch numbers in the table. Each tier's loops are a little longer, so the tree widens as the cord spirals down.
After tier 5, the jute comes out at the center below the last tier.
Tip. Lay the tree flat on the table as you go. It's much easier to see if the left and right loops match.
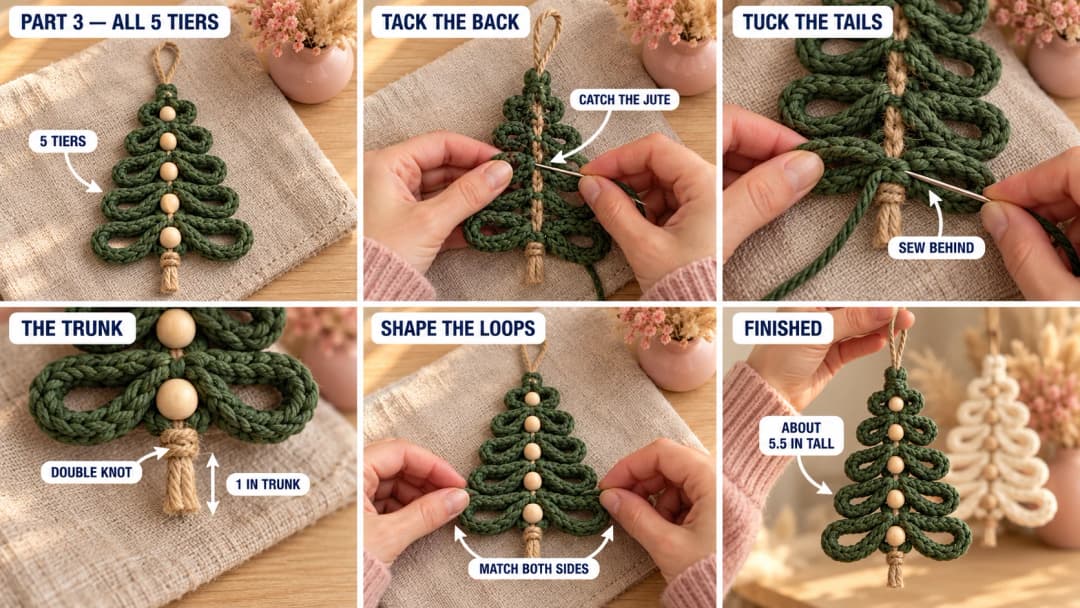
Part 3 — Lock the center and finish
The jute holds the tiers in a line, but cotton can slide on jute. A few stitches on the back lock everything in place.
- Tack the center. Turn the tree face down. Thread the 24-in yarn tail on the tapestry needle. At the bottom tier, make 3 or 4 small stitches through all the center points, catching the jute in each stitch. Then work up the back to the next tier, passing behind the bead, and repeat. Finish at the top curl.
- Tuck the tails. Fold the 3-st starting tail behind the top curl and the 3-st ending tail behind tier 5. Sew each one down with a few stitches, then weave the yarn into the back of the cord and trim it.
- Trunk. Tie a tight double knot in the jute right under the bottom tier, so nothing can slide off. Trim the jute about 1 in (2.5 cm) below the knot. Untwist the very end a little for a soft finish.
- Shape the loops. Turn the tree over and adjust each loop so it curves out and slightly down, the same on both sides. Optional: mist the loops with spray starch and let them dry flat. Skip this if you don't have any.
Hang it by the jute loop and give it a gentle tug. The tiers shouldn't move.
Safety. Wooden beads are small parts, so this is a decoration, not a toy for children under 3. To clean it, spot wash with a damp cloth and let it dry flat.
Make it yours — quick variations
| Variation | Change from base pattern |
|---|---|
| Four-tier tree | Stop after tier 4. Ch 125 for the cord (124 sts): the ending tail is sts 122–124. Use 4 beads. |
| Mini tree | Stop after tier 3. Ch 88 for the cord (87 sts): the ending tail is sts 85–87. Use 3 beads. |
| Big tree | Add a tier 6 with loops of 23 + 23 sts and a 6th bead. Ch 217 for the cord (216 sts). |
| Blush and cream set | Make the cord in blush pink and use cream or white beads for a soft palette. |
| Gift topper | Skip the hanging loop knot and tie the jute around a wrapped present instead. |
| Garland | Make 5 or 6 trees and hang them from a long jute string, about 4 in apart. |
Each tier adds 3 connector stitches and two loops, so the chain length is the sum of the sections plus 1.
Troubleshooting the three things that go wrong
The cord twists like a corkscrew
Your foundation chain is too tight compared to the sc. Chain more loosely, or chain with a hook one size up and switch back to 4 mm for the passes. A twisted cord also relaxes if you roll it, then steam it lightly with an iron held above it.
The loops flop down
Cotton needs a firm cord to hold a loop. Go down to a 3.5 mm hook, or starch the loops (see Part 3). Also check that you pinched all three center points together on each tier.
The tree leans to one side
The left and right loops don't match. Count the stitches in each one again: they should be equal within each tier. Lay the tree flat and adjust the curves before you tack the back.
Frequently asked questions
How long does a spiral Christmas tree take? About an hour to an hour and a half. The cord takes around 40 minutes: 168 chains, then 167 sc and 167 sl st. Marking it and building the tree on the jute takes another 30 to 40 minutes.
How much yarn do I need? About 22 yd (20 m) of worsted #4 cotton per tree: about 20 yd for the cord and 2 yd for tacking the center. It's a good way to use up the end of a ball.
Can I use acrylic yarn? Yes, but the loops will be softer and may droop. If you use acrylic, go down to a 3.5 mm hook so the cord is firm, and starch the loops when you're done.
What if my beads don't fit the jute? Wooden beads need a hole of about 3 mm for 2 mm jute. If yours are smaller, use thinner jute or hemp cord, or skip the beads and sew a small cream pom-pom at the center of each tier.
Can I sell trees made from this pattern? Yes, you're welcome to sell finished trees made from this free pattern at markets, on Etsy or as gifts. Please credit "Pattern by Wavode" in your listing and link back to this page. What you can't do is republish this write-up or my photos as your own pattern.
Related patterns on Wavode
- Crochet Christmas tree decorations: a scalloped tabletop tree on a paper cone.
- Snowflake crochet pattern: a puff stitch snowflake for the tree.
- Snowman keychain: a mini snowman with a top hat and scarf.
- Christmas granny square: a festive square for blankets and pillows.
- Crochet Christmas gnome: a cozy gnome with a long hat and a fluffy beard.
Made a tree? Tag #wavodecrochet on Pinterest. I re-pin every finished make and credit the maker.
Pattern by Clara Hartwell for Wavode. Questions? Email me at support@wavode.com.