Snowflake Crochet Pattern: Free Puff Stitch Ornament

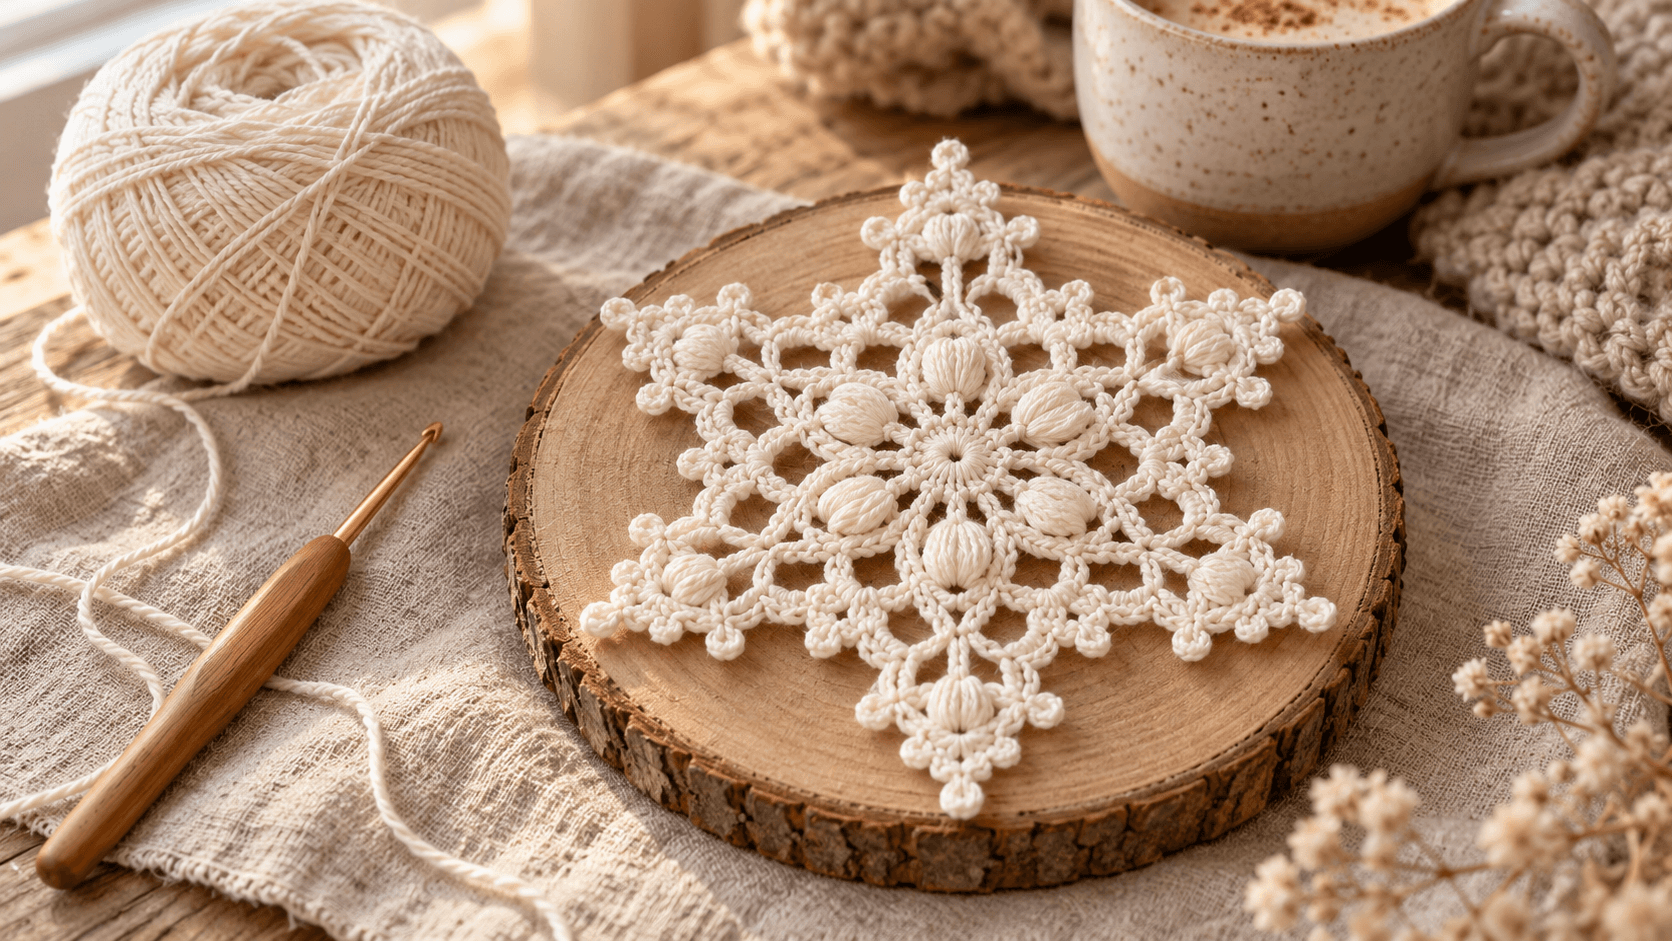
This free snowflake crochet pattern is drafted for a six-point ornament with a ring of puff stitches and a picot-trimmed edge. The design uses three joined rounds: a small center, a textured middle, and alternating valleys and points. Choose cream cotton for a winter look, or try blush pink and dusty blue for a softer holiday palette.
I’ve kept the written pattern compact, with checkpoints after every round. Most of the final round goes into chain spaces, so you don’t need to hunt for every stitch top. Read the puff and picot definitions before starting; the closing chain on a puff needs special attention.
Key Takeaways
- The written design has three rounds and six outer points.
- Twelve puff stitches form the textured middle, with a chain space between each pair.
- Each point carries three picots; smaller chain loops sit in the valleys.
- Use US crochet terms, check your counts, and block the finished motif before judging its shape.
What gives this snowflake its texture?
The puff stitches create a raised ring, while tall stitches build the outer points. Small picots add the branching detail. In the reference photo, the contrast between thick stitch groups and open spaces gives the snowflakes their lacy appearance. This draft uses that contrast as its design starting point.
I’d keep the yarn smooth enough to show those openings. A very fuzzy strand can hide the small picots, especially around the tips. Color helps, too: cream emphasizes the shadows between stitches, while pink or blue turns the same seasonal shape into a decorative accent you can use beyond Christmas.
For another small holiday project, see the snowman keychain crochet pattern. Both designs suit a basket of small yarn leftovers, though this snowflake needs no stuffing or sewn pieces.
What supplies do you need?
Start with smooth cotton yarn and a hook suited to its thickness. For the first test, I suggest light/DK cotton, CYC weight 3, with a 3.5 mm hook. These are starting choices for the draft rather than a confirmed sample combination. Keep extra yarn nearby until consumption is measured.
- Yarn: light/DK cotton in cream, white, blush pink, dusty blue, or another color you like.
- Yarn allowance: set aside about 30 yd (27 m) for your first motif, including tails. This is a planning allowance, not measured usage.
- Hook: 3.5 mm as a starting point; adjust if your puff stitches feel cramped.
- Notions: scissors, a yarn needle, and a removable stitch marker.
- For blocking: a suitable pinning surface and rust-resistant pins.
- Optional: thin ribbon or cotton cord for hanging, plus a fabric stiffener suitable for your yarn.
The Craft Yarn Council’s Standard Yarn Weight System places DK yarn in category 3, Light. Its hook guidance is a starting range rather than a requirement for every project. The 3.5 mm hook suggested here is a draft-specific choice that needs checking with your chosen cotton.
Use one color for the first snowflake. It makes the joins easier to see and lets you concentrate on the repeat. Once the construction makes sense, a contrasting border is an easy variation: finish the second round, then attach the new color in the first chain space.
Skill level, size, and gauge
This pattern is aimed at confident beginners who can work joined rounds and basic stitches. You’ll also need puff stitches, treble crochet, and picots. There are no increases to count inside individual stitch tops after the center; instead, the border grows by placing groups into chain spaces.
Gauge is not essential for an ornament, but tension affects the shape. Keep the chains relaxed and the puff loops at a consistent height. The draft has no verified finished measurement. Measure your blocked test motif from one tip to the opposite tip before deciding whether it suits your tree, gift wrap, or garland.
Thread and a smaller hook would produce a finer version, but that combination needs its own sample. Changing yarn thickness does more than change the diameter: it also changes the balance between dense stitches and open loops.
Abbreviations and special stitches
The instructions use US crochet terminology. The basic abbreviations follow the Craft Yarn Council’s Crochet Abbreviations Master List. Puff stitches can have different definitions in different patterns, so use the version below for this design. A closing chain is included in each puff, separately from the following chain space.
- ch: chain.
- sl st: slip stitch.
- sc: single crochet.
- hdc: half double crochet.
- dc: double crochet.
- tr: treble crochet.
- st / sts: stitch / stitches.
- sp: space.
- yo: yarn over.
- rnd: round.
Puff stitch
With one loop already on your hook, yarn over, insert the hook into the indicated stitch, and pull up a loop. Repeat that movement twice more in the same stitch. You now have seven loops on your hook.
Yarn over and draw through all seven loops. Chain one to close the puff. That closing chain is part of the puff instruction. When the pattern then says “ch 3,” make three additional chains. Count the closed puff as one stitch.
Mark the closing chain of your first puff. At the end of Round 2, you’ll join into this chain rather than trying to insert your hook through the gathered strands.
Picot
Chain three. Slip stitch into the first of those three chains, the chain nearest the stitch you just worked. This makes a small loop. Continue with the next stitch in the pattern; the picot does not use another stitch or space from the previous round.
If the chain is hard to enter, pinch its base while making the slip stitch. Avoid tightening it so much that the loop disappears. All picots in this pattern use the same three-chain method.
The pattern — snowflake crochet steps
Work in joined rounds without turning. The beginning chain one never counts as a stitch. Round 1 creates twelve anchor stitches. Round 2 puts a puff into each anchor. Round 3 uses the twelve spaces between puffs, alternating a small valley with a taller point to produce six points.
Round counts at a glance
| Round | Where to work | Check before continuing |
|---|---|---|
| 1: center | Into the foundation ring | 12 sc |
| 2: texture | One puff into every sc | 12 puffs; 12 separate ch-3 spaces |
| 3: border | Into the ch-3 spaces, skipping puff tops | 6 valleys; 6 points; 18 picots |
Starting position for Round 3: the first chain space after the first puff. That space receives a valley. The next space receives a point. Continue alternating until all twelve spaces are used. The last group is a point; the joining slip stitch returns to the first valley.
Placement guide for the written draft. This is not a standard crochet stitch chart or a picture of a finished sample.
Foundation
Make a magic ring. If you prefer a fixed ring, chain four and slip stitch into the first chain. Work the Round 1 stitches into the center of that ring, not into the individual chains. The fixed-ring option can leave a more visible center opening.
Round 1: center ring
Chain one. Work 12 sc into the ring. Tighten the magic ring if using one. Join with a slip stitch to the first sc.
Checkpoint: 12 sc. The beginning chain and joining slip stitch do not add to this count. Place a marker in the first sc if it helps you identify the join.
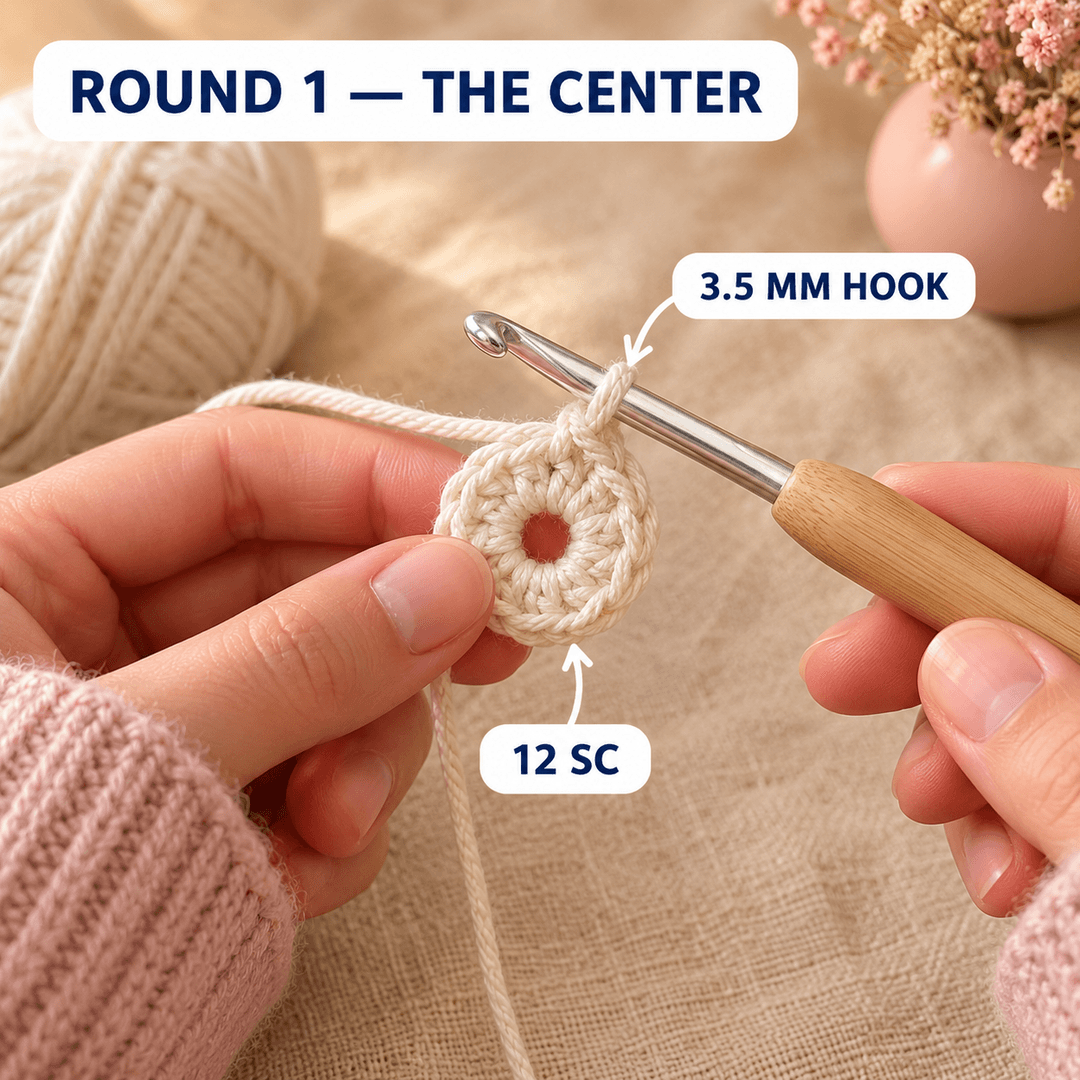
Step illustration: the center after Round 1. AI-generated; follow the written count above.
Round 2: puff-stitch ring
Chain one. Work a puff into the same sc as the join, then chain three.
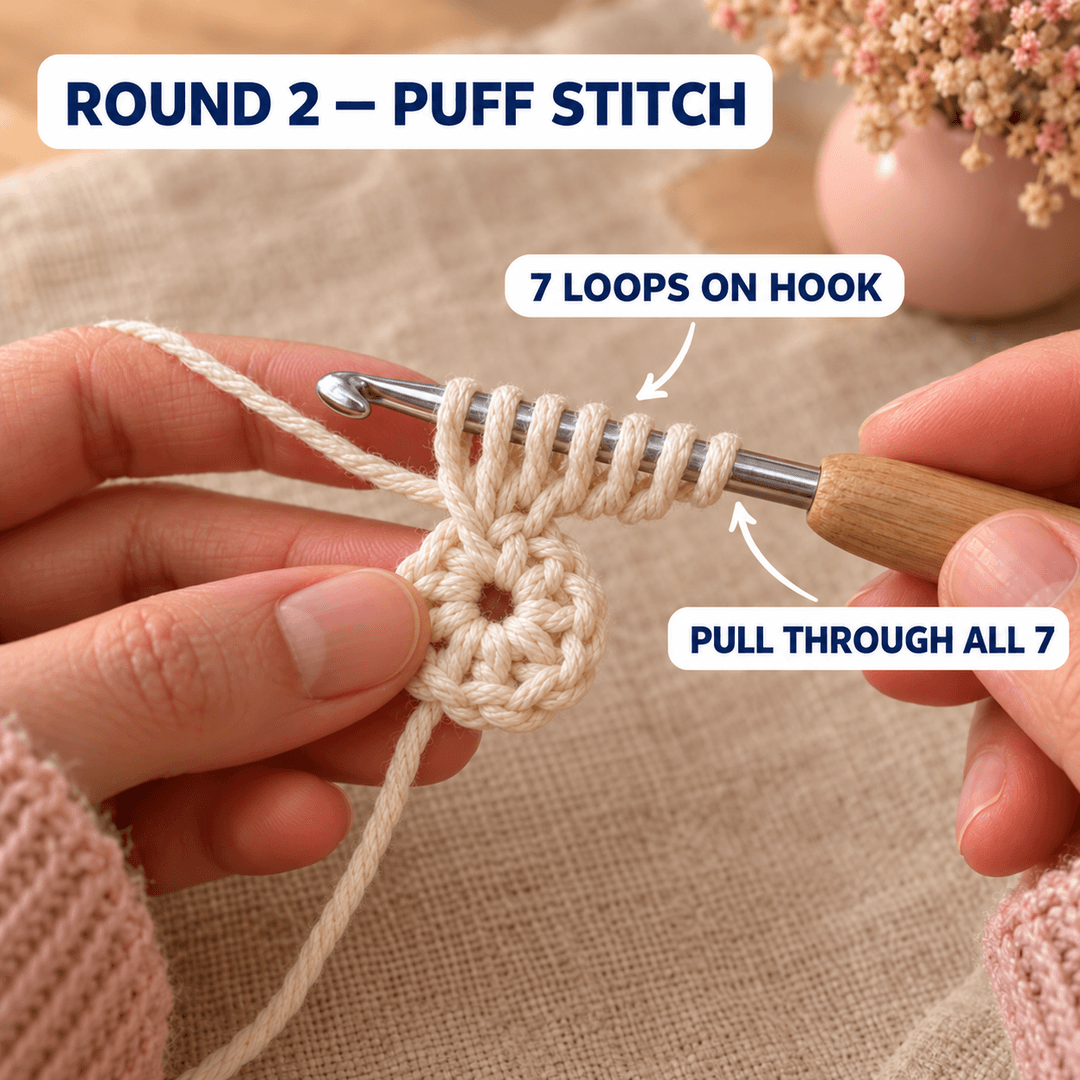
Step illustration: forming the first puff before its final pull-through. Close the puff with ch 1, then make three additional chains.
Work one puff in the next sc, ch 3 eleven times. Join with a slip stitch into the closing chain of the first puff. Slip stitch into the first ch-3 space to position your hook for the border.
Checkpoint: 12 puffs and 12 ch-3 spaces. Every sc from Round 1 receives exactly one puff. There is a ch-3 space after the last puff, before the join, as well as between the other puffs.
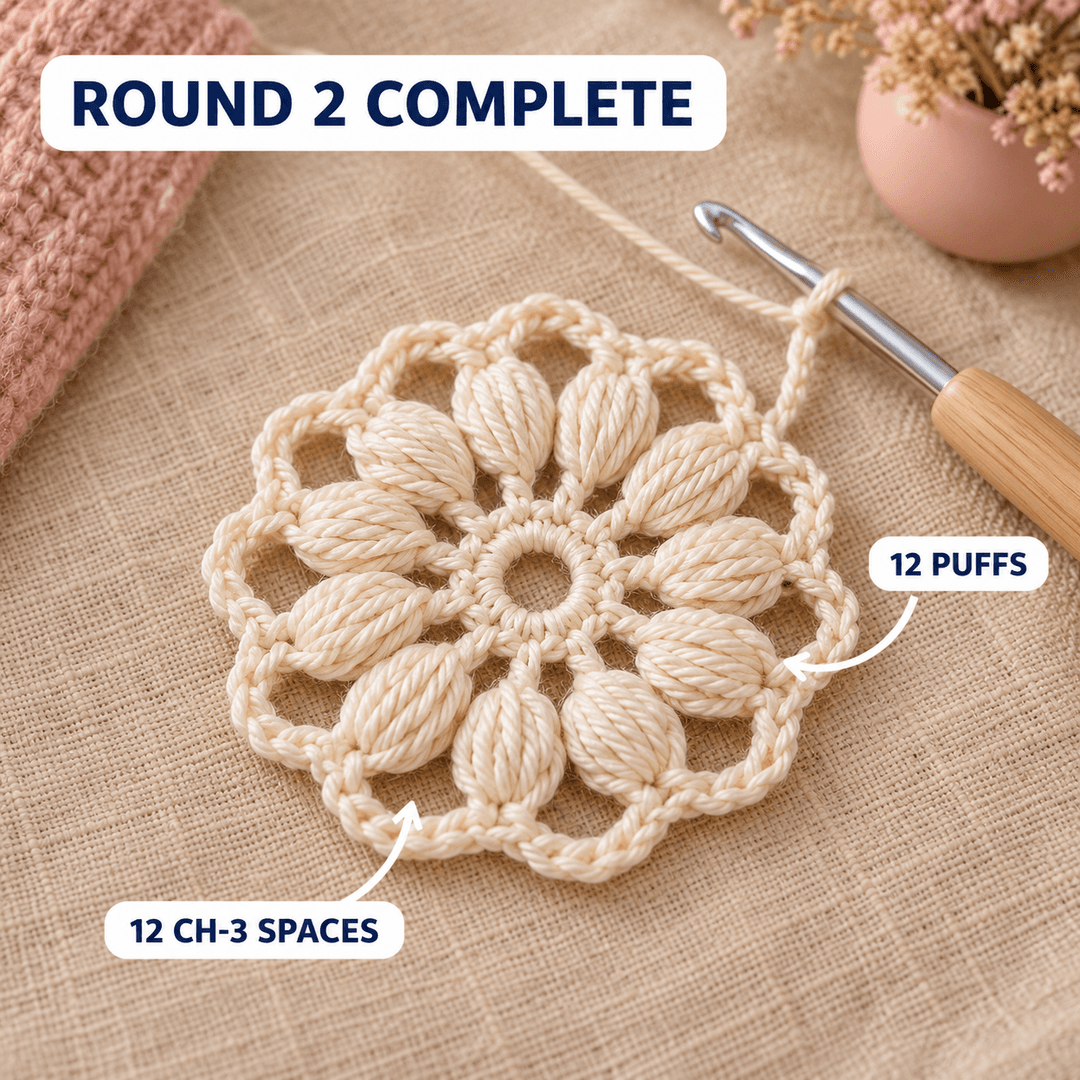
Step illustration: the puff ring before adding the pointed border. Count your own twelve puffs and twelve spaces before continuing.
Round 3: valleys and pointed border
Chain one. Work the following pair of instructions six times total, beginning in the ch-3 space where your hook is positioned:
- Valley: in the current ch-3 space, work sc, ch 3, sc.
- Point: in the next ch-3 space, work sc, hdc, dc, picot, tr, picot, tr, picot, dc, hdc, sc.
After each point, move directly into the next ch-3 space for the next valley. Skip the puff tops throughout this round. Don’t add traveling chains or stitches between spaces. Every stitch in a valley or point is worked into its designated space, except the slip stitches that close the picots.
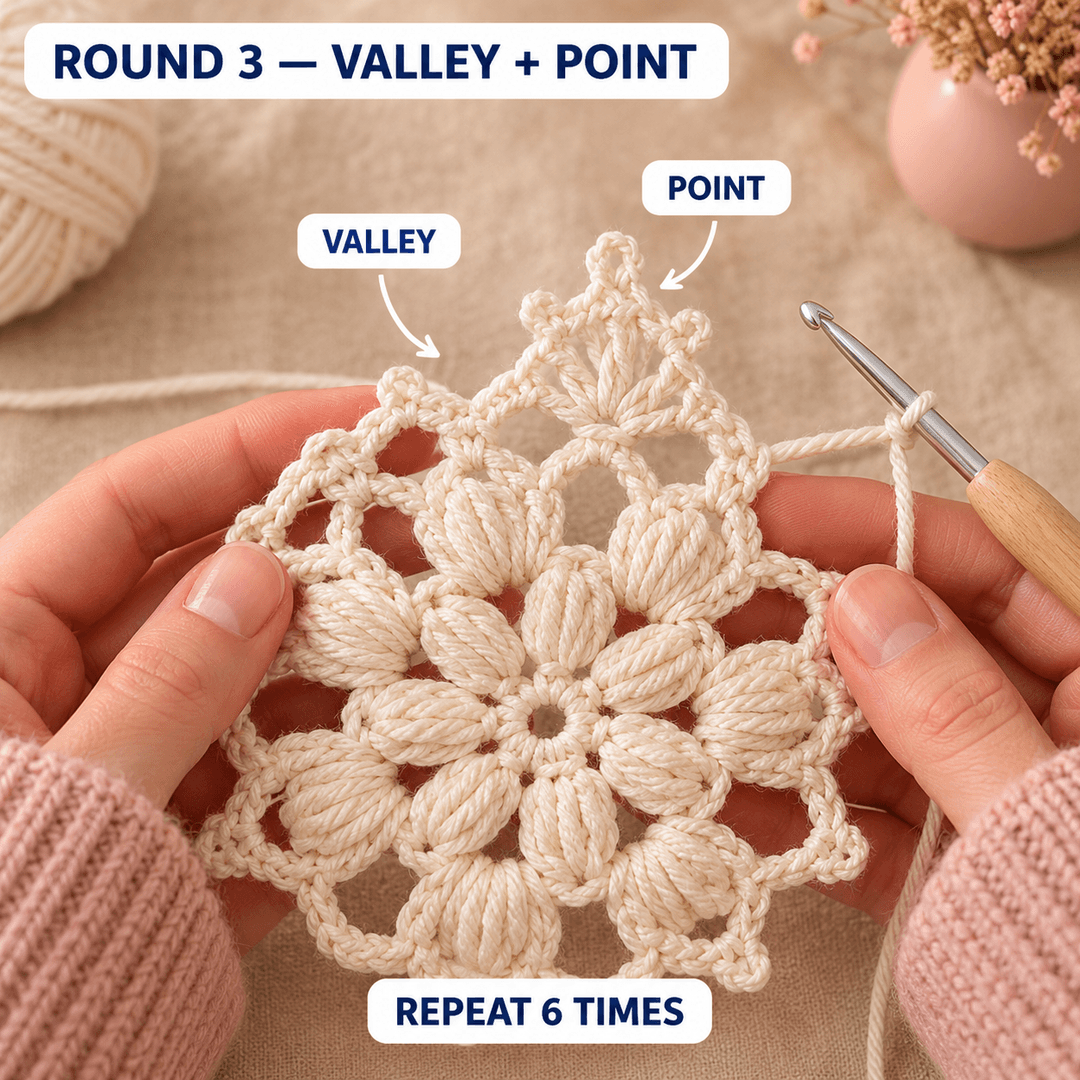
Step illustration: one valley–point pair in progress. Follow the written placement; repeat the pair six times in total.
After the sixth point, join with a slip stitch to the first sc of the round. Fasten off, leaving a tail long enough to weave securely through several stitches.
Checkpoint: 6 valleys, 6 points, and 18 picots. The stitch totals are 24 sc, 12 hdc, 12 dc, and 12 tr. There are also six valley ch-3 loops. Picot chains and slip stitches are separate from these stitch totals.
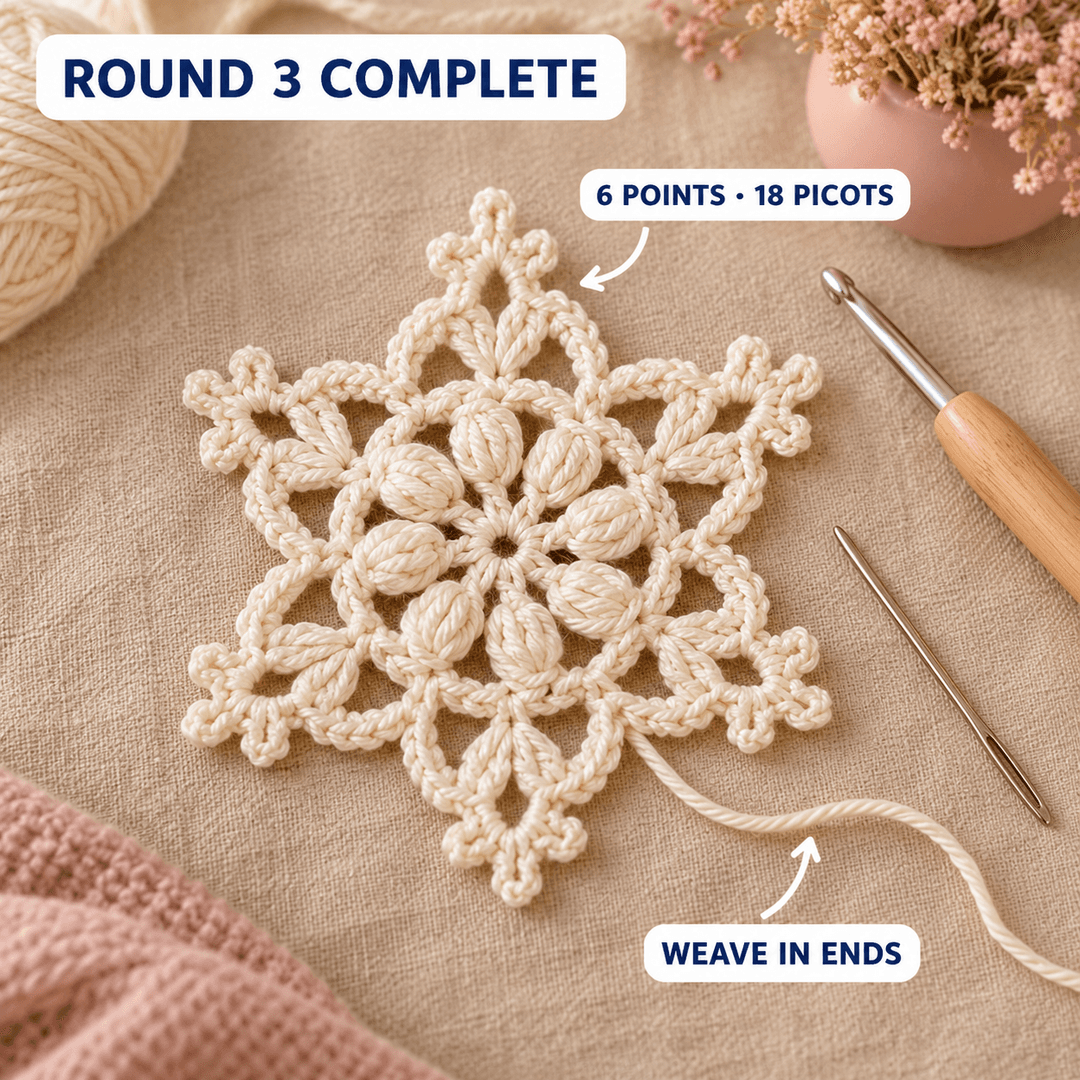
Step illustration: the intended six-point outline after Round 3. This generated view is not confirmation of the draft’s finished shape.
Read one point in three parts: work sc, hdc, dc, then make the first picot. Work tr, make the center picot, then work another tr and the third picot. Finish with dc, hdc, sc. All eight base stitches share one ch-3 space; each picot closes into its own first chain.
A quick count check
Each valley uses one space and contributes two single crochets. Each point uses the next space and contributes eight base stitches. Six pairs therefore use all twelve spaces from Round 2. If you reach the join with a spare space, check the valley–point sequence before fastening off.
The easiest place to lose the repeat is beside the join. Lay the motif down and point to each tall group. Count those groups rather than counting the picot loops; three picots belong to each individual point.
How do you finish and block the snowflake?
Weave in the ends before shaping the motif. For cotton suitable for wet blocking, gently wet the snowflake, press out excess water in a towel, and pin it flat. Arrange the six points evenly around the center. Let it dry completely before removing the pins or adding a hanging loop.
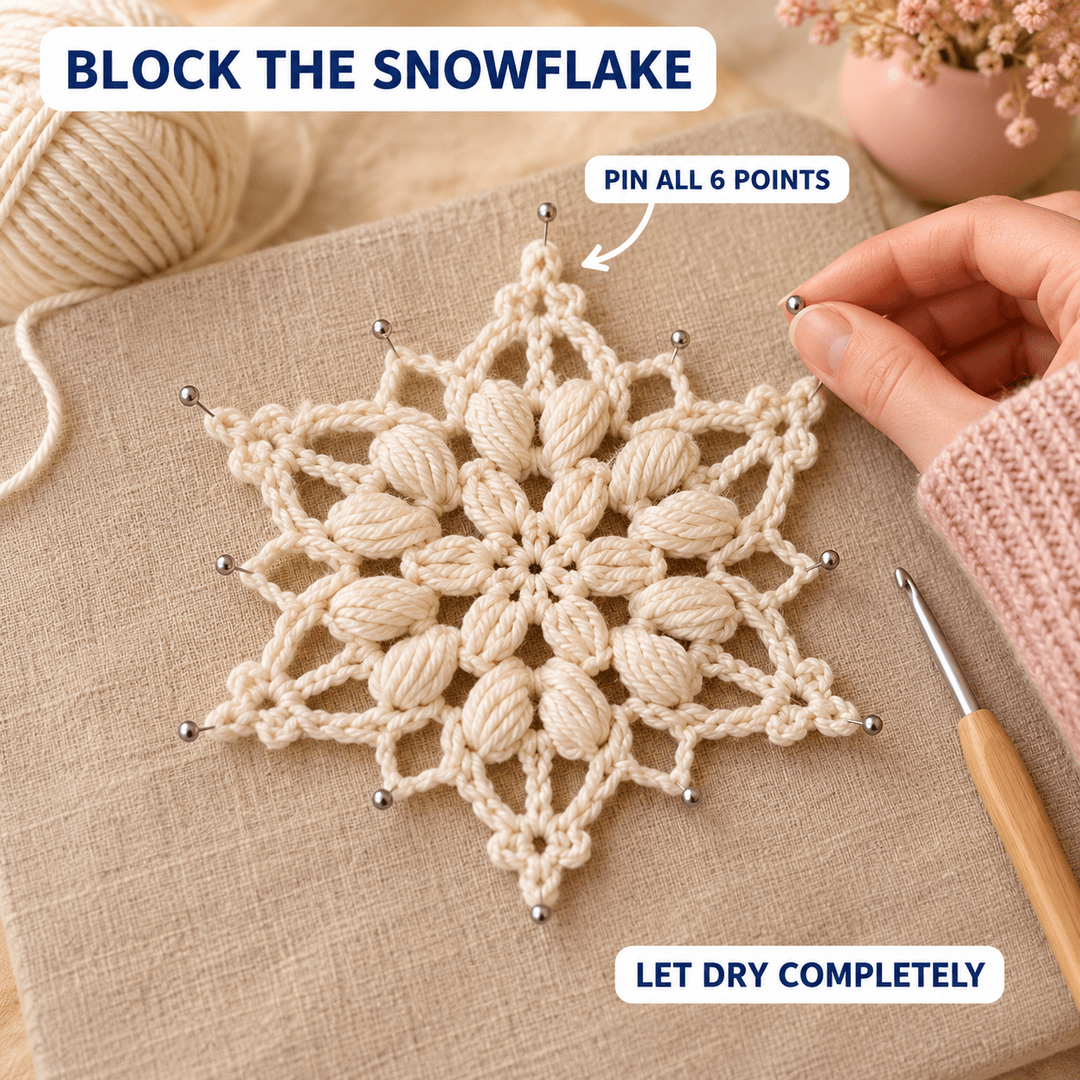
Step illustration: arranging the points for blocking. Use rust-resistant pins and remove them only after the motif has dried completely.
Begin with opposite points. Pin one tip, then the tip directly across from it. Add the remaining four, keeping their distance from the center similar. Open the valley loops and picots gently. Stretching one side harder than another can distort an otherwise even repeat.
Don’t judge the pattern solely while it’s damp. The dry sample will tell you whether the border holds its outline and whether the puffs remain distinct. If the motif forms a deep cup or strong ruffles, check the counts and tension before attempting to stretch it flat.
Optional stiffening and hanger
For a firmer hanging decoration, follow the directions on a fabric stiffener labeled as suitable for the yarn you chose. Test it on a small scrap first. Different products can change the feel or appearance of the yarn, so avoid committing a whole batch before checking the result.
Let the snowflake dry on a protected pinning surface. Once dry, thread a ribbon or cord through the center picot of one point and tie a hanging loop. Keep the loop light enough that it doesn’t pull the tip out of shape.
What if your snowflake looks uneven?
Check the construction before changing the hook. First check for missing chain spaces, an extra valley, or puff-closing chains mistaken for border spaces. Count twelve spaces after Round 2 and six complete valley–point pairs after Round 3, then assess your tension.
The snowflake has five or seven points. One space probably received the wrong group. Follow the border from its starting valley and confirm that the groups alternate. Two points beside each other indicate a missed valley; two valleys suggest a missed point.
The border is crowded. Confirm that each tall group goes into a ch-3 space. Working into the puff top instead can crowd the raised stitch. If the placement is correct, loosen your chains on the next test rather than forcing the finished motif wider.
A puff is difficult to close. Pull its loops to an even height before drawing through them. Work slowly and keep the hook opening facing the loops. If your yarn splits repeatedly, try a smoother strand for the test motif.
One tip is shorter. Look for a missing treble crochet or a picot placed between the wrong stitches. The tallest section is two trebles with the center picot between them. A double crochet accidentally used in that position changes the tip height.
Ways to use your crochet snowflakes
Add a single snowflake to a wrapped gift, hang several from a branch, or space them along a simple garland. I’d finish and measure the first motif before making a batch. That gives you a consistent size target and a chance to settle on the yarn, color, and firmness you prefer.
A cream garland works with natural twine and plain paper decorations. Alternate blush and blue for a pastel display. For gift wrapping, leave the snowflake soft and use ribbon through a point to secure it. The recipient can remove the ribbon and hang the ornament later.
If you’d like another seasonal project after this motif, try the pumpkin table runner crochet pattern or the pumpkin keychain crochet pattern. Choose according to how much time and yarn you want to commit.
Frequently asked questions
Is this the exact snowflake pattern in the photo?
No. The supplied photo is the visual inspiration for a new written draft. It suggests raised stitch groups, open spaces, and decorative points, but it doesn’t reveal the full construction. These instructions have not been identified as the pictured designer’s pattern, and no matching finished sample has been made.
Can a beginner make this snowflake?
A confident beginner can attempt the draft after learning joined rounds, treble crochet, puffs, and picots. Read the special-stitch definitions first, then stop after each round to count. There are only three rounds, but the last one needs attention because valley groups and point groups alternate around the motif.
Can I use crochet thread instead of DK cotton?
Yes, as a separate sample experiment. Use a hook suitable for the thread and keep the same written repeats. The result should be finer, but its actual size and shape need checking. Make one complete snowflake before planning a thread garland or buying supplies for a large batch.
Does it need fabric stiffener?
Stiffener is optional. Block the cotton motif first, let it dry, and see whether it hangs the way you want. A soft snowflake can work as a gift embellishment. For a firmer ornament, test a suitable stiffener on a scrap and follow the manufacturer’s directions for application and drying.
How much yarn and time does one snowflake take?
The draft has no measured yarn usage or tested completion time. Set aside about 30 yd (27 m) for the first DK-cotton sample, then record what you actually use. Your speed will depend on familiarity with the puff stitch and picots. Blocking and drying take additional time.
UK terminology note
The same stitch can have a different name in US and UK patterns. Follow the US abbreviations throughout this article, or use this conversion table consistently. Chains, picots, and the puff definition retain their written movements. These conversions follow the Craft Yarn Council’s US/UK terminology chart.
| US term used here | UK equivalent |
|---|---|
| Single crochet (sc) | Double crochet (dc) |
| Half double crochet (hdc) | Half treble (htr) |
| Double crochet (dc) | Treble (tr) |
| Treble crochet (tr) | Double treble (dtr) |
How this draft was checked
The written construction has received a stitch-count review: each round uses all its available anchors, and the border totals reconcile with six complete repeats. The HTML preview was checked at phone, tablet, and desktop widths, and a printable copy was inspected. These checks cover instructions and presentation; they do not establish the finished fabric’s behavior.
Editorial credit: Clara Hartwell is the site's editorial persona. This article and its step illustrations were prepared with AI assistance. No designer credentials, personal making experience, or tester endorsement are asserted. The original supplied photo was used as visual inspiration and is not reproduced in this article.
What a sample test needs to establish
Before treating this draft as a tested pattern, make a complete motif and record the following. A second maker should then follow the revised instructions without extra explanation. Keep any corrections beside the round that prompted them so the final version and its photographs describe the same construction.
| Test record | What to note |
|---|---|
| Materials | Yarn brand, fiber, weight, color, and actual hook size |
| Consumption | Yarn used for the motif, including ends and hanging cord |
| Dimensions | Tip-to-tip width after blocking; center-to-tip measurements |
| Shape | Whether the border lies flat without force; any crowding or ruffles |
| Readability | Confusing joins, puff closures, space placement, or picot instructions |
| Time | Hands-on making time, listed separately from drying |
| Photographs | Actual sample before and after blocking, plus clear round details |
Sources checked October 3, 2026:
- Craft Yarn Council, Crochet Abbreviations Master List, including the US/UK conversion chart. Supports terminology and abbreviation meanings.
- Craft Yarn Council, Standard Yarn Weight System. Supports the Light/category 3 classification of DK yarn. It does not validate the hook selection, allowance, or construction of this draft.
The written snowflake design, repeat diagram, counts, and supply allowance are part of this new draft. They are not reproduced from a source pattern.