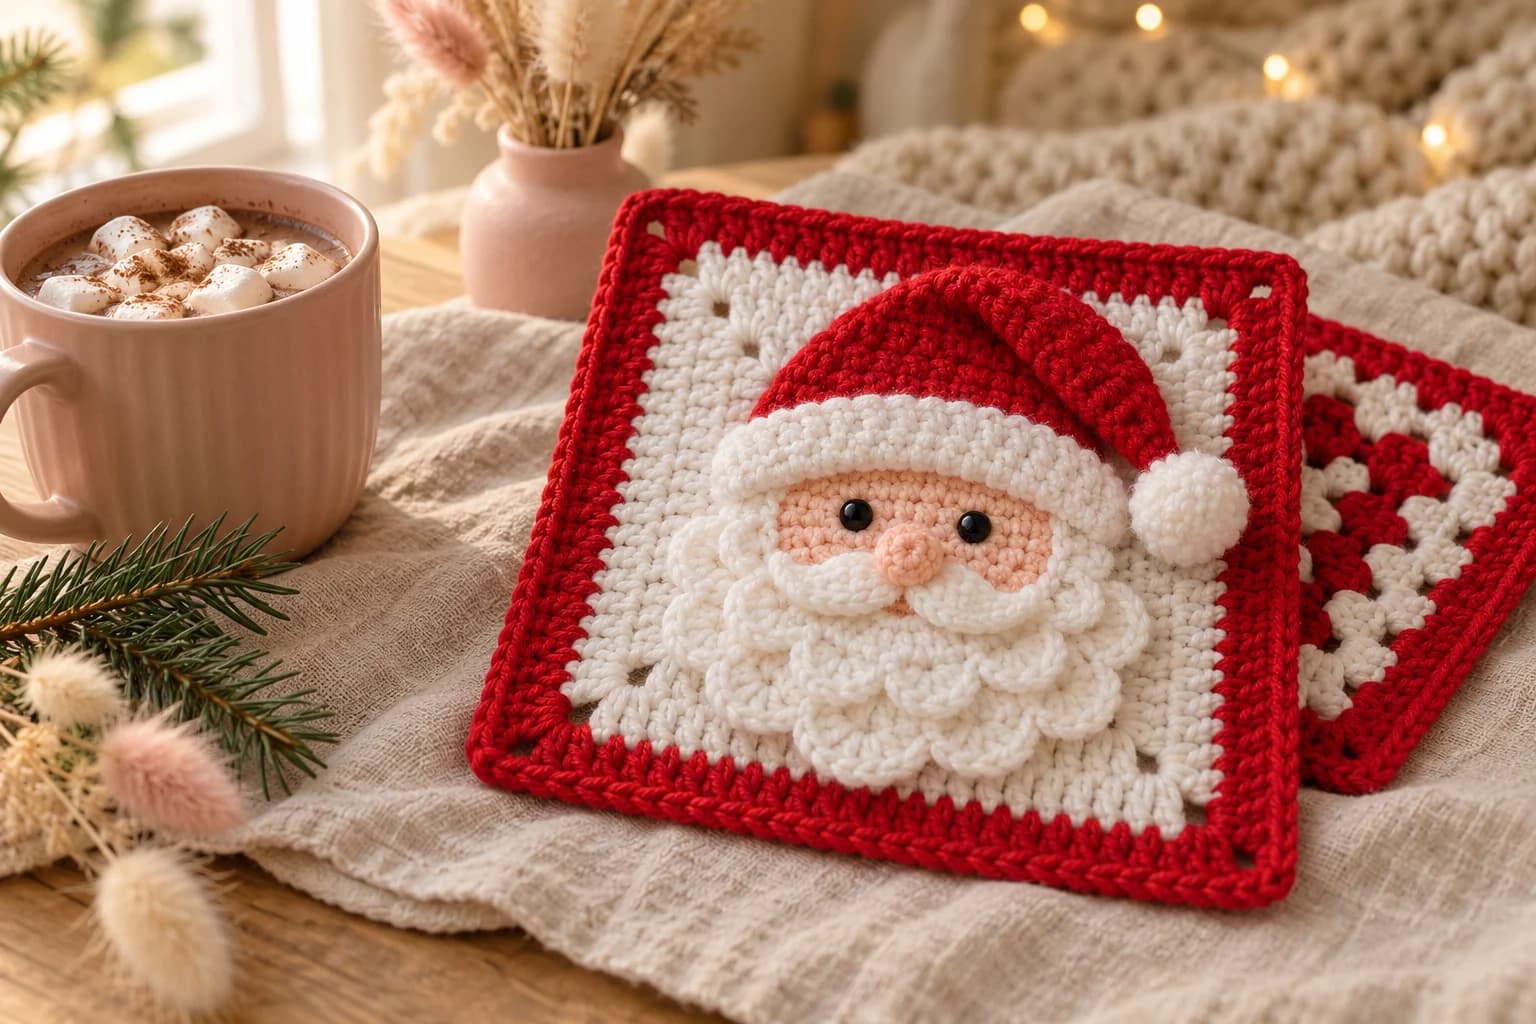
Crochet Santa Ornament


I love a red-and-white ornament tucked between the green branches of a Christmas tree. This crochet Santa ornament has a round white face, a scalloped beard and a pointed red hat, with a little loop at the tip for hanging. The raised whiskers sit just beneath his red nose.
The doubled white circle feels a little thicker between your fingers. I like how the scallops hold the edges together while making the beard. Work the hat across the top, then give Santa his face.
| At a glance | |
|---|---|
| Yarn | Medium-weight acrylic, worsted #4, in white and red |
| Hook | 3 mm throughout |
| Pieces | 5 crocheted sections, including the attached hat; the hanging loop continues from its tip |
| Construction | Joined circles, a scalloped joining edge and a hat worked in turned rows |
| Skill | Magic ring, sc, hdc, dc, slip stitches and sc decreases |
These written instructions follow the Santa ornament video tutorial. The numbered hat rows and five-loop nose are a counted reconstruction of the demonstration.
Red and white yarn for this Santa ornament
- Yarn: medium-weight acrylic in white and red. Keep the same yarn thickness for both colors so the hat and beard sit neatly together.
- Hook: 3 mm for every section.
- Eyes: two black eyes suitable for gluing onto the fabric.
- Finishing: glue suitable for yarn and the eye material, scissors and a tapestry needle for hiding the ends.
- Helpful extras: removable markers to keep the two panels aligned.
Stitches, in US terms: magic ring (MR), chain (ch), slip stitch (sl st), single crochet (sc), half double crochet (hdc), double crochet (dc), stitch (st), and single crochet two together (sc2tog). To sc2tog, pull up a loop in each of the next two stitches, yarn over and pull through all three loops.
The white panels use joined rounds. Join to the first dc, rather than to the starting chain. The ch 1 at the beginning of a round or turned row does not count as a stitch. Keep the first dc marked if its top is hard to find.
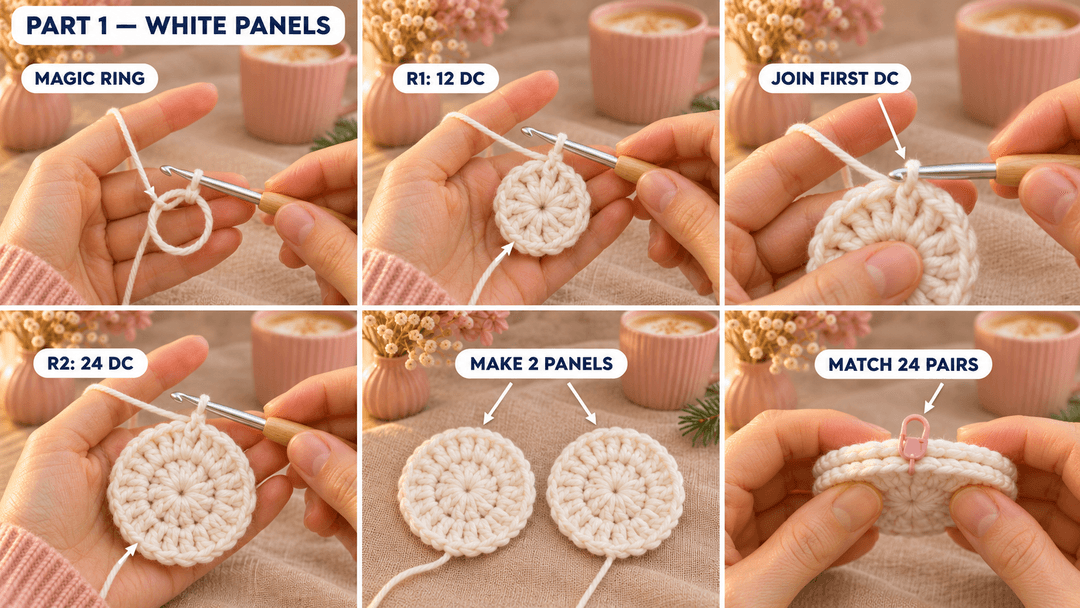
Making the two white Santa panels
White, 3 mm hook. Make 2. The magic ring is the center of each circular panel; the final round forms its outside edge.
- R1: MR, ch 1, 12 dc in the ring. (12)
- R2: ch 1, 2 dc in each st around. (24)
After each round, sl st into the top of the first dc. Pull the magic ring closed after R1. After R2, ch 1, fasten off with a 6 in (15 cm) tail and weave the ends into the back of the panel.
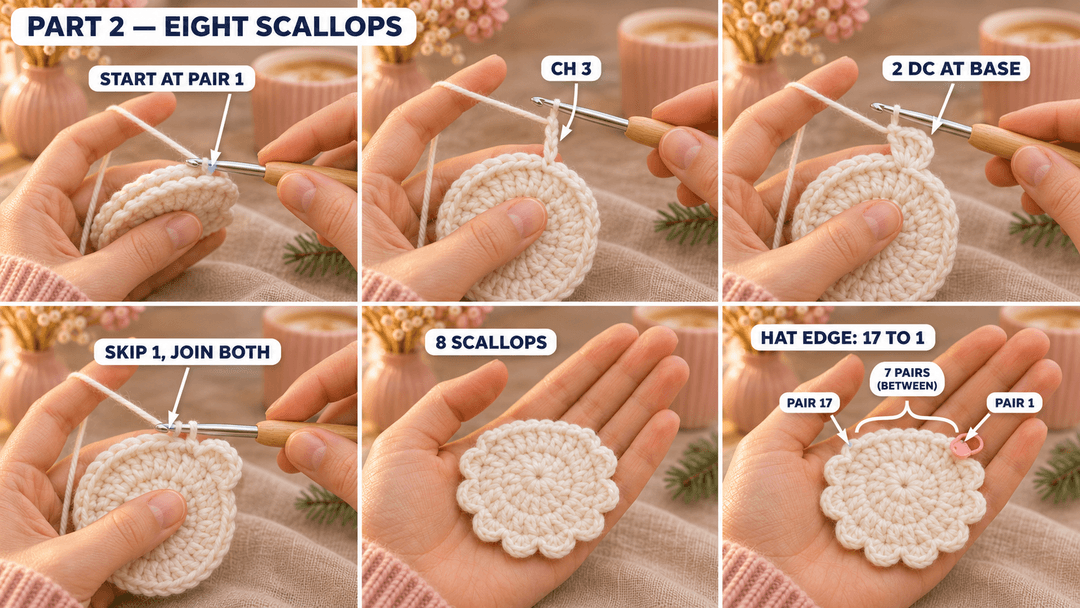
Lay the panels together and match their edges, with the ends tucked between them. Keep the circles flat while making the joining border.
Joining the panels with a scalloped edge
White, 3 mm hook. Work directly onto the panels. Each joining slip stitch passes through a matching stitch on both layers.
Attach white through a matching pair of edge stitches. Mark that pair as stitch 1 and count the 24 pairs around the edge in your working direction. Keep that marker in place through assembly. Work the following motif 8 times in total:
- Ch 3.
- Work 2 dc into the point at the foot of the ch 3.
- Skip the next stitch on each panel.
- Insert the hook through the following matching stitch on both panels and make a sl st.
The little clusters curl around the cheeks and chin. The joining slip stitches land in pairs 3, 5, 7, 9, 11, 13, 15 and 17. After the eighth motif, ch 1 and fasten off with a 6 in (15 cm) tail. Tuck the end between the circles, leaving the top edge ready for Santa’s hat.
Tip. Pick up the matching stitch from each panel before pulling the joining loop through. If one circle slips ahead, undo that join and line the edges up again.
The pointed red Santa hat and hanging loop
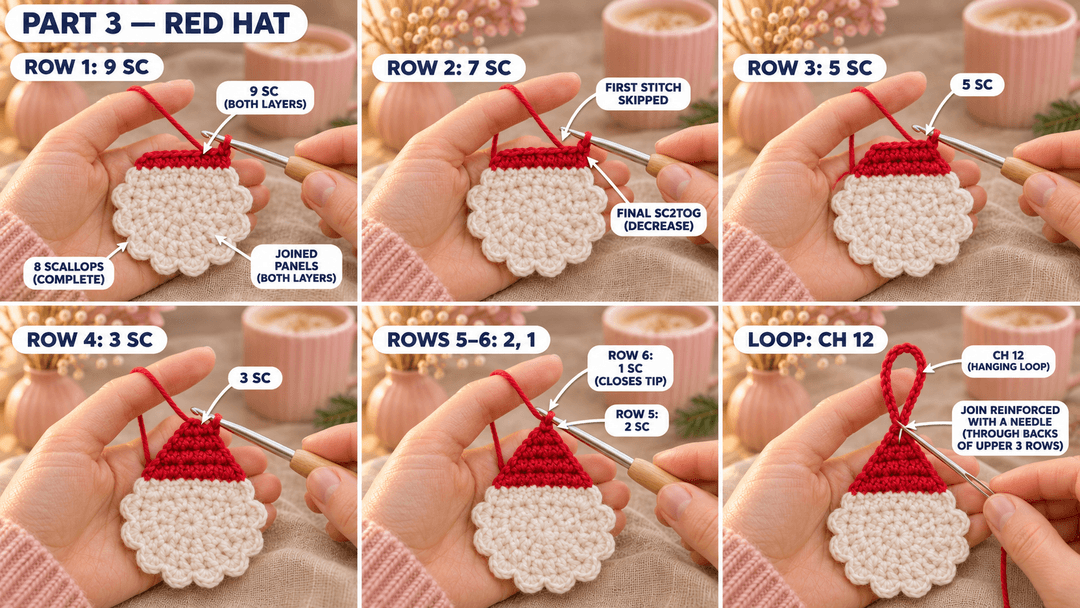
Red, 3 mm hook. Make 1, worked directly onto the upper edge. Start at the last white join, pair 17. The first row is the bottom of the hat; the last row becomes its tip.
Attach red through pair 17. Work toward the starting marker across the upper edge, picking up both panel layers. Include the marked starting pair at the other end.
- Row 1: ch 1, sc through pair 17, sc through each of pairs 18–24, sc through pair 1. (9)
- Row 2: ch 1, turn, skip the first st, sc in each of the next 6 sts, sc2tog. (7)
- Row 3: ch 1, turn, skip the first st, sc in each of the next 4 sts, sc2tog. (5)
- Row 4: ch 1, turn, skip the first st, sc in each of the next 2 sts, sc2tog. (3)
- Row 5: ch 1, turn, sc in the first st, sc2tog. (2)
- Row 6: ch 1, turn, sc2tog. (1)
For Rows 2–4, the skipped first stitch narrows one side and the sc2tog narrows the other. At Row 5, work into the first stitch. The final two rows bring the tip together.
At the tip, ch 12. Sl st back into the stitch directly beneath the chain to close the hanging loop. Ch 1 and fasten off with a 12 in (30 cm) tail. With that tail, take 10 small reinforcing stitches through the loop join and the backs of the upper three hat rows, then weave in the end. Hang it gently by the loop; reinforce the join again if it loosens.
Santa’s white whiskers and red nose
White whiskers
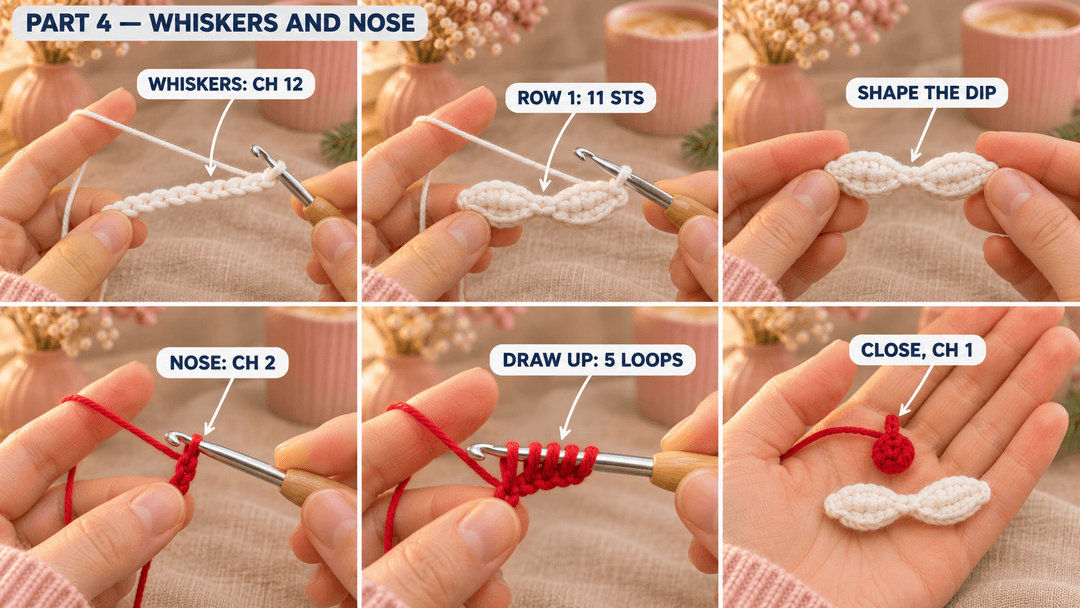
White, 3 mm hook. Make 1. Ch 12. Work along one side of the chain, beginning in the second chain from the hook.
- Row 1: sc in the 2nd ch from the hook, hdc in the next ch, dc in each of the next 2 ch, hdc in the next ch, sc in the next ch, sl st in the next ch, sc in the next ch, dc in each of the next 2 ch, sc in the last ch. (11)
Sl st into the same last chain, ch 1 and fasten off with a 6 in (15 cm) tail. Hide the ends on the back. Shape the strip gently with your fingers, with its shallow middle dip ready to sit beneath the nose.
Red nose
Red, 3 mm hook. Make 1. Leave a 6 in (15 cm) starting tail and ch 2. Use the second chain from the hook for a small, two-draw-up puff.
- Yarn over, insert the hook into the second chain from the hook, yarn over and pull up a loop. Three loops sit on the hook.
- Yarn over, insert the hook into that same chain again, yarn over and pull up a loop. Five loops sit on the hook.
- Yarn over and draw through all five loops. Ch 1 to secure the puff.
- Fasten off with a 6 in (15 cm) tail.
Tie the two ends together behind the nose and weave them into the back before trimming. Keep the gathered side facing forward when attaching it.
Adding the face and finishing the ornament
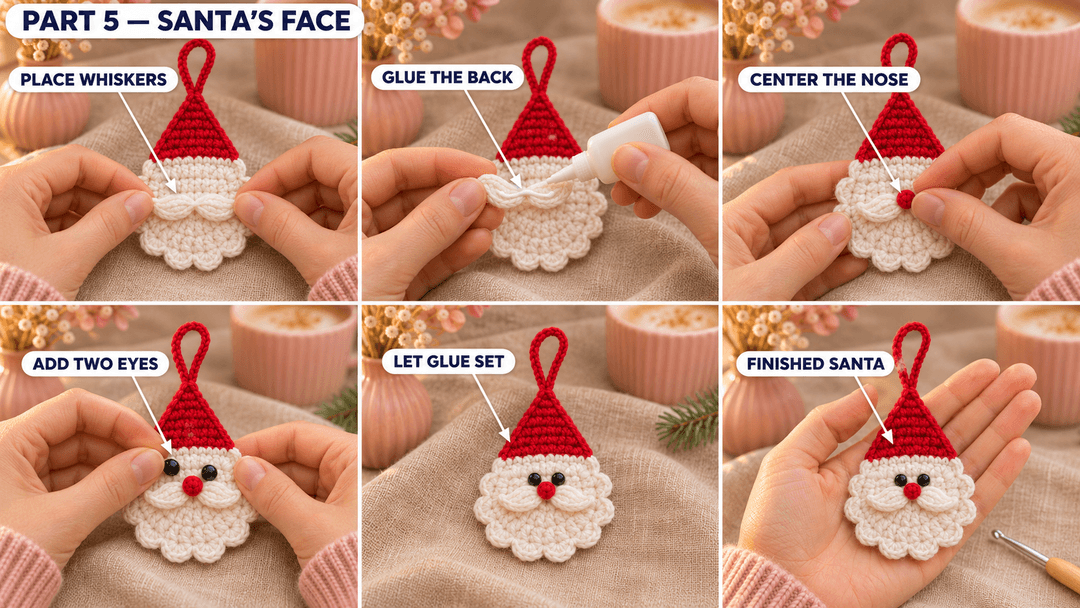
Lay Santa face up with his hat pointing away from you. Arrange the white whiskers across the face, with the middle dip centered beneath the hat. Put glue on the back of the whiskers and press them into place.
Glue the red nose over the dip in the whiskers. Set an eye just above it on each side, then hold Santa at arm’s length. When you like his expression, press the eyes down and let the glue set according to its directions.
Safety. With glued eyes and a hanging loop, this Santa belongs on display, out of reach of children under three. Embroidered eyes are an alternative to the plastic pieces; keep the finished ornament for decoration.
A little Santa for the Christmas tree
I like this little face against a dark green branch, where the white beard catches the light. Slip the red loop over the end of a twig and turn Santa toward the room. He also makes a cheerful finishing touch tied around a wrapped Christmas gift.
UK terms: US sc = UK dc, US hdc = UK htr, and US dc = UK tr.
Made a Santa ornament? Tag #wavodecrochet on Pinterest so I can see it.
Questions? Email me at support@wavode.com.