Crochet Star Amigurumi

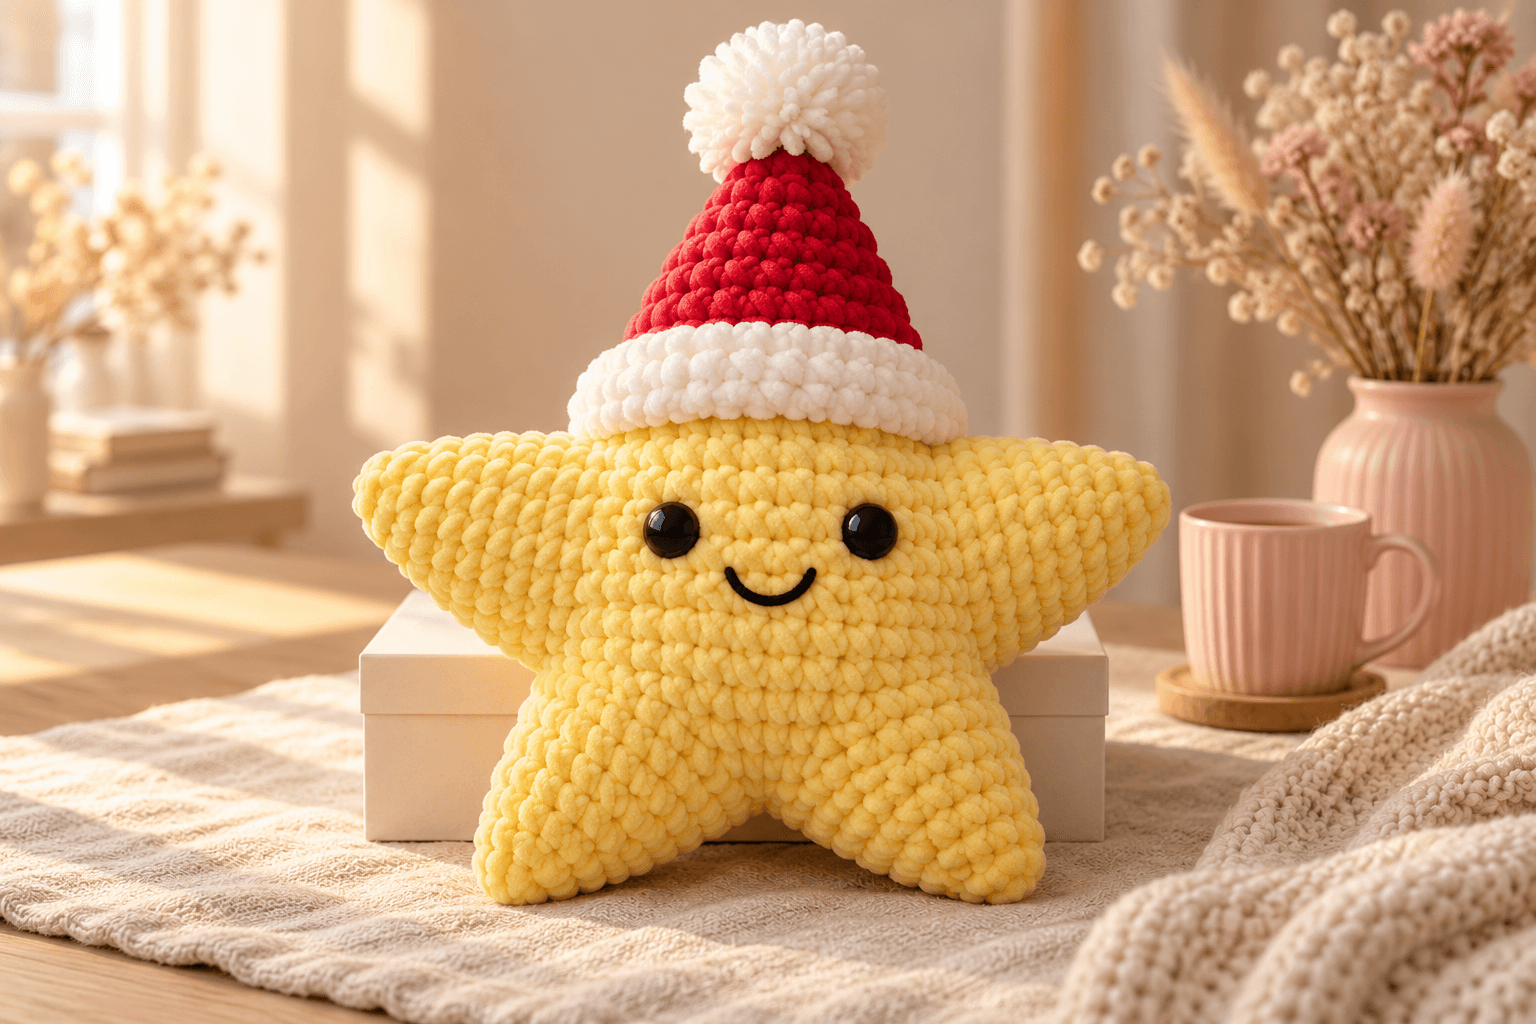
My first stuffed star looked like a yellow cushion. I'd pushed filling right into the valleys between the points, and the whole shape went round. Sunny is the star I made next. This crochet star amigurumi is about 13–14 in (33–36 cm) across, with five plump yellow points, two shiny eyes, a little stitched smile and a red Santa hat. His middle is only softly padded, so the points stay points.
He's made in super bulky chenille, which is squishy, quick and very forgiving. Each point is crocheted on its own, from the tip down, and every point has its own marked place on the front and back panels, so you always know where it goes. And because his face goes on while the front panel is still flat, setting the eyes is easy.
| At a glance | |
|---|---|
| Finished size | about 13–14 in (33–36 cm) across; 17 in (43 cm) tall with the hat and pompom |
| Yarn | super bulky #6 polyester chenille in yellow, red and white; white worsted for the pompom |
| Hook | 5 mm (H/8), for every crocheted piece |
| Pieces | 9: 8 crocheted pieces and 1 yarn pompom |
| Time | about 4–5 hours |
| Skill | intermediate: spiral rounds, increases, joining numbered edges and simple embroidery |
Yellow chenille, a red Santa hat and the supplies you'll need
- Chenille: super bulky #6 polyester chenille, about 131 yd (120 m) per 100 g ball, like Premier Parfait Chunky, in yellow, red and white. Sunny takes about 140 yd yellow, 20 yd red and 15 yd white. That's a little more than you need, so you won't run short on the last point: buy two balls of yellow.
- Pompom yarn: about 30 yd white worsted #4 acrylic. Smooth yarn makes a fluffier pompom than chenille.
- Sewing yarn: about 5 yd smooth yellow worsted and about 1 yd each of smooth red and white, plus a little black worsted for the smile. Smooth yarn in the same colors sinks into the chenille pile, so the seams disappear.
- Hook: 5 mm (H/8) for the panels, the points and the hat.
- Eyes: two 20 mm black safety eyes with their washers, or black yarn if you'd rather embroider them.
- Small things: polyester fiberfill, a tapestry needle, scissors, sewing pins, ten locking stitch markers, a scrap of contrasting yarn and a piece of stiff cardboard about 3½ in (9 cm) wide for the pompom.
Tension. I crochet this at about 2½ sc per inch (2.5 cm), snug enough that the stuffing doesn't peek through. At that tension Sunny comes out about 13–14 in (33–36 cm) across. Chenille varies a lot from brand to brand, so yours may come out a little bigger or smaller.
Stitches, in US terms: magic ring (MR), single crochet (sc), increase (inc: 2 sc in one stitch) and slip stitch (sl st). R means round; st means stitch. Everything is worked in a continuous spiral: put a marker in the first stitch and move it up each round. The number in parentheses is the stitch count at the end of the round.
Tip. Chenille can snap if you yank a magic ring shut. Pull it closed slowly. If it starts to fray, stop, run a strand of smooth yellow yarn through the first stitches and draw that closed instead.
Making the star’s two rounded center panels
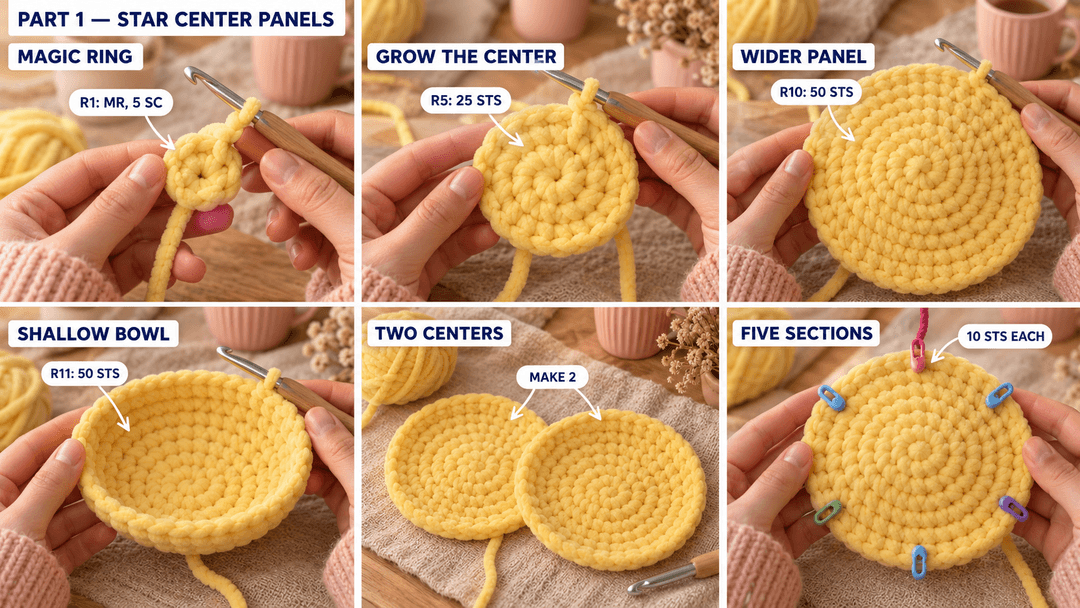
Center panels (yellow chenille, 5 mm hook, Make 2). The magic ring is the middle of the panel: on the front panel, it's the middle of Sunny's face. The last round is the outside edge, where the points will be sewn. Don't stuff the panels.
- R1: MR, 5 sc in the ring. (5)
- R2: inc × 5. (10)
- R3: (sc, inc) × 5. (15)
- R4: (sc 2, inc) × 5. (20)
- R5: (sc 3, inc) × 5. (25)
- R6: (sc 4, inc) × 5. (30)
- R7: (sc 5, inc) × 5. (35)
- R8: (sc 6, inc) × 5. (40)
- R9: (sc 7, inc) × 5. (45)
- R10: (sc 8, inc) × 5. (50)
- R11: sc around. (50)
Sl st in the next stitch and fasten off, leaving a 6 in (15 cm) tail, and weave it in on the wrong side. The plain last round makes each panel cup very slightly, like a saucer. That's what you want: don't press it flat.
Marking five equal sections
The edge of each panel is divided into five sections of ten stitches, one for each point. With the right side facing you, start at the first stitch of R11 and put a marker in stitches 1, 11, 21, 31 and 41:
| Panel section | R11 stitches | Point attached here |
|---|---|---|
| A | 1–10 | top, under the Santa hat |
| B | 11–20 | first side point |
| C | 21–30 | first lower point |
| D | 31–40 | second lower point |
| E | 41–50 | other side point |
On the front panel only, tie a scrap of yarn between stitches 5 and 6 of R11. That's the top of Sunny's head, right in the middle of section A. Leave it there until the hat is on.
When you hold the two panels back to back, the back panel runs the other way, like a mirror. A still meets A at the top, but front B meets back E, front C meets back D, front D meets back C, and front E meets back B.
Sunny's face: two black eyes and a little smile
Do this now, while the front panel is on its own and flat. Lay it right side up with section A at the top. The magic ring is the middle of the face.
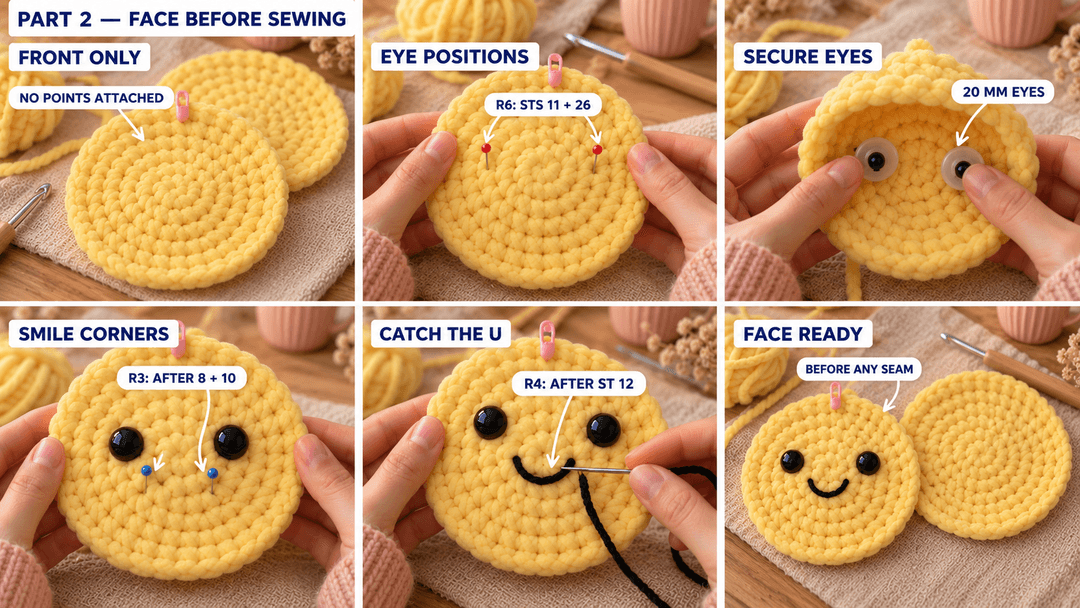
- Place the eyes. Find the first stitch of R6 and count around in the direction you crocheted. Pin one eye between R6 and R7 above stitch 11, and the other above stitch 26. They sit opposite each other, level, one on each side of the face.
- Fix the eyes. Look at the panel from a little distance: if the eyes look even, push the posts through and press the washers on firmly from the back of the panel.
- Mark the smile. Below the magic ring, put a pin on R3 just after stitch 8 and another just after stitch 10: those are the corners of the smile. Put a third pin on R4, between stitches 12 and 13, just under the middle.
- Stitch the smile. With black yarn, come up at one corner and go down at the other, leaving the strand a little loose so it curves. Then come up at the third pin, catch the loose strand and go back down right below it, so the curve becomes a U. Knot the ends on the back of the panel.
That's the whole face: Sunny has no nose and no cheeks. If you'd rather embroider the eyes, make five short vertical black stitches in each eye spot, between R6 and R7. Put the finished face aside and make the points.
Safety. With plastic eyes and a cut-yarn pompom, Sunny isn't a toy for children under three. For a little one, embroider the eyes, leave off the pompom and sew the hat down firmly.
Five tapered points for the Christmas star
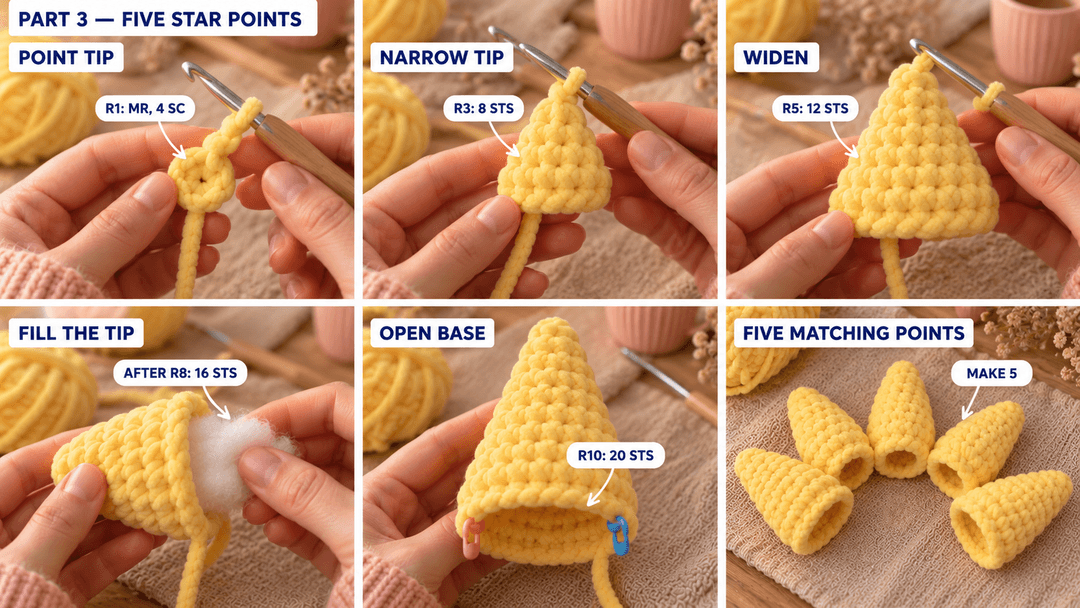
Points (yellow chenille, 5 mm hook, Make 5). The magic ring is the tip of the point. The last round is the wide, open base that gets sewn between the two panels. All five are the same.
- R1: MR, 4 sc in the ring. (4)
- R2: sc around. (4)
- R3: inc × 4. (8)
- R4: sc around. (8)
- R5: (sc, inc) × 4. (12)
- R6: sc around. (12)
- R7: (sc 2, inc) × 4. (16)
- R8: sc around. (16)
- R9: (sc 3, inc) × 4. (20)
- R10: sc around. (20)
After R8, push a little tuft of filling into the tip: it's much harder to reach later. After R10, add a bit more so the point is round, but keep the last two rounds only lightly filled, so the base stays soft and easy to sew. Sl st in the next stitch and fasten off, leaving a 6 in (15 cm) tail, and weave both tails into the inside.
The base of each point has 20 stitches: ten go to the front panel and ten to the back. Put one marker between stitches 20 and 1 and another between stitches 10 and 11, so you can see the two halves.
Putting Sunny together without losing the points
Sunny has no seam running around his middle: the five point bases fill the whole edge of the panels, side by side. Each point is sewn ten stitches to the front panel and ten to the back, with smooth yellow yarn, one whipstitch per stitch.
Sewing on the first four points
- Set up. Lay the front panel face down on the table, section A at the top. Lay the back panel on top of it, right side up, A at the top too. Spread the five points around the edge, open ends facing in.
- Top point, front half. Sew the first half of a point (stitches 1–10, between its two markers) to front section A, one stitch to one stitch.
- Top point, back half. Flip the star over and sew the other ten stitches of that point to back section A, working back toward where you started. The point now wraps the top edge like a little cap.
- Three more points. Sew the next three points the same way, to front B and back E, front C and back D, then front D and back C. Keep the fifth point aside.
- Close the valleys. Where two points meet, take three small stitches through both point corners and both panel edges, and pull just until the gap closes. Those little stitches are what keep the valleys sharp.
Stuffing and closing
Stuff the middle through the last open section, front E and back B. Push the filling out toward the bases of the points, then press Sunny gently between your palms. He should be plump but flatter than a ball, with a clear dip between every pair of points.
Sew the fifth point to front E with its first ten stitches, then to back B with the other ten, the same way as before. When four stitches are left, add a last tuft if he needs it and close the seam. Finish the last two valleys with three stitches each and hide the knots inside.
Tip. If a valley bulges, pull a little filling out before you close the last point. Tugging the seam tighter only puckers it; less filling brings the star shape back.
The red Santa hat with a white brim and pompom
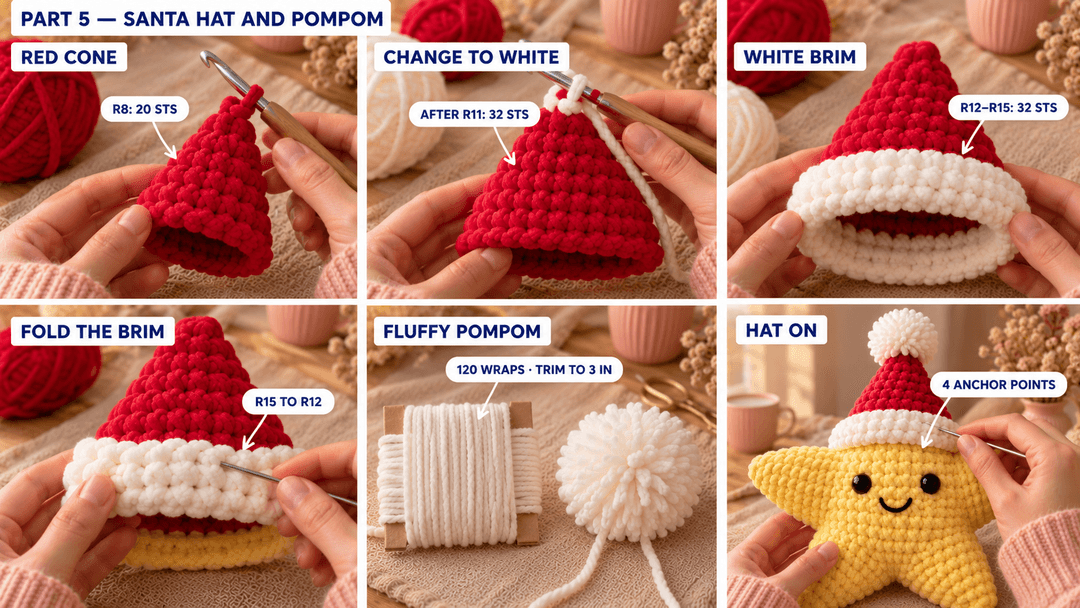
Hat (red, then white chenille, 5 mm hook, Make 1). The magic ring is the tip, where the pompom goes. The last round is the brim. The hat stays empty: it slides over Sunny's top point.
- R1: MR, 4 sc in the ring. (4)
- R2: inc × 4. (8)
- R3: sc around. (8)
- R4: (sc, inc) × 4. (12)
- R5: sc around. (12)
- R6: (sc 2, inc) × 4. (16)
- R7: sc around. (16)
- R8: (sc 3, inc) × 4. (20)
- R9: (sc 4, inc) × 4. (24)
- R10: (sc 5, inc) × 4. (28)
- R11: (sc 6, inc) × 4. (32)
Change to white in the last stitch of R11: work it until two red loops are left on the hook, then finish it with white. Cut the red, leaving a 6 in (15 cm) tail, and tie the ends inside.
- R12–R15: sc around. (32) 4 rounds: the brim.
Sl st in the next stitch and fasten off with a 6 in (15 cm) tail, then weave it inside. Fold the last two white rounds up over the first two, so the edge of R15 lies next to R12, and you get a thick double brim. Tack it in place with smooth white yarn at stitches 1, 9, 17 and 25, through the two white layers only.
A fluffy white pompom
Pompom (white worsted, Make 1). Wrap the yarn 120 times around the 3½ in (9 cm) piece of cardboard. Slide the bundle off and tie it tightly around the middle with a separate 12 in (30 cm) strand, using a double knot. Keep the two ends of that strand long.
Cut through the loops on both sides, fluff the strands out and trim them into a ball about 3 in (7.5 cm) across, taking care not to cut the long tying ends. Thread those two ends through the tip of the hat, one on each side of the magic ring, and knot them together inside. Sew back through the tip twice, give the pompom a gentle tug to check it's secure, and brush off the loose fluff.
Putting on the hat
Slide the hat over Sunny's top point, with the color change at the back. The white brim sits at the base of the point and overlaps the top of both panels, just above his eyes. Pin it before you sew, and check the pompom stands up straight.
Sew the brim down with smooth white yarn in four places: at the front and back, take three small stitches from under the brim into the panel between R8 and R9, at the center of section A (on the scrap-yarn line at the front). At each side, take three stitches into the corner of the top point, just above its seam. Working from under the brim keeps the stitches hidden in the white pile.
Take out the scrap yarn and all the markers. Check that the brim doesn't cover the eyes and that no sewing strand crosses the smile.
A Christmas star tucked beside the presents
Sunny can stand on his two lower points, but he's happiest leaning on something: a wrapped present, a small cushion, the side of the sofa. I like him against plain red paper with a sprig of pine.
If he's a gift, give him a shallow box with tissue paper around the points rather than a narrow bag, so the brim and pompom keep their shape. And if you'd like company for him on the shelf, Nutmeg the gingerbread man wears a Santa hat too.
UK terms: sc = UK dc; sl st = UK ss. The stitch counts stay the same.
Made your own Sunny? Tag #wavodecrochet on Pinterest so I can see him.
You might also like