Crochet Penguin Keychain

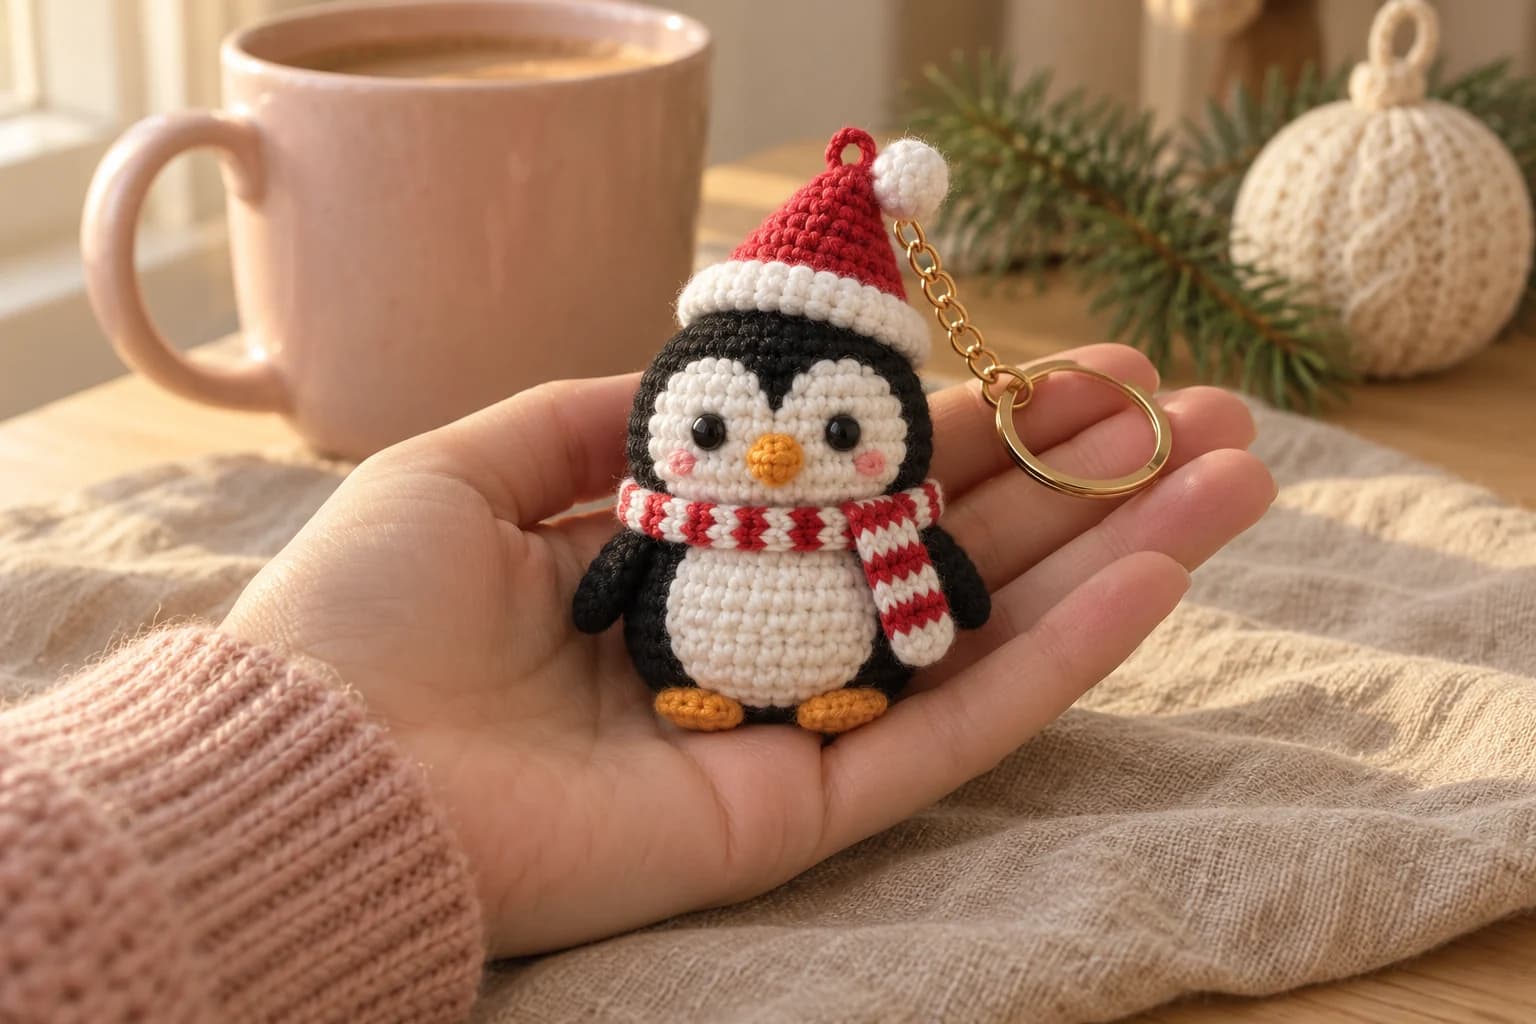
A penguin's face is the hard part. Most mini penguins I've tried ask you to change color in the middle of a round to draw the white mask, and at this size the jogs show. This one cheats: the face is two little white circles sewn side by side, and the safety eyes go straight through their centers. The heart shape at the top comes for free, and both eyes end up exactly where they should.
The body bulges out into a round tummy and narrows again at the neck, right where the scarf sits. The rest is a cozy little Christmas outfit: a red Santa hat with a puffy white brim and pompom, and a red and white striped scarf with one end hanging down. The key ring hangs from the tip of the hat, so the penguin dangles upright, face forward.
| At a glance | |
|---|---|
| Finished size | about 4 in (10 cm) tall to the pompom, 2¼ in (6 cm) wide across the flippers |
| Yarn | DK #3 cotton in black, white, red, orange and a little pink |
| Hook | 2.5 mm |
| Pieces | 13, and most of them take five minutes |
| Time | about 2½ hours |
| Skill | easy: magic ring, sc, inc, dec, flat rows for the scarf |
Why his face is two little white circles
Look at a real penguin from the front and the white of the face dips down in the middle, between the eyes. Two circles of 12 sts, side by side, make exactly that shape. Where they meet at the top, there's a little black notch; where they meet at the bottom, the beak covers the join.
The other trick is the eyes. Each circle starts with a magic ring, so it has a tiny hole right in its center. Push the post of a safety eye through that hole and into the head, and the eye is centered in its circle without measuring anything. The washer then locks the circle in place too, so the sewing afterwards is only to keep the edges flat.
Yarn, eyes and the keychain bits
- Yarn: DK #3 cotton. I like Paintbox Yarns Cotton DK: the black is a true black, and the stitches stay crisp at this size. By my estimate from the stitch count, with tails for sewing: about 30 yd of black, 14 yd of white, 9 yd of red, 2 yd of orange and 1 yd of pink. Pink scraps are only for the cheeks; any soft rose works.
- Hook: 2.5 mm, small for DK on purpose, so the fabric is firm and the stuffing doesn't show.
- Eyes: two 6 mm black safety eyes with their washers.
- Keychain: a split key ring with a short chain (gold or silver) and an open jump ring of about 7 mm, plus two pairs of flat pliers.
- Small things: fiberfill, 2 stitch markers, a few sewing pins, a tapestry needle and scissors.
Tension. Aim for about 6 sc per inch (2.5 cm), tight enough that the stuffing doesn't show between the stitches, with rounds about as tall as the stitches are wide (about 6 rounds per inch). At that tension the body comes out about 2 in (5 cm) wide and 2½ in (6.5 cm) tall without the hat, and the whole penguin about 4 in (10 cm) to the top of the pompom. Those sizes are estimates from the counts, so measure yours.
Stitches (US terms): magic ring (MR), chain (ch), slip stitch (sl st), single crochet (sc), increase (inc, 2 sc in the same st), decrease (dec, sc 2 together; I use the invisible decrease, through the front loops only), back loop only (BLO), front loop only (FLO). R stands for round, st for stitch. Every piece in the round is a continuous spiral: don't join, and move your marker up at the start of each round. The number in parentheses is the stitch count.
Making the little pieces first
Get the small pieces out of the way first: the face circles have to be ready before the head closes. Leave every tail long; you'll sew with them.
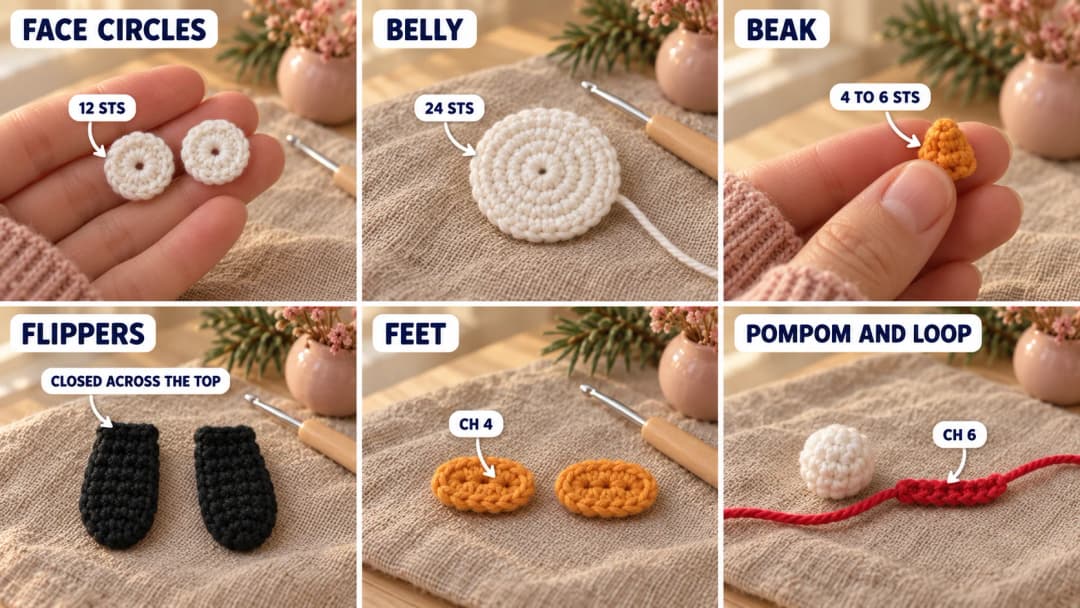
Face circles (white, Make 2).
- R1: MR, 6 sc in the ring. (6)
- R2: inc × 6. (12)
Sl st in the next st and fasten off, leaving a 10 in (25 cm) tail. Pull the ring closed, but not so hard that the little hole in the center disappears: the eye post goes through it.
Belly (white, Make 1).
- R1: MR, 6 sc in the ring. (6)
- R2: inc × 6. (12)
- R3: (sc, inc) × 6. (18)
- R4: (sc 2, inc) × 6. (24)
Sl st in the next st and fasten off, leaving an 18 in (45 cm) tail. Pull the ring closed tight. It's a flat circle about 1⅓ in (3.5 cm) across, big enough to cover most of the tummy.
Beak (orange, Make 1).
- R1: MR, 4 sc in the ring. (4)
- R2: (sc, inc) × 2. (6)
Fasten off, leaving an 8 in (20 cm) tail. Don't stuff it: it's a tiny cone that keeps its shape on its own.
Flippers (black, Make 2).
- R1: MR, 4 sc in the ring. (4) This is the tip of the flipper.
- R2: (sc, inc) × 2. (6)
- R3: (sc 2, inc) × 2. (8)
- R4–R7: sc around. (8)
- R8: flatten the opening and sc 4 through both layers. (4)
Fasten off, leaving a 10 in (25 cm) tail. Don't stuff them. Each flipper is a flat paddle about 1¼ in (3 cm) long, closed along the top edge.
Feet (orange, Make 2). Ch 4.
- R1: sc in the 2nd ch from the hook, sc in the next ch, 3 sc in the last ch, then along the other side of the chain, sc in the next ch and 2 sc in the last ch. (8)
The last 2 sc go in the same ch as the very first sc. Sl st in the first sc and fasten off, leaving an 8 in (20 cm) tail. Each foot is a little flat oval.
Pompom (white, Make 1).
- R1: MR, 6 sc in the ring. (6)
- R2: (sc, inc) × 3. (9)
- R3: sc around. (9)
- R4: (sc, dec) × 3. (6)
Push the starting tail inside as stuffing. Fasten off, leaving an 8 in (20 cm) tail, and pass it through the front loop of each of the 6 sts, then pull tight to close. Keep that tail for sewing.
Key loop (red, Make 1). Leave an 8 in (20 cm) starting tail, ch 6, and fasten off, leaving a second 8 in (20 cm) tail. Don't join it into a ring: both tails go into the hat in Part 4.
The black body, from a flat base to the crown
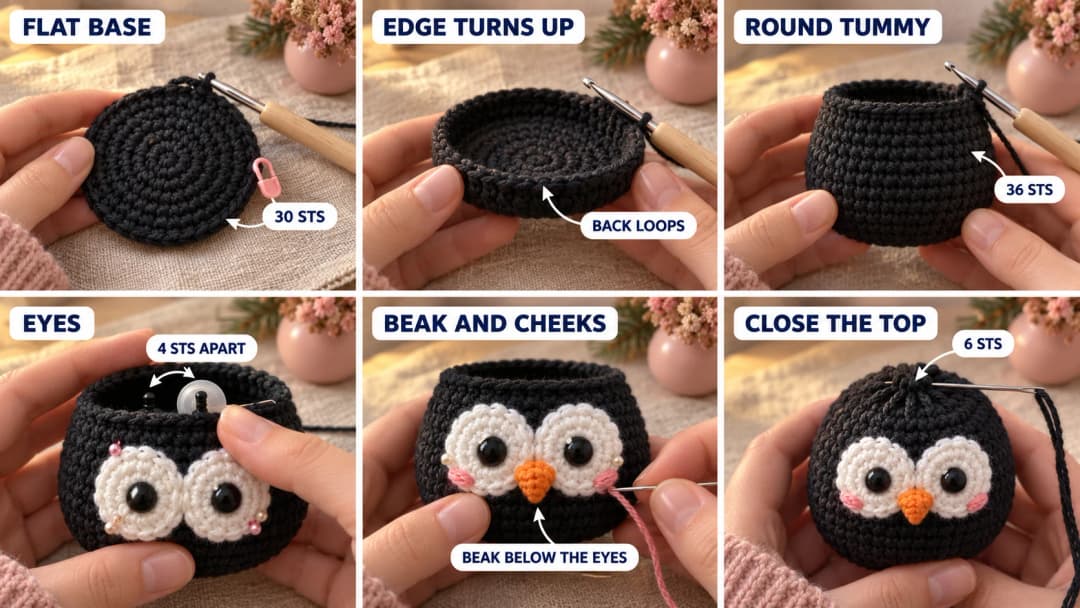
Make 1, in black. The body and head are one piece. The magic ring is the middle of the flat base he stands on, and the last round closes at the crown, under the hat, so the closing never shows. The little step where the rounds meet is the back of the penguin.
- R1: MR, 6 sc in the ring. (6)
- R2: inc × 6. (12)
- R3: (sc, inc) × 6. (18)
- R4: (sc 2, inc) × 6. (24)
- R5: (sc 3, inc) × 6. (30) The base is a flat disc.
- R6: in BLO, sc around. (30) The edge turns up sharply, so he stands on a flat base.
- R7: (sc 4, inc) × 6. (36) The tummy starts to round out.
- R8–R13: sc around. (36) 6 rounds: the round tummy.
- R14: (sc 4, dec) × 6. (30) The neck: the scarf sits on this round.
- R15–R18: sc around. (30) 4 rounds for the face.
Don't fasten off. Slip the live loop onto a second marker so it can't unravel.
Setting the face while the head is still open
The body is an open cup, and you can reach the inside with your fingers. Start every thread on the inside and come back in through the opening.
- Find center front. Count 15 sts along R16 from the last st of the round (the back) and put a pin in the 15th st. That's center front. Every placement on the penguin starts from this pin.
- Face circles and eyes. Push the post of a safety eye through the center hole of a face circle, from the right side. Then push it into the body between R16 and R17, 2 sts to the left of the pin. Do the same with the second circle, 2 sts to the right of the pin. That leaves 4 sts between the two posts, so the two circles just meet at center front. Before you lock anything, pin the circles edge to edge at the middle: if your circles came out a little smaller or bigger, move both posts by the same amount until the edges touch. Check from the front that the eyes are level, then push the washers onto the posts from the inside until they click.
- Sew the circles flat. With each circle's white tail, whipstitch its edge to the body, one small stitch in each of its 12 sts, then knot the tail inside. Each circle covers R15 to R18, so the tops reach the edge of the opening: that's fine, the hat brim will sit right there.
- Beak. Pin the beak on R15, centered on the pin, where the two circles meet at the bottom, open end against the face. Sew it on with 6 small whipstitches around its opening and knot the tail inside.
- Cheeks. With pink, make a short straight stitch over 1 st on R15, 4 sts to the left of the pin, then a second one right on top of it so it's a little plump. Repeat 4 sts to the right of the pin. They sit on the lower outer edge of each circle, below and outside the eyes.
Pull every thread just snug: tight stitches pucker the face.
Tip. If an eye leans, the circle probably moved before the washer went on. Safety eyes can't come out once they click, so pin both circles first and look at the face from arm's length before you lock anything.
Closing the crown
Put the live loop back on your hook.
- R19: (sc 3, dec) × 6. (24)
- R20: (sc 2, dec) × 6. (18)
Stuff the body now, firmly, pushing the fiberfill down into the base and out into the round tummy, so he stands up straight. Press the base flat on the table with your palm.
- R21: (sc, dec) × 6. (12) Top up the stuffing.
- R22: dec × 6. (6)
Fasten off, leaving a 6 in (15 cm) tail. Pass it through the front loop of each of the 6 sts and pull tight to close. Push the needle into the center and out through the back, pull a little so the end sinks inside, and trim.
Belly, flippers and feet
Everything here is sewn on the outside. To hide each end, knot it against the body, push the needle in next to the knot and out somewhere else, pull until the knot pops inside, and trim.
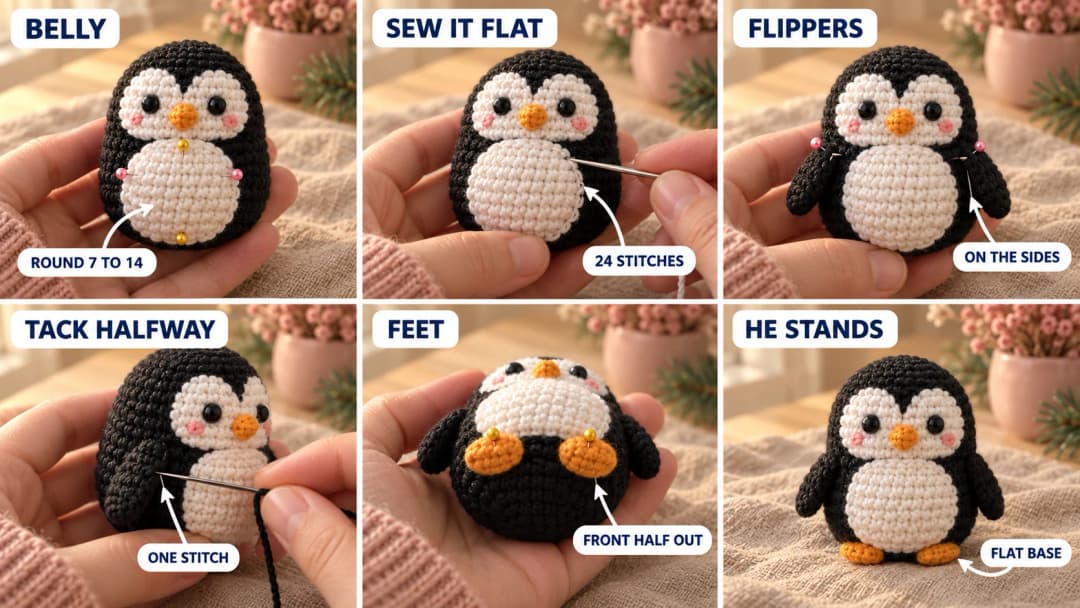
- Belly. Pin the white circle on center front, its bottom edge on R7 and its top edge on R14, right side out, so it covers the round of the tummy. With its tail, whipstitch it all around, one small stitch in each of its 24 sts.
- Flippers. Hold each flipper with its closed edge at the top and the tip pointing down. Pin one on each side, closed edge on R14, 8 sts from the pin, so it sits right on the side, well clear of the belly. Sew along the closed edge with 6 small whipstitches. Then take one stitch through the inner side of the flipper, about halfway down, into the body. That holds it close but lets the tip angle out a little, like little arms.
- Feet. Turn him over. Pin each foot flat on the underside of the base, long side pointing forward, 3 sts to the left and 3 sts to the right of center front (count along R6, straight below the pin), so the front half of each foot sticks out past the edge of R6. Sew the back half of each foot to R5 with 5 small stitches.
Stand him up: he should sit on the flat base and his feet should peek out at the front.
The Santa hat that carries the key ring
Make 1, in red and white. The hat is worked from the tip down.
- R1: MR, 6 sc in the ring. (6) Pull the ring closed tight: this is the tip.
- R2: (sc, inc) × 3. (9)
- R3: (sc 2, inc) × 3. (12)
- R4: (sc, inc) × 6. (18)
- R5: (sc 2, inc) × 6. (24)
- R6: (sc 3, inc) × 6. (30)
- R7: sc around. (30) Change to white in the last st.
- R8: (sc 4, inc) × 6. (36)
- R9: sc around. (36)
- R10: (sc 4, dec) × 6. (30) The white brim bulges out into a soft, puffy roll and comes back to 30 sts, the size of the head.
Sl st in the next st and fasten off, leaving a 24 in (60 cm) tail for sewing.
Changing color. Work the last sc of R7 until 2 loops are left on the hook, then finish it with white. Cut the red, leaving a 6 in (15 cm) tail, and tie the two tails together loosely inside the hat. The color change sits at the back of the hat.
Fix the key loop now, while the hat is empty. The penguin hangs from this loop, so it's anchored in the hat, not just knotted to it.
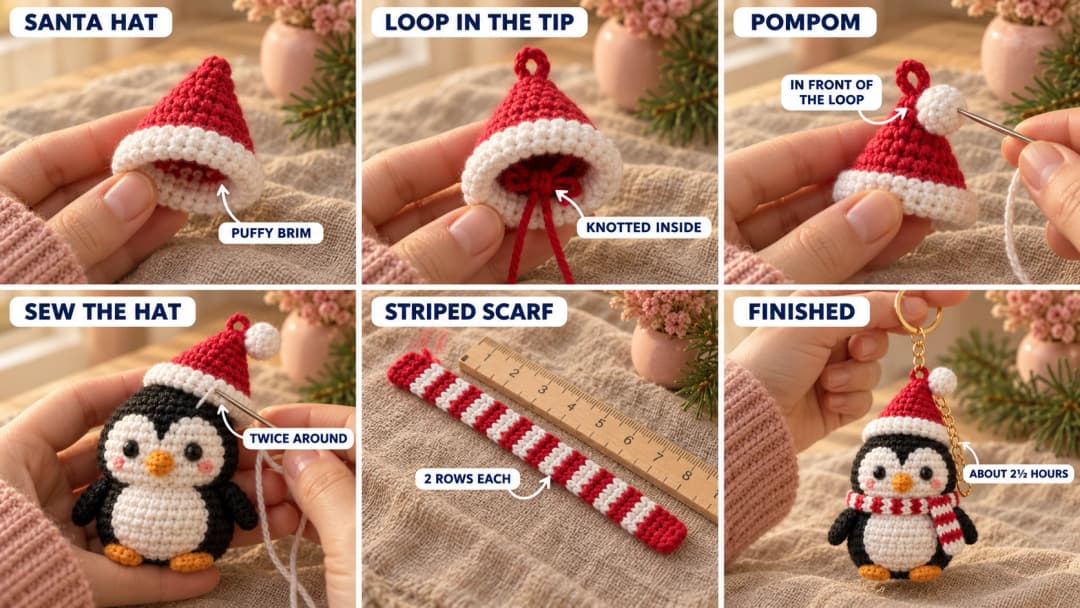
- Thread one tail of the red chain onto the needle and push it from the outside to the inside of the tip, between R1 and R2, just left of the magic ring, on the back of the hat. Do the same with the other tail just right of the ring. Inside, pull until only a short red loop stands above the tip, about ½ in (1.2 cm) tall, and tie the two tails in a tight double knot.
- With each tail in turn, sew 5 small stitches through the inside of R1 and R2, around the knot, catching only the inner half of the stitches. That's 10 small stitches in total. Trim the tails.
- Pompom. Hold the pompom on the very tip, just in front of the loop. With its tail, take 6 stitches through the pompom and the tip, then hide the end inside the hat.
Put a small tuft of stuffing into the tip of the hat so it holds its cone.
Sew the hat on. Slide the hat over the head with its color change at the back, lined up with the jog of the body. The bottom edge of the white brim sits along R18, just covering the top edge of the face circles. Pin it at the front, back and sides. With the white tail, whipstitch the last round of the brim to R18, one stitch in each of the 30 sts. Then go around a second time, deeper, another 30 stitches: the whole penguin will hang from this seam. Hide the end inside.
Hold him up by the loop and give it a few firm tugs. Cotton chain can stretch over time: if your loop gets longer, sew over it with a second red strand, from the tip to the top of the loop and back.
A red and white scarf, wrapped on last
Make 1, in red and white, worked in flat rows across its width.
With red, ch 3.
- Row 1: sc in the 2nd ch from the hook and in the next ch. (2)
- Rows 2–38: ch 1, turn, sc 2. (2)
Stripes. Work 2 rows in each color: rows 1 and 2 in red, rows 3 and 4 in white, rows 5 and 6 in red, and so on, until rows 37 and 38, in red. That's 19 stripes, 10 red and 9 white, with red at both ends. To change color, finish the last sc of the 2nd row of a stripe with the new color. Don't cut the yarn: carry the color you're not using up the same edge of the scarf, and keep that edge facing down when you wrap it.
Check the length before you fasten off. Wrap the scarf around the neck at R14: it should go around once and leave about ¾ in (2 cm) hanging at the front. Your tension decides this, so trust the try-on, not the row count. If it's short, add 2 rows; at this tension, each pair of rows is about ⅓ in (0.8 cm). Fasten off and weave in the ends.
Wrap it on. Lay one end on the front of the body, on R14, 2 sts to the right of the pin (on the right as you look at him), with the top edge of the scarf along the top of R14, just under the beak. Take the scarf around the back over the tops of the flippers, then back to the front, over the first end, and let the last end hang straight down over the belly at that same spot, on the right as you look at him. With a red strand, tack the scarf where the two ends cross with 3 small stitches, then take 4 more stitches around the back, through the scarf and into R14, so it can't ride up.
Hang it on your keys, or on the tree
Add the ring. A key ring with a chain usually ends in a small jump ring. Open it sideways with the pliers, twisting one end toward you and the other away (never pull the ends apart), slip it through the red loop, and twist it closed until the ends meet with no gap.
Hold him up by the ring: he hangs straight from the tip of his hat, face forward, with the scarf end swinging over his belly.
Safety. This keychain has a metal key ring and plastic safety eyes, so it isn't a toy for children under 3. For a little one, leave off the ring and the loop, and embroider the eyes with a few black straight stitches through the center of each face circle instead.
For the tree, skip the hardware and tie a 6 in (15 cm) length of thin red ribbon through the loop instead. I like to make three of them, one on keys, one on a bag zip and one on the tree, and tuck the extra two into stockings: they're exactly the right size.
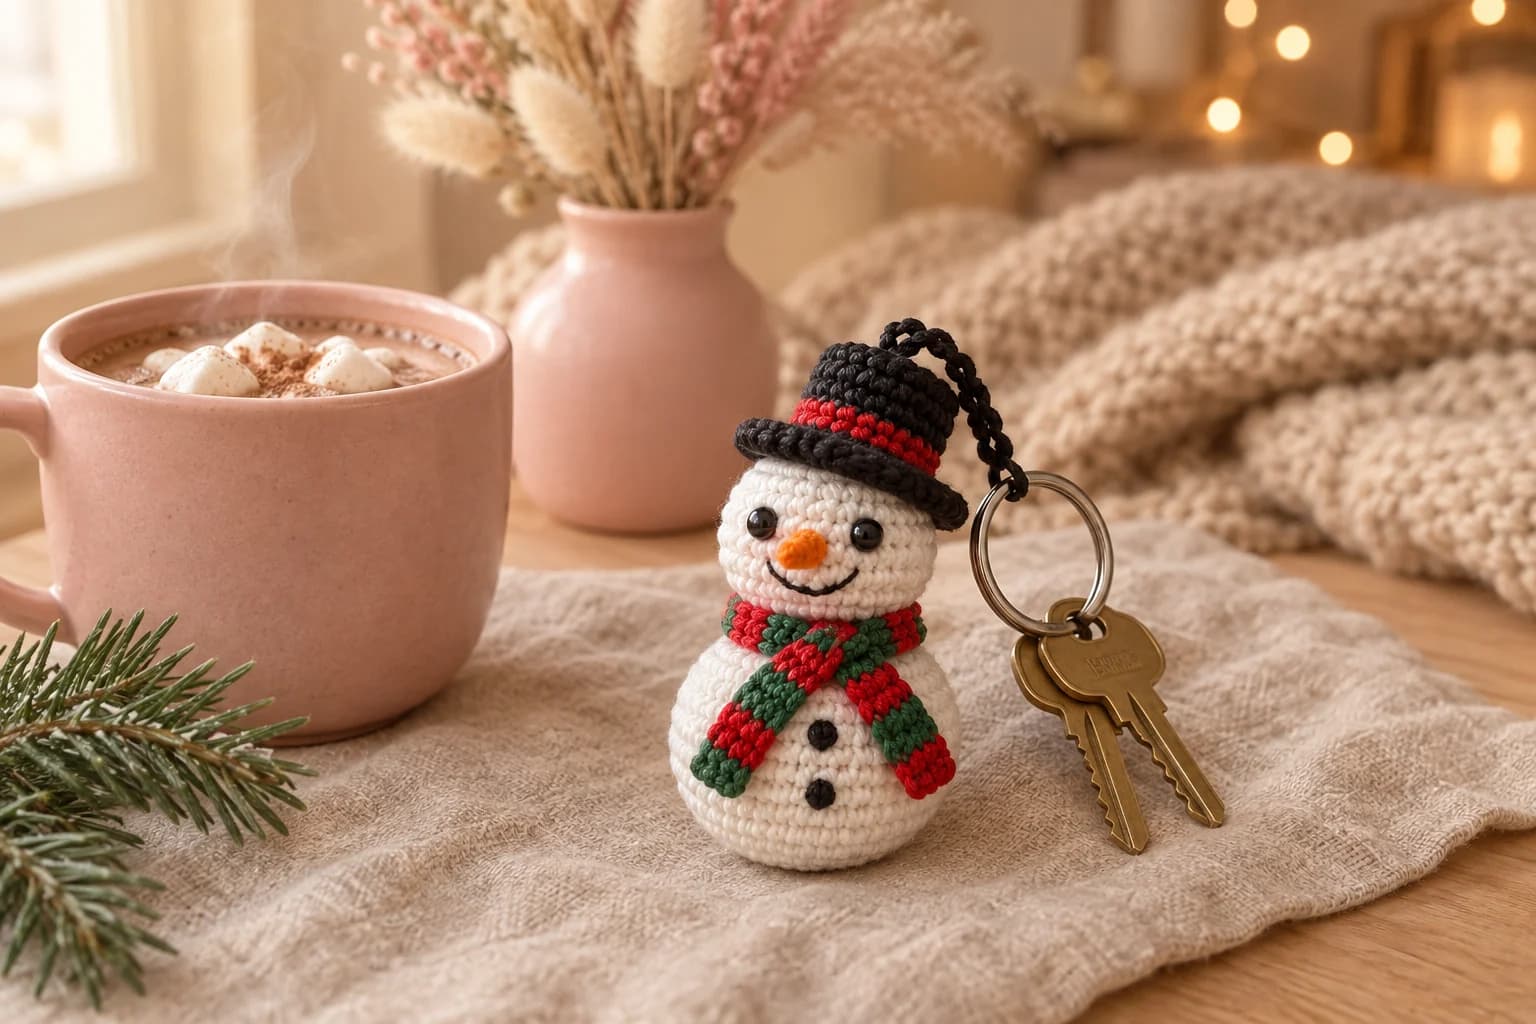
If you want a friend for him on the same ring, my snowman keychain wears a striped scarf too, and the two look lovely side by side.
Made a little penguin? Tag #wavodecrochet on Pinterest so I can see him.
Pattern by Clara Hartwell for Wavode. Questions? Email me at support@wavode.com.