Crochet Pom Pom Hat

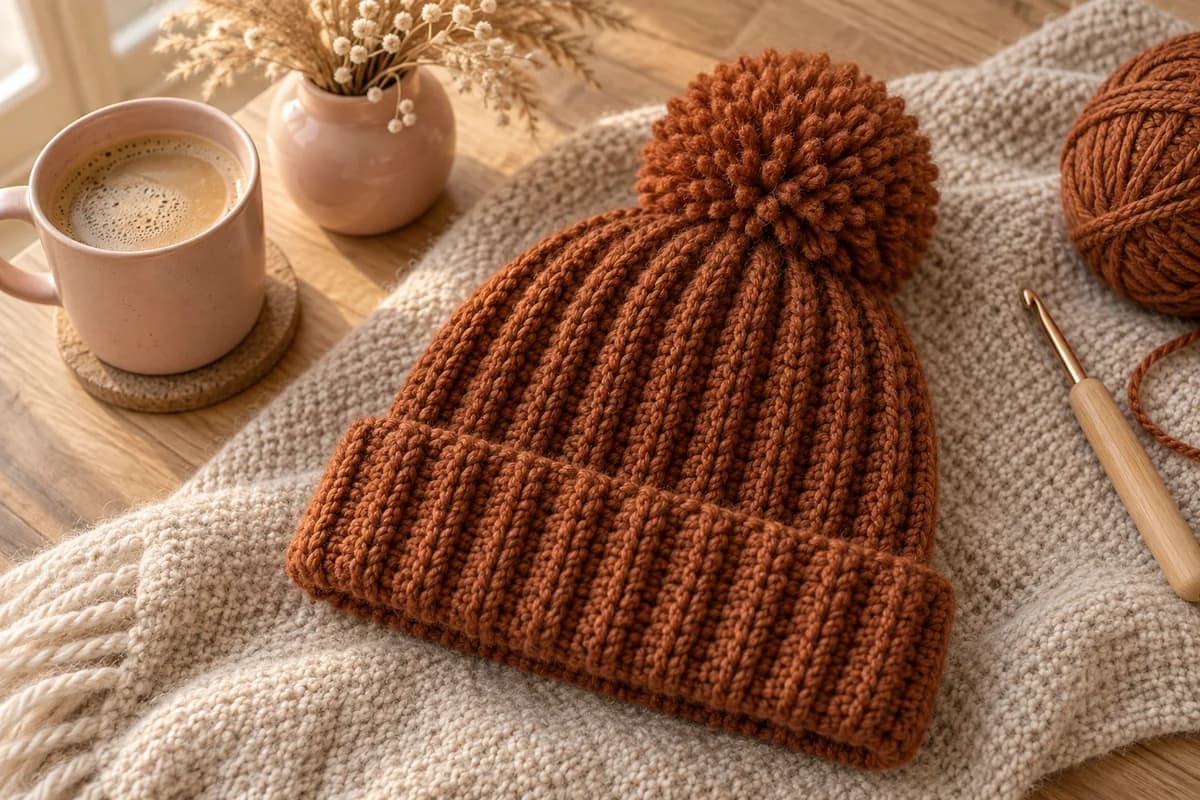
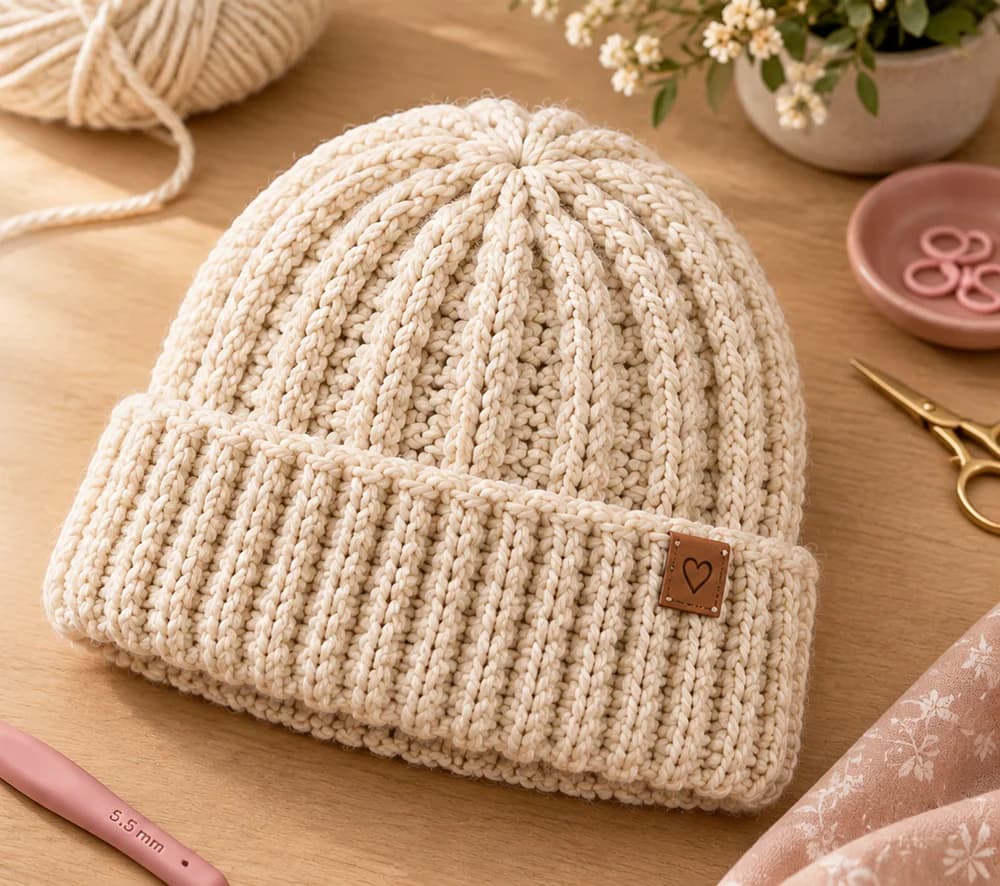
This free crochet pom pom hat pattern makes a warm ribbed beanie with a deep fold-up cuff and a big, fluffy pom-pom on top, in three adult sizes. It's worked from the brim up in joined rounds of front and back post double crochet, so there's no side seam to sew. You'll need about 220 yards of worsted #4 yarn, a 5.5 mm hook and a pom-pom maker, and it takes 3 to 4 hours.
Key Takeaways
- Two stitches make the whole hat: front post and back post double crochet, side by side.
- Worked in the round, no seam. You can try it on while you go.
- The ribs look the same on both sides, so the folded cuff shows ribs too.
- Budget 180–260 yd (165–240 m) of worsted #4, pom-pom included.
Why I love this pom-pom hat
This is my "grab it on the way out" hat. The ribs hug the head without squeezing, the cuff doubles the warmth over the ears, and the pom-pom makes it look finished in a way a plain beanie never does.
The trick is the post stitches. A front post double crochet pushes its stitch toward you, and a back post double crochet pushes it away. Put them side by side and you get raised columns that read like knit 1×1 ribbing. And because the rounds are joined, the columns run straight up from the cuff to the crown.
I also like that it's worked in the round. You can slip it on after a few rounds and check the fit, before you've made the whole thing. There's no rectangle to seam and no row ends to gather.
Skill level. Advanced beginner. If you can make a double crochet, you can learn post stitches in about ten minutes. The only new idea is where the hook goes, and I show you both below.
Do you prefer a seamed, knit-look version? My crochet ribbed beanie is worked flat and sideways in half double crochet. And for a colorful hat with no cuff, try my crochet striped beanie.
What you'll need
Yarn
- About 220 yd (200 m) of worsted #4 yarn in a warm rust or caramel brown. A smooth, plied wool blend shows the ribs best and makes a full, bouncy pom-pom. Lion Brand Wool-Ease (197 yd / 180 m per 85 g skein) is a good match. Buy 2 skeins for any size, from the same dye lot.
- By size, including the pom-pom, plan on 180–220 yd (S), 200–240 yd (M) and 220–260 yd (L).
- Fuzzy or splitty yarn hides the ribs and makes post stitches hard to see.
Hook and notions
- 5.5 mm (US I-9) hook.
- A 3.5 in (9 cm) pom-pom maker, or two cardboard rings cut 3.5 in across with a 1.25 in hole.
- 1 locking stitch marker.
- A tapestry needle and sharp scissors.
- Optional: a small faux-leather label and a sewing needle with matching thread.
Gauge
In the rib pattern: 14 sts × 8 rnds = 4 in (10 cm), relaxed.
To check it, make 20 fhdc (see below) and turn. Then work rows instead of rounds: ch 2, (FPdc, BPdc) across, turn, and repeat for 8 rows. Worked flat, the ribs switch sides every row, but the size is the same. Measure the middle 4 in without stretching.
If you have more than 14 sts, your hat will be too small, so go up to a 6 mm hook. If you have fewer, go down to 5 mm. Height is easy to fix later: add or skip a round before the crown.
Abbreviations (US crochet terms)
- ch = chain
- sl st = slip stitch
- st(s) = stitch(es)
- rnd(s) = round(s)
- fhdc = foundation half double crochet
- FPdc = front post double crochet
- BPdc = back post double crochet
- FPdc2tog / BPdc2tog = 2 post stitches worked together (a decrease)
Fhdc: Ch 3. Yarn over, insert the hook in the 3rd ch from the hook, pull up a loop, yarn over and pull through 1 loop (this is the "chain" at the bottom), yarn over and pull through all 3 loops. For the next one, yarn over and insert the hook under the 2 loops of that bottom chain, then repeat. Each fhdc makes its own chain and its stitch at the same time. It stretches, which a plain chain doesn't. That matters at a brim.
FPdc: Yarn over. Insert the hook from the front, around the back of the next stitch's post, and out to the front again. The post is the stitch's upright "leg". Yarn over, pull up a loop, then (yarn over, pull through 2) twice.
BPdc: Yarn over. Insert the hook from the back, around the front of the post, and out to the back again. Finish like a dc.
FPdc2tog: Yarn over, insert the hook around the post of the next st from the front, yarn over, pull up a loop, yarn over, pull through 2. Do the same around the following st. Yarn over and pull through all 3 loops.
BPdc2tog: The same as FPdc2tog, but go around both posts from the back.
UK crocheters: this pattern uses US terms. US double crochet = UK treble, and US half double crochet = UK half treble.
Sizes and finished measurements
Numbers are for S (M, L). If only one number is given, it's the same for all sizes.
| S | M | L | |
|---|---|---|---|
| Fits head | 20–21 in (51–53 cm) | 21.5–22.5 in (55–57 cm) | 23–24 in (58–61 cm) |
| Stitches around | 64 | 68 | 72 |
| Hat around, unstretched | 18.25 in (46 cm) | 19.5 in (49 cm) | 20.5 in (52 cm) |
| Height, cuff folded | about 8.5 in (21.5 cm) | about 9 in (23 cm) | about 9.5 in (24 cm) |
| Folded cuff | 3 in (7.5 cm) | 3 in (7.5 cm) | 3 in (7.5 cm) |
| Pom-pom | 3.5 in (9 cm) | 3.5 in (9 cm) | 3.5 in (9 cm) |
The hat is about 2–3 in smaller around than the head. That's on purpose. Ribs stretch, and that stretch is what keeps a beanie in place. Heights are without the pom-pom.
How the hat is built
Here's the whole hat in plain words.
- Round 1 is a ring of foundation half double crochet. It becomes the folded edge at the top of the cuff.
- Every round after that alternates one FPdc and one BPdc, always stacked on the same kind of stitch below. The columns line up into ribs.
- The first 3 in of ribs become the cuff, folded up and out. The rest is the body.
- Two decrease rounds halve the stitches twice. Then you gather the last stitches closed and tie on the pom-pom, which covers the crown.
Each rib pair (one FPdc + one BPdc) is 2 sts, and the decreases work in groups of 4. That's why every count here divides evenly.
The pattern — step by step
Don't turn at the end of the rounds: the right side faces you the whole time. The ch 2 at the start of a round doesn't count as a stitch. Work the first post stitch of each round around the stitch at the base of the ch 2, and join with a sl st into the top of that first post stitch.
Part 1 — The foundation ring
Leave a 6-in (15 cm) tail.
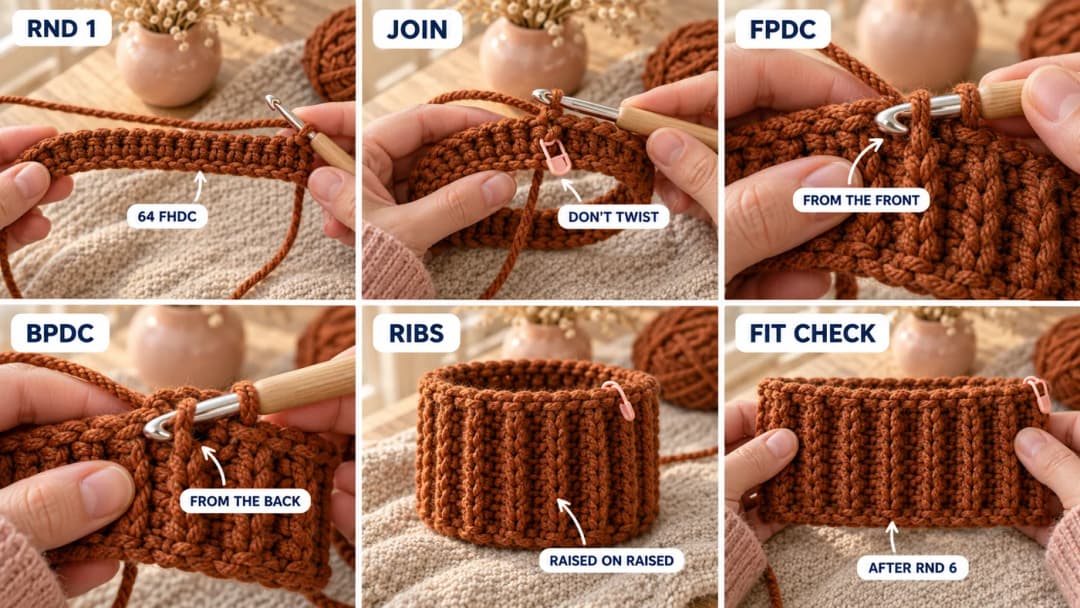
Rnd 1: Fhdc 64 (68, 72). Lay the strip flat and check that it isn't twisted: the bottom chains should all run along the same edge. Bring the two ends together and sl st into the top of the first fhdc to join. (64 (68, 72) sts)
Place the marker in the sl st. It marks the start of the round, which will sit at the center back of the hat.
No fhdc yet? Ch 64 (68, 72) with a 6.5 mm hook, so the edge doesn't pull in. Sl st into the first ch to make a ring, without twisting. Switch to the 5.5 mm hook, ch 2, hdc in the same ch and in each ch around, and sl st to the first hdc. You have the same 64 (68, 72) sts.
Part 2 — The ribs
Rnd 2: Ch 2. (FPdc around the next st, BPdc around the next st) 32 (34, 36) times in total. Sl st into the top of the first FPdc. (64 (68, 72) sts)
Rnd 3: Ch 2. (FPdc around the next FPdc, BPdc around the next BPdc) 32 (34, 36) times in total. Sl st into the top of the first FPdc. (64 (68, 72) sts)
How to see which is which: an FPdc stands out toward you like a raised column. A BPdc sinks back and you see its two top loops lying flat. So raised stitch gets a FPdc, sunken stitch gets a BPdc. If you ever put a FPdc on a sunken stitch, the rib breaks right there.
Rnds 4–21 (22, 23): Repeat Rnd 3. (64 (68, 72) sts in every rnd)
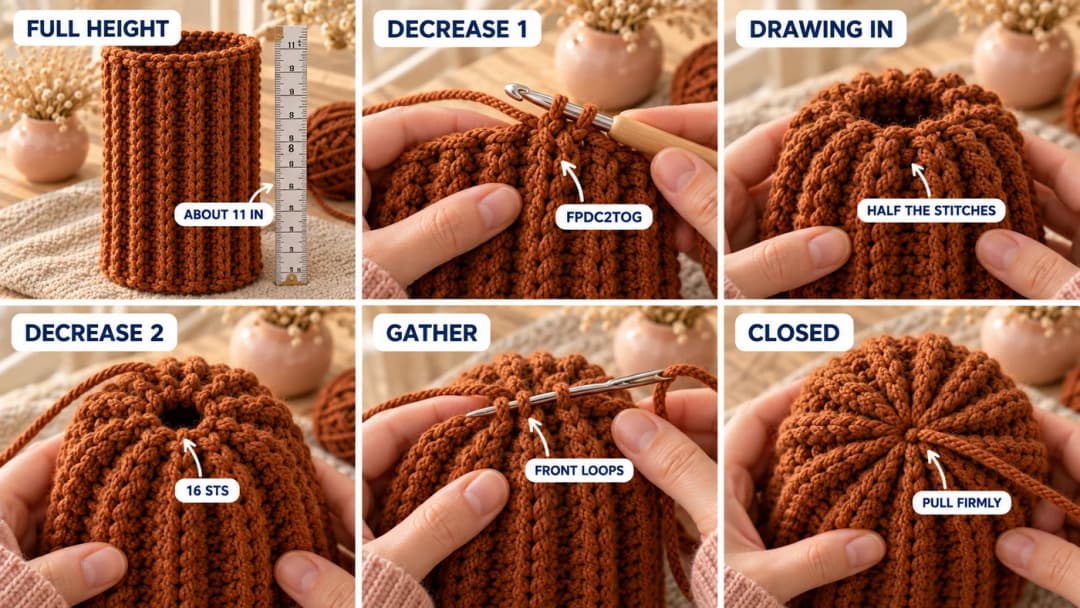
That's 20 (21, 22) rib rounds in all, and the tube is about 10.5 (11, 11.5) in tall from the foundation edge.
Check the fit after Rnd 6. At about 3 in tall, slip the tube over your head like a headband. It should stretch on easily and hug without pinching. Too tight? Restart with 4 more sts (68 → 72). Too loose? Restart with 4 fewer. Always change the count by 4, so the crown decreases still divide.
The join sits on a slight diagonal. Joined rounds always leave a faint seam line. Keeping the marker at the first FPdc of every round keeps it straight up the back.
Part 3 — The crown
Rnd 22 (23, 24), first decrease: Ch 2. (FPdc2tog over the next 2 sts, BPdc2tog over the next 2 sts) 16 (17, 18) times in total. Sl st into the top of the first FPdc2tog. (32 (34, 36) sts)
Each FPdc2tog goes around one raised stitch and one sunken one. The ribs merge two by two, and the top starts to draw in.
Rnd 23 (24, 25), second decrease: Ch 2. FPdc2tog over the next 2 sts, 16 (17, 18) times in total. Sl st into the top of the first FPdc2tog. (16 (17, 18) sts)
Fasten off, leaving a 12-in (30 cm) tail.
Gather the top:
- Thread the tail onto your tapestry needle.
- Weave it through the front loop of each of the last 16 (17, 18) sts, all the way around.
- Pull it firmly. The top closes like a drawstring bag.
- Go around a second time through the same sts and pull again. That closes the last little hole.
- Take the needle to the inside and knot it. Leave the tail for now: it helps anchor the pom-pom.
Part 4 — The pom-pom
A full, dense pom-pom needs 35–45 yd (32–41 m) of yarn. Skimping is what makes a pom-pom floppy.
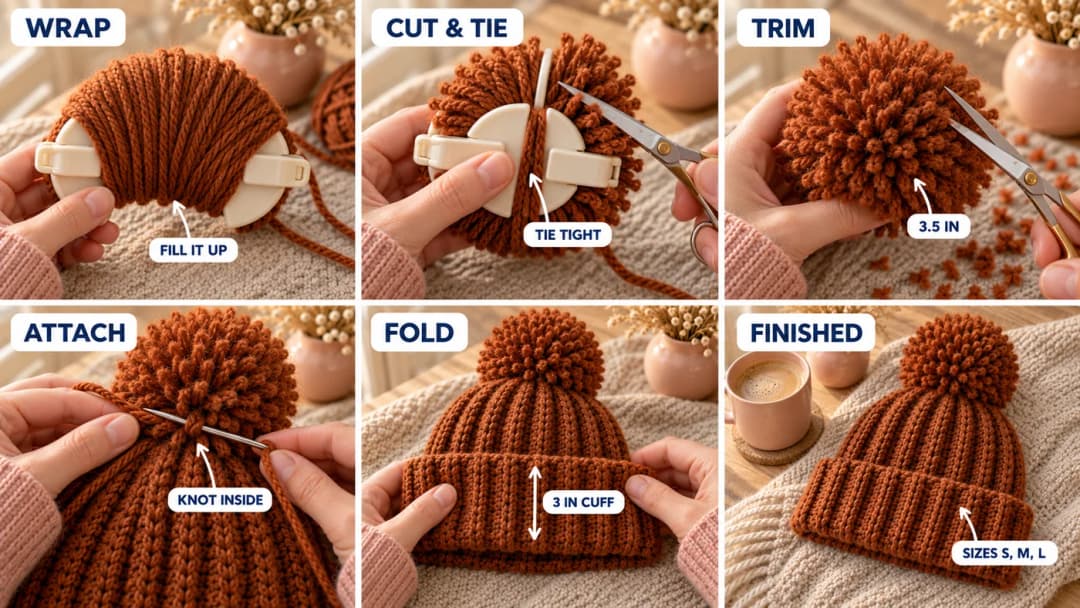
- Wrap the pom-pom maker (or both cardboard rings held together) until the hole is completely full, and then a little more. Keep the strands side by side, not crossed.
- Cut around the outer edge, between the two halves, with sharp scissors.
- Tie it tightly. Slide a 16-in (40 cm) strand between the halves, around the middle, and pull it as hard as you can. Knot it twice. Don't trim these two ends.
- Release the pom-pom and fluff it.
- Trim it round to about 3.5 in (9 cm). Turn it as you go and cut only the strands that stick out. It looks smaller after trimming, and that's the point: a trimmed pom-pom is dense.
Want it extra full? Hold the pom-pom over the steam of a kettle for a few seconds, at a safe distance, and roll it between your hands. The strands puff up and fill the gaps. Optional, and skip it with acrylic, which can go limp.
Part 5 — Attach the pom-pom and finish
- Thread one tie end onto the tapestry needle and pass it through the center of the gathered crown to the inside. Do the same with the second tie end, about 2 sts away.
- Pull the pom-pom down snug against the crown and knot the two ends together inside, three times.
- Knot them again with the crown tail, then weave all three ends through the gathered sts for 2 in and trim.
- Weave in the starting tail at the foundation edge, along the inside of a BPdc column.
- Fold up the cuff. Fold the first 3 in (about 6 rounds) up and out. Because a FPdc on one side is a BPdc on the other, the folded cuff shows the same ribs as the body.
- Optional: add a label. Sew a small faux-leather tag onto the front of the cuff with a sewing needle and thread, through the outer layer only, so it still folds.
Washing tip. If you'd rather wash the hat without the pom-pom, tie the two ends inside with a bow instead of knots. You can untie it, wash the hat, and tie it back on.
Make it yours — quick variations
| Variation | Change from base pattern |
|---|---|
| Slouchy | Work 4–6 more rib rounds before the crown. Add about 25 yd. |
| Shallow cuff | Work 2 fewer rib rounds and fold just 2 in. Saves about 15 yd. |
| No cuff | Work 6 fewer rib rounds and don't fold. It's a single layer, so it's less warm over the ears. |
| Wider ribs (2×2) | Work (FPdc, FPdc, BPdc, BPdc) around. Every count here is a multiple of 4, so it divides. Decrease the same way. |
| Two-tone | Work Rnds 1–6 in a second color for a contrast cuff, and make the pom-pom in that color too. |
| Faux-fur pom-pom | Skip Part 4 and sew on a 4-in faux-fur pom-pom with a snap. Take it off to wash. Saves about 40 yd. |
Troubleshooting the three things that go wrong
The ribs zigzag instead of running straight
A FPdc landed on a sunken stitch, or a stitch got skipped right after the join. Count your sts at the end of every round. Then check that the first stitch of each round is a FPdc around the raised stitch at the base of the ch 2.
The hat is too short or too long
Height is the easiest thing to change. Before you start the crown, try the tube on with the cuff folded. It should reach the top of your head with the cuff over your ears. Add or skip rib rounds until it does, and the crown adds about 1 in.
The pom-pom is floppy or falls apart
It needs more wraps and a tighter tie. Wrap until the hole is completely full, and pull the center tie as hard as the yarn allows before you knot it. A firm trim also helps. If strands pull out, the tie wasn't tight enough, so it's worth making a new one.
Frequently asked questions
How long does a crochet pom pom hat take to make? About 3 to 4 hours for the hat in size M, plus about 30 minutes for the pom-pom. Post stitches are a little slower than plain double crochet at first. After a few rounds the rhythm becomes automatic. Size S is closer to 3 hours, and size L closer to 4.
How much yarn do I need for a pom-pom hat? About 220 yd (200 m) of worsted #4 for size M, pom-pom included. Plan on 180–220 yd for S and 220–260 yd for L. The pom-pom alone uses 35–45 yd. Two skeins of a 197 yd yarn cover every size, with a little to spare.
Is this crochet beanie good for beginners? It's good for an advanced beginner. You need to know double crochet, and post stitches take about ten minutes to learn. It's worked in joined rounds with only two decrease rounds, so there's little counting. If you've never made a hat, my seamed crochet ribbed beanie is easier.
Can I use a different yarn weight? Yes, but you'll need new numbers. Measure your gauge in the rib, then multiply the stitches per inch by about 2.5 in less than the head size. Round to the nearest multiple of 4 so the crown divides. Add rib rounds until the tube is about 11–12 in tall, then work the crown.
How do I wash it? Follow the yarn label. Wool-Ease can go in the machine on a gentle cycle in a mesh bag, then dry flat. For pure wool, hand wash in cool water, squeeze it out in a towel and dry it flat. Fluff the pom-pom with your fingers while it dries. Don't hang the hat, or the ribs will stretch.
Can I sell hats made from this pattern? Yes, you're welcome to sell finished hats made from this free pattern at markets, on Etsy or as gifts. Please credit "Pattern by Wavode" in your listing and link back to this page. What you can't do is republish this write-up or my photos as your own pattern.
Related patterns on Wavode
- Crochet ribbed beanie: a cream knit-look hat worked flat and sideways, with a fold-up brim.
- Crochet striped beanie: a top-down slouchy hat with nine stripe combos.
- Oversized bobble crochet scarf: a chunky rust wrap that pairs with this hat.
- Winter white rose crochet headband: an ear warmer for days when a hat is too much.
Made this hat? Tag #wavodecrochet on Pinterest. I re-pin every finished make and credit the maker.
Pattern by Clara Hartwell for Wavode. Questions? Email me at support@wavode.com.