Crochet Ribbed Collar Top

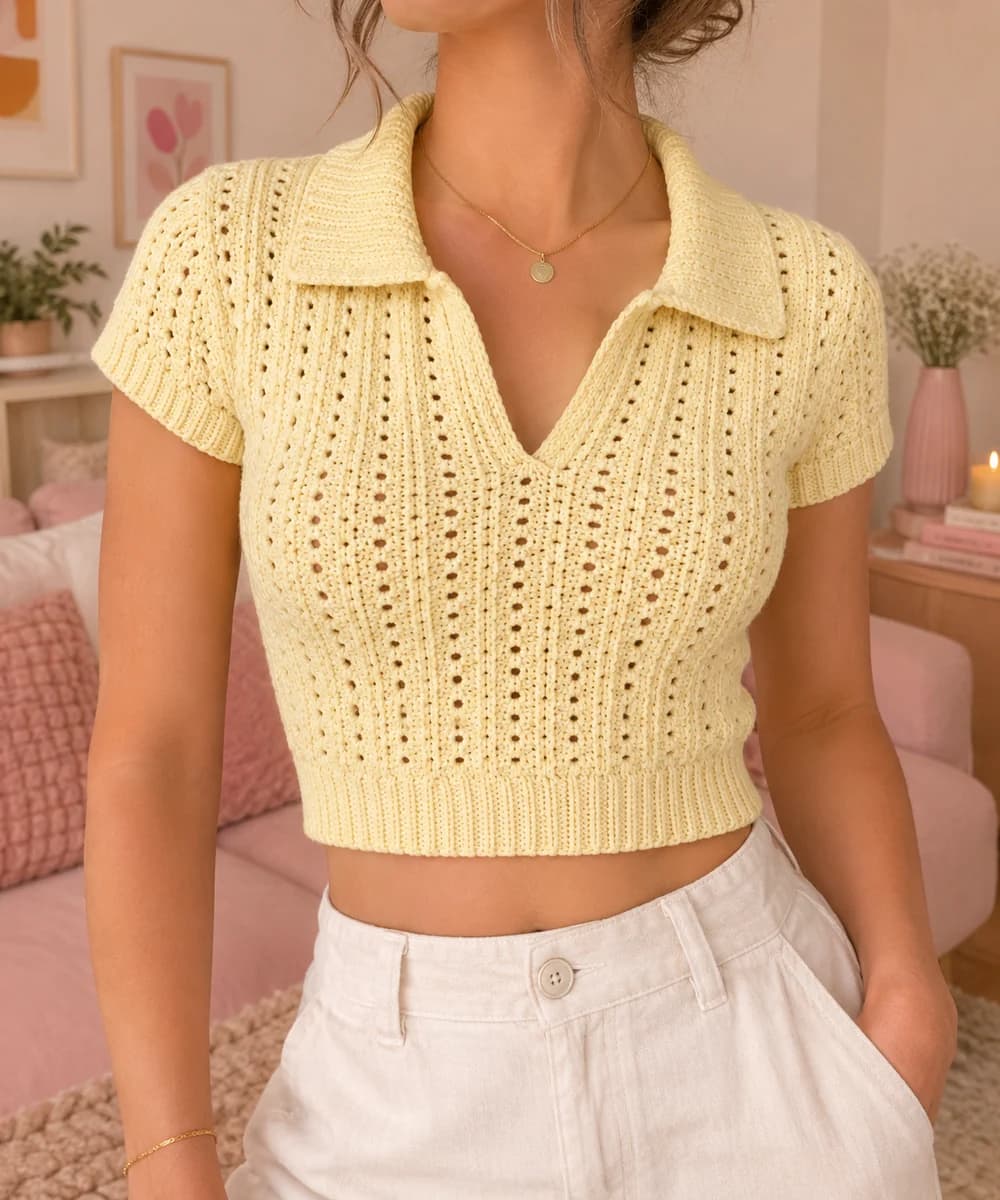
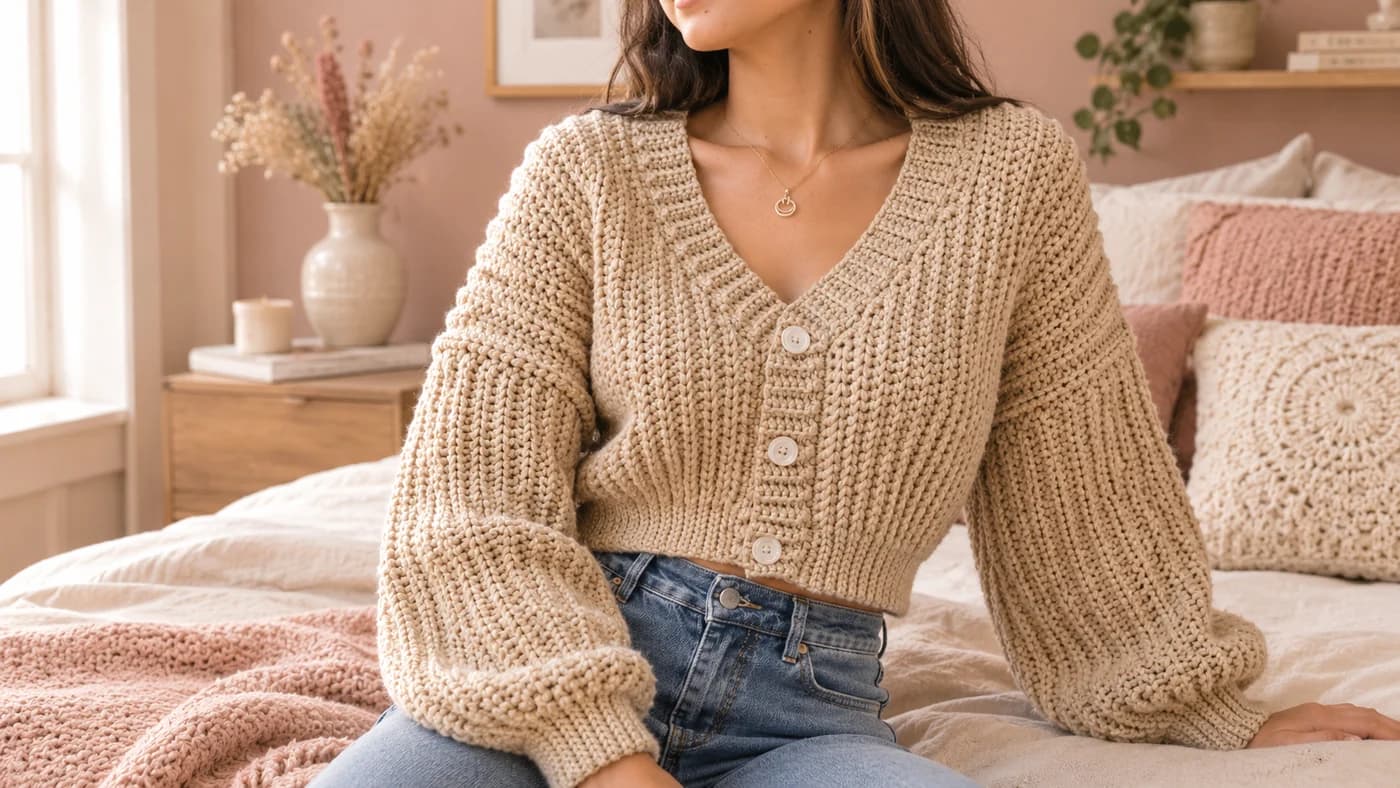
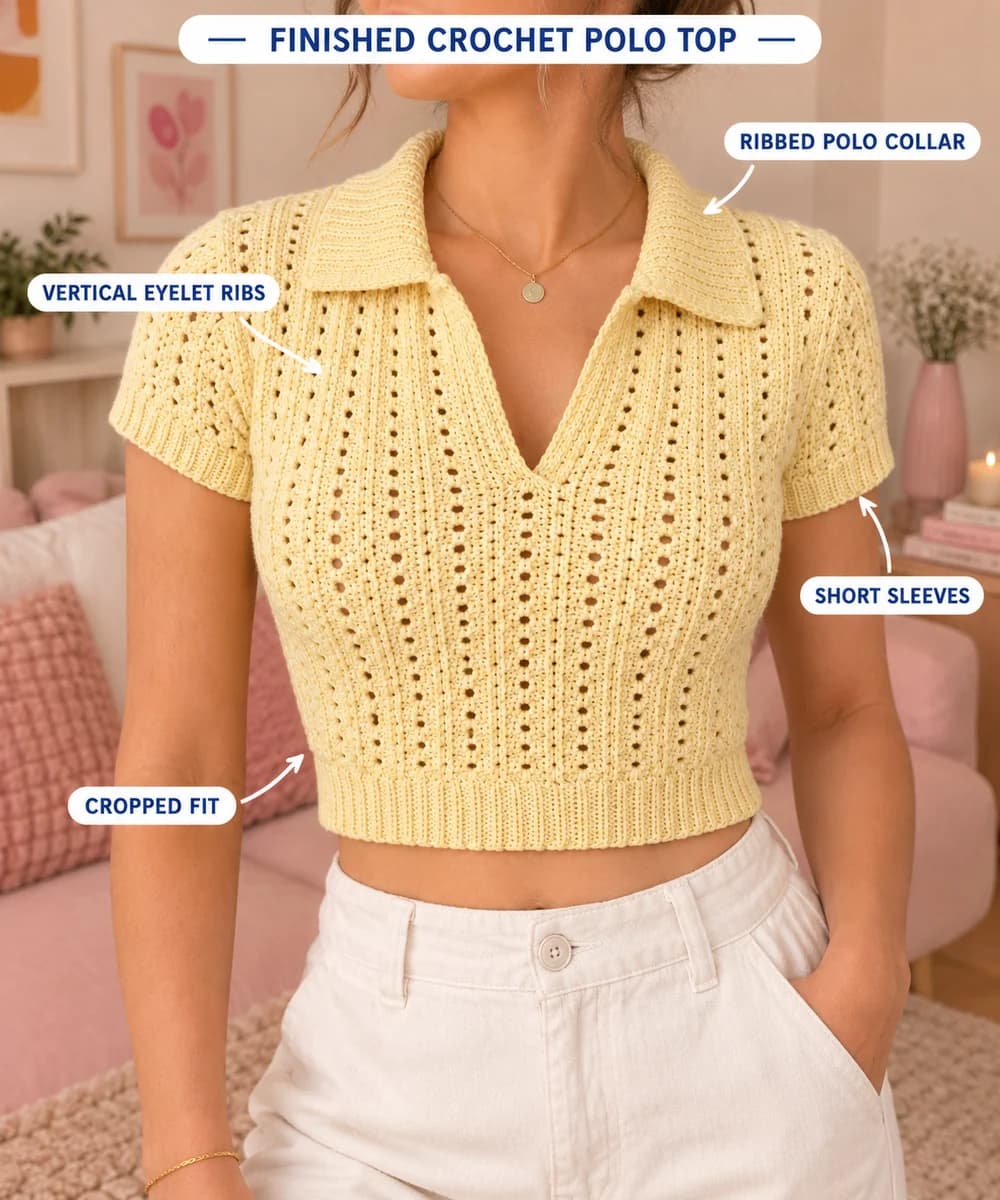
This free crochet ribbed collar top pattern makes a cropped polo with short sleeves, a split neckline and a fold-down ribbed collar. The body is covered in vertical ribs: three-stitch columns with a raised center line, separated by a line of tiny eyelets. All the shaping is done in whole ribs, so the armholes, sleeve caps and neckline are just a few stepped decreases. You'll need DK #3 cotton, a 4 mm and a 3.5 mm hook, and about 740 yards for size S. It comes in 5 sizes, XS to XL.
Key Takeaways
- Five pieces: a back, a front with a split neck, two short sleeves and a collar picked up at the end.
- One 2-row stitch repeat makes the vertical ribs and eyelets. It's easy to learn.
- Budget 665–1,000 yd (610–915 m) of DK #3 cotton, depending on size.
- Hem, cuffs and collar are all worked in back-loop ribbing on a 3.5 mm hook.
Why I love this ribbed collar top
I wanted a crochet top that still looks right on a cool morning, when a strappy crop top doesn't. A collar does that. It makes a simple cropped shape look like a proper shirt, and it looks just as good with high-waisted jeans as with a skirt.
The construction stays simple. The back is a rectangle with a small notch at each armhole. The front is the same piece until the neck, where you split it in two and work each side on its own. The short sleeves get a stepped cap, and the collar is picked up around the finished neckline. Every bit of shaping uses the same move: you take away one whole rib at the edge. That's why the sleeves sit neatly on the shoulder instead of drooping off it.
The texture does the rest. Each rib is three stitches wide, and the middle one is a post stitch, so it stands up like a little cord. Between the ribs, a chain-1 space repeats on every row and lines up into a column of eyelets. That gives you vertical stripes that make the top look longer, and a bit of airflow in summer.
Skill level. Intermediate beginner. You need chain, single crochet, double crochet, front and back post double crochet, back-loops-only ribbing and a whipstitch seam. If post stitches are new to you, the swatch below is a gentle way to learn them.
What you'll need
Yarn (DK weight #3 cotton, about 665 (740, 820, 905, 1000) yd / 610 (675, 750, 830, 915) m)
- Paintbox Yarns Cotton DK (137 yd / 125 m per 50 g): 6 (6, 7, 8, 8) balls.
- Rico Essentials Cotton DK works too. Any smooth DK cotton or cotton blend shows the ribs clearly.
- I worked these totals out from the stitch count, seams included. The ball counts add a margin of about 10% for the swatch. Buy all the balls from one dye lot.
Hooks
- 4 mm (US G/6) for the body and sleeves.
- 3.5 mm (US E/4) for the hem band, cuffs, placket edging and collar. The smaller hook keeps the ribbing snug.
Notions
- Tapestry needle.
- 6 locking stitch markers.
- Measuring tape and scissors.
Gauge
- Eyelet rib pattern on a 4 mm hook: 20 sts × 11 rows = 4 in (10 cm). Each rib plus its eyelet counts as 4 sts.
- Back-loop sc ribbing on a 3.5 mm hook: 20 sts × 22 rows = 4 in (10 cm).
Check the gauge before you start. This is a fitted top, so half a stitch per inch changes the bust by about 2 in. If you have too many stitches, go up a hook size. If you have too few, go down one.
Abbreviations (US crochet terms)
- ch: chain
- sl st: slip stitch
- sc: single crochet
- hdc: half double crochet
- dc: double crochet
- FPdc: front post double crochet (work the dc around the post of the stitch below, from the front)
- BPdc: back post double crochet (same, but from the back)
- BLO: back loop only
- sk: skip
- sp: space
- st(s): stitch(es)
- RS / WS: right side / wrong side
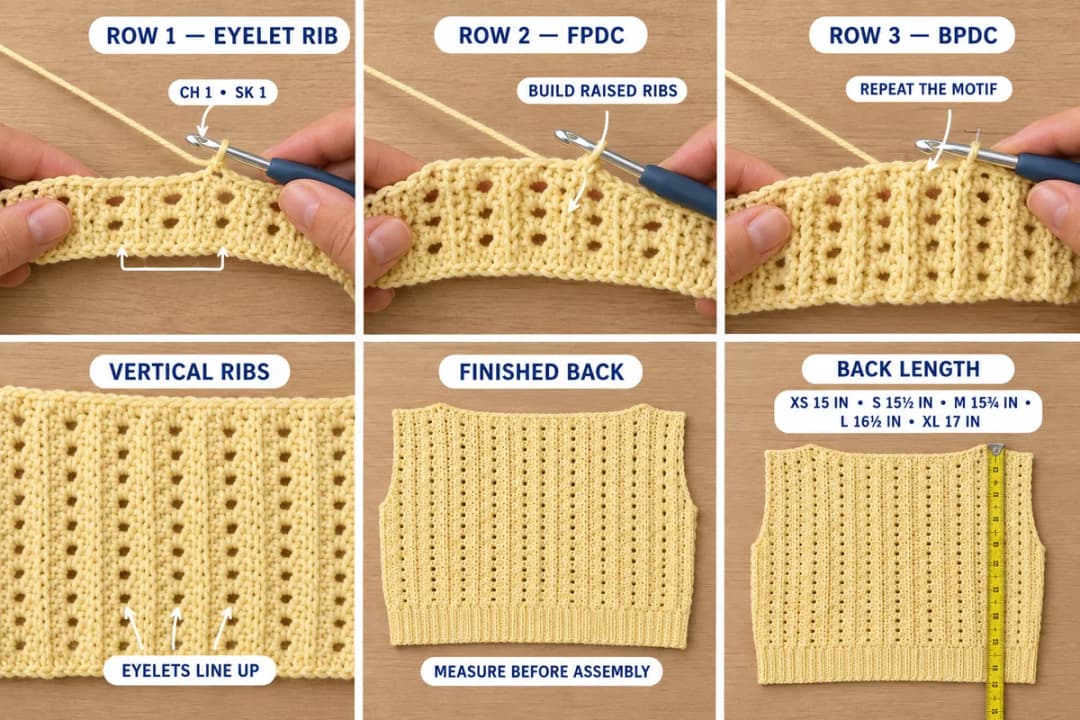
The eyelet rib stitch (swatch first)
The stitch count is always a multiple of 4, minus 1. That gives you full ribs at both edges.
Foundation: Ch 24. Sc in the 2nd ch from the hook and in each ch across. Turn. (23 sc)
Row 1 (WS): Ch 3 (counts as a dc here and on every row). Dc in the next 2 sts. Ch 1, sk 1 st, dc in the next 3 sts. Repeat from * to the end. Turn. (23 sts: 6 ribs and 5 ch-1 sps)
Row 2 (RS): Ch 3. FPdc around the next dc, dc in the next dc. Ch 1, sk the ch-1 sp, dc in the next dc, FPdc around the next dc, dc in the next dc. Repeat from *, working the last dc into the top of the turning ch. Turn.
Row 3 (WS): Ch 3. BPdc around the next st, dc in the next st. Ch 1, sk the ch-1 sp, dc in the next st, BPdc around the next st, dc in the next st. Repeat from *, ending in the top of the turning ch. Turn.
Repeat Rows 2 and 3. Both post stitches push the center of each rib toward the right side, so the raised line is always on the RS. The eyelets stack because every ch-1 always sits over the ch-1 below it.
Work 12 rows, then measure across the middle. Use this swatch to practice the rib decrease too (see Part 1).
Size chart
| Size | Finished bust | Length (hem to shoulder) | Armhole depth | Sleeve length | Neck width | Yarn |
|---|---|---|---|---|---|---|
| XS | 31½ in / 80 cm | 15 in / 38 cm | 6¾ in | 3¾ in | 6½ in | 665 yd |
| S | 34¾ in / 88 cm | 15½ in / 39 cm | 7 in | 3¾ in | 6½ in | 740 yd |
| M | 38 in / 96.5 cm | 15¾ in / 40 cm | 7¼ in | 4 in | 8¼ in | 820 yd |
| L | 41¼ in / 105 cm | 16½ in / 42 cm | 8 in | 4 in | 8¼ in | 905 yd |
| XL | 44½ in / 113 cm | 17 in / 43 cm | 8¼ in | 4½ in | 8¼ in | 1,000 yd |
The top is meant to fit close, with 0 to 2 in of ease. Choose the size closest to your bust measurement, or the next size up if you're between two. Cotton relaxes a little with wear.
Instructions are written XS (S, M, L, XL). When only one number is given, it applies to every size.
The pattern, step by step
How to decrease 1 rib
All the shaping in this top uses one move. You take away 4 sts at the edge: the outer rib and the ch-1 sp beside it. The method depends on which end of the row you're shaping.
- At the end of the row: work in pattern until 4 sts remain, so you end on the last dc of a rib. Leave the last ch-1 sp and the last rib unworked. Turn.
- At the start of the row: ch 1, sl st in each of the first 5 sts (the 3 sts of the rib, the ch-1 sp and the first dc of the next rib). Ch 3, which counts as that dc, then carry on in pattern.
The edge comes out in neat steps, one rib wide. Seams and the collar cover them.
Part 1: The back
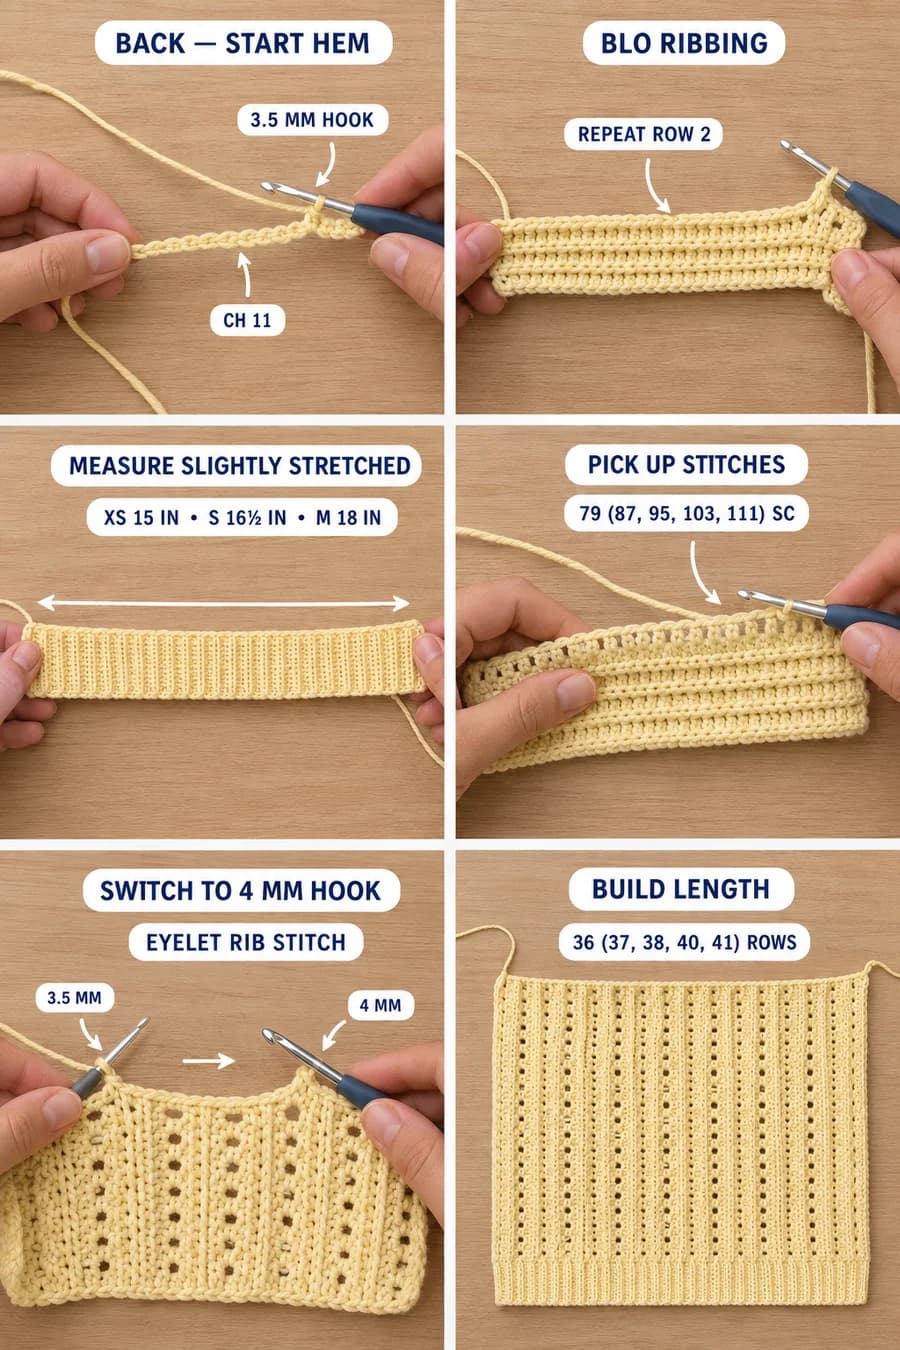
Hem band. With the 3.5 mm hook, ch 11.
Row 1: Sc in the 2nd ch from the hook and in each ch across. Turn. (10 sc)
Row 2: Ch 1 (doesn't count as a st). Sc BLO in each st across. Turn.
Repeat Row 2 until the band measures 15 (16½, 18, 19½, 21) in, slightly stretched. That's about 82 (90, 98, 106, 116) rows, but measure rather than count. The band is about 1 in shorter than the body on purpose, so the hem hugs a little. Don't fasten off.
Pick-up row (RS). Turn the band so you work along one long edge. Ch 1, then work 79 (87, 95, 103, 111) sc evenly across the row ends. That's about one sc per row end, skipping one now and then. Switch to the 4 mm hook. Turn.
Body. Work Row 1 of the eyelet rib stitch, then repeat Rows 2 and 3. You'll have 20 (22, 24, 26, 28) ribs. Work straight until you've finished Row 18 (all sizes). The piece measures about 8½ in from the bottom of the band.
Armhole notches, Row 19: Decrease 1 rib at both ends of the row: sl st across at the start, stop 4 sts short at the end. (71 (79, 87, 95, 103) sts, 18 (20, 22, 24, 26) ribs)
Work straight in pattern until you've worked 36 (37, 38, 40, 41) rows of eyelet rib in total, counting Row 1. The piece measures about 15 (15½, 15¾, 16½, 17) in from the bottom of the band, and the armhole is about 6¾ (7, 7¼, 8, 8¼) in deep. Fasten off, leaving a 20-inch tail for the shoulder seam.
Part 2: The front, with the split neck
Make the front exactly like the back, armhole notches on Row 19 included, but stop after 20 (21, 22, 24, 25) rows of eyelet rib. Don't fasten off. You have 71 (79, 87, 95, 103) sts.
Split for the neck. The center st of the row is a ch-1 sp: it's st 36 (40, 44, 48, 52). You'll skip it and work each side on its own. Each side has 35 (39, 43, 47, 51) sts, which is 9 (10, 11, 12, 13) full ribs.
First side, Row 1: Work in pattern across the first 35 (39, 43, 47, 51) sts, ending with a complete rib. Turn, leaving the rest unworked.
Work 15 more rows on these sts (16 rows in total for this side), decreasing 1 rib at the neck edge on these rows:
- XS and S: work Rows 2–8 straight. Decrease 1 rib at the neck edge on Rows 9, 11, 13 and 15. Work Row 16 straight. (19 (23) sts left)
- M, L and XL: work Rows 2–6 straight. Decrease 1 rib at the neck edge on Rows 7, 9, 11, 13 and 15. Work Row 16 straight. (23 (27, 31) sts left)
The decreases fall on every other row, so the neck edge is always at the same end of the decrease row. One side of the neck uses the "end of the row" method and the other side the "start of the row" method.
Fasten off, leaving a 20-inch tail.
Second side. With the same side facing as on the first side's Row 1, leave the center ch-1 sp unworked and join the yarn in the next dc. Ch 3 (counts as a dc) and work in pattern to the end of the row. (35 (39, 43, 47, 51) sts) Work Rows 2–16 as for the first side, decreasing on the same rows. Fasten off, leaving a 20-inch tail.
Both sides end on the same row as the back: 36 (37, 38, 40, 41) rows in total.
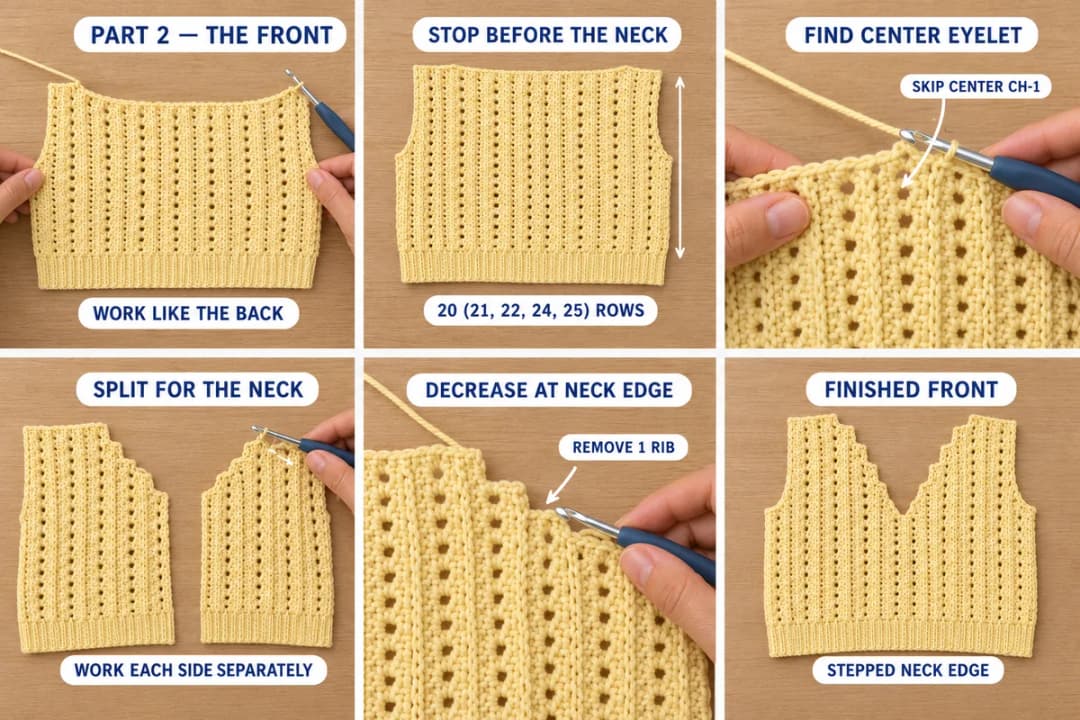
My finding: The center ch-1 sp is what makes this split so tidy. Because every size has an even number of ribs, the middle of the row always falls on an eyelet. Skipping it leaves a full rib on both sides, so the pattern carries on as if each half were its own little panel.
Part 3: The sleeves (make 2)
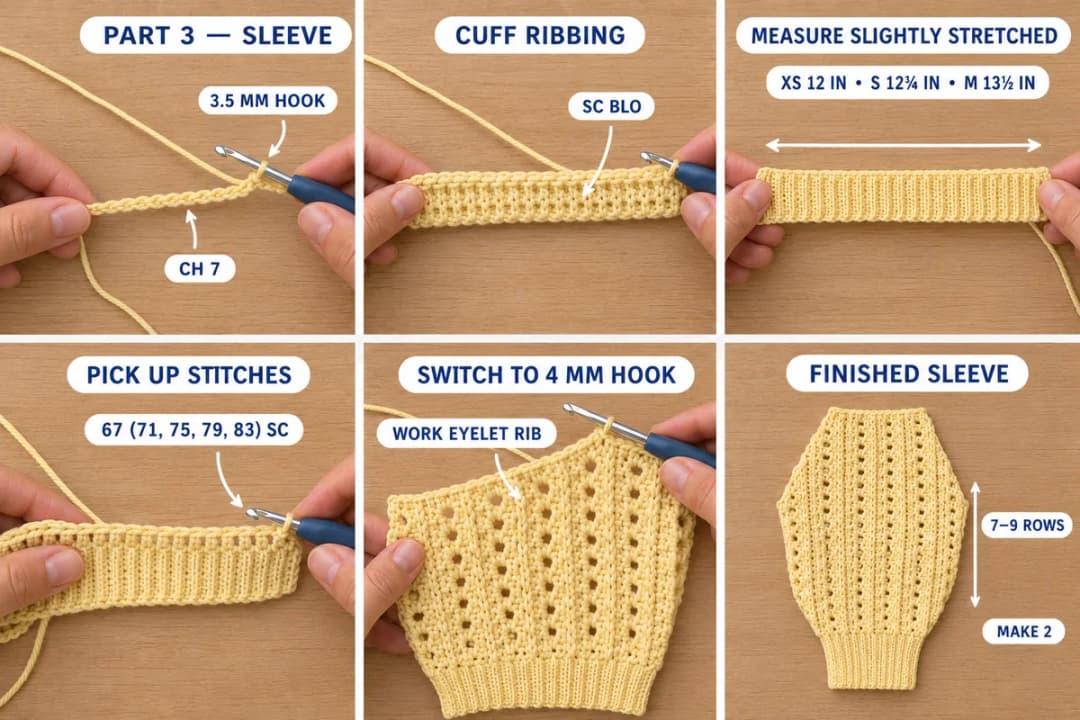
Cuff. With the 3.5 mm hook, ch 7.
Row 1: Sc in the 2nd ch from the hook and in each ch across. Turn. (6 sc)
Row 2: Ch 1, sc BLO in each st across. Turn.
Repeat Row 2 until the cuff measures 12 (12¾, 13½, 14¼, 15) in, slightly stretched (about 66 (70, 74, 78, 82) rows). Don't fasten off.
Pick-up row (RS). Ch 1, then work 67 (71, 75, 79, 83) sc evenly along one long edge. Switch to the 4 mm hook. Turn.
Sleeve. Work Row 1 of the eyelet rib stitch, then Rows 2 and 3, for 7 (7, 8, 8, 9) rows in total. You'll have 17 (18, 19, 20, 21) ribs. The sleeve measures about 3¾ (3¾, 4, 4, 4½) in from the bottom of the cuff. The cuff is a little narrower than the sleeve, so it draws the sleeve in slightly and keeps it from flaring.
Sleeve cap. The cap is 9 rows. Number them from Cap Row 1, and keep the stitch pattern going.
- Cap Row 1: decrease 1 rib at both ends. This notch matches the armhole notch on the body. (59 (63, 67, 71, 75) sts)
- Cap Rows 2, 4, 6 and 8: work straight.
- Cap Rows 3, 5, 7 and 9: decrease 1 rib at both ends.
You have 27 (31, 35, 39, 43) sts left across the top of the cap. Fasten off, leaving a 30-inch tail to sew the sleeve in.
Part 4: Assembly
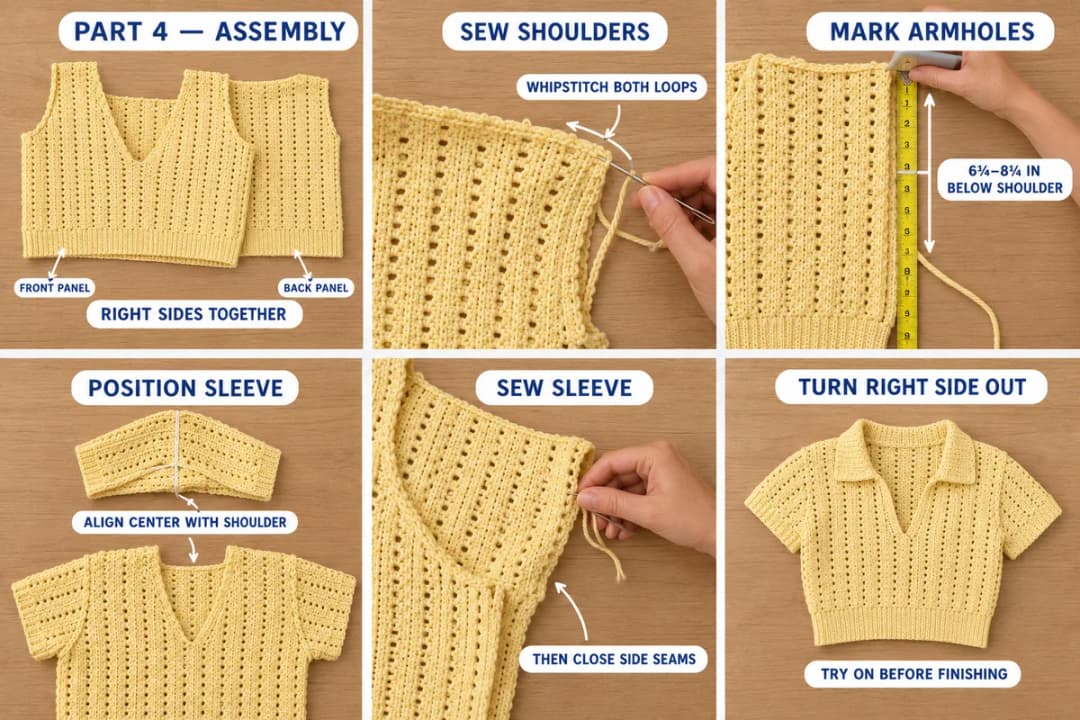
Lay the pieces flat, right side up, and match them before you sew. All seams are whipstitched through both loops with the yarn tails.
- Shoulders. Place the front on the back, RS together, with the top edges lined up. Whipstitch the 19 (23, 23, 27, 31) shoulder sts together on each side, working from the armhole edge toward the neck. The center 33 (33, 41, 41, 41) back sts stay open for the neck.
- Check the armholes. Open the top out flat. Measure from the shoulder seam down to each armhole notch: about 6¾ (7, 7¼, 8, 8¼) in on the front and on the back. Place a marker at each notch.
- Sew in the sleeves. Fold each sleeve in half across its width and put a marker at the center of the top of the cap. Line that marker up with the shoulder seam, with the cuff pointing away from the body. Match the notches on the sleeve to the notches on the body. Pin the cap all around the armhole, easing in the small amount of extra fullness over the shoulder, then whipstitch it in.
- Side and underarm seams. Fold the top RS together. Sew each side in one seam: start at the cuff, go along the underarm, and continue down the body to the bottom of the hem band.
- Turn the top right side out and try it on before you weave in the ends.
Part 5: The placket edging and the ribbed collar
Use the 3.5 mm hook for both.
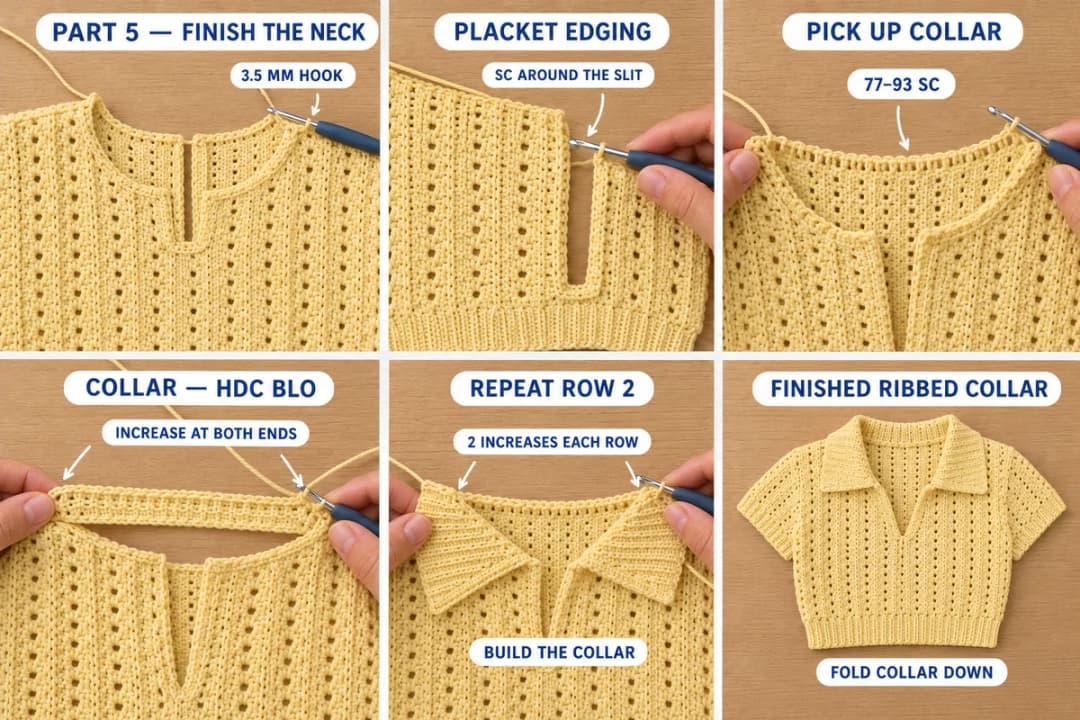
Placket edging. This finishes the straight slit at the center front. With the RS facing, join the yarn at the top of the slit on the left side, where the neck decreases begin. Work 2 sc in each row end down the slit, 1 sc in the skipped center ch-1 sp, then 2 sc in each row end up the other side. (33 (33, 25, 25, 25) sc) Fasten off.
Collar. You pick up the collar from the inside of the top, so the seam ridge ends up hidden under the fold.
Row 1 (pick-up): Turn the top inside out (WS facing). Join the yarn at the top of the placket edging on one side. Work 22 (22, 26, 26, 26) sc evenly along the stepped front neck edge up to the shoulder seam, 1 sc in each of the 33 (33, 41, 41, 41) back-neck sts, then 22 (22, 26, 26, 26) sc down the other front neck edge, ending at the top of the placket edging. Turn. (77 (77, 93, 93, 93) sc)
Row 2: Ch 2 (doesn't count as a st). 2 hdc BLO in the first st, hdc BLO in each st to the last st, 2 hdc BLO in the last st. Turn. (79 (79, 95, 95, 95) sts)
Rows 3–8: Repeat Row 2. (91 (91, 107, 107, 107) sts after Row 8)
Row 9: Ch 1, sc BLO in each st across. Fasten off.
The two increases on every row make the collar fan out, so its ends turn into the classic polo points. Turn the top right side out and fold the collar down over the neckline. The back loops make horizontal ridges, so the collar looks ribbed on both sides.
Finishing and blocking
- Weave in every tail through at least 6 sts, then back the other way. Cotton is slippery, and short ends work loose in the wash.
- Wet block the whole top. Soak it in cool water, roll it in a towel and lay it flat on a mat. Pin it to the measurements in the size chart, keeping the ribs straight, and let it dry fully.
- Press the collar. Optional. If you own a steam iron, hold it just above the folded collar, without touching it, and let it set the fold. Skip this if you don't have one. The collar folds fine without it.
Care
Hand wash in cool water, or use a cold delicate cycle in a laundry bag. Lay it flat to dry and reshape it while it's damp. Don't tumble dry: cotton shrinks in heat and the ribbing loses its bounce. Store the top folded. A hanger pulls the shoulders long over time.
Frequently asked questions
How much yarn do I need for this ribbed collar top? About 665 (740, 820, 905, 1000) yd of DK #3 cotton for sizes XS to XL. In Paintbox Cotton DK that's 6 (6, 7, 8, 8) balls of 125 m each, with a little extra for the swatch. Buy them all from one dye lot so the color matches.
Can I make it longer, or not cropped? Yes. Every 2 rows of eyelet rib add about ¾ in. Add the same number of rows to the back and to the front before the armhole notch on Row 19, and shift every later row number by the same amount. The armholes and the 16 neck rows stay the same. Allow about 30 yd more per extra inch of length, depending on size.
Can I use worsted yarn instead of DK? Not with these numbers. Worsted #4 makes thicker stitches, so you'd get a top several inches bigger and much heavier. If you only have worsted, make a swatch and pick a size whose bust, at your gauge, gives you 0 to 2 in of ease.
Can I make the collar a different color? Yes, and it looks lovely in cream or white. Work the placket edging and the collar in the second color. You'll need about 45–55 yd of it, and the main color total drops by the same amount.
Can I sell tops made from this pattern? Yes, you can sell finished tops you've made yourself. Please credit "Pattern by Wavode" and link back to this page. Please don't republish the written pattern or my photos.
Related patterns on Wavode
- Crochet crop top pattern with a square neck: a sleeveless summer top in the same DK cotton, made from simple flat panels too.
- Sage flare crochet skirt: a tennis-style skirt that goes with this top.
- Breezy drawstring crochet shorts: an easy high-waisted bottom for a summer set.
- Crochet ribbed beanie: the same back-loop ribbing, used for a knit-look hat.
Made this top? Tag #wavodecrochet on Pinterest. I re-pin every finished make and credit the maker.
Pattern by Clara Hartwell for Wavode. Questions? Email me at support@wavode.com.