Crochet Halter Top

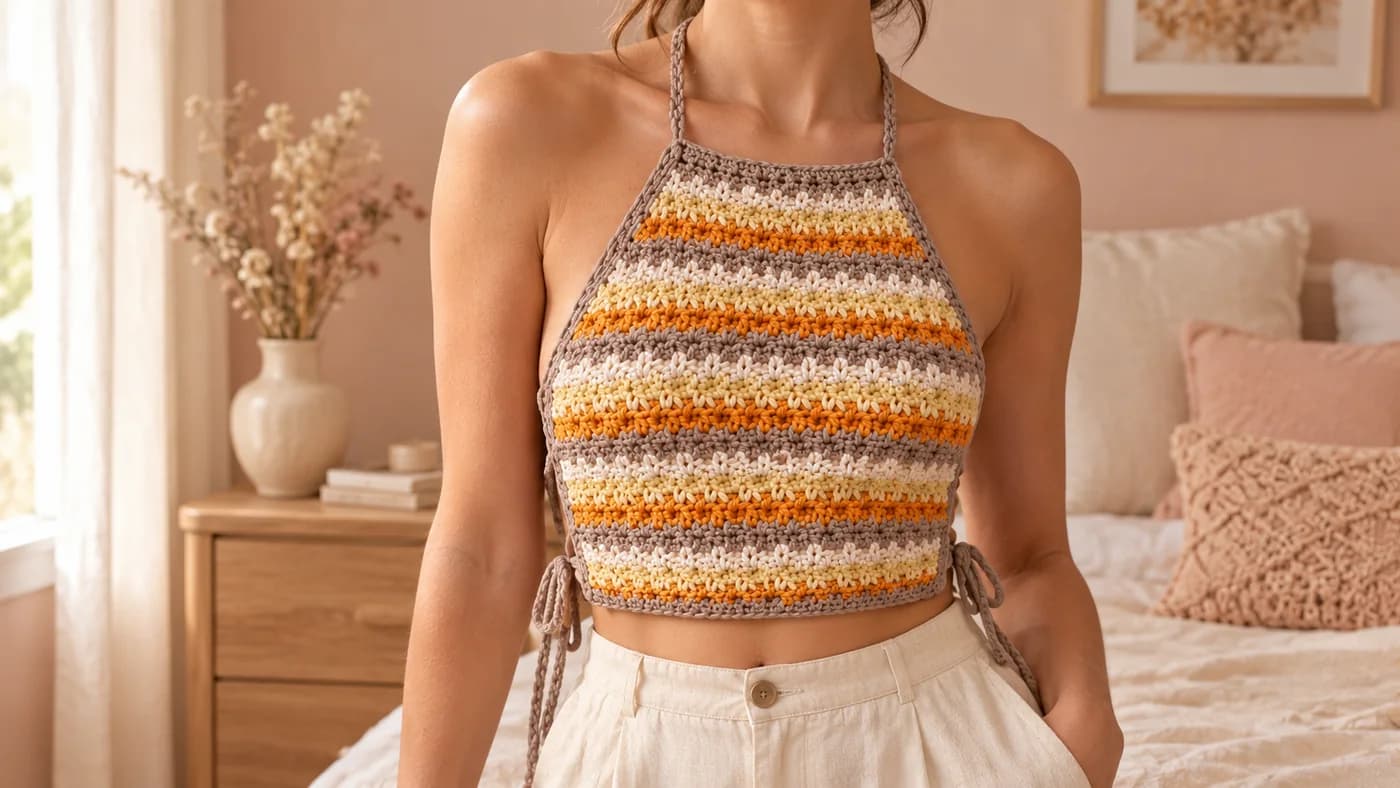
This free crochet halter top pattern makes a striped summer top from one shaped front panel and two edging bands that turn into ties. Each band starts as a waist tie, runs up the side of the panel and keeps going as a neck strap. There are no seams at all. The stripes are worked in griddle stitch, which alternates single and double crochet for a pebbly texture. You'll need DK #3 cotton in 4 colors, a 4 mm and a 3.5 mm hook, and about 290 yards for size S. It comes in 5 sizes, XS to XL.
Key Takeaways
- One panel, two bands, zero seams. The ties are worked as part of the side edging.
- One easy stitch: griddle stitch, a 1-row repeat of sc and dc.
- Budget 270–405 yd (245–370 m) of DK #3 cotton in 4 colors, depending on size.
- The ties do the fitting, so the sizing is forgiving.
Why I love this crochet halter top
A halter top is the quickest wearable I know. There's only one panel to make, and you can finish it in an afternoon and an evening. The back is open and held by ties, so you don't need to hit an exact bust measurement. Pull the ties a little tighter or looser and it fits.
I wanted the straps to be part of the top, not sewn on afterwards. Sewn-on straps are where halter tops usually fail: the seam takes all the weight at the neck. In this pattern, the taupe band starts as a waist tie, runs up the side of the panel and carries on as the neck strap. All three rows of the band run unbroken from tie to strap, so there's nothing to pull loose.
The stitch is griddle stitch, and it's the reason the stripes look so neat. Every stitch is a single crochet on top of a double crochet, or the other way round. That gives a firm, bumpy fabric that doesn't stretch out of shape and doesn't show the "jog" you can get with taller stitches. It's also a single row to remember.
Skill level. Beginner. You need chain, single crochet, half double crochet, double crochet and single crochet two together (sc2tog). The only shaping is a decrease at each end of the row.
What you'll need
Yarn (DK weight #3 cotton, 4 colors, about 270 (290, 335, 360, 405) yd / 245 (265, 305, 330, 370) m in total)
- Color A, taupe (stripes, edgings, ties and straps): 120 (125, 140, 150, 165) yd.
- Color B, cream (stripes): 50 (55, 65, 70, 80) yd.
- Color C, butter yellow (stripes): 50 (55, 65, 70, 80) yd.
- Color D, orange (stripes): 50 (55, 65, 70, 80) yd.
- In Paintbox Yarns Cotton DK (137 yd / 125 m per 50 g), that's A: 1 (1, 2, 2, 2) balls, and 1 ball each of B, C and D. Size S uses most of one ball of A, so buy a second if your gauge runs loose.
- I worked these totals out from the stitch count, with about 10 yd extra per color for the ends.
Hooks
- 4 mm (US G/6) for the panel.
- 3.5 mm (US E/4) for the edgings, ties and straps. The smaller hook keeps the ties firm.
Notions
- Tapestry needle.
- 2 locking stitch markers.
- Measuring tape and scissors.
Gauge
- Griddle stitch on a 4 mm hook: 18 sts × 15 rows = 4 in (10 cm).
The ties make this top forgiving, but gauge still sets the width of the front. Make a 5-inch swatch in griddle stitch. If you have more than 18 sts per 4 in, go up a hook size. If you have fewer, go down one.
Abbreviations (US crochet terms)
- ch: chain
- sl st: slip stitch
- sc: single crochet
- hdc: half double crochet
- dc: double crochet
- sc2tog: single crochet 2 together (insert in the next st, pull up a loop, insert in the following st, pull up a loop, yarn over and pull through all 3 loops)
- st(s): stitch(es)
- RS / WS: right side / wrong side
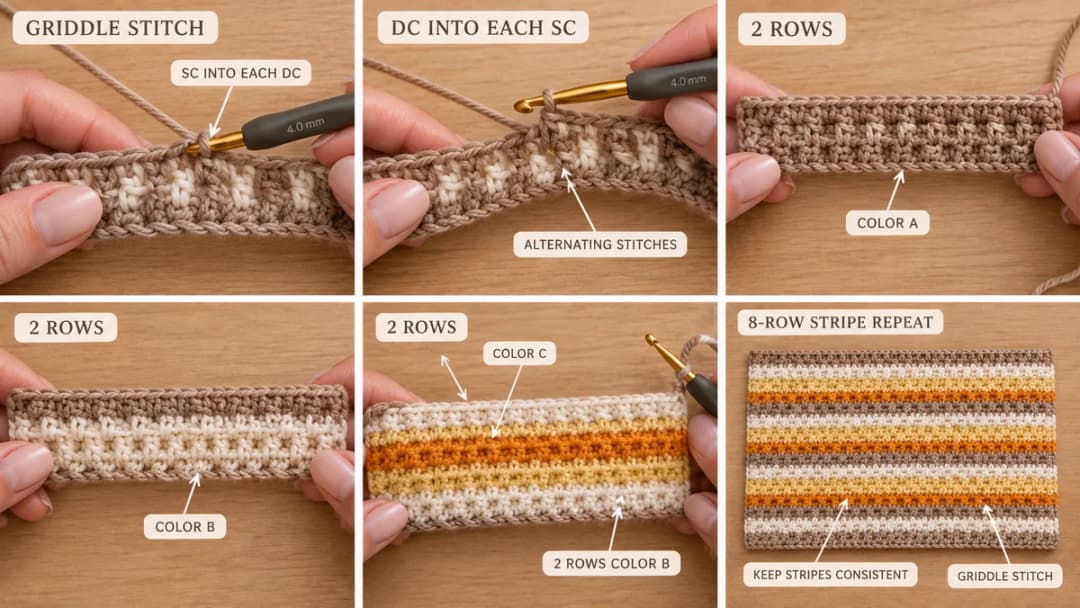
Griddle stitch and the stripe sequence
Griddle stitch always works on an even number of stitches.
Foundation: Ch an odd number. Sc in the 2nd ch from the hook, dc in the next ch. Sc in the next ch, dc in the next ch. Repeat from * to the end. Turn.
Every row after that: Ch 1 (doesn't count as a st). Sc in the next st, dc in the next st. Repeat from * to the end. Turn.
That's the whole stitch. Because the row ends on a dc, the first st of the next row is always that dc, and it gets a sc. So every sc sits on a dc and every dc on a sc, and the fabric comes out bumpy and solid.
On shaped rows the count changes at the edges. Then use the rule rather than the count: sc into each dc, dc into each sc, and treat an sc2tog as a sc.
Stripe sequence (8-row repeat):
- 2 rows Color A (taupe)
- 2 rows Color B (cream)
- 2 rows Color C (butter yellow)
- 2 rows Color D (orange)
Change color on the last yarn-over of the row before. Leave a 6-inch tail of each color and carry nothing up the side: the taupe side bands cover the edges, and you weave the tails into them later.
Size chart
| Size | To fit bust | Panel width at hem | Panel length | Neck edge | Total yarn |
|---|---|---|---|---|---|
| XS | 30–32 in / 76–81 cm | 14¼ in / 36 cm | 11¾ in / 30 cm | 4½ in | 270 yd |
| S | 33–35 in / 84–89 cm | 15½ in / 39 cm | 12½ in / 32 cm | 4½ in | 290 yd |
| M | 36–38 in / 91–97 cm | 17 in / 43 cm | 13½ in / 34 cm | 5 in | 335 yd |
| L | 39–42 in / 99–107 cm | 18¾ in / 47.5 cm | 14¾ in / 37.5 cm | 5 in | 360 yd |
| XL | 43–46 in / 109–117 cm | 20 in / 51 cm | 15¾ in / 40 cm | 5¼ in | 405 yd |
The panel covers the front only. The back stays open and the ties close it, so pick the size by your bust measurement and let the ties do the rest. If you'd like more coverage at the sides, go up one size.
Instructions are written XS (S, M, L, XL). When only one number is given, it applies to every size.
The pattern, step by step
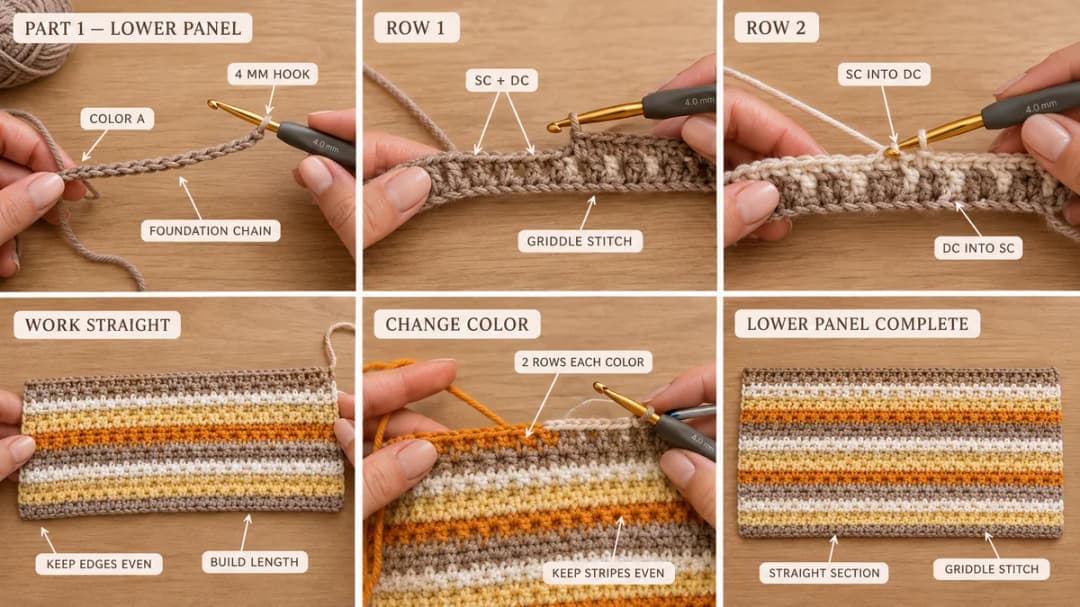
Part 1: The lower panel
With the 4 mm hook and Color A, ch 65 (71, 77, 85, 91).
Row 1 (RS): Sc in the 2nd ch from the hook, dc in the next ch. Sc in the next ch, dc in the next ch. Repeat from * to the end. Turn. (64 (70, 76, 84, 90) sts)
Row 2: Ch 1. Sc in the next st, dc in the next st. Repeat from * to the end. Turn.
Keep repeating Row 2, following the stripe sequence (Rows 1–2 are the first 2 rows of A). Work straight until you've finished Row 22 (22, 24, 24, 26). The panel measures about 6 (6, 6½, 6½, 7) in from the foundation.
Place a marker at each end of the last row. That's where the underarm shaping starts, and where each tie will meet the strap later.
Part 2: Shaping the armholes
Keep the stripe sequence going. Every shaping row loses 1 st at each end.
Decrease row: Ch 1. Sc2tog over the first 2 sts. Work in pattern (sc into each dc, dc into each sc) to the last 2 sts. Sc2tog over the last 2 sts. Turn. (2 sts fewer)
Repeat the decrease row 22 (25, 27, 31, 33) times in total, on every row. You'll have 20 (20, 22, 22, 24) sts left for the neck edge. Fasten off.
The panel now looks like a tall trapeze: straight at the bottom, then slanting in steadily to a narrow top. The finished panel measures about 11¾ (12½, 13½, 14¾, 15¾) in from the foundation to the neck edge.
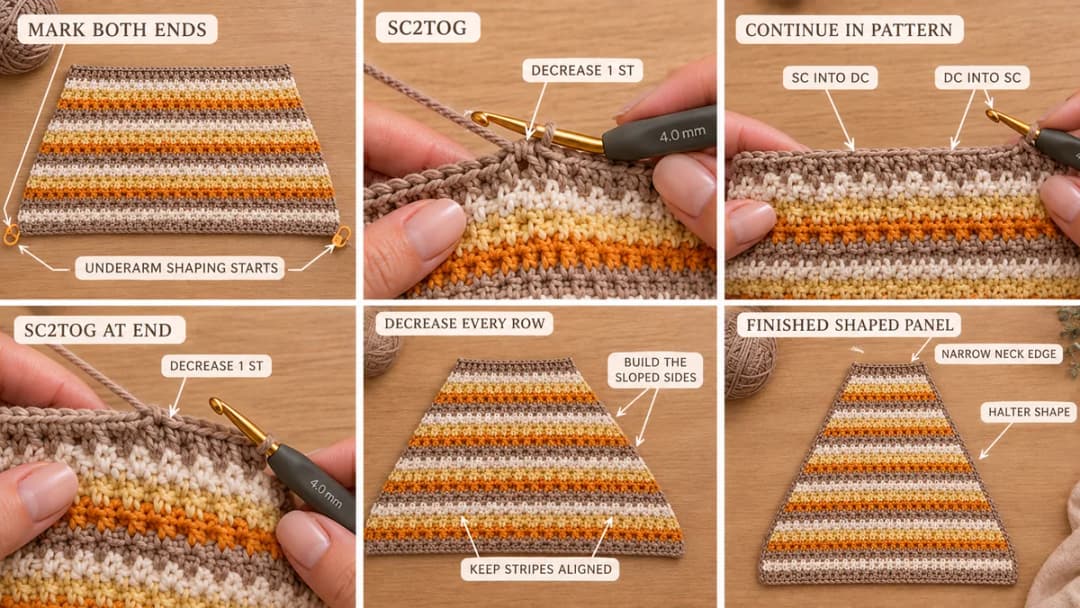
My finding: Decreasing on every row looks steep on paper, but it's what gives a halter its shape. The slant follows the line from the underarm to the side of the neck, so the taupe band sits flat along the body instead of gaping. If you decrease every other row, the top comes out like a wide apron and the straps fall off the shoulders.
Part 3: Hem and neck edgings
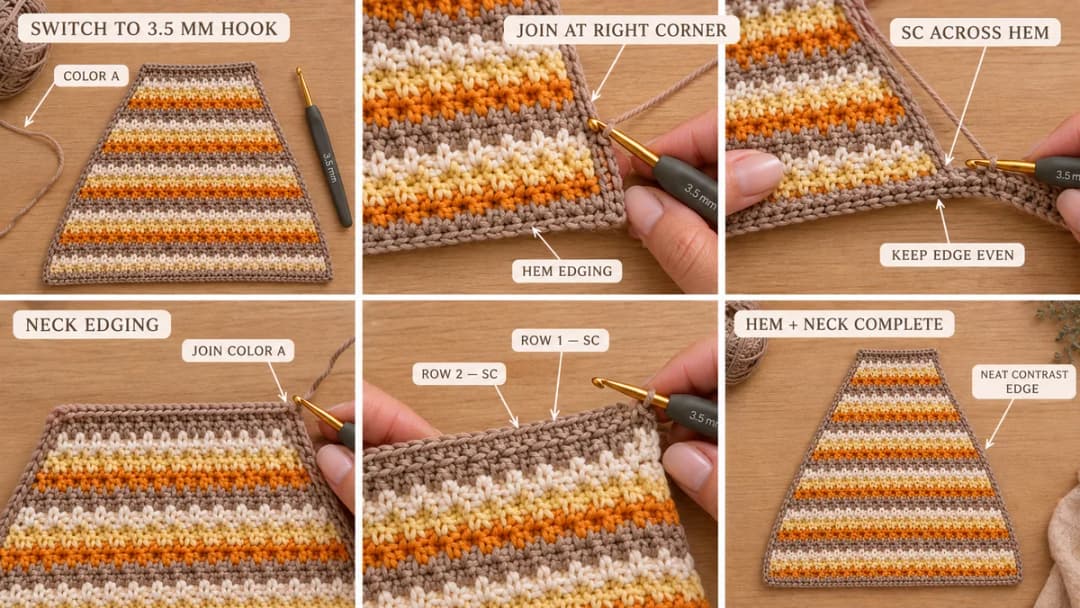
Switch to the 3.5 mm hook and Color A for all the edgings.
Hem edging. With the RS facing, join A at the right corner of the foundation edge. Ch 1 and work 1 sc in each ch across the bottom. (64 (70, 76, 84, 90) sc) Fasten off.
Neck edging. With the RS facing, join A at the right corner of the top edge.
- Row 1: Ch 1, sc in each st across. Turn. (20 (20, 22, 22, 24) sc)
- Row 2: Ch 1, sc in each st across. Fasten off.
This gives a neat taupe line across the top, and it frames the stripes the same way the hem edging does at the bottom.
Part 4: The side bands with ties and straps (make 2)
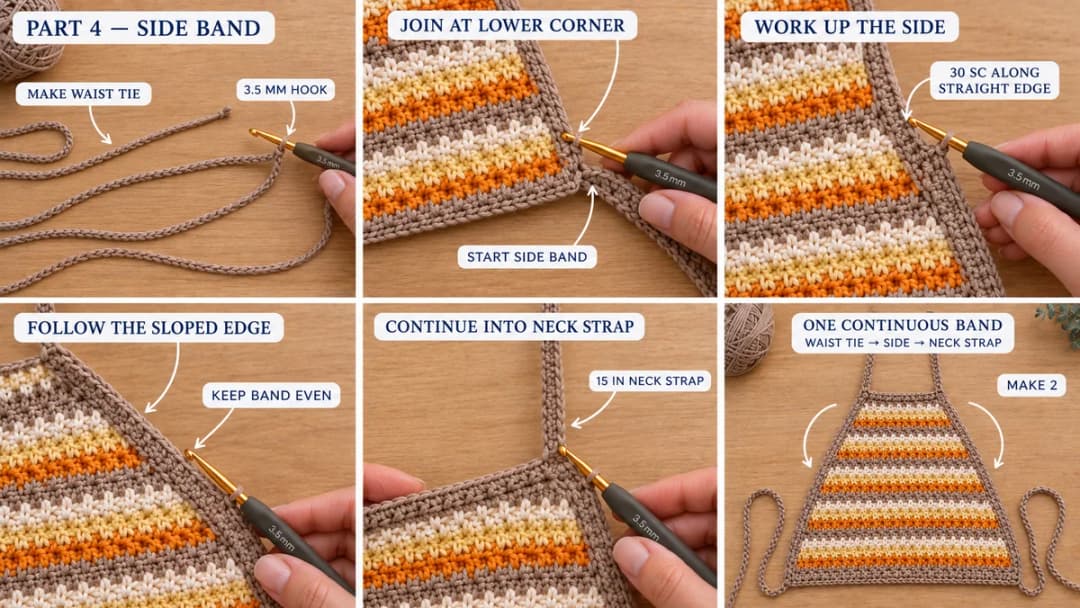
This is the clever part. Each band is three long rows. Every row runs from the tip of the neck strap, down the side of the panel, to the tip of the waist tie. Work one band on each side of the panel, with the 3.5 mm hook and Color A.
Row 1 (RS): Make a slip knot and chain until the chain measures 16 (16, 17, 18, 19) in, about 80 (80, 85, 90, 95) ch. That's the waist tie. With the RS of the panel facing, sc into the bottom corner of the side edge, through the end of the hem edging. Then work up the side:
- 30 (30, 32, 32, 35) sc evenly along the straight side, up to the marker;
- 38 (44, 47, 54, 57) sc evenly along the slanted edge, up to the top corner, ending through the ends of the neck edging.
At the top corner, chain until the new chain measures 15 in, about 75 ch. That's the neck strap. Turn.
Row 2: Hdc in the 3rd ch from the hook and in each ch along the strap. Hdc in each sc along the side of the panel. Hdc in each ch along the tie. Turn.
Row 3: Ch 1. Sc in each hdc all the way back, along the tie, the side and the strap. Fasten off.
Repeat on the other side of the panel. To keep the RS facing, rotate the panel so that you again start at the bottom corner and work up toward the top.
Tie a firm overhand knot close to the tip of each tie and strap, then trim the tails to about 1 in. The knots keep the ends from unravelling and give the ties a little weight.
Finishing
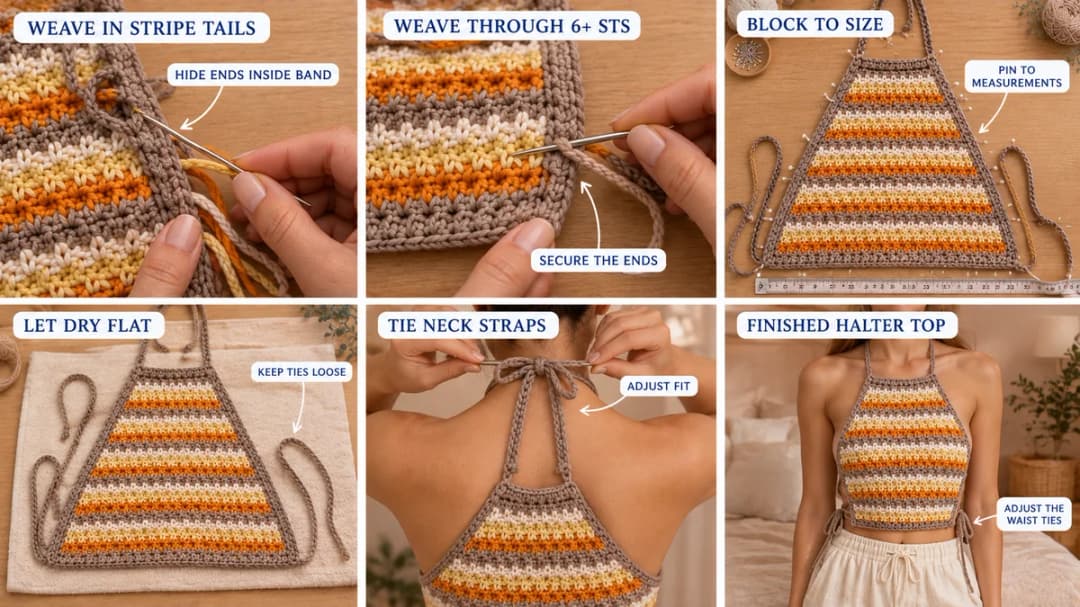
- Weave in the stripe tails along the inside of the side bands, where they disappear into the taupe stitches. Go through at least 6 sts, then back the other way.
- Block the panel. Pin it flat to the size chart measurements, spray it with water until damp, and let it dry. Leave the ties loose, so they don't stretch.
- Try it on. Tie the straps behind your neck first, then the waist ties in a bow at your back. Adjust the neck knot until the top of the panel sits just below your collarbone.
Care
Hand wash in cool water, or use a cold delicate cycle in a laundry bag. Untie the bows first so the ties don't tangle. Lay flat to dry and reshape the panel while it's damp. Don't tumble dry: cotton shrinks and the ties can stretch in heat.
Frequently asked questions
How much yarn do I need for this halter top? About 270 (290, 335, 360, 405) yd of DK #3 cotton for sizes XS to XL, split across 4 colors. Taupe (A) uses the most, about 120 to 165 yd, because it makes the ties, straps and edgings as well as one stripe in four.
Can I make it in one color? Yes. Work every row in the same color. You'll need the same total yardage, and there are no stripe tails to weave in. Griddle stitch has enough texture to look good in a solid color.
Will the ties hold the top up? Yes. Each tie and strap is part of the same unbroken band that runs up the side of the panel, so the neck strap isn't hanging from a seam. The 3.5 mm hook makes the band firm. Cotton chains stretch a little with wear, so tie a fresh knot at the neck now and then.
Can I make it longer? Yes. Add rows to Part 1 before the markers, then work Part 2 as written. Each 4 rows add just over 1 in. Lengthen both side bands by the same amount: about 5 more sc on the straight side for every inch.
Can I sell halter tops made from this pattern? Yes, you can sell finished tops you've made yourself. Please credit "Pattern by Wavode" and link back to this page. Please don't republish the written pattern or my photos.
Related patterns on Wavode
- Crochet ribbed collar top: a cropped polo with sleeves, in the same DK cotton.
- Crochet crop top pattern with a square neck: another easy summer top, with wide straps and eyelet rows.
- Sage flare crochet skirt: a tennis-style skirt that pairs well with this top for a summer set.
- Breezy drawstring crochet shorts: easy high-waisted shorts for a beach outfit.
Made this top? Tag #wavodecrochet on Pinterest. I re-pin every finished make and credit the maker.
Pattern by Clara Hartwell for Wavode. Questions? Email me at support@wavode.com.