Crochet Crop Top Pattern

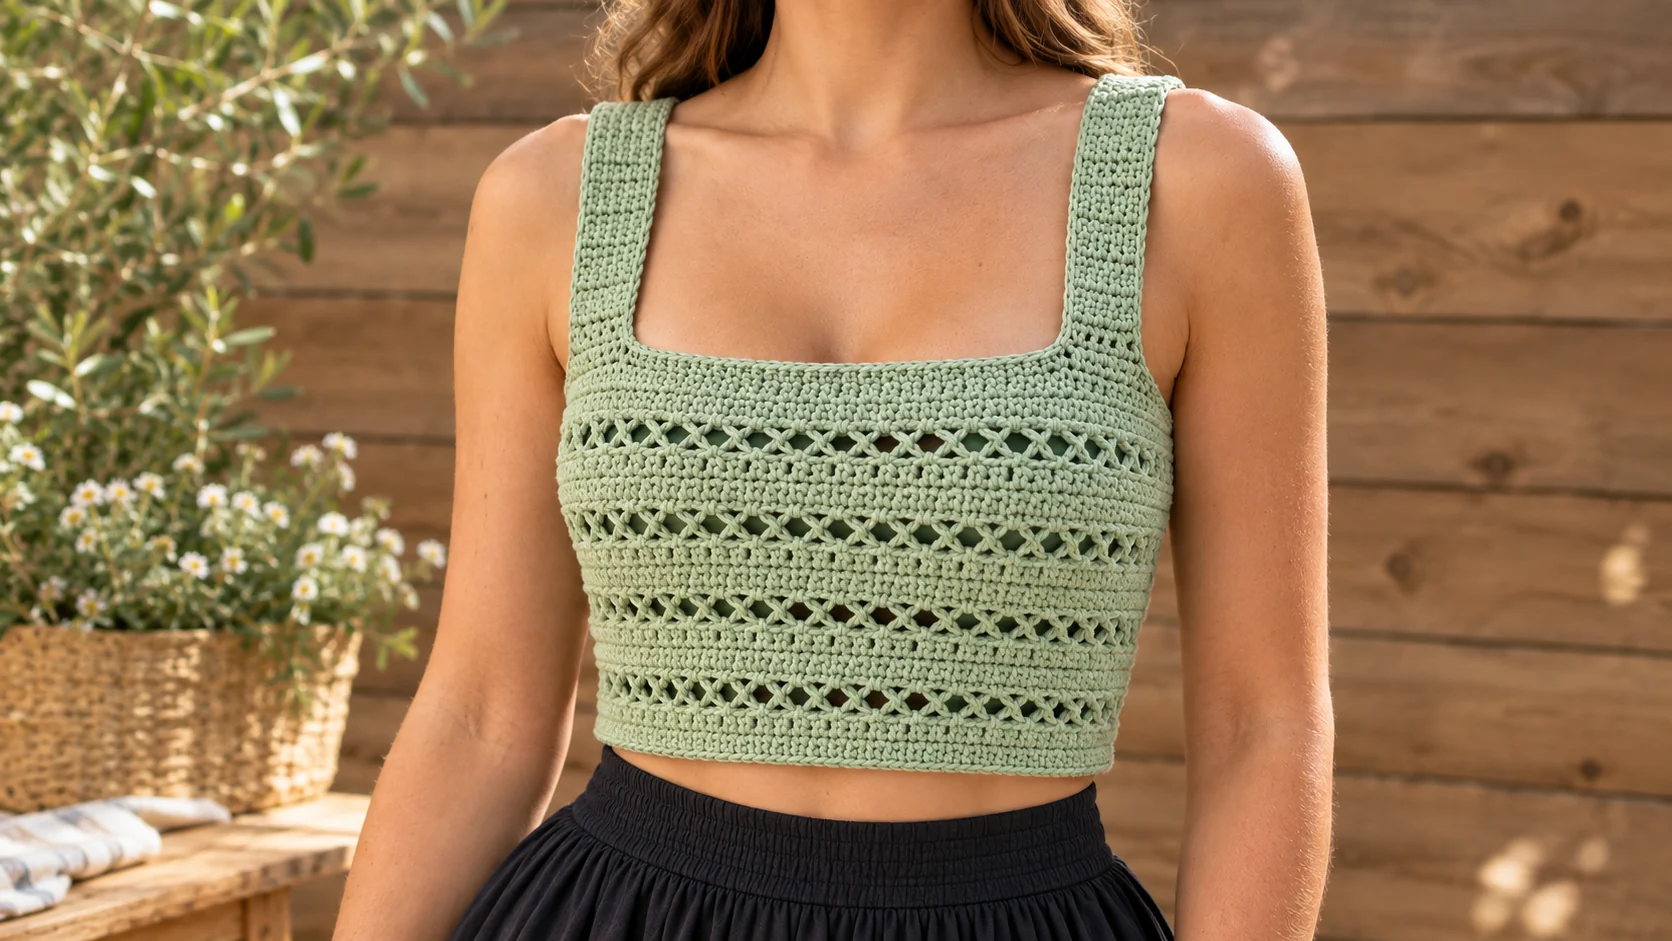
This free crochet crop top pattern makes a fitted summer top with a square neckline, wide comfy straps and neat rows of little eyelets. It's just two rectangles and two straps. There's no shaping, no increases and no armhole math. The eyelet rows come from one easy stitch, the crossed double crochet, set between bands of half double crochet. You'll need DK #3 cotton, a 4 mm hook and about 510 yards for size S. It comes in 5 sizes, XS to XL, and takes one weekend.
Key Takeaways
- Four pieces only: a front, an identical back and two straps.
- A 4-row repeat: one crossed-stitch eyelet row, then three rows of half double crochet.
- Budget 430–740 yd (395–680 m) of DK #3 cotton, depending on size.
- Length is easy to change. Each repeat adds or removes about 1⅓ in (3.4 cm).
Why I love this crochet crop top
This is the top I make when the weather turns and I want something handmade to wear with high-waisted shorts or a flowy skirt. It looks polished, but it's really just two rectangles joined at the sides with two straps on top. That's the whole construction.
The texture does all the talking. Every fourth row, pairs of double crochet cross over each other. Each pair makes a little twisted "X", and the gaps between the pairs turn into tiny eyelets. Stacked up the body, they read like a row of stitched ribbon. It's far easier than it looks.
I love it in a soft sage green, because cotton in a fresh, muted color just feels like summer. It's also lovely in cream, butter yellow, terracotta or a dusty blue.
Skill level. Advanced beginner. If you can work single, half double and double crochet in rows, you can make this. The crossed stitch is the only new move, and I walk you through it below.
Want a matching bottom? My sage flare crochet skirt and my breezy drawstring crochet shorts are also built from simple flat panels, so they pair nicely with this top.
What you'll need
Yarn
- DK #3 cotton or cotton blend in a soft sage green. A smooth, mercerized-look cotton shows the crossed stitches most clearly. Paintbox Yarns Cotton DK (137 yd / 125 m per 50 g ball) is a good match, and any DK #3 cotton works.
- Amount by size: about 430 (510, 560, 665, 740) yd, or 395 (465, 510, 610, 675) m. Plan for a range of 400–460 (470–550, 520–600, 620–710, 690–790) yd, because tension and yarn brand shift the numbers.
- Buy 4 (5, 5, 6, 6) balls of 137 yd from the same dye lot.
Hook and notions
- 4 mm (US G-6) hook.
- 4 locking stitch markers.
- A tapestry needle, scissors and a tape measure.
- Rust-proof pins or clips for trying on the straps.
Gauge
In pattern: 18 sts × 12 rows = 4 in (10 cm), after blocking.
To check it, chain 23 and work Rows 1–8 below on 22 sts, then repeat Rows 5–8 twice more. Wet the swatch, let it dry flat and measure the center.
Gauge really matters on a fitted top. Half a stitch per inch changes the finished bust by 2 to 3 inches. If your swatch has more than 18 sts over 4 in, go up to a 4.5 mm hook. If it has fewer, go down to 3.75 mm.
Abbreviations (US crochet terms)
- ch = chain
- sc = single crochet
- hdc = half double crochet
- dc = double crochet
- sc2tog = single crochet 2 together
- st(s) = stitch(es)
- RS / WS = right side / wrong side
- rep = repeat
Crossed dc pair: Skip the next st, dc in the following st. Then, working in front of the dc you just made, dc in the skipped st. That's one pair, and it uses 2 sts.
UK crocheters: this pattern uses US terms. US single crochet = UK double crochet, US half double crochet = UK half treble, and US double crochet = UK treble.
Sizes and fit
Numbers are written as XS (S, M, L, XL). When only one number is given, it applies to all sizes.
| XS | S | M | L | XL | |
|---|---|---|---|---|---|
| Finished bust | 30¼ in (77 cm) | 33 in (84 cm) | 36½ in (93 cm) | 40 in (102 cm) | 44½ in (113 cm) |
| Body length | 11 in (28 cm) | 12¼ in (31 cm) | 12¼ in (31 cm) | 13¾ in (35 cm) | 13¾ in (35 cm) |
| Sts per panel | 68 | 74 | 82 | 90 | 100 |
| Eyelet repeats | 7 | 8 | 8 | 9 | 9 |
How to choose. This top is meant to fit close to the body, with zero to 1 inch of negative ease. Pick the finished bust that matches your bust or sits just under it. Rows worked side to side have only a little stretch, and cotton relaxes a bit as you wear it, so don't size down more than 1 inch.
The top has no closure. You step into it or pull it over your head with your arms up, like a tube top with straps.
How the construction works
Here's the plan in plain words. The front and back are the same rectangle, worked flat from the hem up. You sew them together along both side edges, from hem to top, which gives you a tube.
The top edge of that tube becomes the neckline and the top of the armholes. Then you sew one strap from the front top edge, over each shoulder, to the back top edge. The space between the two straps is the square neckline. The space outside each strap is the armhole.
A final round of sc around the neckline and each armhole ties it all together and hides the strap joins.
The pattern — step by step
Turn at the end of every row. The ch 1 at the start of an sc or hdc row doesn't count as a stitch. The ch 3 at the start of a crossed dc row does count as the first dc.
Part 1 — Front panel: hem
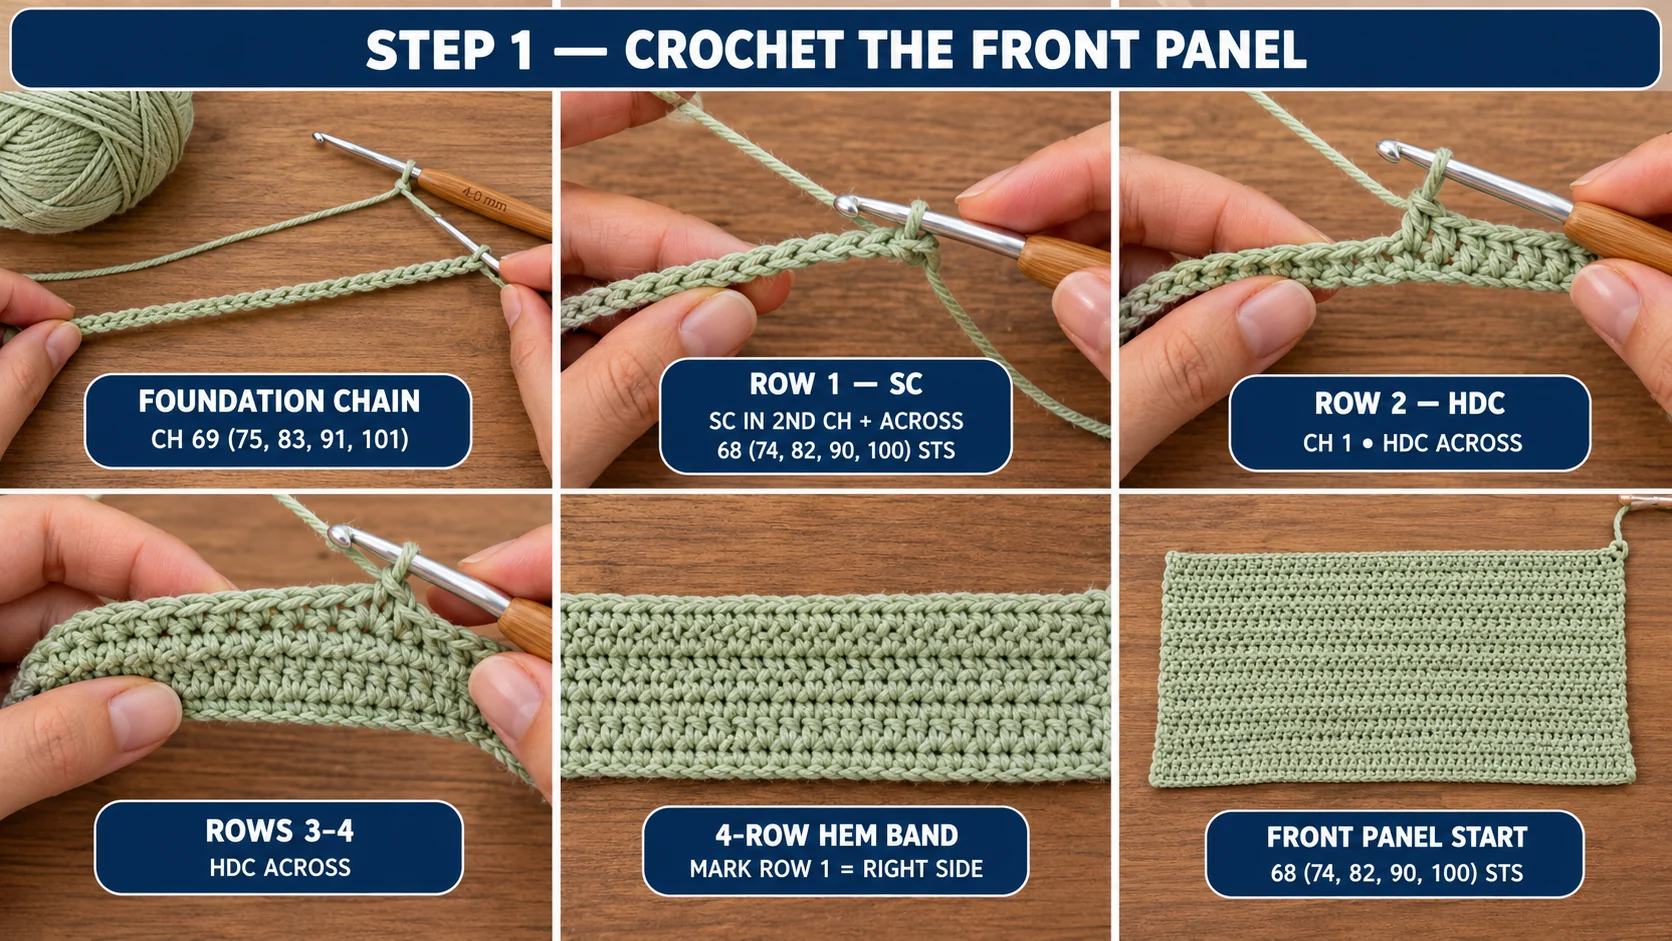
Foundation: Ch 69 (75, 83, 91, 101).
Row 1 (RS): Sc in the 2nd ch from the hook and in each ch across. Turn. (68 (74, 82, 90, 100) sts)
Rows 2–4: Ch 1, hdc in each st across. Turn.
Put a marker in Row 1 to show the right side. The hem band is 4 rows tall.
Part 2 — Front panel: the 4-row eyelet repeat
Row 5 (RS, eyelet row): Ch 3 (counts as the first dc). *Skip the next st, dc in the following st, then dc in the skipped st, working in front of the dc just made; rep from * to the last st. Dc in the last st. Turn. (33 (36, 40, 44, 49) crossed pairs, plus 1 dc at each end: 68 (74, 82, 90, 100) sts)
Row 6 (WS): Ch 1, hdc in each st across. Work the last hdc into the top of the ch-3. Turn.
Rows 7–8: Ch 1, hdc in each st across. Turn.
That's one repeat. Rows 5–8 are the whole texture.
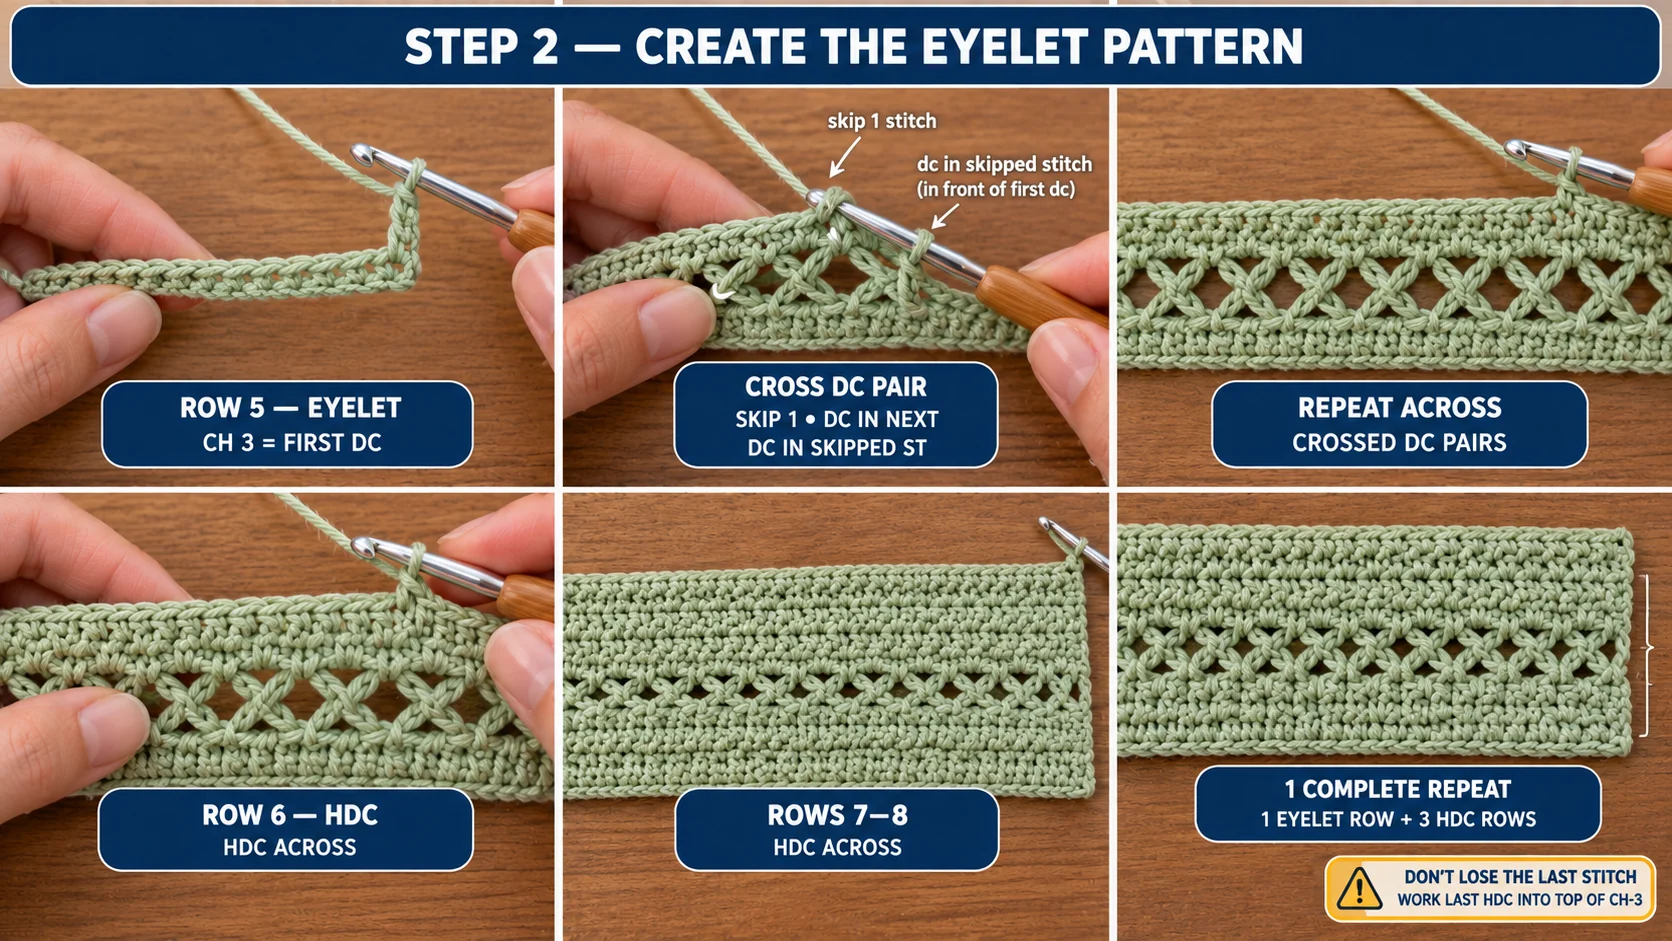
Don't lose the last stitch. On the hdc row after an eyelet row, the top of the ch-3 hides at the very end. Look for it and put your last hdc there. If a row comes up one stitch short, this is almost always why. Count every row for the first two repeats.
Part 3 — Front panel: body and top band
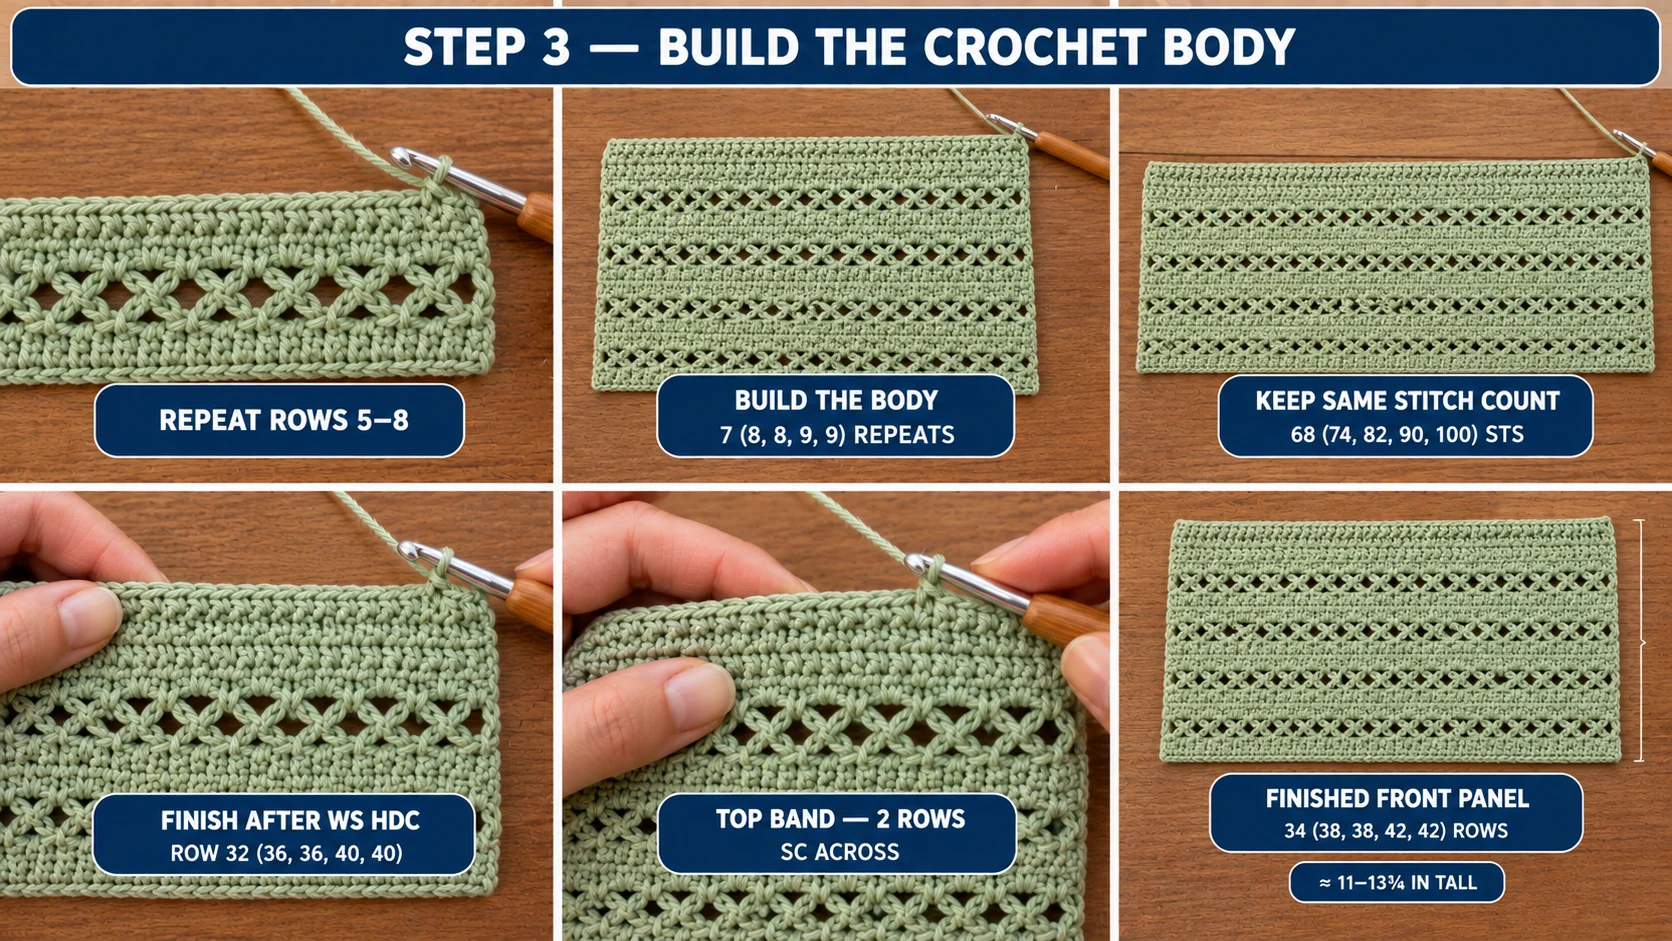
Work the body: Rep Rows 5–8 another 6 (7, 7, 8, 8) times, for 7 (8, 8, 9, 9) eyelet repeats in total. You end after a WS hdc row, Row 32 (36, 36, 40, 40).
Top band, next 2 rows: Ch 1, sc in each st across. Turn. (68 (74, 82, 90, 100) sts)
Fasten off and weave in the ends. The panel has 34 (38, 38, 42, 42) rows and measures about 11 (12¼, 12¼, 13¾, 13¾) in tall.
Adjusting the length. Want it longer or cropped higher? Add or remove eyelet repeats before the top band. Each repeat changes the length by about 1⅓ in (3.4 cm) and uses about 21 (23, 25, 28, 31) yd per panel. Change both panels the same way.
Part 4 — Back panel, blocking and side seams
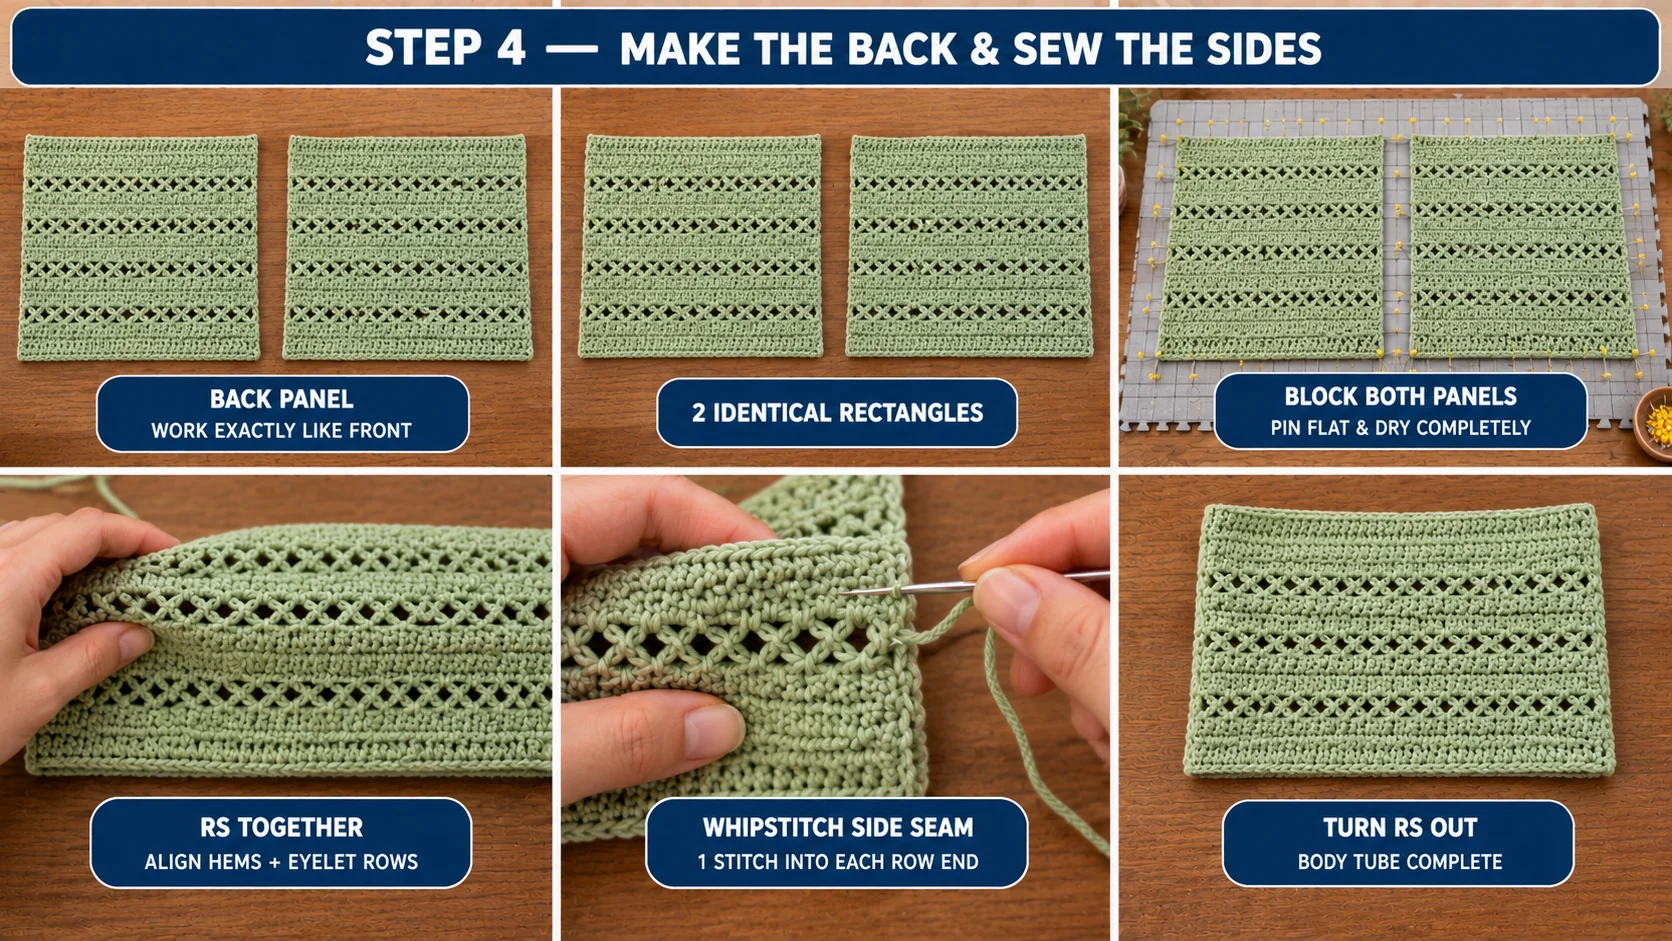
Back panel: Work exactly as for the front. Both panels are identical, so you can pick either one as the front later.
Block both panels. Wet them, press out the water in a towel and pin them flat to 15 (16½, 18¼, 20, 22¼) in wide by 11 (12¼, 12¼, 13¾, 13¾) in tall. Let them dry fully. Blocked cotton seams much more neatly.
Sew the side seams:
- Lay the panels RS together, with the hems lined up and the eyelet rows matching at the edges.
- Cut about 30 in (75 cm) of yarn for each side.
- Whipstitch one side edge from the hem up to the top band, putting one stitch into each row end. Go through both layers each time.
- Repeat on the other side, then turn the tube RS out.
Part 5 — Straps (make 2)
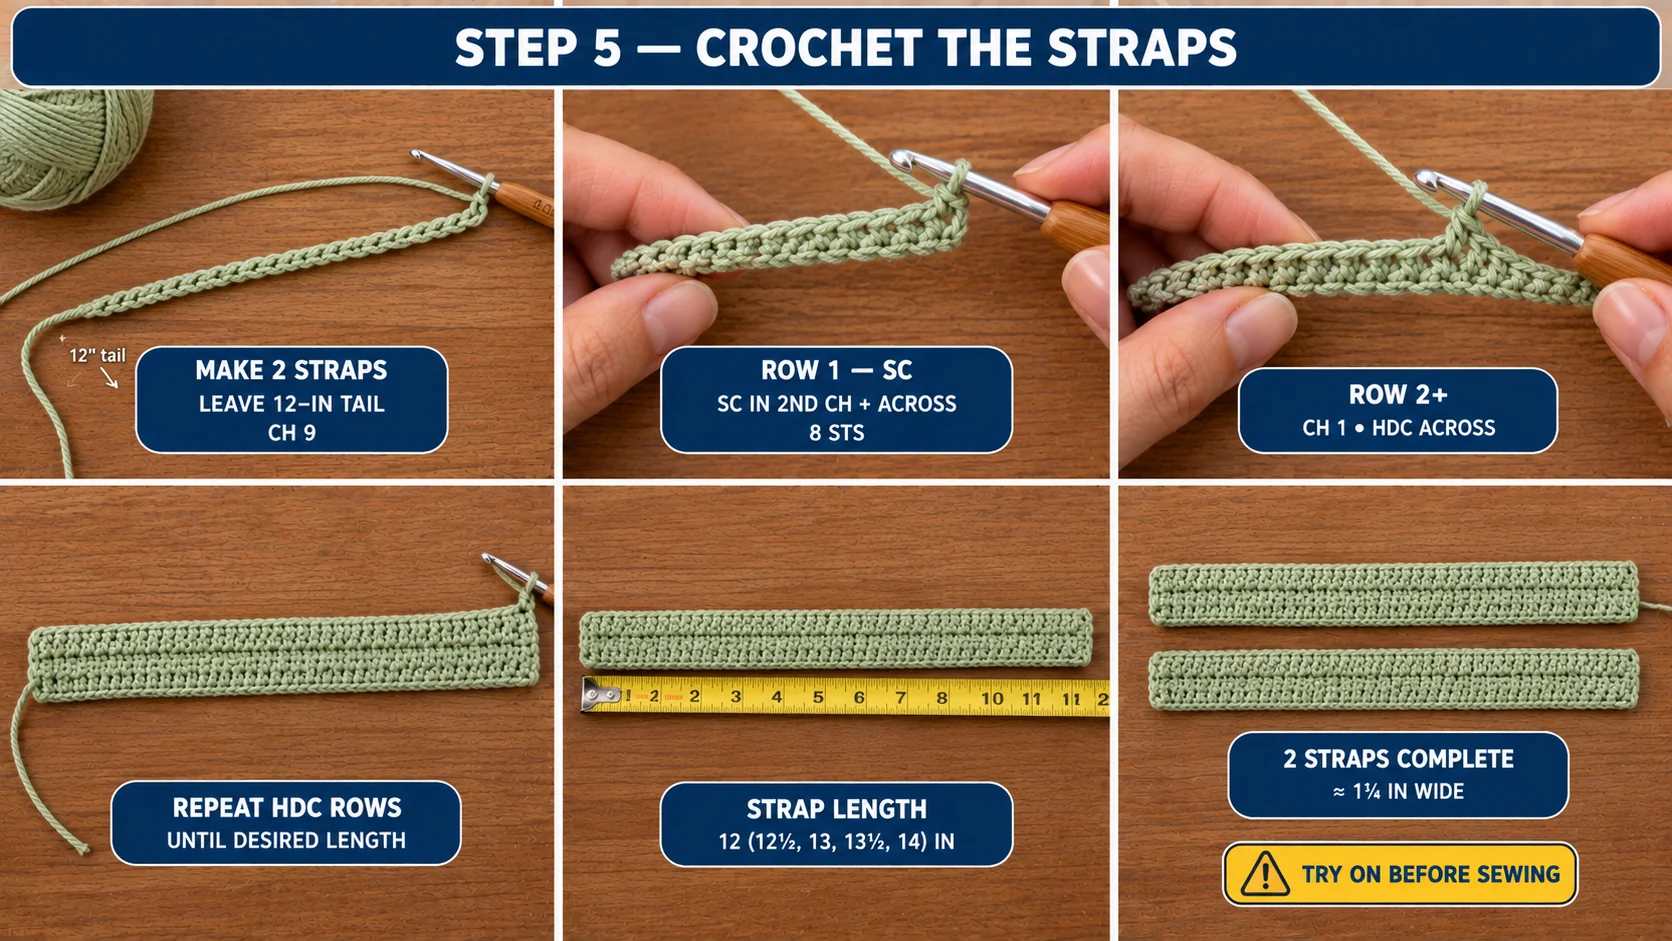
Foundation: Leave a 12 in (30 cm) starting tail, then ch 9.
Row 1: Sc in the 2nd ch from the hook and in each ch across. Turn. (8 sts)
Row 2 and on: Ch 1, hdc in each st across. Turn.
Work until the strap measures about 12 (12½, 13, 13½, 14) in (30.5 (32, 33, 34.5, 35.5) cm). Fasten off, leaving a second 12 in tail. The strap is about 1¾ in (4.5 cm) wide.
That length is a starting point. Your perfect strap length depends on your shoulders and how high you like the neckline, so try it on before you sew anything.
Part 6 — Attach the straps and finish
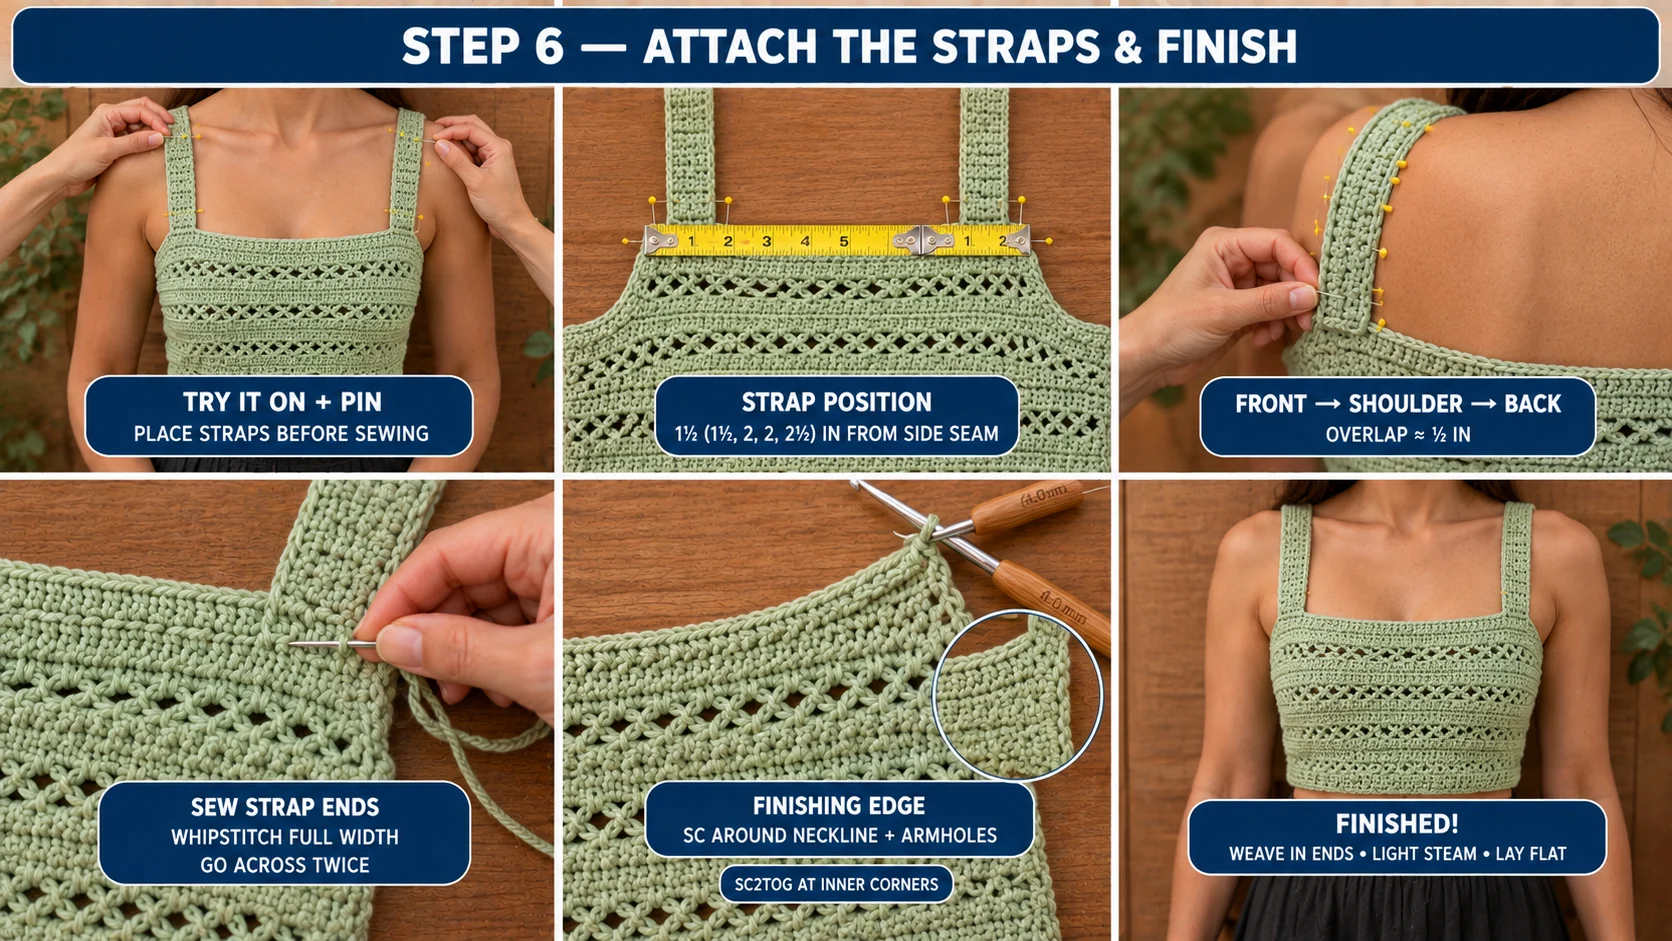
Try it on and pin.
- Put the top on. Place a marker on the front top edge 1½ (1½, 2, 2, 2½) in in from each side seam. That's where the outer edge of each strap goes. Do the same on the back.
- Pin each strap from the front marker, over the shoulder, to the back marker. Overlap the strap about ½ in (1.3 cm) onto the WS of the top band.
- Check in a mirror. Adjust the strap length by adding or pulling out a few rows now. Cotton straps stretch about ½ in as you wear them, so pin them snug.
Sew the straps. The straps carry the whole weight of the top, so these are load-bearing seams.
- Using the strap tails, whipstitch across the full width of the strap end on the WS. Go through the top band and the strap each time.
- Go across twice, about 16 stitches in total, then knot and weave the tail in for at least 2 in.
- Repeat for all 4 strap ends.
Edging (sc, RS facing):
- Neckline. Join the yarn at a back strap. Sc in each st along the back top edge between the straps. Along the strap's inner side, work 4 sc for every 3 row ends. Sc2tog at each inner corner, where the strap meets the top band, to keep the corners square. Work the front and the other strap the same way. Join with a sl st to the first sc and fasten off.
- Armholes. Work the same way around each armhole: sc in each st along the top band, 1 sc across the top of the side seam, and 4 sc for every 3 row ends up the strap's outer side.
Weave in all the ends. Give the finished top a light steam or a mist of water and lay it flat to dry.
Make it yours — quick variations
| Variation | Change from base pattern |
|---|---|
| Longer tank | Add 3 to 4 eyelet repeats for a top that reaches the waistband. Each adds about 1⅓ in and 21–31 yd per panel. |
| Narrower neckline | Place the straps 1 in farther in from the side seams on both panels. |
| Thinner straps | Ch 7 for 6 sts (about 1⅓ in wide). Only do this in the smaller sizes, since wider straps spread the weight better. |
| Lower back | On the back panel only, stop 2 repeats early, then work the 2-row top band. Lengthen both back strap ends to match. |
| Two-tone | Work every eyelet row in cream and the hdc rows in green. Carry the unused color up the side edge, where the seam hides it. |
| Matching set | Pair it with my breezy drawstring crochet shorts in the same cotton. |
Troubleshooting the three things that go wrong
The panel is getting narrower
You're losing a stitch. It's almost always the top of the ch-3 at the end of the hdc row after an eyelet row. Count at the end of every eyelet row and the row after it, until the rhythm is automatic.
The eyelet rows don't line up at the side seams
The two panels have a different number of rows in the hem. Both panels need exactly 4 hem rows before the first eyelet row. When you seam, match the eyelet rows first, then fill in between.
The top feels loose after a few hours
Cotton relaxes with body heat and wear. If it's only a little loose, wash it and dry it flat, and it will tighten back up. If it slides down, shorten the straps by 1 in. For your next one, choose the smaller size or go down half a hook size.
Frequently asked questions
How long does this crochet crop top take to make? About 9 to 14 hours in total, depending on the size. Each panel is 34 to 42 rows, and the eyelet rows go fastest. The straps, seams and edging take another 2 to 3 hours. Over one weekend, or a week of evenings, it comes together comfortably.
How much yarn do I need? About 430 (510, 560, 665, 740) yd of DK #3 cotton, or 395 (465, 510, 610, 675) m. That's 4 (5, 5, 6, 6) balls of a 137 yd cotton. Buy them all from one dye lot, because a change in shade shows clearly on a plain green top.
Which size should I make? Choose the finished bust that matches your bust measurement or sits up to 1 in below it. This top is meant to fit close. Between sizes? Go smaller for a snug fit, or larger if you want to wear something underneath.
Can I use a different yarn? Yes, as long as you match the gauge of 18 sts × 12 rows over 4 in. A cotton-acrylic DK is softer and stretches a little more. A linen blend drapes beautifully but is stiffer at first. Avoid worsted #4 cotton unless you redo the stitch counts, because it makes the fabric much thicker.
How do I wash it? Follow the yarn label. For most cottons, hand wash or use a gentle cool cycle in a mesh bag. Press the water out in a towel and dry it flat. Don't hang it, because wet cotton is heavy and the straps will stretch.
Can I sell tops made from this pattern? Yes, you're welcome to sell finished tops made from this free pattern at markets, on Etsy or as gifts. Please credit "Pattern by Wavode" in your listing and link back to this page. What you can't do is republish this write-up or my photos as your own pattern.
Related patterns on Wavode
- Sage flare crochet skirt: a tennis-style A-line skirt in two seamed panels.
- Breezy drawstring crochet shorts: high-waisted moss-stitch shorts in cotton.
- Granny square crochet bag: a cream beach tote with tassels for summer days.
- Cropped balloon-sleeve crochet sweater: the cold-weather cousin of this top.
Made this top? Tag #wavodecrochet on Pinterest. I re-pin every finished make and credit the maker.
Pattern by Clara Hartwell for Wavode. Questions? Email me at support@wavode.com.