Daisy Granny Square Baby Dress

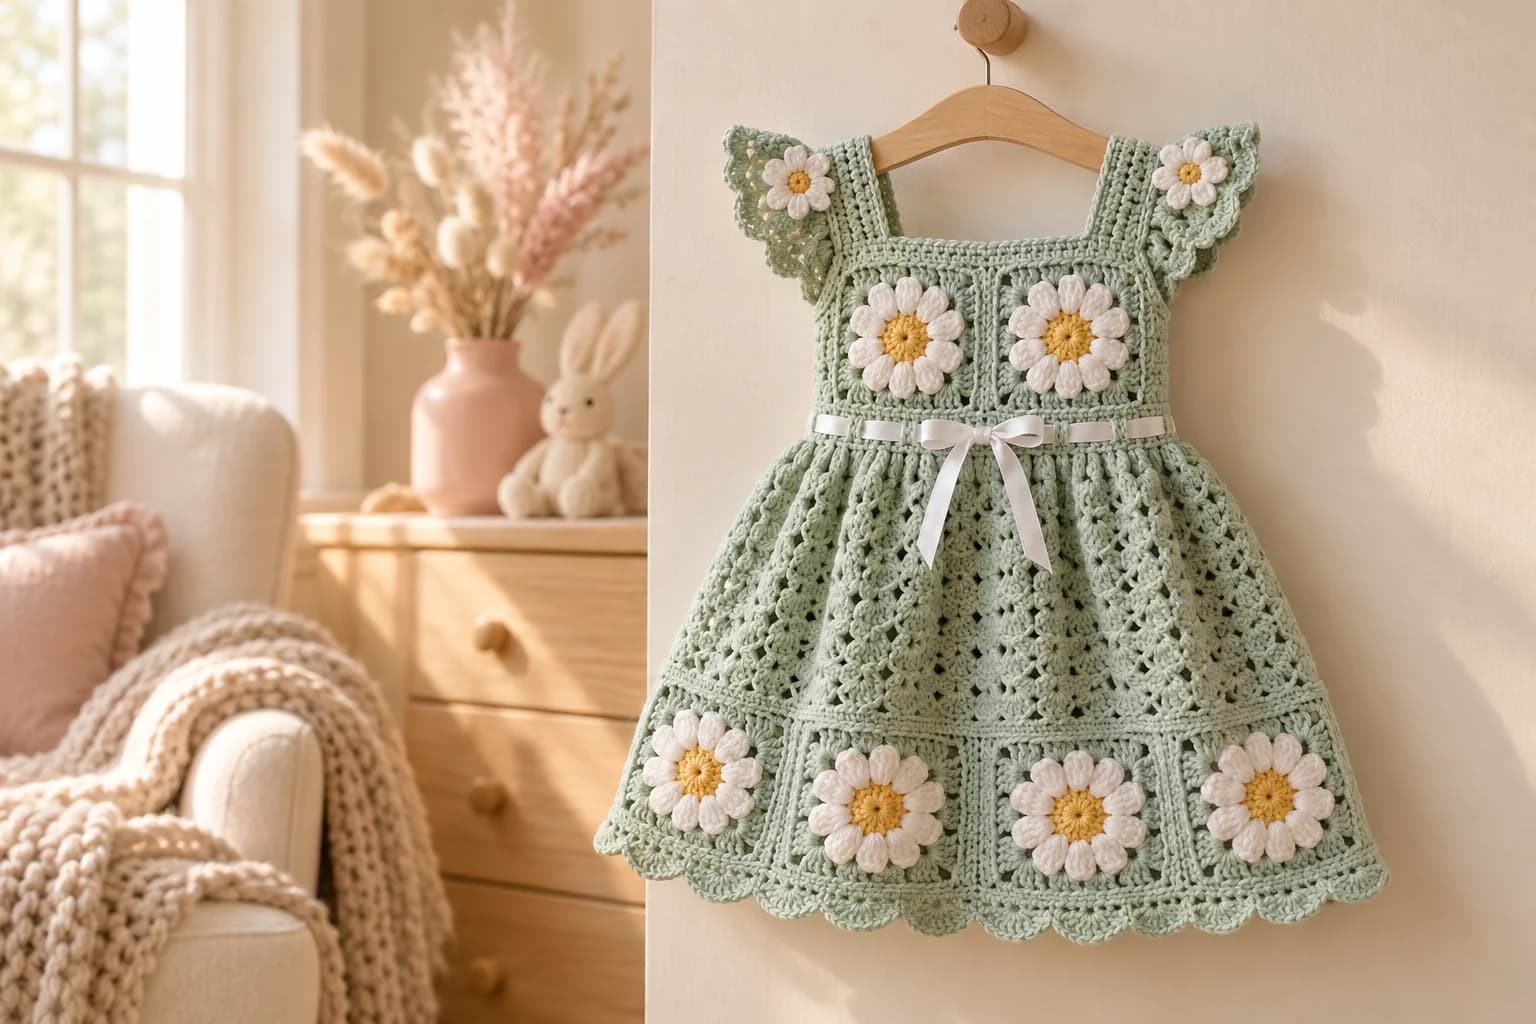
This free granny square baby dress is mint green, scattered with white daisies, and tied at the waist with a little ribbon bow. The bodice is a strip of six daisy squares. The skirt is soft shell lace, and a band of eight more daisy squares sits just above the scalloped hem. Every square is the same, so once you've made one, you know the whole dress. You'll need DK cotton in mint, white and yellow, and about 230 yards of mint for the smallest size. It comes in 3 sizes, 6 to 24 months.
Key Takeaways
- 14 identical daisy squares: 6 for the bodice and 8 for the hem band.
- The size comes from the hook: 3.5 mm, 4 mm or 4.5 mm, with the same stitch counts.
- The skirt is shell lace that grows from 5-dc to 7-dc shells, so it flares gently.
- A buttoned back and a ribbon waist make it easy to put on and adjust.
Why I love this granny square baby dress
Granny squares and babies just go together. This dress turns the daisy square into something you can wear: a fresh mint dress with flowers at the chest and the hem. It's light, it breathes, and it looks sweet at a summer party or a spring photo shoot.
I like how portable it is. You can make the squares anywhere, a few at a time. Then you join them, and the dress comes together surprisingly fast.
The skirt is relaxing too. It's one shell round, repeated, with the shells growing a little bigger halfway down. Isn't it nice when the rhythm does the shaping for you?
Skill level. Intermediate. You need a magic ring, sc, hdc, dc, tr, puff stitch, working in rows and in rounds, and joining squares. Each step is easy on its own.
What you'll need
Yarn (DK weight #3 cotton)
| Color | Used for | Amount |
|---|---|---|
| Mint | Squares (outer rounds), bodice, skirt, sleeves | about 230 (260, 295) yd |
| White | Daisy petals | about 40 (45, 50) yd |
| Yellow | Daisy centers | about 15 (17, 19) yd |
- In Paintbox Yarns Cotton DK (137 yd / 125 m per 50 g), that's 2 (2, 3) balls of mint, and 1 ball each of white and yellow.
- Cotton is soft, breathable and easy to wash, which is what you want for a baby.
- I worked these totals out from the stitch count, part by part, with a margin of about 12% for the ends and the joins.
Hook
- 3.5 mm (E/4) for 6–12 months, 4 mm (G/6) for 12–18 months, 4.5 mm (7) for 18–24 months.
Notions
- 2 buttons, ½ in (12 mm), flat, in white.
- About 36 in (90 cm) of white satin ribbon, ⅜ in (10 mm) wide.
- Tapestry needle, sewing needle and white thread, a few stitch markers.
Gauge and sizes
Gauge: one daisy square measures 3 (3¼, 3½) in / 7.5 (8.25, 9) cm on each side, before joining. One shell round is about ½ in tall.
This dress uses the same stitch counts in every size. The hook makes the squares bigger, and that makes the whole dress bigger. So check your square first: if it's smaller, go up a hook size; if it's bigger, go down one.
| Size | To fit chest | Finished chest | Length from shoulder | Mint |
|---|---|---|---|---|
| 6–12 months | 17–18 in | 18 in / 46 cm | about 16 in | 230 yd |
| 12–18 months | 18–19 in | 19½ in / 50 cm | about 17½ in | 260 yd |
| 18–24 months | 19–20 in | 21 in / 53 cm | about 19 in | 295 yd |
Instructions are written 6–12 m (12–18 m, 18–24 m). When only one number is given, it applies to every size.
Abbreviations (US crochet terms)
- ch: chain
- sl st: slip stitch
- sc: single crochet
- hdc: half double crochet
- dc: double crochet
- tr: treble crochet
- puff: (yarn over, insert the hook, pull up a loop) 3 times in the same st, yarn over and pull through all 7 loops
- MR: magic ring
- sk: skip
- sp: space
- st(s): stitch(es)
- rnd(s): round(s)
- RS / WS: right side / wrong side
The pattern, step by step
Part 1: The daisy square (make 14)
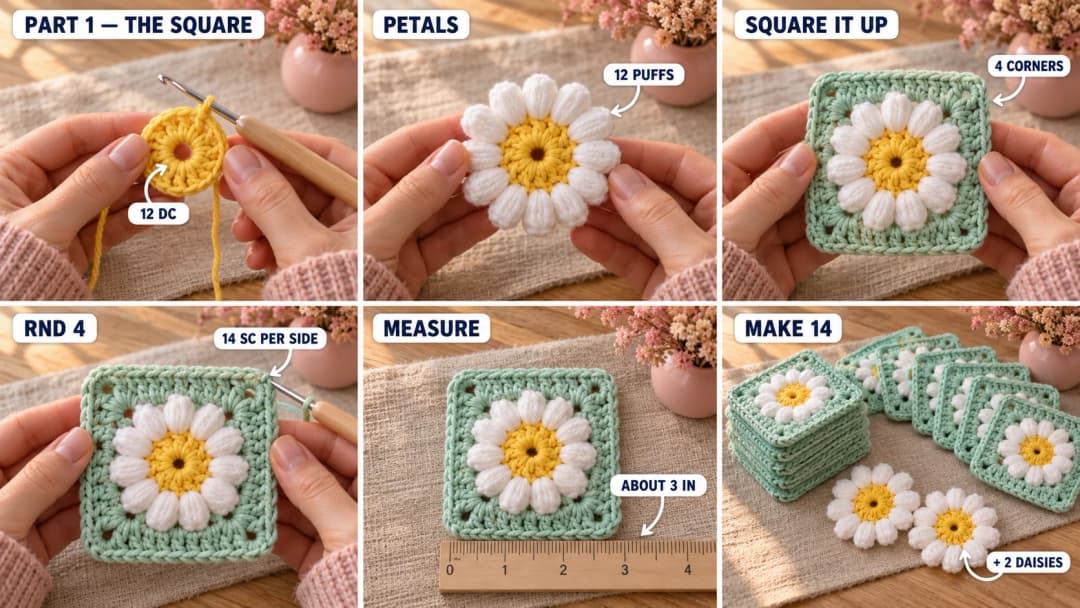
Rnd 1 (yellow): MR, ch 3 (counts as a dc), 11 dc in the ring. Pull the ring closed and join with a sl st to the top of the ch-3. Fasten off. (12 dc)
Rnd 2 (white petals): Join white in any st. Ch 2, puff in the same st, ch 2. Puff in the next st, ch 2. Repeat from * 10 more times. Join with a sl st to the top of the first puff. Fasten off. (12 puffs, 12 ch-2 sps)
Rnd 3 (mint, square up): Join mint in any ch-2 sp. Ch 3 (counts as a dc), (2 dc, ch 2, 3 dc) in the same sp for the first corner. 3 hdc in each of the next 2 ch-2 sps, (3 dc, ch 2, 3 dc) in the next ch-2 sp. Repeat from * twice more. 3 hdc in each of the last 2 ch-2 sps. Join to the top of the ch-3. (12 sts per side, 4 corner sps)
Rnd 4 (mint): Ch 1, sc in the same st and in each st to the next corner. (Sc, ch 2, sc) in the corner sp, sc in each st to the next corner. Repeat from * around, ending with the last corner. Join to the first sc. Fasten off, leaving a 12-in tail on the 6 bodice squares. (14 sc per side, 4 corner sps)
Measure it: it should be about 3 (3¼, 3½) in across. Make 14 squares.
Then make 2 shoulder daisies: work only Rnds 1 and 2, and leave an 8-in white tail.
Part 2: The bodice strip and the ribbon round
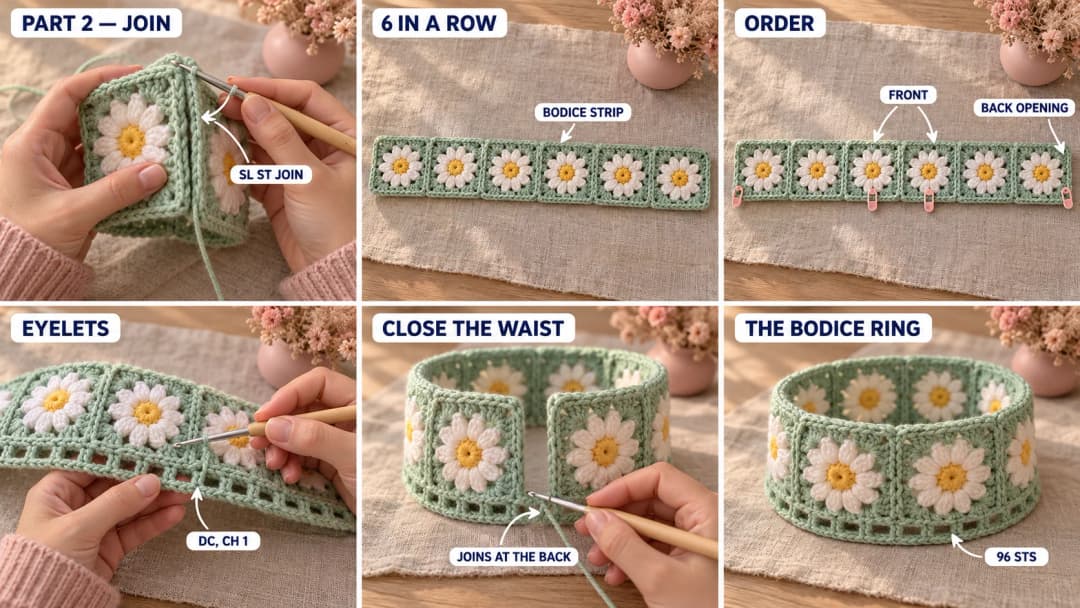
Join 6 squares in a row. Hold two squares RS together. With mint, sl st through the back loops of both squares along one side: in the corner sp, in each of the 14 sc, and in the next corner sp. Add the next square the same way. The order, from left to right with the RS facing, is: back 1, side 1, front 1, front 2, side 2, back 2. Don't join back 1 to back 2: the gap between them is the back opening.
The strip is about 18 (19½, 21) in long and 3 (3¼, 3½) in tall.
Ribbon round (eyelets): With the RS facing, join mint in the bottom corner sp of back 1, at the back opening. Ch 4 (counts as a dc and ch 1), sk the next st. Dc in the next st, ch 1, sk the next st. Repeat from * along the bottom edge of all 6 squares. Count each corner sp and each sc as a st. At the end, join with a sl st to the 3rd ch of the beginning ch-4. This closes the round across the back, so the opening stops at the waist. (48 dc, 48 ch-1 sps: 96 sts)
Don't fasten off: the skirt starts here (Part 4).
Part 3: The upper bodice, straps and back opening
Before the skirt, finish the top of the bodice. Work along the top edge of the strip.
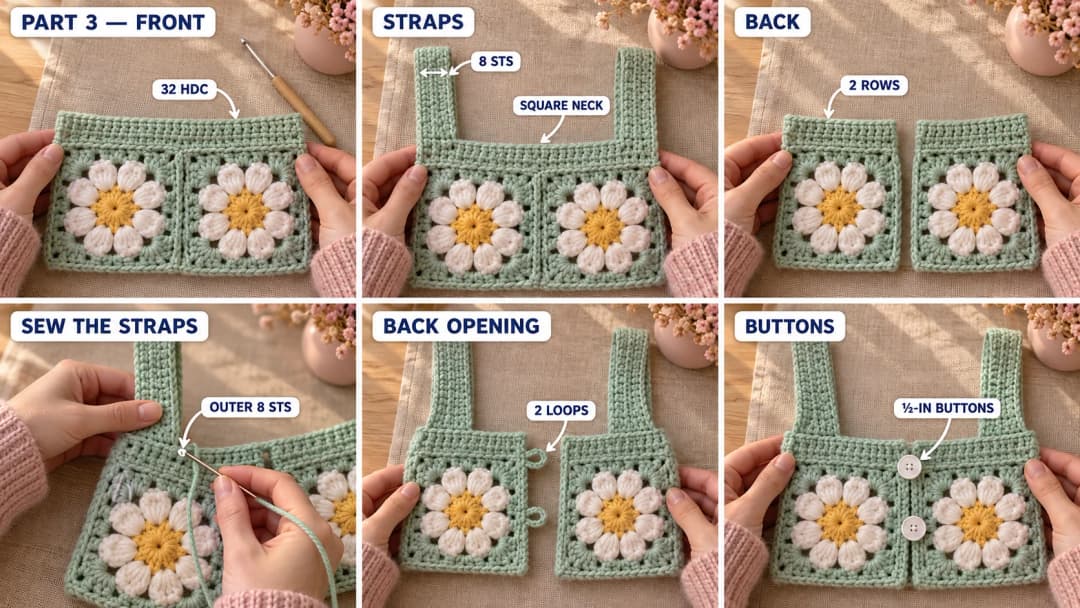
Front, Row 1 (RS): Join mint in the top corner sp of front 1, next to side 1. Ch 2 (doesn't count, here and on every row). Hdc in the same sp, in each of the 14 sc, in the corner sp, in the next corner sp of front 2, in each of the 14 sc and in the last corner sp. Turn. (32 hdc)
Front, Row 2: Ch 2, hdc in each st across. Turn. (32 hdc)
First strap, Row 3: Ch 2, hdc in each of the first 8 sts. Turn. Leave the other sts unworked. (8 hdc)
First strap, Rows 4 to 15 (16, 17): Ch 2, hdc in each of the 8 sts. Turn. Fasten off, leaving a 10-in tail. The strap is about 4 (4½, 5) in long.
Second strap: With the RS facing, join mint in the 25th st of Row 2 (8 sts from the other end). Work Rows 3 to 15 (16, 17) over the last 8 sts. Fasten off, leaving a 10-in tail.
The 16 sts in the middle stay free: that's the square neckline.
Back halves (make both): Join mint in the top corner sp of back 1 at the back opening. Ch 2, hdc in the corner sp, in each of the 14 sc and in the next corner sp. Turn. (16 hdc) Work 1 more row of hdc. Fasten off. Repeat on back 2, starting at the back opening.
Sew the straps. Lay the dress flat, RS out. Bring each strap over to the back, without twisting it. Sew its end to the outer 8 sts of the matching back half (the side near the armhole) with the tail, through both layers. Try the dress on the baby first if you can: shorten or lengthen the straps by a row or two.
Back opening: With the RS facing, join mint at the top of the back 2 edge. Ch 1, sc evenly down the edge to the ribbon round: 2 sc in each hdc row end and 14 sc along the square. Ch 1, turn the work and sc evenly up the back 1 edge in the same way, making 2 button loops: one at the top and one halfway down the square. For each loop, ch 4 and sk 2 sts. Fasten off. Sew the 2 buttons to the back 2 edge, opposite the loops, with doubled sewing thread.
Part 4: The shell lace skirt
Go back to the ribbon round and keep working in rounds with the RS facing.
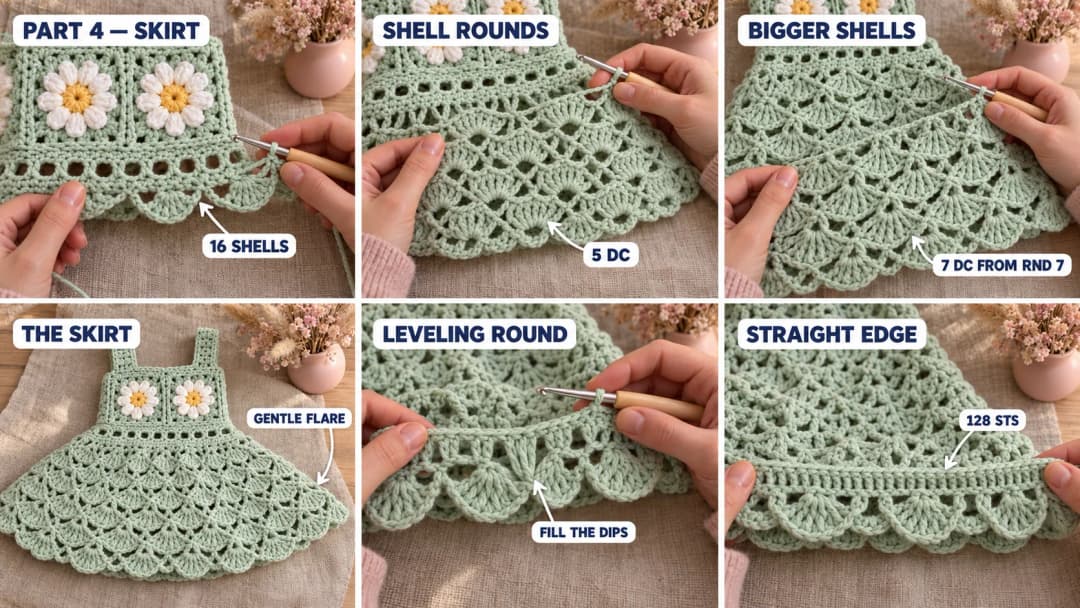
Rnd 1: Ch 1, sc in the same st as the join. Sk 2 sts, 5 dc in the next st, sk 2 sts, sc in the next st. Repeat from * around, leaving out the last sc. Join to the first sc. (16 shells)
Rnds 2–6: Sl st in each of the next 3 dc (you're on the center dc of the shell). Ch 1, sc in the same st. 5 dc in the next sc, sc in the center dc of the next shell. Repeat from * around, leaving out the last sc. Join to the first sc. (16 shells)
The shells now sit over the sc of the round below, and the sc over the shells.
Rnd 7: Sl st in each of the next 3 dc. Ch 1, sc in the same st. 7 dc in the next sc, sc in the center dc of the next shell. Repeat from * around, leaving out the last sc. Join. (16 bigger shells)
Rnds 8 to 12 (13, 13): Sl st in each of the next 4 dc (the center of a 7-dc shell). Ch 1, sc in the same st. 7 dc in the next sc, sc in the center dc of the next shell. Repeat from * around, leaving out the last sc. Join.
Leveling round: Sl st in each of the next 4 dc. Ch 1, sc in the same st. Hdc in the next dc, dc in the next dc, tr in the next dc, tr in the next sc, tr in the first dc of the next shell, dc in the next dc, hdc in the next dc, sc in the center dc. Repeat from * around, leaving out the last sc. Join to the first sc. (128 sts)
The edge is now straight, ready for the band of squares. Fasten off.
Part 5: The daisy hem band
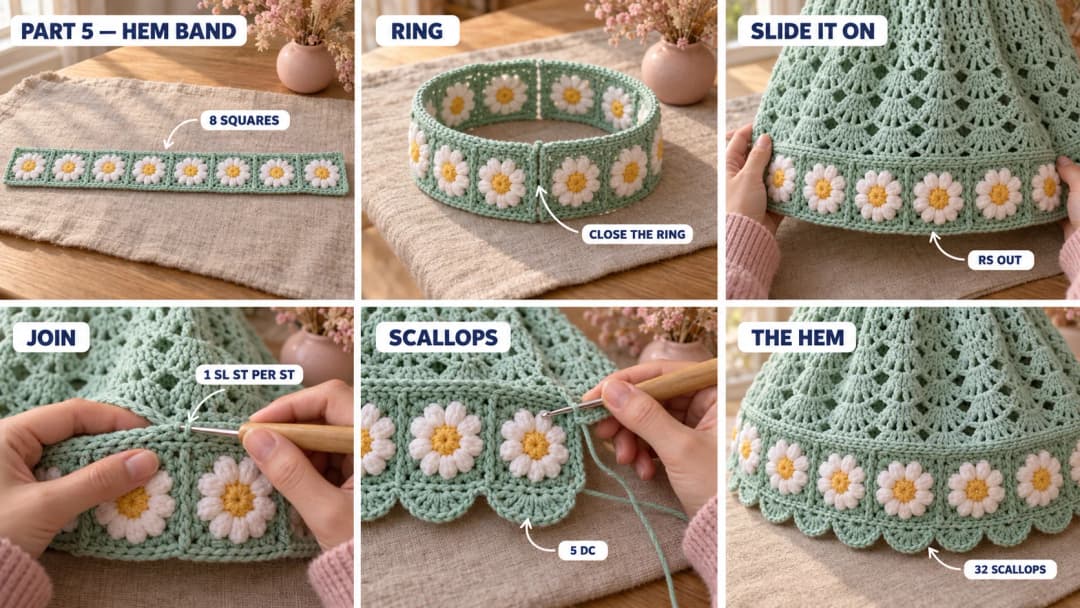
Join 8 squares into a ring. Join them in a row as in Part 2, then join the last square to the first. The ring is about 24 (26, 28) in around.
Join the ring to the skirt. Slide the ring over the skirt, both RS facing out, with the top edge of the squares against the leveling round. With mint, sl st through both layers: 1 sl st in each of the 128 sts of the leveling round, together with the 16 sts along the top of each square (14 sc and the 2 corner sps). Fasten off.
Scalloped hem: With the RS facing, join mint in any st along the bottom edge of the ring. Ch 1, sc in the same st. Sk 1 st, 5 dc in the next st, sk 1 st, sc in the next st. Repeat from * around, counting the 14 sc and 2 corner sps of each square, and leaving out the last sc. Join to the first sc. Fasten off. (32 scallops)
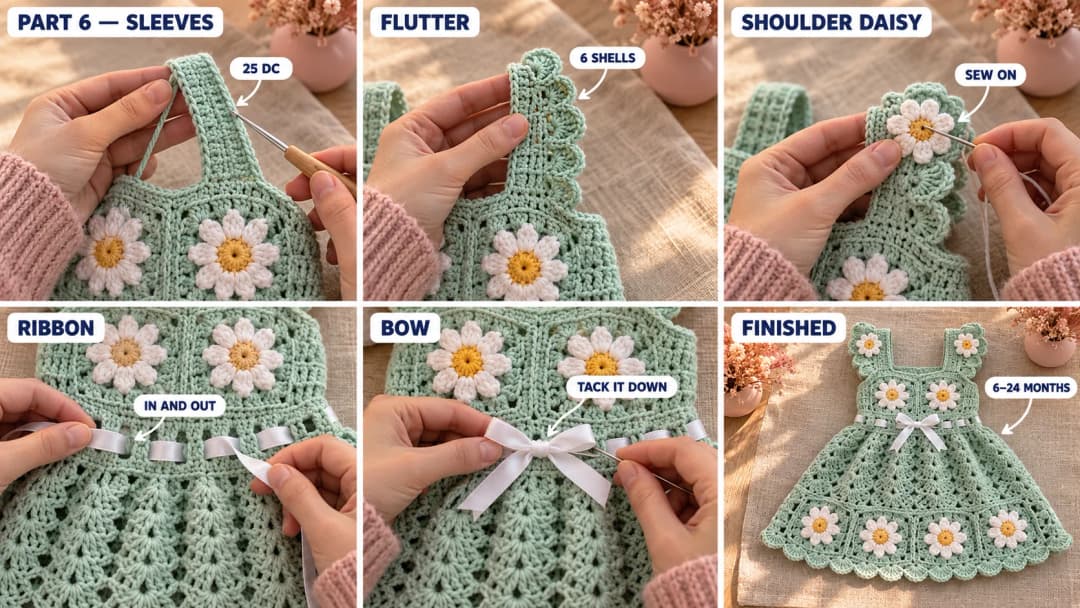
Part 6: Cap sleeves, shoulder daisies and the ribbon
Cap sleeves (make 2). With the RS facing, join mint at the front end of one strap's outer edge (the armhole side).
- Row 1: Ch 3 (counts as a dc). Work 25 (29, 33) dc evenly along the outer edge of the strap, ending at the back. Turn.
- Row 2: Ch 1, sc in the first st. Sk 1 st, 5 dc in the next st, sk 1 st, sc in the next st. Repeat from * across. Fasten off. (6 (7, 8) shells)
The little shells fall over the top of the arm like a flutter sleeve.
Shoulder daisies: Sew one daisy (Rnds 1–2) on the top of each shoulder, over the cap sleeve, with a few stitches through the yellow center and between the petals.
Ribbon: Weave the ribbon in and out of the ch-1 sps of the ribbon round, starting and ending at the center front. Tie a small bow. Then, with the sewing thread, tack the ribbon to the dress at both side seams and at the back, so it can't be pulled out. Trim the ends to about 4 in and seal them with a tiny drop of fray stopper.
Finishing: Weave in all the ends, hiding mint tails in the mint rounds and white tails in the petals. Wet block the dress flat: open the shells, square the squares and pin the scallops. Let it dry.
Safety and care. Sew the buttons on with doubled thread and check them before each wear, because loose buttons are a choking hazard. Keep the ribbon tacked down and the bow short, and never leave a baby asleep in clothes with ties. If you'd rather skip ribbon, thread a crochet chain instead and tack it the same way. Hand wash in cool water and lay flat to dry.
Make it yours — quick variations
| Variation | Change from base pattern |
|---|---|
| Blush and cream | Work the mint rounds in blush pink and the petals in cream. |
| Sleeveless | Skip the cap sleeves. Sc along the strap edges instead. |
| Longer dress | Add 2 rounds of 7-dc shells before the leveling round. That adds about 1 in and 15 to 20 yd of mint. |
| Tunic top | Stop the skirt after Rnd 9 and fasten off. The 7-dc shells make a pretty hem on their own, so skip the hem band. |
| Rainbow daisies | Make each center in a different pastel: yellow, pink, peach and lilac. |
Troubleshooting the three things that go wrong
The squares are different sizes
Your tension changes between sessions. Measure each square before you join it. If one is clearly bigger or smaller, remake it: the bodice and the hem band only fit if the squares match.
The hem band doesn't fit the skirt
Count the leveling round: it must be 128 sts, and the ring of 8 squares has 8 × 16 = 128 sts along the top. If they match but the ring looks tight, block the skirt first, then join.
The neckline gapes
The straps are too long, or the neck sts got stretched. Shorten each strap by a row, and work the back opening sc a little firmer.
Frequently asked questions
How much yarn do I need for this granny square baby dress? About 230 (260, 295) yd of mint, 40 (45, 50) yd of white and 15 (17, 19) yd of yellow DK cotton. In Paintbox Cotton DK, that's 2 (2, 3) balls of mint and one ball each of white and yellow.
Why do the sizes change the hook and not the stitch counts? Because the squares have to stay the same. A bigger hook makes every square, and the skirt with it, about 8% bigger. It keeps the pattern simple: you follow the same instructions and only measure your square.
Can I make it bigger than 24 months? Yes. Use a 5 mm hook for squares of about 3¾ in. The chest becomes about 22½ in, for 2–3 years. Add 2 rounds of shells to the skirt for length.
Is it safe for a baby? Yes, with a few precautions. Sew the buttons on firmly and check them often, tack the ribbon so it can't come loose, and keep the bow short. Don't let a baby sleep in it unsupervised.
Can I sell dresses made from this pattern? Yes, you can sell finished dresses you've made yourself. Please credit "Pattern by Wavode" and link back to this page. Please don't republish the written pattern or my photos.
Related patterns on Wavode
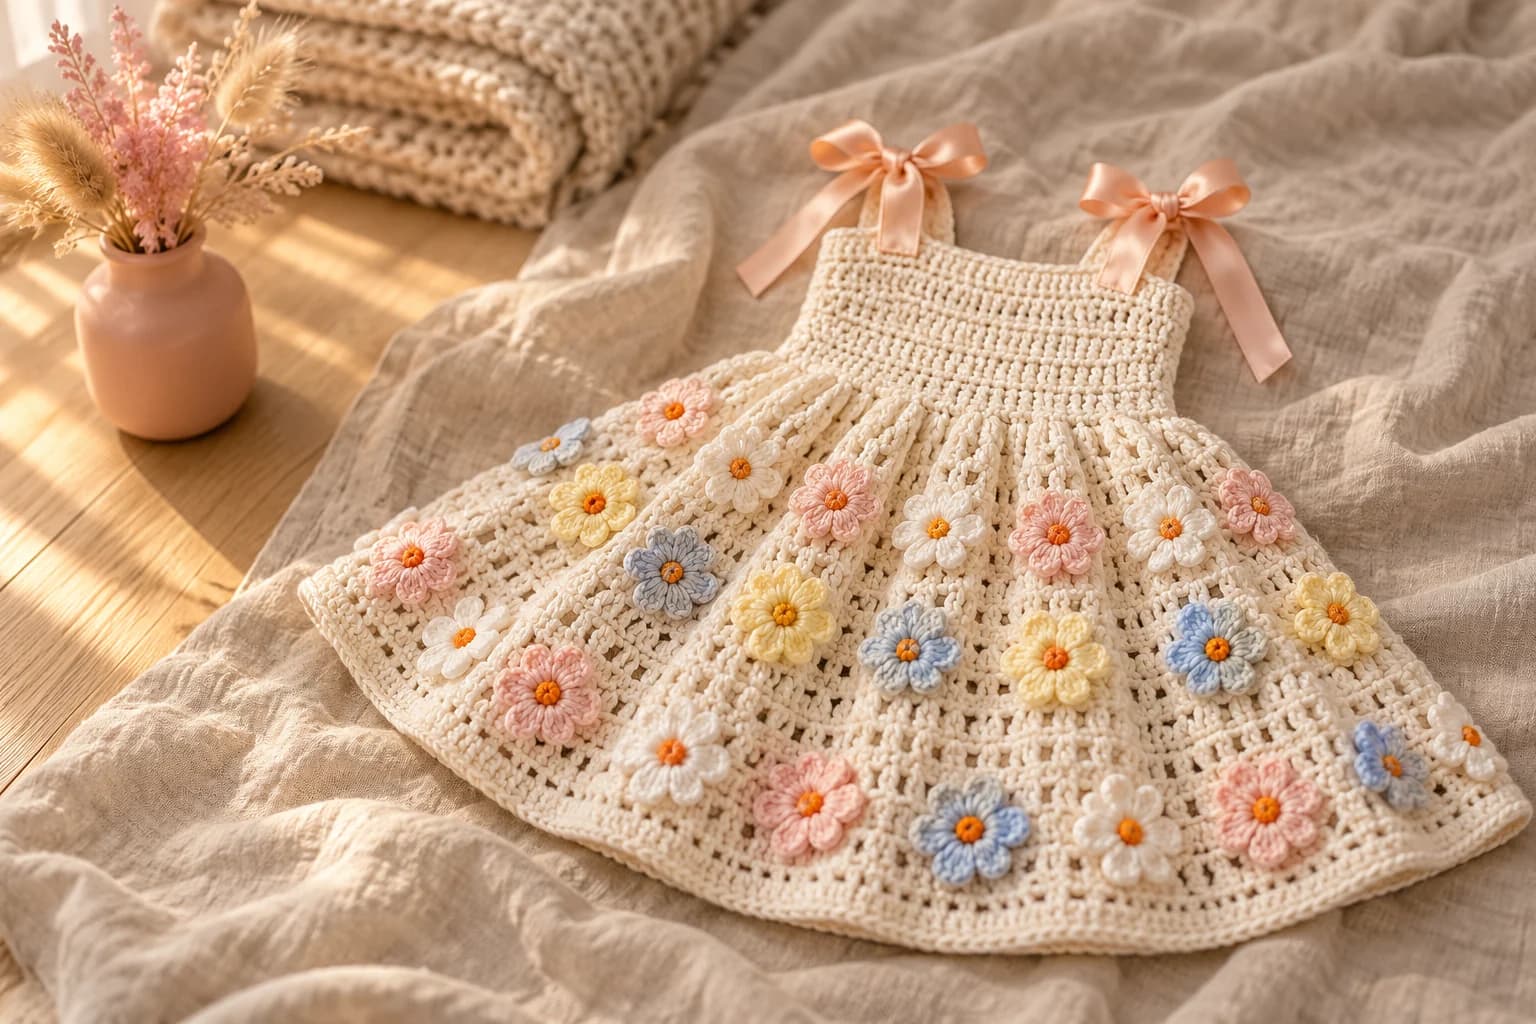
- Crochet baby sundress: a ridged sundress with pastel flowers and ribbon ties.
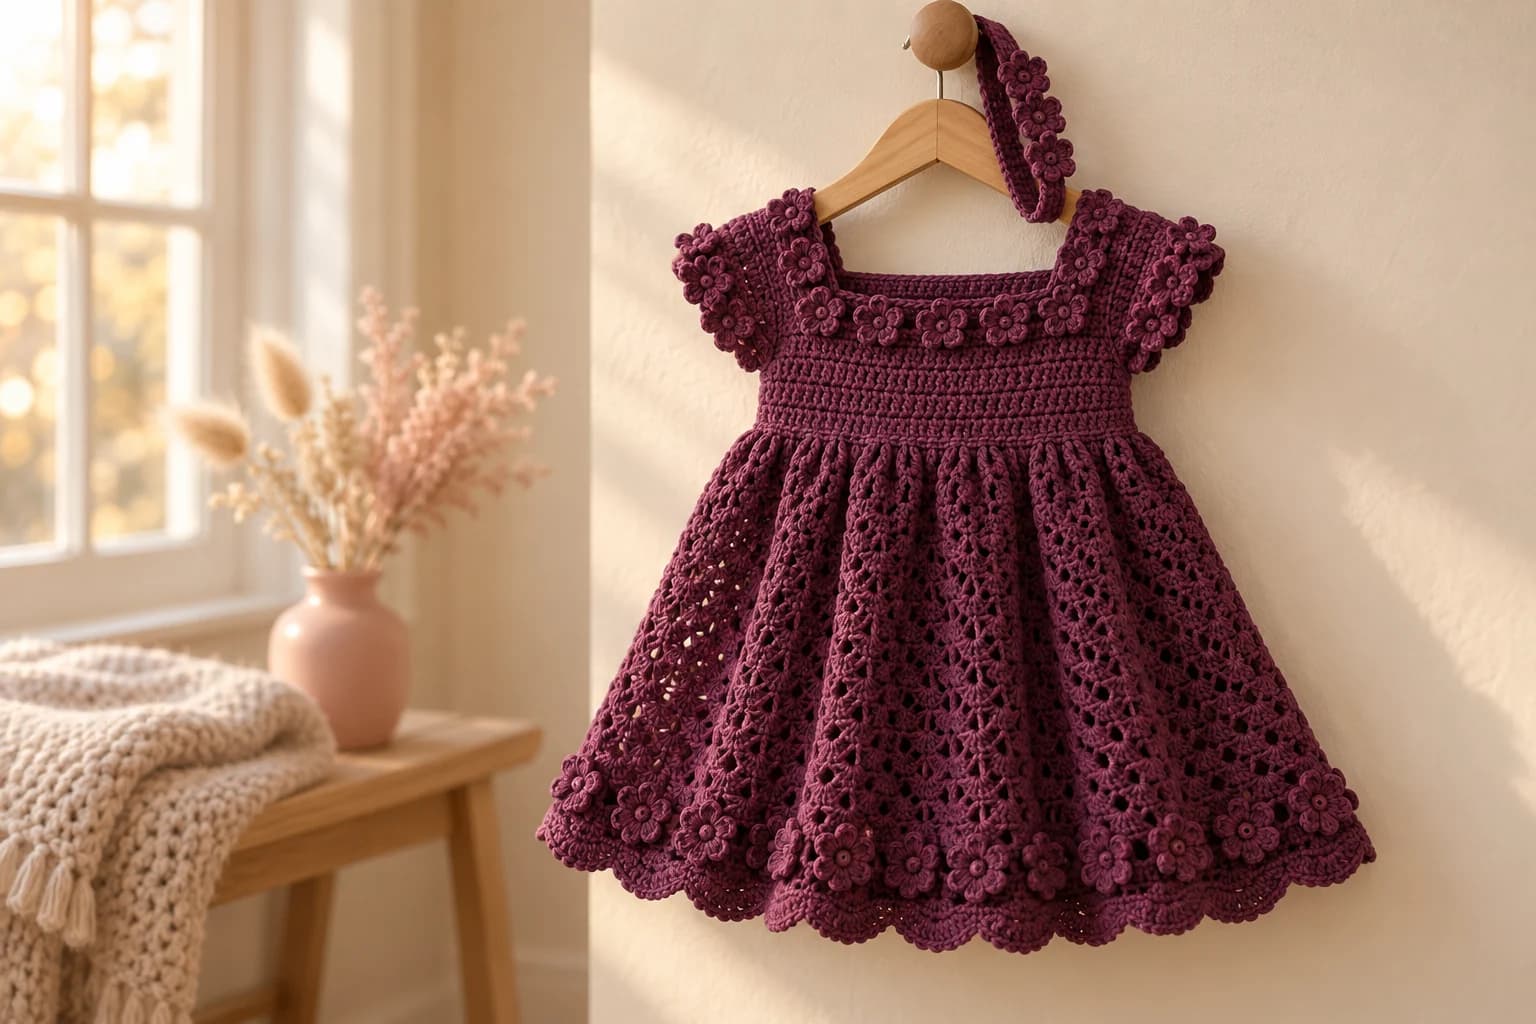
- Plum blossom toddler dress: a square-neck dress with flower trim and a headband.
- Crochet daisy coaster: the daisy motif as a quick coaster.
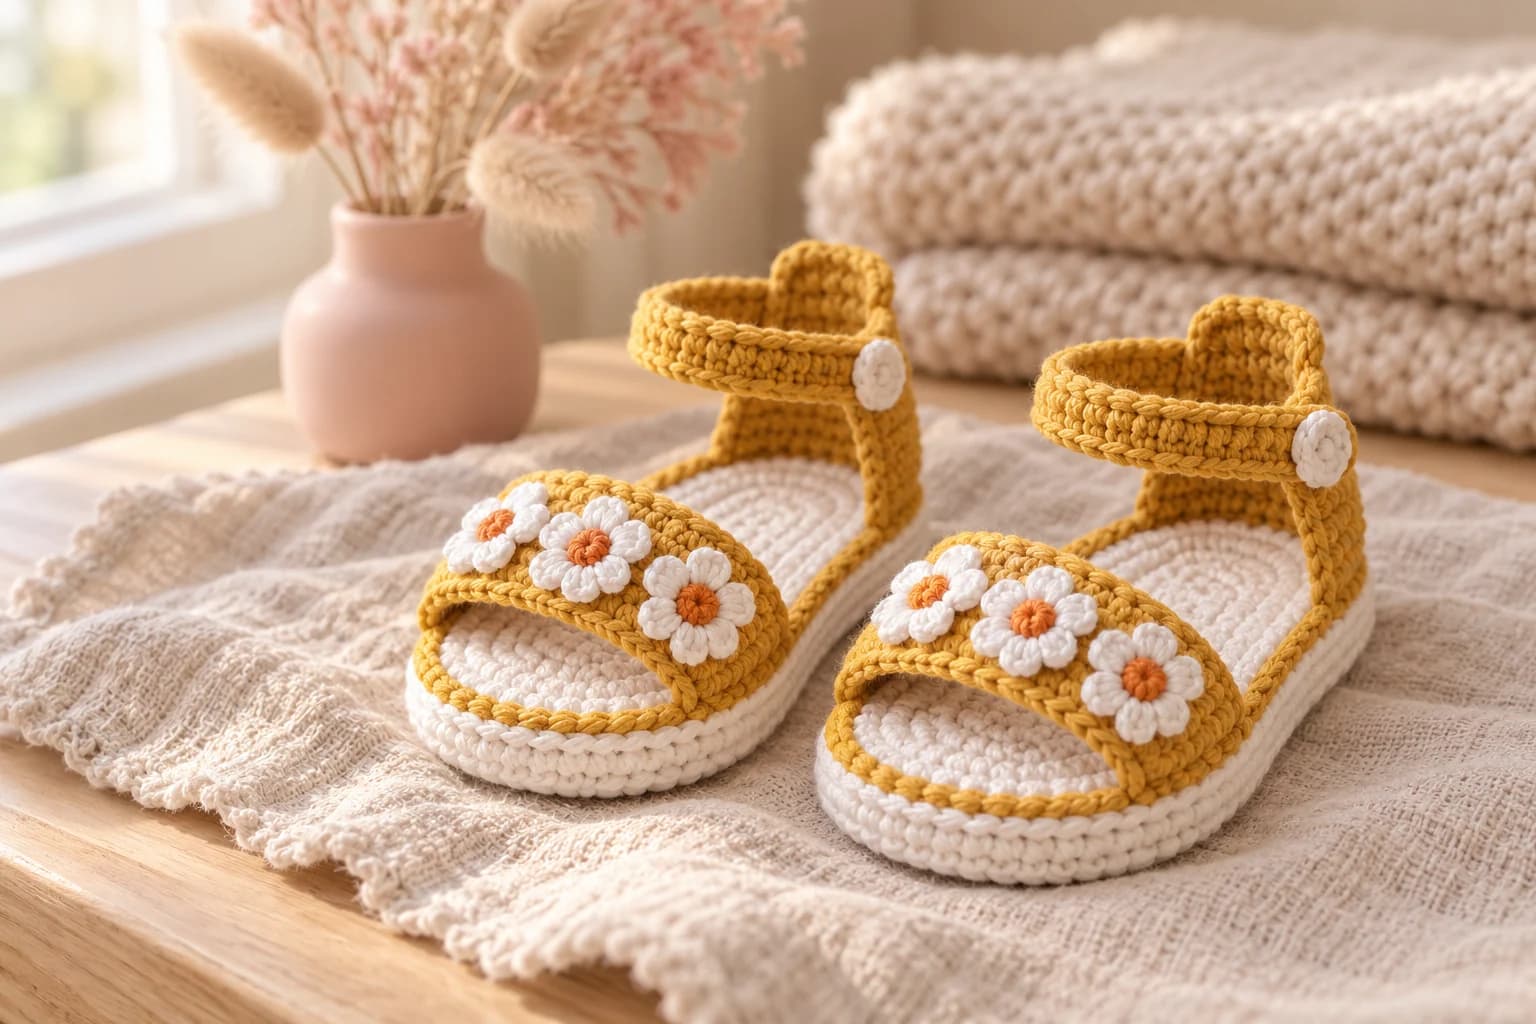
- Crochet baby sandals: little sandals to match.
Made a daisy dress? Tag #wavodecrochet on Pinterest. I re-pin every finished make and credit the maker.
Pattern by Clara Hartwell for Wavode. Questions? Email me at support@wavode.com.