Snow Princess Baby Dress Set

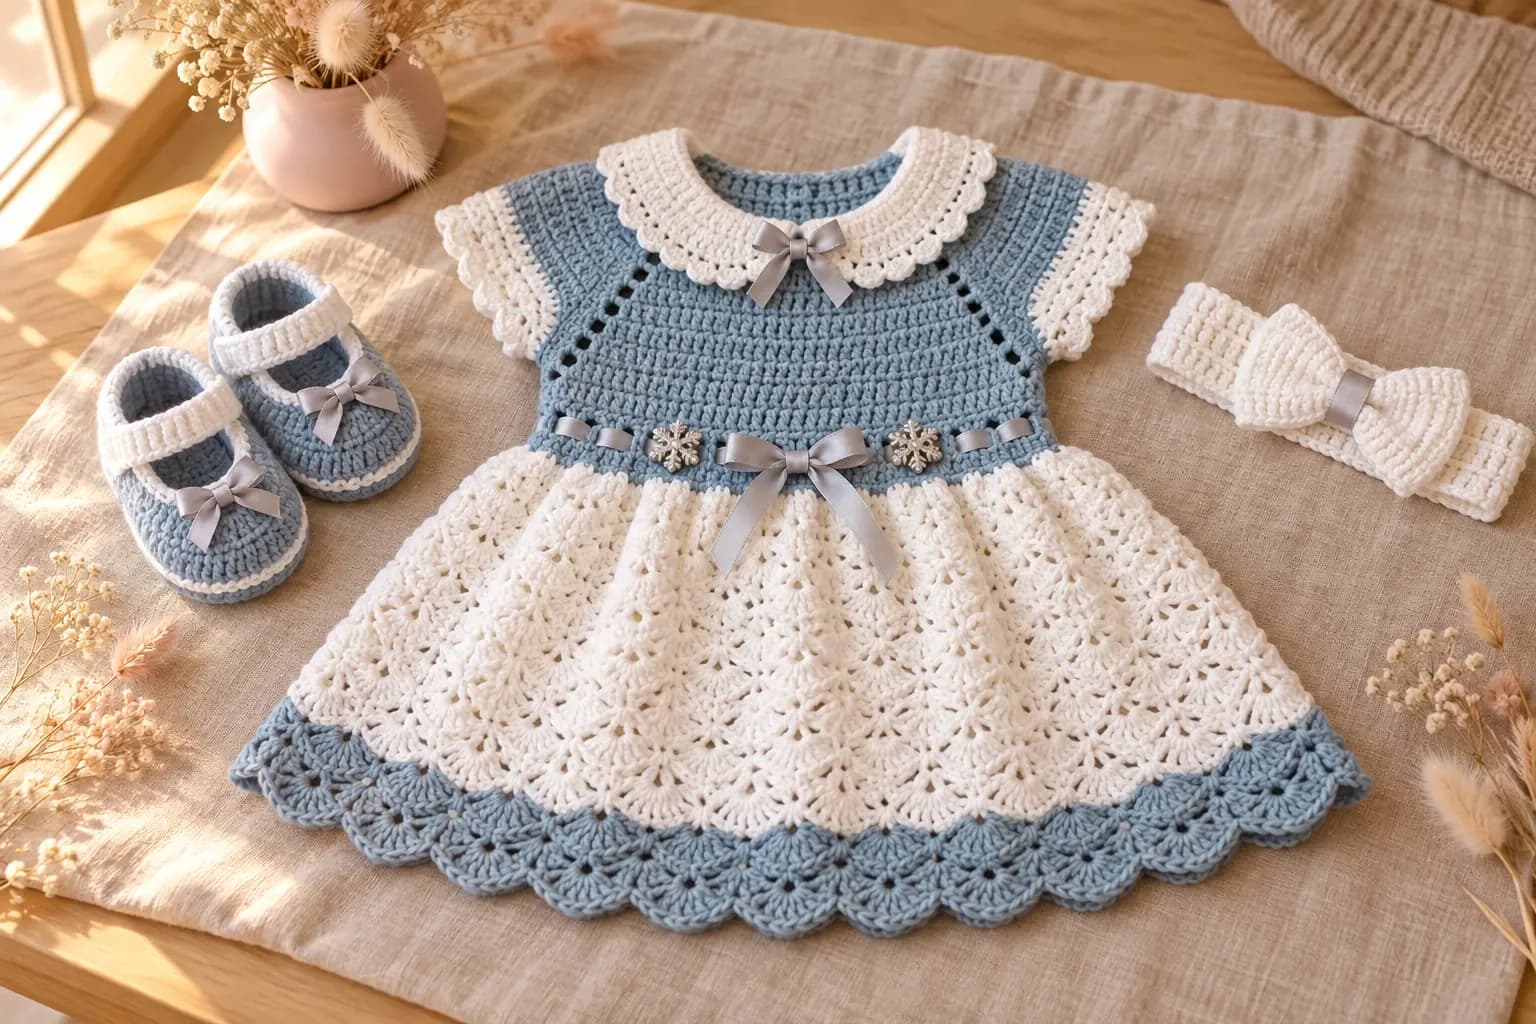
This crochet baby dress set is a little winter princess outfit: a dusty blue dress with a white collar and a lacy white skirt, plus matching booties and a bow headband. The dress is worked from the top down in one piece, with a raglan yoke, so there are no shoulder or side seams. A silver ribbon ties at the waist. You'll need DK cotton in two colors, a 4 mm and a 3.5 mm hook, and about 175 yd of blue and 300 yd of white for the smallest size. The set comes in 3 sizes, 0 to 12 months.
Key Takeaways
- Top-down and seamless: the yoke, bodice, skirt and sleeves all grow from one neckline chain.
- The collar is worked into that same chain, in two halves that meet at the front under a tiny bow.
- The skirt is classic shell stitch, with bigger shells near the hem so it flares.
- Three pieces, two colors: about 175 to 230 yd of blue and 300 to 400 yd of white for the whole set.
Why I love this baby dress set
Some outfits are made for one photo, and this is one of them. Dusty blue, snowy white and a touch of silver look like a first winter: holidays, a christening, a first snow. And because it's cotton, it's soft enough to actually wear all day.
The dress is simpler than it looks. The yoke grows down from the neck with four raglan lines, the sleeves are set aside, and the body carries on to the waist. A round of eyelets holds the ribbon. From there it's shell stitch all the way down, round after round.
What makes it special is the collar. It's worked into the free loops of the very first chain, so it's part of the dress, not sewn on. Fold it down, tie a little bow at the front, and suddenly it's a princess dress. Who could resist those booties next to it?
Skill level. Intermediate. You need ch, sc, hdc, dc, back-loop stitches, working in rows and in rounds, increasing at raglan lines, and following a size table. If you've made a top-down sweater, this will feel familiar.
If you want a summery version, my daisy granny square baby dress has the same ribbon waist.
What you'll need
Yarn (DK weight #3 cotton, two colors)
| Color | Used for | Amount, 0–3 (3–6, 6–12) months |
|---|---|---|
| Dusty blue | Yoke, bodice, waist, hem, booties | about 175 (200, 230) yd |
| White | Collar, sleeves, skirt, booties' rims and straps, headband | about 300 (340, 400) yd |
- I like Paintbox Yarns Cotton DK (137 yd / 125 m per 50 g): that's 2 (2, 2) balls of blue and 3 (3, 3) of white. Rico Essentials Cotton DK works too. Buy each color from one dye lot.
- I worked these totals out from the stitch count of every piece, plus a margin of about 12% for the swatch and the ends.
Hooks
- 4 mm (US G/6) for the dress and headband.
- 3.5 mm (US E/4) for the booties, so they're firm.
Notions
- 3 buttons, ⅜ in (10 mm), for the back of the dress.
- About 1½ yd (1.4 m) of silver-grey satin ribbon, ⅜ in (10 mm) wide: about 1 yd for the waist, and the rest for the collar bow, the 2 bootie bows and the center of the headband bow.
- 2 small snowflake buttons (optional), for the waistband. See the safety note.
- Locking stitch markers, a tapestry needle, a sewing needle and white and grey thread, and scissors.
Gauge
- Hdc (dress): 18 sts × 13 rows = 4 in (10 cm) with the 4 mm hook.
- Shell stitch (skirt): each shell round is about ½ in (1.3 cm) tall.
- Sc (booties): 22 sts × 24 rnds = 4 in (10 cm) with the 3.5 mm hook.
Check the hdc gauge before you start. If you have more than 18 sts, go up a hook size. If you have fewer, go down one. One stitch per 4 in changes the chest by about 1 in.
Abbreviations (US crochet terms)
- ch: chain
- sl st: slip stitch
- sc: single crochet
- hdc: half double crochet
- dc: double crochet
- dec: single crochet two together
- BLO: back loop only
- sk: skip
- sp: space
- st(s): stitch(es)
- rnd(s): round(s)
- RS / WS: right side / wrong side
Size chart
| Size | To fit chest | Finished chest | Neckline | Sleeve opening | Length (shoulder to hem) |
|---|---|---|---|---|---|
| 0–3 months | 16 in | 18¼ in / 46 cm | 10¾ in | 6 in | about 14 in / 36 cm |
| 3–6 months | 17 in | 19 in / 48 cm | 11½ in | 7 in | about 15¾ in / 40 cm |
| 6–12 months | 18 in | 21 in / 53 cm | 12½ in | 7¼ in | about 17½ in / 44 cm |
The dress has about 2 to 3 in of ease at the chest, so it's comfy over a onesie. The back opens from the neck to the waist with 3 buttons, so it slips easily over the head.
| Size | Bootie sole length | Headband (around) |
|---|---|---|
| 0–3 months | about 3½ in / 9 cm | 13½ in / 34 cm |
| 3–6 months | about 4 in / 10 cm | 15 in / 38 cm |
| 6–12 months | about 4¼ in / 11 cm | 16½ in / 42 cm |
Babies grow fast, so measure the baby's foot and head if you can, and choose by measurement rather than by age. Instructions are written 0–3 (3–6, 6–12) months. When only one number is given, it applies to every size.
The pattern, step by step
Part 1: The raglan yoke (blue)
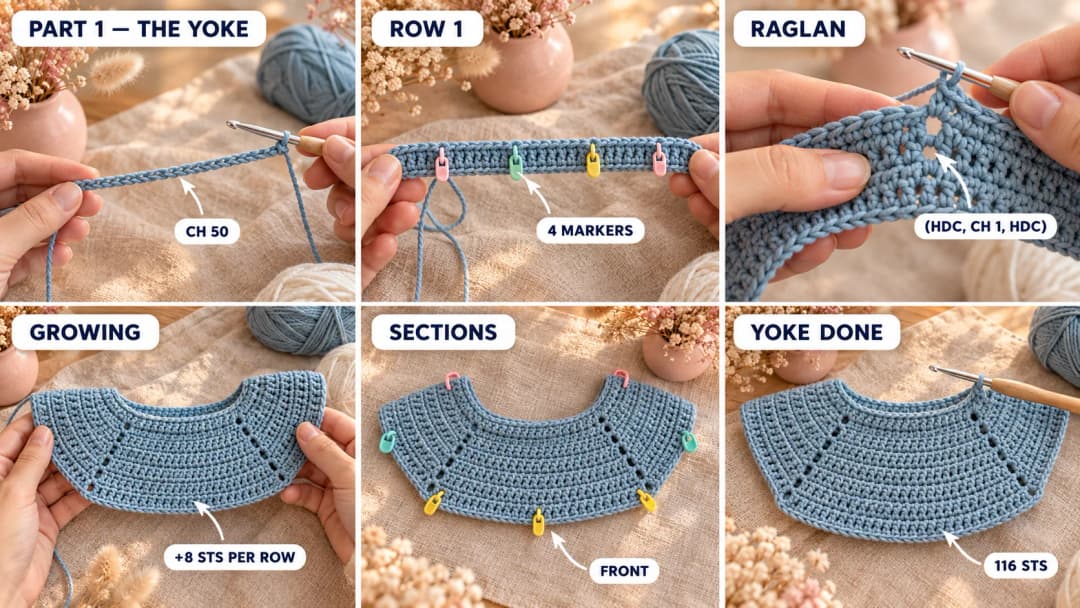
The yoke is worked flat, in rows, from the neckline down. The two short edges become the back opening. With the 4 mm hook and blue, ch 50 (54, 58).
Row 1: Hdc in the 3rd ch from the hook and in each ch across. Turn. (48 (52, 56) hdc)
Mark the raglan points. Count from the start of the row and place a marker in these 4 stitches:
- 0–3 m: the 10th, 15th, 34th and 39th sts.
- 3–6 m: the 10th, 17th, 36th and 43rd sts.
- 6–12 m: the 11th, 18th, 39th and 46th sts.
That splits the neckline into back half, raglan, sleeve, raglan, front, raglan, sleeve, raglan, back half: 9 (9, 10) / 4 (6, 6) / 18 (18, 20) / 4 (6, 6) / 9 (9, 10) sts between the markers.
Row 2: Ch 2 (doesn't count, here and on every row). Hdc in each st to the next marked st, (hdc, ch 1, hdc) in the marked st. Repeat from * 3 more times, then hdc in each st to the end. Turn. (52 (56, 60) hdc and 4 ch-1 sps)
Row 2 adds only 4 hdc: each marked st turns into 2 hdc with a ch-1 sp between them. From Row 3 on, each row adds 8 hdc, because you now increase on both sides of every ch-1 sp.
Move each marker up into its ch-1 sp. These 4 little holes are the raglan lines. Between them you now have back half 10 (10, 11), sleeve 6 (8, 8), front 20 (20, 22), sleeve 6 (8, 8) and back half 10 (10, 11) hdc.
Rows 3 to 10 (11, 12): Ch 2. Hdc in each st to the next ch-1 sp, (hdc, ch 1, hdc) in the ch-1 sp. Repeat from * 3 more times, then hdc in each st to the end. Turn. Each row adds 8 hdc: 1 to each back half and 2 to each sleeve and to the front. After Row 3 you have 60 (64, 68) hdc.
At the end of the last row you have 116 (128, 140) hdc and 4 ch-1 sps:
| Back half | Sleeve | Front | Sleeve | Back half | |
|---|---|---|---|---|---|
| 0–3 m | 18 | 22 | 36 | 22 | 18 |
| 3–6 m | 19 | 26 | 38 | 26 | 19 |
| 6–12 m | 21 | 28 | 42 | 28 | 21 |
The yoke measures about 3 (3½, 3¾) in from the neckline at the front. Don't fasten off.
Part 2: The bodice, waist and back opening (blue)
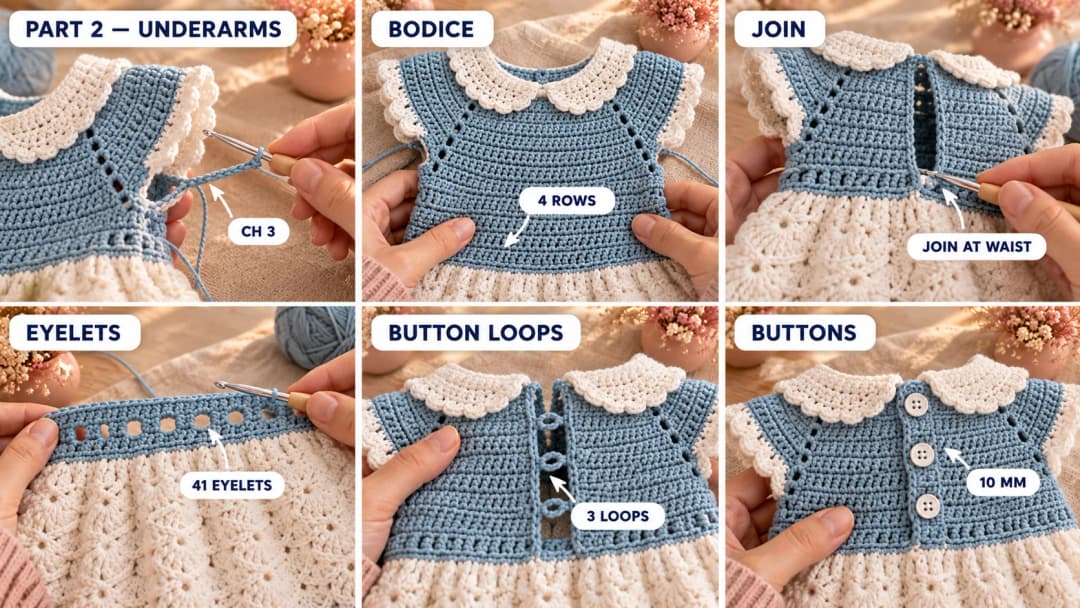
Separation row: Ch 2. Hdc in each st of the first back half, hdc in the ch-1 sp, ch 3, skip all the sleeve sts, hdc in the next ch-1 sp, hdc in each st of the front, hdc in the next ch-1 sp, ch 3, skip the sleeve sts, hdc in the last ch-1 sp, hdc in each st of the second back half. Turn. (82 (86, 94) sts, counting each ch as a st)
Bodice, 4 (5, 6) rows: Ch 2, hdc in each st across (in each ch on the first row). Turn.
Try it on the baby if you can: the bodice should end at the waist, just under the ribs. Add or remove a row here.
Order tip. The collar and the cap sleeves (Part 4) don't have to wait until the end. The collar goes into the neckline chain, and the sleeves into the armholes, so you can add them any time after the separation row. I often do, because a dress with its collar on is much nicer to try on.
Now the dress joins into rounds. The two back edges meet at the waist, and the opening above them stays open.
Waist, Rnd 1: Ch 1, sc in each st across, then join with a sl st to the first sc, without twisting. (82 (86, 94) sc)
Waist, Rnd 2 (eyelets): Ch 4 (counts as a dc and ch 1), sk 1. Dc in the next st, ch 1, sk 1. Repeat from * around. Join to the 3rd ch of the beginning ch-4. (41 (43, 47) eyelets)
Waist, Rnd 3: Ch 1, sc in each dc and in each ch-1 sp around. Join. (82 (86, 94) sc) Fasten off the blue.
Back opening edging and button loops. With the blue and the RS facing, join at the waist on the right back edge. Ch 1 and sc evenly up the edge to the neckline, about 3 sc for every 2 rows. Fasten off. Join at the neckline on the left back edge and sc evenly down to the waist, making 3 button loops as you go: one just under the neckline, one at the underarm and one halfway between. For each loop, ch 3 and skip 1 st instead of a sc. Fasten off.
Sew the 3 buttons to the right edge, opposite the loops.
Part 3: The shell skirt and scalloped hem
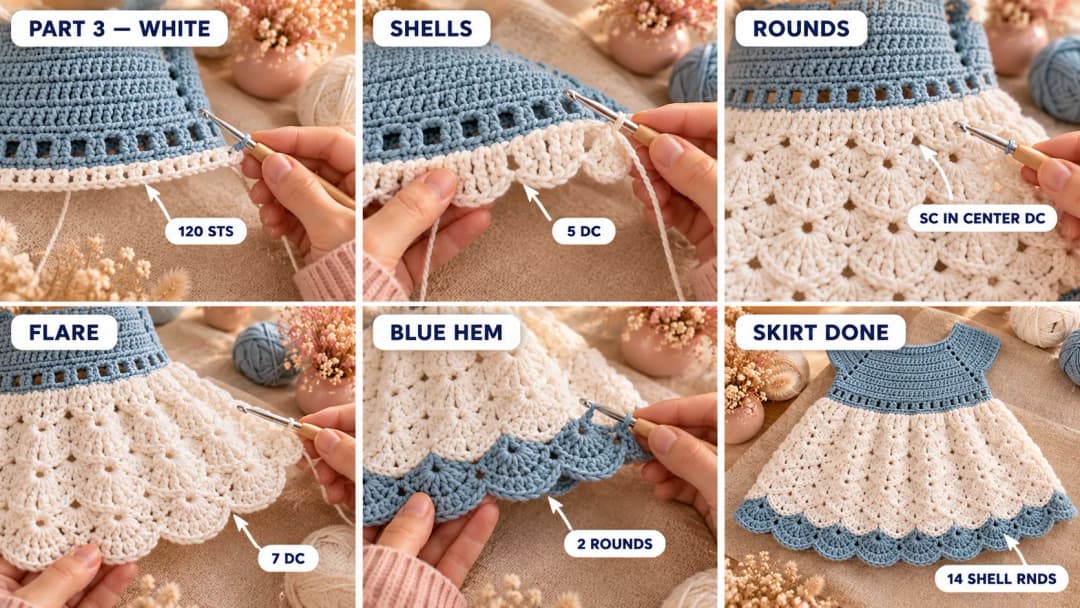
Switch to white. You're now working in joined rounds with the RS facing.
Skirt, Rnd 1: Join white in the first sc of the last waist round. Ch 1. (Sc in the next st, 2 sc in the next st) 38 (40, 44) times, then sc in each of the last 6 sts. Join. (120 (126, 138) sc)
Skirt, Rnd 2 (setting up the shells): Ch 1, sc in the first st. Sk 2, 5 dc in the next st, sk 2, sc in the next st. Repeat from * around, ending the last repeat with sk 2 (no sc). Join to the first sc. (20 (21, 23) shells)
Rnd A (shells over the sc): Ch 3 (counts as a dc), 2 dc in the same st. Sc in the center dc of the next shell, 5 dc in the next sc. Repeat from * around, ending with sc in the center dc of the last shell, then 2 dc in the same st as the beginning ch-3. Join to the top of the ch-3. The half shells at the start and end make one whole shell.
Rnd B (shells back in line): Ch 1, sc in the same st (the center of that joined shell). 5 dc in the next sc, sc in the center dc of the next shell. Repeat from * around, ending with 5 dc in the last sc. Join to the first sc.
Skirt, Rnds 3 to 7 (8, 9): Work odd-numbered rounds as Rnd A and even-numbered rounds as Rnd B. (still 20 (21, 23) shells)
Bigger shells for the flare. From here, every shell has 7 dc. The sc always goes into the center dc of the shell below: the 3rd dc of a 5-dc shell, or the 4th dc of a 7-dc shell.
- Rnd A7: Ch 3, 3 dc in the same st. Sc in the center dc of the next shell, 7 dc in the next sc. Repeat around, ending with sc in the center dc of the last shell and 3 dc in the same st as the beginning. Join to the top of the ch-3.
- Rnd B7: Ch 1, sc in the same st. 7 dc in the next sc, sc in the center dc of the next shell. Repeat around, ending with 7 dc in the last sc. Join to the first sc.
Skirt, Rnds 8 (9, 10) to 15 (17, 19): Keep the same rhythm: odd rounds are Rnd A7, even rounds are Rnd B7. That's 14 (16, 18) shell rounds in all. Fasten off the white.
| Size | Last 5-dc round | First 7-dc rounds | Last white round |
|---|---|---|---|
| 0–3 m | Rnd 7 (A) | Rnd 8 = B7, Rnd 9 = A7 | Rnd 15 = A7 |
| 3–6 m | Rnd 8 (B) | Rnd 9 = A7, Rnd 10 = B7 | Rnd 17 = A7 |
| 6–12 m | Rnd 9 (A) | Rnd 10 = B7, Rnd 11 = A7 | Rnd 19 = A7 |
Blue hem, Rnds 16 and 17 (18 and 19, 20 and 21): Join the blue. Work the first blue round as B7 and the second as A7, in every size. Fasten off and weave in the ends. The blue shells make the scalloped band at the hem.
Part 4: Cap sleeves and the Peter Pan collar (white)
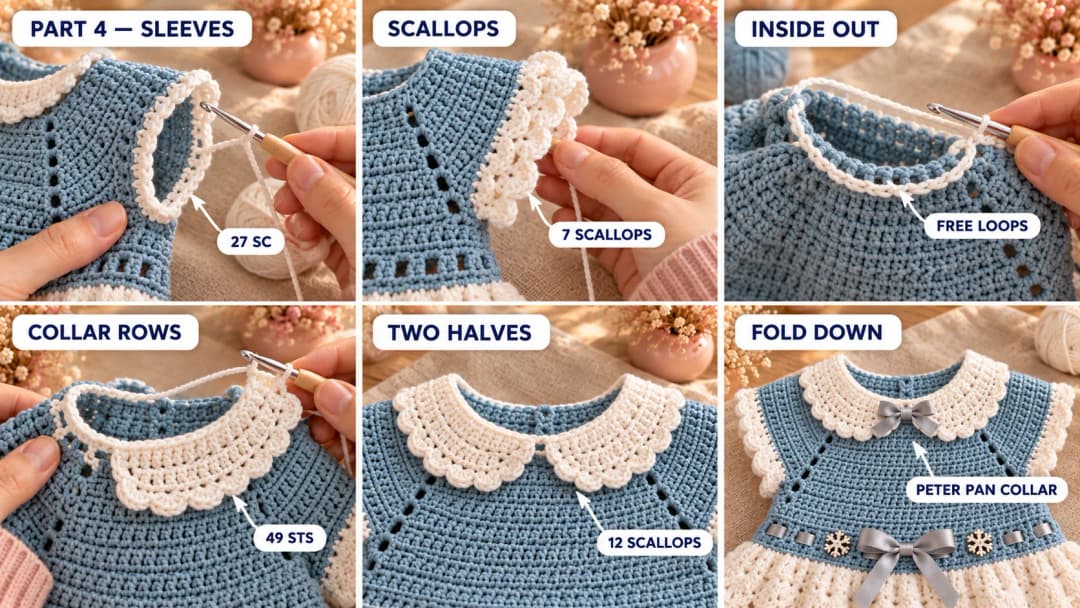
Cap sleeves (make 2). With white and the RS facing, join at the center of the underarm ch.
- Rnd 1: Ch 1. Sc in the free loop of each underarm ch, 1 sc in the gap at the corner, sc in each sleeve st, 1 sc in the gap at the other corner. Join. (27 (31, 33) sc)
- Rnd 2: Ch 2, hdc in each st around, increasing 1 (1, 0) st and decreasing 0 (0, 1) st. Join. (28 (32, 32) hdc)
- Rnd 3: Ch 2, hdc in each st around. Join. (28 (32, 32) hdc)
- Rnd 4 (scallops): Ch 1. Sc in the next st, sk 1, 5 dc in the next st, sk 1. Repeat from * around. Join to the first sc. Fasten off. (7 (8, 8) scallops)
Peter Pan collar (make 2 halves). The collar is worked into the free loops of the foundation chain, along the neckline. Turn the dress inside out, so the WS faces you. When you fold the collar down at the end, its right side will face out.
Each half runs from one back edge to the center front: 24 (26, 28) free loops.
- Row 1: Join white in the free loop at the top of one back edge. Ch 1, sc in each of the next 24 (26, 28) free loops, ending at the center front. Turn. (24 (26, 28) sc)
- Row 2: Ch 2. Hdc in the next st, 2 hdc in the next st. Repeat from * across. Turn. (36 (39, 42) hdc)
- Row 3: Ch 2. Hdc in each of the next 2 sts, 2 hdc in the next st. Repeat from * across, and work 1 extra hdc in the last st. Turn. (49 (53, 57) hdc)
- Row 4 (scallops): Ch 1, sc in the first st. Sk 1, 5 dc in the next st, sk 1, sc in the next st. Repeat from * across: the last repeat ends with a sc in the last st. Fasten off. (12 (13, 14) scallops) Each repeat uses 4 sts, so 12 (13, 14) repeats plus the first sc use all 49 (53, 57).
Work the second half the same way, from the center front to the other back edge, starting in the free loop next to the first half. Turn the dress right side out and fold the collar down over the yoke. Steam it lightly so it lies flat.
Part 5: Mary Jane booties (make 2)
Use the 3.5 mm hook. The booties are worked in rounds, from the sole up. Join each round with a sl st to the first st, and ch 1 at the start of each round (it doesn't count).
Sole (blue). Ch 13 (15, 17).
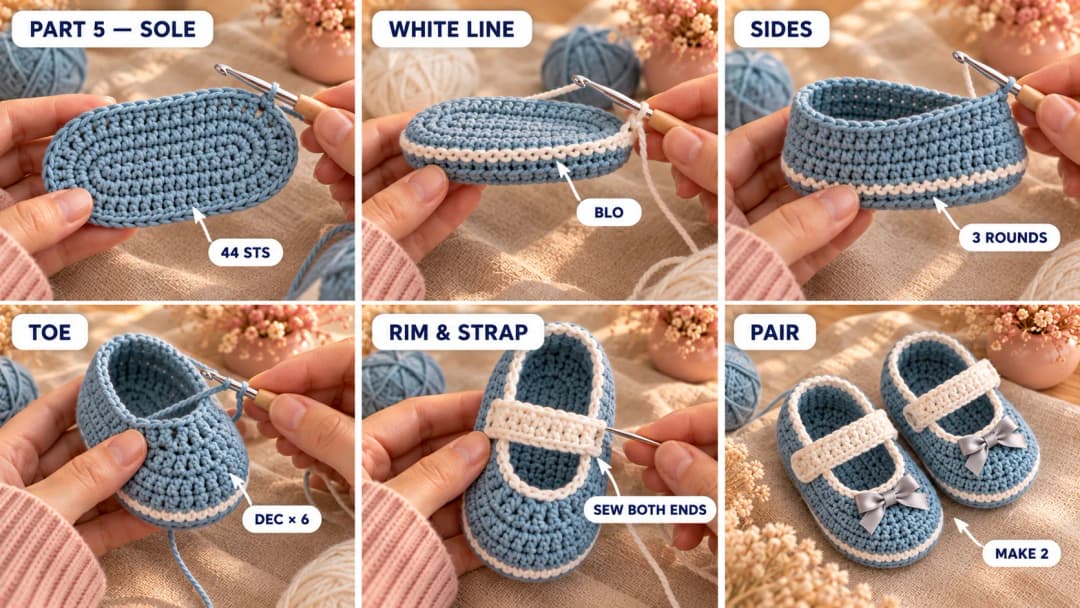
- Rnd 1: 2 sc in the 2nd ch from the hook, sc in the next 10 (12, 14) ch, 4 sc in the last ch. Turn the chain so you can work into its other side (its bottom loops): sc in the next 10 (12, 14) ch, then 2 more sc in the 2nd ch from the hook, the very ch you started in. That ch now holds 4 sc in all, like the toe. Join to the first sc. (28 (32, 36) sc) The end where you worked the 4 sc first is the toe; the end where you started is the heel, and each round begins at its center.
- Rnd 2: 2 sc in each of the next 2 sts, sc in the next 10 (12, 14), 2 sc in each of the next 4, sc in the next 10 (12, 14), 2 sc in each of the last 2. (36 (40, 44) sc)
- Rnd 3: (Sc, 2 sc in the next st) × 2, sc in the next 10 (12, 14), (sc, 2 sc in the next st) × 4, sc in the next 10 (12, 14), (sc, 2 sc in the next st) × 2. (44 (48, 52) sc)
The sole is about 3½ (4, 4¼) in long. Lay the baby's foot on it if you can.
Sides.
- Rnd 4 (white, BLO): Change to white. Sc in the back loop of each st around. (44 (48, 52)) This turns the edge up and makes the thin white line around the sole.
- Rnds 5–7 (blue): Change to blue. Sc in each st around. (44 (48, 52))
Toe.
- Rnd 8: Sc in the first 16 (18, 20) sts, dec × 6 over the next 12 sts (the toe), sc in the last 16 (18, 20) sts. (38 (42, 46))
- Rnd 9: Sc in the first 13 (15, 17) sts, dec × 6 over the next 12 sts, sc in the last 13 (15, 17) sts. (32 (36, 40))
- Rnd 10: Sc around, decreasing 4 sts evenly. (28 (32, 36)) Fasten off the blue.
The 6 decreases of Rnds 8 and 9 sit right over the toe, because each round starts at the center of the heel: the same number of sts goes before and after them.
White rim.
- Rnd 11: Join white at the center of the heel. Ch 1, sc in each st around. Join. (28 (32, 36)) Fasten off and weave in the ends. This thin white edge frames the opening.
White strap (make 1 per bootie). With white, ch 6.
- Row 1: Hdc in the 3rd ch from the hook and in each ch across. Turn. (4 hdc)
- Row 2: Ch 2, hdc in the back loop of each st across. Turn.
Repeat Row 2 until the strap measures 2½ (2¾, 3) in, about 8 (9, 10) rows. Fasten off, leaving a 10-in tail.
Lay the strap across the instep, just behind the toe decreases, with the ridges running across the foot. Sew each short end firmly to the inside of the white rim, on the sides of the bootie. The strap stays put and the bootie slips on, so there's no button.
Tie a small grey satin bow and sew it to the top of the toe, in front of the strap, through the knot and both loops of the bow.
Part 6: The bow headband and finishing
Band (white, 4 mm hook). Ch 11.
- Row 1: Hdc in the 3rd ch from the hook and in each ch across. Turn. (9 hdc)
- Row 2: Ch 2, hdc in the back loop of each st across. Turn.
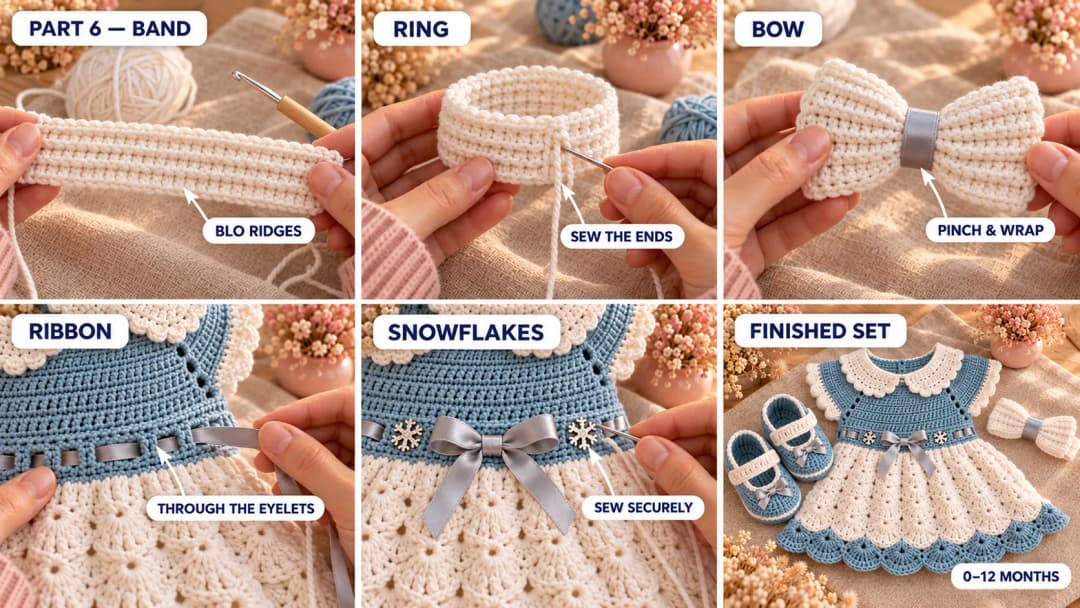
Repeat Row 2 until the band measures 13½ (15, 16½) in when gently stretched, about 44 (49, 54) rows. The back-loop rows make soft ridges that stretch a little. Fold the band into a ring and sew the short ends together with a whipstitch.
Bow (white). Ch 22. Row 1: hdc in the 3rd ch from the hook and in each ch across. (20 hdc) Rows 2–10: ch 2, hdc in each st across. Fasten off. Pinch the rectangle in the middle, wrap a short piece of grey ribbon around the pinch 2 or 3 times, and sew it in place. Sew the bow to the band, right over the seam.
Finishing the dress.
- Ribbon. Thread the long satin ribbon through the waist eyelets, starting and ending at the center front, and tie a bow. Sew the knot to the dress with a few stitches, so the ribbon can't be pulled out. Trim the tails to about 4 in, and seal the ends with a dab of fray stop.
- Collar bow. Tie a tiny grey bow and sew it securely where the two collar halves meet.
- Snowflakes (optional). Sew a snowflake button on each side of the waist bow, through every hole several times. Or embroider a little snowflake with white yarn instead: three crossed straight stitches.
- Weave in all the ends and steam the skirt lightly so the shells relax.
Safety. Buttons, snowflake charms and satin bows can come off and are a choking hazard, so sew each one on very securely and check them before every wear. For the youngest babies, embroider the snowflakes and use crochet bows instead. Keep the waist ribbon tacked down and its tails short. Never leave a headband on a sleeping or unsupervised baby, and take the whole set off for naps and at night.
Make it yours — quick variations
| Variation | Change from base pattern |
|---|---|
| Rose princess | Swap the dusty blue for blush pink, and use a cream ribbon. |
| Christening white | Work everything in white, with an ivory satin ribbon. |
| Long sleeves | After Rnd 1 of the sleeve, work hdc rounds in blue to the wrist, then the white scallop round. |
| Longer skirt | Add 2 shell rounds (1 Rnd A7 and 1 Rnd B7) before the blue hem for every extra inch. |
| Simple headband | Skip the bow and sew a small crochet snowflake onto the band. |
Troubleshooting the three things that go wrong
The yoke is too tight around the neck
Your gauge is tighter than 18 hdc. Go up half a hook size for the foundation chain only, or work it with a 5 mm hook and switch back for Row 1. The neckline then stretches more easily over the head.
The skirt pulls in instead of flaring
Check that you have 20 (21, 23) shells, and that you switched to 7-dc shells at the right round. If your dc are short, the skirt is shorter but still flares; add a round of 7-dc shells.
The collar ruffles or curls up
Ruffles mean your stitches are taller than mine: rework Rows 3 and 4 with a hook half a size smaller, keeping the same counts. Curling means the collar is too tight: go up a hook size for the collar only. A light steam fixes small curls.
Frequently asked questions
How long does the whole set take? About 12 to 16 hours. The dress is most of it, about 9 to 12 hours. The booties take about 1½ hours a pair, and the headband about an hour.
How much yarn do I need? About 175 (200, 230) yd of blue and 300 (340, 400) yd of white in DK cotton for the dress, booties and headband together.
Can I use acrylic instead of cotton? Yes. A soft baby acrylic in DK works, and it's lighter and machine washable. The shells will be a little fuzzier and less crisp. Keep the same gauge.
How do I wash it? Hand wash cool or use a gentle machine cycle in a mesh bag, then dry flat. Take off the ribbon first if you like, and press the satin with a cool iron.
Can I sell sets made from this pattern? Yes, you're welcome to sell finished sets made from this free pattern at markets, on Etsy or as gifts. Please credit "Pattern by Wavode" in your listing and link back to this page. What you can't do is republish this write-up or my photos as your own pattern.
Related patterns on Wavode
- Daisy granny square baby dress: a summery mint dress with a ribbon waist.
- Primrose twirl baby dress: another twirly dress for little ones.
- Rosebud baby booties: cotton booties with a rosebud bow.
- Snowflake crochet pattern: crochet your own snowflakes for the waistband.
Made a snow princess set? Tag #wavodecrochet on Pinterest. I re-pin every finished make and credit the maker.
Pattern by Clara Hartwell for Wavode. Questions? Email me at support@wavode.com.