Strawberry Crochet Hat

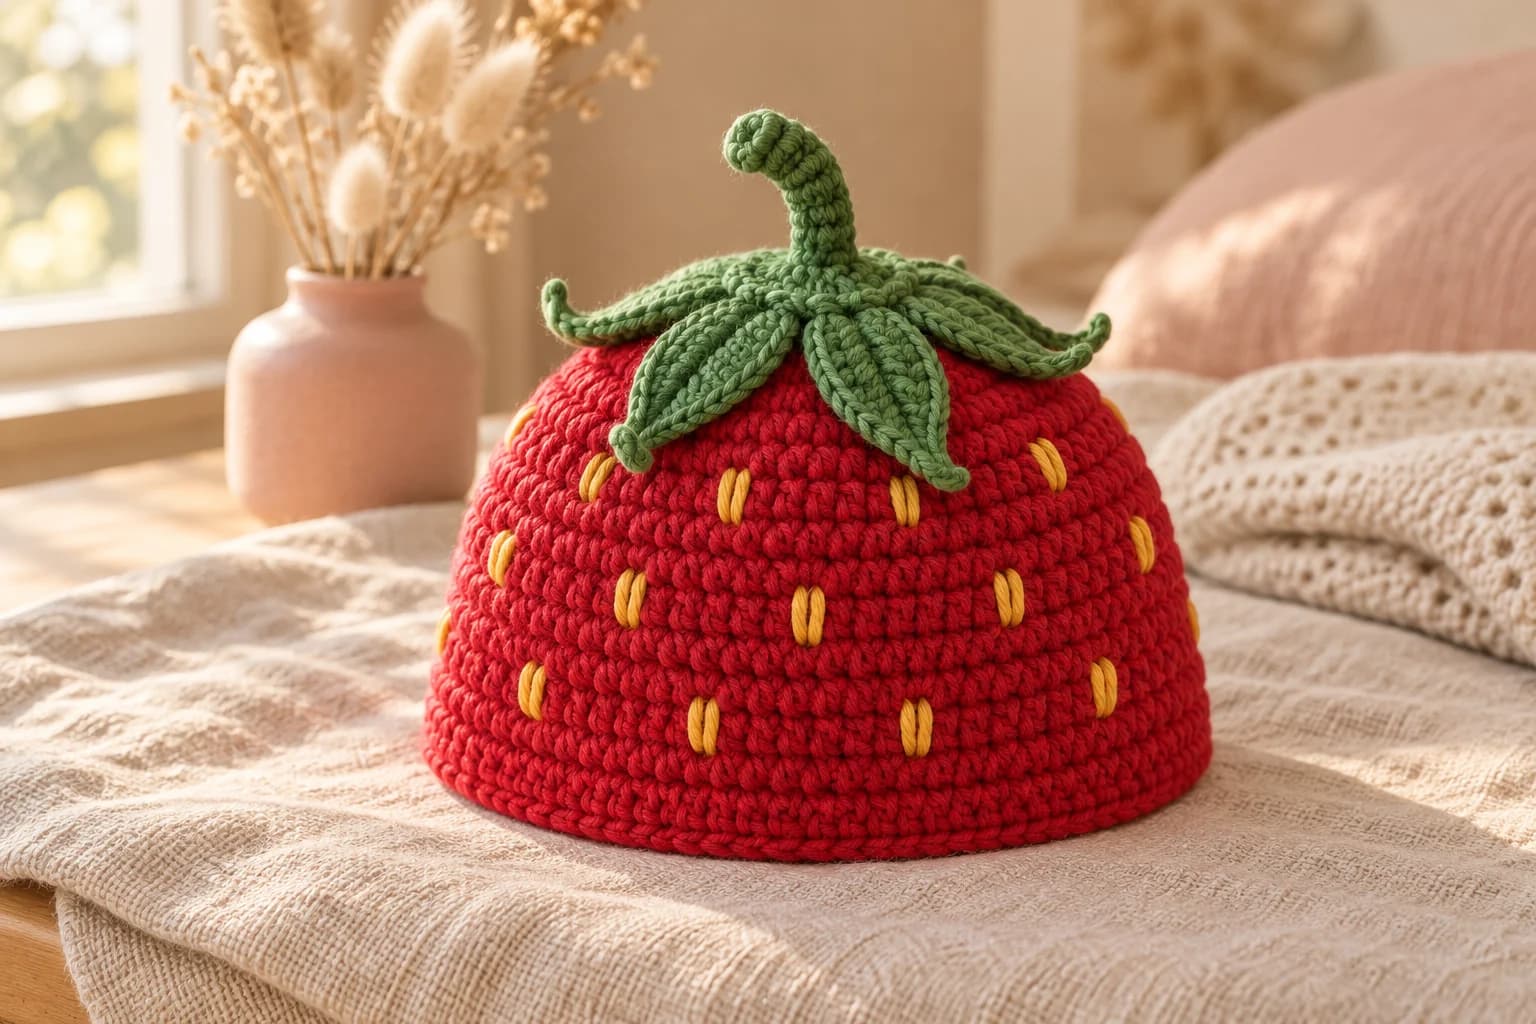
This strawberry crochet hat is a round red baby beanie with yellow seeds, six green leaves and a little curly stem on top. It's worked from the top down in half double crochet, so you can try it on as you go and stop at the right length. You'll need worsted cotton in red, green and a scrap of yellow, a 5 mm and a 4 mm hook, and about 2 to 3 hours. It comes in 4 sizes, from newborn to 12 months.
Key Takeaways
- Top down, no seams: a flat circle of half double crochet, then even rounds to the brim.
- The seeds are embroidered, not sewn on, so there are no small parts on the hat.
- Six leaves and a stem are crocheted separately and sewn to a small green disc on the crown.
- Small amounts: about 50 to 85 yd of red, 25 yd of green and a few yards of yellow.
Why I love this strawberry hat
Is there anything sweeter than a baby dressed as a strawberry? It's the hat I'd make for a summer baby, a first photo shoot or a little one born in strawberry season. It also makes a lovely baby shower gift, because it's quick and it photographs beautifully.
The hat itself is a plain beanie. The magic is in the details: yellow seeds stitched in a brick pattern, and a green calyx with leaves that fall over the crown like a real strawberry top. The stem gives it a little curl of personality.
Skill level. Easy. You need a magic ring, ch, sl st, sc, hdc and dc, plus simple embroidery with a tapestry needle. If you've made one beanie before, this is a quick one.
If you love fruit and veggie hats, my pumpkin keychain uses the same leaf-and-stem idea in miniature.
What you'll need
Yarn (worsted or aran weight #4 cotton)
| Color | Used for | Amount, NB (0–3, 3–6, 6–12) months |
|---|---|---|
| Strawberry red | Hat | about 50 (60, 70, 85) yd |
| Leaf green | Leaves, disc and stem | about 25 yd in every size |
| Sunny yellow | Seeds | a few yards |
- I like Paintbox Yarns Cotton Aran (93 yd / 85 m per 50 g): that's 1 (1, 1, 2) balls of red and 1 ball each of green and yellow, with lots left over. A soft worsted baby acrylic works too.
- I worked these totals out from the stitch count, plus a margin of about 15% for the swatch and the ends.
Hooks
- 5 mm (US H/8) for the hat.
- 4 mm (US G/6) for the leaves, disc and stem, so they're firm and hold their shape.
Notions
- A stitch marker, a tapestry needle and scissors.
Gauge
14 hdc × 10 rnds = 4 in (10 cm) with the 5 mm hook. Easier still: Rnd 5 should measure about 4 in (10 cm) across. If it's bigger, go down a hook size. If it's smaller, go up one.
Abbreviations (US crochet terms)
- MR: magic ring
- ch: chain
- sl st: slip stitch
- sc: single crochet
- hdc: half double crochet
- dc: double crochet
- st(s): stitch(es)
- rnd(s): round(s)
Size chart
| Size | Baby's head | Hat around | Hat depth (crown to edge) |
|---|---|---|---|
| Newborn | 13–14 in | 13 in / 33 cm | 5½ in / 14 cm |
| 0–3 months | 14–15 in | 14¼ in / 36 cm | 6 in / 15 cm |
| 3–6 months | 15–16½ in | 15½ in / 39 cm | 6½ in / 16.5 cm |
| 6–12 months | 16½–18 in | 17 in / 43 cm | 7 in / 18 cm |
The hat is a little smaller than the head, so it stays on. Measure the baby's head above the ears if you can. Instructions are written NB (0–3, 3–6, 6–12) months. When only one number is given, it applies to every size.
The pattern, step by step
Part 1: The crown (red)
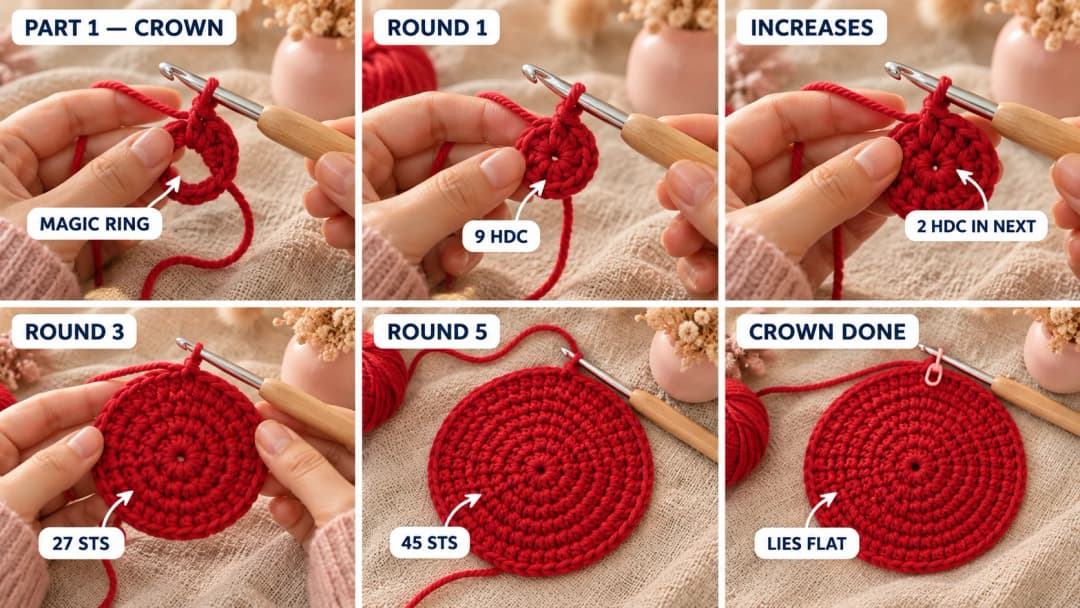
Work in joined rounds with the 5 mm hook. Ch 1 at the start of each round (it doesn't count) and join with a sl st to the first hdc. Don't turn.
- Rnd 1: MR. Ch 1, 9 hdc in the ring. Join, then pull the ring tight. (9 hdc)
- Rnd 2: 2 hdc in each st around. (18)
- Rnd 3: Hdc in the next st, 2 hdc in the next st. Repeat from * 9 times in all. (27)
- Rnd 4: Hdc in the next 2 sts, 2 hdc in the next st. Repeat 9 times in all. (36)
- Rnd 5: Hdc in the next 3 sts, 2 hdc in the next st. Repeat 9 times in all. (45)
Newborn: stop increasing here. You have 45 sts.
- Rnd 6, 0–3 months only: Hdc in the next 8 sts, 2 hdc in the next st. Repeat 5 times in all. (50) Stop increasing.
- Rnd 6, 3–6 and 6–12 months: Hdc in the next 4 sts, 2 hdc in the next st. Repeat 9 times in all. (54) 3–6 months: stop increasing.
- Rnd 7, 6–12 months only: Hdc in the next 8 sts, 2 hdc in the next st. Repeat 6 times in all. (60)
You now have 45 (50, 54, 60) sts, and the crown is a flat circle about 4 (4¾, 4¾, 5½) in across.
Part 2: The body, the brim and the seeds
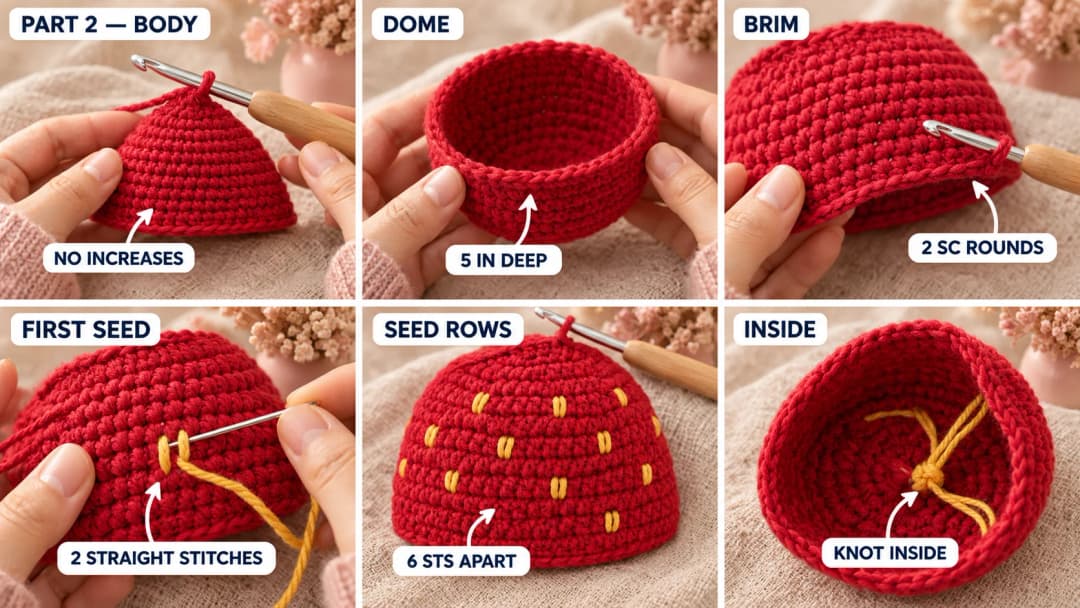
Body: Ch 1, hdc in each st around. Join. (45 (50, 54, 60) hdc) Repeat this round until the hat measures 5 (5½, 6, 6½) in from the center of the crown, about 7 (7, 8, 9) rounds. The crown curves down into a dome as you go.
Brim, 2 rounds: Ch 1, sc in each st around. Join. Repeat once more. Fasten off and weave in the end. The hat now measures 5½ (6, 6½, 7) in deep.
The seeds (yellow). Thread a tapestry needle with an 18-in piece of yellow. Each seed is 2 straight stitches on top of each other, running up and down over the height of 1 hdc. Pull them just snug, so they sit plump on the surface.
- Make the first seed round on the last increase round, then a new seed round every 3rd round, always staying at least 1 round above the brim. That's Rnds 5, 8 and 11 (6, 9 and 12; 6, 9 and 12; 7, 10, 13 and 16): 3 (3, 3, 4) seed rounds.
- On each seed round, place a seed about every 6 sts: count 6, stitch a seed, count 6 again. If the last gap of the round comes out a little shorter, that's fine.
- Shift each new seed round by 3 sts, so the seeds sit between the seeds above, like bricks.
- Run the yarn along the inside between seeds, and catch only the back of the fabric so nothing shows on the right side. Knot the ends inside and weave them in well.
Part 3: Leaves, stem and finishing (green)
Switch to the 4 mm hook. The smaller hook makes the green pieces firm, so the leaves keep their points.
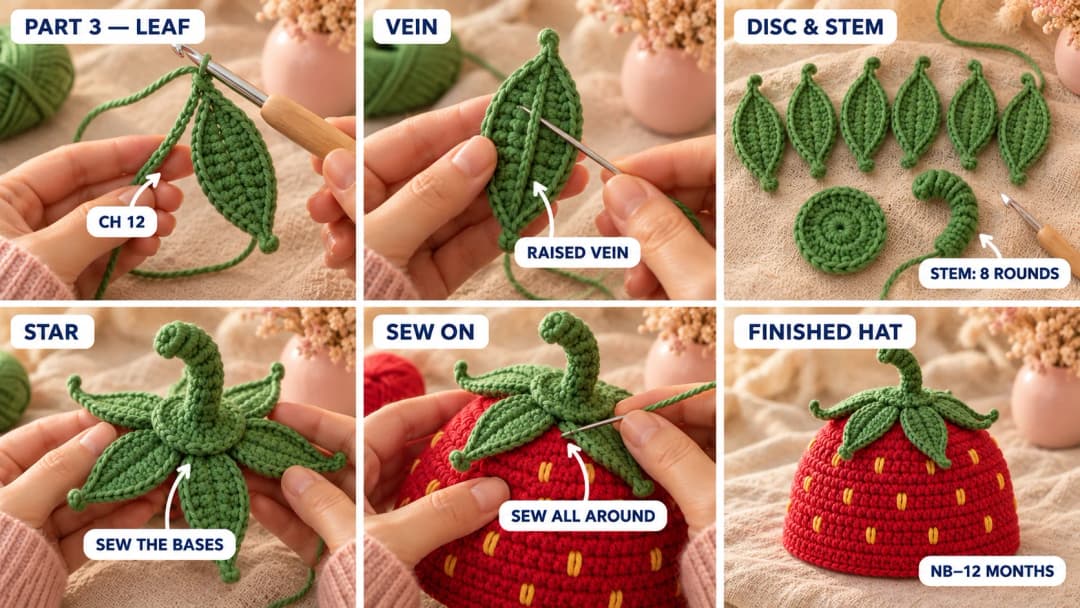
Leaves (make 6). Each leaf is worked around both sides of a chain. The first ch you work into is the tip; the last ch is the base.
Ch 12 (12, 13, 13).
- Sl st in the 2nd ch from the hook (the tip), sc in the next ch, hdc in the next ch, dc in the next 5 (5, 6, 6) ch, hdc in the next ch, sc in the next ch. (10 (10, 11, 11) sts)
- Work 3 sc in the last ch (the base).
- Now work along the other side of the chain: sc in the next ch, hdc in the next ch, dc in the next 5 (5, 6, 6) ch, hdc in the next ch, sc in the next ch. (9 (9, 10, 10) sts)
- Pointed tip: sl st in the tip ch, ch 2, sl st in the 2nd ch from the hook. Fasten off, leaving a 6-in tail.
Each leaf is about 2½ (2½, 2¾, 2¾) in long. Count check, numbering the chains from the hook: the first side covers the 2nd to the 11th (11th, 12th, 12th) ch, so its last sc lands in the ch right before the base. The 3 sc go in the 12th (12th, 13th, 13th) ch, the very last one (the first ch you made). The second side covers the 11th (11th, 12th, 12th) back to the 3rd ch, and the closing sl st goes into the 2nd ch, the tip. The 1st ch from the hook is never worked: it's the little turning ch that makes the tip.
The vein. With the RS facing and the tip tail on the tapestry needle, run a line of surface slip stitches down the middle of the leaf, over the foundation chain, from the tip to the base. Or simply backstitch along it with the tail. It pulls the center in a little and makes a raised vein, like a real strawberry leaf. Keep the base tail for sewing.
Disc. MR, ch 1, 6 sc in the ring. Join. (6 sc) Next round: ch 1, 2 sc in each st. Join. (12 sc) Fasten off, leaving a 12-in tail.
Stem. The stem curves on its own because one side is taller than the other.
- Rnd 1: MR, ch 1, 6 sc in the ring. Don't join from here on: work in a spiral, with a marker in the first st of each round. (6 sc)
- Rnds 2 and 3: Sc in each st around. (6)
- Rnds 4 to 8: Sc in the next 3 sts, hdc in the next 3 sts. (6) The hdc are taller, so the stem bends toward the sc side.
The stem is about 1½ in long and clearly curved. If your cotton is stiff and the curve stays gentle, work the last 2 rounds as sc in the next 3 sts, dc in the next 3 sts: the taller side bends it more. Fasten off, leaving a 10-in tail. Don't stuff it: 6 sts around in a 4 mm hook is firm enough to stand up.
Put the strawberry top together.
- Lay the disc wrong side up. Place the 6 leaves around it like the petals of a flower, with the base of each leaf tucked under the edge of the disc, one leaf every 2 sts. Sew each base in place with its tail, going through both layers several times.
- Sew the open end of the stem to the center of the disc, all the way around, with the stem's tail.
- Center the disc on the crown of the hat, over the magic ring. Sew all around the edge of the disc into the hat with the disc's tail, with small, close stitches.
- Let the leaves fall over the crown. To stop little fingers from lifting them, tack the middle of each leaf to the hat with 2 small stitches, and leave the tips free so they curl.
Weave in all the ends on the inside of the hat.
Safety. There are no buttons, beads or safety eyes on this hat, and the seeds are embroidered. Still, sew the stem and the leaves on very securely, with 10 or more stitches each, and check them before every wear. Never leave a hat on a sleeping baby, and take it off for naps and at night.
Make it yours — quick variations
| Variation | Change from base pattern |
|---|---|
| Blueberry | Work the hat in navy, skip the seeds, and make 5 short leaves (ch 6) and no stem. |
| Cherry | Red hat, no seeds, one leaf and a longer stem (12 rounds, with the sc/hdc curve). |
| Rolled brim | Instead of the 2 sc rounds, work 3 rounds of hdc in the back loop only and fold them up. |
| With ear flaps | Work 2 flaps of hdc rows at the sides of the brim, then add braided ties (for babies who are always supervised). |
| Bigger sizes | Keep increasing 9 sts per round until the crown fits, then work even to the right depth. |
Troubleshooting the three things that go wrong
The crown ruffles or cups
A ruffly crown means your stitches are shorter than mine, and a cupped crown means they're taller. Change the hook by half a size, or make the next round plain. The crown should lie flat until you start the even rounds.
The seam line slants
That's normal with joined rounds in hdc. To keep it straight, join into the top of the first hdc, not the ch 1. The seeds hide a slight slant anyway: start the seed rounds at the back.
The leaves curl up too much
Your green is worked too tightly, or the yarn is very springy. Steam the leaves lightly before sewing them on, and tack the middle of each one to the hat, right on the vein.
Frequently asked questions
How long does it take? About 2 to 3 hours: about 1½ to 2 hours for the hat and an hour for the seeds, leaves and stem.
How much yarn do I need? About 50 (60, 70, 85) yd of red, 25 yd of green and a few yards of yellow in worsted or aran cotton.
Can I use acrylic instead of cotton? Yes. A soft worsted baby acrylic is warmer and stretchier, which is nice for autumn and winter. Cotton is cooler and crisper, so the leaves keep their points better.
Is it good for newborn photos? Yes, the newborn size is made for that. For a photo shoot, the hat can sit a little lower on the forehead, like in a classic newborn portrait.
Can I sell hats made from this pattern? Yes, you're welcome to sell finished hats made from this free pattern at markets, on Etsy or as gifts. Please credit "Pattern by Wavode" in your listing and link back to this page. What you can't do is republish this write-up or my photos as your own pattern.
Related patterns on Wavode
- Crochet princess dress: a royal blue, red and yellow baby dress with booties and a bow headband.
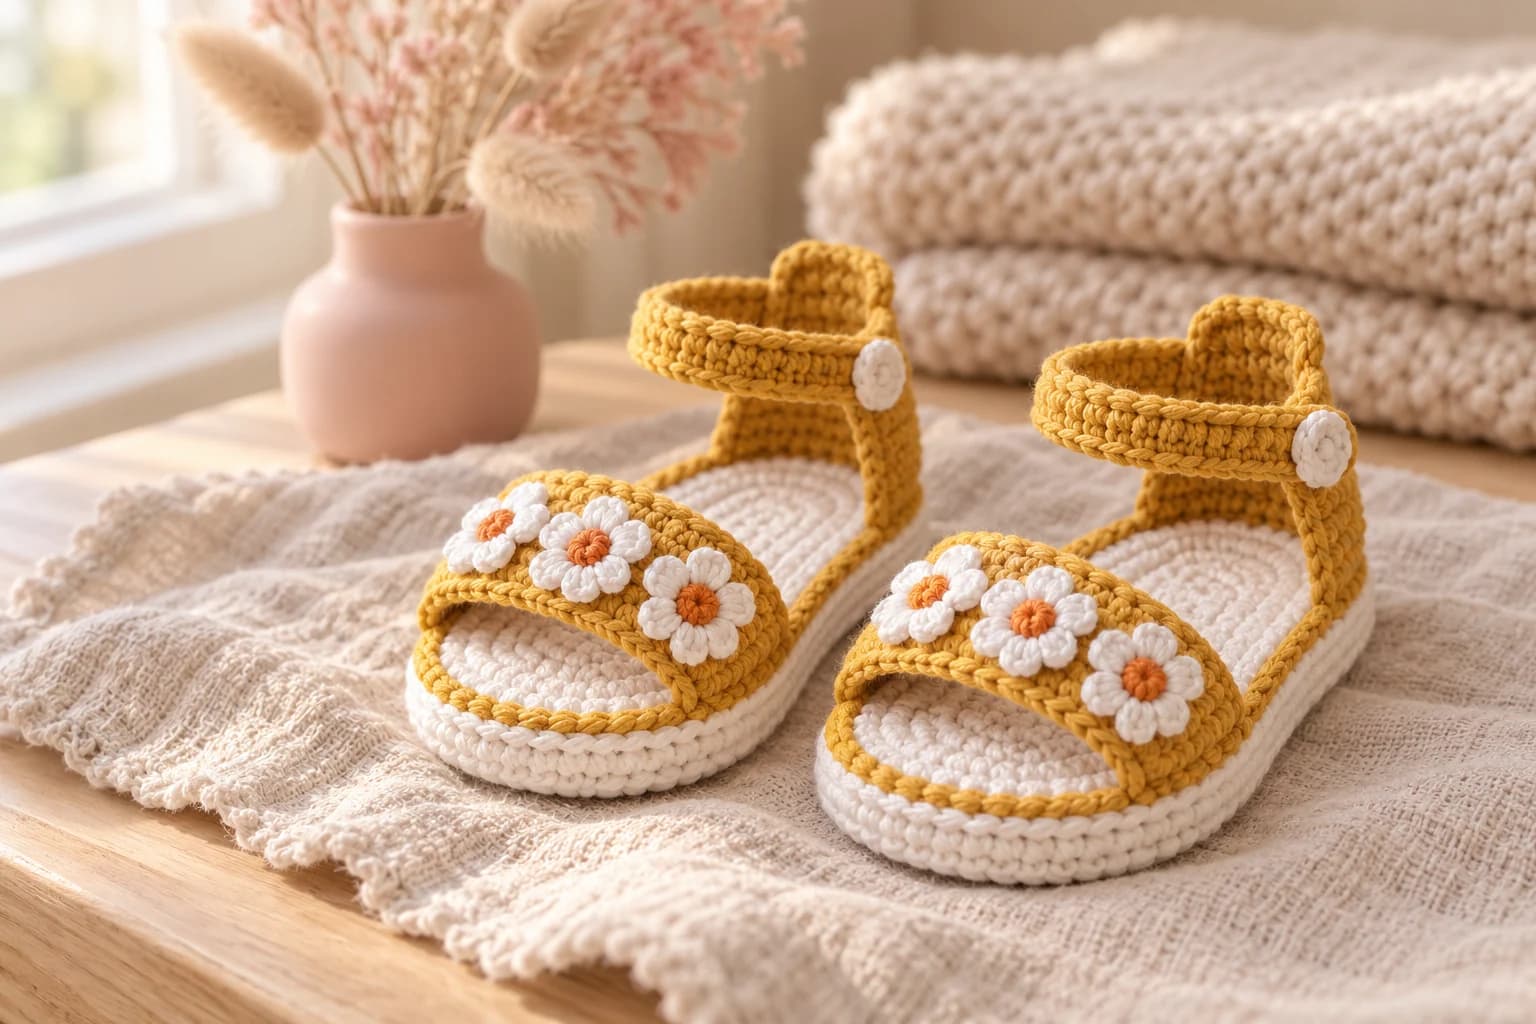
- Crochet baby sandals: cotton sandals with daisy flowers.
- Crochet striped beanie: a top-down hat for grown-ups, with 9 stripe combos.
- Pumpkin keychain: a mini fall pumpkin with a leaf and a curly vine.
Made a strawberry hat? Tag #wavodecrochet on Pinterest. I re-pin every finished make and credit the maker.
Pattern by Clara Hartwell for Wavode. Questions? Email me at support@wavode.com.