Newborn Baby Romper Crochet Pattern

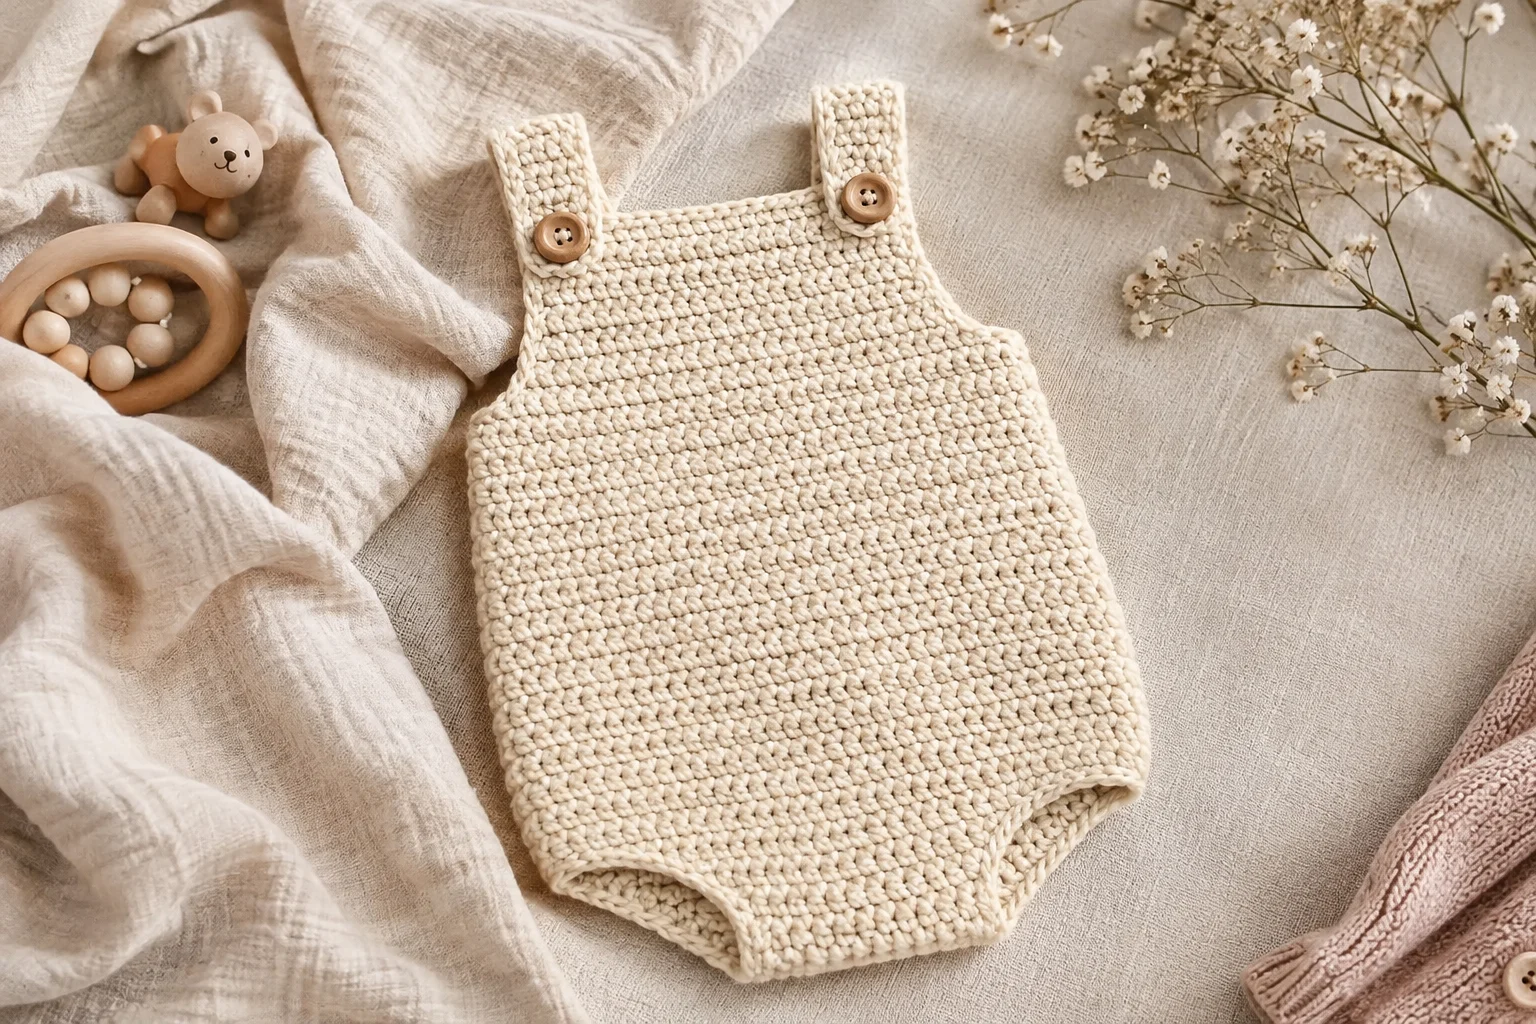
This free newborn baby romper crochet pattern makes a soft, sleeveless bubble romper in cream DK cotton on a 3.5 mm hook. It's two flat panels in plain single crochet, each shaped from the crotch up, then seamed at the sides. Two straps button onto the front bib, and snaps at the crotch make diaper changes easy. It comes in two sizes, Newborn and 0–3 months, uses about 160 (200) yards, and takes 6 to 8 hours.
Key Takeaways
- Two flat panels, two side seams. No sleeves, no hood, no working in the round.
- Single crochet only, plus simple increases and decreases. The shape comes from the counts, not from fancy stitches.
- Buttons on the straps, snaps at the crotch, so you can change a diaper without undressing the baby.
- Budget ~160 (200) yd of DK #3 cotton. Two 50 g balls cover the Newborn size.
About this newborn romper
A newborn romper is one of the quickest baby gifts that still looks special. This one is the plain, sleeveless style you see in baby photo shoots and on baby-shower tables. It has a rounded bubble body, a straight bib and two wide straps with wooden buttons.
I kept it simple on purpose. The whole thing is single crochet. The rounded legs come from increases at the edges of each row, and the armholes come from a few decreases. Plain single crochet in cotton gives a dense, smooth fabric that looks neat and feels soft.
It's also practical. The straps button at the front, so you can size them up by a row or two as the baby grows. The crotch closes with snaps, so a diaper change doesn't mean pulling the whole romper off.
Skill level. Advanced beginner. You need chain, single crochet, increases (2 sc in one stitch), sc2tog and whipstitch seaming. If you can crochet a flat rectangle and count your stitches, you can make this.
Want sleeves and a hood instead? My hooded crochet baby romper is a button-front version in three sizes, up to 12 months.
A safety note about buttons and snaps
Buttons and snaps on baby clothes are a choking hazard if they come loose, so sew them on more firmly than feels necessary. Use doubled sewing thread and go through each button 8 to 10 times, then knot it securely on the wrong side. Check every button and snap before each wear, and re-sew at the first sign of looseness. If you'd rather not use buttons at all, sew a snap under each strap end and stitch the button on top as decoration only.
What you'll need
Yarn
- ~160 (200) yd of DK #3 100% cotton in cream or oatmeal. Most 50 g balls of DK cotton hold about 115–125 yd, so two balls make the Newborn size and two balls are just enough for 0–3 months. Buy a third ball if your tension runs loose.
- Why cotton: it's breathable, washes well and doesn't shed fibers near a baby's face. Choose a soft, mercerized or combed cotton, not a stiff kitchen cotton.
Hook and notions
- 3.5 mm (US E-4) hook.
- 4 stitch markers.
- Tapestry needle, sewing needle and cream thread.
- 2 wooden buttons, 5/8 in (15 mm).
- 3 sew-on snap sets, 10 mm, for the crotch.
Gauge
Single crochet, worked flat: 20 sts × 22 rows = 4 in (10 cm).
That's the same gauge as my hooded baby romper and baby socks, so a swatch for one works for all three. Gauge matters on a garment. At baby scale, being off by two stitches over 4 in changes the chest by almost an inch. Swatch first, and change your hook size if you need to.
Abbreviations (US crochet terms)
- ch = chain
- sc = single crochet
- inc = 2 sc in the same stitch
- sc2tog = single crochet 2 together
- sl st = slip stitch
- st(s) = stitch(es)
- RS / WS = right side / wrong side
UK crocheters: this pattern uses US terms. US single crochet = UK double crochet.
Sizes and finished measurements
Instructions are written Newborn (0–3 months). Where there's only one number, it applies to both sizes.
| Size | Fits chest | Finished chest | Length, crotch to bib top | Strap length |
|---|---|---|---|---|
| Newborn | 13–14 in | 16 in | 9.5 in | 4 in |
| 0–3 months | 15–16 in | 18.5 in | 10.5 in | 4.5 in |
The finished chest has about 2 in of ease, which leaves room for a diaper and a onesie underneath.
How the romper goes together
Here's the shape in plain words before you start. You make two panels, a front and a back, from the bottom up. Each one starts as a narrow crotch strip. Then you increase at both edges to curve out into the legs and bottom. The body goes straight up to the armholes, then you shape the armholes and work the bib. The back panel gets two straps with a buttonhole at each end. Last, you seam the sides, edge the openings, and sew on the buttons and snaps.
The pattern — step by step
Part 1 — Front panel: crotch and leg curve
Foundation: Ch 13 (15).
Row 1 (RS): Sc in the 2nd ch from the hook and in each ch across. Turn. (12 (14) sts)
Rows 2–4: Ch 1, sc in each st across. Turn. (12 (14) sts)
This narrow strip is the crotch. It's about 2.5 (2.75) in wide.
Rows 5–12 (increase every row): Ch 1, inc in the first st, sc across to the last st, inc in the last st. Turn. (28 (30) sts after Row 12)
Next rows (increase every other row):
- Odd rows: Ch 1, inc in the first st, sc across to the last st, inc in the last st. Turn.
- Even rows: Ch 1, sc in each st across. Turn.
Repeat these two rows 6 (8) times. (40 (46) sts after Row 24 (28))
Put a marker at each end of your last row. The curved edges below the markers become the leg openings.
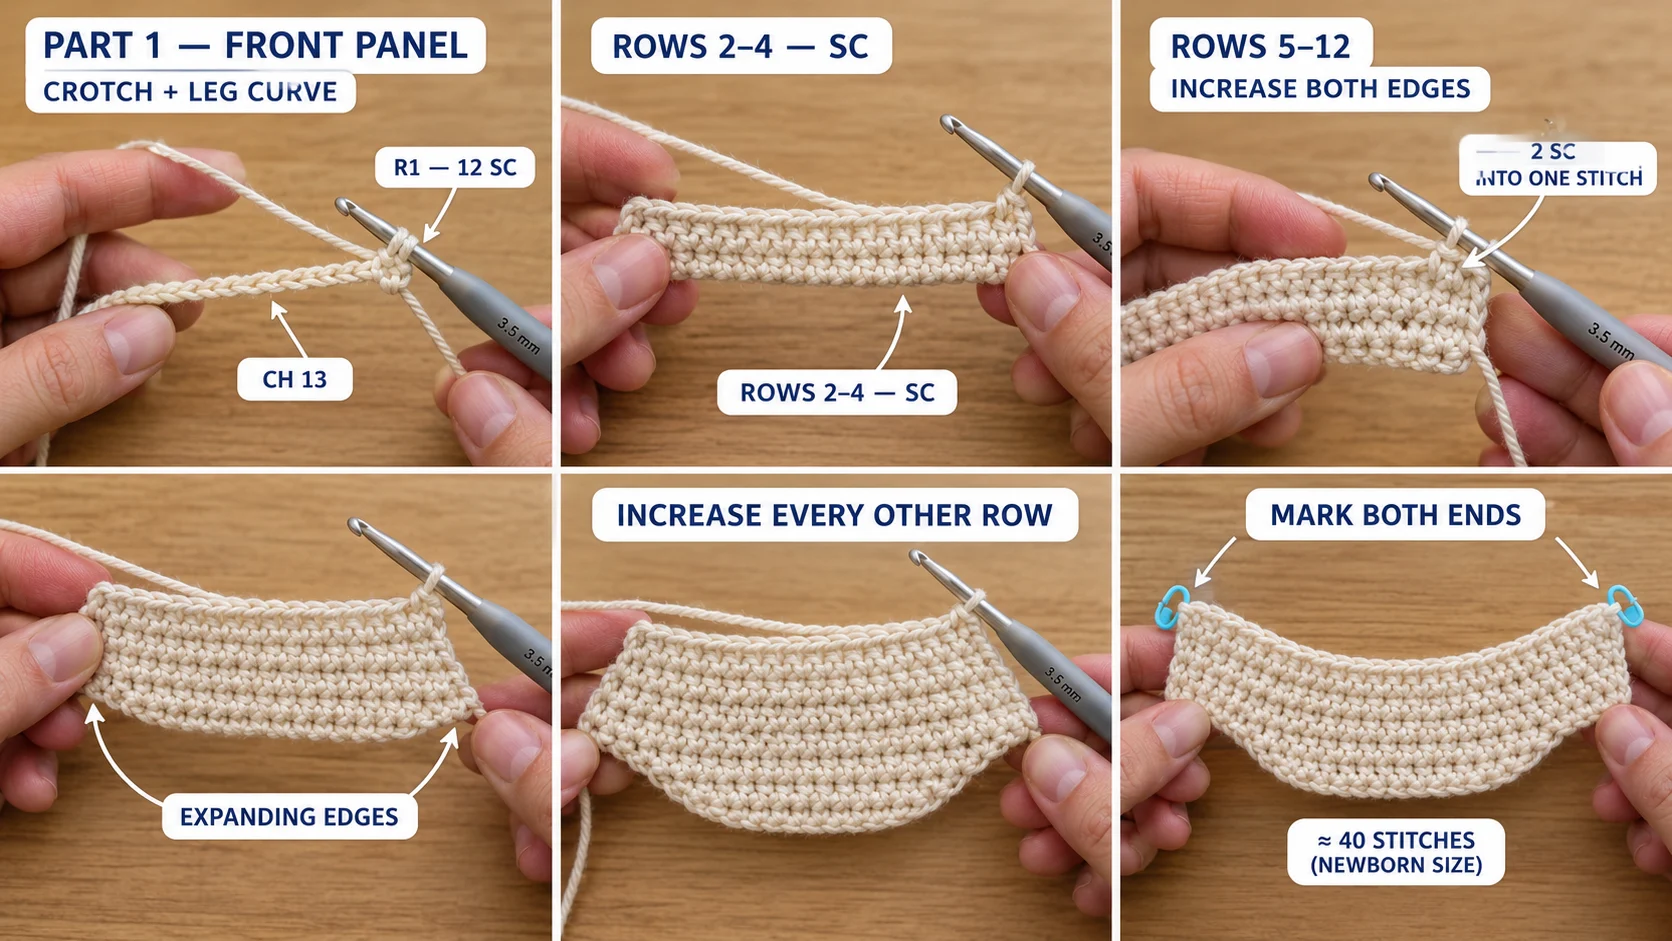
Why two increase speeds? Increasing every row makes a steep curve right at the crotch. Switching to every other row makes the curve gentler as it reaches the hips. Together they give the rounded "bubble" leg you see in the photos, instead of a straight triangle.
Part 2 — Front panel: body, armholes and bib
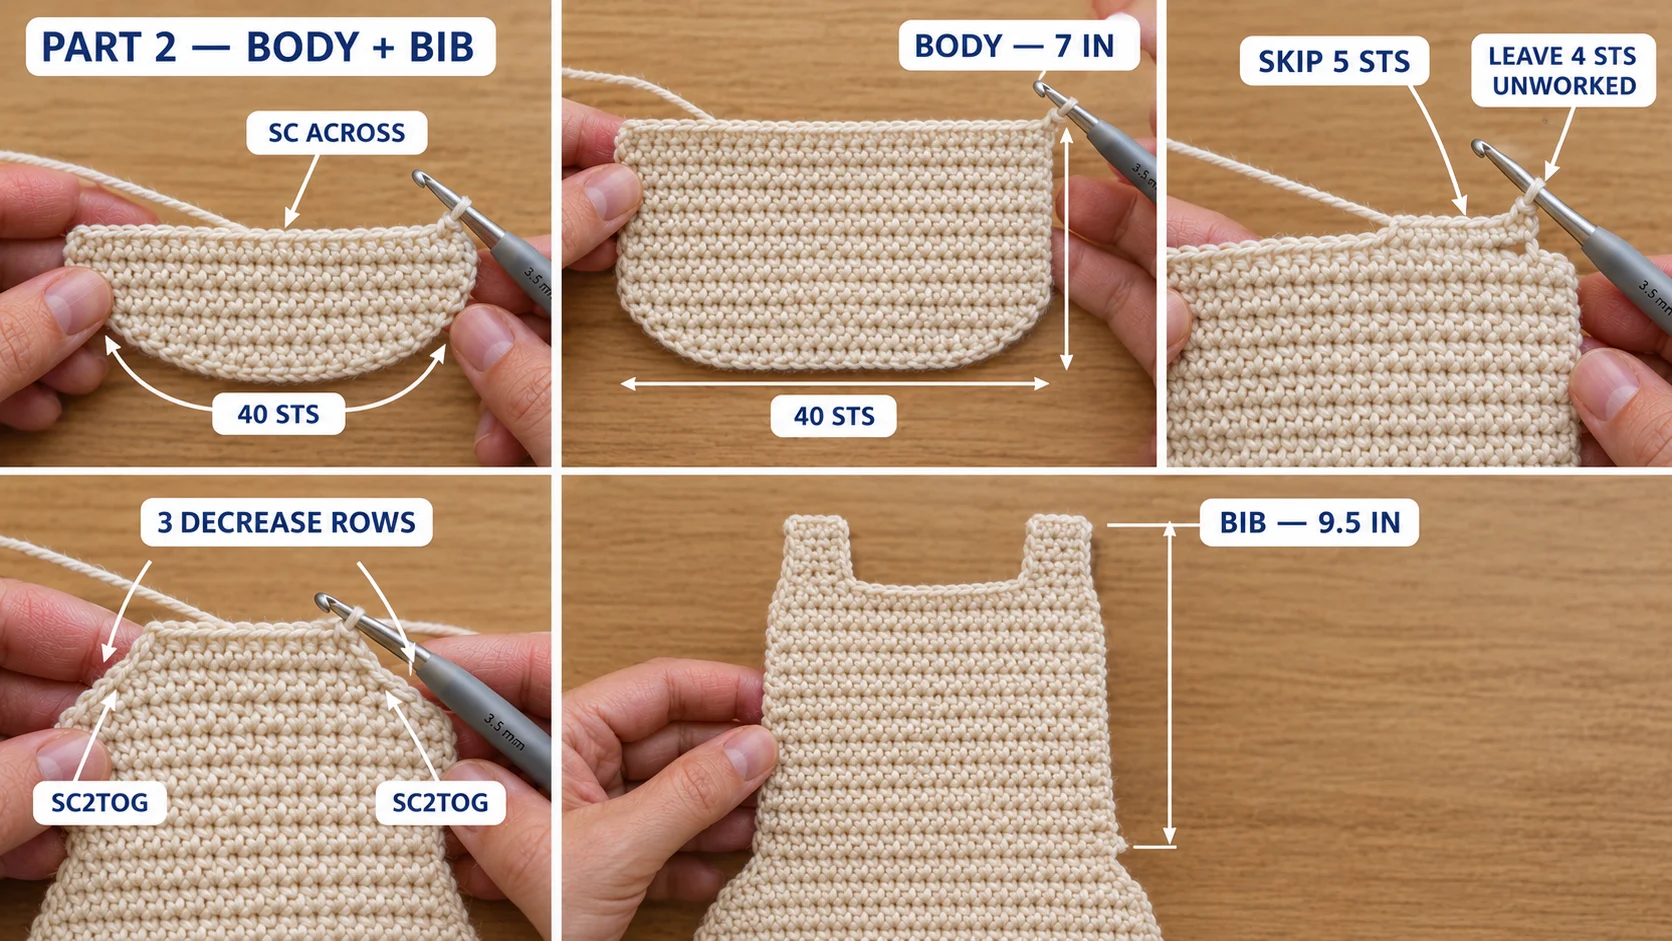
Body: Ch 1, sc in each st across. Turn. Repeat this row until the panel measures 7 (7.75) in from the foundation chain. That's about 38 (42) rows in total. (40 (46) sts)
Armhole row: Sl st in each of the first 5 sts, ch 1, sc in the same st as the last sl st, then sc in each st across until 4 sts remain. Turn, and leave the last 4 sts unworked. (32 (38) sts)
Armhole decreases (3 rows): Ch 1, sc2tog, sc across to the last 2 sts, sc2tog. Turn. (26 (32) sts after 3 rows)
Bib: Ch 1, sc in each st across. Turn. Repeat until the panel measures 9.5 (10.5) in from the foundation. Fasten off and weave in the ends.
Part 3 — Back panel with straps
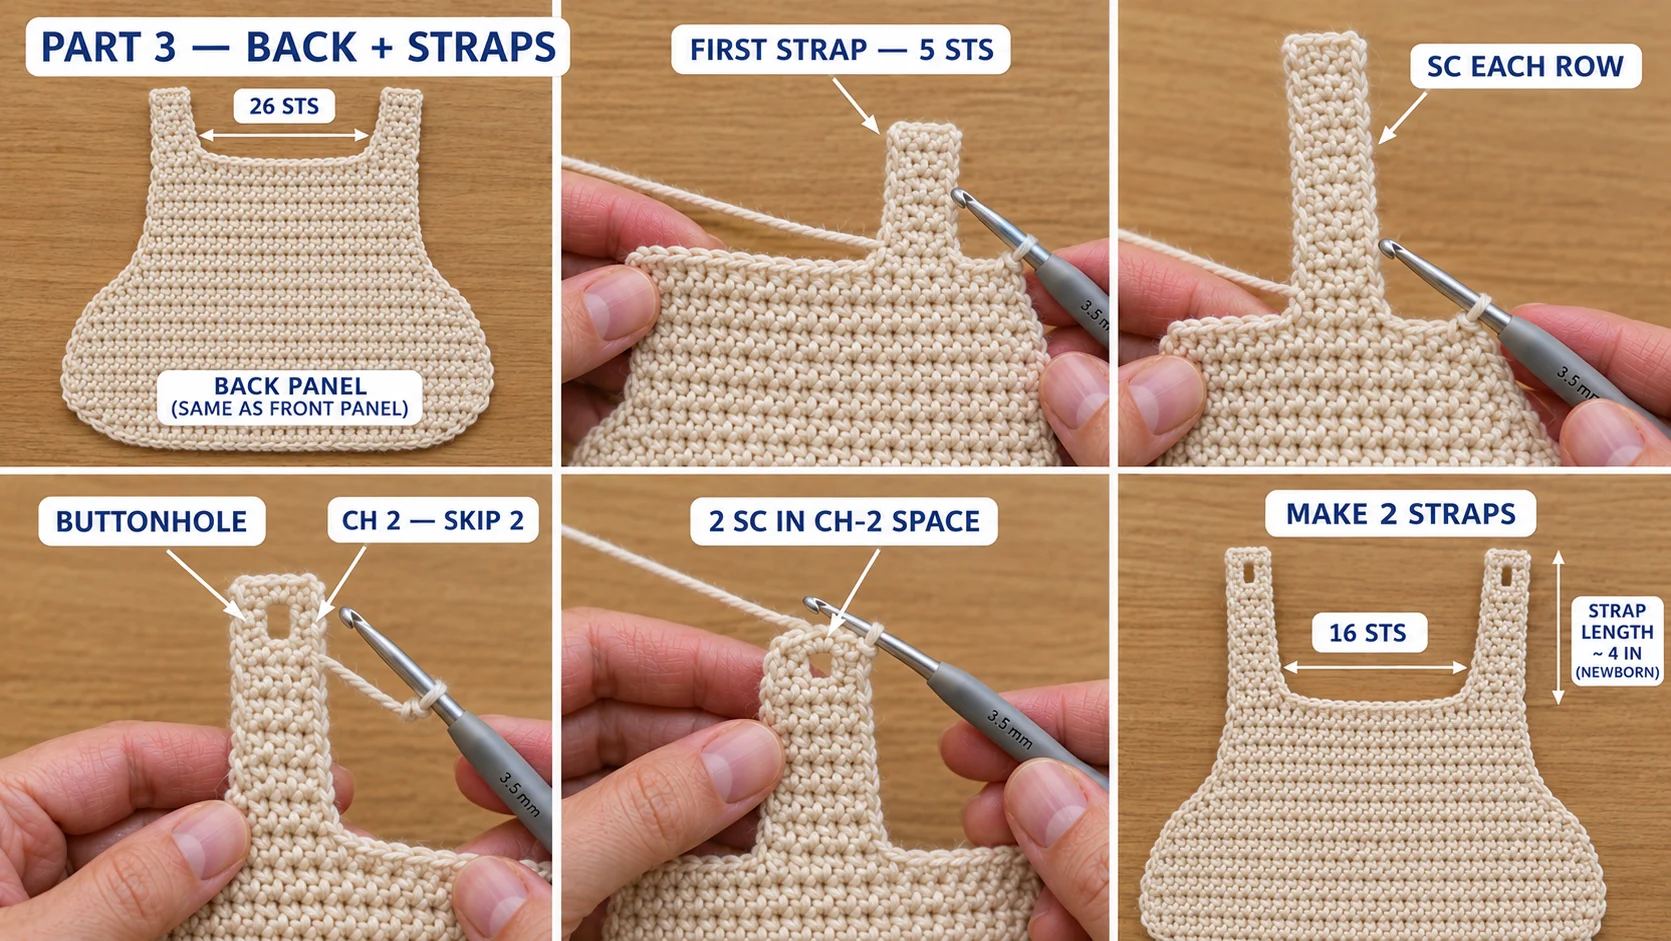
Work the back panel exactly like the front, from the foundation through the last bib row, and don't fasten off. You now have 26 (32) sts across the top.
First strap: Ch 1, sc in the first 5 sts. Turn, and leave the rest unworked. (5 sts)
- Strap rows: Ch 1, sc in each of the 5 sts. Turn. Repeat until the strap measures 3.25 (3.75) in from the top of the bib.
- Buttonhole row: Ch 1, sc in the first st, ch 2, skip 2 sts, sc in the last 2 sts. Turn.
- Next row: Ch 1, sc in the first 2 sts, 2 sc in the ch-2 space, sc in the last st. Turn. (5 sts)
- Last 2 rows: Ch 1, sc in each st. Turn. Fasten off. The strap is now about 4 (4.5) in long.
Second strap: With the RS facing, join the yarn in the 5th st from the other end of the bib. Work it the same way as the first strap. The 16 (22) sts between the straps stay free as the back neckline.
Want the straps to cross? Make each strap 1 in longer. Then cross them at the back before you button them on. Crossed straps stay on narrow baby shoulders a little better once the baby starts wiggling.
Part 4 — Seams and edging
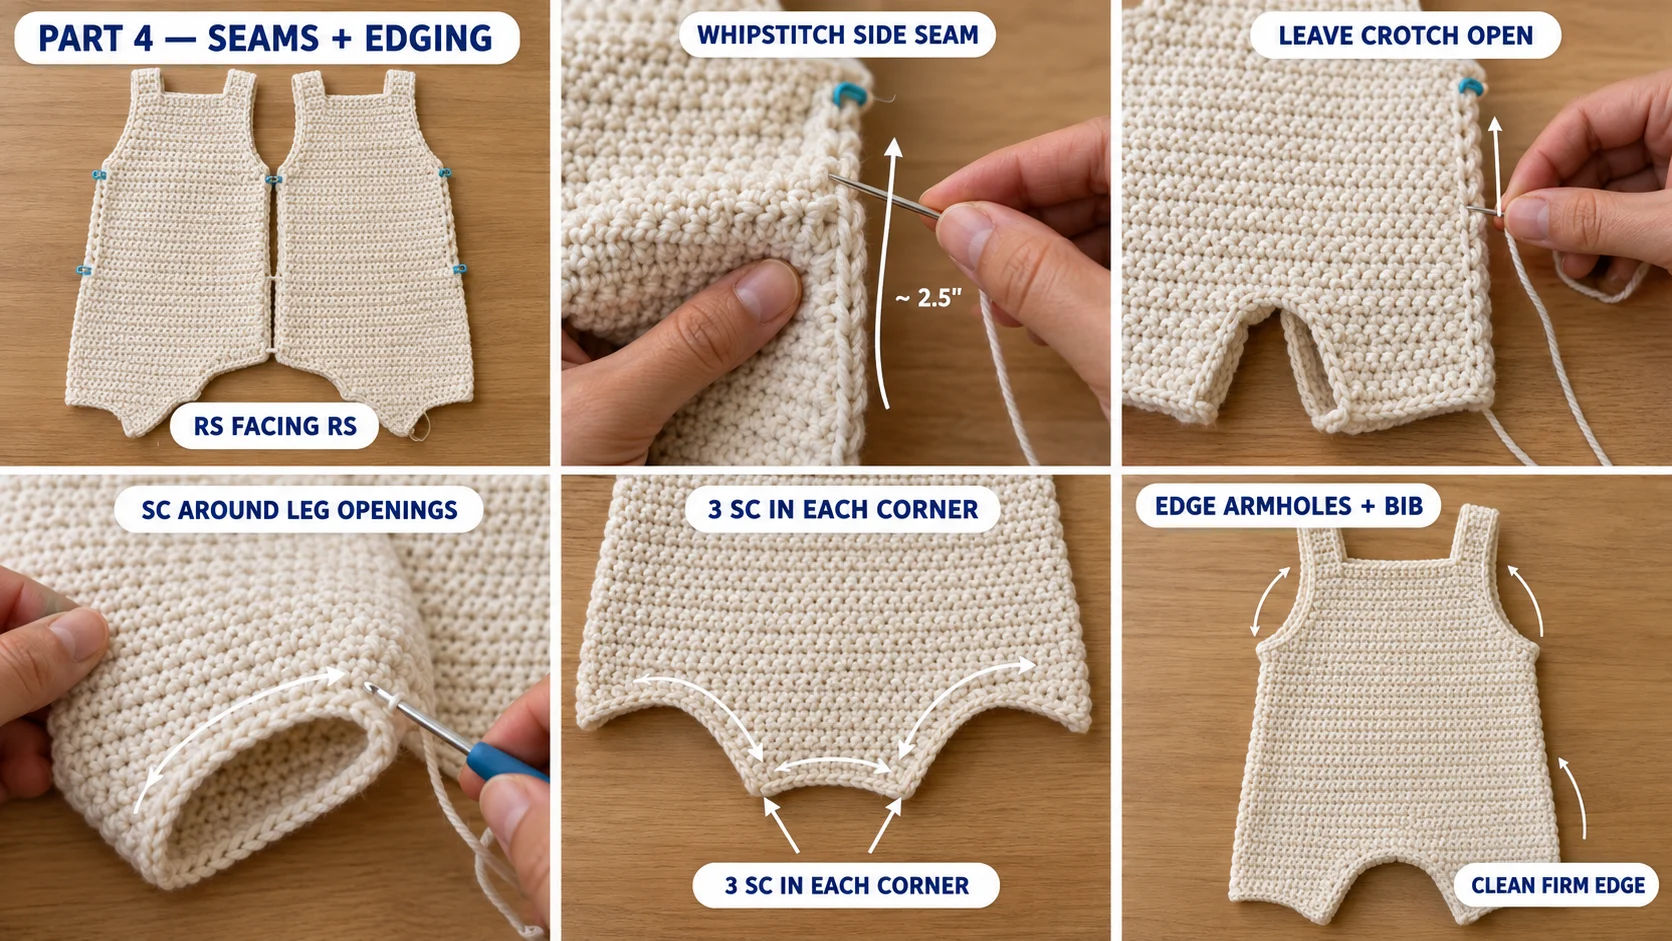
Side seams: Place the front and back panels together, RS facing each other. Line up the markers. Whipstitch each side from the marker up to the armhole, about 2.5 (2.75) in. Leave the crotch strips open. They close with snaps. Turn the romper RS out.
Leg and crotch edging: With the RS facing, join the yarn at one corner of the front crotch. Work one round of sc all the way around the bottom opening: across the front crotch, up and around one leg curve, across the back crotch, and around the other leg curve. Work 3 sc in each crotch corner, and sl st to the first sc to join. Fasten off.
Armhole and top edging: Join the yarn at the underarm seam. Sc evenly around the armhole, across the front bib, around the other armhole, then up and around both straps and across the back neckline. Work 3 sc at each corner. Sl st to the first sc to join and fasten off.
The edging gives every opening a neat, firm line and stops the leg curves from stretching.
Part 5 — Buttons, snaps and finishing
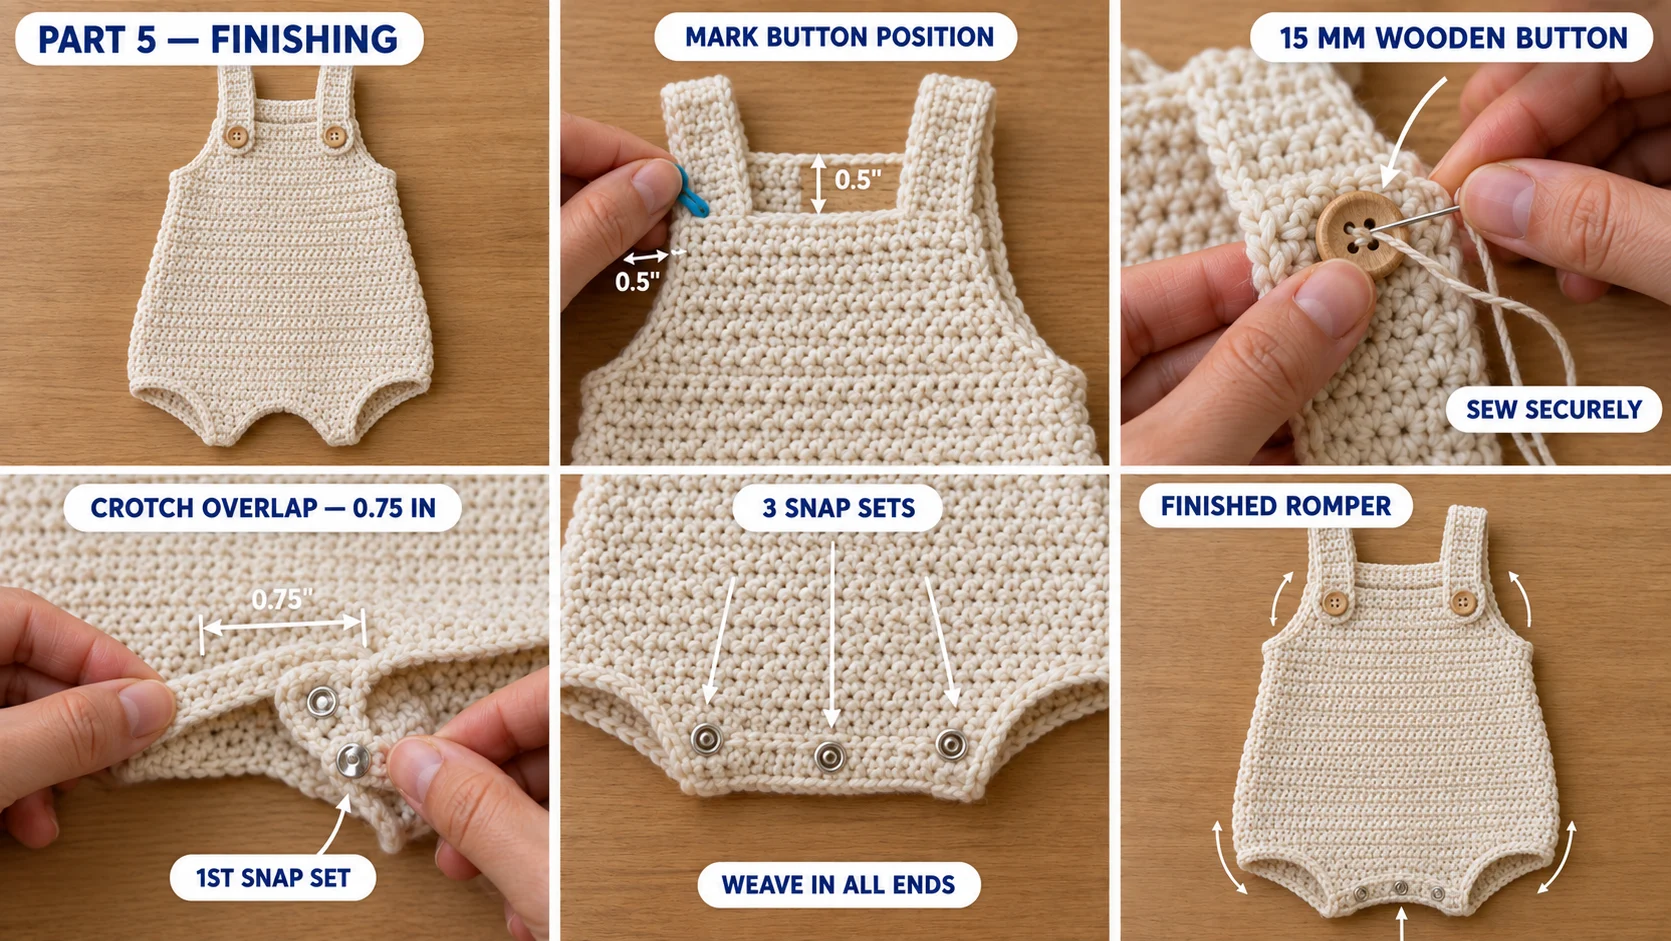
- Buttons: Bring the straps over to the front. Mark where each buttonhole sits on the bib, about 0.5 in below the top edge and 0.5 in in from the armhole corner. Sew a button at each mark, following the safety note above.
- Snaps: The back crotch strip overlaps the front one by about 0.75 in. Sew 3 snap halves evenly across the inside of the back crotch strip, and the matching halves across the outside of the front crotch strip.
- Weave in every end for at least 2 in, then back the other way. Check the inside for any loose tails, because they'll rub on bare skin.
- Block gently: Lay the romper flat on a towel, mist it with cool water and ease the leg curves into shape. Let it dry flat.
Make it yours — quick variations
- Ribbed straps: Work the strap rows in the back loop only for a soft ribbed texture that stretches a little more.
- Two-tone: Work the crotch and leg curves in a contrast color, then switch to cream at the body. Oatmeal with a mocha bottom looks lovely in photos.
- Heart pocket: Crochet a small heart or a 1.5 in square and sew it to the center of the bib.
- Bigger baby: For 3–6 months, start with ch 17 (16 sts). Increase every row for Rows 5–12 (32 sts), then every other row 10 times (52 sts). Work the body to 8.5 in, then the armholes as written (38 sts), and the bib to 11.5 in. Make the straps 5 in long.
Troubleshooting
The leg curves ruffle
Your increases are too close together for your tension. Rework the leg curve and switch to every-other-row increases two rows earlier. The edging round also pulls a slightly wavy curve flat.
The bib is too narrow to fit the buttons
You worked extra decreases. Count after the armhole rows. You should have 26 (32) sts before you start the bib. If you have fewer, rip back to the armhole row.
The straps are too short
Newborns vary a lot in length. Add 2 rows to each strap before the buttonhole row for every extra half inch you need. Because the buttons are at the front, you can also move them lower on the bib.
Frequently asked questions
What size is a newborn baby romper? This pattern's Newborn size fits a chest of about 13–14 in and measures 16 in around when finished. The 0–3 month size fits a 15–16 in chest. If you're gifting before the birth, make the 0–3 month size. It gets more wear, and a little extra room is easy to hide.
How much yarn do I need? About 160 yd of DK cotton for the Newborn size and about 200 yd for 0–3 months. That's two 50 g balls of most DK cottons. Buy a third ball if your tension runs loose or you plan to add a pocket.
Can I use acrylic yarn? Soft baby acrylic works and machine-washes well, but cotton breathes better against newborn skin. If you use acrylic, choose one labeled for babies, and check the gauge, because acrylic DK often works up slightly larger.
Is this romper good for newborn photos? Yes. The plain single crochet fabric and the simple shape photograph cleanly, and the straps are easy to adjust on a sleeping baby. For a photo prop only, you can skip the snaps and sew the crotch closed.
How do I wash a crochet baby romper? Hand wash in cool water with a fragrance-free baby soap. Squeeze the water out gently in a towel and dry it flat. Don't hang it wet, because cotton stretches long under its own weight. Check the buttons and snaps after every wash.
Can I sell rompers made from this pattern? Yes, you're welcome to sell finished rompers made from this free pattern at markets, on Etsy or as gifts. Please credit "Pattern by Wavode" on your listing and link back to this page. What you can't do is republish this write-up or my photos as your own pattern.
Related patterns on Wavode
- Hooded crochet baby romper: a button-front romper with sleeves and a hood, in 3 sizes up to 12 months.
- Classic newborn bonnet: a simple bonnet that makes a matching set for photos.
- Crochet baby socks: same DK cotton and gauge, for tiny feet.
- Rosebud baby booties: a baby-shower favorite to go with the romper.
Made this romper? Tag #wavodecrochet on Pinterest. I re-pin every finished make and credit the maker.
Pattern by Clara Hartwell for Wavode. Questions? Email me at support@wavode.com.