Starfish Baby Crochet

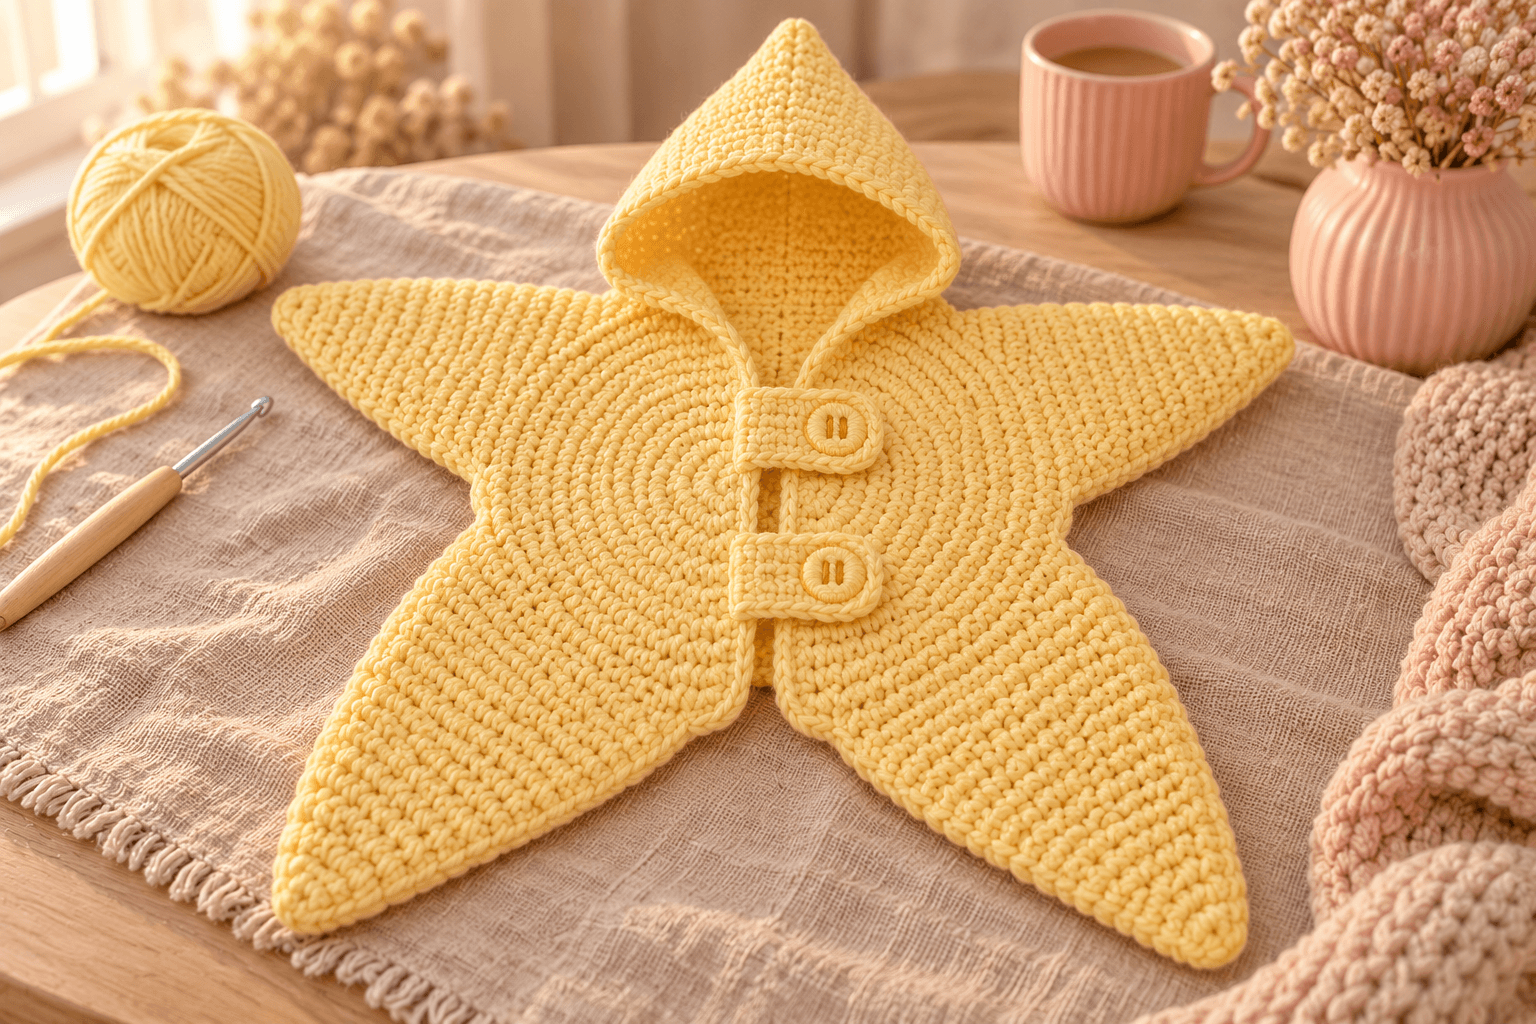
The butter-yellow color is what draws me to this little star. This starfish baby crochet outfit has an approximately 11 in (28 cm) round center, with pointed sleeves and longer legs that spread out like a starfish. The hood makes the fifth point. I like how the circular rows keep the middle simple.
I use single crochet for a close, even fabric and soft tabs with stitched circles for the button detail. The front opens from the neckline toward the middle of the tummy, so dressing starts with the outfit laid open. This version is intended for brief, awake, closely supervised photographs.
| At a glance | |
|---|---|
| Size label | 0–3 months; choose by actual measurements |
| Central panels | about 11 in (28 cm) across each |
| Flat outline | about 23 in (58 cm) across the sleeve tips; 24 in (61 cm) from hood to lower tips |
| Yarn | worsted #4 smooth butter-yellow acrylic |
| Hook | 5 mm |
| Crocheted sections | 9, including the sleeves, legs and hood worked directly onto the body |
| Time | about 14–18 hours |
| Skill | intermediate: shaping, picking up stitches, matching marked edges and sewing |
Sizing the starfish outfit for 0–3 months
The age label is a starting point. I compare the measurements before choosing an outfit for a baby. The Craft Yarn Council baby size chart lists a 3-month chest of 16 in (40.5 cm) and hips of 19 in (48 cm). Measure over the clothing and diaper that will be worn underneath.
| Check before dressing | Pattern measurement or fit requirement |
|---|---|
| Center of each body panel | about 11 in (28 cm) across |
| Each sleeve extension | about 6½ in (16.5 cm) from its body attachment to its tip |
| Each leg extension | about 10½ in (27 cm) from its body attachment to its tip |
| Hood | about 6¼ in (16 cm) high; folded depth about 6¾ in (17 cm), before edging |
| Closed outfit | room for the diaper, relaxed breathing and freely bent hips and knees |
| Face opening | stays clear of the nose and mouth without being held back |
Check the finished shape on a baby-sized mannequin first. Then check the fit with a caregiver supporting the awake baby. Stop if the closed points pull the arms straight, press on the feet or stop the knees bending. Use a different size or garment if the fit checks fail; tightening the tabs is not a sizing fix.
Safety. This hooded outfit is a supervised photo costume, not sleepwear or a swaddle. Remove it before sleep and keep the face uncovered. Health Canada explains that hoods and oversized daywear can become hazardous during sleep. Use ordinary fitted clothing for sleep and car-seat travel.
Soft yarn, hook and the starfish gauge swatch
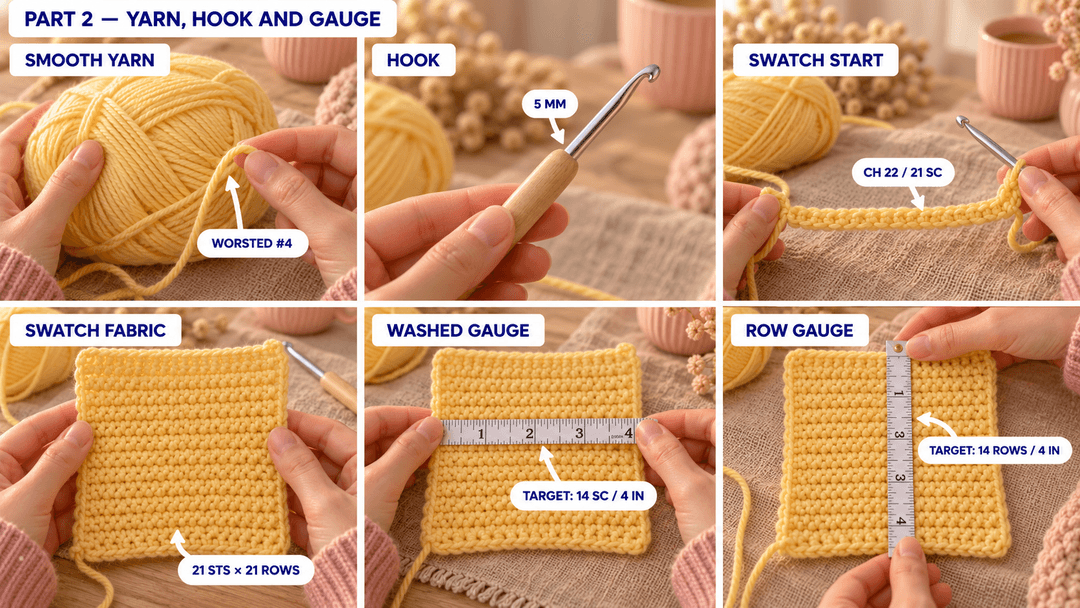
- Yarn: smooth, machine-washable worsted #4 acrylic, about 219 yd (200 m) per 100 g, in butter yellow. Allow about 650 yd, including yarn for a separate swatch and the seams. Choose a smooth strand that holds together when rubbed between your fingers.
- Hook: 5 mm for the swatch and every section. Change hook size if necessary to match the washed gauge.
- Closures: two matched sets of soft, sew-on hook-and-loop tape, each ¾ in × ¾ in (2 × 2 cm). Round the corners and sew every edge down. Use sew-on tape rather than adhesive-backed tape.
- Sewing thread: matching polyester sewing thread and a sewing needle for the tape.
- Small things: a blunt yarn needle, locking stitch markers, ten labeled scrap-yarn markers, scissors, a tape measure and rustproof pins for blocking and removable sewing chalk.
Target gauge: 3½ sc per inch (2.5 cm), with 14 sc and 14 rows measuring 4 in (10 cm) after washing and drying flat, unstretched. This is a garment gauge. The cloth should feel soft and bend easily around a finger.
For the swatch, ch 22, sc in the second chain from the hook and across, giving 21 stitches. Work 20 further rows of 21 sc, beginning each with ch 1 and a turn. The turning chain never counts as a stitch. Wash and dry flat, then measure the middle 14 stitches and 14 rows. Match both directions before working the outfit.
Stitches, in US terms: magic ring (MR), chain (ch), slip stitch (sl st), single crochet (sc), increase (inc: 2 sc in one stitch), decrease (dec: sc 2 together through both loops), stitch (st), round (R) and row. Counts appear in parentheses. Continuous rounds use a first-stitch marker and are not joined. Turned rows begin with ch 1, which does not count. Work through both loops unless told otherwise.
Part 1 — Making the starfish back panel
Round back
Butter yellow, 5 mm hook. Make 1.
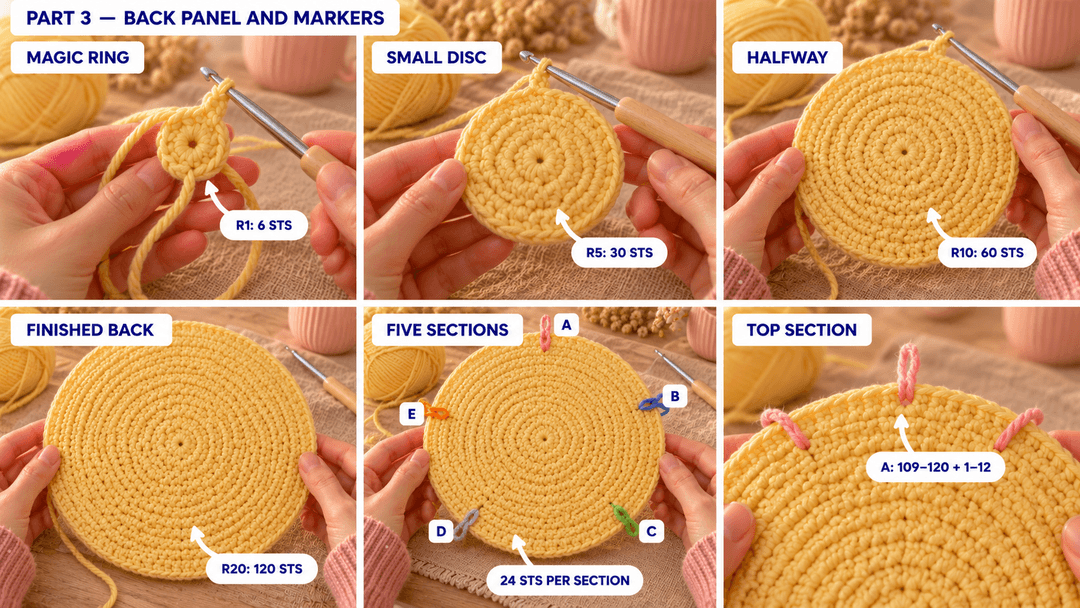
The magic ring is the middle of the back; R20 becomes the attachment edge. Leave an 8 in (20 cm) starting tail and work a continuous spiral.
- R1: MR, 6 sc in the ring. (6)
- R2: inc × 6. (12)
- R3: (sc, inc) × 6. (18)
- R4: (sc 2, inc) × 6. (24)
- R5: (sc 3, inc) × 6. (30)
- R6: (sc 4, inc) × 6. (36)
- R7: (sc 5, inc) × 6. (42)
- R8: (sc 6, inc) × 6. (48)
- R9: (sc 7, inc) × 6. (54)
- R10: (sc 8, inc) × 6. (60)
- R11: (sc 9, inc) × 6. (66)
- R12: (sc 10, inc) × 6. (72)
- R13: (sc 11, inc) × 6. (78)
- R14: (sc 12, inc) × 6. (84)
- R15: (sc 13, inc) × 6. (90)
- R16: (sc 14, inc) × 6. (96)
- R17: (sc 15, inc) × 6. (102)
- R18: (sc 16, inc) × 6. (108)
- R19: (sc 17, inc) × 6. (114)
- R20: (sc 18, inc) × 6. (120)
Sl st in the next st and fasten off, leaving a 12 in (30 cm) tail at the edge. Close the ring, then weave both tails into the back of the fabric. The panel stays empty.
Mark the five attachment sections
Lay the panel with its chosen outside facing you. Keep the start of R20 at twelve o'clock. Put a scrap marker before stitch 1, then count clockwise around the visible edge, starting with the stitch immediately after that marker. These are placement numbers; keep them separate from the original spiral marker. Mark each block below at both ends.
| Section | Placement stitch numbers on R20 | Position when viewed from outside |
|---|---|---|
| A, hood | 109–120 and 1–12 | top, with its midpoint at the top marker |
| B, sleeve | 13–36 | upper right |
| C, leg | 37–60 | lower right |
| D, leg | 61–84 | lower left |
| E, sleeve | 85–108 | upper left |
Pin the washed panel flat and let it dry into a circle about 11 in (28 cm) across. Keep the markers in place.
Tip. A panel that stands up like a bowl or develops ripples needs attention before the next piece. Recount the six increases in each round, then check the washed gauge. Pinning should settle the fabric gently, without stretching the edge to force a size.
Shaping the front panels and button opening
Split round front
Butter yellow, 5 mm hook. Make 1.
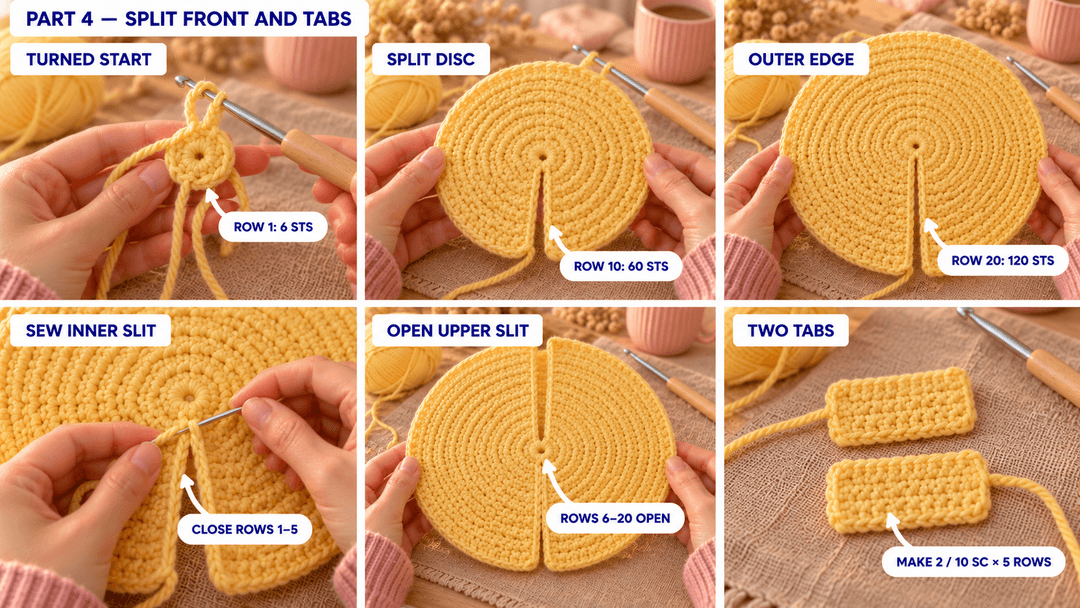
I work the front back and forth, leaving a slit from the tummy toward the neck. I keep the circular tummy in one piece, so the opening is easy to follow.
Leave a 12 in (30 cm) starting tail. Work the first row into a magic ring. At the end of every row, ch 1 and turn; the turning chain is excluded from the counts. Keep the first and last stitches separate. The ring is the tummy center; Row 20 is the outside attachment edge.
- Row 1: MR, 6 sc in the ring. (6)
- Row 2: inc × 6. (12)
- Row 3: (sc, inc) × 6. (18)
- Row 4: (sc 2, inc) × 6. (24)
- Row 5: (sc 3, inc) × 6. (30)
- Row 6: (sc 4, inc) × 6. (36)
- Row 7: (sc 5, inc) × 6. (42)
- Row 8: (sc 6, inc) × 6. (48)
- Row 9: (sc 7, inc) × 6. (54)
- Row 10: (sc 8, inc) × 6. (60)
- Row 11: (sc 9, inc) × 6. (66)
- Row 12: (sc 10, inc) × 6. (72)
- Row 13: (sc 11, inc) × 6. (78)
- Row 14: (sc 12, inc) × 6. (84)
- Row 15: (sc 13, inc) × 6. (90)
- Row 16: (sc 14, inc) × 6. (96)
- Row 17: (sc 15, inc) × 6. (102)
- Row 18: (sc 16, inc) × 6. (108)
- Row 19: (sc 17, inc) × 6. (114)
- Row 20: (sc 18, inc) × 6. (120)
Fasten off, leaving a 12 in (30 cm) tail at the outer edge, and weave it in. Close the magic ring gently. With the starting tail, sew the two slit edges together from the ring through the row ends of Rows 1–5, matching one row end to its partner. Leave Rows 6–20 open. Weave the tail into the inside.
Lay the front flat with its slit pointing straight up. Choose its outside so the Row 20 stitches run clockwise from one lip of the slit to the other. Number those 120 outer stitches from 1 to 120, starting beside the slit. Mark the same A–E blocks as on the back: A wraps around the opening, 12 stitches on each side.
The front and back should lie over one another without stretching. With the outsides facing away from one another, the letters on the back run like a mirror: front B meets back E; front C meets back D; front D meets back C; front E meets back B. Both top A sections remain at the neckline.
Soft fastening tabs
Butter yellow, 5 mm hook. Make 2.
Leave an 8 in (20 cm) starting tail and ch 11. These tabs will lie across the slit. Each first-row edge is a long side; the five row ends at one short end are the edge that gets sewn to the front.
- Row 1: sc in the 2nd ch from the hook and in each ch across. (10)
- Rows 2–5: ch 1, turn, sc 10. (10) 4 rows.
Fasten off, leaving an 18 in (45 cm) tail at the short end for attaching the tab. Weave in the starting tail. Set the tabs aside while the body is flat and easy to handle.
Making the pointed starfish hood
Hood, worked onto the neckline
Butter yellow, 5 mm hook. Make 1.
Hold the front and back inside faces together, with the slit facing you and their top markers aligned. Pin matching section ends. Leave the four pairs of sleeve and leg sections open; they will be crocheted together later.
Start at one lip of the slit, work behind the neck and come back to the other lip. Face the outside of the garment toward you. Join the yarn at front placement stitch 1. Work along the top-right half of the front, across the back neckline, then along the top-left half of the front to the other lip of the slit.
- Row 1: sc 12 along the first front neck half, sc 24 along the back neck section, sc 12 along the second front neck half. (48)
- Rows 2–22: ch 1, turn, sc 48. (48) 21 rows.
For the marked placement numbers, that first row follows front 1–12; back 109–120 then back 1–12; front 109–120. The pickup connects the panels at both shoulder valleys. Catch each edge stitch once, and keep all 48 stitches on the hood row.
Fasten off, leaving a 30 in (75 cm) tail at the top edge. The first hood row is the neck edge; Row 22 is the crown seam. Fold the rectangle with its outside faces together, matching the two ends of Row 22. The fold sits at the back of the head. Whipstitch the 24 matching stitch pairs across the top, then turn the hood right side out. The far end of that seam makes the soft point at the back of the crown.
The hood is about 6¼ in (16 cm) high, with a folded depth of about 6¾ in (17 cm). Pin its face edges back on the mannequin if needed while checking the shape; remove those pins before dressing. If the hood falls over the eyes or nose, stop and change the design before using it on a baby. Tightening the neckline does not correct an oversized hood.
Joining the starfish points and finishing the edges
I crochet the points straight onto the marked body edges, so the joins stay soft. I work around the front half, then around the matching back half, like opening a small paper bag. Each pickup starts with the panels still lying back to back.
Pointed sleeves
Butter yellow, 5 mm hook. Make 2.
Start at the top end of a sleeve opening, beside the hood. Join yarn at front B stitch 13, work toward the lower end of that sleeve, then around its back half to return to the starting point. Keep the outside of the new sleeve facing out. For the second sleeve, use the matching E/B opening in the table below.
| Sleeve | Front half, in order | Back half, in order |
|---|---|---|
| First | B: 13–36 | E: 85–108 |
| Second | E: 85–108 | B: 13–36 |
Follow the numbered path for each sleeve; the second starts at its lower valley. After the pickup, work a continuous spiral and move a marker into the first stitch of each round. R1 is the broad body attachment; R23 becomes the closed hand tip.
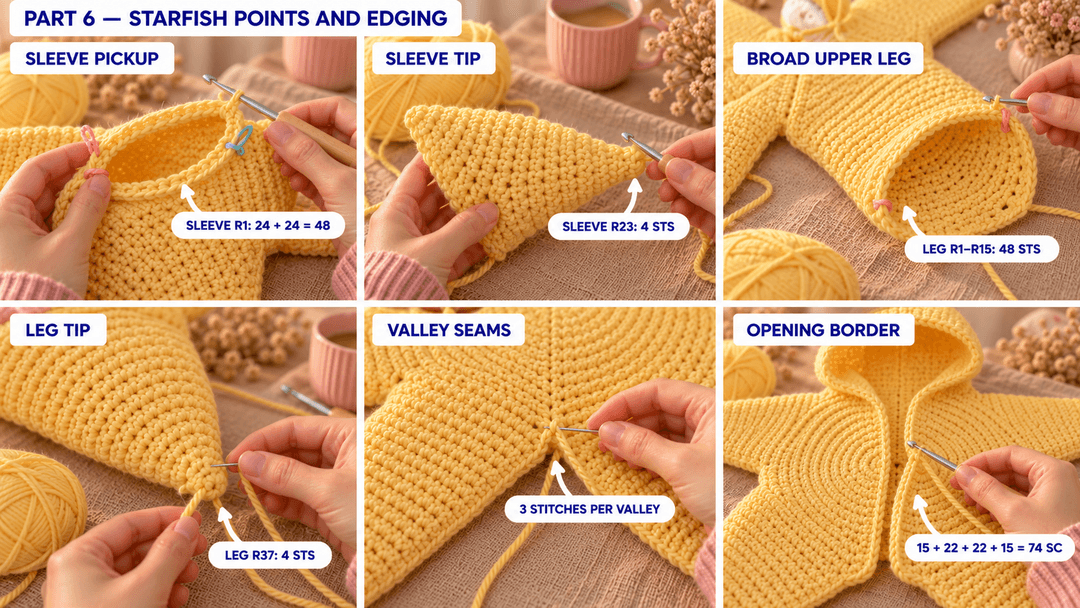
- R1: sc 24 along the front sleeve section, sc 24 along the matching back sleeve section. (48)
- R2: (sc 22, dec) × 2. (46)
- R3: (sc 21, dec) × 2. (44)
- R4: (sc 20, dec) × 2. (42)
- R5: (sc 19, dec) × 2. (40)
- R6: (sc 18, dec) × 2. (38)
- R7: (sc 17, dec) × 2. (36)
- R8: (sc 16, dec) × 2. (34)
- R9: (sc 15, dec) × 2. (32)
- R10: (sc 14, dec) × 2. (30)
- R11: (sc 13, dec) × 2. (28)
- R12: (sc 12, dec) × 2. (26)
- R13: (sc 11, dec) × 2. (24)
- R14: (sc 10, dec) × 2. (22)
- R15: (sc 9, dec) × 2. (20)
- R16: (sc 8, dec) × 2. (18)
- R17: (sc 7, dec) × 2. (16)
- R18: (sc 6, dec) × 2. (14)
- R19: (sc 5, dec) × 2. (12)
- R20: (sc 4, dec) × 2. (10)
- R21: (sc 3, dec) × 2. (8)
- R22: (sc 2, dec) × 2. (6)
- R23: (sc, dec) × 2. (4)
After R23, fasten off, leaving an 8 in (20 cm) tail at the hand tip. Pass it through the front loop of each of the 4 remaining stitches, draw closed gently and weave the end along the inside for at least 2 in (5 cm). Keep the sleeve empty and softly flattened. Work the second sleeve from its marked opening in the same way.
Longer pointed legs
Butter yellow, 5 mm hook. Make 2.
Join yarn at front C stitch 37 for the first leg. Work around the front section, then the matching back section. For the second, start at front D stitch 61. These broad upper sections leave space for the diaper and bent knees.
| Leg | Front half, in order | Back half, in order |
|---|---|---|
| First | C: 37–60 | D: 61–84 |
| Second | D: 61–84 | C: 37–60 |
R1 is the upper-leg attachment. The last round becomes the closed foot tip. Work a continuous spiral, using a marker in the first stitch.
- R1: sc 24 along the front leg section, sc 24 along the matching back leg section. (48)
- R2–R15: sc around. (48) 14 rounds.
- R16: (sc 22, dec) × 2. (46)
- R17: (sc 21, dec) × 2. (44)
- R18: (sc 20, dec) × 2. (42)
- R19: (sc 19, dec) × 2. (40)
- R20: (sc 18, dec) × 2. (38)
- R21: (sc 17, dec) × 2. (36)
- R22: (sc 16, dec) × 2. (34)
- R23: (sc 15, dec) × 2. (32)
- R24: (sc 14, dec) × 2. (30)
- R25: (sc 13, dec) × 2. (28)
- R26: (sc 12, dec) × 2. (26)
- R27: (sc 11, dec) × 2. (24)
- R28: (sc 10, dec) × 2. (22)
- R29: (sc 9, dec) × 2. (20)
- R30: (sc 8, dec) × 2. (18)
- R31: (sc 7, dec) × 2. (16)
- R32: (sc 6, dec) × 2. (14)
- R33: (sc 5, dec) × 2. (12)
- R34: (sc 4, dec) × 2. (10)
- R35: (sc 3, dec) × 2. (8)
- R36: (sc 2, dec) × 2. (6)
- R37: (sc, dec) × 2. (4)
After R37, fasten off, leaving an 8 in (20 cm) tail at the foot tip. Pass the tail through the front loops of the final 4 stitches, draw closed and weave the end along the inside for at least 2 in (5 cm). Keep the leg empty. Work the second leg from its own opening.
Close the small valley gaps
At each of the five valleys between neighboring sections (A/B, B/C, C/D, D/E and E/A), take 3 small stitches through the front and back edge corners with a fresh strand of yellow yarn. Catch the neighboring pickup stitches too, so the corners sit together. Knot securely on the inside and weave each end through several stitch backs in both directions. Keep the opening slit free.
Tip. Spread the points flat on the table before drawing a valley seam snug. Pull only until the gap closes. A tight knot can turn that soft corner into a hard bump against the skin.
Edge the front opening and hood
With the outfit facing you, join yellow yarn at the lower end of one open slit lip, beside Front Row 6. Work up that slit edge, around the hood face opening and down the other slit lip. The edging follows the face opening; leave the crown seam alone.
Work 1 sc in each of the 15 row ends from Front Rows 6–20, 1 sc in each of the 22 row ends up the first hood edge, 1 sc in each of the 22 row ends down the other hood edge, then 1 sc in each of the 15 row ends from Front Rows 20–6. This gives 74 edging stitches. Fasten off with an 8 in (20 cm) tail and weave both ends into the inside.
Lay the opening flat. Its edge should lie softly against the fabric without drawing the neckline inward.
Adding secure buttons and checking the fit
I keep the round button look with flat embroidery on the tabs. Soft sew-on hook-and-loop tape underneath does the fastening. The stitched circles stay part of the fabric.
Embroider the button motifs
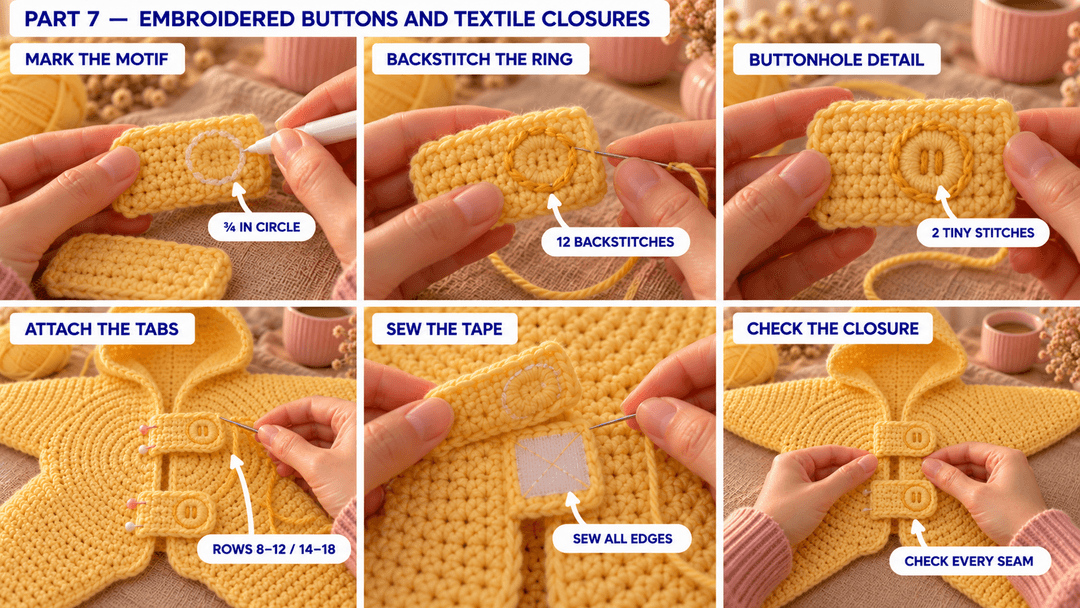
Lay each tab outside face up, with its long direction running across the opening. At its free end, embroider a circle about ¾ in (2 cm) across with matching yellow yarn, using 12 short backstitches evenly spaced around the circle. Center the circle between stitch columns 8 and 9, halfway up Row 3, counting columns from the attachment end. Mark the ¾ in (2 cm) circle with removable sewing chalk before stitching. The five-row attachment edge is at column 1. Add two tiny straight stitches inside the circle for the buttonholes. Weave the ends into the inside of the tab; keep the embroidery flat.
Attach the tabs and textile closures
- Lay the front slit closed, with its lips touching. Put the tabs across it, embroidery facing out. On the wearer's right slit lip, sew one tab's five row ends to Front Rows 8–12, one stitch per row end. Sew the other to Rows 14–18. Go back along each attachment a second time. Both free ends lie toward the wearer's left.
- Sew a soft loop-tape square to the underside of each free tab end, directly beneath the embroidered circle. Use matching sewing thread and small stitches around all four edges, then cross the square diagonally both ways. Keep the corners flat.
- Mark the matching spots on the outside of the opposite slit lip with the tabs resting loosely across the closed opening. Sew the hook-tape halves there, using the same perimeter and diagonal stitching. The hook surfaces must be fully covered by the tabs when closed, facing away from the baby.
- Weave every yarn end in both directions and trim close. Remove all pins and markers. Open and close each tab several times, then pull the tape and tab attachments gently to check the sewing.
Safety. Keep hard buttons and other detachable ornaments off this baby version. Check the textile tape, embroidery, seams and loose threads before every use. Keep the tabs comfortably loose; the outfit must not hold the arms or legs straight.
Before a photograph, open the tabs fully and lay the outfit open on a clear, firm surface at floor level. With a caregiver supporting the baby's head and body, ease each limb into its opening without pulling on a hand or foot. Let the knees stay bent naturally. Close the tabs loosely, check the face opening and stay within arm's reach throughout. Take the outfit off as soon as the photograph is finished or the baby becomes uncomfortable or sleepy.
Washing and caring for the baby outfit
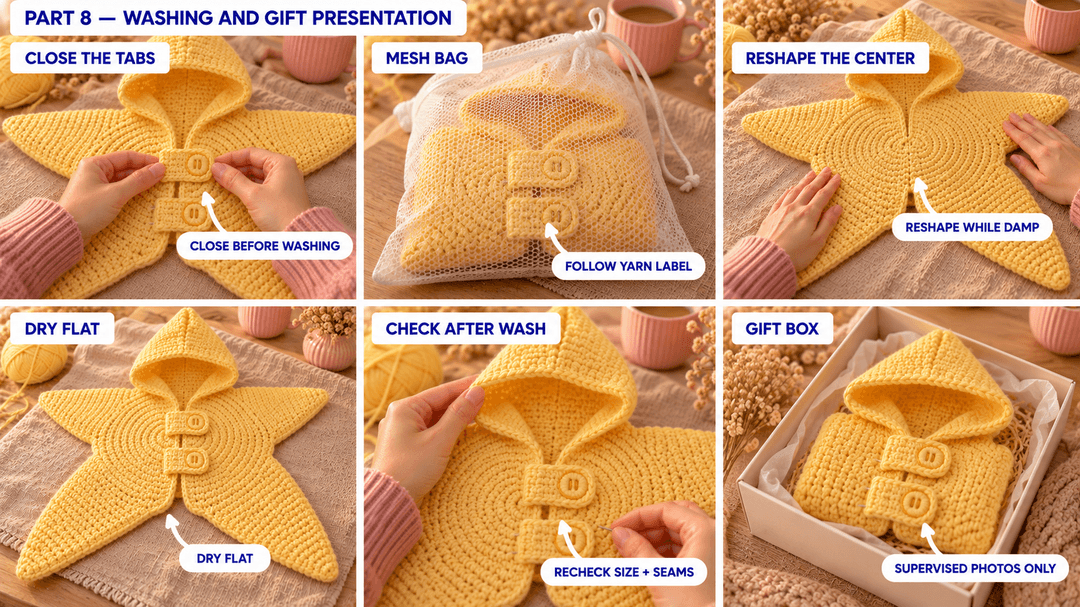
Follow the yarn and tape labels, using the gentler method if they differ. Close the tabs before washing and use a mesh bag to protect the embroidery. Reshape the circular center and points while damp, then dry flat. Recheck the gauge, closures and face opening after the first wash.
For a gift, I tuck a care card under one tab with the size measurements and the words “Awake, closely supervised photos only.” The yellow star looks lovely laid open in a shallow gift box, with its little points folded softly inward.
UK terms: US sc = UK dc; US sc 2 together = UK dc 2 together. Ch and sl st are the same in both.
Made a little yellow star? Tag #wavodecrochet on Pinterest so I can see it.