Crochet Princess Dress

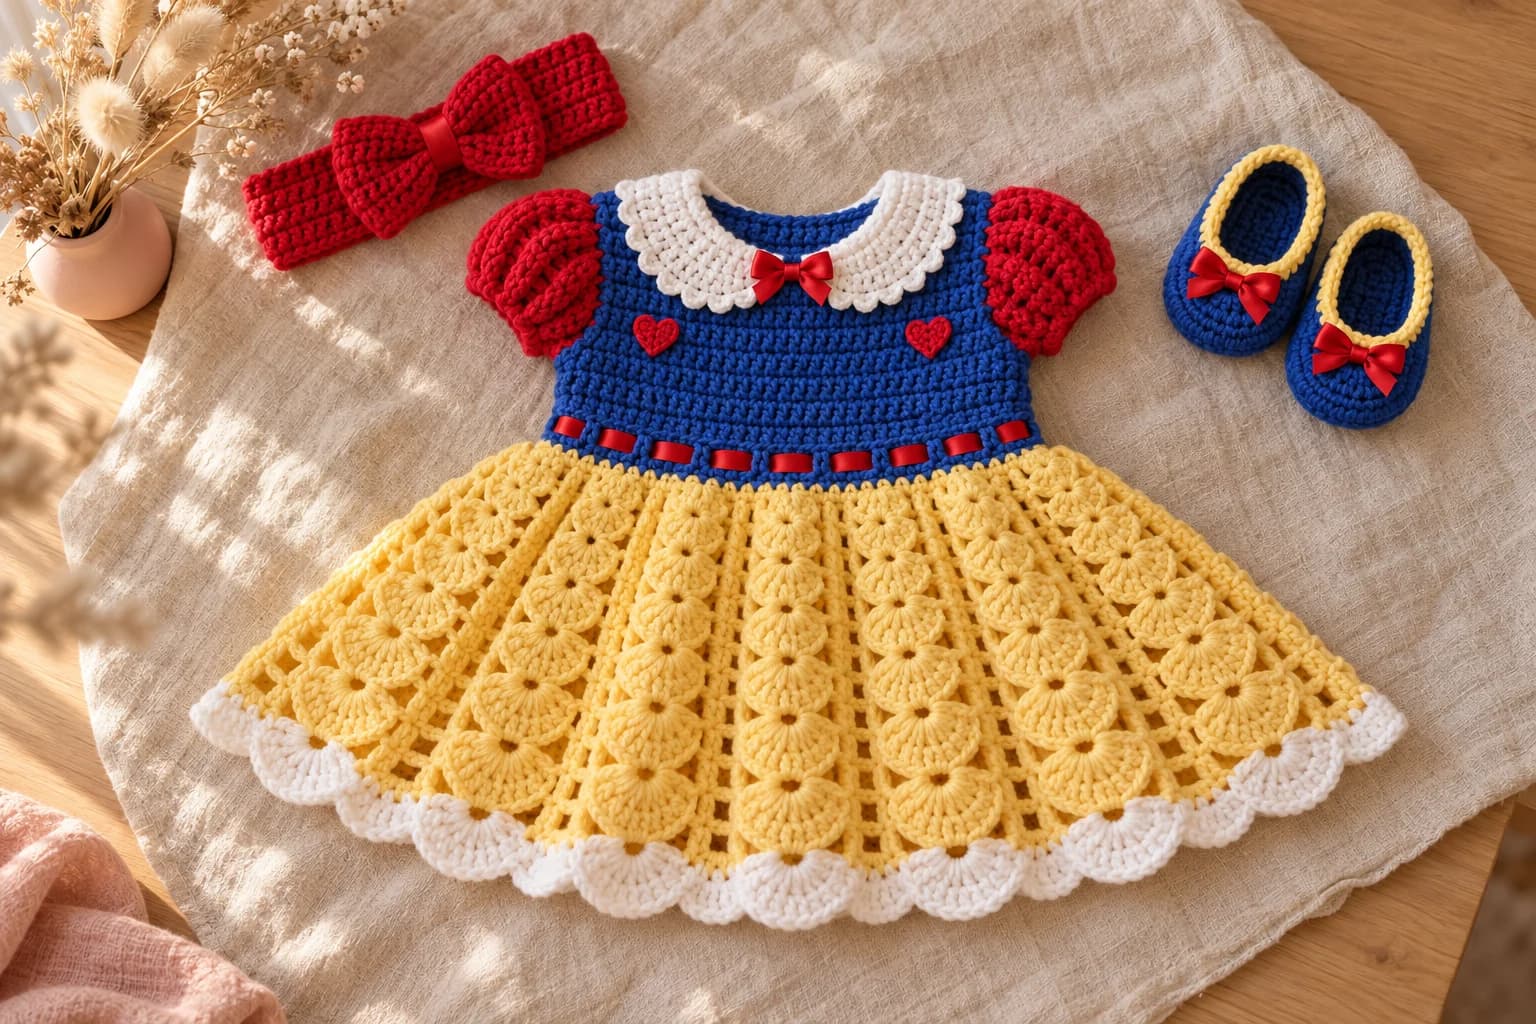
This crochet princess dress turns a baby into a little storybook heroine: a royal blue bodice, red cap sleeves, a white collar and a full yellow skirt, with matching booties and a big red bow headband. The dress grows from the neck down on a round yoke, so there are no side seams. You'll need worsted cotton in four colors, a 5 mm and a 4 mm hook, and about 120 yd of blue and 175 yd of yellow for the smallest size, plus a little red and white. It comes in 3 sizes, 0 to 18 months.
Key Takeaways
- One neckline for every size: the yoke always starts with 40 dc, and the bigger sizes just grow for an extra row or two.
- The skirt is columns of shells, and the shells get bigger as you go down, so it flares on its own.
- The red cap sleeves are 3 short rows, worked straight into the armhole.
- Four colors, small amounts: about 120 to 170 yd of blue, 175 to 260 yd of yellow, 75 yd of red and 60 yd of white.
Why I love this princess dress
Every little one needs one dress-up outfit that feels like a fairytale. Royal blue, red and sunny yellow are the classic princess colors, and if this one reminds you of a certain princess with an apple, that's the idea. It's perfect for a first birthday, a costume party or Halloween, and soft enough for a whole day of being admired.
The dress is easier than it looks. The yoke is a flat circle that grows in double crochet rows. You set the sleeve stitches aside, join the bodice into a round, and add a row of eyelets at the waist. From there, the skirt is just shells stacked on shells.
What makes it a princess dress are the details: a white collar worked into the neckline chain, puffy red caps on the shoulders, two tiny crochet hearts and a red ribbon woven through the waist. Can you picture it with the red bow headband and the little slippers?
Skill level. Intermediate. You need ch, sl st, sc, hdc, dc, tr, working in rows and in rounds, and evenly spaced increases. If you've made a top-down yoke before, you'll feel at home.
If you like a softer, wintery look, my snow princess baby dress set is a dusty blue and white dress with a raglan yoke.
What you'll need
Yarn (worsted weight #4 cotton, four colors)
| Color | Used for | Amount, 0–6 (6–12, 12–18) months |
|---|---|---|
| Royal blue | Yoke, bodice, waist, booties | about 120 (140, 170) yd |
| Buttery yellow | Skirt, bootie rims | about 175 (215, 260) yd |
| Red | Cap sleeves, hearts, headband and bow | about 75 yd in every size |
| White | Collar, scalloped hem | about 60 yd in every size |
- I like Lion Brand 24/7 Cotton (186 yd / 170 m per 100 g): that's 1 (1, 1) skein of blue, 1 (2, 2) of yellow, 1 of red and 1 of white. For a lighter, washable dress, Red Heart Soft is a good worsted acrylic. Buy each color from one dye lot.
- I worked these totals out from the stitch count of every piece, plus a margin of about 15% for the swatch and the ends.
Hooks
- 5 mm (US H/8) for the dress and headband.
- 4 mm (US G/6) for the booties, so they're firm.
Notions
- 2 buttons, ½ in (12 mm), for the back of the dress.
- About 1¾ yd (1.6 m) of red satin ribbon, ⅜ in (10 mm) wide: about 1 yd for the waist, and the rest for the collar bow and the 2 bootie bows.
- Locking stitch markers, a tapestry needle, a sewing needle and red thread, and scissors.
- Thin round elastic (optional), about 12 in, to keep the booties on.
Gauge
- Dc (dress): 14 sts × 7 rows = 4 in (10 cm) with the 5 mm hook.
- Sc (booties): 18 sts × 20 rnds = 4 in (10 cm) with the 4 mm hook.
Check the dc gauge before you start. If you have more than 14 sts, go up a hook size. If you have fewer, go down one. Half a stitch per inch changes the chest by about 2½ in, so it's worth the swatch.
Abbreviations (US crochet terms)
- ch: chain
- sl st: slip stitch
- sc: single crochet
- hdc: half double crochet
- dc: double crochet
- tr: treble crochet
- dec: single crochet two together
- BLO: back loop only
- sp: space
- st(s): stitch(es)
- rnd(s): round(s)
- RS: right side
- shell: (2 dc, ch 2, 2 dc) in the same sp, or (3 dc, ch 2, 3 dc) for a big shell
Size chart
| Size | To fit chest | Finished chest | Neckline | Armhole | Length (shoulder to hem) |
|---|---|---|---|---|---|
| 0–6 months | 16–17 in | 18¼ in / 46 cm | 11½ in | 7 in | about 14 in / 36 cm |
| 6–12 months | 17½–18 in | 19½ in / 49 cm | 11½ in | 7 in | about 16½ in / 42 cm |
| 12–18 months | 18½–19 in | 20½ in / 52 cm | 11½ in | 8 in | about 18½ in / 47 cm |
The dress has about 1½ to 2 in of ease at the chest. The back opens down the yoke and closes with 2 buttons, so it slips easily over the head.
| Size | Bootie sole length | Headband (around) |
|---|---|---|
| 0–6 months | about 3½ in / 9 cm | 13½ in / 34 cm |
| 6–12 months | about 4 in / 10 cm | 15½ in / 39 cm |
| 12–18 months | about 4¾ in / 12 cm | 16½ in / 42 cm |
Babies grow fast, so measure the baby's chest, foot and head if you can, and choose by measurement rather than by age. Instructions are written 0–6 (6–12, 12–18) months. When only one number is given, it applies to every size.
The pattern, step by step
Part 1: The circular yoke (blue)
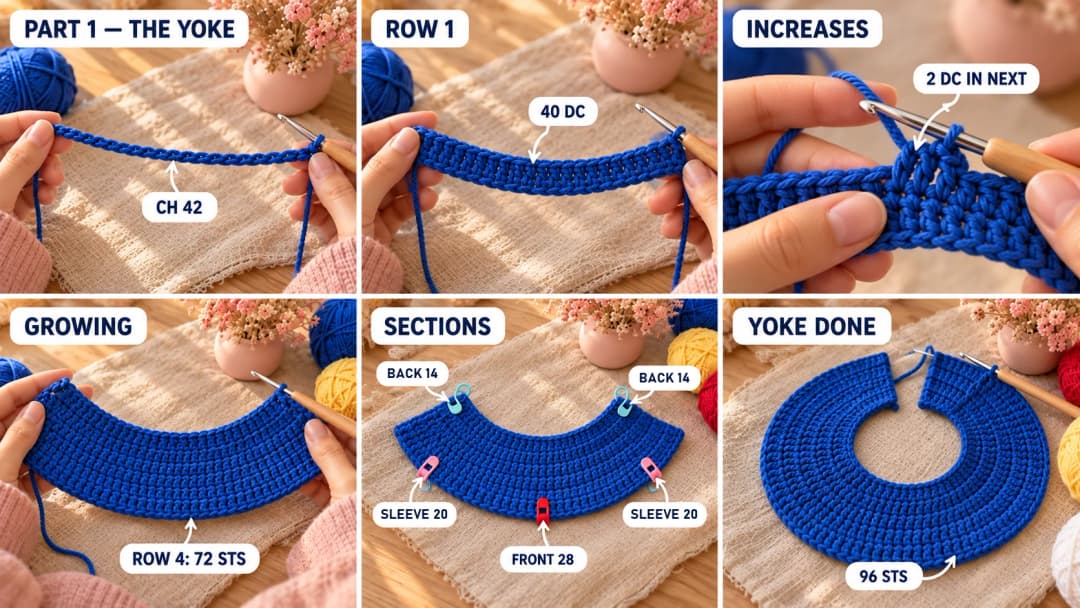
The yoke is worked flat, in rows, from the neckline down. Its two short edges become the back opening. The beginning ch 2 of each row doesn't count as a stitch.
With the 5 mm hook and blue, ch 42.
Row 1: Dc in the 3rd ch from the hook and in each ch across. Turn. (40 dc) This is the same in every size.
Now follow the rows for your size. In every row, ch 2 and turn at the end. "(Dc in the next 3, 2 dc in the next) × 10" means: work 1 dc in each of the next 3 sts, then 2 dc in the following st, and repeat that 10 times in all.
| Row | 0–6 months | 6–12 months | 12–18 months |
|---|---|---|---|
| 2 | (Dc in next 3, 2 dc in next) × 10 (50) | Dc in each st (40) | Dc in each st (40) |
| 3 | (Dc in next 4, 2 dc in next) × 10 (60) | (Dc in next 3, 2 dc in next) × 10 (50) | (Dc in next 3, 2 dc in next) × 10 (50) |
| 4 | (Dc in next 4, 2 dc in next) × 12 (72) | (Dc in next 4, 2 dc in next) × 10 (60) | (Dc in next 4, 2 dc in next) × 10 (60) |
| 5 | (Dc in next 5, 2 dc in next) × 12 (84) | (Dc in next 4, 2 dc in next) × 12 (72) | (Dc in next 4, 2 dc in next) × 12 (72) |
| 6 | (Dc in next 6, 2 dc in next) × 12 (96) | (Dc in next 5, 2 dc in next) × 12 (84) | (Dc in next 5, 2 dc in next) × 12 (84) |
| 7 | — | (Dc in next 5, 2 dc in next) × 14 (98) | (Dc in next 5, 2 dc in next) × 14 (98) |
| 8 | — | — | (Dc in next 6, 2 dc in next) × 14 (112) |
At the end you have 96 (98, 112) dc, and the yoke measures about 3½ (4, 4½) in deep. Lay it flat: it's a wide half-moon with an opening at the back. Don't fasten off.
Mark the sections. Counting from the start of your next row, place markers to split the yoke into back half, sleeve, front, sleeve, back half:
| Size | Back half | Sleeve | Front | Sleeve | Back half |
|---|---|---|---|---|---|
| 0–6 m | 14 | 20 | 28 | 20 | 14 |
| 6–12 m | 14 | 20 | 30 | 20 | 14 |
| 12–18 m | 16 | 24 | 32 | 24 | 16 |
Part 2: The bodice and the eyelet waist (blue)
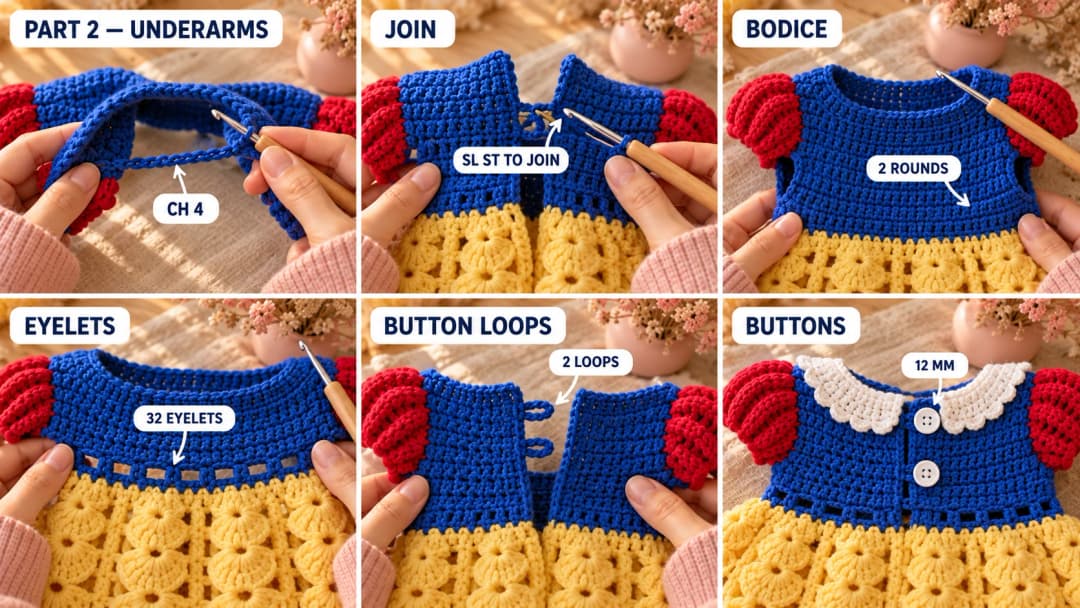
Division row: Ch 2. Dc in each st of the first back half, ch 4 (5, 4), skip the sleeve sts, dc in each st of the front, ch 4 (5, 4), skip the next sleeve sts, dc in each st of the second back half. Now join with a sl st to the first dc of this row, without twisting. (64 (68, 72) sts, counting each ch as a st)
That sl st closes the back at the underarms, so the opening only runs down the yoke. From here on, you work in joined rounds, and the side facing you is the RS. Double crochet looks the same on both sides, so there's no wrong choice.
Bodice, 2 (3, 4) rounds: Ch 2, dc in each st around (in each ch on the first round). Join to the first dc. (64 (68, 72) dc)
The bodice should end just under the baby's ribs. If you can, try it on and add or remove a round here.
Eyelet round: Ch 4 (counts as a dc and ch 1), skip the next st. Dc in the next st, ch 1, skip the next st. Repeat from * around. Join to the 3rd ch of the beginning ch-4. (32 (34, 36) eyelets) Fasten off the blue.
Order tip. The back edging and the button loops can wait until the very end. I usually add them after the skirt, the red caps and the collar are done, because the open back makes the dress easy to lay flat and work on.
Back opening and button loops. With blue, join at the top of the left back edge. Ch 1 and work 2 sc in the side of each yoke row, down to the underarm. Fasten off. On the right back edge, work the same way, but make 2 button loops: one at the neckline and one just above the underarm. For each loop, ch 3 and skip the space of 1 sc instead of working it. Sew the 2 buttons to the left edge, opposite the loops.
Part 3: The yellow shell skirt and the white hem
Switch to yellow. You're working in joined rounds with the RS facing, and you never turn.
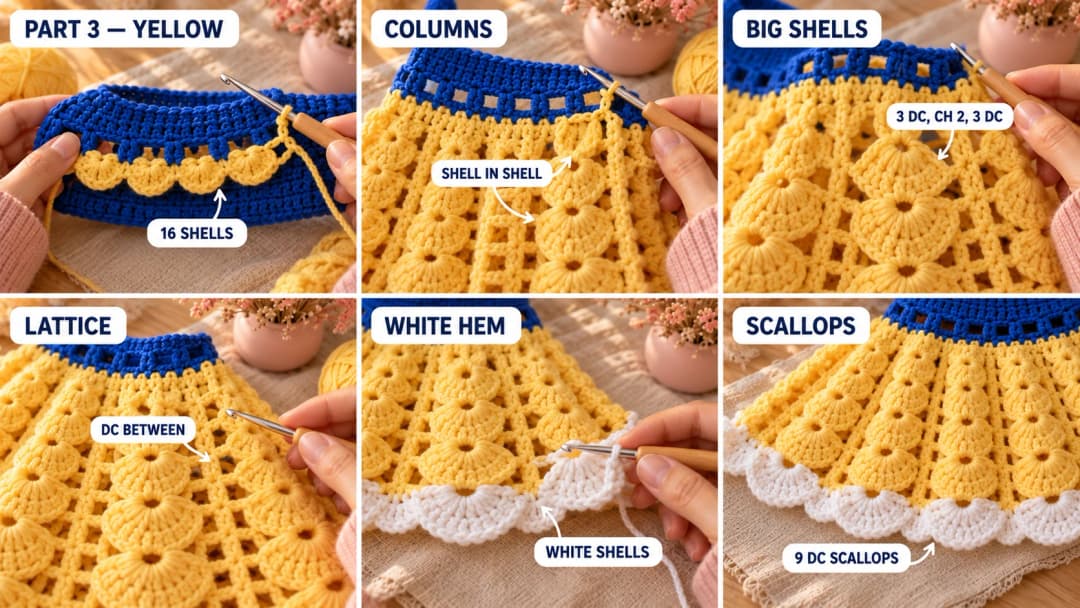
Skirt, Rnd 1: Join yellow in the ch-1 sp at the center back. Ch 3 (counts as a dc), (dc, ch 2, 2 dc) in the same sp. Ch 1, skip the next ch-1 sp, (2 dc, ch 2, 2 dc) in the next ch-1 sp. Repeat from * around, ending with ch 1. Join to the top of the ch-3. (16 (17, 18) shells)
Each shell sits in every other eyelet. The skirt already starts to flare, because each shell is wider than the 4 sts it covers.
Skirt, Rnds 2 to 4 (small shells): Sl st in the next dc and into the ch-2 sp. Ch 3, (dc, ch 2, 2 dc) in the same sp. Ch 1, (2 dc, ch 2, 2 dc) in the ch-2 sp of the next shell. Repeat from * around, ending with ch 1. Join.
The shells now stack straight on top of each other in columns, with a little gap between the columns.
Skirt, Rnds 5 to 8 (big shells): Sl st in each dc up to the first ch-2 sp, then into the sp. Ch 3, (2 dc, ch 2, 3 dc) in the same sp. Ch 1, (3 dc, ch 2, 3 dc) in the ch-2 sp of the next shell. Repeat from * around, ending with ch 1. Join.
Skirt, Rnd 9 (wide shells): Sl st in each dc up to the first ch-2 sp, then into the sp. Ch 3, (2 dc, ch 2, 3 dc) in the same sp. Ch 1, dc in the ch-1 sp between the shells, ch 1, (3 dc, ch 2, 3 dc) in the ch-2 sp of the next shell. Repeat from * around, ending with ch 1, dc in the last ch-1 sp, ch 1. Join.
Skirt, Rnds 10 to 13 (15, 17): Work as Rnd 9, but put the single dc in the single dc between the shells below. Fasten off the yellow. (still 16 (17, 18) shells, 13 (15, 17) yellow rounds in all)
That single dc between the columns is what makes the open lattice: a little hole on each side of it, so every column of shells reads like a stack of flowers.
White hem, Rnd 1: Join white in the ch-2 sp of any shell. Ch 3, (2 dc, ch 2, 3 dc) in the same sp. Ch 1, sc in the single dc between the shells, ch 1, (3 dc, ch 2, 3 dc) in the next shell sp. Repeat from * around, ending with ch 1, sc in the last single dc, ch 1. Join.
White hem, Rnd 2 (scallops): Sl st in the next 2 dc and into the ch-2 sp. Ch 3, 8 dc in the same sp. Sc in the next sc, 9 dc in the next shell sp. Repeat from * around, ending with sc in the last sc. Join to the top of the ch-3. Fasten off. (16 (17, 18) white scallops)
Part 4: Red cap sleeves, the white collar and the hearts
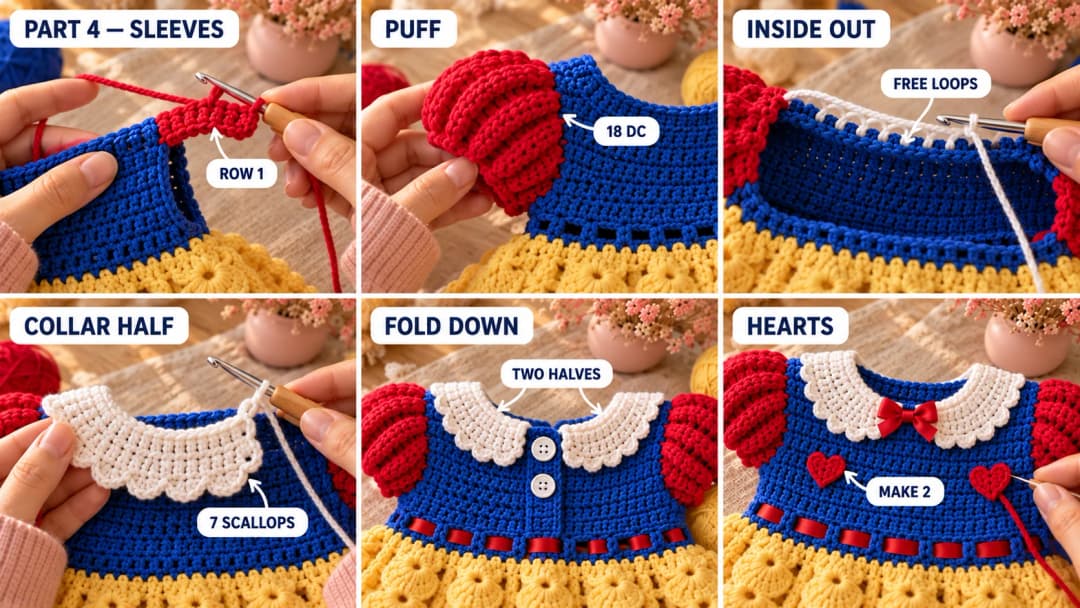
Cap sleeves (make 2). The caps are worked in short rows across the skipped sleeve sts only, not around the underarm. With the 5 mm hook, red and the RS facing, join in the first skipped sleeve st on the back side of the armhole.
- Row 1: Ch 1. Sc in the first 2 sts, hdc in the next 2, dc in the next 12 (12, 16), hdc in the next 2, sc in the last 2. Turn. (20 (20, 24) sts)
- Row 2: Ch 1. Sl st in the first 2 sts, sc in the next 2. Dc in the next st, 2 dc in the next st. Work this repeat 6 (6, 8) times in all: each repeat uses 2 dc, so it covers all 12 (12, 16) dc. Sc in the next 2, sl st in the last 2. Turn. (18 (18, 24) dc in the middle)
- Row 3: Ch 1. Skip the 2 sl sts. Sl st in the next sc, sc in the next sc, dc in each of the next 18 (18, 24) dc, sc in the next sc, sl st in the next sc. Leave the last 2 sl sts unworked. Fasten off.
The extra dc of Row 2 make the cap puff up over the shoulder. To tidy the underarm, join red in the gap at one corner, sc in the free loop of each of the 4 (5, 4) underarm ch, and sl st in the gap at the other corner. Fasten off.
White collar (make 2 halves). The collar is worked into the free loops of the foundation chain, along the neckline. Turn the dress inside out, so the collar's front ends up on the outside when you fold it down. Each half covers 20 free loops, from one back edge to the center front, in every size. Ignore the 2 extra ch at the very start of the foundation.
- Row 1: Join white at the top of one back edge. Ch 1, sc in each of the next 20 free loops, ending at the center front. Turn. (20 sc)
- Row 2: Ch 2. Dc in the first st. 2 dc in the next st, dc in the next st. Work this repeat 9 times in all, then dc in the last st. Turn. (29 dc) Check: 1 + 18 + 1 = 20 sts used, and 1 + 27 + 1 = 29 dc made.
- Row 3 (scallops): Ch 1, sc in the first st. Skip 1 st, 5 dc in the next st, skip 1 st, sc in the next st. Repeat from * across. Fasten off. (7 scallops)
Each scallop repeat uses 4 sts, so 7 repeats and the first sc use all 29. Work the second half the same way, from the center front to the other back edge, starting in the free loop next to the first half. Turn the dress right side out and fold the collar down over the yoke.
Little hearts (make 2, red). Make a magic ring. Into the ring: ch 3, 3 tr, 3 dc, ch 1, tr, ch 1, 3 dc, 3 tr, ch 3, sl st into the ring. Pull the ring tight; the tr at the bottom is the point. Fasten off, leaving a 6-in tail. Sew one heart to the front of the yoke on each side, just in front of a red cap, with small stitches all around the edge.
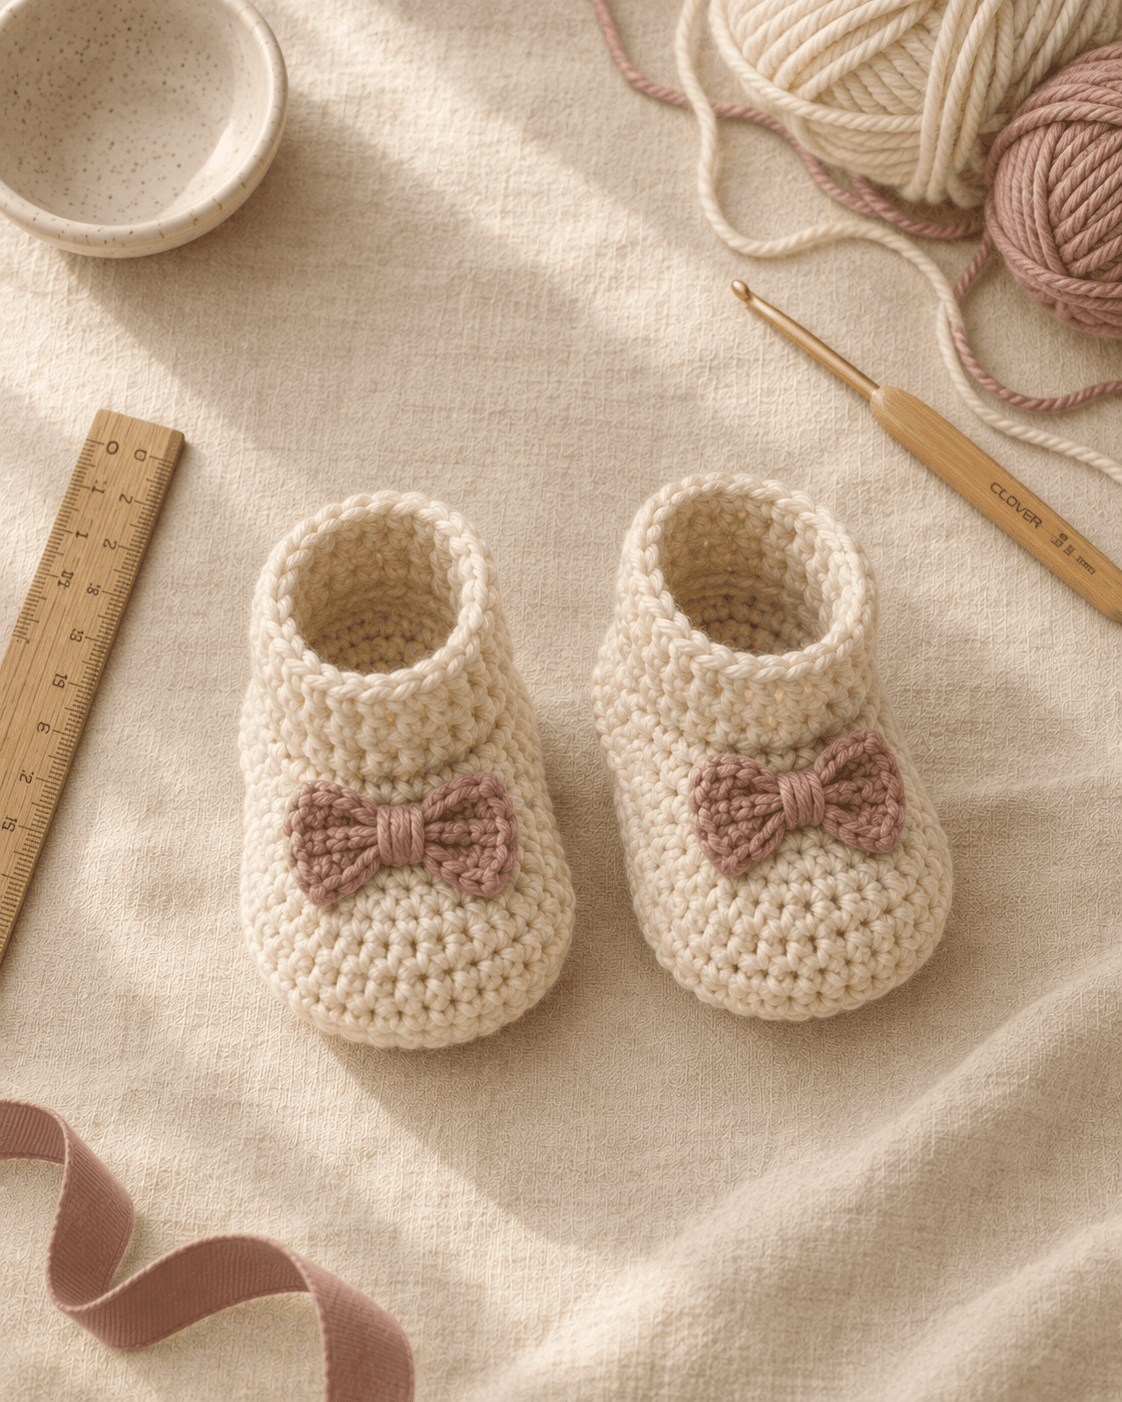
Part 5: Ballet slipper booties (make 2)
Use the 4 mm hook. The booties are worked in joined rounds, from the sole up. Ch 1 at the start of each round (it doesn't count) and join with a sl st to the first st. Each round starts at the center of the heel.
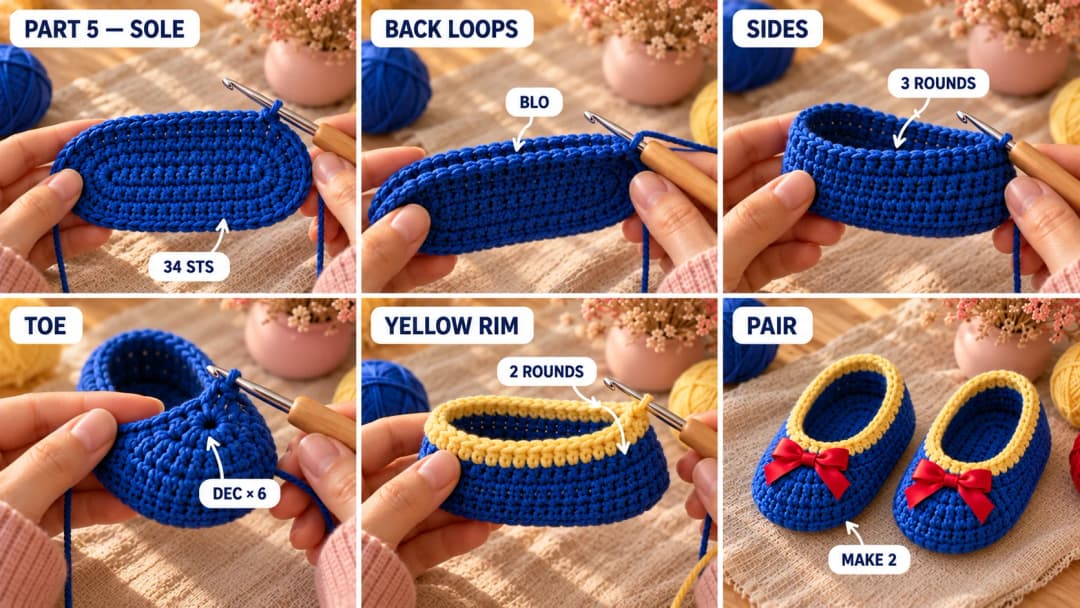
Sole (blue). Ch 11 (14, 17).
- Rnd 1: Sc in the 2nd ch from the hook and in the next 8 (11, 14) ch: that's 9 (12, 15) sc. Work 3 sc in the last ch (the toe). Working along the other side of the chain, sc in the next 8 (11, 14) ch, then 2 more sc in the ch you started in, which now holds 3 sc like the toe. Join. (22 (28, 34) sc: 9 (12, 15) + 3 + 8 (11, 14) + 2)
- Rnd 2: 2 sc in the first st, sc in the next 8 (11, 14), 2 sc in each of the next 3, sc in the next 8 (11, 14), 2 sc in each of the last 2. (28 (34, 40) sc)
- Rnd 3: Sc in the first st, 2 sc in the next, sc in the next 8 (11, 14), (sc in the next, 2 sc in the next) × 3, sc in the next 8 (11, 14), (sc in the next, 2 sc in the next) × 2. (34 (40, 46) sc)
The sole is about 3½ (4, 4¾) in long. Lay the baby's foot on it if you can.
Sides (blue).
- Rnd 4: Sc in the back loop of each st around. (34 (40, 46)) This turns the edge up.
- Rnds 5 and 6: Sc in each st around. (34 (40, 46))
Toe (blue). The 9 toe sts sit right in the middle of the round, so the decreases land over the toe.
- Rnd 7: Sc in the first 10 (13, 16) sts, dec 6 times, sc in the last 12 (15, 18) sts. (28 (34, 40))
- Rnd 8: Sc in the first 10 (13, 16) sts, dec 3 times, sc in the last 12 (15, 18) sts. (25 (31, 37)) Fasten off the blue.
Yellow rim.
- Rnds 9 and 10: Join yellow at the center of the heel. Sc in each st around. (25 (31, 37)) Fasten off and weave in the ends.
Tie a small red satin bow and sew it to the top of the toe, through the knot and both loops, with red thread. For booties that stay on kicking feet, weave the thin elastic through the stitches of Rnd 9 on the inside, pull it just snug and knot it.
Part 6: The red bow headband and finishing
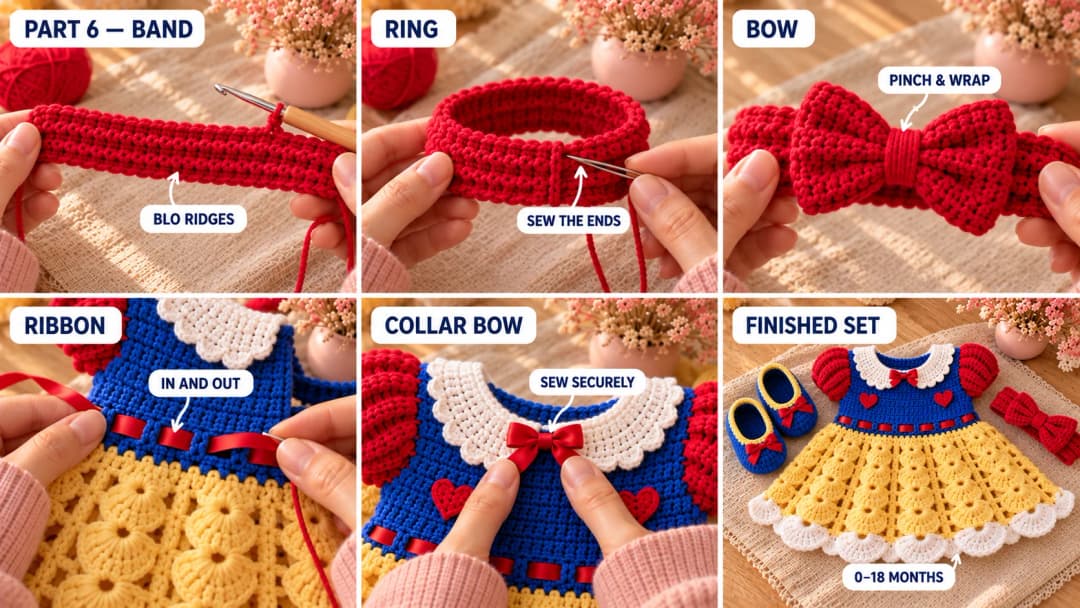
Band (red, 5 mm hook). Ch 9.
- Row 1: Hdc in the 3rd ch from the hook and in each ch across. Turn. (7 hdc)
- Row 2: Ch 2, hdc in the back loop of each st across. Turn.
Repeat Row 2 until the band measures 13½ (15½, 16½) in when gently stretched. The back-loop rows make soft ridges that stretch a little. Fold the band into a ring and sew the short ends together with a whipstitch.
Bow (red). Ch 25. Row 1: hdc in the 3rd ch from the hook and in each ch across. (23 hdc) Rows 2–8: ch 2, hdc in each st across. Fasten off.
Bow center (red). Ch 6. Row 1: hdc in the 3rd ch from the hook and in each ch across. (4 hdc) Rows 2–7: ch 2, hdc in each st across. Fasten off, leaving a 10-in tail.
Pinch the big rectangle in the middle into a bow shape. Wrap the small strip around the pinch and sew its ends together at the back. Then sew the bow to the band, right over the seam, going through the strip and the band several times.
Finishing the dress.
- Ribbon. Starting at the center back, weave the red satin ribbon in and out of the waist eyelets all the way around. Overlap the ends by about ½ in at the back, trim, and sew them flat to the dress with red thread. There's no bow at the back to lie on, and no loose tails.
- Collar bow. Tie a small red bow and sew it securely where the two collar halves meet at the front.
- Weave in all the ends. Steam the skirt lightly so the shells open up, and steam the collar so it lies flat.
Safety. Buttons and satin bows can come off and are a choking hazard, so sew each one on very securely and check them before every wear. For the youngest babies, swap the satin bows for little crochet bows and the buttons for crochet ties. The waist ribbon is sewn flat, so there are no tails to pull. Never leave a headband on a sleeping or unsupervised baby, and take the whole set off for naps and at night.
Make it yours — quick variations
| Variation | Change from base pattern |
|---|---|
| Rose princess | Blush pink yoke, cream skirt, white collar and blush sleeves. |
| Sea princess | Turquoise yoke, lilac skirt and purple sleeves. |
| Everyday dress | Skip the hearts and the bows, and work the skirt in the same color as the yoke. |
| Longer skirt | Add 2 rounds of wide shells before the white hem for every extra inch. |
| Long sleeves | Instead of the cap, work dc rounds in red around the whole armhole down to the wrist, then 1 round of sc. |
Troubleshooting the three things that go wrong
The yoke cups up instead of lying flat
Your dc are shorter than mine, so the rows don't grow fast enough. Go up half a hook size, or add 1 plain row (dc in each st) before the last increase row. A yoke that ruffles has the opposite problem: go down half a size.
The neckline won't go over the head
The opening is 11½ in plus the length of both back edges, which is plenty for a baby's head if the chain is loose enough. If your foundation chain is tight, make it with a hook one size bigger, then switch back for Row 1.
The skirt hangs straight instead of flaring
Check that you have 16 (17, 18) shells and that you moved to 3-dc shells at Rnd 5. If the skirt still looks narrow, start the single dc between the shells one or two rounds earlier.
Frequently asked questions
How long does the whole set take? About 10 to 13 hours. The dress is most of it, about 8 to 10 hours. The booties take about an hour a pair, and the headband about an hour.
How much yarn do I need? About 120 (140, 170) yd of royal blue, 175 (215, 260) yd of yellow, 75 yd of red and 60 yd of white in worsted cotton, for the dress, booties and headband together.
Can I use acrylic instead of cotton? Yes. A soft worsted acrylic like Red Heart Soft is lighter and easy to wash. The shells will be a little softer and less crisp. Keep the same gauge.
Will this fit as a Halloween costume over clothes? Yes, the dress has 1½ to 2 in of ease, so it fits over a onesie or thin long-sleeved top. For a chunkier sweater underneath, make the next size up.
Can I sell dresses made from this pattern? Yes, you're welcome to sell finished dresses made from this free pattern at markets, on Etsy or as gifts. Please credit "Pattern by Wavode" in your listing and link back to this page. What you can't do is republish this write-up or my photos as your own pattern.
Related patterns on Wavode
- Snow princess baby dress set: a dusty blue and white winter version with Mary Janes.
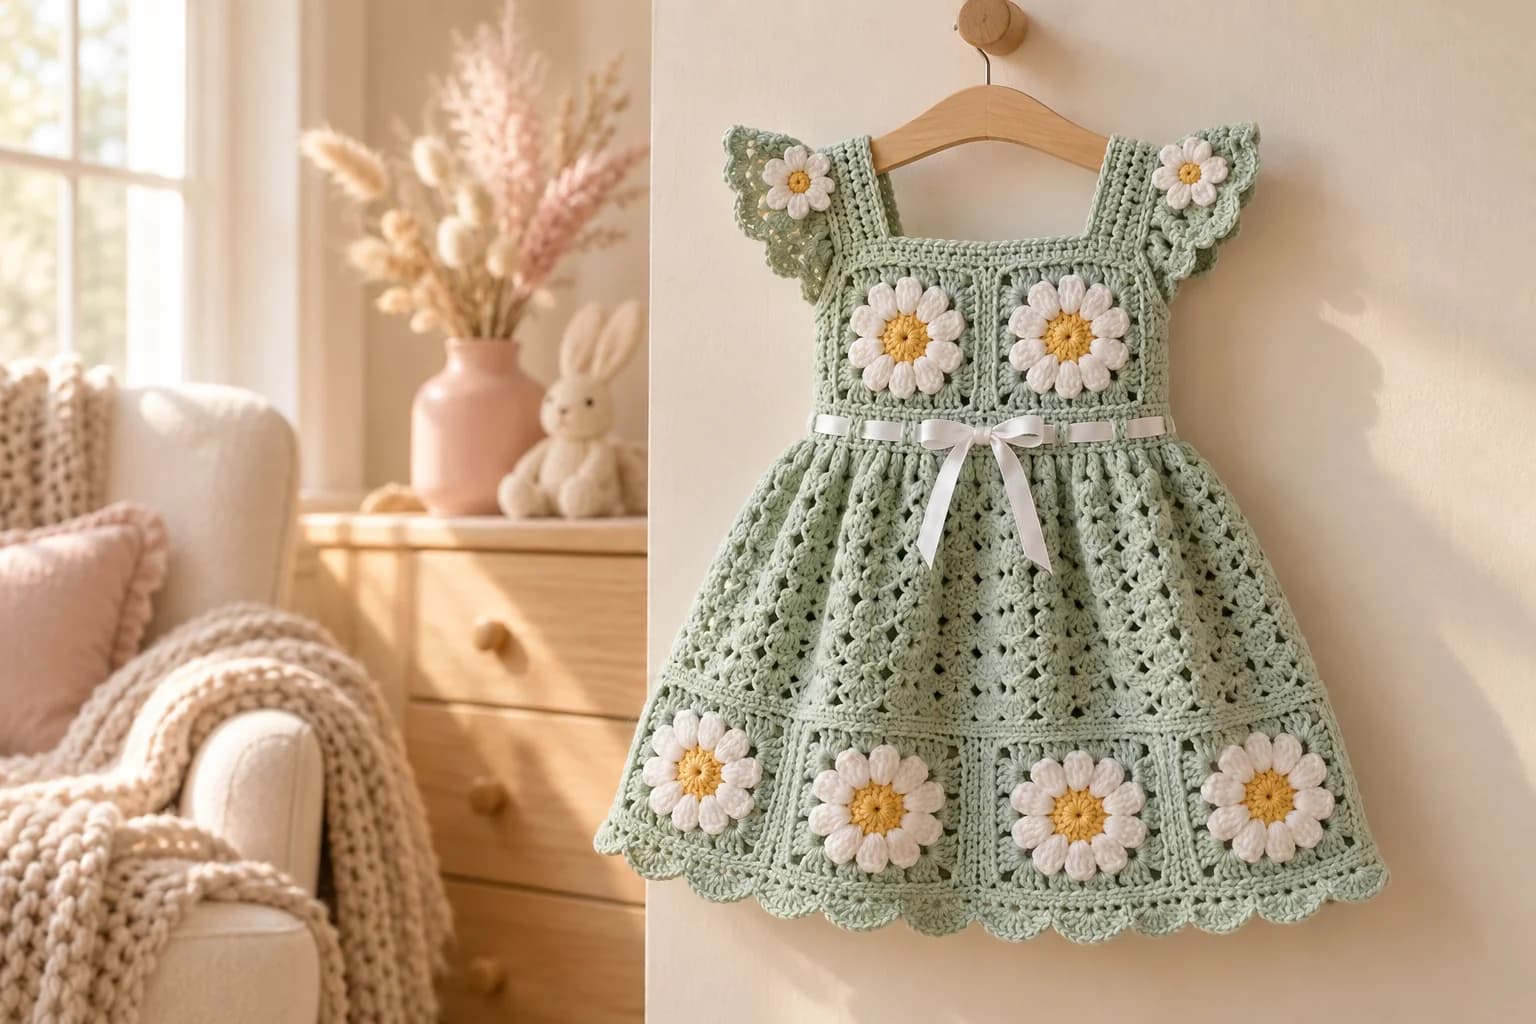
- Daisy granny square baby dress: a summery mint dress with a ribbon waist.
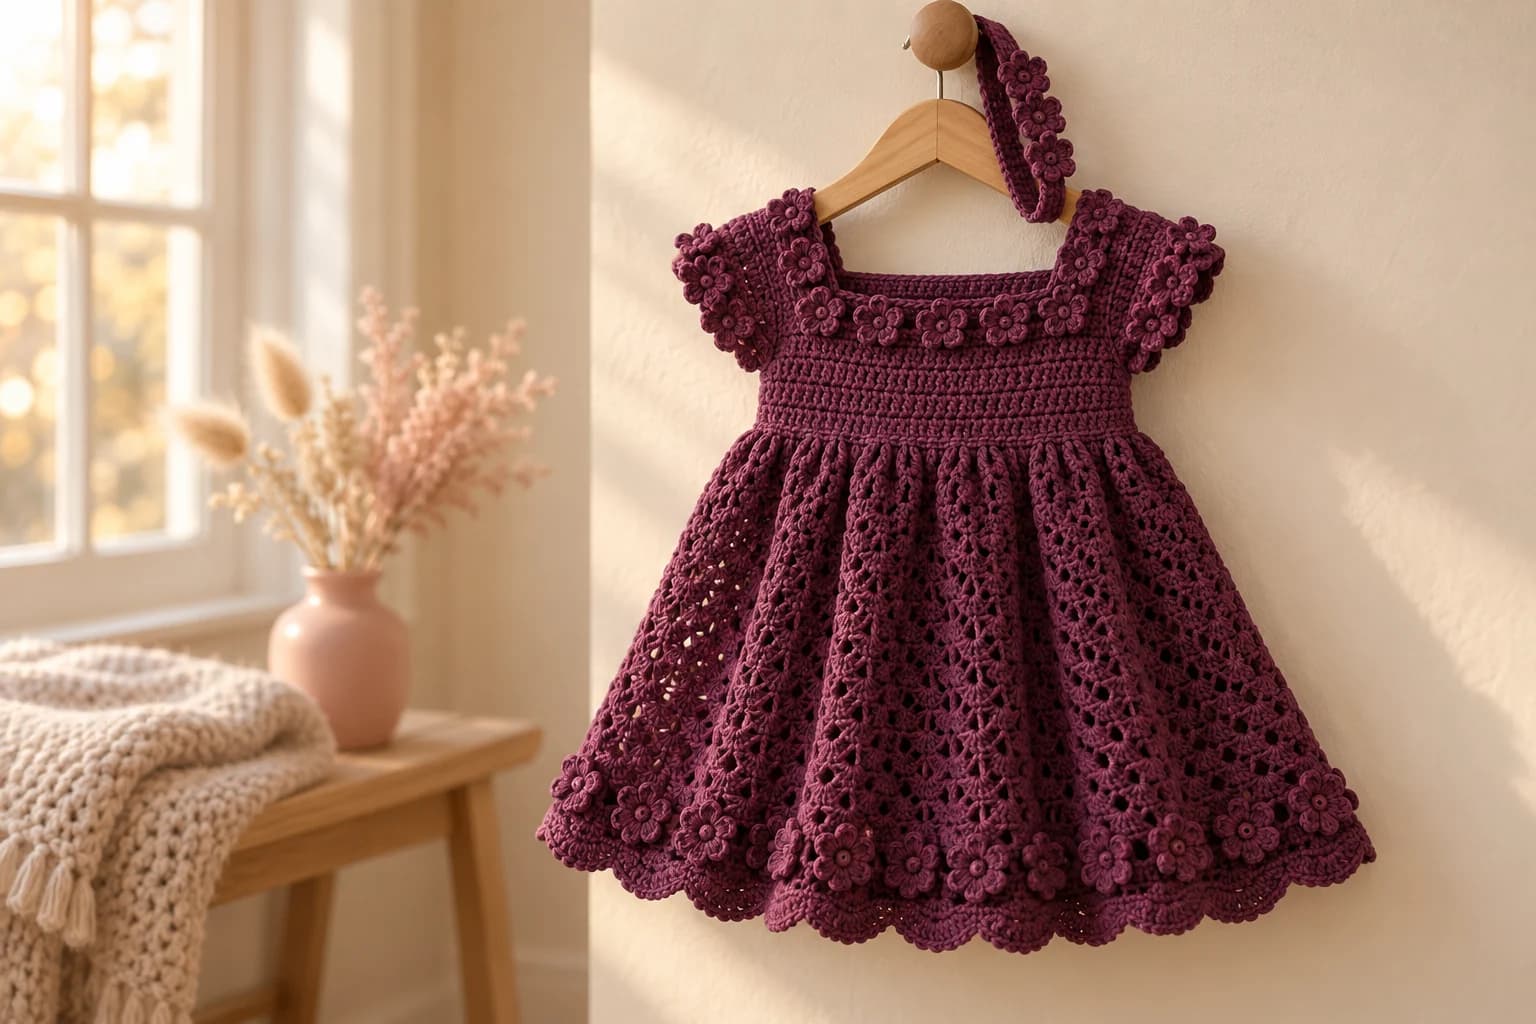
- Plum blossom toddler dress: a V-stitch skirt and flower trim for bigger little ones.
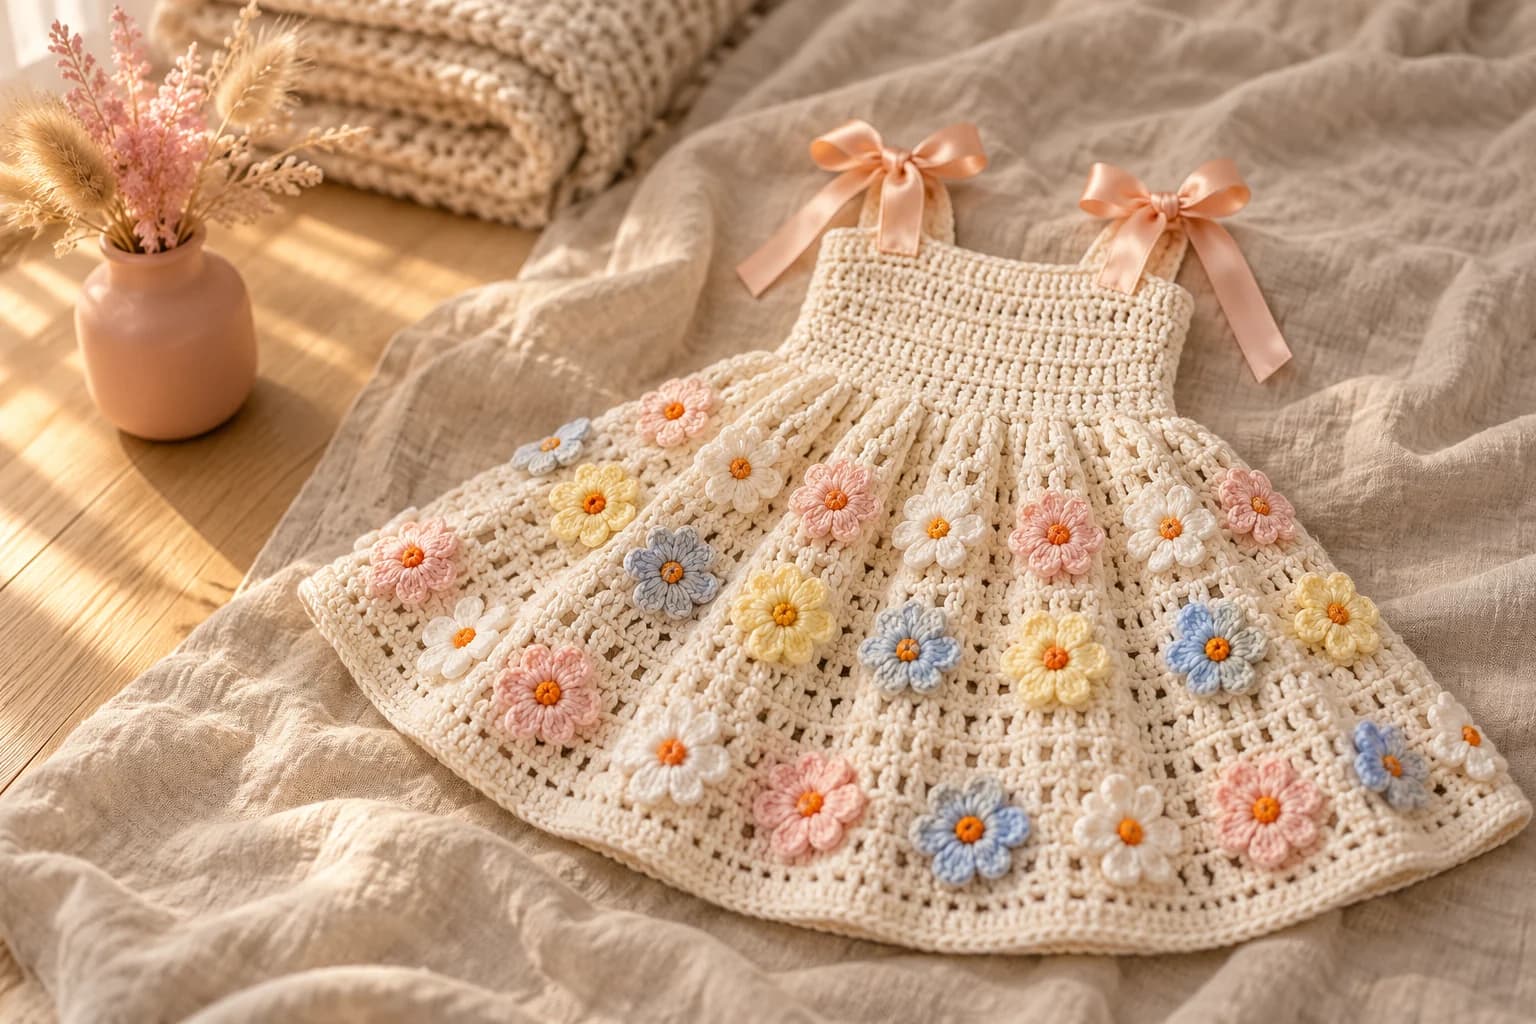
- Crochet baby sundress: a cream sundress with flowers and ribbon ties.
Made a princess dress? Tag #wavodecrochet on Pinterest. I re-pin every finished make and credit the maker.
Pattern by Clara Hartwell for Wavode. Questions? Email me at support@wavode.com.