Primrose Twirl Dress

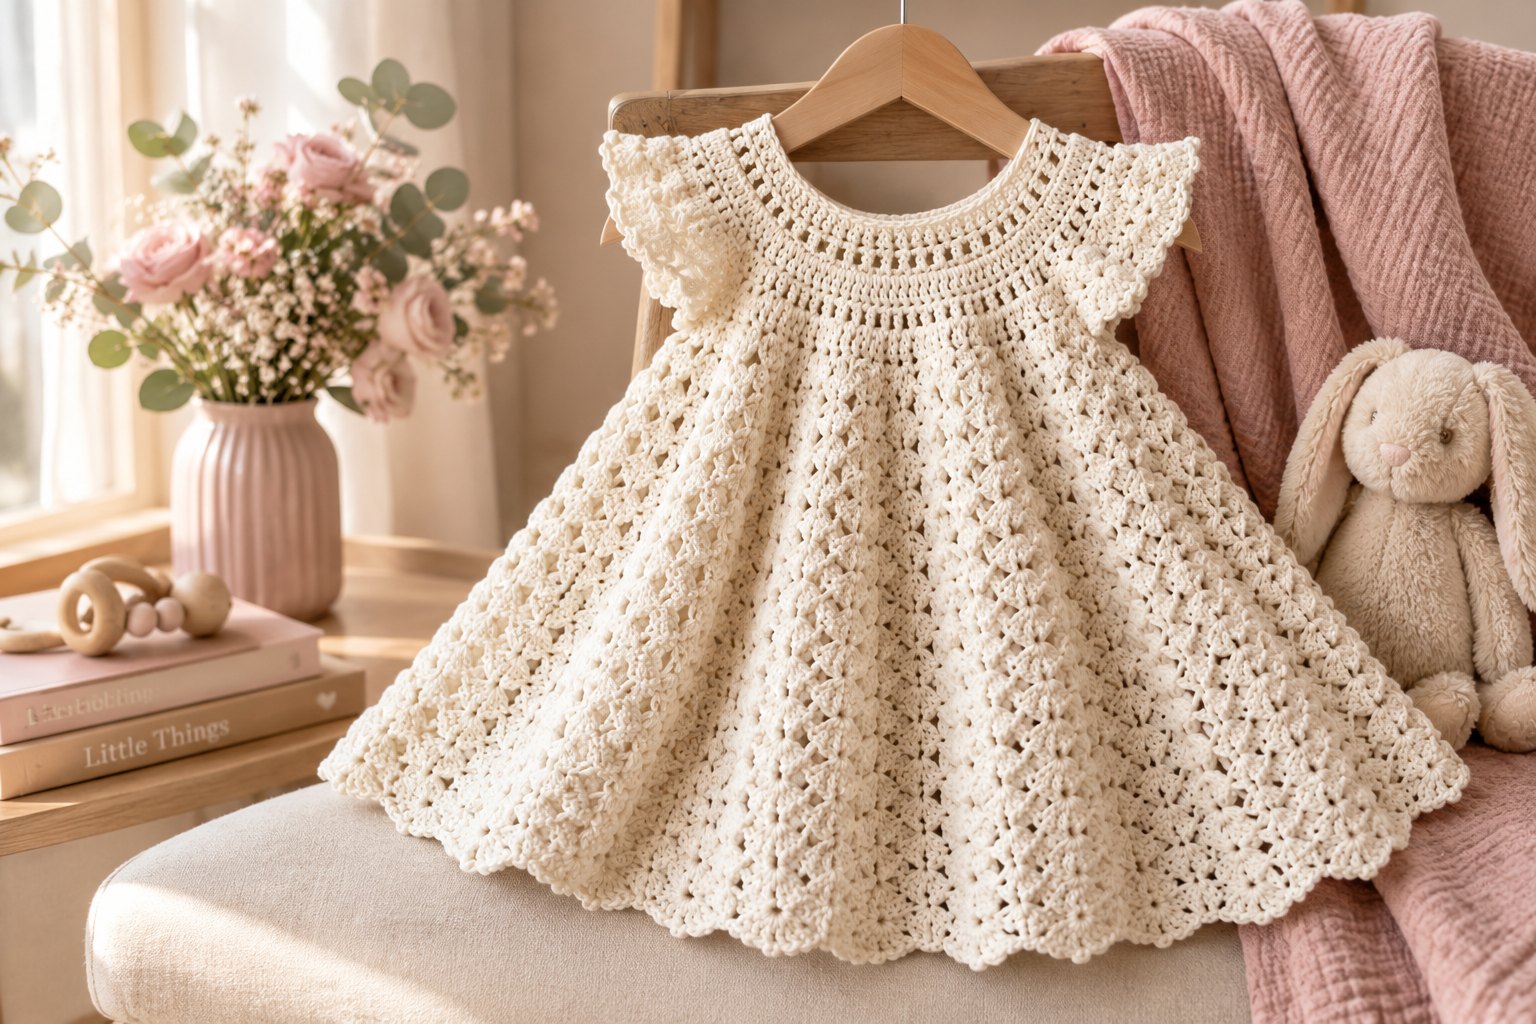
The Primrose Twirl Dress is a free crochet baby dress worked top down in one piece: a round double-crochet yoke, a twirly shell-stitch skirt, and two little flutter sleeves added at the end. You'll need DK weight cotton, a 4 mm hook, and about 250 to 400 yards depending on size. There's no side seam and no sewing the skirt to the bodice. Graded in 3 sizes from 0 to 24 months, it takes roughly 10 to 15 hours, which is a relaxed week of evenings.
Pattern at a glance
Primrose is a cream heirloom-style dress in 3 baby sizes (0–6, 6–12, 12–24 months). The yoke is worked flat in rows so a short back opening forms on its own, then it splits for the armholes and joins into rounds for the skirt. The skirt flares twice: first with V-stitches slipped in between the shells, then when those V-stitches grow into shells of their own.
A picot hem, a two-button back and scalloped flutter sleeves finish it. Every size starts from the same 60-stitch neck, so the math stays simple.
I named her Primrose for the soft primrose-cream yarn and the way the skirt swings out like an opening flower when a toddler spins. That twirl is the whole point of the design.
Why top-down is the easiest way to make a crochet dress
A dress has two parts that have to fit: the bodice and the length. Worked top down, you can try the yoke on the baby (or hold it against a well-fitting shirt) before you've committed to a single skirt round. If the yoke fits, the rest of the dress is only a question of how long you want it.
The one-piece construction also means no bulky seam at the waist, which is the place a baby dress rubs most when the little one is sitting or crawling. If you made my hooded baby romper, this one goes the other way. The romper is seven flat pieces seamed together. Primrose is one continuous piece with only two sleeve edgings added afterwards.
Skill level. Easy intermediate. You need chain, single crochet, double crochet, working in rows and in joined rounds, and a basic shell stitch. There's no seaming and no in-the-round shaping beyond straightforward increase rows.
A safety note about the buttons
Buttons on baby clothes can become a choking hazard if they work loose, so sew them on more firmly than feels necessary. Use doubled sewing thread, go through each button 8–10 times, and knot on the wrong side. Check them before every wear. For a newborn, or if you'd rather not worry about it at all, use sew-on snaps behind the button loops, or tie the neck with a length of crocheted chain instead.
What you'll need
Yarn (DK #3 weight cotton, 250 (320, 400) yd total, with a small safety margin)
- Cream or natural white is the signature Primrose look. Pale primrose yellow, blush or dove grey work just as well for a sister set. Paintbox Cotton DK in Champagne White is a good match, and any soft DK cotton or cotton-bamboo blend works too.
- Pick cotton or a cotton blend. It's breathable against baby skin, it washes well, and it gives the shell stitch the crisp, defined texture you see in the photos. Acrylic tends to make shells look fuzzy and soft-edged.
Hook
- 4 mm (US G-6).
Notions
- 2 buttons, ½ in (or sew-on snaps; see the safety note above).
- Tapestry needle, sewing needle and thread.
- 4 stitch markers, measuring tape, scissors.
Gauge
- 18 dc × 10 rows = 4 in (10 cm) on a 4 mm hook, worked flat.
Gauge matters most for the yoke. The skirt is forgiving, but a tight yoke won't close at the back. Crochet a 4-inch swatch first. If you get more than 18 stitches, go up a hook size. If you get fewer, go down one.
Abbreviations (US crochet terms)
- ch: chain
- sc: single crochet
- dc: double crochet
- sl st: slip stitch
- st(s): stitch(es)
- sp: space
- beg: beginning
- rnd: round
- RS / WS: right side / wrong side
Special stitches
- Shell: (2 dc, ch 1, 2 dc) in the same stitch or space.
- V-st: (dc, ch 1, dc) in the same stitch or space.
- Gap: the small space between the last dc of one shell and the first dc of the next.
Size chart
| Size | Finished chest | Shoulder to hem | Yoke rows | Total yardage |
|---|---|---|---|---|
| 0–6 mo | 19½ in | 13 in | 9 | 250 yd |
| 6–12 mo | 20½ in | 15 in | 10 | 320 yd |
| 12–24 mo | 22 in | 17 in | 11 | 400 yd |
Instructions are written as 0–6 mo (6–12 mo, 12–24 mo). A single number applies to all sizes. Each size gives about 1½–2 in of ease at the chest, so the dress slips on easily over a onesie.
The pattern, step by step
Part 1: The yoke (worked flat, top down)
The yoke is worked back and forth in rows. The row ends meet at the center back but aren't joined, and that gap becomes the button opening. Row 1 is the RS.
Foundation: Ch 62.
Row 1 (RS): Dc in 3rd ch from hook and in each ch across. Turn. (60 dc; the skipped ch-2 does not count as a stitch)
For every row below, ch 2 at the start does not count as a stitch, and each row ends with "Turn."
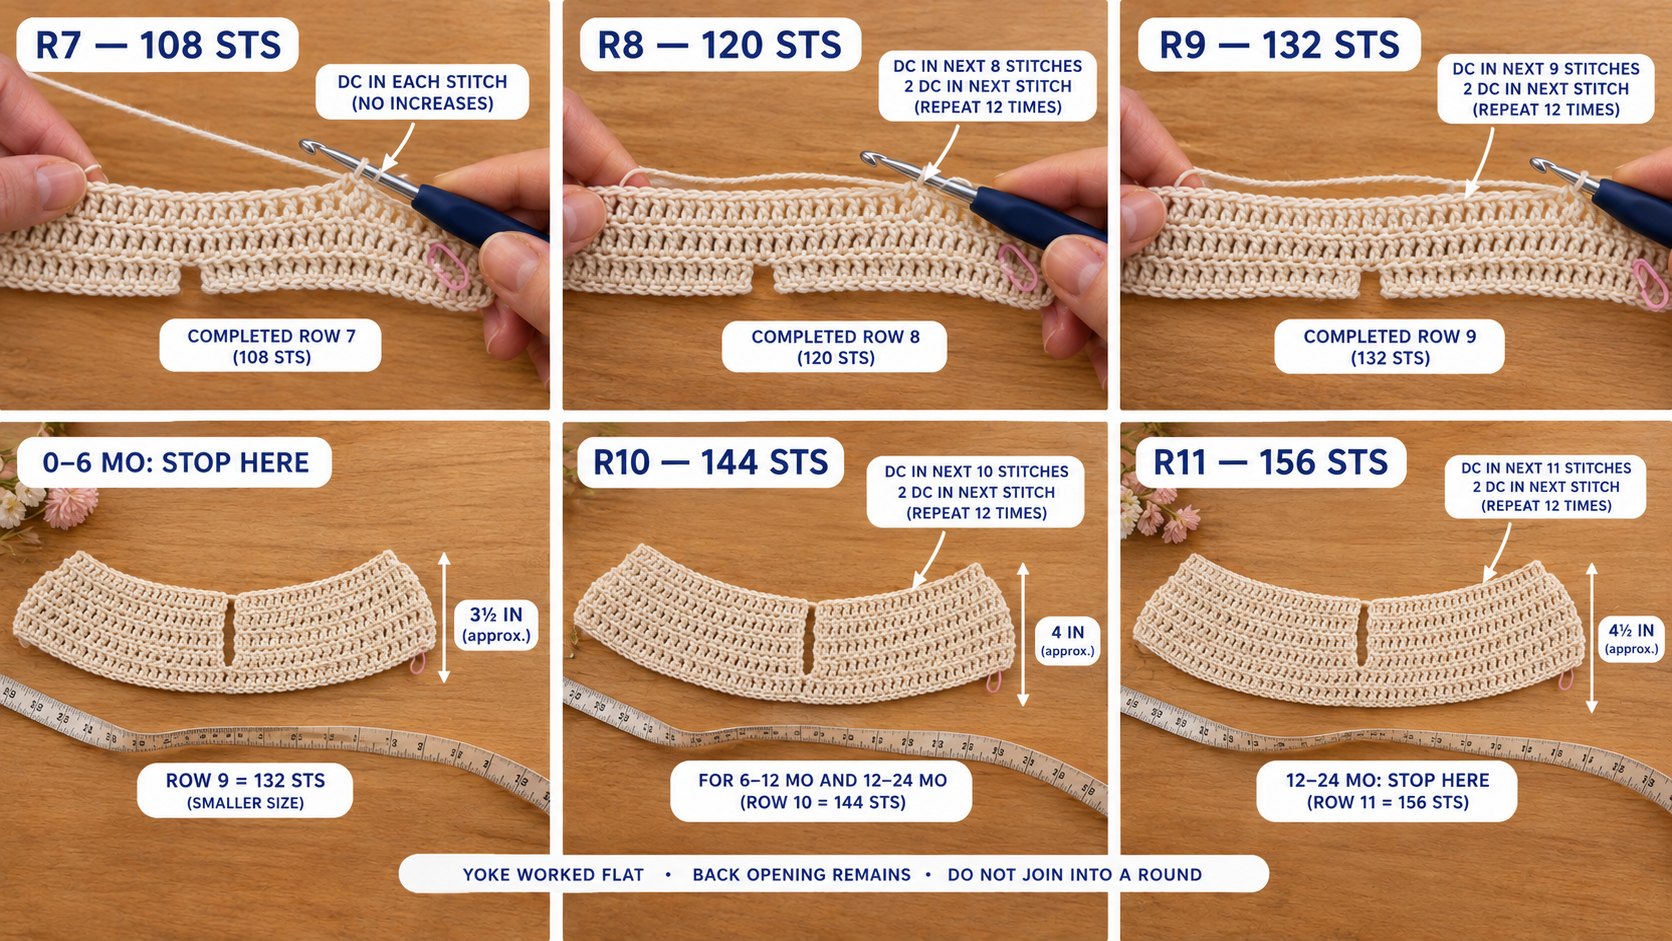
Row 2: Ch 2, dc in next 4 sts, 2 dc in next st 12 times. (72)
Row 3: Ch 2, dc in next 5 sts, 2 dc in next st 12 times. (84)
Row 4: Ch 2, dc in each st across. (84)
Row 5: Ch 2, dc in next 6 sts, 2 dc in next st 12 times. (96)
Row 6: Ch 2, dc in next 7 sts, 2 dc in next st 12 times. (108)
Row 7: Ch 2, dc in each st across. (108)
Row 8: Ch 2, dc in next 8 sts, 2 dc in next st 12 times. (120)
Row 9: Ch 2, dc in next 9 sts, 2 dc in next st 12 times. (132) Size 0–6 mo: stop here.
Row 10 (sizes 6–12 and 12–24 mo only): Ch 2, dc in next 10 sts, 2 dc in next st 12 times. (144) Size 6–12 mo: stop here.
Row 11 (size 12–24 mo only): Ch 2, dc in next 11 sts, 2 dc in next st 12 times. (156)
The yoke should now measure about 3½ (4, 4½) in from the foundation chain to the last row. Lay it flat. It should look like a thick ring with a split at one side, and it shouldn't ruffle.
My finding: Every size starts at 60 stitches on purpose. With a back opening, the neck never has to pass over the baby's head, so it doesn't need to grow with the size. What grows is the yoke depth and the armholes, and one extra increase row per size handles both. It also means you can start the yoke before you've even decided which size to make.
Part 2: Split for the armholes and join into the round
Mark the yoke into 5 sections using the counts below, placing a stitch marker between each section. Going across the last row: back half, sleeve, front, sleeve, back half.
| Back | Sleeve | Front | Sleeve | Back | |
|---|---|---|---|---|---|
| 0–6 mo | 20 | 26 | 40 | 26 | 20 |
| 6–12 mo | 21 | 30 | 42 | 30 | 21 |
| 12–24 mo | 23 | 32 | 46 | 32 | 23 |
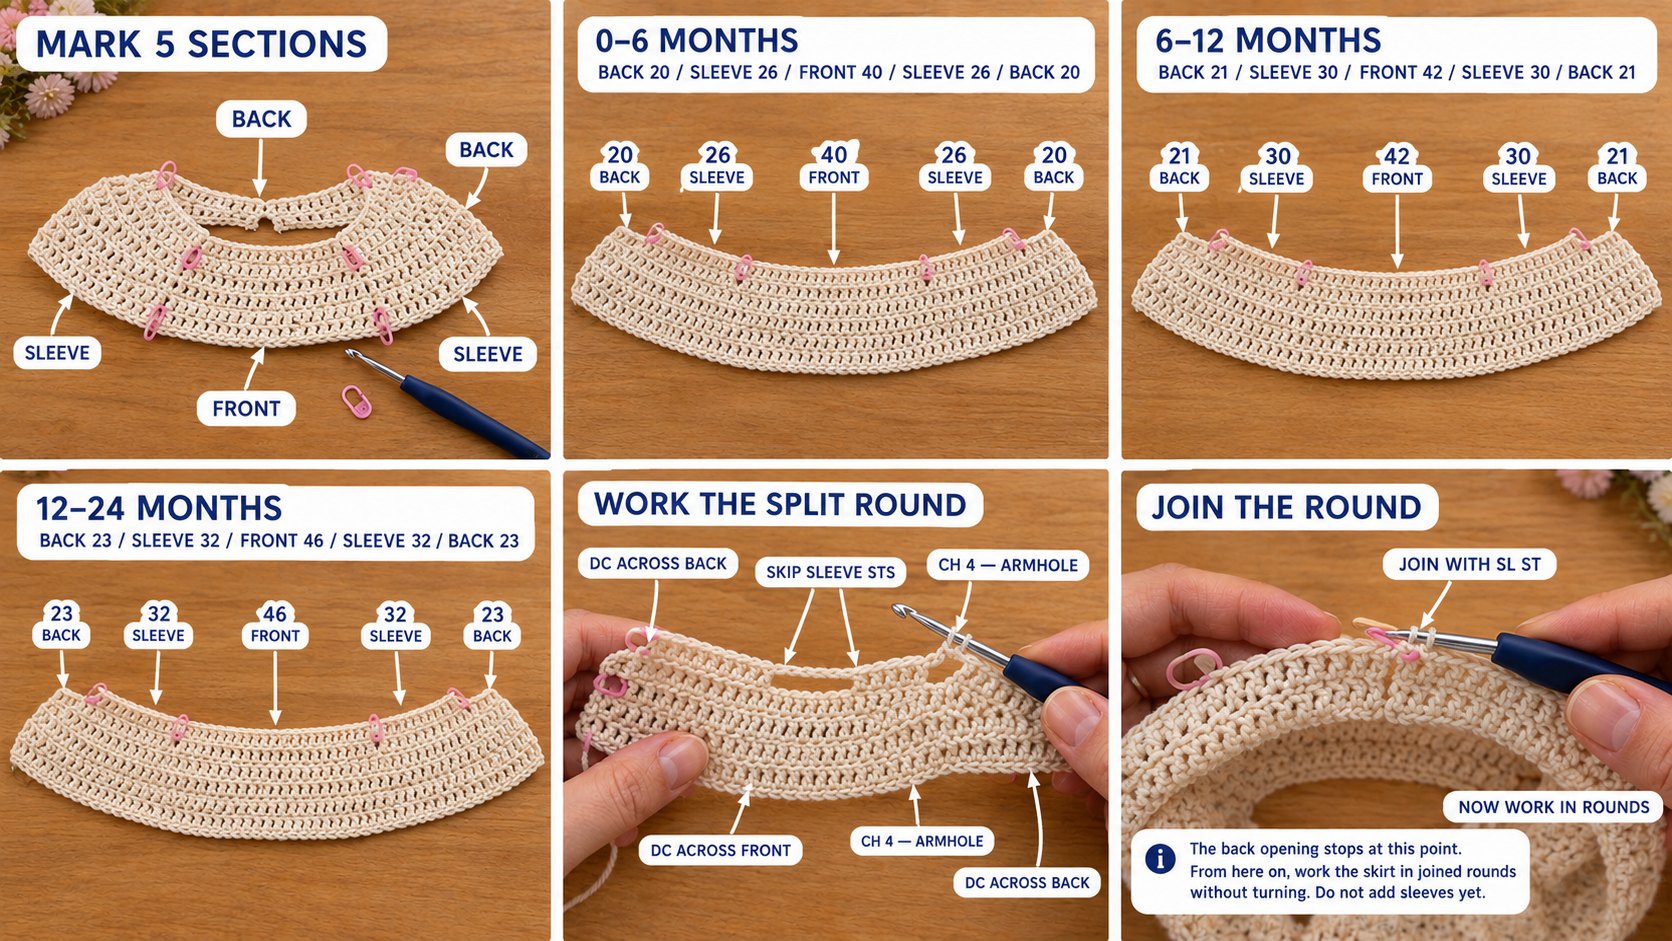
Split round: Turn as usual. Ch 2 (does not count), dc in first 20 (21, 23) sts, ch 4, skip next 26 (30, 32) sts, dc in next 40 (42, 46) sts, ch 4, skip next 26 (30, 32) sts, dc in last 20 (21, 23) sts. Join with a sl st to the first dc of the round. (80 (84, 92) dc + 8 ch = 88 (92, 100) sts)
That sl st closes the back below the yoke, so the opening stops here. From now on you work in joined rounds without turning. The side facing you is the RS of the skirt.
Part 3: The Primrose twirl skirt
Rnd 1: Ch 3 (counts as dc), (dc, ch 1, 2 dc) in same st as join (first shell made), skip 3 sts, shell in next st 21 (22, 24) times, skip last 3 sts. Join with a sl st to top of beg ch-3. (22 (23, 25) shells) Work into the underarm chains just like any other stitch.
Rnd 2: Sl st in next dc and in next ch-1 sp. Ch 3 (counts as dc), (dc, ch 1, 2 dc) in same sp, shell in each ch-1 sp around. Join to top of beg ch-3. (22 (23, 25) shells)
Rnds 3–4: Repeat Rnd 2.
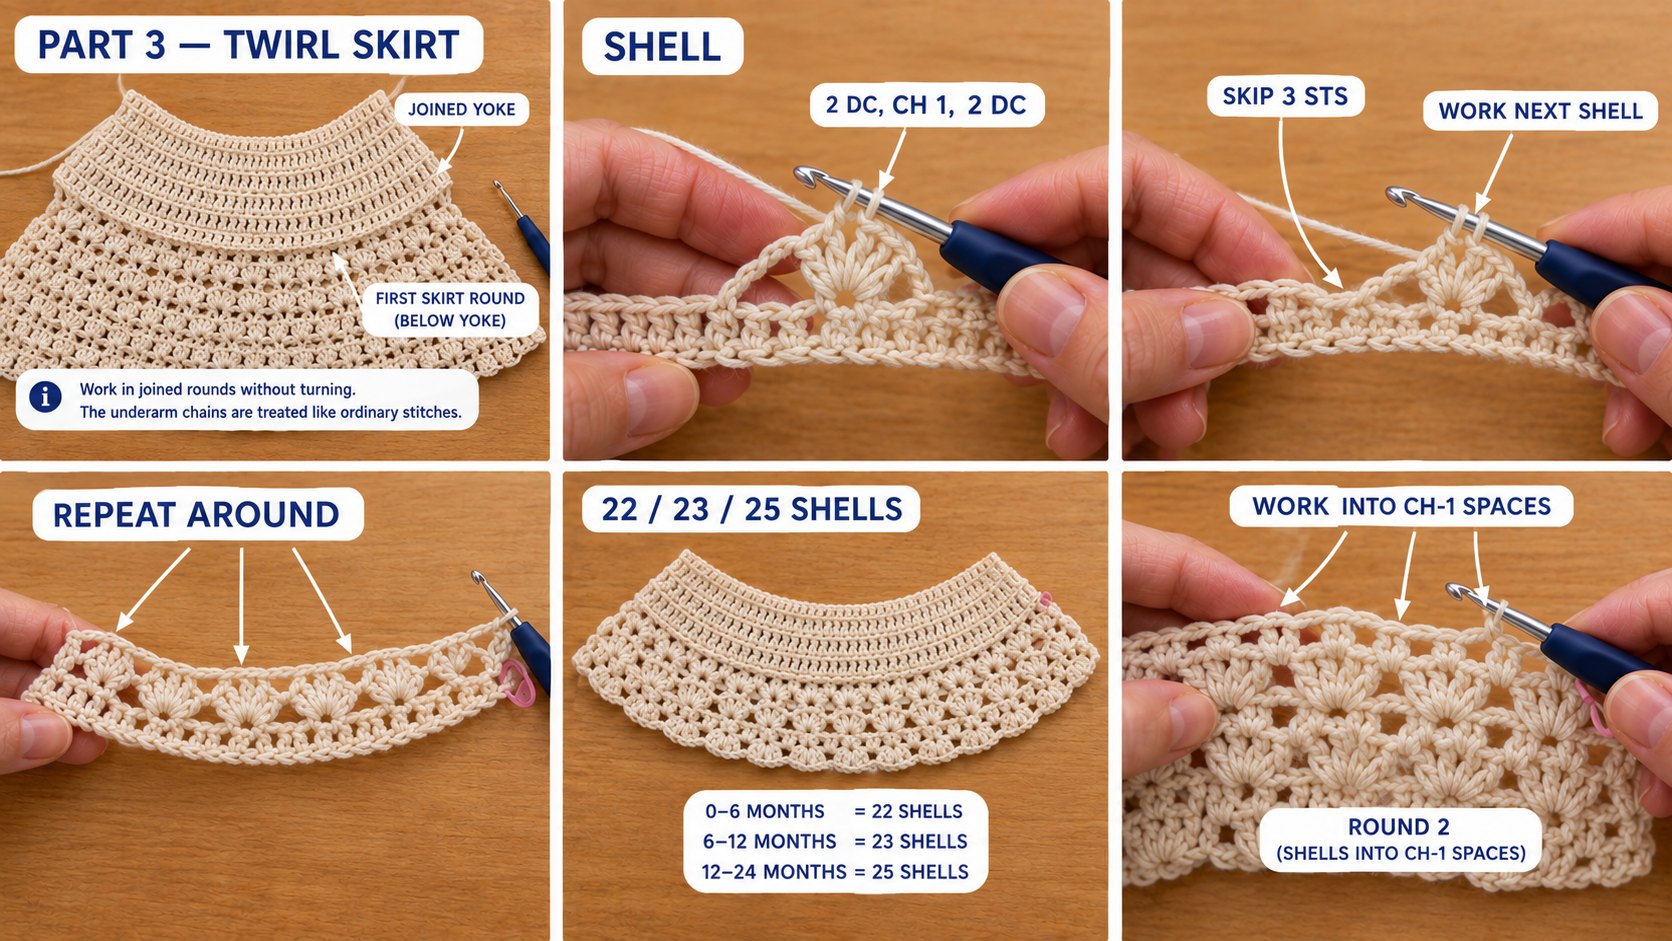
Rnd 5 (first flare): Sl st in next dc and in next ch-1 sp. Ch 3, (dc, ch 1, 2 dc) in same sp, V-st in next gap, shell in next ch-1 sp, V-st in next gap around. Join. (22 (23, 25) shells + 22 (23, 25) V-sts)
Rnds 6–10: Sl st in next dc and in next ch-1 sp. Ch 3, (dc, ch 1, 2 dc) in same sp, V-st in ch-1 sp of next V-st, shell in next shell's ch-1 sp, V-st in next V-st's ch-1 sp around. Join.
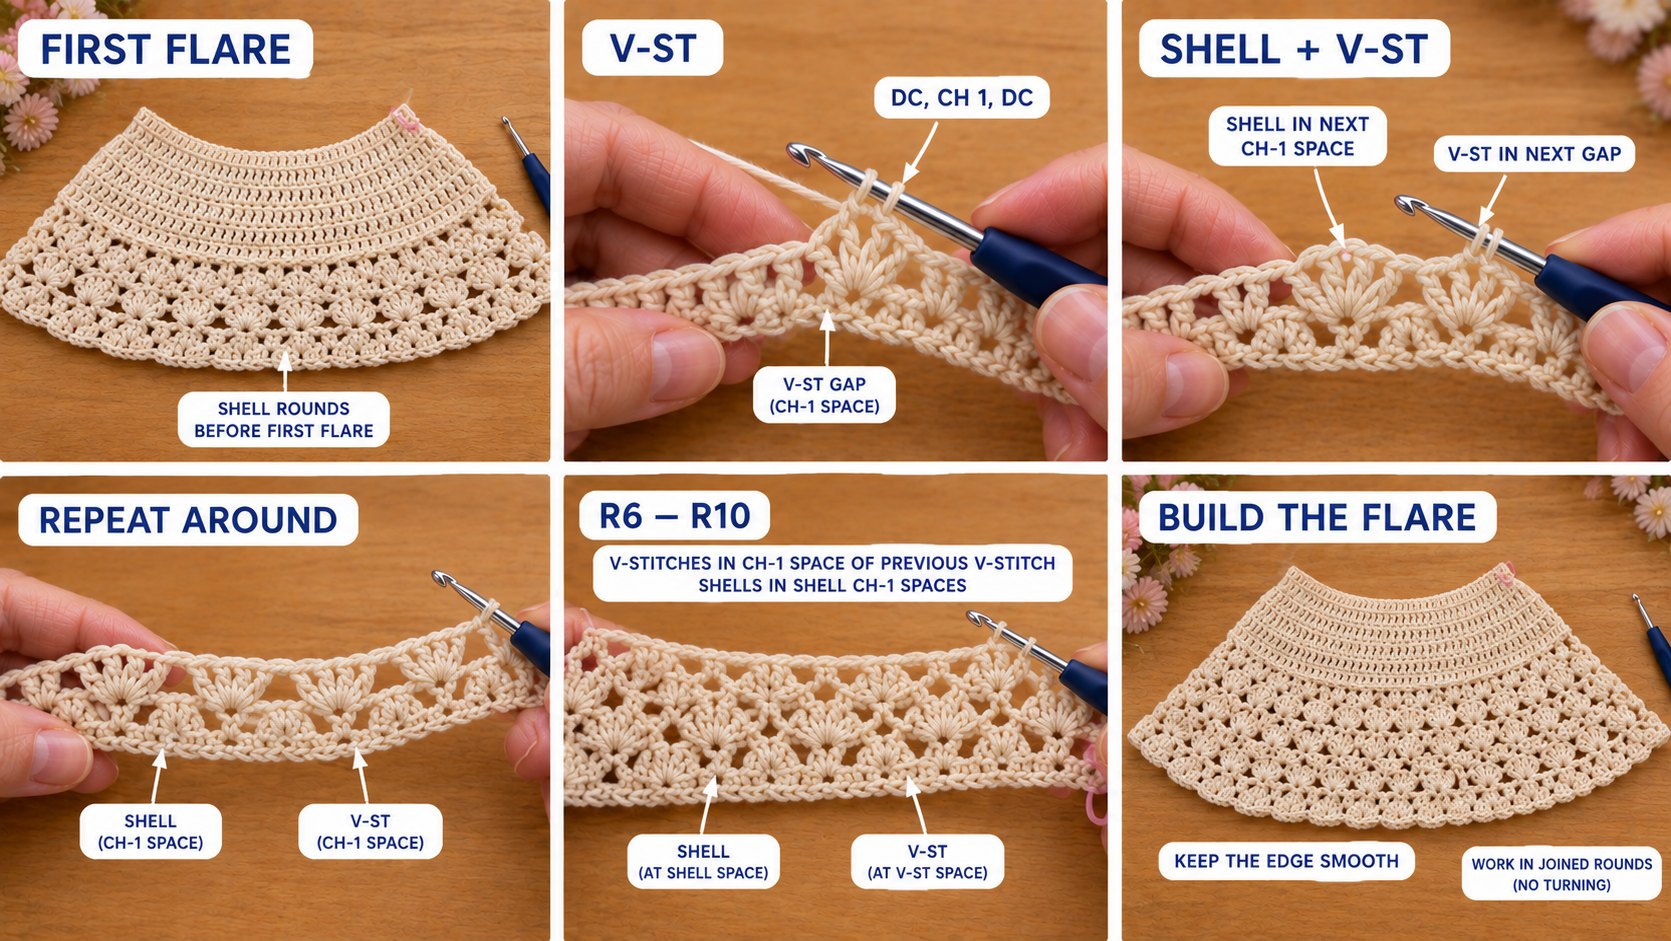
Rnd 11 (second flare): Sl st in next dc and in next ch-1 sp. Ch 3, (dc, ch 1, 2 dc) in same sp, shell in ch-1 sp of next V-st, shell in next ch-1 sp around. Join. (44 (46, 50) shells)
Rnd 12 onward: Repeat Rnd 2 until the skirt measures 9 (10½, 12) in from the underarm, or ¼ in shorter than you want the finished length. That's roughly 20 (23, 26) skirt rounds in total, but go by the tape measure rather than the round count.
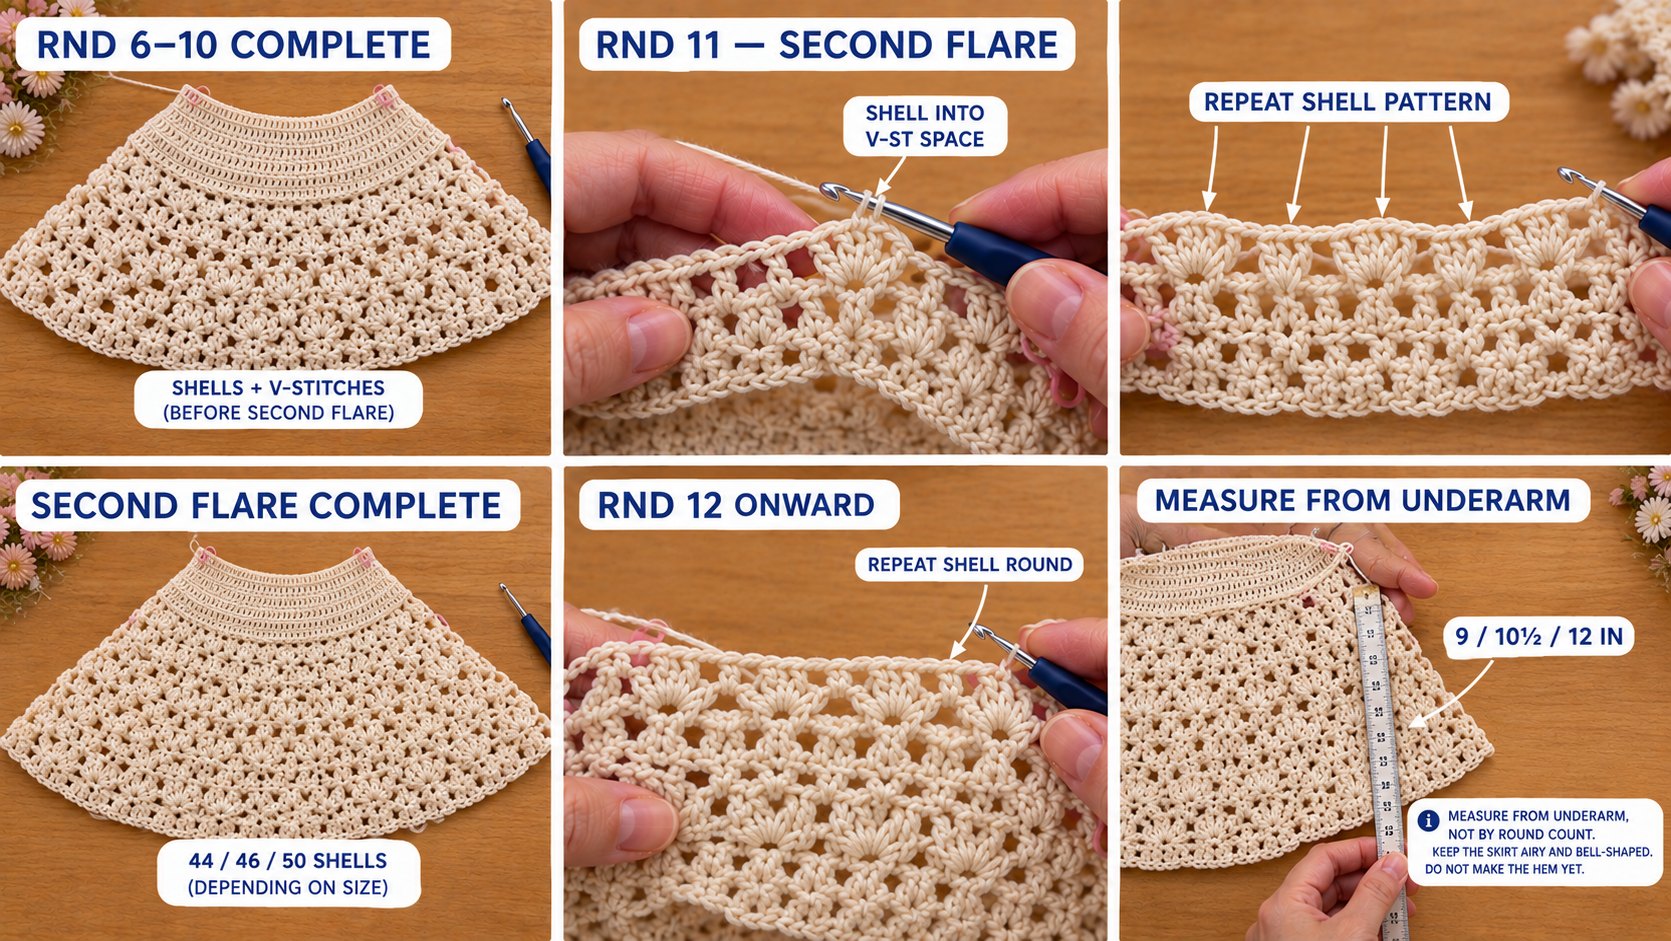
Why two flares instead of one: doubling the shell count in a single round (two shells in every shell) adds so much width at once that the edge has nowhere to go but into ruffles. Adding the V-stitches first, then turning them into shells six rounds later, spreads the flare over the whole skirt. You get the soft bell shape and the Primrose twirl without the hem going wavy.
Part 4: The picot hem
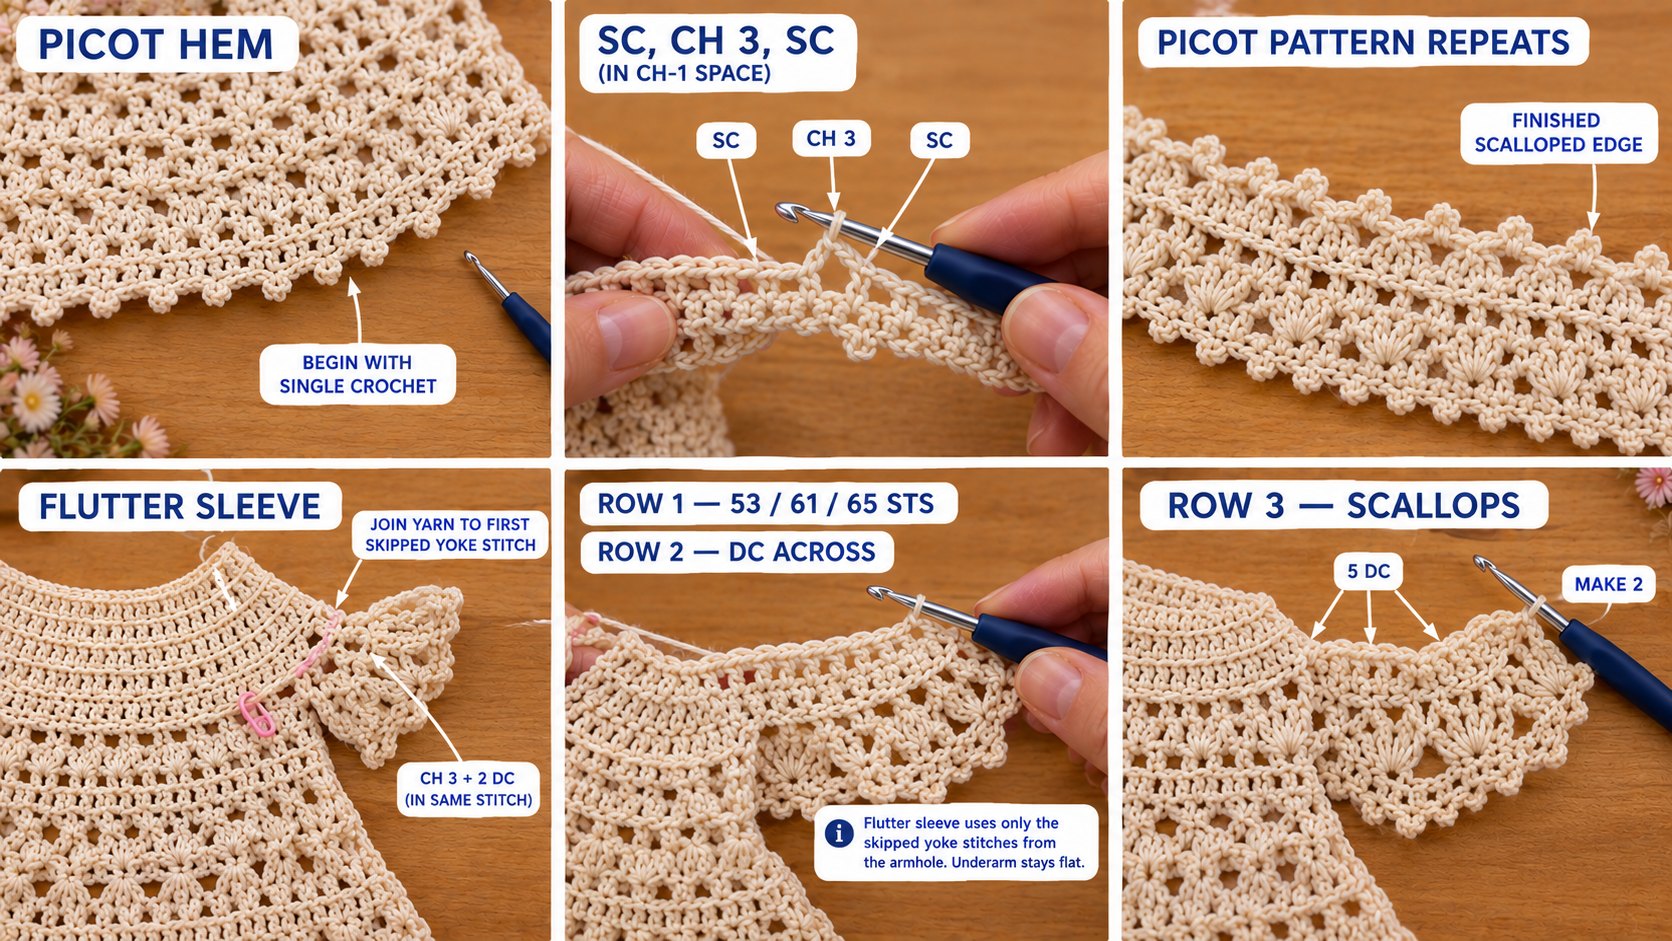
Hem round: Ch 1, sc in same st as join and in next dc, (sc, ch 3, sc) in ch-1 sp, sc in next 2 dc, sc in next 2 dc, (sc, ch 3, sc) in next ch-1 sp, sc in next 2 dc around. Join with a sl st to first sc. Fasten off and weave in the end.
Part 5: The flutter sleeves (make 2)
The flutter is worked in rows across the 26 (30, 32) yoke stitches you skipped at the armhole only. The underarm stays flat, so there's no bulk under the baby's arm.
Row 1 (RS): With RS facing, join yarn in the first skipped yoke st at one end of the armhole. Ch 3 (counts as dc), 2 dc in same st, 2 dc in each remaining skipped yoke st across. Turn. (53 (61, 65) sts)
Row 2: Ch 3 (counts as dc), dc in each st across, working the last dc in top of the turning ch. Turn. (53 (61, 65) sts)
Row 3: Ch 1, sc in first st, skip 1 st, 5 dc in next st, skip 1 st, sc in next st across, working the last sc in top of the turning ch. (13 (15, 16) scallops) Fasten off.
Tidy the underarm: With RS facing, join yarn at one end of the flutter. Sc in each of the 4 free loops of the underarm chain, then sl st into the base of the flutter at the other end. Fasten off. Repeat Rows 1–3 and the tidy-up on the second armhole.
Part 6: Neck edge and back buttons
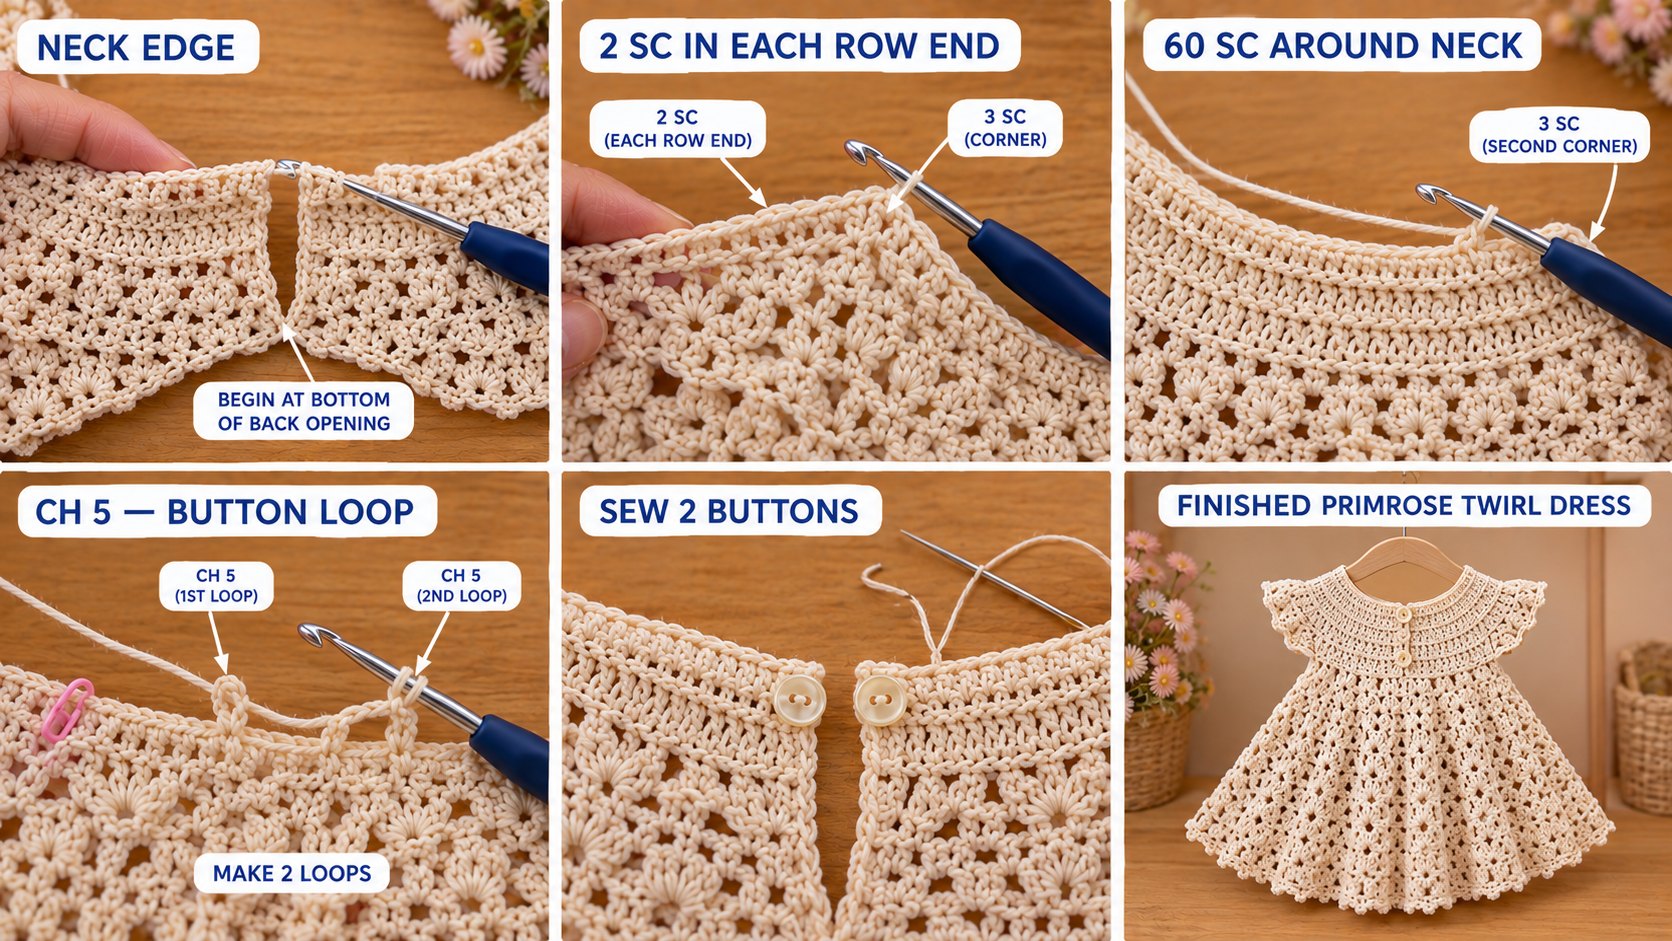
Edging: With RS facing, join yarn at the bottom of the back opening, at the split-round join. Ch 1, then work up the first back edge with 2 sc in each row end, which gives 18 (20, 22) sc. Work 3 sc in the corner, then sc in each free loop of the foundation chain around the neck (60 sc), then 3 sc in the next corner.
Now work down the second back edge with 2 sc in each row end, but make the button loops as you go. Right after the corner, ch 5 (top loop) and continue sc. At the halfway point of the edge, ch 5 again (second loop), then sc to the bottom. Sl st to the first sc and fasten off.
Buttons: Sew 2 buttons on the first back edge, opposite the loops, following the safety note above.
Finishing touches
- Block the skirt. Lay the dress flat on a towel, mist with cool water, and gently open each shell so the ch-1 spaces show clearly. Pat the picot hem into points. Let it dry fully flat. Don't use steam or an iron on cotton lace.
- Try the back closure before the first wear. The loops should hold the buttons without straining. If they gape, work 1–2 sl sts at the base of each loop to tighten it.
- Weave ends into the dc columns, not across the lace. An end woven through a shell's ch-1 space will show from the right side.
Care instructions
Hand-wash in cool water with a gentle, fragrance-free baby soap, or machine-wash on a delicate cycle inside a mesh bag. Roll the dress in a towel to press out the water, then dry flat. A wet cotton dress hung on a hanger will drop several inches in length. Check the buttons after every wash.
Troubleshooting
The yoke ruffles or cups instead of lying flat. Your tension is tighter on the increase rows than on the plain rows. Check your gauge on Row 4. If it's under 18 dc per 4 in, go up to a 4.5 mm hook for the whole yoke.
The back opening won't close. The yoke is too small around, usually from a tight foundation chain. Rework the chain one hook size larger than the one you'll use for the rest, which is a common trick for loose, stretchy starting edges.
The skirt is too narrow at the hem. Work the second-flare round (Rnd 11) earlier, after Rnd 8 instead of Rnd 10. For more swing at the bottom, work the last 4 rounds with bigger shells: (3 dc, ch 1, 3 dc).
The flutter sleeves flop down instead of standing out. Cotton that's too soft or too loose on the hook is the usual cause. Work the flutter with a 3.5 mm hook, or leave out Row 2 for a shorter, perkier flutter.
Frequently asked questions
What size crochet dress will fit my baby? Go by chest measurement rather than age. Primrose's finished chests are 19½, 20½ and 22 in, which fit babies with a chest of roughly 17½–18, 18½–19 and 19½–20 in. If you're between sizes, go up. The dress still looks right with extra room and gets worn longer.
Can I make this dress longer, or into a tunic? Yes. The length is controlled only by the number of skirt rounds. For a tunic to wear over leggings, stop at about 6 (7, 8) in from the underarm. For a longer christening dress, keep repeating Rnd 2 to any length. Allow about 15–20 extra yards for each additional inch.
Can I use a different yarn weight? Sport weight on a 3.5 mm hook gives a smaller, finer dress. That's useful for a newborn or a reborn doll, but you need to swatch and check the chest measurement. Worsted weight makes the lace heavy and stiff for a baby, so I don't recommend it for this design.
Is this pattern beginner-friendly? It's a good second or third garment. If you can make a double-crochet granny square, you can make Primrose. The only new skills are working back and forth, then switching to joined rounds at the split.
Can I sell dresses I make from this pattern? Yes, you're welcome to sell finished Primrose dresses at craft fairs, on Etsy, or as commissions. Please credit "Pattern by Wavode" and link back to this page. What you can't do is republish this write-up or my photos as your own pattern.
Related patterns on Wavode
- Hooded crochet baby romper: the same DK cotton, so a Primrose in summer and a romper in winter make a matching pair.
- Rosebud baby booties: make them in cream to go with the dress for a baby-shower set.
- Classic newborn bonnet: an easy match for the dress in the same yarn.
- Crochet baby socks: a quick one-evening add-on if you have yarn left over.
Made a Primrose? Tag #wavodecrochet and #primrosetwirldress on Pinterest. I re-pin every finished make and credit the maker.
Pattern by Clara Hartwell for Wavode. Questions? Email me at support@wavode.com.