Mini Vampire Amigurumi

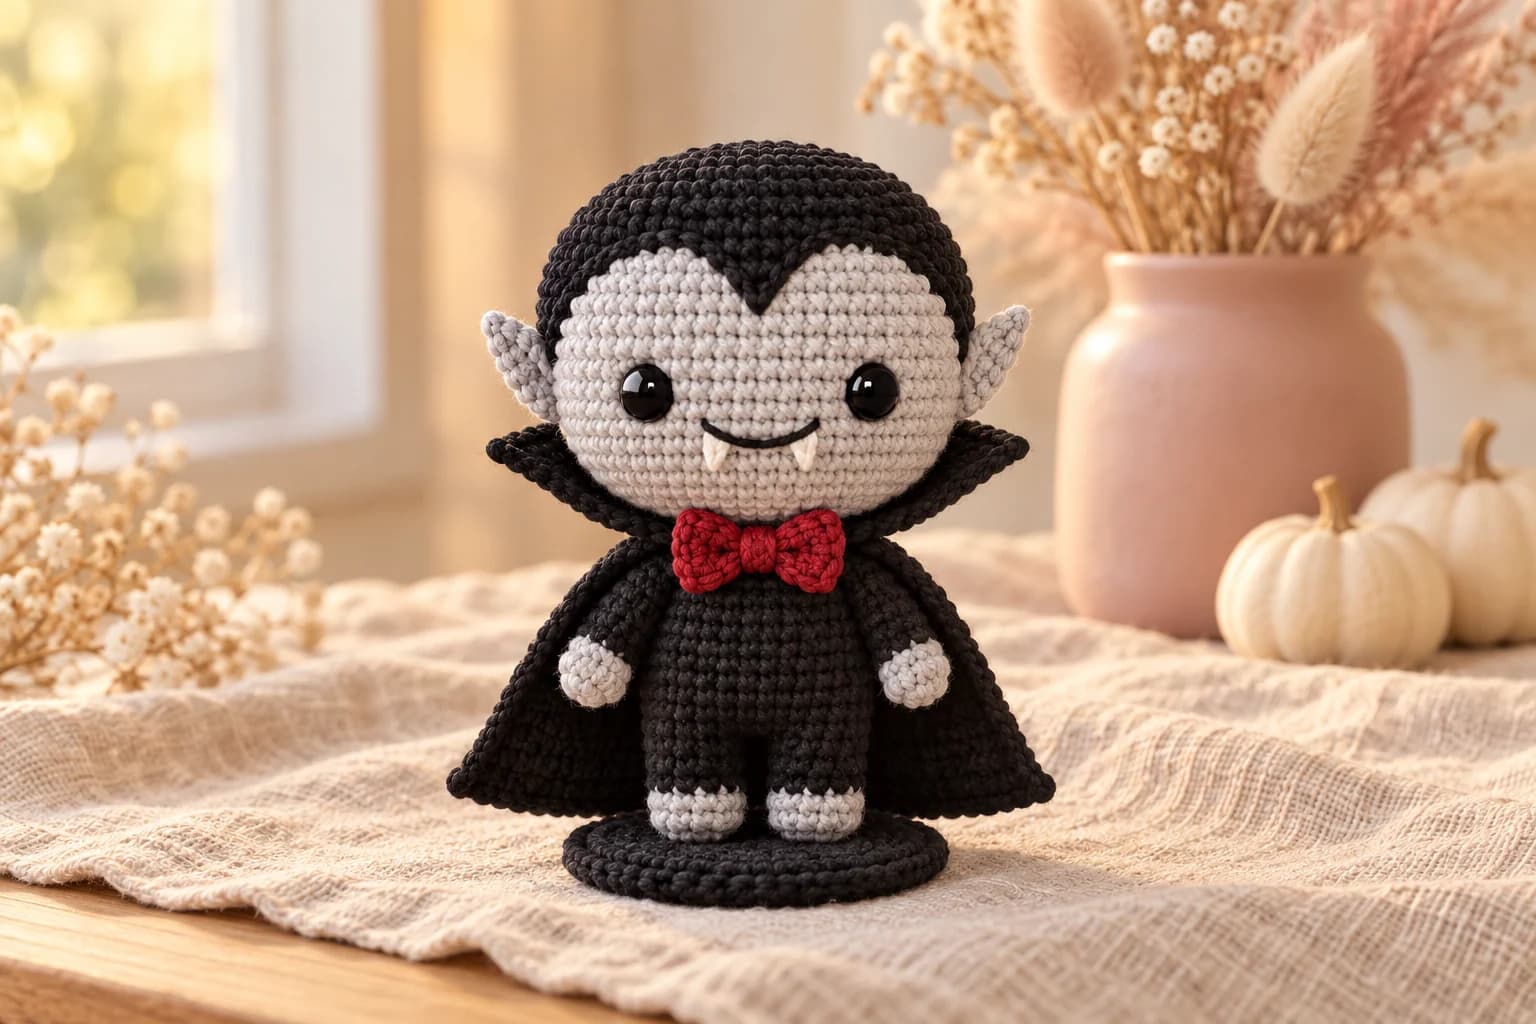
This mini vampire amigurumi is a 3½-inch Dracula for Halloween, with a widow's peak, pointy ears, tiny fangs, a collared cape and a red bow tie. It's crocheted in DK cotton with a 2.5 mm hook, in about 3 to 4 hours. The head and body are worked in the round, the cape is a little flat piece in rows, and the face is embroidered. He stands on a round base, so he's perfect for a Halloween shelf.
Key Takeaways
- The widow's peak is crocheted in, with a simple color split over 5 rounds: no sewing, no felt.
- The legs join into the body, so there's only one seam: head to body.
- The cape is a flat half circle with a stand-up collar worked into its starting chain.
- Small amounts: about 60 yd of black (35 without the base), 15 yd of grey and scraps of red and white.
Why I love this mini vampire
Halloween decorations can be scary, but this one is just cute. He's the friendliest Dracula you'll ever meet: big eyes, a little smile and two tiny fangs. He fits in the palm of your hand, so he's lovely on a desk, in a Halloween table setting or tucked into a trick-or-treat basket for a grown-up.
He's also a great first "character" amigurumi. Every part is small and quick, and you learn three useful tricks along the way: changing colors in the middle of a round, joining two legs into one body, and working a collar into a foundation chain.
Skill level. Intermediate. You need a magic ring, sc, increases and decreases in continuous rounds, color changes, and simple embroidery. The cape uses hdc, dc and tr.
If you like Halloween minis, my pumpkin cat is a sleepy black cat peeking out of a pumpkin.
What you'll need
Yarn (DK weight #3 cotton)
| Color | Used for | Amount |
|---|---|---|
| Black | Hair, body, legs, arms, cape, base | about 60 yd (35 yd without the base) |
| Light grey | Face, ears, hands, feet | about 15 yd |
| Red | Bow tie | about 1 yd |
| White | Fangs | a few inches |
- I like Paintbox Yarns Cotton DK (137 yd / 125 m per 50 g): one ball of each color makes several vampires.
- I worked these totals out from the stitch count of every piece, plus a margin of about 20% for color changes and tails.
Hook and notions
- 2.5 mm (US B/1 or C/2) hook. Go down to 2.25 mm if your stitches show stuffing.
- 2 black safety eyes, 6 mm (or black yarn to embroider them: see the safety note).
- Polyester fiberfill, a stitch marker, a tapestry needle and scissors.
- Optional: a circle of plastic canvas or stiff card, about 1¾ in across, for the base.
Gauge
Gauge isn't critical. What matters is tension: the stitches should be tight enough that the stuffing doesn't show between them. With DK cotton and a 2.5 mm hook, the head is about 1½ in across at its widest. A looser tension gives a slightly bigger vampire, which is fine.
Abbreviations (US crochet terms)
- MR: magic ring
- ch: chain
- sl st: slip stitch
- sc: single crochet
- hdc: half double crochet
- dc: double crochet
- tr: treble crochet
- inc: 2 sc in the same st
- dec: invisible decrease (sc 2 together through the front loops)
- st(s): stitch(es)
- R: round or row
Work the head, body, legs and arms in continuous rounds: don't join, and move a marker to the first st of each round.
The pattern, step by step
Part 1: The head (black and grey)
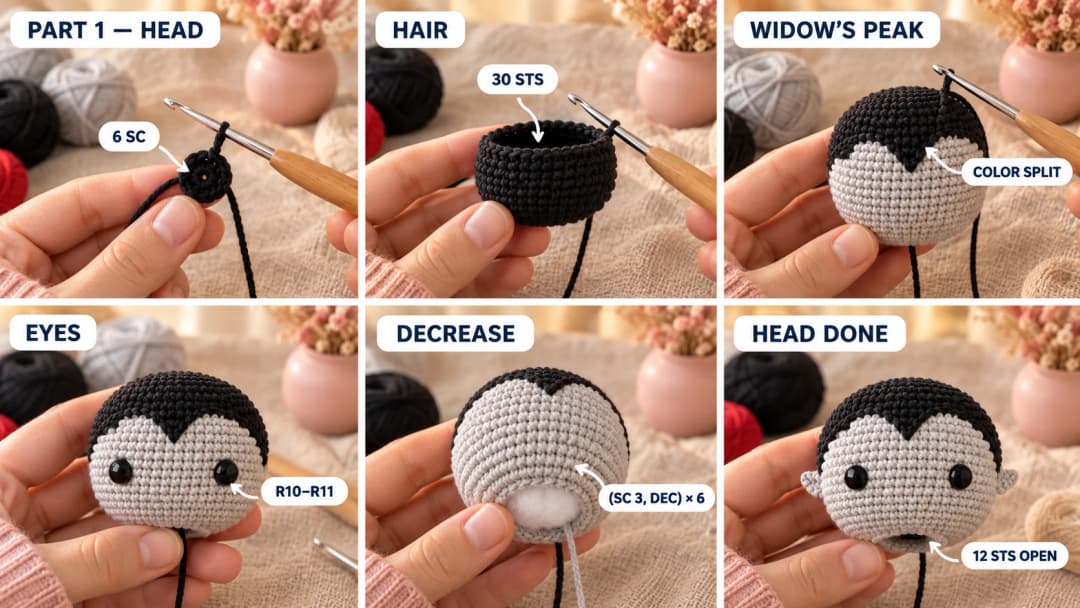
The magic ring is the top of the head; the head is worked down to an open neck.
Hair (black).
- R1: 6 sc in a MR. (6)
- R2: inc × 6. (12)
- R3: (sc, inc) × 6. (18)
- R4: (sc 2, inc) × 6. (24)
- R5: (sc 3, inc) × 6. (30)
- R6–R7: sc around. (30)
Face and widow's peak. The head is round so far, so any spot can be the back. Turn it so your marker sits at the center back. From now on, each round starts at the back.
To change color, work the last yarn over of the stitch before with the new color. Carry the unused color inside the head, loosely, behind the stitches.
- R8: sc 8 black, sc 5 grey, sc 4 black, sc 5 grey, sc 8 black. (30) The 4 black sts in the middle are the top of the peak.
- R9: sc 7 black, sc 7 grey, sc 2 black, sc 7 grey, sc 7 black. (30) The peak narrows to a point.
- R10: sc 6 black, sc 18 grey, sc 6 black. (30)
- R11: sc 5 black, sc 20 grey, sc 5 black. (30)
- R12: sc 5 black, sc 20 grey, sc 5 black. (30) Cut the black, leaving a short tail inside.
The black at the back is the hair, which comes down to the nape. The face is grey from here on.
Eyes. Insert the safety eyes between R10 and R11, in the 12th and 19th sts of R10 (counting from the start of the round), so there are 6 sts between them and 5 grey sts on the outer side of each. Wide-set eyes give him that cute, round face. Check that they sit centered under the peak before you fix the backs.
Lower head (grey).
- R13: (sc 3, dec) × 6. (24)
- R14: (sc 2, dec) × 6. (18)
- Stuff the head firmly.
- R15: (sc, dec) × 6. (12) Sl st in the next st and fasten off with a short tail. Add a little more stuffing; the neck stays open.
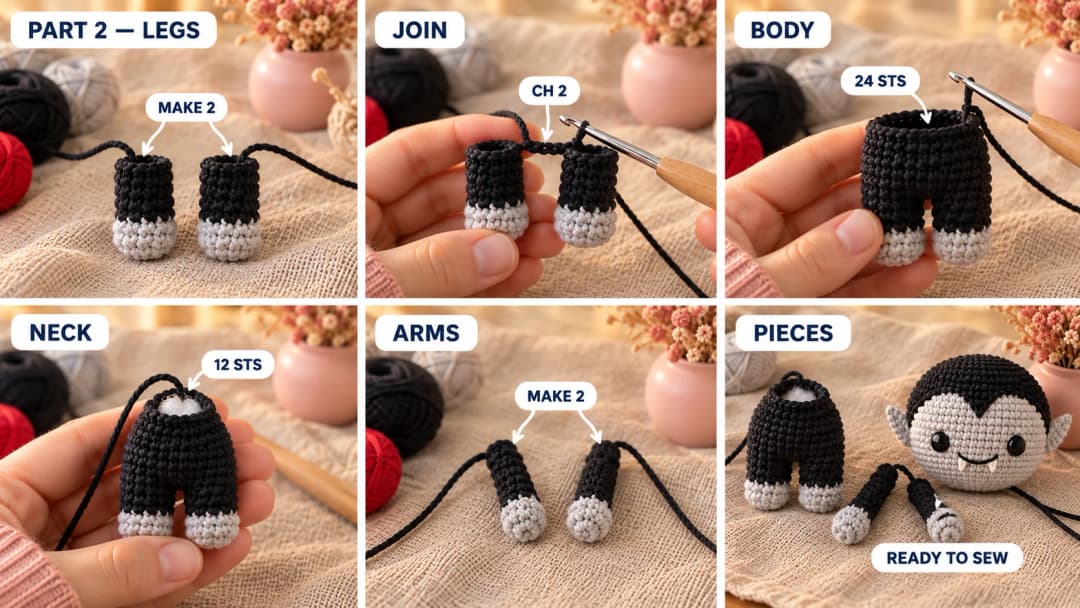
Part 2: Legs, body and arms (grey and black)
Legs (make 2). Each leg starts at the foot.
- R1 (grey): 6 sc in a MR. (6)
- R2: (sc, inc) × 3. (9)
- R3–R4: sc around. (9) These are the grey shoes.
- R5 (black): sc around. (9)
Fasten off the first leg. Don't fasten off the second leg: you'll use it to join them.
Body (black). Stuff both legs lightly.
- R1 (join): Ch 2. Sc in any st of the first leg, then in its next 8 sts (9 sc), sc in each of the 2 ch, sc in the 9 sts of the second leg, sc in the other side of the 2 ch. (22) Make sure both feet point forward before you join.
- R2: (sc 10, inc) × 2. (24)
- R3–R5: sc around. (24)
- R6: (sc 2, dec) × 6. (18)
- R7: sc around. (18) Stuff the legs and body firmly.
- R8: (sc, dec) × 6. (12) Sl st in the next st. Fasten off with a 16-in tail for sewing the head. Top up the stuffing.
Arms (make 2). Each arm starts at the hand.
- R1 (grey): 5 sc in a MR. (5)
- R2–R3: sc around. (5) These are the hands.
- R4–R7 (black): sc around. (5) Fasten off with an 8-in tail. Don't stuff the arms.
Part 3: The cape, collar, ears and bow tie
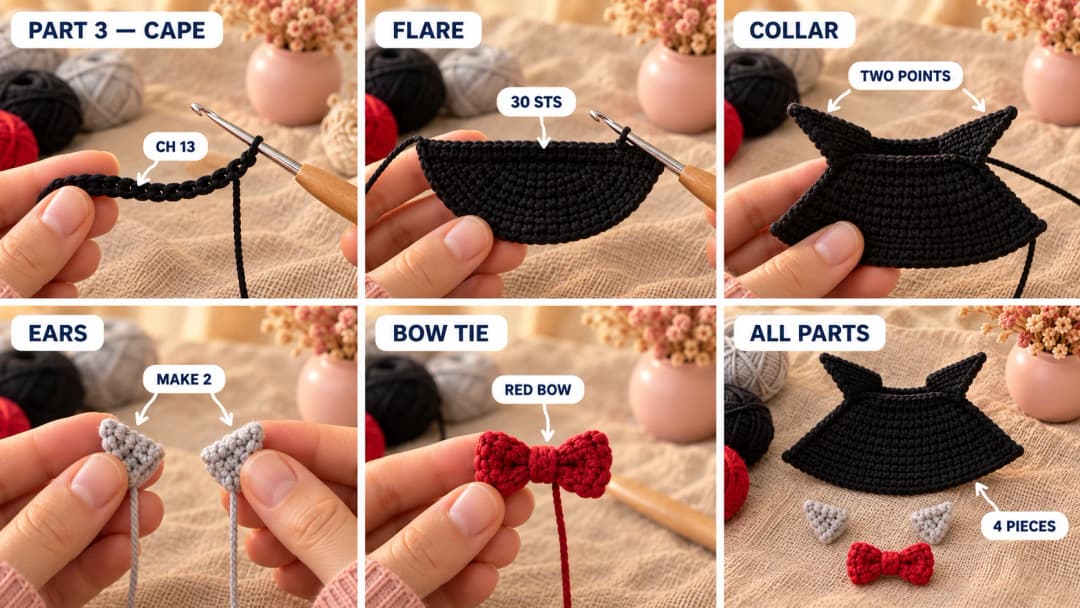
Cape (black). The cape is worked in rows, from the neck down. Ch 13.
- Row 1: Sc in the 2nd ch from the hook and in each ch across. Turn. (12)
- Row 2: Ch 2 (doesn't count, here and on every row). Hdc in the next st, 2 hdc in the next st. Repeat 6 times in all. Turn. (18)
- Row 3: Ch 2. Hdc in the next 2 sts, 2 hdc in the next st. Repeat 6 times in all. Turn. (24)
- Row 4: Ch 2. Hdc in the next 3 sts, 2 hdc in the next st. Repeat 6 times in all. Turn. (30)
- Rows 5–10: Ch 2, hdc in each st across. Turn. (30) Don't fasten off.
Edging: Ch 1, then sc evenly up the side of the cape, 2 sc in the side of each hdc row, and stop at Row 1. Fasten off. Join at the top of the other side and work the same way down to the hem. Fasten off. The edging keeps the fronts from curling.
The cape is about 2 in long and opens out into a half circle about 5½ in around the hem.
Collar (black). The collar is worked into the free loops of the starting chain, along the top of the cape. Join at the right-hand end, with the RS facing.
Count the 12 free loops from right to left before you start, so you know where each group goes:
- Ch 3 to start. This ch is not worked into a loop: it just brings the yarn up to the height of the first point.
- Loop 1: (tr, dc), both in the same loop.
- Loops 2–3: dc in each.
- Loops 4–5: hdc in each.
- Loops 6–7: sc in each.
- Loops 8–9: hdc in each.
- Loops 10–11: dc in each.
- Loop 12: (dc, tr), both in the same loop.
- Ch 3, then sl st into loop 12 again. Again, this ch 3 isn't worked into anything new: it climbs back down from the point. Fasten off with a 10-in tail.
That's 12 loops and 14 sts: 2 in loop 1, 1 in each of loops 2 to 11, and 2 in loop 12. The tr and ch 3 at each end make two tall points, and the middle stays low, like a classic Dracula collar.
Ears (make 2, grey). Into a MR: sc, hdc, dc, ch 2, sl st in the 2nd ch from the hook (a little point), dc, hdc, sc. Pull the ring tight, but don't join. Fasten off with an 8-in tail. Each ear is a small fan with a pointed tip.
Bow tie (red). Into a MR: (ch 2, 2 dc, ch 2, sl st in the ring) twice. Pull the ring tight: you have two little wings. Wrap the tail 3 times around the middle and keep the end for sewing.
Part 4: Face, assembly and base
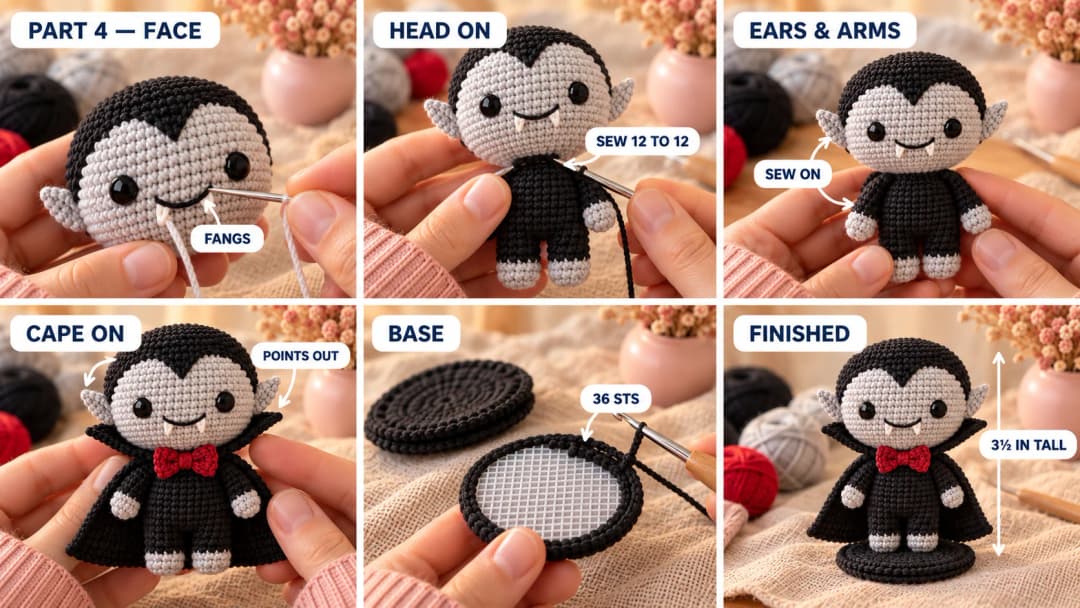
Face. Use a tapestry needle and short lengths of yarn, and start and end each one at the neck opening, where it'll be hidden.
- Mouth: with black, one straight stitch across 4 sts on R12, centered under the eyes. Pull it into a gentle smile with a tiny stitch in the middle.
- Fangs: with white, two short straight stitches pointing down from the mouth, one under each end, each half a round long.
Sew the head to the body. Line up the 12 open sts of the body with the 12 open sts of the head. Sew them together all around with the body's long tail, going through both edges with every stitch, twice around. Add a little stuffing just before you close, so the neck doesn't wobble.
Ears. Sew one ear to each side of the head, at the edge of the face, between R10 and R12, with the point facing up and out.
Arms. Flatten the top of each arm and sew it to the side of the body at R6–R7, with the hands facing forward.
Cape. Wrap the cape around the neck, with the collar standing up behind the head and the two front edges meeting under the chin. Sew the top edge (Row 1) to the body all around the neck. Then sew the bow tie over the place where the front edges meet.
- Arms in front: arrange the cape so it falls behind the arms, with the hands showing in front and the cape flaring out behind them.
- Collar up and out: with the collar's tail, tack the low middle of the collar to the back of the head with 2 or 3 small stitches, about 2 rounds above the neck. Then bend the two points outward, away from the head, and steam them lightly so they stay. For a really crisp collar, brush the points with a little fabric stiffener (or white glue diluted 1:1 with water) and let them dry pointing out. That's optional, and best skipped if a child will handle him.
Base (optional, black). Make 2 circles:
- R1: 6 sc in a MR. (6)
- R2–R6: Increase 6 sts in each round as for the head: inc × 6, (sc, inc) × 6, (sc 2, inc) × 6, (sc 3, inc) × 6, (sc 4, inc) × 6. (36) Sl st and fasten off the first circle.
Put the plastic canvas circle between the two crochet circles, wrong sides together. With the second circle's working loop, sc through both edges all around. (36) Fasten off. Sew the feet to the center of the base with black, several times through each sole. The base is about 2 in across, and the vampire stands on his own.
Safety. This mini vampire has safety eyes and an optional plastic canvas insert, so he's a decoration, not a toy for children under 3. For a toy, embroider the eyes with black yarn (a few stacked straight stitches each), skip the insert and sew every piece on very securely.
Make it yours — quick variations
| Variation | Change from base pattern |
|---|---|
| Lady vampire | Add 2 long black hair strands on each side, and a red cape lining (work Rows 9–10 of the cape in red). |
| Purple cape | Work the cape and collar in deep purple, and the bow tie in black. |
| Keychain | Skip the base, and sew a strong cotton loop to the top of the head (over-sew it at least 10 times). |
| Zombie twin | Work the face and hands in pale green, and the cape in brown. |
| Bigger vampire | Use worsted cotton and a 3.5 mm hook with the same counts: he'll be about 5 in tall. |
Troubleshooting the three things that go wrong
The widow's peak is off-center
The rounds of an amigurumi spiral a little, so the peak drifts by a stitch or two. That's normal. Place the eyes under the peak, 6 sts apart, and check by eye rather than only by counting: the face will look right.
The black shows through the grey face
Your carried strand is pulled too tight, or it's caught on the front. Carry it loosely behind the stitches, and on R10–R12, where the black is only at the back, cut the black and rejoin it if it shows.
He won't stand up
Stuff the legs firmly, and make sure both feet sit flat on the base before you sew them. Without the base, he stands best leaning on his cape.
Frequently asked questions
How long does it take? About 3 to 4 hours: about 1½ hours for the head and body, an hour for the cape and small parts, and an hour for the face, assembly and base.
How big is he? About 3½ in tall, 3¾ in on his base, in DK cotton with a 2.5 mm hook.
Can I make him without safety eyes? Yes. Embroider each eye with black yarn: 3 or 4 straight stitches stacked over 2 sts, between R10 and R11. It's safer for little ones, and just as cute.
Can I use acrylic instead of cotton? Yes. A DK acrylic is softer and a little fuzzier. Cotton gives sharper stitches, which helps the widow's peak and the collar points stand out.
Can I sell vampires made from this pattern? Yes, you're welcome to sell finished vampires made from this free pattern at markets, on Etsy or as gifts. Please credit "Pattern by Wavode" in your listing and link back to this page. What you can't do is republish this write-up or my photos as your own pattern.
Related patterns on Wavode
- Pumpkin cat: a sleepy black cat in a pumpkin hat, peeking out of a pumpkin.
- Pumpkin keychain: a mini ribbed pumpkin with a leaf and a curly vine.
- Girl with a pearl earring keychain: another mini character amigurumi.
- Snowman keychain: a 3.5-inch snowman for when Halloween is over.
Made a mini vampire? Tag #wavodecrochet on Pinterest. I re-pin every finished make and credit the maker.
Pattern by Clara Hartwell for Wavode. Questions? Email me at support@wavode.com.