Sea Turtle Crochet Coaster

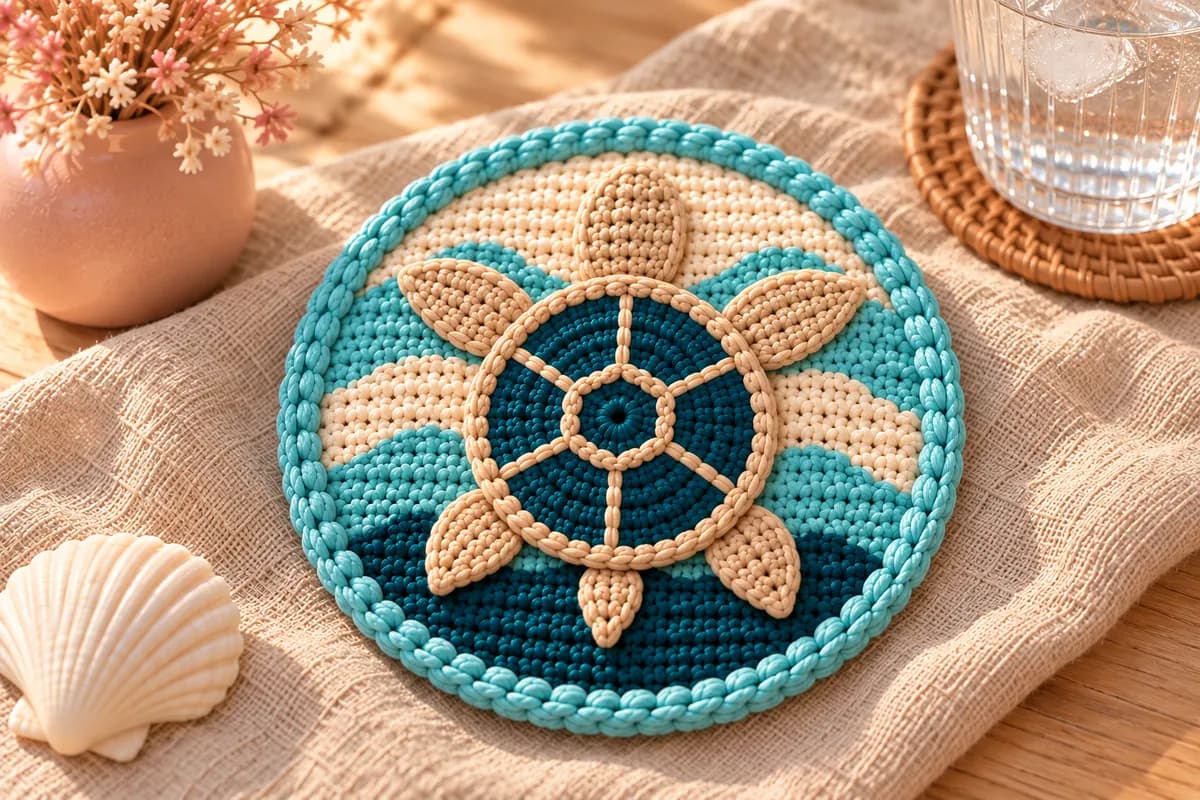
This sea turtle crochet coaster is a round beach coaster with soft rolling waves and a little turtle swimming across it. The coaster is worked flat in rows of single crochet, with deep teal, aqua and cream waves. The turtle is six flat pieces sewn on top, so a glass still sits level. You'll need about 60 yards of DK cotton in four colors, a 3.5 mm hook and 3 to 4 hours.
Key Takeaways
- The coaster is 28 rows plus a border, shaped into a circle with increases and decreases at the row ends.
- Never more than 2 colors in a row, and 20 of the 28 rows use just one color.
- The turtle is completely flat, with no stuffing, so a glass or mug sits steady on the shell.
- About 60 yd (55 m) of DK cotton per coaster, with no safety eyes or hardware.
Why I love this sea turtle coaster
A coaster is the first thing I reach for when I want a quick handmade gift. This one brings a little summer to the table all year: a sea turtle paddling over the waves, right under your iced tea. It's lovely for a beach house, a turtle fan, or anyone who misses the sea.
It's a gentle first step into color work. The first 6 rows are plain deep teal, so you settle into the circle shaping before the first wave. Each wave only takes 2 rows, and the counts are short and symmetric, so they're easy to check.
Why sew the turtle on instead of working it into the picture? Because a separate turtle stays crisp. The shell plates, the flippers and the little tail would be lost in tapestry stitches. Sewn on top, they stand out like a real appliqué.
Skill level. Advanced beginner. You need single crochet, increases and sc2tog decreases, color changes and carrying yarn (I explain both below), working along both sides of a foundation chain, and some simple sewing. The border uses reverse single crochet, with an easier option.
For more of the ocean look, try my ocean wave crochet coaster or my granny square beach tote.
What you'll need
Yarn: DK #3 cotton, such as Paintbox Yarns Cotton DK or Scheepjes Catona. Use 100% cotton: it soaks up condensation from a cold glass and handles a hot mug.
| Color | Used for | Amount |
|---|---|---|
| Aqua (light turquoise) | Waves, border | about 22 yd |
| Cream | Waves | about 15 yd |
| Deep teal | Bottom waves, shell | about 12 yd |
| Sand (light tan) | Shell outline and plates, head, flippers, tail | about 10 yd |
I worked those amounts out from the stitch counts: about 620 stitches for the coaster, 180 for the border and 230 for the turtle, at about 1.6 in of DK cotton per single crochet, plus the carried strands and sewing tails.
Hook and notions
- 3.5 mm (US E/4) hook.
- A tapestry needle, pins and scissors.
- A towel and rust-proof pins, for blocking.
Gauge and finished size
Gauge: about 22 sts and 22 rows to 4 in (10 cm) in tapestry single crochet. Tapestry sc is a little taller than plain sc, so the rows build a true circle. If your swatch is wider than tall, go down half a hook size. If it's taller than wide, go up half a size.
Finished coaster: about 5½ in (14 cm) across with the border, roomy for a glass or a mug. Turtle: about 3½ in (9 cm) from head to tail. Measure your first one: a tighter or looser hand changes it a little.
Abbreviations (US crochet terms)
- MR = magic ring
- ch = chain
- sl st = slip stitch
- sc = single crochet
- hdc = half double crochet
- dc = double crochet
- inc = 2 sc in the same st
- sc2tog = single crochet 2 together (insert in the next st, pull up a loop, insert in the following st, pull up a loop, yarn over and pull through all 3 loops)
- rev sc = reverse single crochet, also called crab stitch (sc worked from left to right)
- RS / WS = right side / wrong side
- st(s) = stitch(es)
- rnd(s) = round(s)
UK crocheters: this pattern uses US terms. US single crochet = UK double crochet.
How the color changes work
Only 8 rows of the coaster use two colors. Here are the three moves you'll repeat on each of them.
- Carrying. Lay the color you're not using along the top of the row below, and work each sc over it, so it hides inside the stitch. Only carry a color in the rows where it appears.
- Changing color. Work the last stitch of the old color until 2 loops are left on the hook. Drop the old color, yarn over with the new color and pull it through. The next stitch is in the new color.
- Keeping it tidy. Tug the carried strand gently every few stitches, so it lies flat without puckering the fabric.
Adding a color: lay its tail along the top of the row from the first stitch, and carry it until you need it. Retiring a color: after its last stitch, carry it for 3 or 4 more sts, then cut it close.
How the rows are written: the color counts are listed in the order you work them, and they include any increases or decreases in that row. Every two-color row is symmetric, so it reads the same from either end. That makes left-handed crochet just as easy.
The pattern — step by step
Part 1 — The deep teal water and the first waves (Rows 1–12)
Every row starts with ch 1 (doesn't count as a st), then turn, except Row 1. The number in brackets is the stitch count at the end of the row.
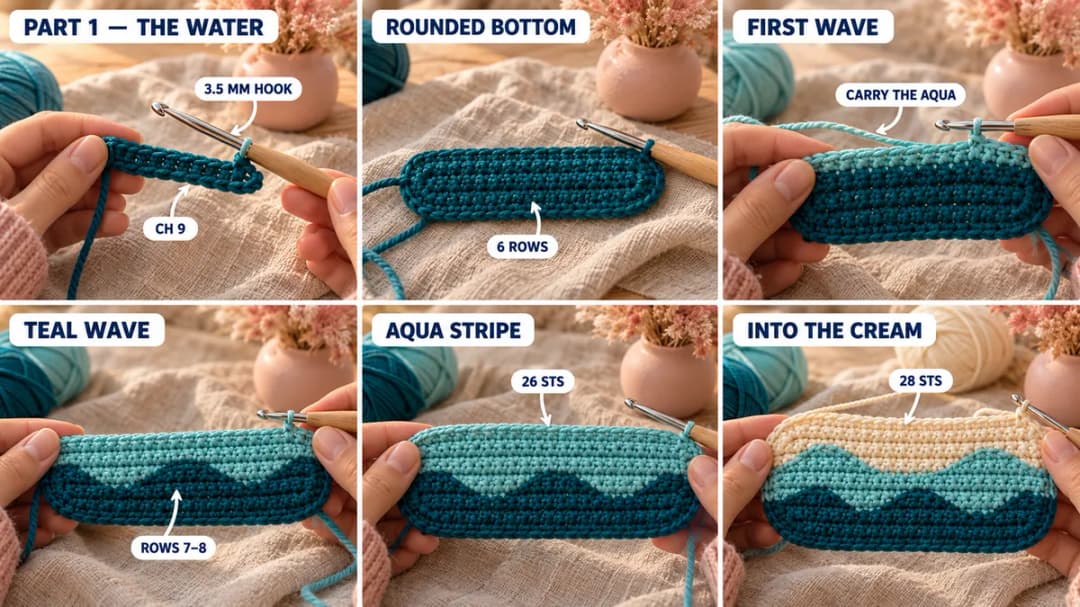
With deep teal, ch 9.
- Row 1 (RS): Sc in the 2nd ch from the hook and in each ch across. (8) Colors: 8 deep teal.
- Row 2 (WS): Inc in the first 2 sts, sc to the last 2 sts, inc in the last 2 sts. (12) Colors: 12 deep teal.
- Row 3 (RS): Inc in the first 2 sts, sc to the last 2 sts, inc in the last 2 sts. (16) Colors: 16 deep teal.
- Row 4 (WS): Inc in the first st, sc to the last st, inc in the last st. (18) Colors: 18 deep teal.
- Row 5 (RS): Inc in the first and last st. (20) Colors: 20 deep teal.
- Row 6 (WS): Inc in the first and last st. (22) Colors: 22 deep teal.
These rows grow into a wide band with rounded ends: the bottom of your circle. Start carrying aqua from the beginning of Row 7.
- Row 7 (RS): Inc in the first and last st. (24) Colors: 2 deep teal, 6 aqua, 8 deep teal, 6 aqua, 2 deep teal.
- Row 8 (WS): No shaping. (24) Colors: 10 aqua, 4 deep teal, 10 aqua. Carry the deep teal to the end of the row, then cut it.
You now have one deep teal wave rising in the middle, with a smaller rise at each edge.
- Row 9 (RS): Inc in the first and last st. (26) Colors: 26 aqua.
- Row 10 (WS): No shaping. (26) Colors: 26 aqua. Start carrying cream from the beginning of Row 11.
- Row 11 (RS): Inc in the first and last st. (28) Colors: 3 cream, 8 aqua, 6 cream, 8 aqua, 3 cream.
- Row 12 (WS): No shaping. (28) Colors: 5 cream, 4 aqua, 10 cream, 4 aqua, 5 cream. Carry the aqua to the end of the row, then cut it.
Two aqua waves now rise into the cream, one on each side of the center.
Part 2 — The cream middle and the top waves (Rows 13–28)
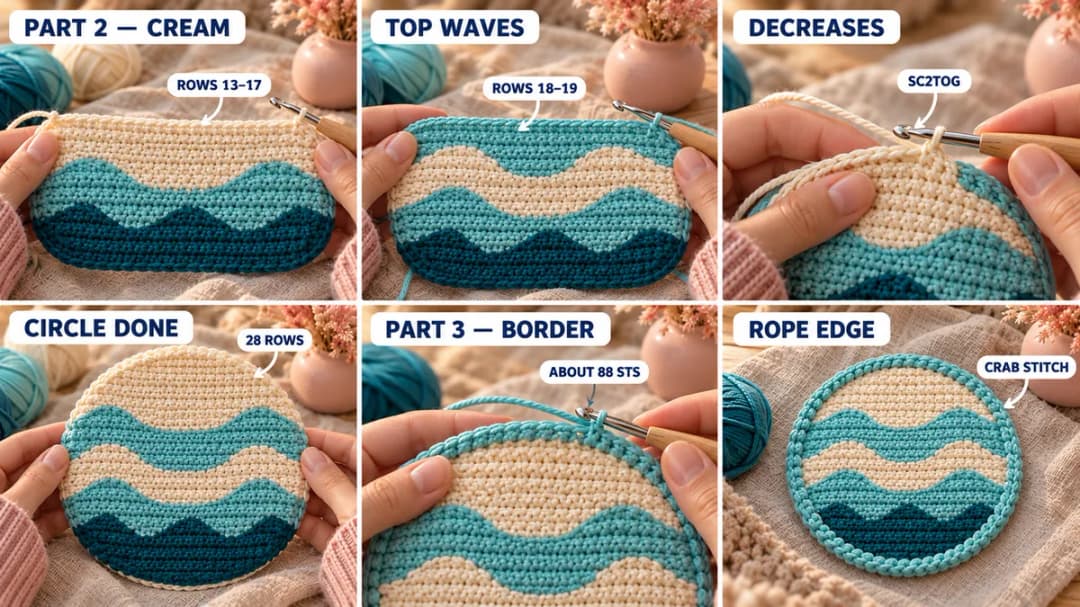
- Rows 13–17: No shaping. (28) Colors: 28 cream. Start carrying aqua again from the beginning of Row 18.
- Row 18 (WS): No shaping. (28) Colors: 4 cream, 6 aqua, 8 cream, 6 aqua, 4 cream.
- Row 19 (RS): Sc2tog over the first 2 sts and over the last 2 sts. (26) Colors: 11 aqua, 4 cream, 11 aqua. Carry the cream to the end of the row, then cut it.
- Row 20 (WS): No shaping. (26) Colors: 26 aqua.
- Row 21 (RS): Sc2tog at each end. (24) Colors: 24 aqua.
- Row 22 (WS): No shaping. (24) Colors: 24 aqua. Start carrying cream again from the beginning of Row 23.
- Row 23 (RS): Sc2tog at each end. (22) Colors: 8 aqua, 6 cream, 8 aqua.
- Row 24 (WS): Sc2tog at each end. (20) Colors: 5 aqua, 10 cream, 5 aqua. Carry the aqua to the end of the row, then cut it.
- Row 25 (RS): Sc2tog at each end. (18) Colors: 18 cream.
- Row 26 (WS): Sc2tog at each end. (16) Colors: 16 cream.
- Row 27 (RS): Sc2tog twice at the start and twice at the end. (12) Colors: 12 cream.
- Row 28 (WS): Sc2tog twice at the start and twice at the end. (8) Colors: 8 cream.
Fasten off the cream. The wide cream band in the middle is where the turtle's shell will sit.
Part 3 — The rope border
Before the border, the circle has slightly stepped edges. The border smooths them into a clean round.
- Rnd 1 (RS): With the RS facing you, join aqua at any row end. Ch 1, then sc evenly around the whole edge: 1 sc in each row end, and 1 sc in each st of Row 1 and Row 28. Along the steps, where one row is wider than the next, work 1 sc for every 2 exposed sts. You'll have about 88 sts. The exact number doesn't matter, as long as the edge lies flat. Sl st in the first sc to join.
- Rnd 2 (RS): Ch 1. Work rev sc in each st around, from left to right. That gives the rope-like edge. Sl st in the first st to join and fasten off.
Easier border. If crab stitch feels awkward, work Rnd 2 as a sl st in the back loop of each st. It gives a neat, flat edge.
Weave in the tails on the back, then block: pin the coaster into a circle on a towel, RS up, spray it until damp and let it dry completely. Block it before you add the turtle, so the circle is true.
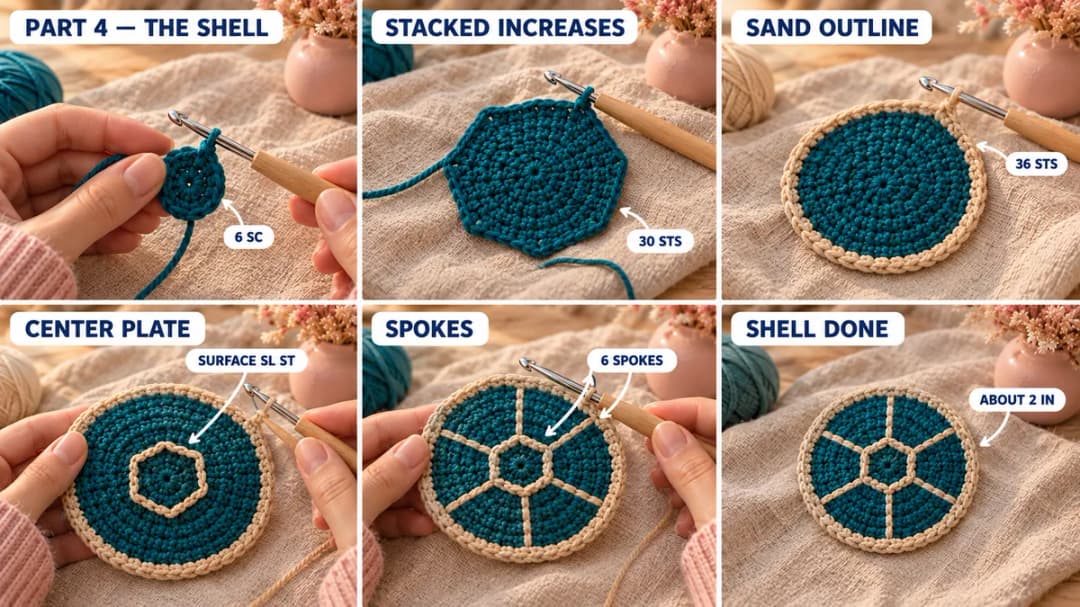
Part 4 — The shell
The magic ring is the center of the shell. The increases are stacked straight above each other, so the shell has 6 soft corners. Those corners guide the plate lines later.
With deep teal:
- Rnd 1: MR, 6 sc in the ring. (6)
- Rnd 2: Inc × 6. (12)
- Rnd 3: (Sc, inc) × 6. (18)
- Rnd 4: (2 sc, inc) × 6. (24)
- Rnd 5: (3 sc, inc) × 6. (30) Change to sand on the last yarn over and cut the deep teal.
- Rnd 6 (sand): (4 sc, inc) × 6. (36)
Sl st in the next st and fasten off, leaving a 24-in (60 cm) tail for sewing the shell down. Weave the deep teal tails in on the back.
Plate lines (sand). These are worked in surface slip stitch on the RS. Hold a 1-yd piece of sand yarn under the shell. Insert the hook from the front between two stitches, pull up a loop, then insert one stitch further along, pull up a loop and draw it through the loop on the hook. It looks like a chain lying on top of the fabric.
- Center plate. Work a ring of surface sl sts in the gap between Rnds 2 and 3, all the way around. The 6 increase points bend it into a small hexagon.
- Spokes. From each corner of the hexagon, work 3 surface sl sts straight out across Rnds 3, 4 and 5, following the increase line, until you reach the sand round. That's 6 spokes in all, dividing the shell into a center plate and 6 outer plates.
Pull each end to the back and weave it in under the deep teal.
Easier option. Instead of surface slip stitch, backstitch the lines with sand yarn and a tapestry needle. The plates look the same, just a little thinner.
Part 5 — Head, flippers and tail
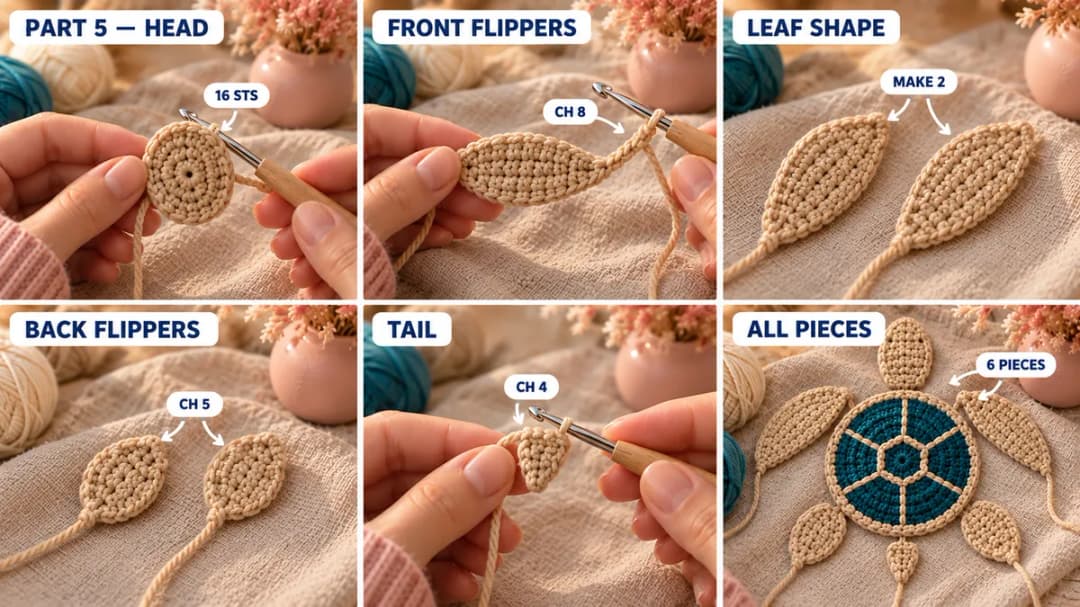
All these pieces are flat and worked in sand. For the flippers and the tail, leave a 10-in (25 cm) tail before you make the slip knot. The slip knot ends up at the rounded base of each piece, which is the end you sew under the shell.
Head (make 1). The magic ring is the center of the head.
- Rnd 1: MR, 8 sc in the ring. (8)
- Rnd 2: Inc × 8. (16)
Sl st in the next st and fasten off, leaving a 10-in tail. You have a small flat circle. Weave in the starting tail on the back. When you pin it on, ease it into a soft egg shape, a little longer than wide. The side where the 10-in tail comes out is the neck, which tucks under the shell.
Front flippers (make 2). Leave the 10-in tail, then ch 8.
- Working along one side of the chain, starting in the 2nd ch from the hook: sl st, sc, hdc, dc, dc, hdc, then 3 sc in the last ch.
- Turn to work along the other side of the chain: hdc, dc, dc, hdc, sc, sl st in the last ch. (15)
Fasten off and weave this end in at the pointed tip. You have a long leaf shape. The end where the long tail comes out, with the 3 sc, is the base; the other end is the tip of the flipper.
Back flippers (make 2). Leave the 10-in tail, then ch 5.
- Starting in the 2nd ch from the hook: sl st, sc, hdc, then 3 hdc in the last ch.
- Along the other side of the chain: hdc, sc, sl st in the last ch. (9)
Fasten off and weave this end in at the tip. These are shorter and rounder than the front flippers.
Tail (make 1). Leave the 10-in tail, then ch 4. Sl st in the 2nd ch from the hook, sc in the next ch, hdc in the last ch. (3) Fasten off and weave this end in at the tip. It's a tiny spike, wider at the base.
Part 6 — Sewing the turtle on
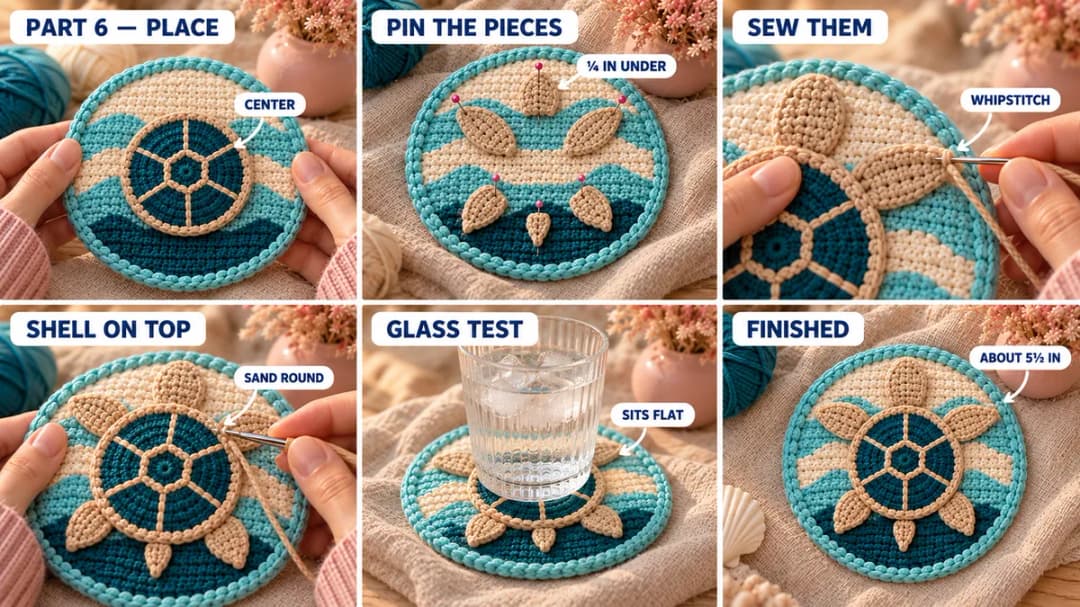
Lay the coaster flat, RS up, with the cream waves at the top (Row 28) and the deep teal at the bottom (Row 1). The turtle swims toward the top.
- Find the spot. Set the shell in the center of the coaster, without sewing it. Each piece below tucks about ¼ in (6 mm) under the shell's edge.
- Pin the pieces. Head at 12 o'clock, neck end under the shell. Front flippers at 10 and 2 o'clock, bases under the shell and tips pointing out and a little forward. Back flippers at 5 and 7 o'clock, tips pointing out and back. Tail at 6 o'clock, base under the shell.
- Sew the pieces. Lift the shell off and leave the pins in. Sew each piece all around its edge with its own tail, in small whipstitches. Catch only the top half of the coaster fabric, so the stitches don't show on the back. Knot each tail on the back and hide the end inside the coaster.
- Sew the shell. Put the shell back in the center, covering the bases of all 6 pieces. With the 24-in sand tail, whipstitch the sand round to the coaster all the way around. Go through the outer loops of Rnd 6 and the top half of the coaster.
- Finish. Weave in the last tail on the back and trim it.
Set a glass on the shell and check that it sits flat. If an edge lifts, add a few more stitches there.
Care and safety. The coaster is made for glasses and mugs, not for pans straight off the stove. To clean it, hand wash it in cool water with mild soap, press it in a towel and let it dry flat. There are no safety eyes or hardware, but it's a table piece, not a toy.
Make it yours — quick variations
| Variation | Change from base pattern |
|---|---|
| Coaster set | Make four coasters and swap the turtle's shell color on each: deep teal, aqua, sand and coral. |
| Plain waves | Skip the turtle for a simple striped beach coaster that matches the set. |
| Turtle eyes | Add a tiny deep teal French knot on each side of the head, 1 st in from the edge. |
| Sandy beach | Work Rows 1–6 in sand instead of deep teal for a shore at the bottom. |
| Hanging decor | Add a 6-in sand loop at the top of the border and hang it as a beach-house ornament. |
Troubleshooting the three things that go wrong
The coaster ruffles or cups
Ruffles mean the rows are too wide for your tension, and cupping means they're too tight. Check the gauge again and change your hook half a size. Blocking fixes small waves, but not a big ruffle.
The carried yarn shows between stitches
Your carried strand is lying too high. Keep it flat on top of the row below and tug it gently every few stitches. A darker color peeking through cream is the usual sign.
The glass wobbles on the turtle
A flipper or the head is sitting on top of the shell edge instead of under it. Unpick that piece, tuck its base under the shell and sew it again. The turtle should be a single flat layer except where the shell overlaps the bases.
Frequently asked questions
How long does this sea turtle coaster take? About 3 to 4 hours. The coaster and border take about 2 hours, the turtle pieces about an hour, and the sewing another half hour or so.
How much yarn do I need? About 60 yd (55 m) of DK cotton in all: about 22 yd of aqua, 15 yd of cream, 12 yd of deep teal and 10 yd of sand. A set of four takes about 240 yd (220 m).
Can I use worsted yarn? Yes, with a 4 mm hook. The coaster grows to about 6½ to 7 in across, and the turtle gets bigger too, so it makes a lovely mug rug. Keep all four colors the same weight.
Is this a good first tapestry crochet project? Yes. Only 8 of the 28 rows use two colors, and never more than two at once. Every two-color row is symmetric, so you can check your count from either end.
Can I sell coasters made from this pattern? Yes, you're welcome to sell finished coasters made from this free pattern at markets, on Etsy or as gifts. Please credit "Pattern by Wavode" in your listing and link back to this page. What you can't do is republish this write-up or my photos as your own pattern.
Related patterns on Wavode
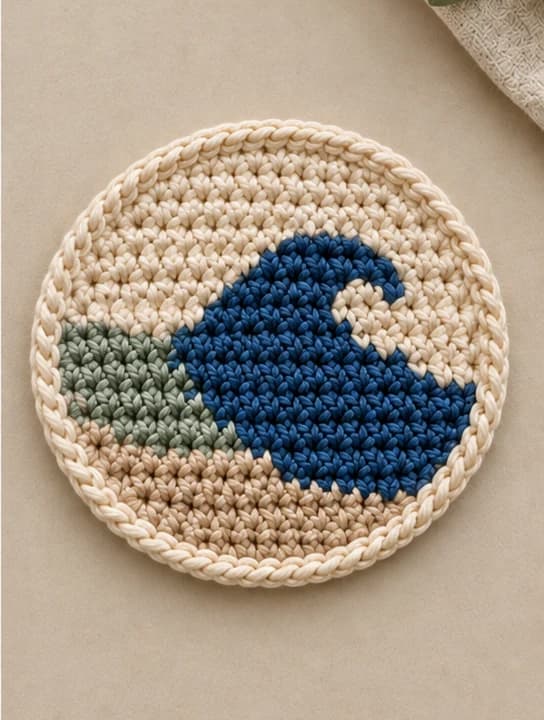
- Ocean wave crochet coaster: a curling navy wave in tapestry crochet.
- Piko the pond turtle: a chunky little turtle with no sewing.
- Cute crochet panda coaster: a tray coaster with a sleepy panda.
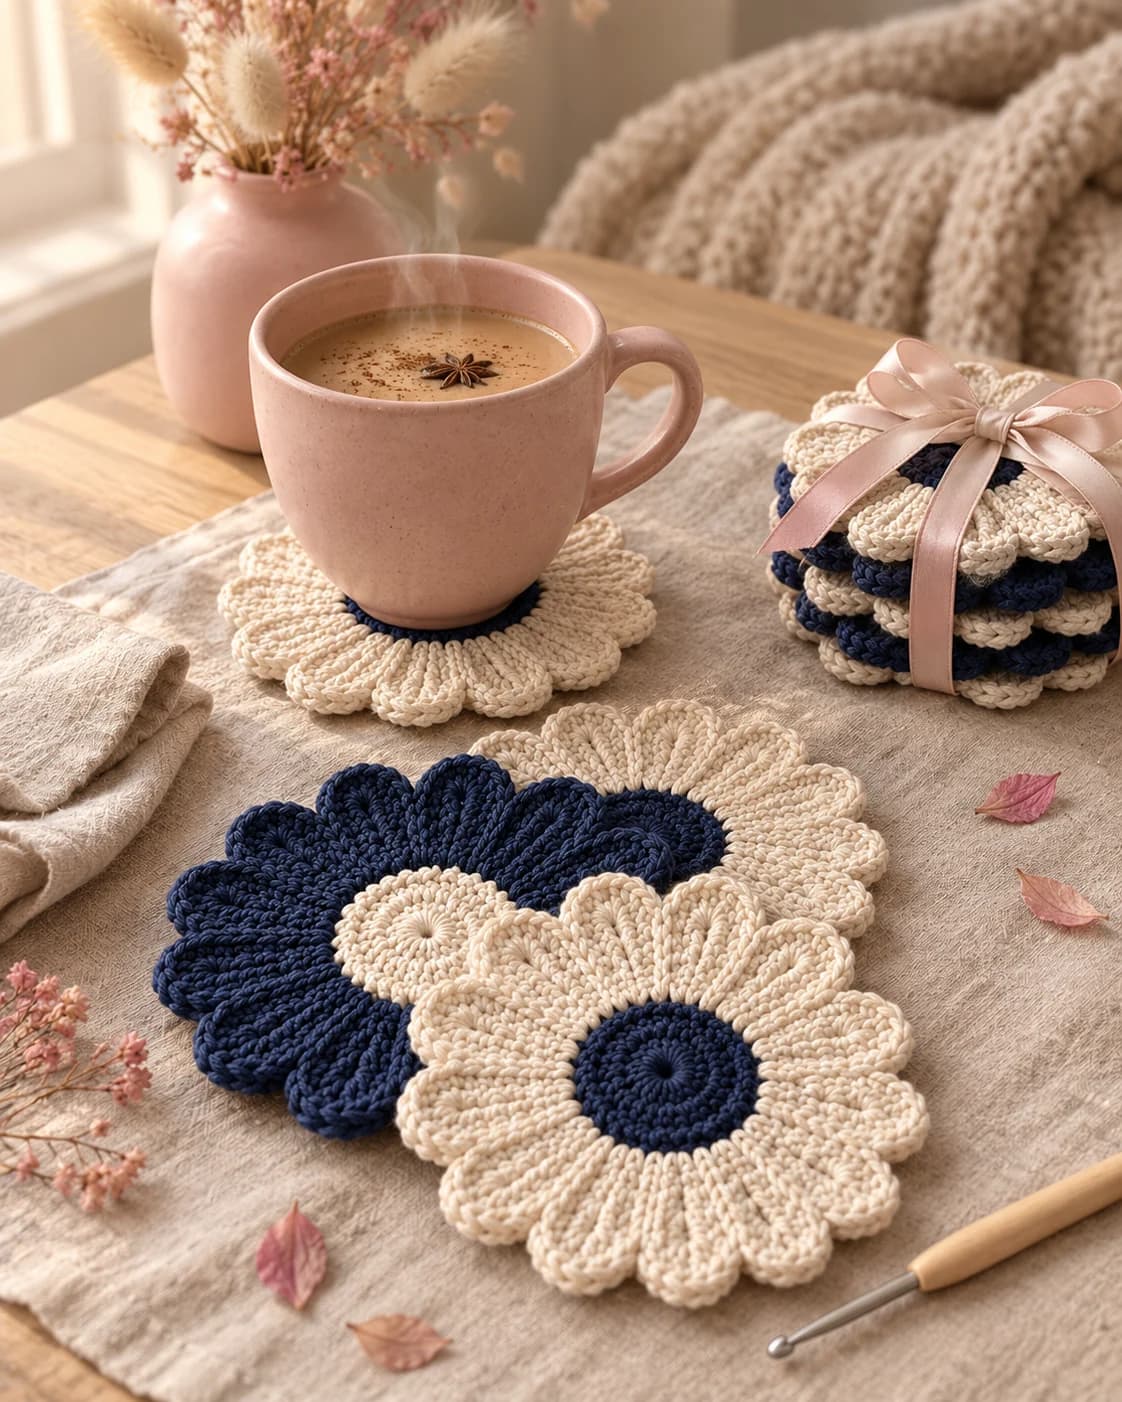
- Crochet daisy coaster: a navy and cream flower set.
Made a sea turtle coaster? Tag #wavodecrochet on Pinterest. I re-pin every finished make and credit the maker.
Pattern by Clara Hartwell for Wavode. Questions? Email me at support@wavode.com.