Cute Crochet Panda Coaster

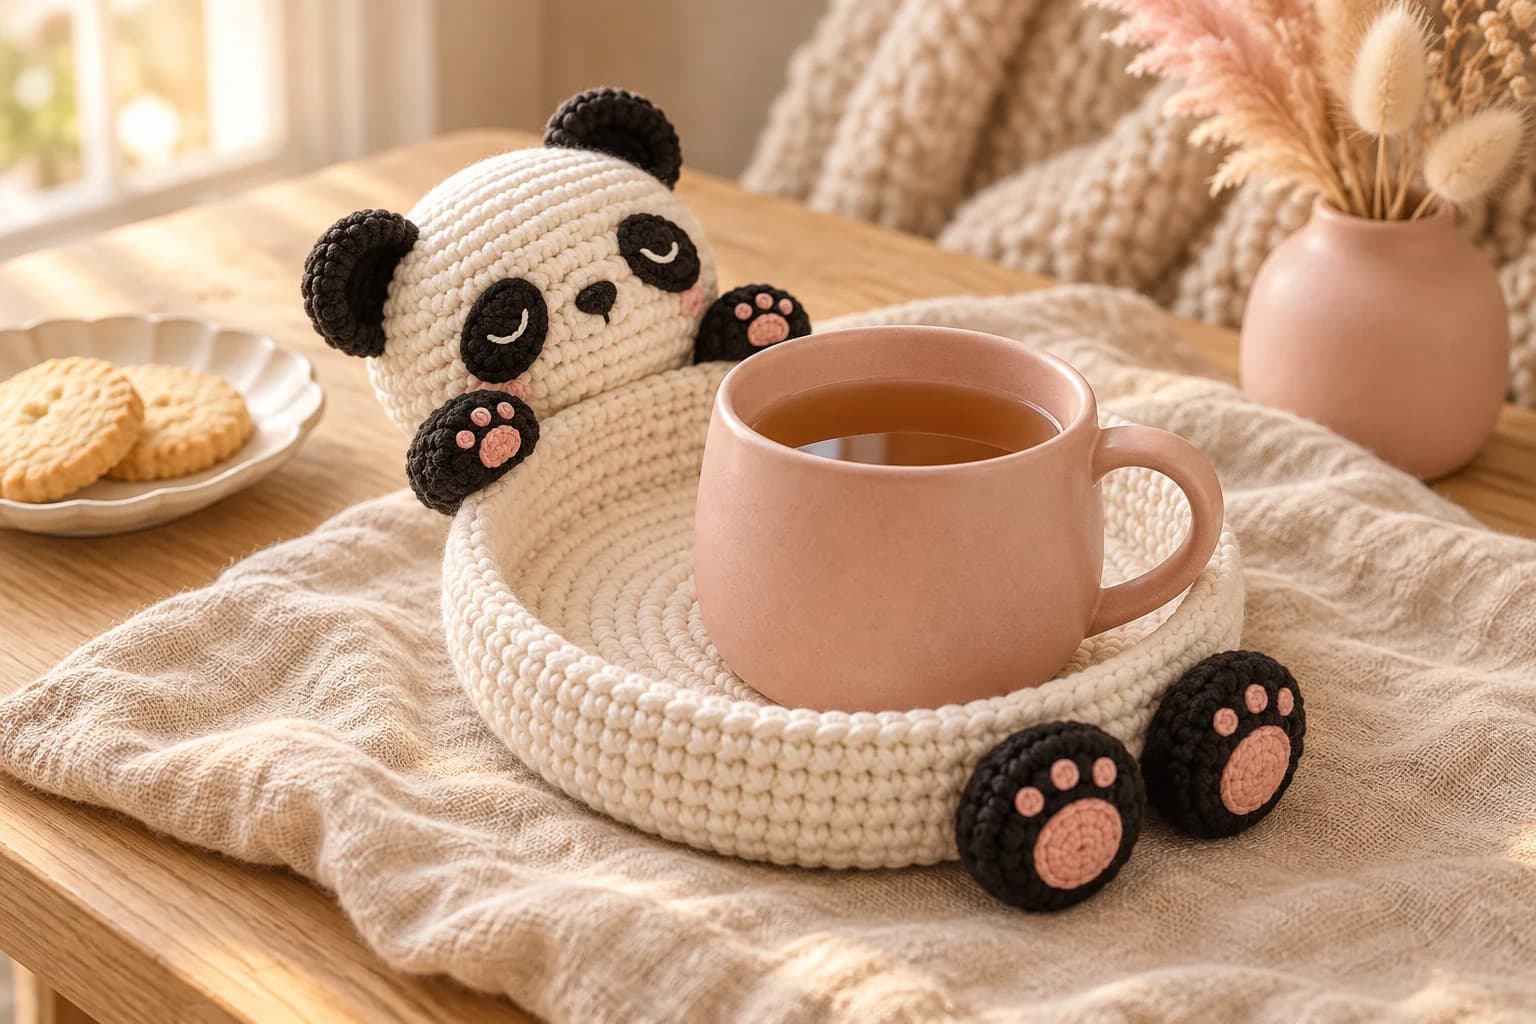
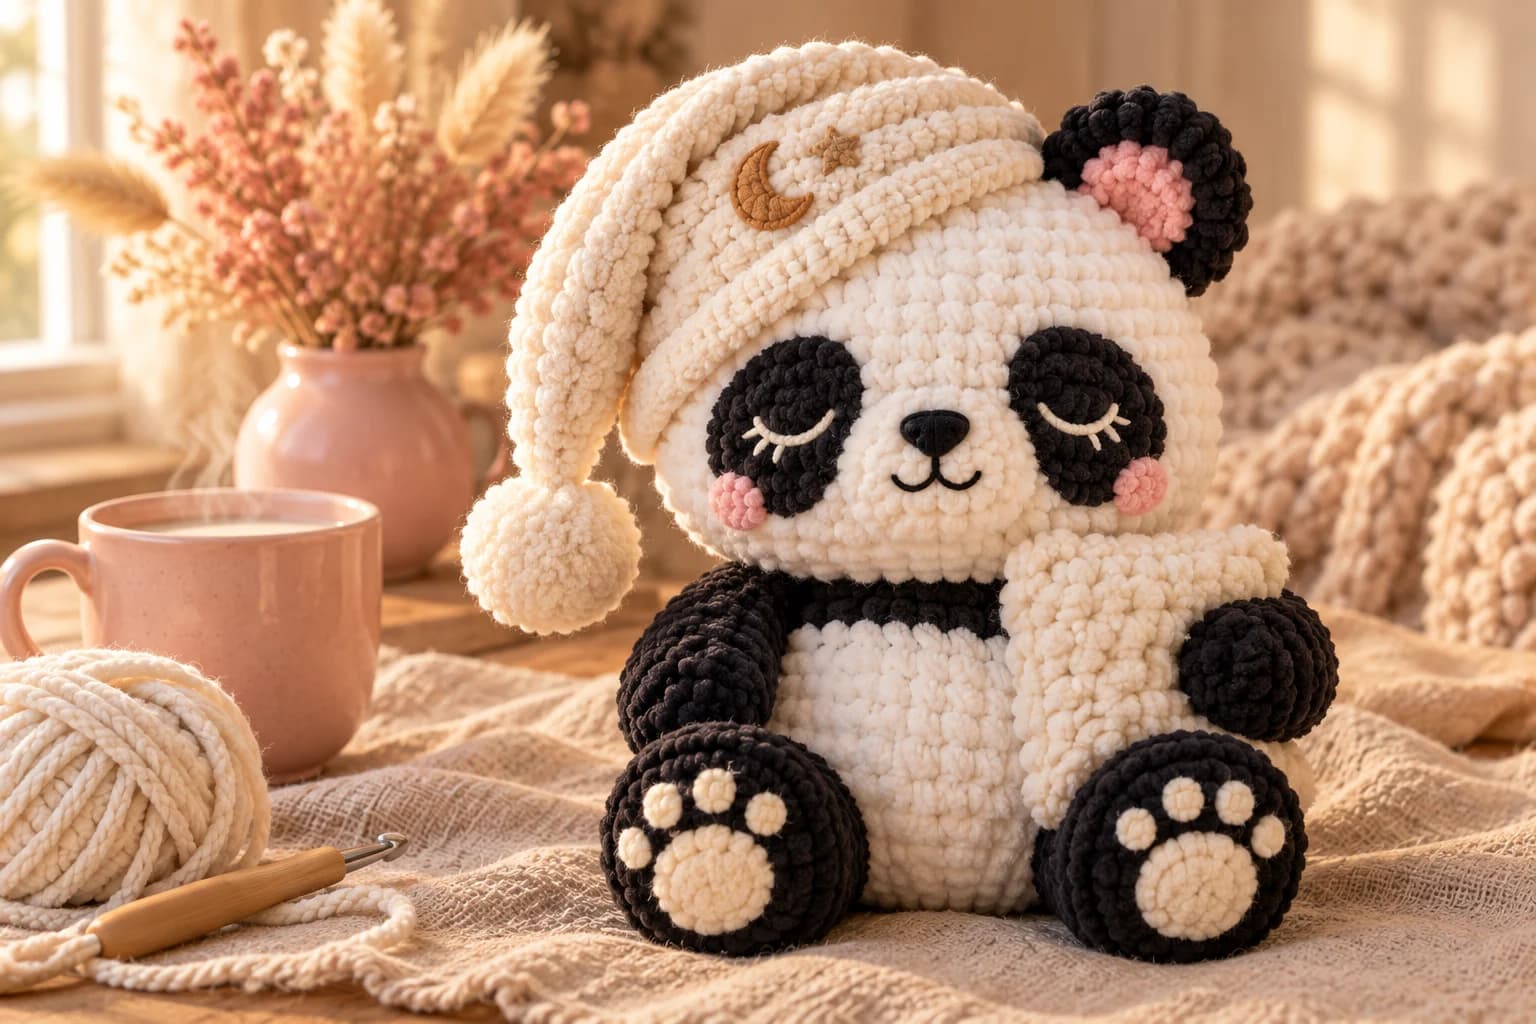
This cute crochet panda coaster is a little tray for your mug, with a sleepy panda hugging the rim. The coaster is a flat circle with a low wall. The panda is a stuffed head, two arms and two round feet with pink paw pads, all sewn around the outside. You'll need about 90 yards of worsted cotton in white, black and pink, a 3.5 mm hook and 3 to 4 hours.
Key Takeaways
- The coaster is a flat 4 in circle with a 3-round wall, so a mug sits inside without sliding.
- The panda only touches the outside wall, so the inside stays flat for your mug.
- The head sits on the table behind the coaster, which keeps the coaster level.
- About 90 yd (82 m) of worsted cotton, and no safety eyes or hardware.
Why I love this panda coaster
A plain coaster does its job. This one makes my afternoon tea feel like a tiny treat: every time I set my mug down, a sleepy panda is there holding it. It's a lovely gift for a coworker's desk, a panda fan or anyone who lives on tea.
The build is simple. The coaster is a classic flat circle in single crochet, with one back-loop round to turn up a neat wall. The panda is made of small amigurumi pieces in the round. Then you sew everything to the outside of the wall.
Doesn't the sleepy face make it? The black eye patches are tiny ovals, and a single white stitch on each one closes the eyes.
Skill level. Easy. You need a magic ring, sc, inc and dec in the round, working in back loops, a small oval worked around a chain, and some simple sewing and embroidery.
What you'll need
Yarn: worsted #4 cotton, such as Lily Sugar 'n Cream. Cotton soaks up drips and handles hot mugs, and it keeps the panda's shape crisp.
| Color | Used for | Amount |
|---|---|---|
| White | Coaster, head, sewing | about 60 yd |
| Black | Ears, eye patches, arms, feet, nose | about 25 yd |
| Soft pink | Paw pads, toes, cheeks | about 5 yd |
I worked those amounts out from the stitch counts: the coaster and head take about 900 single crochet, and the black pieces about 370, at about 2.2 in of worsted cotton each, plus tails.
Hook and notions
- 3.5 mm (US E/4) hook.
- Polyester fiberfill for the head, arms and feet.
- A tapestry needle, stitch markers, pins and scissors.
Gauge and finished size
Gauge: Rnds 1–9 of the coaster measure about 4 in (10 cm) across. The stitches should be tight enough that the stuffing doesn't show through the head.
Finished coaster: about 4½ in (11.5 cm) across with the wall, and 4 in across the flat inside. That fits most mugs. Whole panda: about 7 in (18 cm) from the top of the head to the feet. Measure your first one: a tighter or looser hand changes it a little.
Abbreviations (US crochet terms)
- MR = magic ring
- ch = chain
- sl st = slip stitch
- sc = single crochet
- inc = 2 sc in the same st
- dec = single crochet two together (I use the invisible decrease through the front loops)
- BLO = back loop only
- st(s) = stitch(es)
- rnd(s) = round(s)
Work in continuous rounds, without joining, unless the pattern says otherwise. Move a stitch marker up at the start of every round.
The pattern — step by step
Part 1 — The coaster
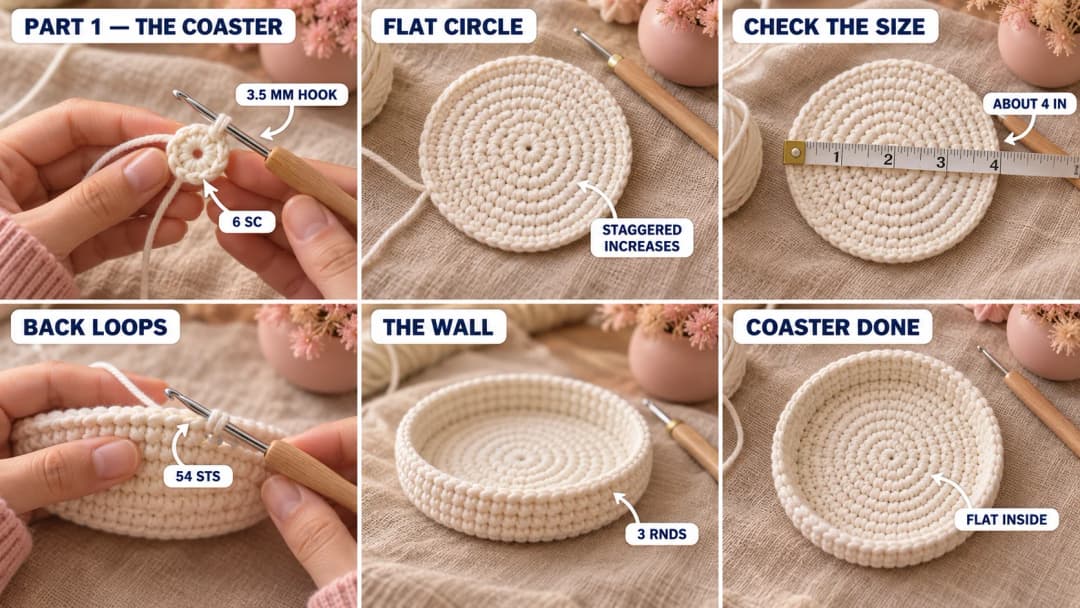
The magic ring is the center of the coaster. The increases are staggered every other round, so the circle stays round instead of turning into a hexagon.
With white:
- Rnd 1: MR, 6 sc in the ring. (6)
- Rnd 2: Inc × 6. (12)
- Rnd 3: (Sc, inc) × 6. (18)
- Rnd 4: (Sc, inc, sc) × 6. (24)
- Rnd 5: (3 sc, inc) × 6. (30)
- Rnd 6: (2 sc, inc, 2 sc) × 6. (36)
- Rnd 7: (5 sc, inc) × 6. (42)
- Rnd 8: (3 sc, inc, 3 sc) × 6. (48)
- Rnd 9: (7 sc, inc) × 6. (54)
Check the size here: the circle should be about 4 in across and lie flat. If it ruffles, go down half a hook size. If it cups, go up half a size.
- Rnd 10 (BLO): Sc in the back loop only of each st. (54) This turns the edge up into a wall.
- Rnds 11–12: Sc in each st around. (54)
Sl st in the next st and fasten off. Weave the tail in along the inside of the wall.
Part 2 — The head and face
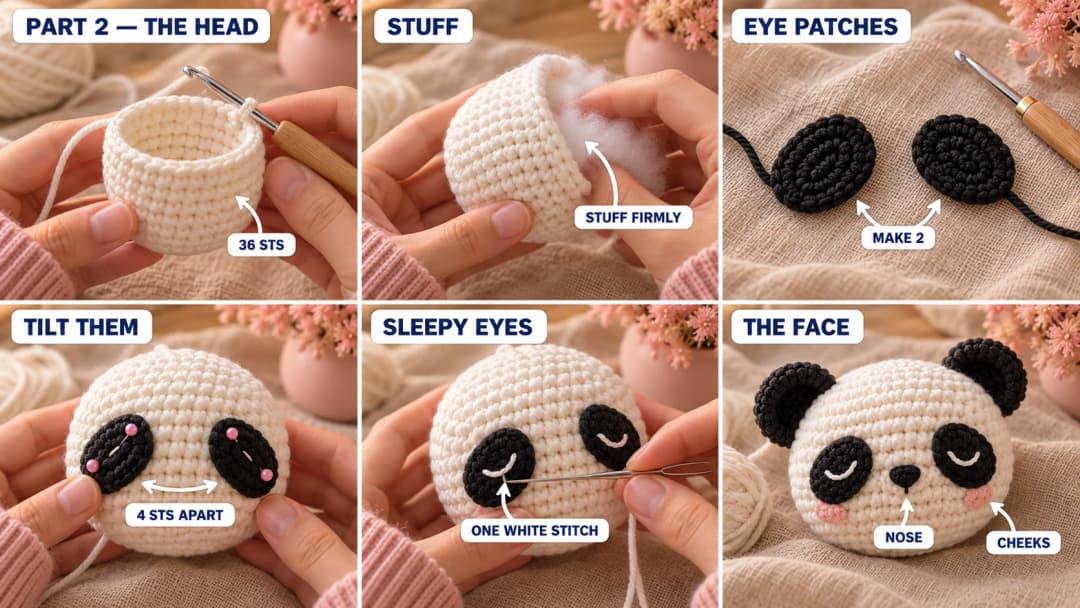
Head (white). The magic ring is the top of the head. The last round closes at the bottom of the head, under the chin.
- Rnd 1: MR, 6 sc in the ring. (6)
- Rnd 2: Inc × 6. (12)
- Rnd 3: (Sc, inc) × 6. (18)
- Rnd 4: (2 sc, inc) × 6. (24)
- Rnd 5: (3 sc, inc) × 6. (30)
- Rnd 6: (4 sc, inc) × 6. (36)
- Rnds 7–13: Sc in each st around. (36)
- Rnd 14: (4 sc, dec) × 6. (30)
- Rnd 15: (3 sc, dec) × 6. (24)
- Rnd 16: (2 sc, dec) × 6. (18)
Stuff the head firmly, shaping it into a round ball.
- Rnd 17: (Sc, dec) × 6. (12)
- Rnd 18: Dec × 6. (6)
Fasten off. Thread the tail through the front loops of the last 6 sts, pull the hole closed and weave the tail in.
Eye patches (black, make 2). Ch 5.
- Rnd 1: Sc in the 2nd ch from the hook, sc in the next 2 ch, 3 sc in the last ch. Turn to work along the other side of the chain: sc in the next 2 ch, 2 sc in the last ch. (10)
Sl st in the first sc and fasten off, leaving a 10-in tail. You have a small black oval.
Face.
- Eye patches. Pin the patches between Rnds 9 and 12, with 4 sts between them. Tilt each one so its outer end sits a little lower, the classic panda look. The end of the rounds should be at the back. Sew each patch down all around its edge with its tail.
- Sleepy eyes (white). On each patch, stitch one short curved line across the middle, curving down, like a closed eye.
- Nose (black). Centered between the patches, 1 round below them, make 4 or 5 short horizontal stitches over 2 sts, stacked into a small triangle pointing down. Add one short straight stitch down from its tip.
- Cheeks (pink). Make 3 short stitches side by side under the outer end of each patch, for a soft oval blush.
Part 3 — Ears, arms and feet
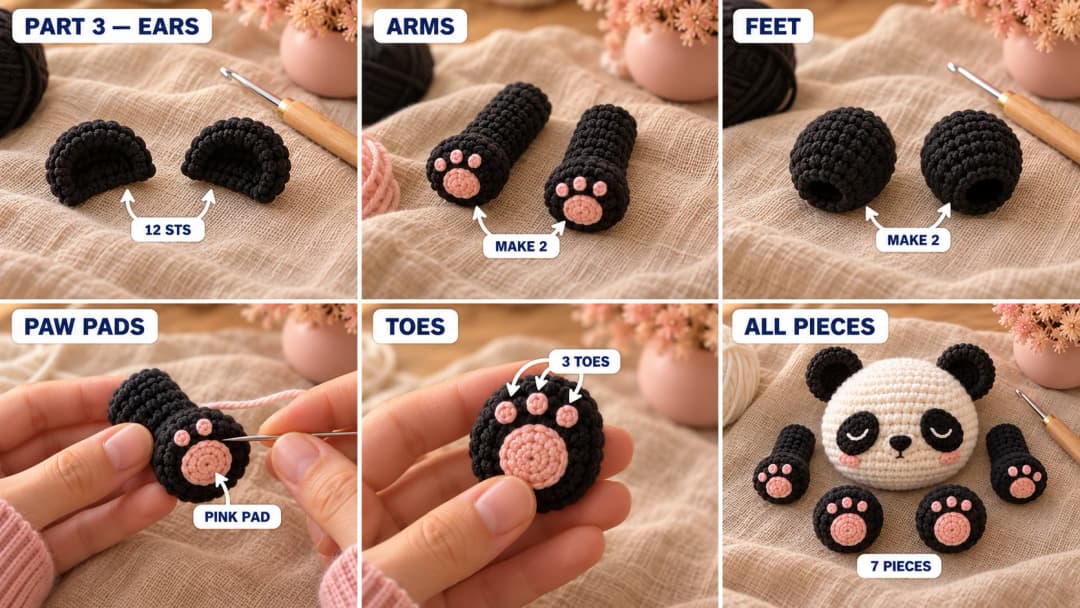
Ears (black, make 2).
- Rnd 1: MR, 6 sc in the ring. (6)
- Rnd 2: Inc × 6. (12)
- Rnd 3: Sc in each st around. (12)
Sl st in the next st and fasten off, leaving a 12-in tail. Don't stuff the ears: press them flat into little half-cups.
Arms (black, make 2). The magic ring is the tip of the paw, where the pink pad goes. The open end is the shoulder, where you sew it on.
- Rnd 1: MR, 6 sc in the ring. (6)
- Rnd 2: (Sc, inc) × 3. (9)
- Rnds 3–6: Sc in each st around. (9)
Stuff the paw end lightly and leave the rest soft.
- Rnd 7: (Sc, dec) × 3. (6)
Fasten off, leaving a 15-in tail. Leave the end open.
Feet (black, make 2). The magic ring is the sole, where the pink pad goes. The open end is where you sew it on.
- Rnd 1: MR, 6 sc in the ring. (6)
- Rnd 2: Inc × 6. (12)
- Rnd 3: (Sc, inc) × 6. (18)
- Rnds 4–5: Sc in each st around. (18)
Stuff lightly, so the foot stays round with a flat sole.
- Rnd 6: (Sc, dec) × 6. (12)
Fasten off, leaving a 15-in tail. Leave the end open.
Paw pads (pink).
- Arm pads (make 2): MR, 6 sc in the ring. (6) Sl st in the first sc and fasten off, leaving an 8-in tail.
- Foot pads (make 2): MR, 6 sc in the ring, then (sc, inc) × 3. (9) Sl st in the next st and fasten off, leaving an 8-in tail.
Sew one small pad on the magic-ring end of each arm and one bigger pad on the sole of each foot, a little below the center. Toes: with pink, make 3 small French knots (wrap the yarn twice) in a curved row just above each pad.
Part 4 — Putting the panda together
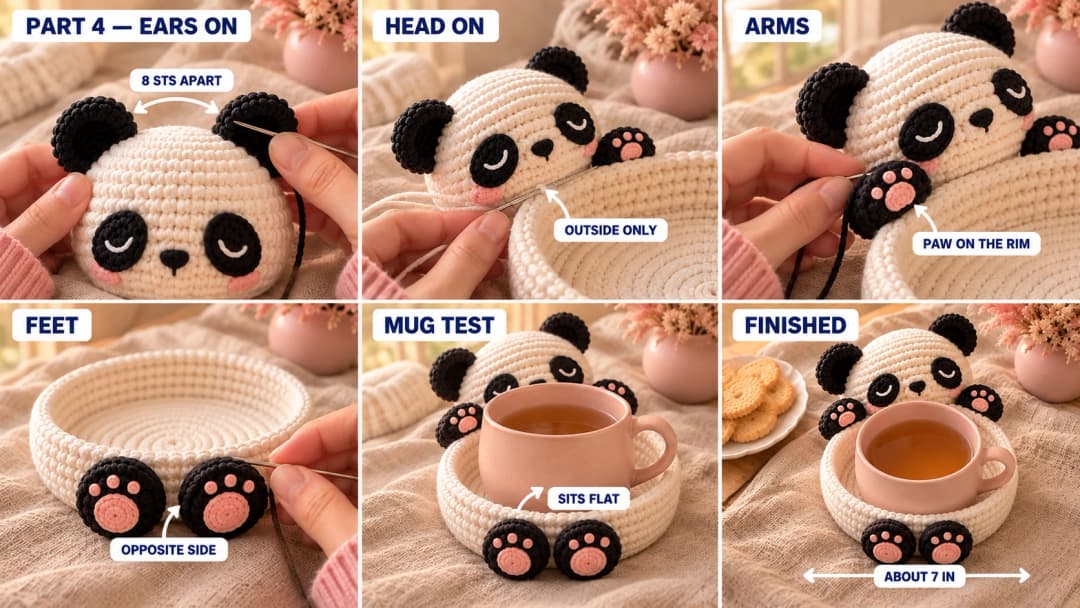
- Ears. Pin the ears on the top of the head, between Rnds 4 and 7, with about 8 sts between them, cupped side facing the same way as the face. Sew them down all around the base with their tails.
- Place the head. Set the coaster flat on the table. Sit the head upright on the table, right behind the coaster, ears up and face looking across the coaster. The lower part of the face, at the cheeks and chin, presses against the outside of the wall. The head should rest on the table, not on the coaster.
- Sew the head. Cut a 30-in (75 cm) piece of white yarn. Sew along the area where the head meets the wall, about 2 in long. Go through the outer side of the wall stitches only, so nothing shows inside the coaster. Go around twice, then knot the yarn inside the head and hide the end.
- Arms. Pin one arm on each side of the head, the shoulder end against the outside of the wall, right next to the head. Bend each arm forward so the paw rests on top of the rim, pink pad facing out. Sew the shoulder end all around to the wall with its tail. Then tack the paw to the top of the rim with 3 or 4 stitches, so it looks like the panda is hugging the coaster.
- Feet. On the opposite side of the coaster, pin the two feet against the outside of the wall, close together (about 4 sts apart), pink soles facing out. Each foot should rest on the table. Sew the open end all around to the wall with its tail.
- Finish. Weave in every tail on the inside of the pieces, then trim it.
Set a mug inside and check that it sits flat. If a paw pushes the rim in, tack it a little further back.
Care and safety. The coaster is made for mugs and cups, not for pans straight off the stove. The flat cotton tray handles a hot mug, but keep the stuffed head away from direct heat. To clean it, spot wash with a damp cloth and mild soap, or hand wash it in cool water, press it in a towel and let it dry flat. There are no safety eyes or hardware, but it's a kitchen piece, not a toy.
Make it yours — quick variations
| Variation | Change from base pattern |
|---|---|
| Polar bear | Make the ears, arms and feet in white, skip the eye patches and embroider black sleepy eyes on the face. |
| Brown bear | Work everything in caramel brown, with a cream muzzle sewn under the eyes. |
| Coaster set | Make four coasters and give each panda a different cheek color. |
| Mug rug | Add 3 more increase rounds before Rnd 10 for a 5½ in tray that holds a mug and a cookie. |
| Hanging panda | Skip the feet and sew the arms over the rim so the panda peeks in from the edge. |
Troubleshooting the three things that go wrong
The coaster ruffles or cups
A wavy circle means too many stitches for your tension, and a cupped one means too few. Check Rnd 9 against the 4-in mark. Change your hook half a size and work the circle again before you start the wall.
The coaster tips toward the panda
The head sits on the coaster instead of on the table. Unpick the seam, lower the head so it rests on the table, and sew it only to the outer side of the wall. The feet should touch the table too.
The mug doesn't sit flat
The paws push the rim inward. Tack each paw on the very top of the rim, not on its inner side. Sew the shoulders a little lower on the wall if the arms are pulling.
Frequently asked questions
How long does this panda coaster take? About 3 to 4 hours. The coaster takes about an hour, the head and face about an hour and a half, and the small pieces and sewing another hour or so.
How much yarn do I need? About 90 yd (82 m) of worsted cotton in all: about 60 yd of white, 25 yd of black and 5 yd of pink. One ball of each color is plenty for a set.
Can I use acrylic yarn? You can, but cotton is better for a coaster. It absorbs drips and condensation, and it handles a hot mug. Acrylic can feel slick under a cup and doesn't soak up water.
Will a big mug fit? The flat inside is about 4 in across, which fits most mugs. For a wide mug, add one more increase round (60 sts) before Rnd 10, and work the wall with 60 sts.
Can I sell coasters made from this pattern? Yes, you're welcome to sell finished coasters made from this free pattern at markets, on Etsy or as gifts. Please credit "Pattern by Wavode" in your listing and link back to this page. What you can't do is republish this write-up or my photos as your own pattern.
Related patterns on Wavode
- Panda keychain: a round little panda to carry with you.
- Crochet daisy coaster: a flower coaster for spring tables.
- Ocean wave crochet coaster: a striped coaster in sea blues.
- Daisy crochet potholder: a matching piece for the kitchen.
Made a panda coaster? Tag #wavodecrochet on Pinterest. I re-pin every finished make and credit the maker.
Pattern by Clara Hartwell for Wavode. Questions? Email me at support@wavode.com.