Sleepy Panda Crochet Pattern

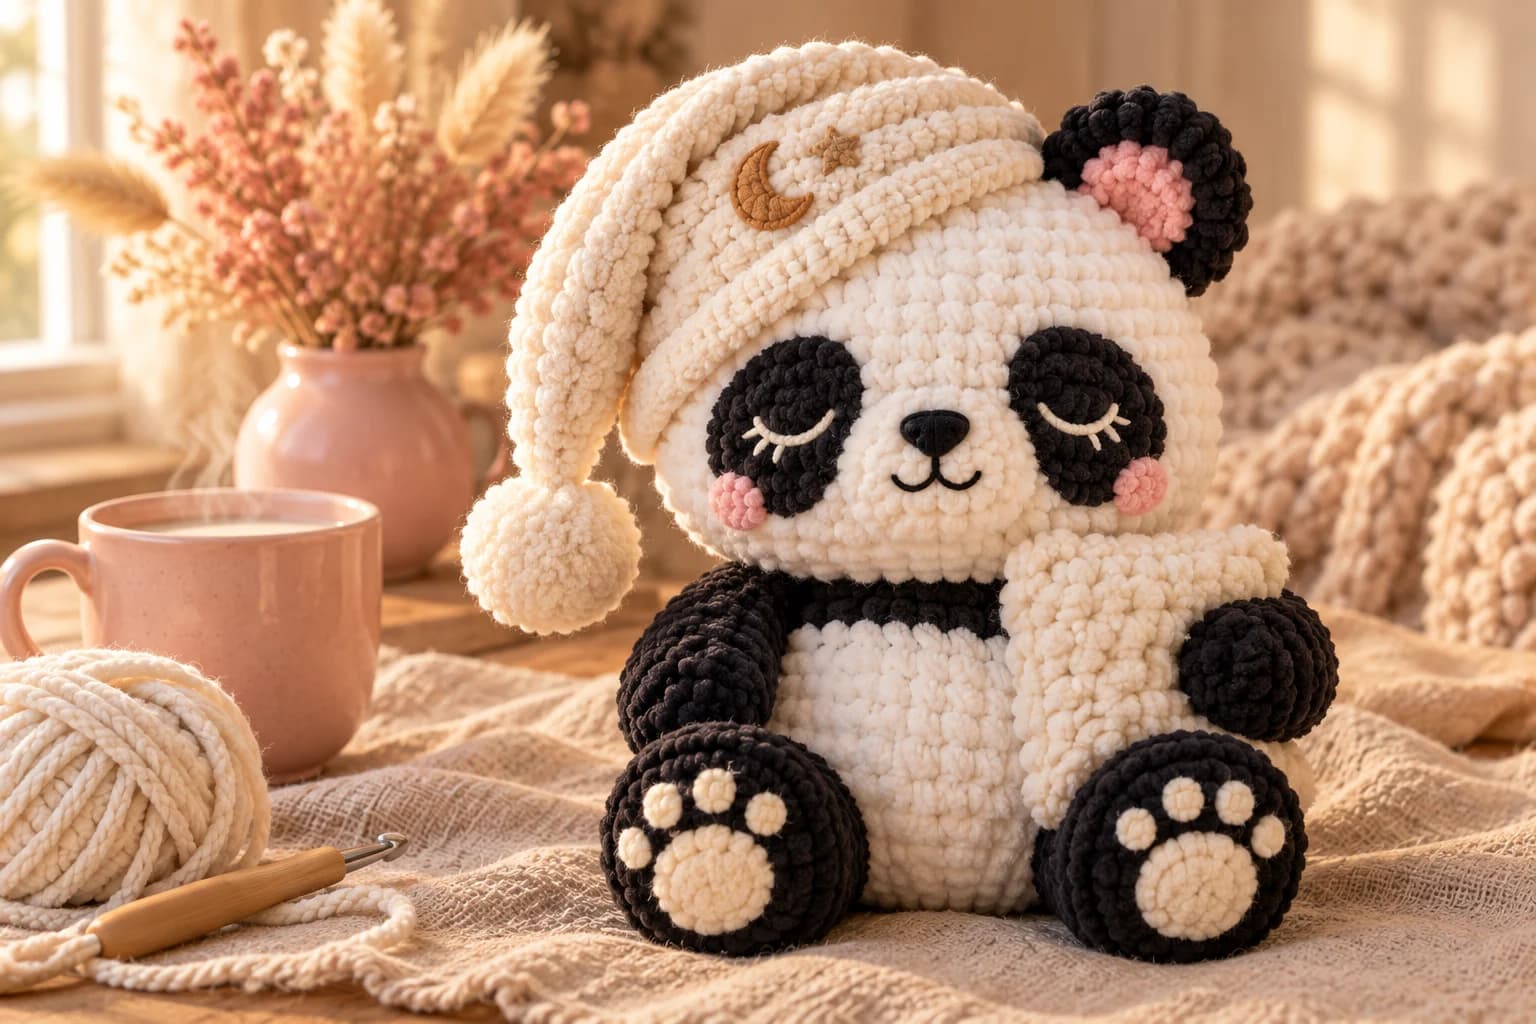
This free sleepy panda crochet pattern makes a soft plush panda, about 10 inches tall, dozing in a moon nightcap with a little pillow under its arm. It's worked in plush chenille yarn on a 5 mm hook, all in single crochet. The eyes are embroidered closed, so there are no safety eyes at all. Plan on about 290 yards of yarn and 5 to 7 hours.
Key Takeaways
- Plush chenille, super bulky #6: white, black and cream, plus worsted scraps for the face.
- No safety eyes: the sleepy eyes are two curved lines stitched on the black patches.
- The nightcap is one long cone with a folded cuff and a crocheted pom-pom.
- Budget ~290 yd (265 m): about 125 yd white, 75 yd black, 90 yd cream.
Why I love this sleepy panda
I like bedtime toys that look as tired as the child holding them. This panda's whole charm is in the closed eyes. Two little curves with tiny lashes, stitched in cream on black patches, and suddenly it looks like it fell asleep mid-hug.
The plush yarn does the rest. Chenille hides small tension wobbles, so the head comes out round and smooth even if your rounds aren't perfect. And since the eyes are embroidered, there's nothing hard to pull off.
The nightcap is my favorite part. It's a long cone that starts at the pom-pom and grows to fit the head, with a folded cuff and a moon and star stitched on the side. Who could say no to a panda in a nightcap?
Skill level. Easy to intermediate. You need a magic ring, sc, inc and dec in the round, a few rows for the pillow, and simple embroidery. Chenille is a little harder to count, so I'll show you how to keep track.
What you'll need
Yarn: super bulky #6 plush chenille, such as Bernat Baby Blanket or Bernat Blanket. It's soft, it washes well and it makes a big plush quickly.
| Color | Used for | Amount |
|---|---|---|
| White | Head, body | about 125 yd (110–140 yd) |
| Black | Eye patches, ears, shoulder band, arms, legs | about 75 yd (65–85 yd) |
| Cream | Nightcap, pom-pom, pillow, paw pads | about 90 yd (80–100 yd) |
| Pink (plush) | Inner ears | about 2 yd |
Embroidery (worsted scraps): black for the nose and mouth, cream for the closed eyes, pink for the cheeks, and tan or gold for the moon and star. Worsted is much easier to embroider with than chenille.
I worked the chenille amounts out from the stitch counts: about 1,030 single crochet in white, 600 in black and 710 in cream, at roughly 4 inches of plush yarn each, plus sewing tails.
Hook and notions
- 5 mm (US H-8) hook. It's much smaller than the label suggests. Plush yarn needs a tight fabric, or the stuffing shows between the stitches.
- About 5 oz (140 g) of polyester fiberfill.
- Stitch markers (several), a large-eye tapestry needle, pins and scissors.
Gauge and finished size
Gauge isn't critical, but tension is. Your stitches should be tight enough that the stuffing doesn't show through. As a check, Rnd 7 of the head (42 sc) should measure about 6 in (15 cm) across lying flat. If it's much bigger, go down to a 4.5 mm hook.
Finished panda: about 10 in (25 cm) tall sitting, plus the cap. The head is about 6 in wide. Measure your first one: plush yarns vary a lot from brand to brand.
Abbreviations (US crochet terms)
- ch = chain
- sl st = slip stitch
- sc = single crochet
- inc = 2 sc in the same stitch
- dec = single crochet two together
- BLO = back loop only
- MR = magic ring
- st(s) = stitch(es)
- rnd(s) = round(s)
UK crocheters: this pattern uses US terms. US single crochet = UK double crochet.
Work every piece in continuous spiral rounds, unless the pattern says to turn. Move your marker up to the first stitch of every new round.
Counting in chenille. The pile hides the stitches, so it's easy to lose your place. Put a marker in the first stitch of every round, and leave the old markers in until the piece is done. To find the top of a stitch, feel for the little V with your fingertip rather than looking for it.
The pieces at a glance
| Piece | Color | Make | Size |
|---|---|---|---|
| Head | white | 1 | 42 sts at the widest |
| Eye patch | black | 2 | a 14-st oval |
| Ear | black + pink | 2 | a small cup, 12 sts |
| Body | white + black | 1 | 36 sts at the widest |
| Arm | black | 2 | about 4 in long |
| Leg | black (+ cream pads) | 2 | a round foot, 18 sts |
| Nightcap | cream | 1 | a long cone, 42 sts at the cuff |
| Pom-pom | cream | 1 | a small ball |
| Pillow | cream | 1 | two 8-st squares |
The pattern — step by step
Part 1 — The head and sleepy face
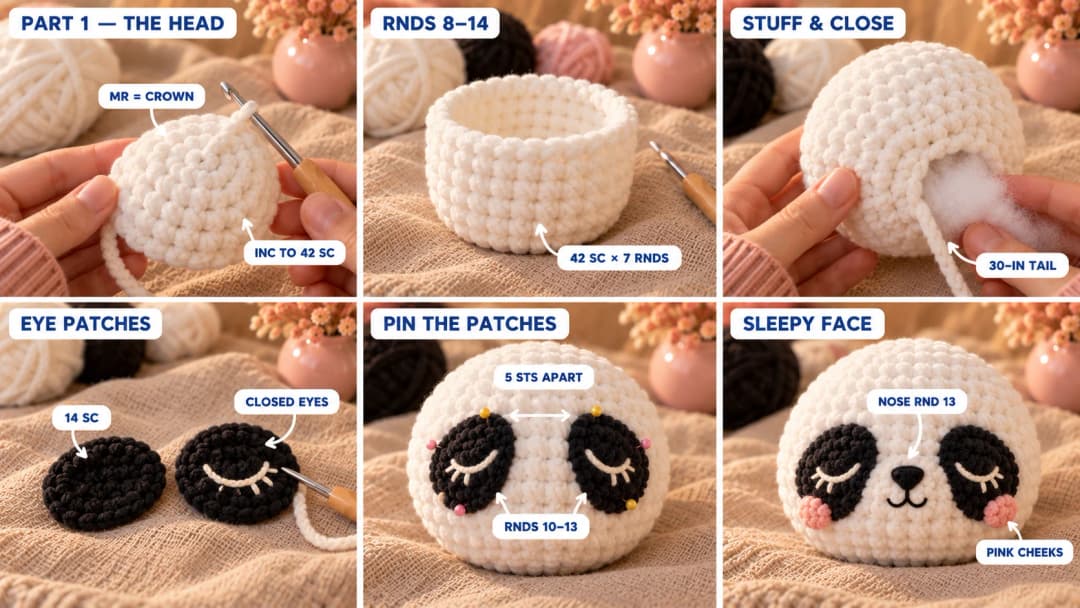
With white. The magic ring is the crown of the head. The last round is the bottom, at the neck.
- Rnd 1: MR, 6 sc in the ring. (6)
- Rnd 2: Inc in each st around. (12)
- Rnd 3: (Sc, inc) × 6. (18)
- Rnd 4: (2 sc, inc) × 6. (24)
- Rnd 5: (3 sc, inc) × 6. (30)
- Rnd 6: (4 sc, inc) × 6. (36)
- Rnd 7: (5 sc, inc) × 6. (42)
- Rnds 8–14: Sc in each st around, 7 rounds. (42)
- Rnd 15: (5 sc, dec) × 6. (36)
- Rnd 16: (4 sc, dec) × 6. (30)
- Rnd 17: (3 sc, dec) × 6. (24)
Stuff firmly, shaping the head round.
- Rnd 18: (2 sc, dec) × 6. (18)
- Rnd 19: (Sc, dec) × 6. (12)
- Rnd 20: Dec × 6. (6)
Top up the stuffing. Fasten off, leaving a 30-in (75 cm) tail. Thread it through the front loops of the last 6 sts and pull closed. Keep this tail: it sews the head to the body.
Eye patches (make 2, black). Worked around a chain, so they come out oval.
- Rnd 1: Ch 4. Sc in the 2nd ch from the hook and in the next ch, 3 sc in the last ch. Working along the other side of the chain, sc in the next ch, 2 sc in the last ch. (8)
- Rnd 2: Inc, sc, inc in each of the next 3 sts, sc, inc in each of the last 2 sts. (14)
Sl st in the next st and fasten off, leaving a 12-in tail.
Embroider the closed eyes now, while the patches are flat. With cream worsted, make a gentle downward curve across the middle of each patch, using 3 or 4 short back stitches. Then add 3 tiny lashes: short straight stitches hanging down from the curve. Take your time here: this is the panda's whole expression.
Sew the face. Choose the side opposite the start of your rounds as the front.
- Eye patches: pin them over Rnds 10–13, with about 5 sts between their inner edges. Tilt each one so its outer end sits a little lower. Sew all around each patch with its tail.
- Nose (black worsted): fill a small upside-down triangle between the patches, on Rnd 13, about 2 sts wide, with straight stitches.
- Mouth (black worsted): one short stitch down from the nose, then a small curve to each side, like a little smile, on Rnd 14.
- Cheeks (pink worsted): a few short straight stitches on Rnd 14, just below the outer end of each patch.
Part 2 — The ears and body
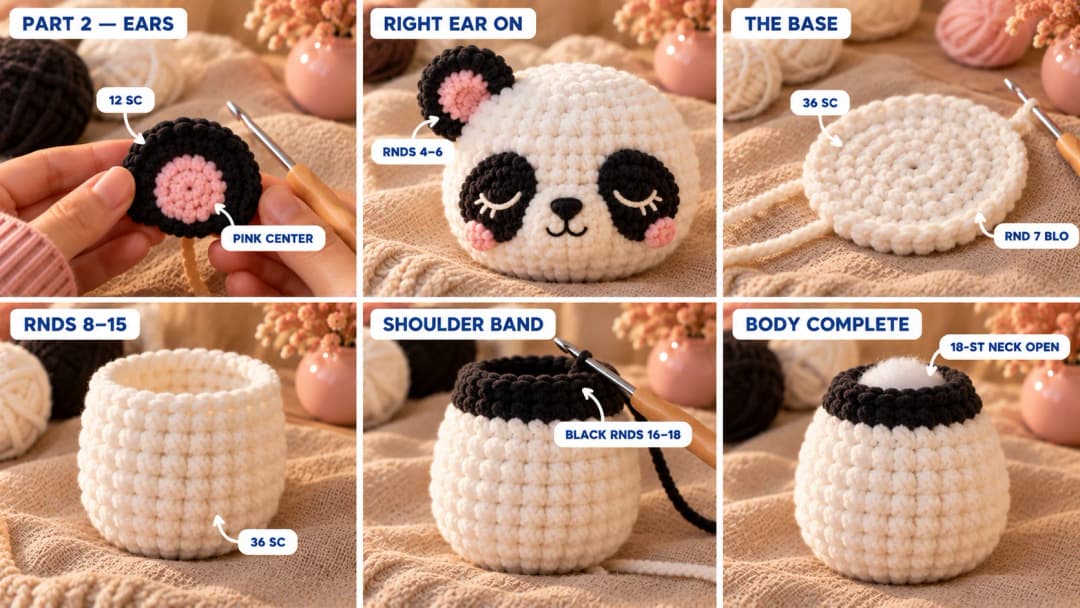
Ears (make 2, black).
- Rnd 1: MR, 6 sc in the ring. (6)
- Rnd 2: Inc in each st around. (12)
- Rnds 3–4: Sc in each st around, 2 rounds. (12)
Fasten off, leaving a 12-in tail. Don't stuff. Flatten each ear into a half-circle.
Inner ears (make 2, pink plush). MR, 6 sc in the ring. Sl st in the first sc and fasten off. Sew one inside each ear, toward the bottom edge.
Sew the ears. The nightcap covers one side of the head, so only one ear shows: the one on the right as you face the panda. Sew it on Rnds 4–6, about 4 sts back from the edge of that eye patch. The second ear is up to you: sew it in the mirror position if you'd like your panda to look complete without its cap, or keep it as a spare.
Body. The magic ring is the base the panda sits on. The last round is the neck.
With white:
- Rnd 1: MR, 6 sc in the ring. (6)
- Rnd 2: Inc in each st around. (12)
- Rnd 3: (Sc, inc) × 6. (18)
- Rnd 4: (2 sc, inc) × 6. (24)
- Rnd 5: (3 sc, inc) × 6. (30)
- Rnd 6: (4 sc, inc) × 6. (36)
- Rnd 7: BLO sc in each st around. (36) This makes the edge of the flat base.
- Rnds 8–13: Sc in each st around, 6 rounds. (36)
- Rnd 14: (4 sc, dec) × 6. (30)
- Rnd 15: Sc in each st around. (30)
Change to black for the shoulder band:
- Rnd 16: Sc in each st around. (30)
- Rnd 17: (3 sc, dec) × 6. (24)
Stuff the body firmly, pressing the base flat so it sits steady.
- Rnd 18: (2 sc, dec) × 6. (18)
Top up the stuffing. Sl st in the next st and fasten off. Leave this 18-st neck open: the head sits on it.
Part 3 — The arms and legs
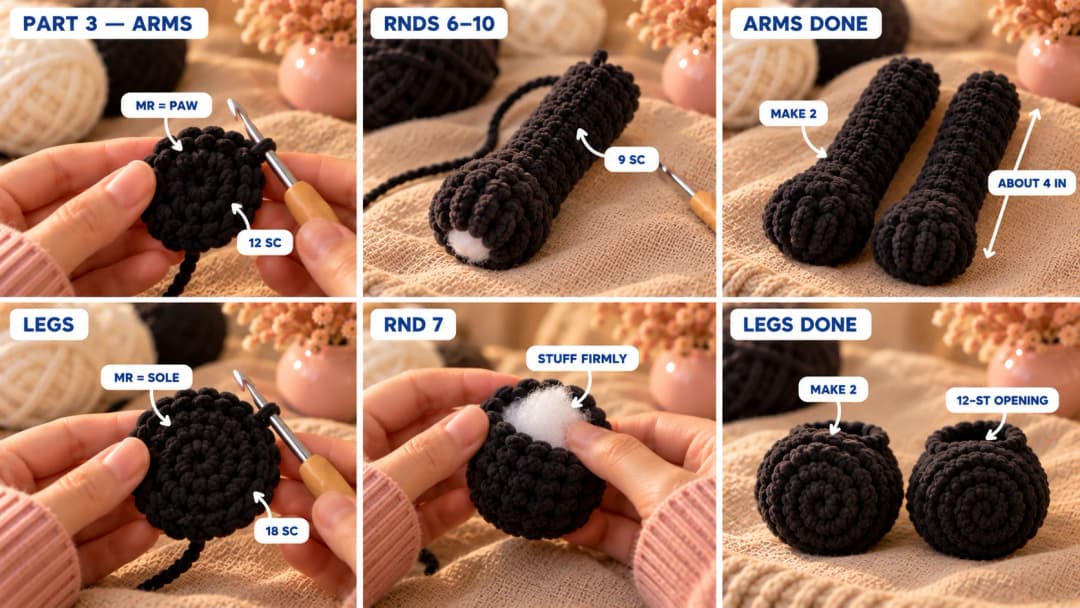
Arms (make 2, black). The magic ring is the paw. The last round is the shoulder.
- Rnd 1: MR, 6 sc in the ring. (6)
- Rnd 2: Inc in each st around. (12)
- Rnds 3–4: Sc in each st around, 2 rounds. (12)
- Rnd 5: (2 sc, dec) × 3. (9)
- Rnds 6–10: Sc in each st around, 5 rounds. (9)
Stuff the paw end, leaving the top of the arm soft so it can bend. Flatten the opening and sew it closed, leaving a 15-in tail.
Legs (make 2, black). The magic ring is the sole of the foot, which faces forward when the panda sits.
- Rnd 1: MR, 6 sc in the ring. (6)
- Rnd 2: Inc in each st around. (12)
- Rnd 3: (Sc, inc) × 6. (18)
- Rnds 4–6: Sc in each st around, 3 rounds. (18)
- Rnd 7: (Sc, dec) × 6. (12)
Stuff firmly. Sl st in the next st and fasten off, leaving a 15-in tail. Leave the 12-st opening: it sews flat against the body.
Paw pads (cream, optional). They make the feet extra sweet. For each foot, make one big pad: ch 4, then work Rnd 1 of the eye patch (8), sl st and fasten off. Then make 4 toe beans: MR, 5 sc in the ring, sl st to close, fasten off. Sew the big pad on the lower half of each sole, and the 4 toe beans in an arc above it.
Part 4 — The nightcap and pom-pom
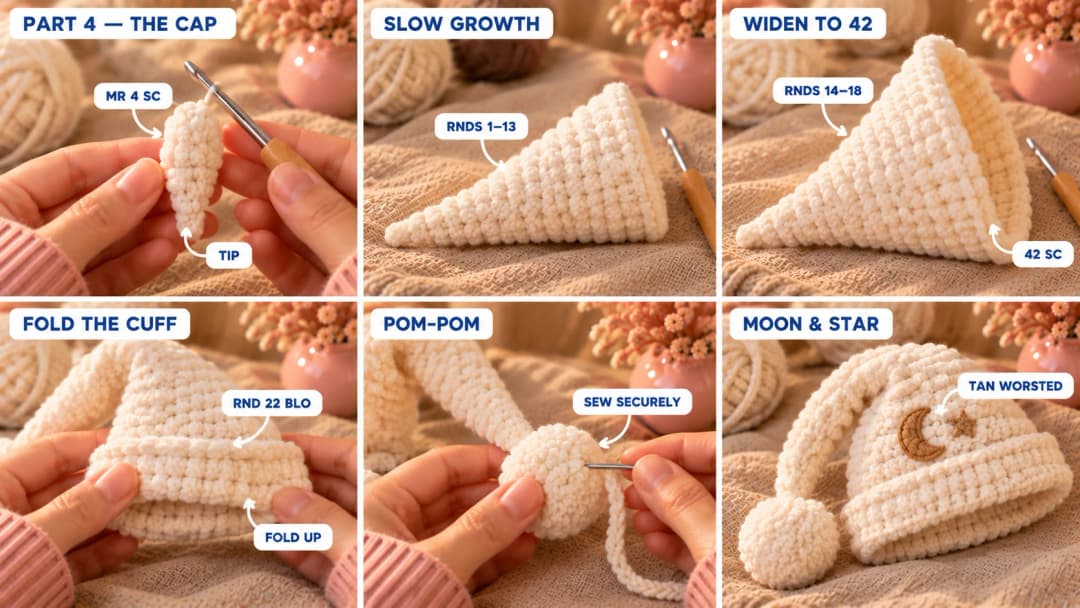
Nightcap (cream). Worked from the tip down to the cuff. The tip stays narrow for a long way, so it flops over.
- Rnd 1: MR, 4 sc in the ring. (4)
- Rnd 2: Sc in each st around. (4)
- Rnd 3: (Sc, inc) × 2. (6)
- Rnds 4–5: Sc in each st around, 2 rounds. (6)
- Rnd 6: (2 sc, inc) × 2. (8)
- Rnds 7–8: Sc in each st around, 2 rounds. (8)
- Rnd 9: (3 sc, inc) × 2. (10)
- Rnds 10–11: Sc in each st around, 2 rounds. (10)
- Rnd 12: (4 sc, inc) × 2. (12)
- Rnd 13: Sc in each st around. (12)
- Rnd 14: (Sc, inc) × 6. (18)
- Rnd 15: (2 sc, inc) × 6. (24)
- Rnd 16: (3 sc, inc) × 6. (30)
- Rnd 17: (4 sc, inc) × 6. (36)
- Rnd 18: (5 sc, inc) × 6. (42)
- Rnds 19–21: Sc in each st around, 3 rounds. (42)
- Rnd 22: BLO sc in each st around. (42) This ridge is the fold line of the cuff.
- Rnds 23–24: Sc in each st around, 2 rounds. (42)
Sl st in the next st and fasten off, leaving a 20-in tail. Fold Rnds 23–24 up to the outside along the ridge to make a doubled cuff. Don't stuff the cap: the tip should hang soft.
Pom-pom (cream).
- Rnd 1: MR, 6 sc in the ring. (6)
- Rnd 2: Inc in each st around. (12)
- Rnds 3–4: Sc in each st around, 2 rounds. (12)
Stuff it firmly.
- Rnd 5: Dec × 6. (6)
Fasten off, close the hole and sew the pom-pom to the tip of the cap with the tail. Go through the tip several times so it can't pull off.
Moon and star. With tan or gold worsted, outline a small crescent moon on the cap, just above the cuff, about 1 in tall, then fill it with satin stitch so it looks solid. Add a tiny star beside it: three straight stitches crossed in the middle, filled in the same way. Place them on the side that will face forward when the cap is on.
Part 5 — The pillow and assembly
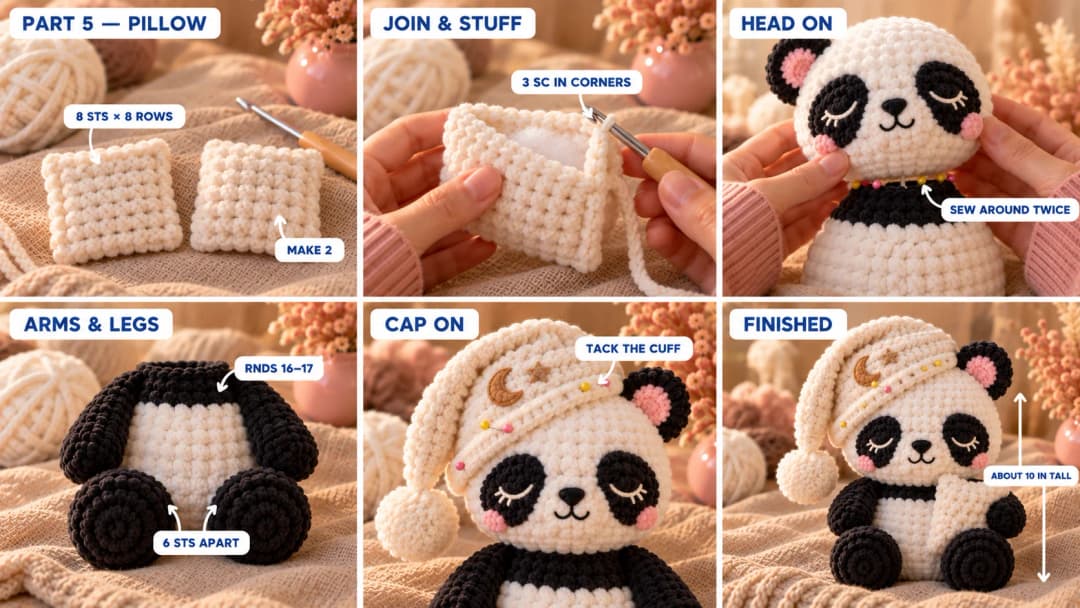
Pillow (cream). Two squares, worked in rows.
- Row 1: Ch 9. Sc in the 2nd ch from the hook and in each ch across. (8)
- Rows 2–8: Ch 1, turn. Sc in each st across. (8)
Fasten off. Make a second square, but don't fasten off. Hold the two squares together and sc through both layers around three sides, working 3 sc in each corner. Stuff the pillow lightly, then sc along the last side to close it. Fasten off and hide the end inside.
Put the panda together.
- Head on body. Set the head on the open neck, face forward, with the black band under the chin. Pin it. With the head's 30-in tail, sew all the way around the neck twice, going deep into both pieces, so the head doesn't wobble. Add a little stuffing in the neck before you close the last stitches.
- Arms. Sew each arm to the side of the body on the black shoulder band, Rnds 16–17, angled slightly forward.
- Legs. Pin each leg to the front of the body, near the base, over Rnds 8–12, with about 6 sts between them. The soles face forward, and the bottoms of the feet rest on the table. Sew all around each open end.
- Nightcap. Pull the cap onto the head at a slant, with the moon at the front. The cuff runs across the forehead just above the eye patches, rising toward the ear and dropping down over the left side as you face the panda, where there's no ear. Pin it, then tack the cuff to the head all the way around with the cap's tail. Let the long tip fall over that same side, and tack it to the cuff with 2 stitches so the pom-pom hangs beside the face.
- Pillow. Tuck the pillow under the arm on the right as you face the panda, against the chest. Tack the paw and the corner of the pillow together with a few stitches, so the panda keeps hold of it.
Weave in all your ends inside the body. Your sleepy panda is ready for bed.
Safety and care. There are no safety eyes or hard parts, which makes this panda a good choice for little ones. Still, sew every seam twice, go through the pom-pom and the pillow corner several times, and check the plush now and then for loose stitches. Chenille can shed fibers if a stitch breaks. To clean it, hand wash in cool water or use a gentle machine cycle in a mesh bag, then let it air dry.
Make it yours — quick variations
| Variation | Change from base pattern |
|---|---|
| Pastel nightcap | Make the cap and pillow in blush pink or sage green. |
| Awake panda | Use 15 mm safety eyes in the patches instead of closed eyes (not for under 3). |
| Starry pillow | Embroider three tiny stars on the pillow with the moon color. |
| Two-ear panda | Sew both ears on and skip the cap, or let the cap rest behind the ears. |
| Smaller panda | Use worsted #4 yarn and a 3.5 mm hook. Same rounds, about 6 in tall. |
Troubleshooting the three things that go wrong
I lose count in the chenille
It happens to everyone. Leave a marker in the first stitch of every round instead of moving one marker up. If you lose your place, count the markers, not the stitches. And avoid ripping back too often: chenille gets bald and wiry when you frog it.
The face looks grumpy, not sleepy
It's the curve of the eyes. A curve that bends down in the middle with lashes underneath reads as sleepy. A curve that bends up reads as squinting. Also check the patches: their outer ends should sit a little lower than the inner ends.
The cap slides off
The cuff isn't tacked down enough. Stitch it to the head every 2 or 3 sts all the way around, going into the head stitches, not just the surface fuzz.
Frequently asked questions
How long does the sleepy panda take? About 5 to 7 hours. Plush yarn grows fast: the head takes about an hour and a half, the body about an hour, and the cap about an hour. The face embroidery, limbs, pillow and sewing take the rest.
How much yarn do I need? About 290 yd (265 m) of super bulky #6 plush yarn: about 125 yd white, 75 yd black and 90 yd cream, plus a little pink and some worsted scraps for the face. One skein of each main color is enough.
Is this panda safe for a baby? It has no safety eyes, buttons or wire, so there are no hard parts to come loose. Sew every seam twice, secure the pom-pom and pillow well, and check the toy regularly. As with any soft toy, keep it out of the crib for babies under 12 months.
Can I use regular yarn instead of chenille? Yes. With worsted #4 yarn and a 3.5 mm hook, the same rounds make a panda about 6 in tall. The stitches will show more, so keep your tension even. My crochet lion plush is a good worsted pattern to warm up on.
Can I sell pandas made from this pattern? Yes, you're welcome to sell finished pandas made from this free pattern at markets, on Etsy or as gifts. Please credit "Pattern by Wavode" in your listing and link back to this page. What you can't do is republish this write-up or my photos as your own pattern.
Related patterns on Wavode
- Sleepy bear on the moon: another bedtime friend for the nursery.
- Chunky lamb plush: a soft lamb in the same kind of chenille yarn.
- Crochet red panda: a sitting red panda with a striped tail.
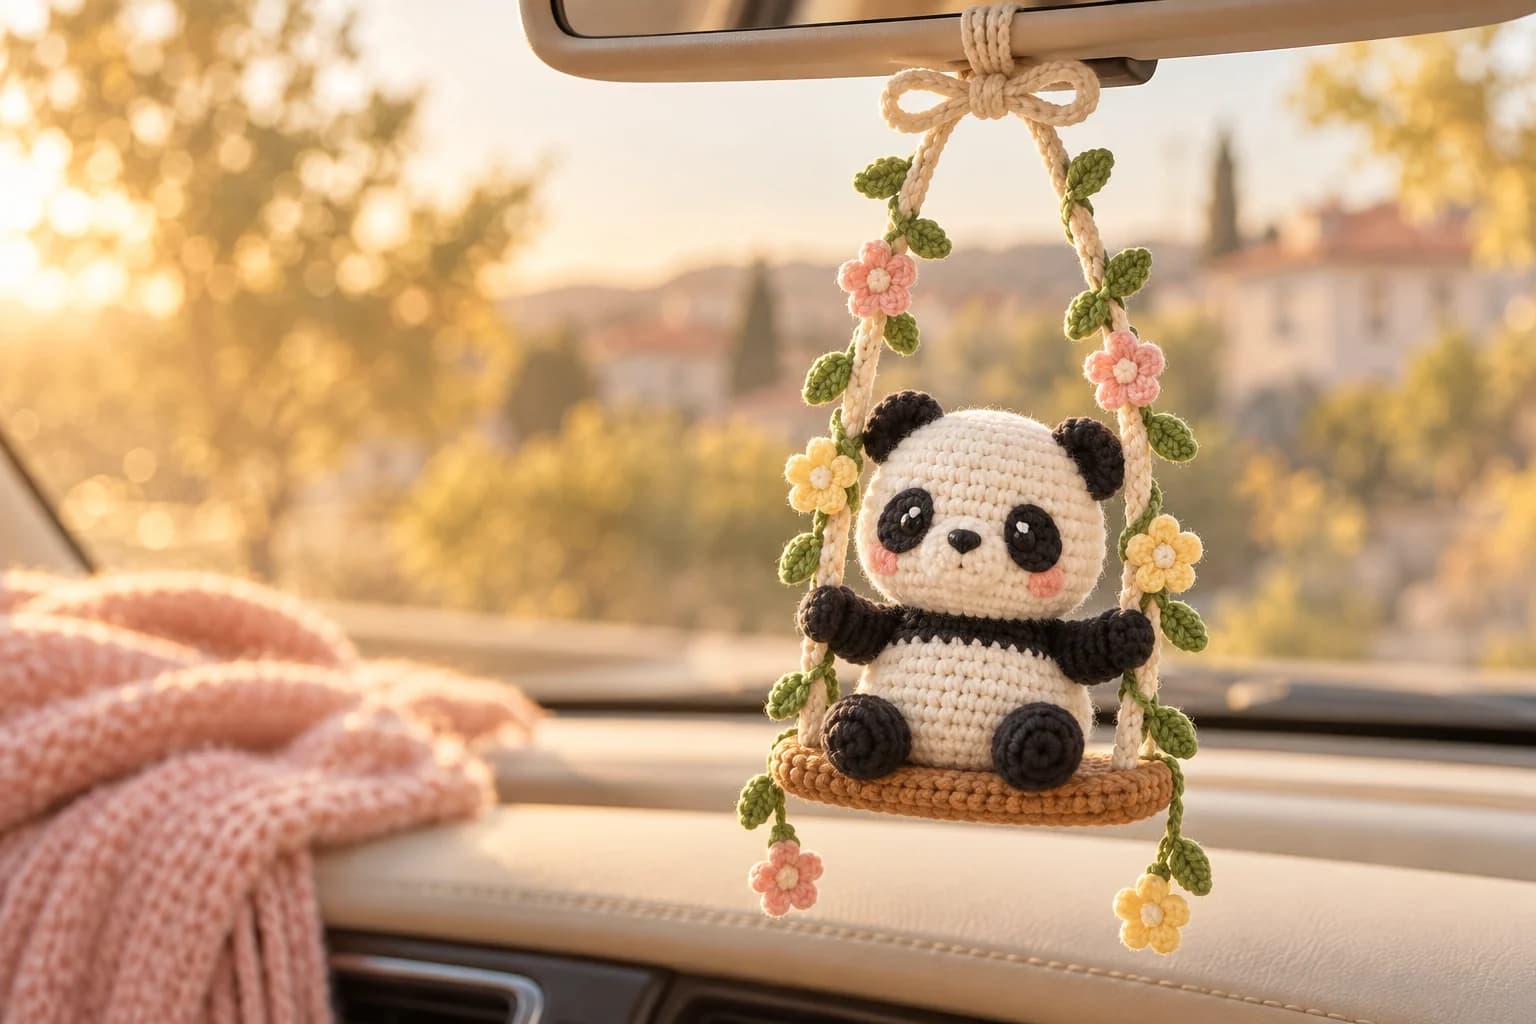
- Panda car charm: a tiny panda on a swing for your mirror.
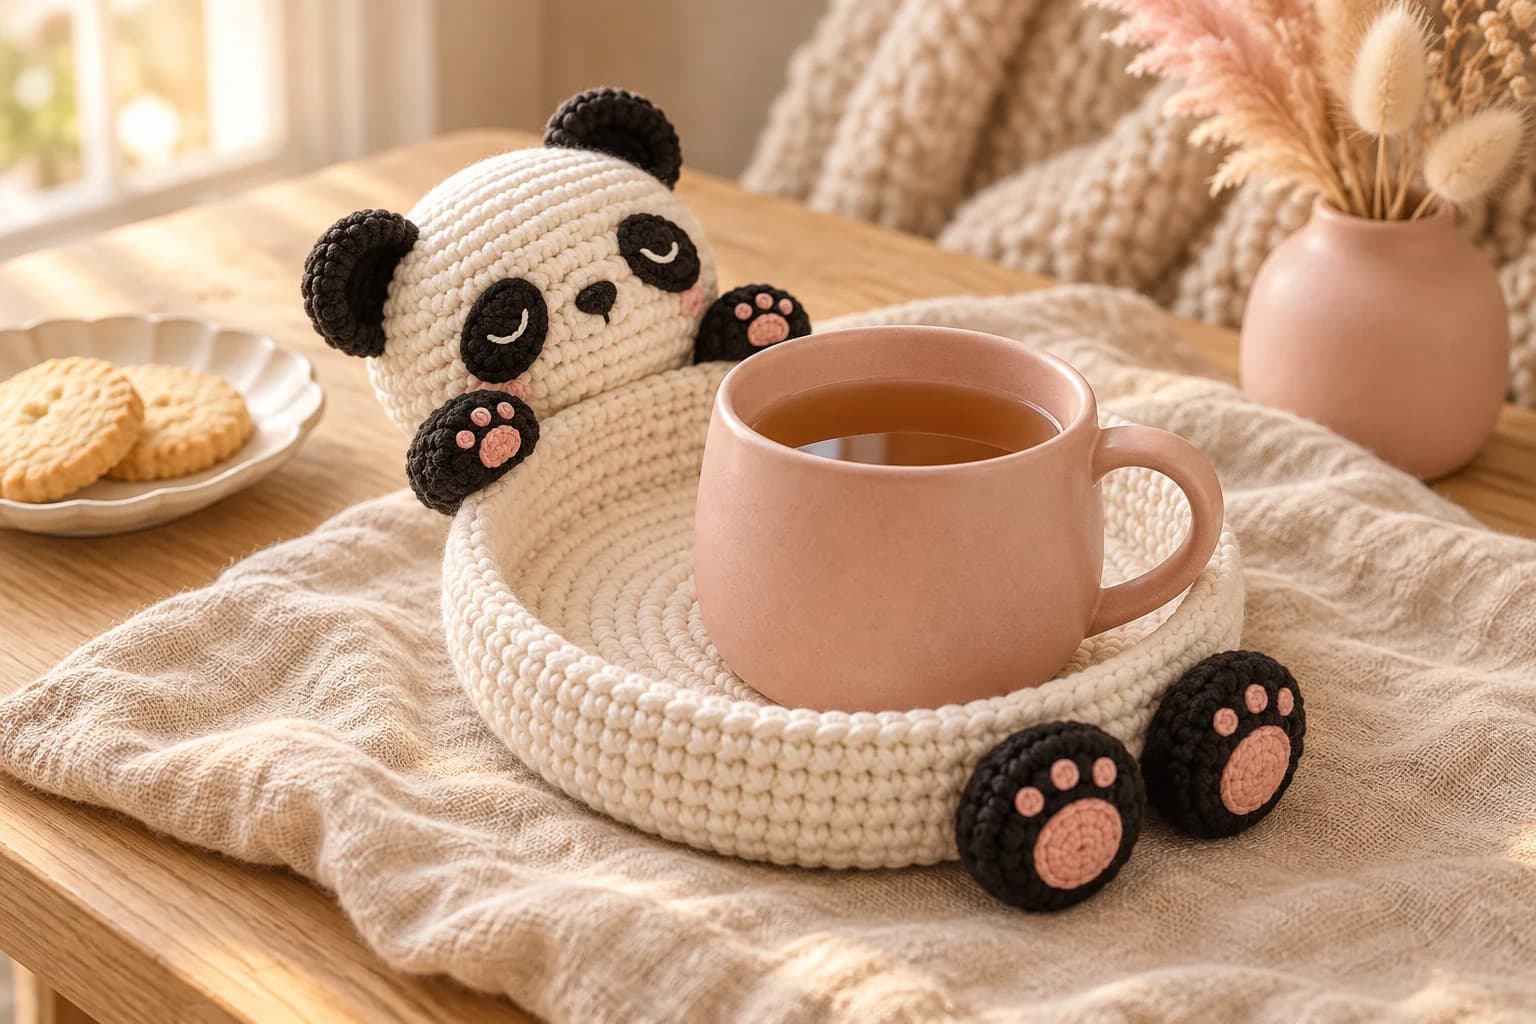
- Cute crochet panda coaster: a sleepy panda that hugs your mug.
Made a sleepy panda? Tag #wavodecrochet on Pinterest. I re-pin every finished make and credit the maker.
Pattern by Clara Hartwell for Wavode. Questions? Email me at support@wavode.com.