Crochet Paw Keychain

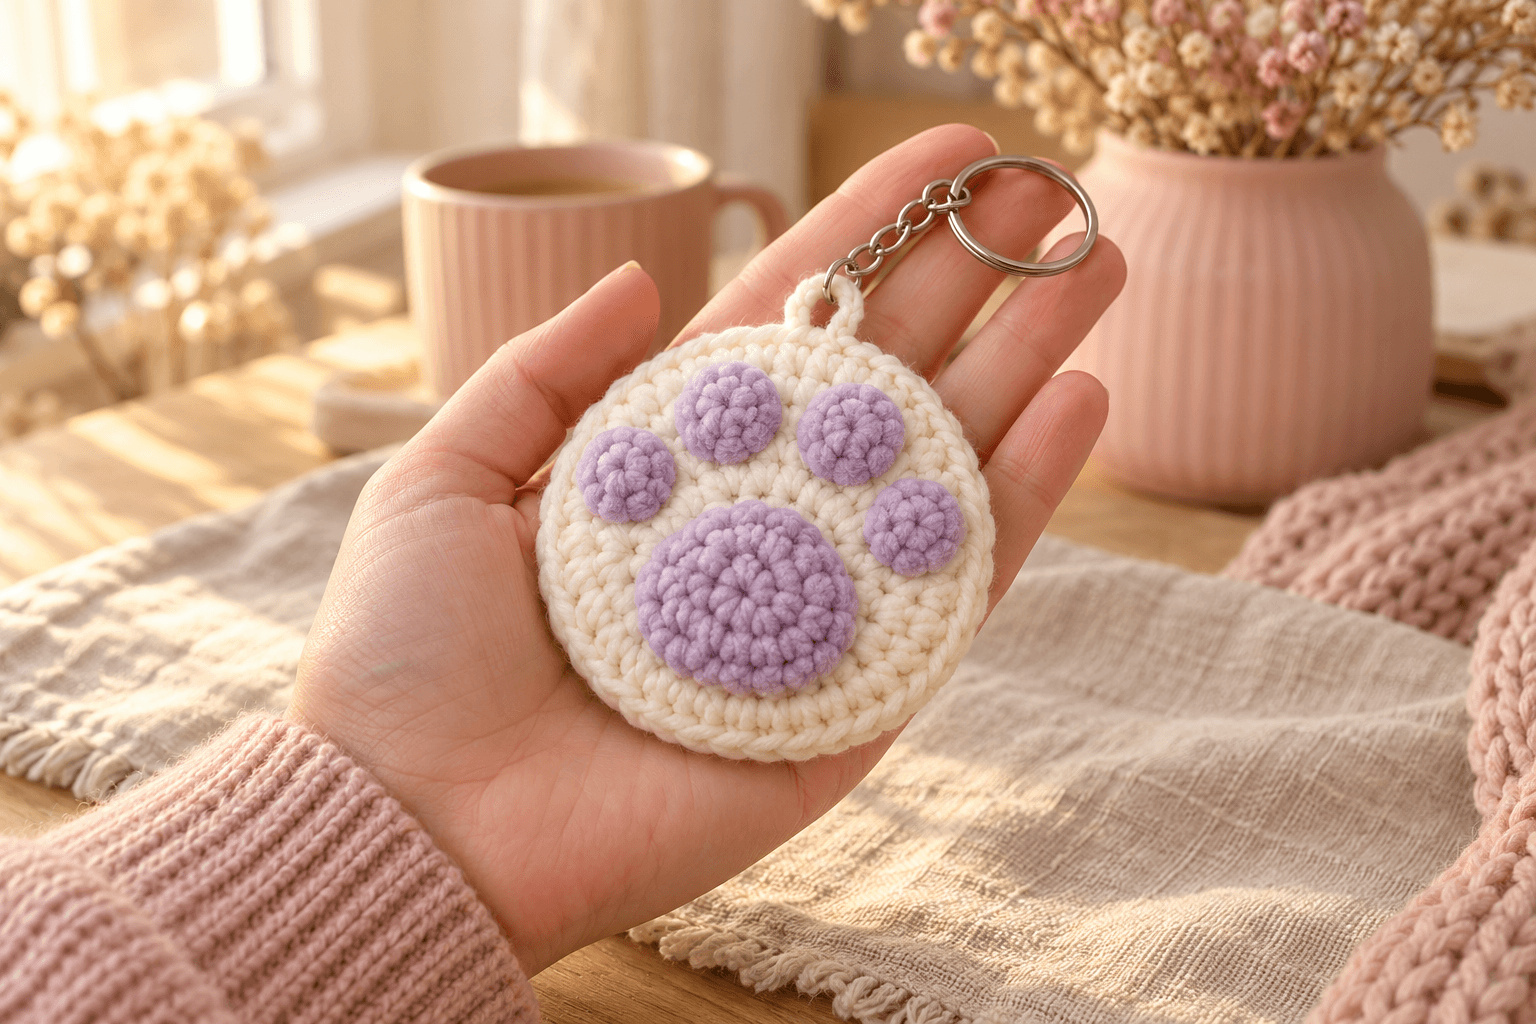
I like a bag charm I can find by touch when my keys sink to the bottom. This crochet paw keychain is about 3¼ in (8 cm) across, with a cream chenille base and soft lilac pads. The little toe bumps give my fingers something to catch.
I sew the lilac pads on while the front lies flat, with the back of every stitch easy to reach. I keep the filling light, like a tiny cushion, and anchor the hanging loop inside before closing the edge. That gives the chain a firm place to pull.
| At a glance | |
|---|---|
| Finished size | about 3¼ in (8 cm) across, excluding loop and ring |
| Yarn | bulky #5 polyester chenille in cream and lilac; smooth cream cotton for sewing |
| Hook | 4 mm |
| Pieces | 7 |
| Time | about 1½–2 hours |
| Skill | easy: magic ring, sc, inc and simple sewing |
Yarn and supplies for the plush paw
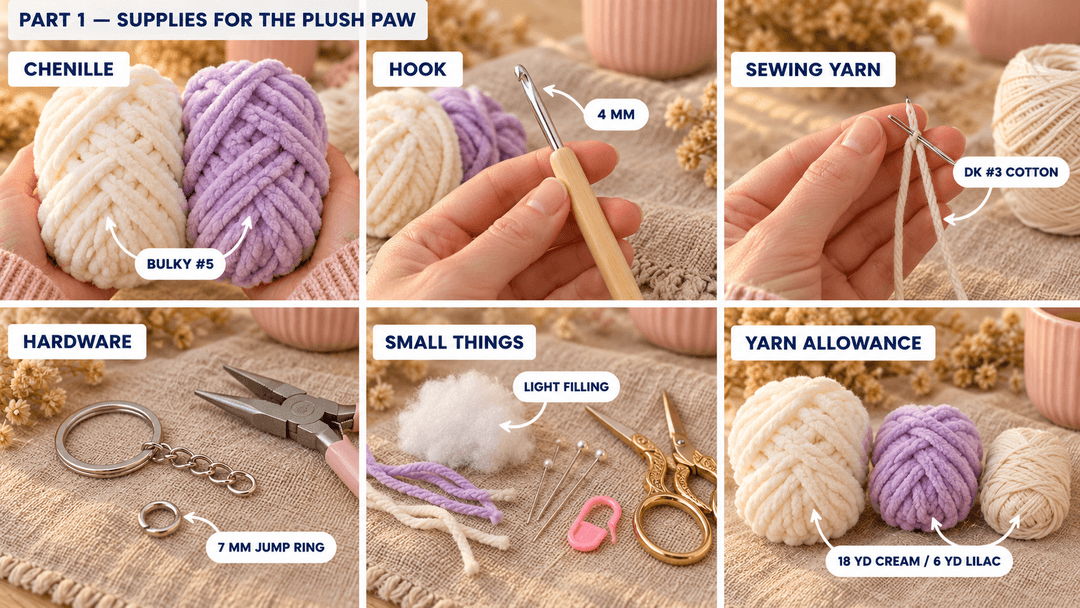
- Chenille: bulky #5, 100% polyester, about 131 yd (120 m) per 100 g. Allow about 18 yd cream and 6 yd lilac. Choose both colors from the same yarn range so the pads keep their proportions.
- Sewing and hanging yarn: about 4 yd smooth cream DK #3 cotton. It slips between the chenille stitches and holds the seams without shedding its pile.
- Hook: 4 mm, for every crocheted piece.
- Hardware: one split key ring with a short chain and a 7 mm jump ring, plus two pairs of flat pliers.
- Small things: a little fiberfill, a locking stitch marker, contrasting scrap yarn, pins, a blunt tapestry needle and scissors.
Tension. Use about 3 sc per inch (2.5 cm) and 3 rounds per inch, snug enough that the stuffing doesn't show. The cream panels measure about 3¼ in (8 cm) across. Chenille varies between brands, so check the first panel before making its partner.
Stitches, in US terms: magic ring (MR), single crochet (sc), increase (inc: 2 sc in the same stitch), slip stitch (sl st), stitch (st) and round (R). Work continuous spirals without joining or turning. Move the marker into the first stitch of each round. The number in parentheses is the finished stitch count.
Part 1 — Making the cream paw panels
Front and back panels
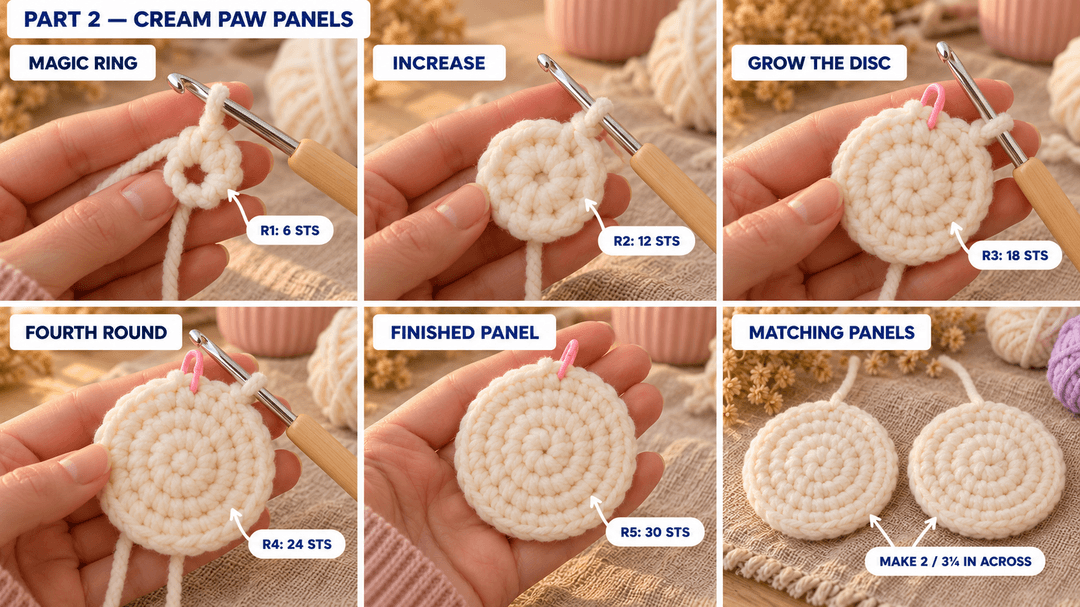
Cream, 4 mm hook. Make 2.
Leave a 6 in (15 cm) starting tail for each piece. The magic ring becomes the center of each panel; the last round becomes its outside edge. Keep the right side, with the neat little stitch tops, facing you. On the front panel, leave a small scrap in the first stitch of each round as you finish it.
- R1: MR, 6 sc in the ring. (6)
- R2: inc × 6. (12)
- R3: (sc, inc) × 6. (18)
- R4: (sc 2, inc) × 6. (24)
- R5: (sc 3, inc) × 6. (30)
Sl st in the next st and fasten off, leaving a 6 in (15 cm) tail at the outside edge. Pull the magic ring closed gently and weave both tails into the wrong side. Keep the panels flat and empty for sewing.
Choose one as the front. With its right side facing you, put a contrast scrap marker in the gap between stitches 30 and 1 of R5. This is the top of the paw. Keep that gap at twelve o'clock throughout the pad placement. Count earlier rounds from their own scrap markers.
Tip. Chenille can snap when you yank the magic ring shut. Hold the stitch bases and tighten it slowly. If the pile starts stripping, thread smooth cream cotton through the six stitch bases and draw them closed instead.
Four lilac toe pads and the center pad
Toe pads
Lilac, 4 mm hook. Make 4.
Leave a 6 in (15 cm) starting tail. The magic ring is the center of the visible pad; the last round is its sewing edge.
- R1: MR, 6 sc in the ring. (6)
Sl st in the first sc and fasten off, leaving a 6 in (15 cm) tail at the edge. Close the ring gently. Weave the ends into the back, keeping the pad softly rounded. Let the chenille pile give each little toe its puff.
Center pad
Lilac, 4 mm hook. Make 1.
Leave a 6 in (15 cm) starting tail. The magic ring is the middle of the visible pad; the last round is its sewing edge.
- R1: MR, 6 sc in the ring. (6)
- R2: inc × 6. (12)
Sl st in the next st and fasten off, leaving a 6 in (15 cm) tail at the edge. Close the ring and weave the ends into the back. Keep this pad unstuffed too; the chenille pile supplies the soft little rise.
Sewing the pads onto the paw
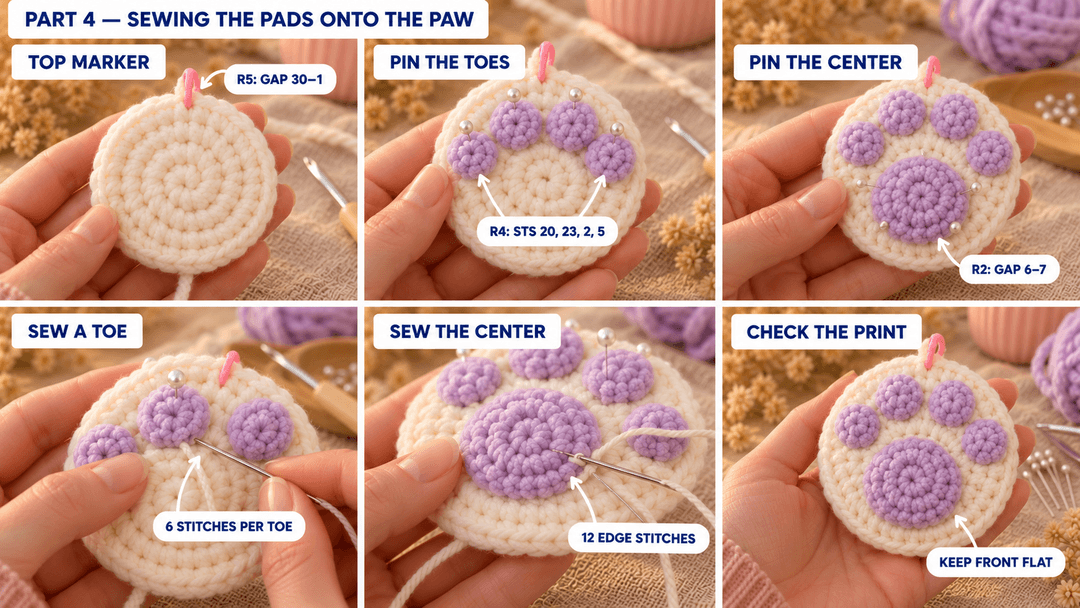
Lay the front panel right side up, top marker pointing away from you. Pin the small pads in a curved row across the upper half, their right sides facing you.
- Toe positions. Center their magic rings over R4 stitches 20, 23, 2 and 5 of the cream panel. Follow that order around the top, from one outside toe to the other. Leave a narrow cream gap between neighboring pads.
- Center position. Center the larger pad's magic ring over the gap between stitches 6 and 7 of R2, below the cream magic ring. Its right side faces you, with the toe pads above it.
- Sew the toes. With smooth cream cotton, knot the end on the wrong side of the panel. Catch the underside of each lilac edge stitch and a small bite of cream fabric directly beneath it. Take 6 small stitches around each toe pad, keeping the cotton tucked underneath the lilac pile.
- Sew the center pad. Work the same way around its 12 edge stitches, one sewing stitch per edge stitch. Knot the cotton on the wrong side and weave each end through the backs of several cream stitches.
Hold the panel up with the top marker between the middle toes. The little toes should curve over the center pad like a paw print pressed into soft sand.
Tip. Pull each sewing stitch just until the pad rests against the cream. If the front puckers, loosen that stitch before moving on.
Joining and lightly stuffing the paw
Before joining, anchor the hanging loop inside the back panel. I use doubled cotton here because a bag charm gets pulled by its chain.
Anchor the loop while the back is open
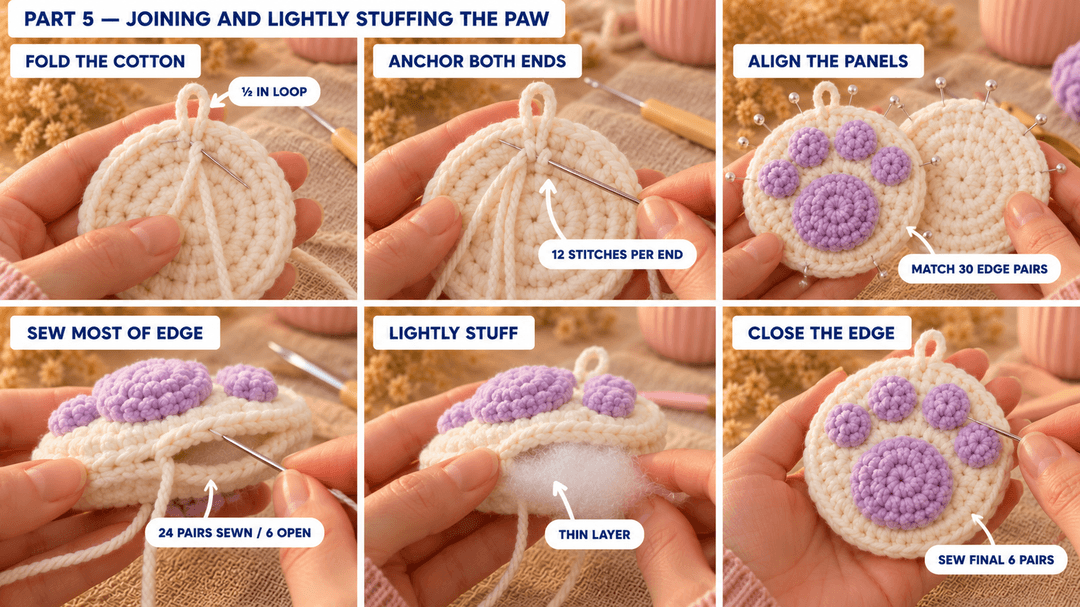
- Lay the back panel right side down. Mark any gap at its outside edge as its top. Cut 24 in (60 cm) of smooth cream cotton and fold it in half.
- Keep the folded end above that top gap, with a ½ in (1.3 cm) loop showing beyond the edge. Pass both free ends through the gap to the wrong side.
- Thread one end onto the needle. Run it down toward the center, weaving under the backs of 4 consecutive stitches along a radial line, then back toward the top under 4 neighboring stitches. Take another 4 small backstitches along R4, beside the top gap. Keep the needle inside the backs of the fabric so the thread stays hidden on the outside.
- Repeat with the second end beside the first path. Knot the ends together inside and weave them through 3 more stitch backs each. Tug the loop firmly to check the anchor.
Close the cream edge
Hold the panels wrong sides together, pads facing out. Align their top gaps and pin them there, then at the bottom and both sides. The back panel's stitch direction runs the other way, like a mirror: pair the edges by position as you go.
With 24 in (60 cm) of smooth cream cotton, knot the end inside at the top. Whipstitch through both loops of each matching pair of R5 stitches. Start beside the loop and work around 24 pairs, leaving the final 6 pairs open.
Slide in a thin, even layer of fiberfill through that opening. Spread it toward the middle with your fingertip; the paw should feel like a soft biscuit, with its pads still easy to see. Finish the remaining 6 pairs, knot at the seam and bury the end inside. Remove the scrap markers.
Adding the keyring so the paw hangs upright
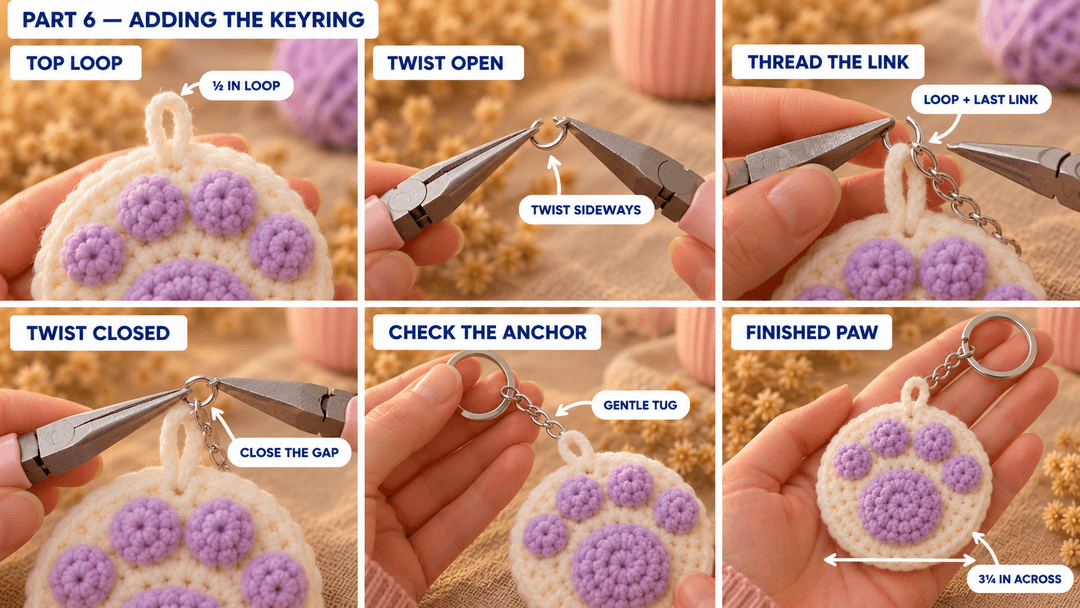
With the pads facing you, hold the cotton loop at the top between the middle toes. Twist the jump ring open sideways with the pliers, slip it through the cotton loop and the last link of the chain, then twist it closed until the ends meet.
Lift the key ring and give the paw a gentle tug. Check that the jump ring closes fully and the cotton anchor holds. If the cotton loop stretches with use, shorten it by sewing across its base several times with fresh cotton, then secure those ends inside the seam.
Safety. This keychain has metal hardware and isn't a toy for children under 3. Keep it on an adult's keys or bag.
I like the cream and lilac against a dark bag, where the little paw print stands out. For a small gift, slip the ring through a hole in a folded card and let the paw sit on the front, like a soft seal.
UK terms: US sc = UK dc; sl st is the same in both.
Made a lilac paw? Tag #wavodecrochet on Pinterest so I can see it.