Crochet Clover Keychain

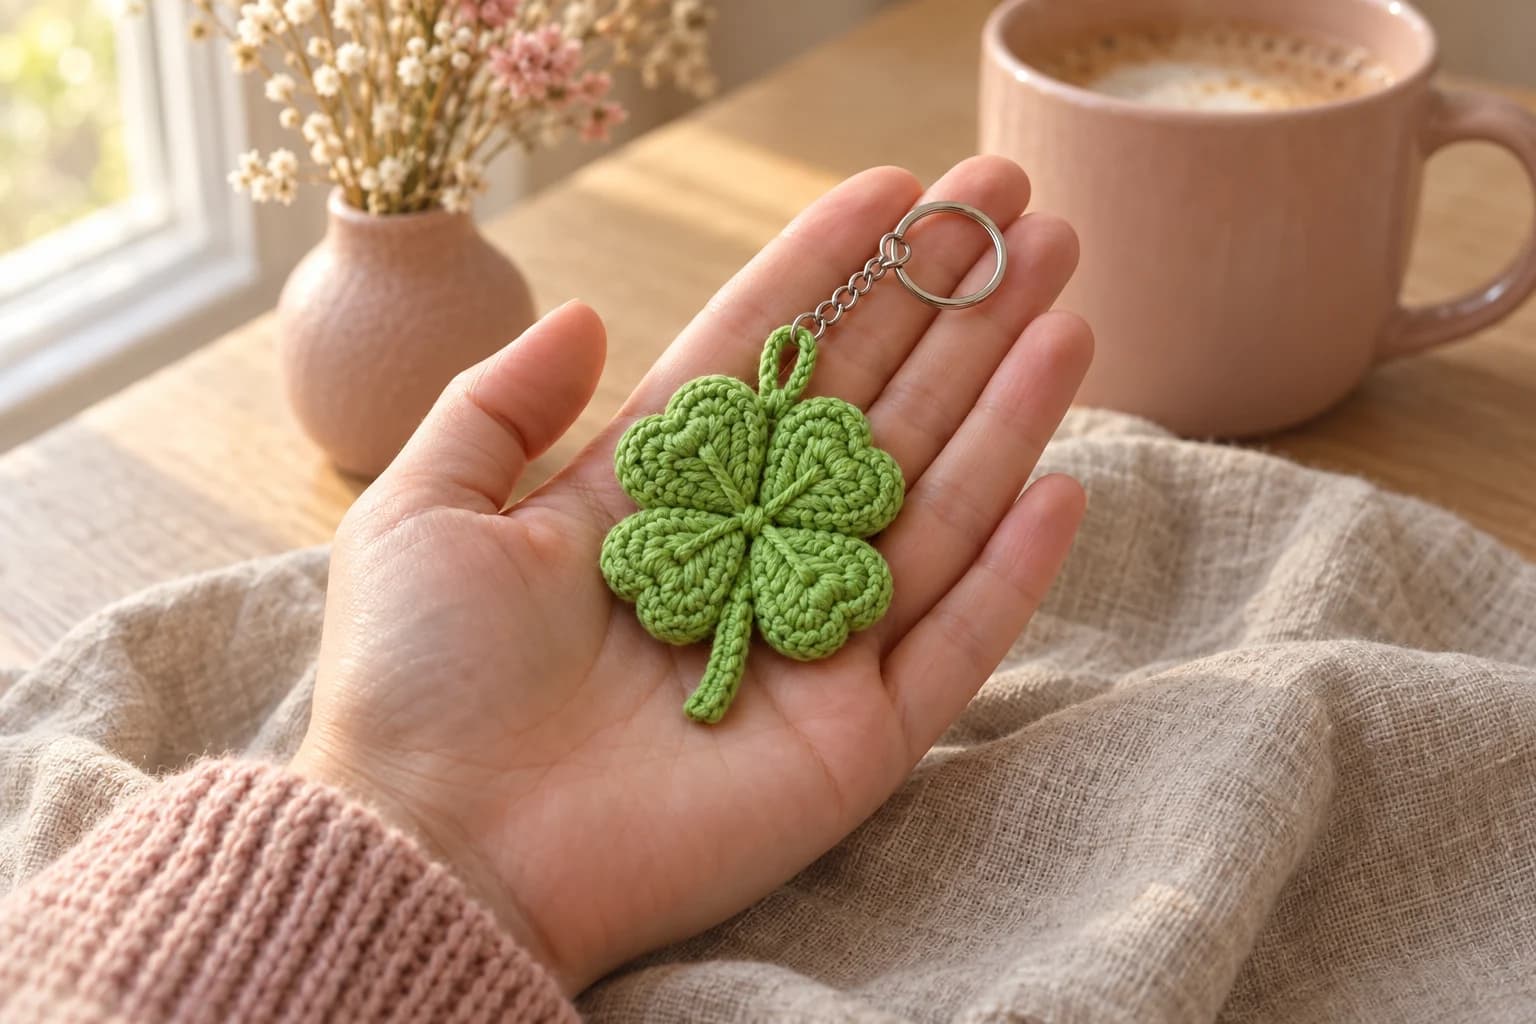
This crochet clover keychain is a thick little four-leaf clover with heart-shaped leaflets, a short stem and a loop for your keys, made from two layers joined in one round. Two layers make it sturdy enough for a key ring that gets tugged every day, and all the yarn ends hide between them. You'll need about 16 yards of green DK cotton, a 3 mm hook and about an hour.
Key Takeaways
- Two layers, one joining round: the outline round goes through both clovers at once, so there's no sewing.
- The loop is crocheted in, at the top between two leaflets, so the clover hangs straight with its stem down.
- The leaflet veins are stitched before joining, so their ends are hidden inside.
- Metal ring: not a toy for children under 3.
Why I love this clover keychain
A four-leaf clover is the classic good-luck charm: one leaf each for hope, faith, love and luck. That's why I make these by the handful. One goes on a friend's keys before a driving test, one on a backpack for exam week, a whole batch on a market table in March for St. Patrick's Day.
A flat clover on a keychain soon curls and frays. This one is two clovers back to back, joined by the outline round, so it stays crisp and feels nice and plump in your hand. The loop is part of that same round, which makes it much stronger than a ring pushed through a single stitch.
Skill level. Easy. You need a magic ring, chains, single crochet, half double, double and treble crochet, and joining rounds with a slip stitch. The only new move for some readers is working the last round through two layers at once, and I explain it in Part 2.
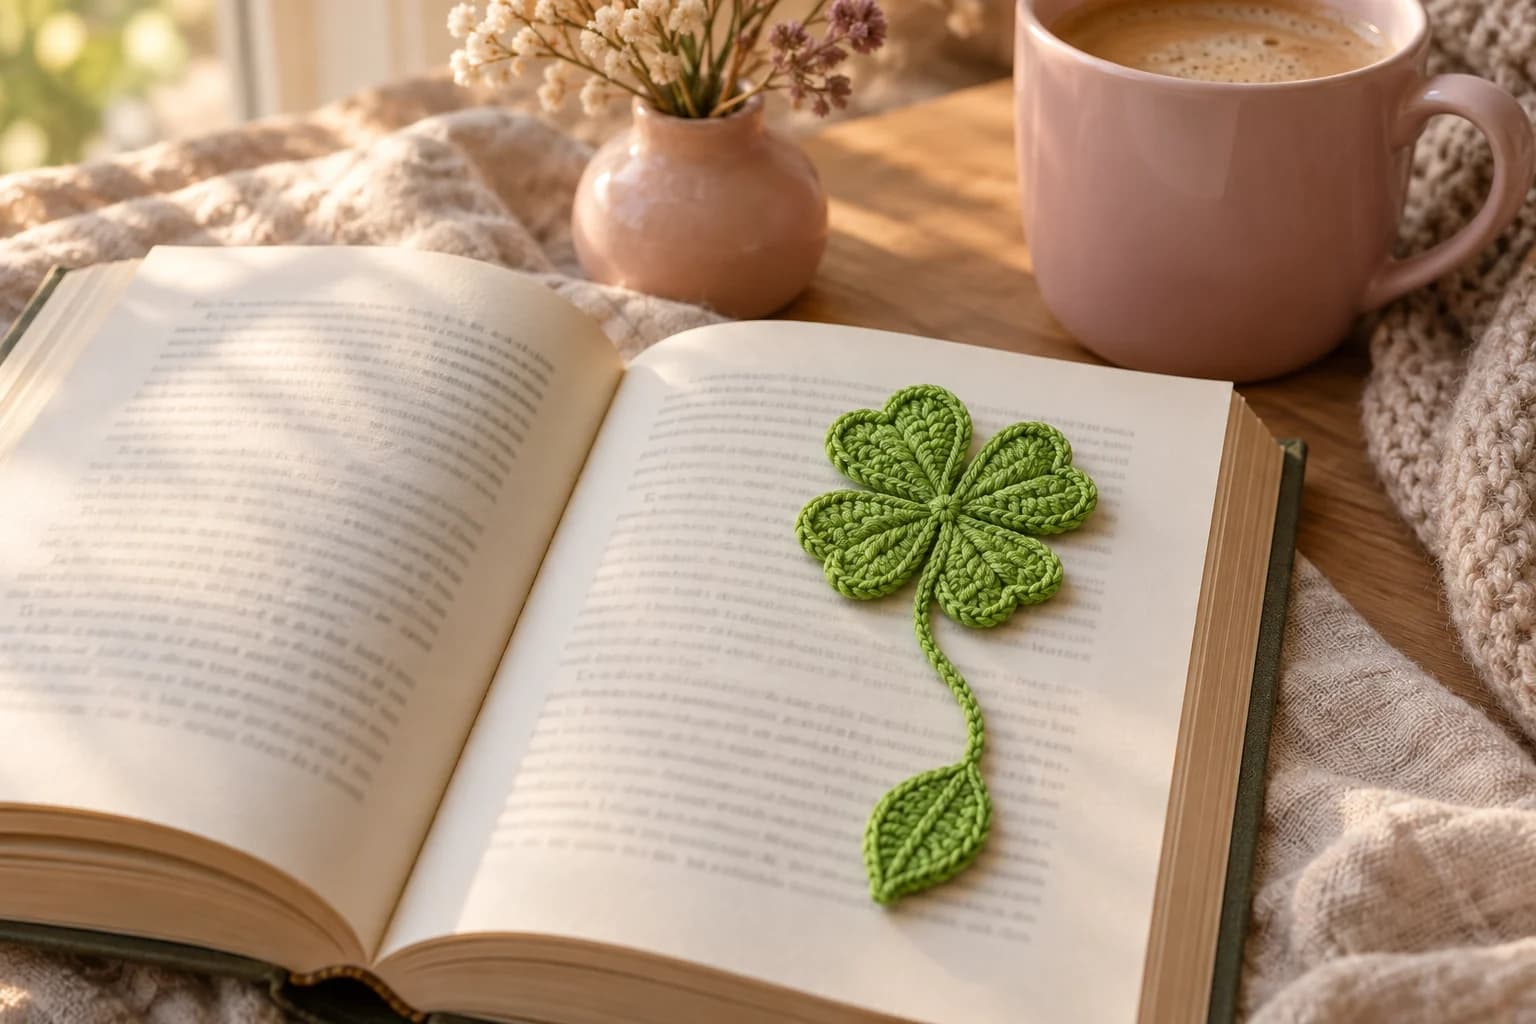
If you love clovers, my crochet clover bookmark uses the same heart-shaped leaflets on a long stem, in one layer.
What you'll need
Yarn: about 16 yd (15 m) of green DK #3 cotton, such as Paintbox Yarns Cotton DK or any smooth DK cotton. A bright grass or apple green looks the most like a real clover.
I worked this amount out from the stitch count, with a margin for tails, so treat it as an estimate. Cotton is the best choice for a keychain: it keeps its shape, it doesn't pill much, and it holds a crisp outline.
Hook, hardware and notions
- 3 mm hook (between US C/2 and D/3; a 3.25 mm D/3 works too). It's smaller than the ball band suggests, so the stitches are tight and the clover is firm.
- A key ring (a split ring about 1 in / 25 mm, with or without a short chain, or a swivel clasp) and an 8 mm jump ring.
- Two small pairs of pliers, to open the jump ring.
- A tapestry needle, scissors and two stitch markers.
Gauge and finished size
Gauge isn't critical, but tension is: keep it firm so the layers lie flat against each other. With DK cotton and a 3 mm hook, the finished clover is about 2½ in (6.5 cm) across, a little smaller than a palm, and the stem adds about 1¼ in (3 cm). These are estimates: measure your first one.
Abbreviations (US crochet terms)
- MR: magic ring
- ch: chain
- sl st: slip stitch
- sc: single crochet
- hdc: half double crochet
- dc: double crochet
- tr: treble crochet
- sk: skip
- st(s): stitch(es)
- R: round
All the rounds are joined rounds: close each one with a sl st in the first stitch. When a round starts with ch 1, that ch 1 doesn't count as a stitch. Stitch counts are in parentheses at the end of each round.
The pattern, step by step
Here's the whole thing in one sentence. You make two clover layers of 3 rounds each, stitch the veins on the front layer, then hold the layers back to back and work the outline round through both, adding the loop at the top and the stem at the bottom.
Part 1: The two clover layers (make 2)
Work both layers the same way. The magic ring is the center of the clover, and the side facing you as you work is the right side.
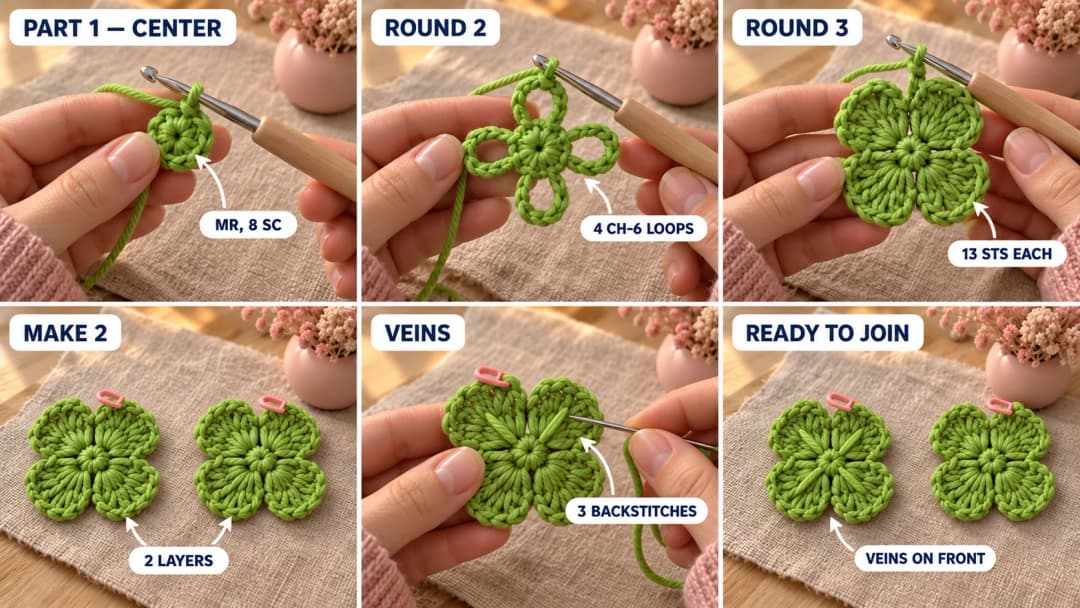
- R1: 8 sc in a MR. Pull the ring closed tightly and sl st in the first sc. (8)
- R2: ch 1. Starting in the same st as the join, (sc in the next st, ch 6, sk the next st) 4 times in total. Sl st in the first sc. (4 sc and 4 ch-6 loops)
- R3: sl st in the first ch-6 loop. In that loop, work (sc, hdc, 2 dc, 2 tr, dc, 2 tr, 2 dc, hdc, sc). Repeat the same group in each ch-6 loop, 4 times in total. Sl st in the first sc. (4 leaflets of 13 sts, 52 sts)
Each ch-6 loop becomes one heart-shaped leaflet: the two pairs of trebles are the lobes, and the shorter dc between them makes the dip.
Back layer. Fasten off, and weave both tails into the wrong side. They'll be hidden between the layers. Put a stitch marker in the sc you joined R3 into: it marks the join, so you can line the two layers up later.
Front layer. Don't fasten off. Put the second stitch marker in the loop on your hook so it can't unravel while you stitch the veins. It also marks this layer's join.
Veins on the front layer. Cut a 20-in (50 cm) length of the same green, or of a lighter green if you want the veins to stand out a little more. On the right side of the front layer, backstitch a line from the center to the dip of each leaflet: 3 small backstitches per leaflet, along the middle, between the two lobes. Carry the yarn across the wrong side to the next leaflet. Knot the two ends on the wrong side and trim them to about ½ in: they'll be hidden between the layers too.
Part 2: Joining the layers, the loop and the stem
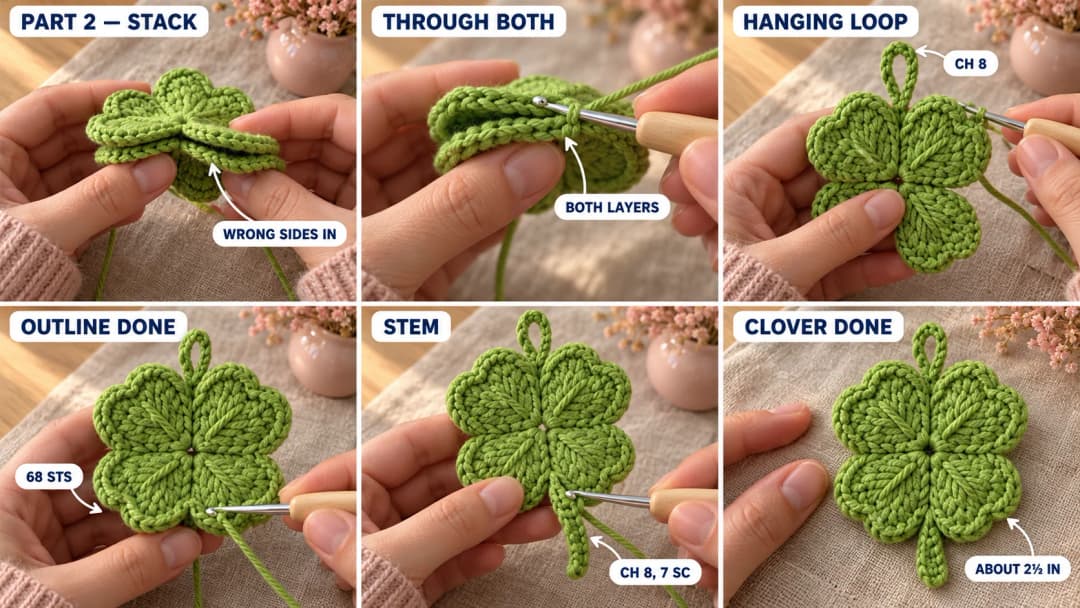
Line them up. Put the loop from the marker back on your hook. Hold the back layer behind the front layer, wrong sides together, with the two markers on top of each other and the four leaflets exactly lined up. Take the marker out of the back layer. Each leaflet group is symmetrical, so every stitch of the front layer has a matching stitch of the same height behind it.
For the joining round, insert the hook through the stitch of the front layer and the matching stitch of the back layer each time, and work the stitch through both.
- R4 (joining round, through both layers): don't ch 1. Starting in the sc you joined into and the matching sc behind it:
- Leaflets 1 and 2: (sl st in the sc, sc in the hdc, sc in each of the next 2 dc, 2 sc in each of the next 2 tr, sl st in the middle dc, 2 sc in each of the next 2 tr, sc in each of the next 2 dc, sc in the hdc, sl st in the last sc of the leaflet) 2 times in total.
- Hanging loop: ch 8, sl st in the same st as the last sl st.
- Leaflets 3 and 4: the same as leaflets 1 and 2, 2 times in total.
- Sl st in the first sl st. (68 sts: 17 per leaflet, plus a ch-8 loop)
Pull the sl st in the middle of each leaflet snug: that's what draws the dip of the heart in. The loop now sits in the gap between leaflets 2 and 3, the top of the clover. The loop on your hook sits in the gap between leaflets 4 and 1, right opposite: that's the bottom, where the stem grows out.
Stem. Without fastening off:
- ch 8. Starting in the 2nd ch from the hook, sc in the back bump of each of the 7 chs, back to the clover. (7 sc)
Sl st in the first sl st of R4 again. Fasten off, leaving a 6-in (15 cm) tail, and weave it in between the layers. The back bump is the little ridge on the back of each chain: working into it makes a neat, firm stem that looks the same on both sides.
Part 3: Reinforce the loop and add the ring
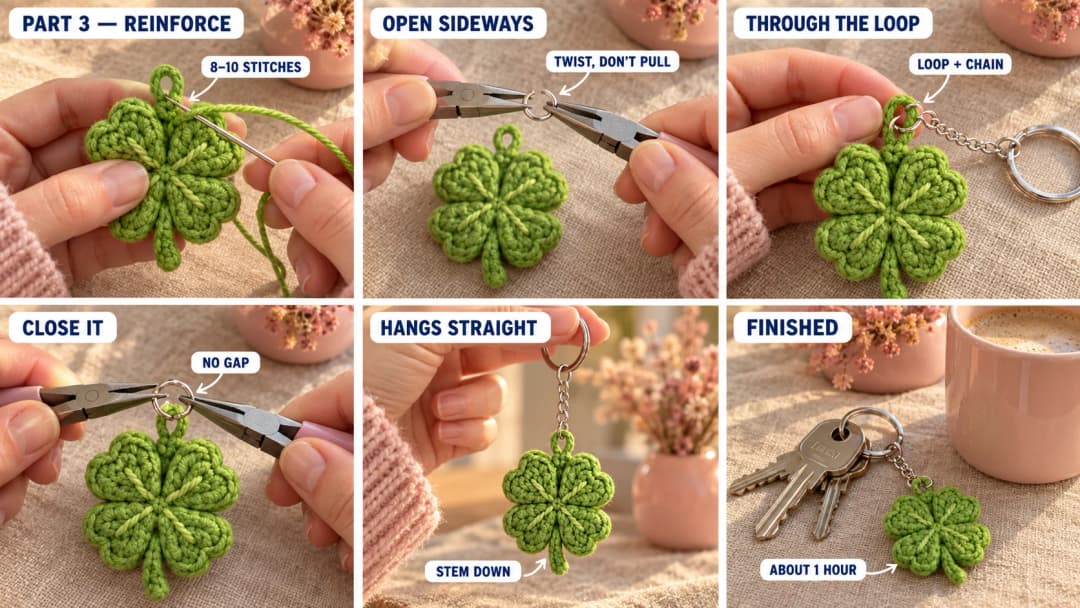
- Reinforce the loop. Cut a 10-in (25 cm) length of green. Hide its end between the layers, then sew 8 to 10 small stitches over the base of the loop: each one goes around the first 2 chains of the loop and down through both layers, just below the joining round. Hide the end between the layers. A keychain gets pulled every day, so be generous here.
- Open the jump ring sideways with two pairs of pliers, one on each side of the cut: twist one side toward you and the other away. Never pull it open into a "C": it won't close neatly again.
- Add the hardware. Slide the open jump ring through the crocheted loop and the end of the key ring (or its chain), then twist it closed so the two ends meet with no gap.
Hang it from your finger: the clover should hang straight, with the stem pointing down. Cotton chains stretch a little over time. If the loop gets long, sew a few more stitches over its base to shorten it.
Safety. This keychain has a metal jump ring and key ring, so it isn't a toy for children under 3. For a baby or toddler, skip the hardware and give the clover on its own, with the loop sewn shut.
Make it yours — quick variations
| Variation | Change from the base pattern |
|---|---|
| Three-leaf shamrock | R1: 6 sc in a MR. R2: (sc, ch 6, sk 1) 3 times in total. R3 the same, 3 times in total (39 sts). R4: work the leaflets 3 times in total (51 sts), but put the loop in the dip of leaflet 2 (after its sl st in the middle dc, ch 8 and sl st in the same st), so it sits right opposite the stem, which grows out between leaflets 3 and 1. |
| Two-tone clover | Work R1 of the front layer in a lighter green, fasten off, and join the main green for R2. |
| Lucky gold veins | Stitch the leaflet veins in gold or mustard yarn. |
| Bag charm | Use a swivel clasp instead of a key ring. |
| Phone or zipper charm | Leave out the jump ring and the key ring: thread a 6-in loop of thin cord through the crocheted loop instead. |
| Party favors | One clover takes about 16 yd, so a 50 g ball of DK cotton (about 115–135 yd) is enough for about 7 clovers. |
Troubleshooting the three things that go wrong
The two layers don't line up
Each layer must have exactly 13 sts per leaflet on R3. Count them before you join. If one layer is a little bigger, work it again with a tighter tension, or with a hook half a size smaller for R3.
The clover cups or ruffles
Cupping means R4 is tight: loosen up on the 2-sc increases. Ruffles mean too many stitches: check that you work only 2 sc in each treble. A firm press under a heavy book for an hour flattens it.
The clover hangs crooked
The loop isn't exactly in the gap between leaflets 2 and 3. Check that you chained it after the last sl st of leaflet 2. If it's off by one stitch, it still hangs fine; if it's off by a whole leaflet, the stem will point sideways.
Frequently asked questions
How long does this clover keychain take? About an hour: about 15 minutes per layer, 10 minutes for the veins and 20 minutes for the joining round, the stem and the hardware.
Is it a good St. Patrick's Day project? Yes. It's quick, it uses one color and little yarn, so you can make a whole batch for gifts or a market table. The three-leaf shamrock variation above is the traditional Irish version.
Do I have to stitch the veins? No, the clover looks lovely without them. But stitching them on the front layer before joining is easy, and it makes the leaflets look much more like real clover leaves.
Can I use acrylic yarn? Yes, a smooth DK acrylic works. Cotton gives a crisper outline and wears better on keys, but acrylic is a good choice in bright colors.
Can I sell keychains made from this pattern? Yes, you're welcome to sell finished keychains made from this free pattern at markets, on Etsy or at a craft fair. Please credit "Pattern by Wavode" in your listing and link back to this page. What you can't do is share or sell the pattern itself, or republish my photos as your own.
Related patterns on Wavode
- Crochet clover bookmark: the same heart-shaped clover on a long stem with a leaf.
- Crochet flower keychain: a flat pink cherry blossom for your keys.
- Crochet daisy flower keychain: a daisy with a puffy yellow center.
- Crochet dragonfly keychain: another little garden friend for your bag.
Made a clover keychain? Tag #wavodecrochet on Pinterest. I re-pin every finished make and credit the maker.
Pattern by Clara Hartwell for Wavode. Questions? Email me at support@wavode.com.