Crochet Flower Keychain

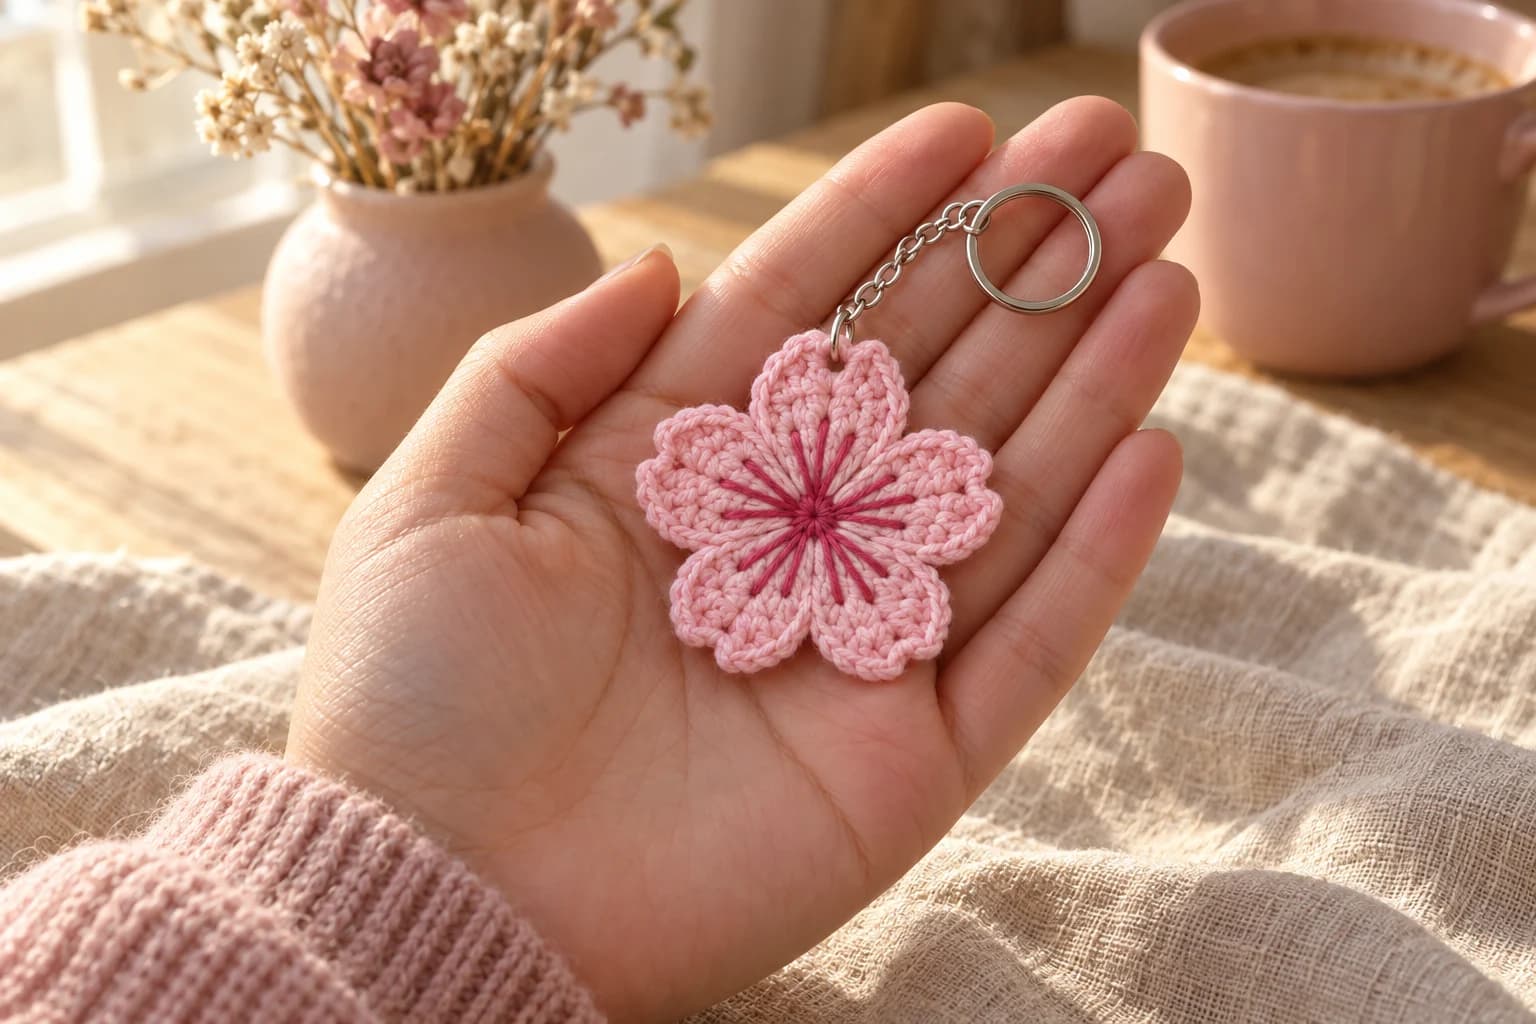
This crochet flower keychain is a flat pink cherry blossom with five notched petals and a raspberry center. It's worked in four joined rounds: a small center, then the five petals, then an outline round that sharpens each petal and pulls in the little notch at its tip. A few straight stitches make the center, and a jump ring holds the key ring. You'll need DK cotton in two pinks, a 3 mm hook and about 45 minutes.
Key Takeaways
- Four rounds, one piece: a 10-st center, a 20-st round, the petals, and an outline.
- The notch is built in: each petal fans from two stitches, and the outline pulls a sl st into the gap between them.
- Easy center: fifteen straight stitches in raspberry, no extra pieces.
- Small amounts: about 8 yd of light pink and 1 yd of raspberry.
Why I love this keychain
Is there a quicker flower that still looks this pretty? I don't think so. Four rounds and a few stitches of embroidery, and you have a cherry blossom you can hang from your keys. The little notch at the tip of each petal is what makes it read as a cherry blossom rather than any five-petal flower.
It's also the perfect first keychain. There's no stuffing, no sewing pieces together, and you can make a whole handful in an evening for party favors, teachers' gifts or a spring market table.
Skill level. Easy. You need a magic ring, sc, hdc, dc and tr, joining rounds with a sl st, and a few straight stitches with a needle. I explain each part step by step.
Love blossoms? My mini cherry blossom bonsai is covered in them.
What you'll need
Yarn (DK #3 cotton)
| Color | Used for | Amount |
|---|---|---|
| Light pink | The flower | about 8 yd |
| Raspberry | The center | about 1 yd |
- I like Paintbox Yarns Cotton DK. The petals keep their shape and the stitches stay crisp. Any DK cotton works: check your size against the gauge below.
- I've worked these amounts out from the stitch count, with tails. They're estimates.
Hook
- 3 mm. A little larger than for amigurumi, so the tall petal stitches open up nicely.
Notions
- A tapestry needle and scissors.
- A split key ring with a short chain, plus an open jump ring, 7 to 8 mm.
- Two pairs of flat or chain-nose pliers (or one pair and your fingernail) to open and close the jump ring.
Gauge
Gauge isn't critical. With DK cotton and a 3 mm hook, aim for about 5½ sc per inch (2.5 cm). At that tension, the flower should come out about 2¼ in (5.5 cm) across, from petal tip to petal tip. That size is an estimate from the stitch heights, so measure yours. A tighter or looser hand makes it a little smaller or bigger, and that's fine.
Abbreviations (US crochet terms)
- MR: magic ring
- ch: chain
- sl st: slip stitch
- sc: single crochet
- hdc: half double crochet
- dc: double crochet
- tr: treble crochet (yarn over twice)
- R: round
- st(s): stitch(es)
These rounds are joined, not worked in a spiral: each one ends with a sl st into its first stitch. The number in parentheses at the end of each round is the stitch count.
How the flower is built
Here's the whole thing in one sentence. A small round center grows to 20 sts, each petal is a fan of tall stitches worked into two of those sts, and an outline round of sc and sl sts finishes the edge. In each petal, the two tr stand side by side and lean apart. That makes the notch at the tip, and the outline round deepens it with a sl st.
The pattern, step by step
Part 1: The flower
Make 1, in light pink.
- R1: MR, 10 sc in the ring, sl st to the first sc. (10) Pull the ring closed tightly.
- R2: ch 1, 2 sc in each st around, sl st to the first sc. (20)
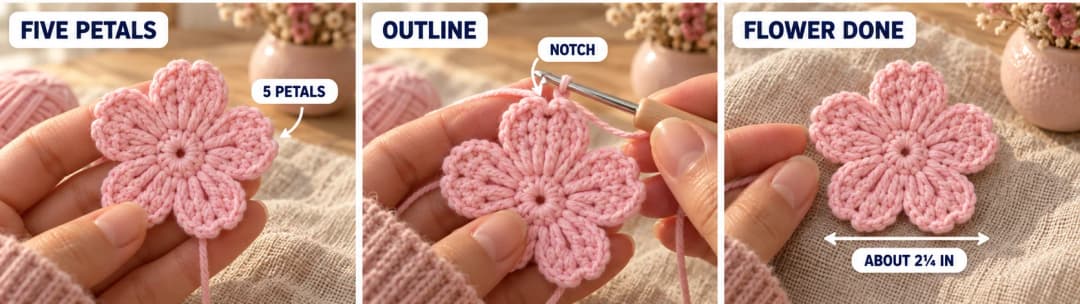
- R3: [(hdc, dc, tr) in the next st, (tr, dc, hdc) in the next st, sl st in each of the next 2 sts] × 5. (40)
That's 5 petals in total. Each one is a fan of 6 tall stitches worked into 2 sts, with 2 sl sts between petals. The last sl st of R3 goes into the st where you joined R2.
- R4: ch 1, [sc in the next hdc, 2 sc in the next dc, 2 sc in the next tr, sl st in the gap between the two tr, 2 sc in the next tr, 2 sc in the next dc, sc in the next hdc, sl st in each of the next 2 sl sts] × 5, sl st to the first sc. (65)
The notch. The "sl st in the gap" goes down between the two tr of the petal, not into a stitch, and it doesn't count as using one. Pull it snug: it's what makes the little V at the tip of each petal.
Fasten off and weave in both tails on the back, through the backs of the stitches, at least 1 in (2.5 cm) each way.
Each petal is about ¾ in (2 cm) long, and the flower about 2¼ in (5.5 cm) across.
Part 2: The center and the key ring
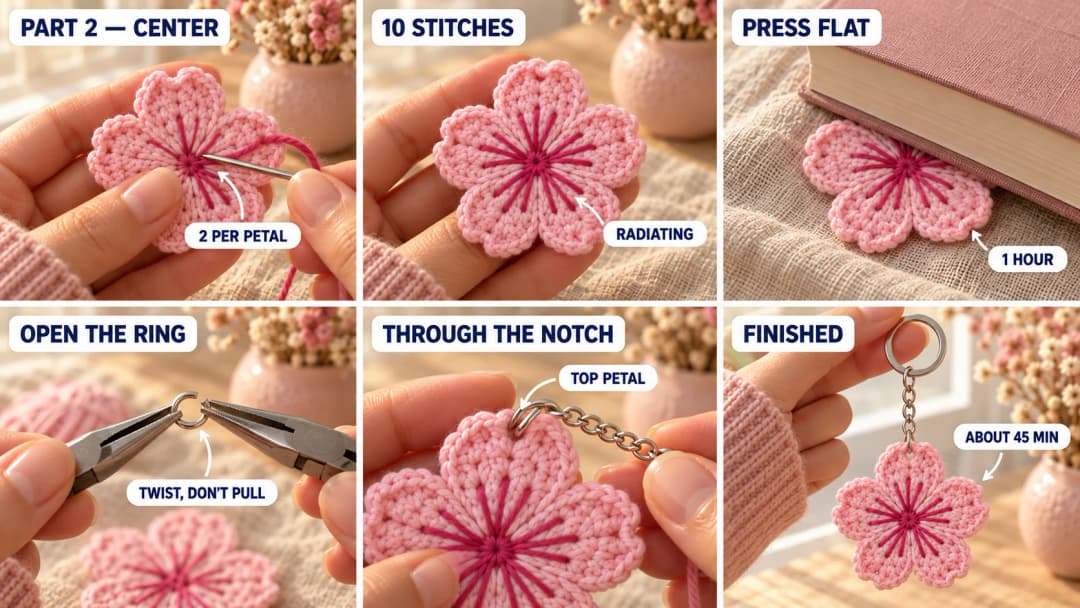
The center. Thread about 1 yd (90 cm) of raspberry onto the tapestry needle. Bring it up from the back right next to the center hole, leaving a short tail on the back.
- Make 15 straight stitches that radiate from the center out to the middle of the petals, about halfway up the dc of R3, 3 for each petal: one toward each lobe of the petal, and one in the middle, pointing at its notch.
- Go down halfway up the petal each time, and come back up at the center for the next stitch. Keep them flat and snug, but don't pull the flower out of shape.
- Fill the center hole with 2 or 3 tiny stitches across it, so the middle reads darker.
- Knot the two raspberry ends together on the back and weave them in.
Block it flat. Cotton petals can curl a little. Press the flower under a heavy book for an hour. Optional: hold a steam iron just above it (never touching), then let it cool flat. Skip this if you don't own a steam iron.
The key ring.
- Choose the top petal. Open the jump ring sideways with the pliers, twisting one end toward you and the other away, never pulling it apart into an oval.
- Slide the jump ring into the notch of that petal, through the gap between the two tr of R3, just below the R4 sl st. That way the ring goes around the notch sl st and the tops of both tr, not around a single loop.
- Add the end link of the keychain's short chain onto the open jump ring.
- Close the jump ring the same way, twisting the ends back until they meet with no gap, so the yarn can't slip out.
Hold the flower up by its ring: it hangs with the top petal pointing up. Give it a few firm tugs.
Safety. This keychain has a metal jump ring and key ring, so it isn't a toy for children under 3.
Make it yours — quick variations
| Variation | Change from base pattern |
|---|---|
| Two-sided flower | Make 2 flowers, place them back to back and whipstitch around the outline. It's sturdier and looks good from both sides. |
| White blossom | Light cream petals with a pink or yellow center. |
| Two-tone petals | Work R1–R2 in raspberry and R3–R4 in light pink. Skip the embroidered center or keep it short. |
| Bag charm | Swap the key ring for a lobster clasp so it clips onto a bag handle. |
| Garland | Leave off the ring and string several blossoms on a long chain for a spring garland. |
Troubleshooting the three things that go wrong
The petals don't have a notch
The two tr of each petal need to be worked in two different stitches, one at the end of the first fan and one at the start of the second, and the outline sl st has to go into the gap between them. Pull that sl st a little tighter.
The flower cups or ruffles
If it cups, your R3 is tight: work the tall stitches a little looser, or go up to a 3.5 mm hook for R3. If it ruffles, R4 is too loose: go down to a 2.5 mm hook for R4 only. Then press it flat under a book.
The jump ring slips out
There's a gap in the ring, or it's only through one loop. Close it completely with the pliers, and make sure it goes through the notch, around the sl st and the tops of both tr.
Frequently asked questions
How long does this keychain take? About 45 minutes if you're used to tall stitches: about 25 minutes for the flower and 20 for the center, blocking and ring. Give yourself longer for your first one.
Can I use worsted yarn? Yes, with a 4 mm hook. The flower comes out about 3 in across, which makes a nice bag charm.
Do I need a jump ring? It's the neatest way to get the flower to hang from a petal tip. Without one, chain 8 in the notch of the top petal instead of the sl st in R4, sl st back into the same gap, and slide the split ring onto that loop.
Can I sell keychains made from this pattern? Yes, you're welcome to sell finished keychains made from this free pattern at markets, on Etsy or as gifts. Please credit "Pattern by Wavode" in your listing and link back to this page. What you can't do is republish this write-up or my photos as your own pattern.
Related patterns on Wavode
- Mini cherry blossom bonsai: a little tree full of blossoms.
- Crochet flower bouquet bag charm: a daisy, a tulip and a rose.
- Crochet coffee cup keychain: a mini takeaway cup.
- Crochet hat keychain: a mini straw hat with a red band.
- Cute crochet flower bracelet: forget-me-nots for your wrist.
Made a blossom? Tag #wavodecrochet on Pinterest. I re-pin every finished make and credit the maker.
Pattern by Clara Hartwell for Wavode. Questions? Email me at support@wavode.com.