Cute Crochet Flower Bracelet

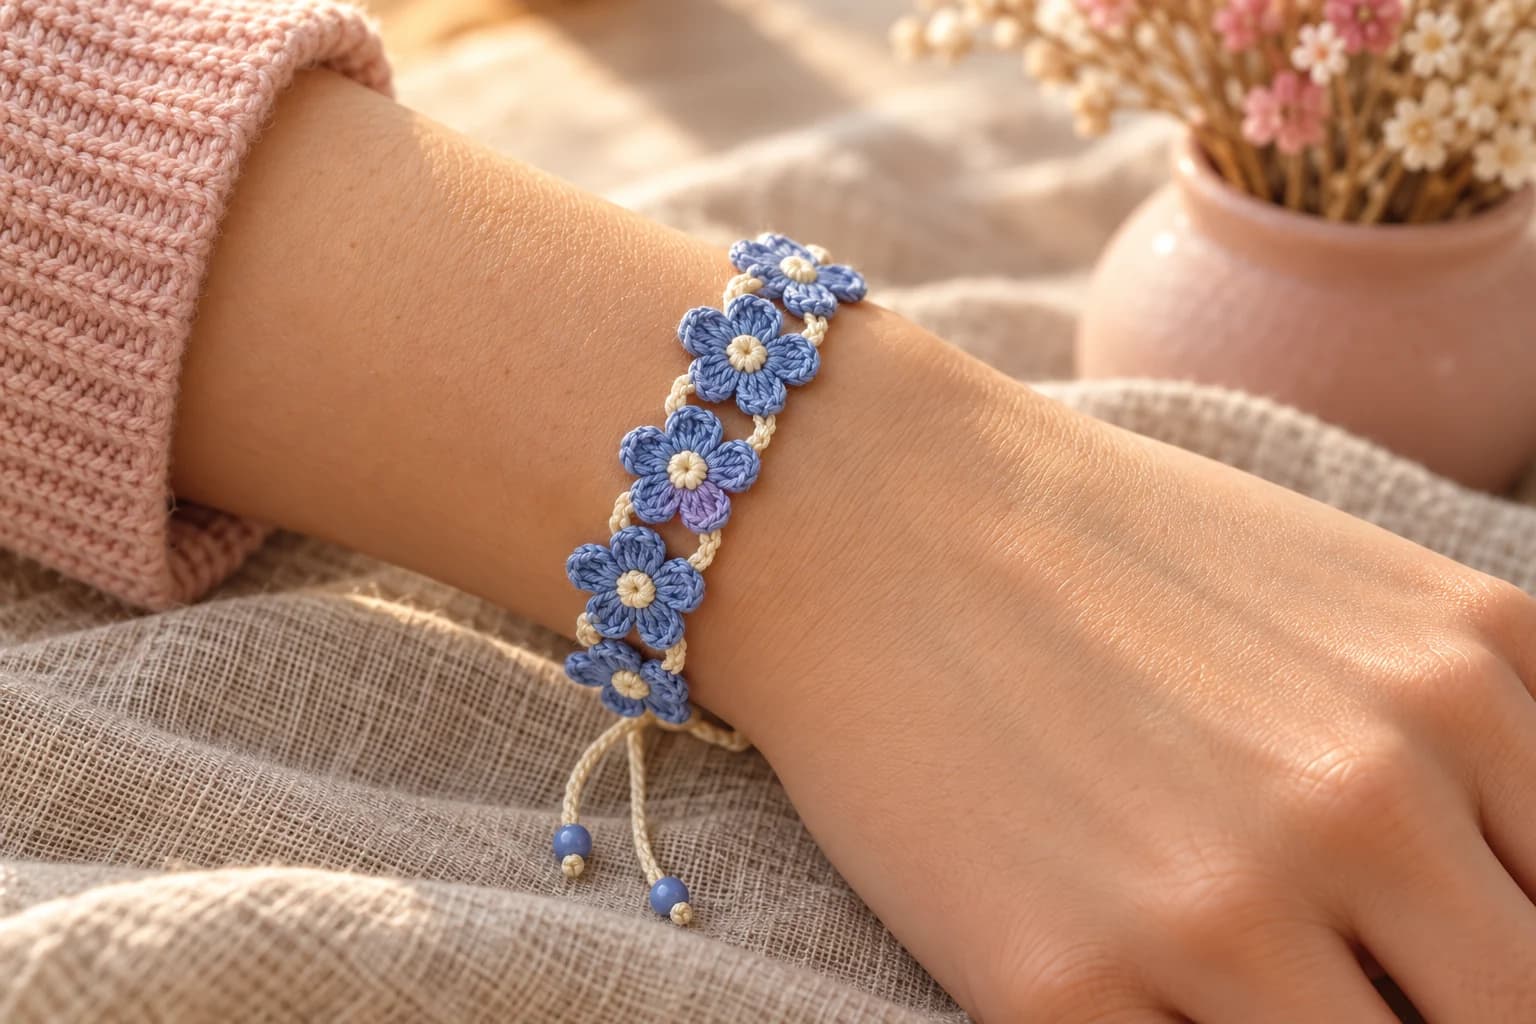
This cute crochet bracelet is a close-set row of blue forget-me-not flowers, joined by short cream links, with an adjustable sliding knot. You crochet the flowers first: a tiny cream center and five blue petals. Then two cream strands join them into a band, and their ends become the ties. A few square knots make the slider, and a bead finishes each tie. You'll need size 10 crochet thread in two colors, a 1.5 mm steel hook and about 2 to 3 hours.
Key Takeaways
- Only four stitches: ch, sl st, sc and dc, plus a magic ring.
- Fits any wrist: you set the length by the number of flowers, and the sliding knot does the rest.
- No metal findings: the clasp is a macramé sliding knot, so you won't need a clasp or jump rings.
- Tiny amounts: about 12 yd of blue and 15 yd of cream thread. One ball makes many bracelets.
Why I love this bracelet
Why do flower bracelets look so much better in thread than in yarn? It's the scale. The flowers sit almost petal to petal, and the short cream links barely show between them, so the bracelet reads as one continuous band of blue flowers around the wrist.
Forget-me-nots are my favorite for this. Five round blue petals and a pale center are all it takes to read as the real flower. They're also friendship-bracelet territory: quick enough to make one for a friend in an evening, and cheap enough to make a stack.
Skill level. Easy, once you're used to thread. If you've never crocheted with thread, the stitches are the same as with yarn, just smaller. Work in good light and keep a gentle, even tension.
Looking for something more delicate? My lily of the valley crochet bracelet has white bell flowers on a fine chain.
What you'll need
Thread (size 10 cotton crochet thread)
| Color | Used for | Amount |
|---|---|---|
| Periwinkle blue | Petals | about 12 yd |
| Cream | Flower centers, links, ties and slider | about 15 yd |
- Any mercerized size 10 cotton works, like Aunt Lydia's Classic 10 or DMC Cébélia 10. It's smooth and crisp and shows every stitch.
- These amounts are estimates for a 7-flower bracelet, with generous tails. A standard ball of size 10 thread makes a lot of bracelets.
Hook
- 1.5 mm (US 7 or 8 steel). If your flowers come out tight and cupped, go up to 1.75 mm.
Notions
- A fine tapestry needle that fits the thread, sharp scissors, two stitch markers.
- 2 small beads for the tie ends, with a hole big enough for one strand of thread. I use blue 6/0 seed beads, about 4 mm.
- Optional: a tiny dot of clear-drying craft glue for the knots.
Abbreviations (US crochet terms)
- MR: magic ring
- ch: chain
- sl st: slip stitch
- sc: single crochet
- dc: double crochet
- st(s): stitch(es)
How the bracelet is built
Here's the whole thing in one sentence. You make a row of separate flowers, then work a cream strand along the top of the row and another along the bottom, each one slip-stitched to the petal tips. Between neighboring flowers the two strands make a short link with a tiny opening, so the flowers sit almost petal to petal. The top strand runs on past both end flowers to become the ties. The bottom strand starts and ends where the top strand turns into a tie.
The pattern, step by step
Part 1: The flowers (make 7, or as many as your wrist needs)
Center (cream).
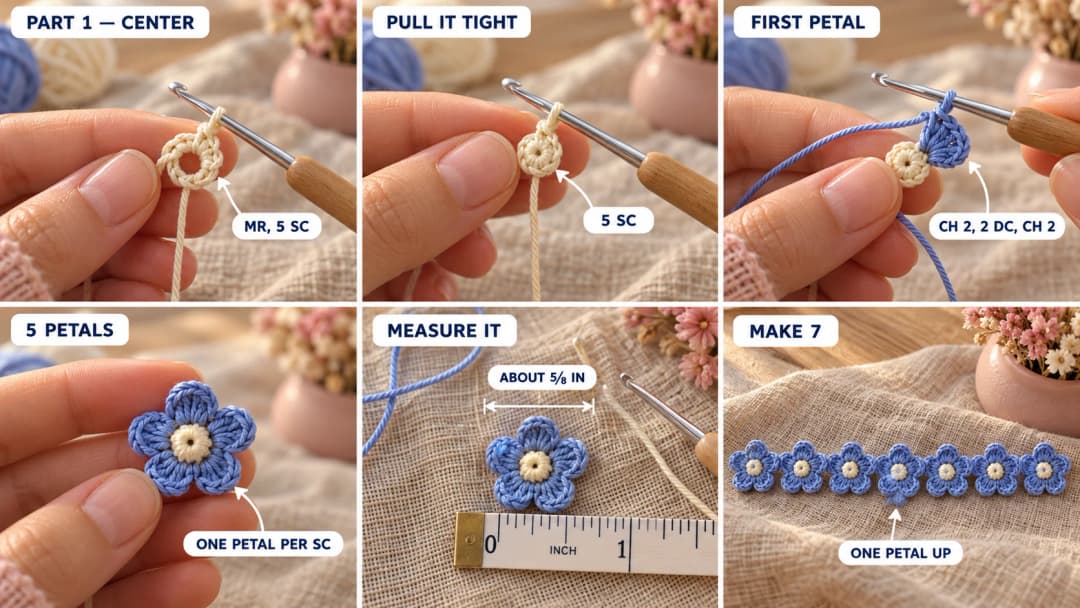
- MR. Ch 1, 5 sc in the ring. Pull the ring closed tightly and join with a sl st to the first sc. (5 sc) Fasten off, leaving a 4 in (10 cm) tail.
Petals (blue).
- Join blue with a sl st in any sc of the center. Ch 2, 2 dc in the same st, ch 2, sl st in the same st. That's the first petal.
- (Sl st, ch 2, 2 dc, ch 2, sl st) all in the next sc. Work from * to * 4 times in total, one petal in each remaining sc.
- Join with a sl st to the first sl st. (5 petals) Fasten off, leaving a 4 in tail.
The petal tip is the little gap between the two dc at the top of each petal. That's where the links attach.
Weave all the tails in on the back, going through the center sts and the base of the petals, then trim. The front of the flower is the side you were facing as you worked.
How big is your flower? Measure one across, from petal tip to petal tip. With size 10 thread and a 1.5 mm hook, it's usually about ⅝ in (1.5 cm). Write your number down: you'll need it to choose how many flowers to make.
Part 2: How many flowers?
Measure your wrist snugly with a tape measure. The flower band should be about 1 in (2.5 cm) shorter than your wrist, and the ties close the gap.
With ⅝ in flowers and the short links below, each flower adds about ¾ in (2 cm) to the band, and the two end links add about ½ in (1.3 cm). So:
| Wrist | Flowers |
|---|---|
| 5½ to 6 in / 14 to 15 cm | 6 |
| 6 to 7 in / 15 to 18 cm | 7 |
| 7 to 8 in / 18 to 20 cm | 8 |
If your flowers are bigger or smaller, lay them in a row with a gap of about 3/16 in (4 mm) between petal tips and measure the row. Add or remove flowers until it's about 1 in shorter than your wrist.
Part 3: Linking the flowers (cream)
Lay the flowers in a row, front side up, with one petal of each flower pointing straight up. Now each flower has:
- a top petal, pointing up, which stays free;
- a left petal and a right petal, at about 10 and 2 o'clock, just above the middle;
- two bottom petals, at about 7 and 5 o'clock.
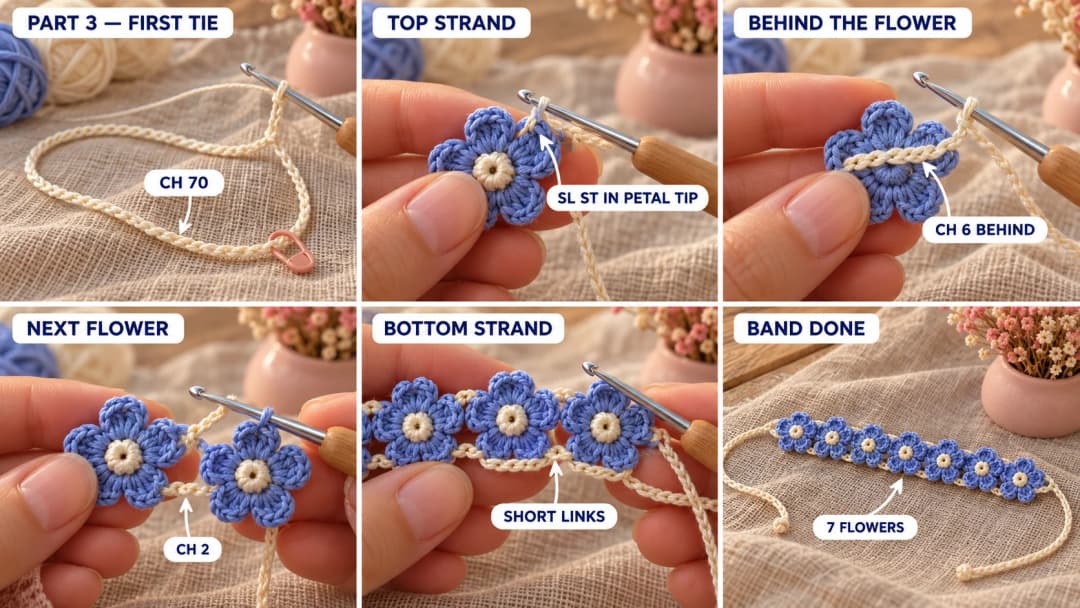
The top strand links the left and right petals and becomes both ties.
- Leave a 4 in tail and ch 70, or until the chain measures about 6 in (15 cm). This is the first tie. Put a marker in the last ch: it's junction A.
- Ch 3, then sl st into the tip of the left petal of flower 1.
- Ch 6, laying the chain behind flower 1, and sl st into the tip of its right petal. The chain should lie flat behind the flower without pulling. Add or remove a ch if it doesn't.
- Ch 2, sl st into the left petal of the next flower, ch 6 behind it, sl st into its right petal. Repeat this step for every remaining flower.
- After the right petal of the last flower, ch 3. Put a marker in this 3rd ch: it's junction B.
- Ch 70 for the second tie. Fasten off, leaving a 4 in tail.
The bottom strand links the two bottom petals.
- Join cream with a sl st in the marked ch at junction A.
- Ch 3, sl st into the tip of the lower-left petal of flower 1. Ch 4 behind the flower and sl st into the tip of its lower-right petal.
- Ch 2, sl st into the lower-left petal of the next flower, ch 4 behind it, sl st into its lower-right petal. Repeat for every remaining flower.
- After the lower-right petal of the last flower, ch 3 and sl st into the marked ch at junction B. Fasten off.
Between two flowers, the top and bottom ch-2s now make a short link with a tiny oval opening, and the flowers sit almost petal to petal. At each end, they meet at a junction, so the band tapers into the tie. Weave in the strand ends along the chains behind the flowers.
Part 4: Firm ties, the sliding knot and the bead tips
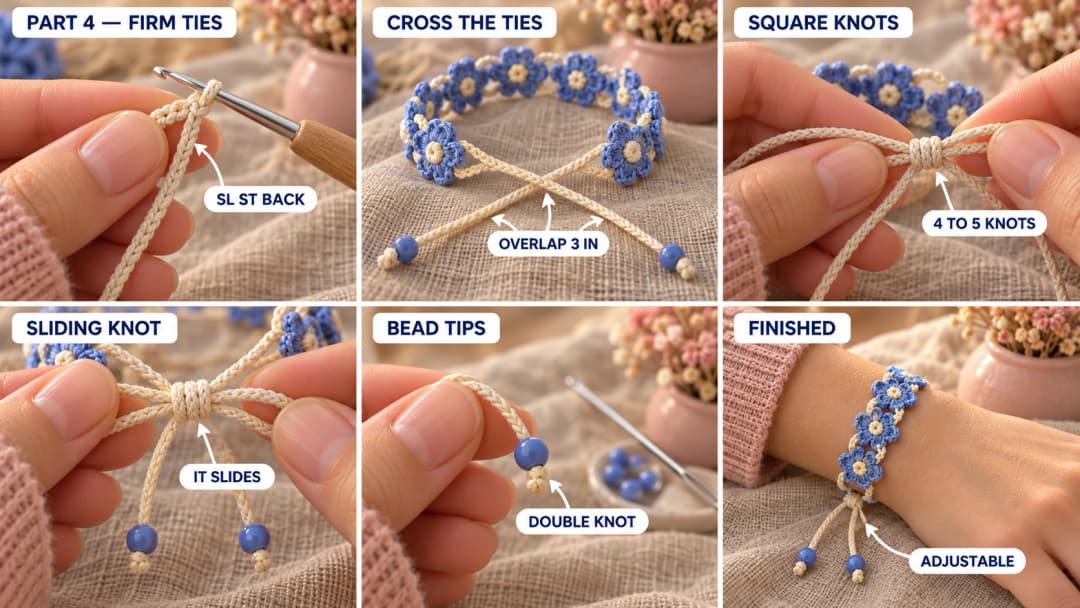
Firm the ties. A single chain in cotton stretches. Join cream at the free end of one tie and sl st in the back bump of each ch up to the junction. Fasten off and weave the end in. Repeat on the other tie.
Sliding knot. It's a short run of square knots tied around both ties, so the two ties can slide through it.
- Lay the bracelet in a circle and cross the ties so they overlap by about 3 in (7.5 cm), pointing in opposite directions.
- Cut 12 in (30 cm) of cream thread. Center it under the overlapped ties.
- Tie 4 to 5 square knots around both ties: left end over the ties and under the right end, right end under the ties and up through the loop on the left, pull snug. Then repeat, mirrored (right over, left under). Each pair of half-knots is one square knot.
- Pull the last knot firm, trim the ends to about ⅛ in (3 mm), and dab them with a tiny dot of glue if you like. Glue only the slider's own ends, never the ties, or it won't slide.
Bead tips. Thread the tail at the end of one tie through a bead and push the bead up to the end of the cord. Tie a tight double overhand knot right under it, dab the knot with glue if you like, and trim. Repeat on the other tie.
Wearing it. Pull the two bead ends apart to tighten, and pull the band to loosen.
Finishing
- Block lightly (optional). Pin the flowers flat on a towel, mist them with water and let them dry. The petals open up and the links straighten.
- Care. Hand wash in cool water if it ever needs it and lay it flat to dry. Take it off before swimming or showering, since wet cotton stretches.
Safety. This is a bracelet for older children and adults. The small beads and the long ties aren't safe for babies or toddlers, so keep it out of reach of little ones.
More cute crochet bracelet ideas from the same flower
Once you've made one, the flower and the links work for a whole collection:
| Idea | What to change |
|---|---|
| Daisy bracelet | White petals, yellow centers. Make the petals a little longer: (sl st, ch 3, 2 tr, ch 3, sl st) in each sc. |
| Rainbow bracelet | Make each flower in a different color, with cream centers to tie them together. |
| Ankle bracelet | Measure your ankle and add about one flower for every extra ¾ in (2 cm). Use the same ties and slider. |
| Friendship pair | Make two in swapped colors, blue with cream centers and cream with blue centers, one for you and one for a friend. |
| Single-flower bracelet | One flower in the middle and long ties on both sides. It takes about 20 minutes, and it's lovely for kids' party favors (older kids). |
| Flower choker | Make enough flowers for your neck minus 2 in. Use the same ties and slider, with longer ties. |
Troubleshooting the three things that go wrong
The flowers cup instead of lying flat
Your center ring is too tight, or your hook is too small for your tension. Go up to a 1.75 mm hook for the petals only, or work 6 sc in the center instead of 5. (That gives 6 petals, which looks just as pretty.)
The links pull the flowers sideways
The chains behind the flowers are too short. Undo back to that flower and add a ch until it lies flat.
The slider won't slide
It's too tight, or glue has reached the ties. Tie a new slider with one fewer square knot and keep the glue on its own trimmed ends only.
Frequently asked questions
How long does this bracelet take? About 2 to 3 hours for a 7-flower bracelet. Each flower takes 10 to 15 minutes once you're used to thread, and the links and slider take about half an hour.
Can I use yarn instead of thread? Yes, with a matching hook. In fingering-weight cotton with a 2.25 mm hook, the flowers come out about 1 in across, so you need fewer of them. It's chunkier and more playful, and also lovely.
Do I need a magic ring? It gives the tightest center. If you prefer, ch 4, join with a sl st to make a ring, and work the 5 sc into it.
Can I sell bracelets made from this pattern? Yes, you're welcome to sell finished bracelets made from this free pattern at markets, on Etsy or as gifts. Please credit "Pattern by Wavode" in your listing and link back to this page. What you can't do is republish this write-up or my photos as your own pattern.
Related patterns on Wavode
- Lily of the valley crochet bracelet: white bell flowers and sage leaves on a fine chain.
- Boho fern leaf crochet earrings: cascading leaves on a hoop.
- Autumn leaf crochet earrings: a beginner starburst leaf in fall colors.
- 20 crochet jewelry ideas: more bracelets, necklaces and earrings to try.
Made a flower bracelet? Tag #wavodecrochet on Pinterest. I re-pin every finished make and credit the maker.
Pattern by Clara Hartwell for Wavode. Questions? Email me at support@wavode.com.