Sunshine Crochet Dress

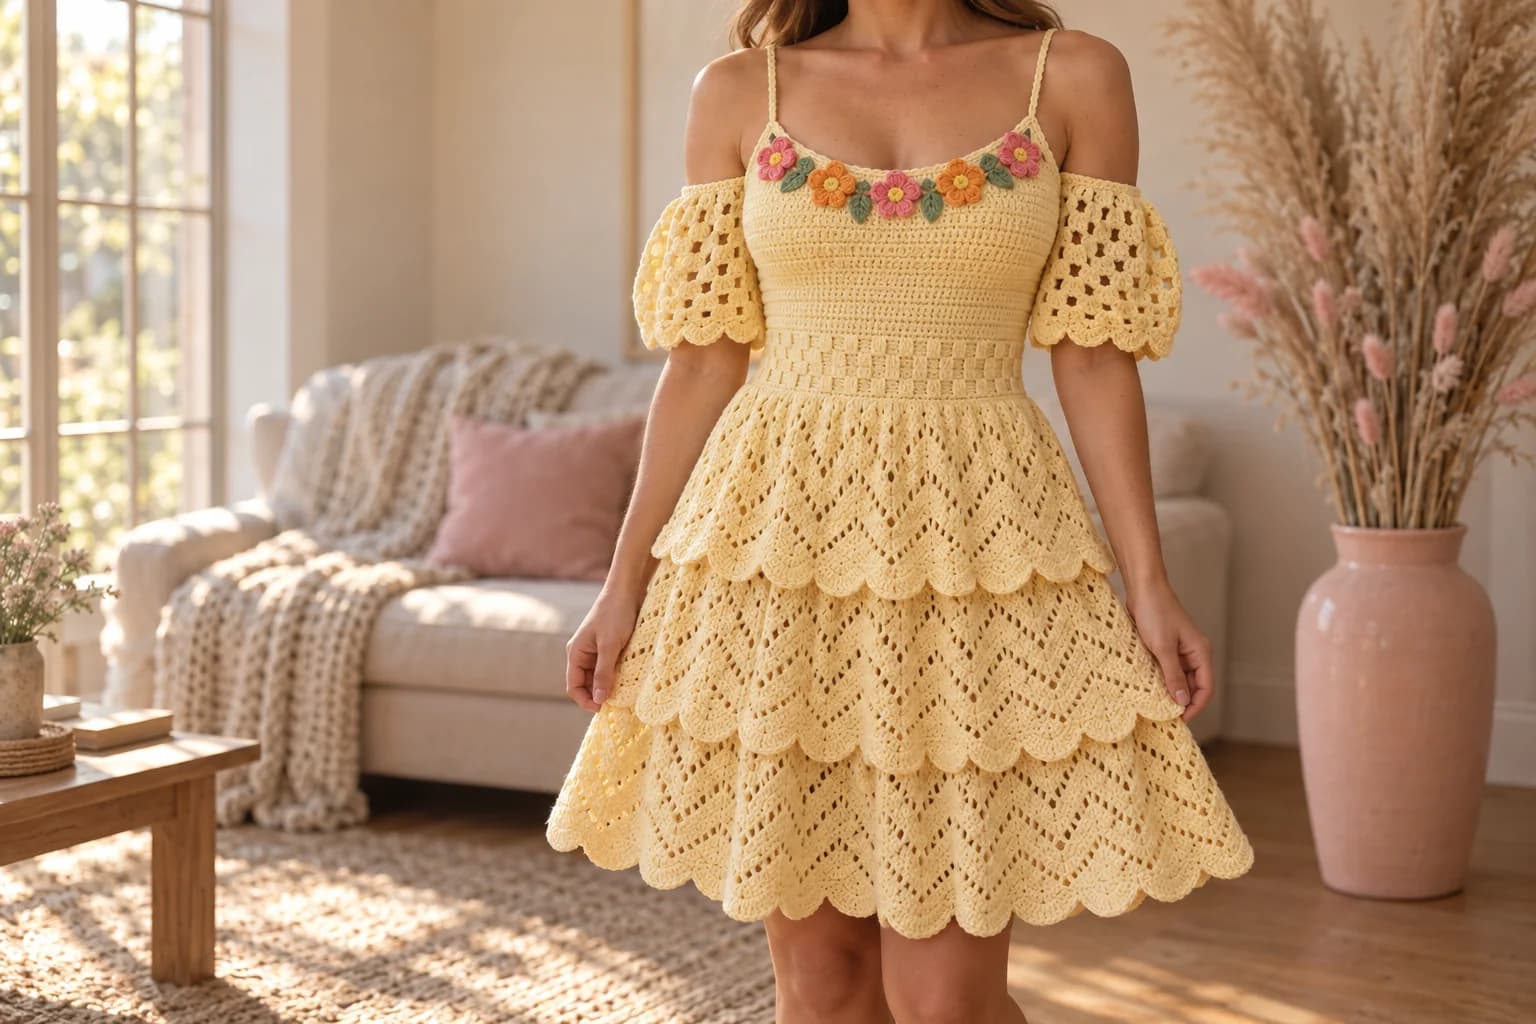
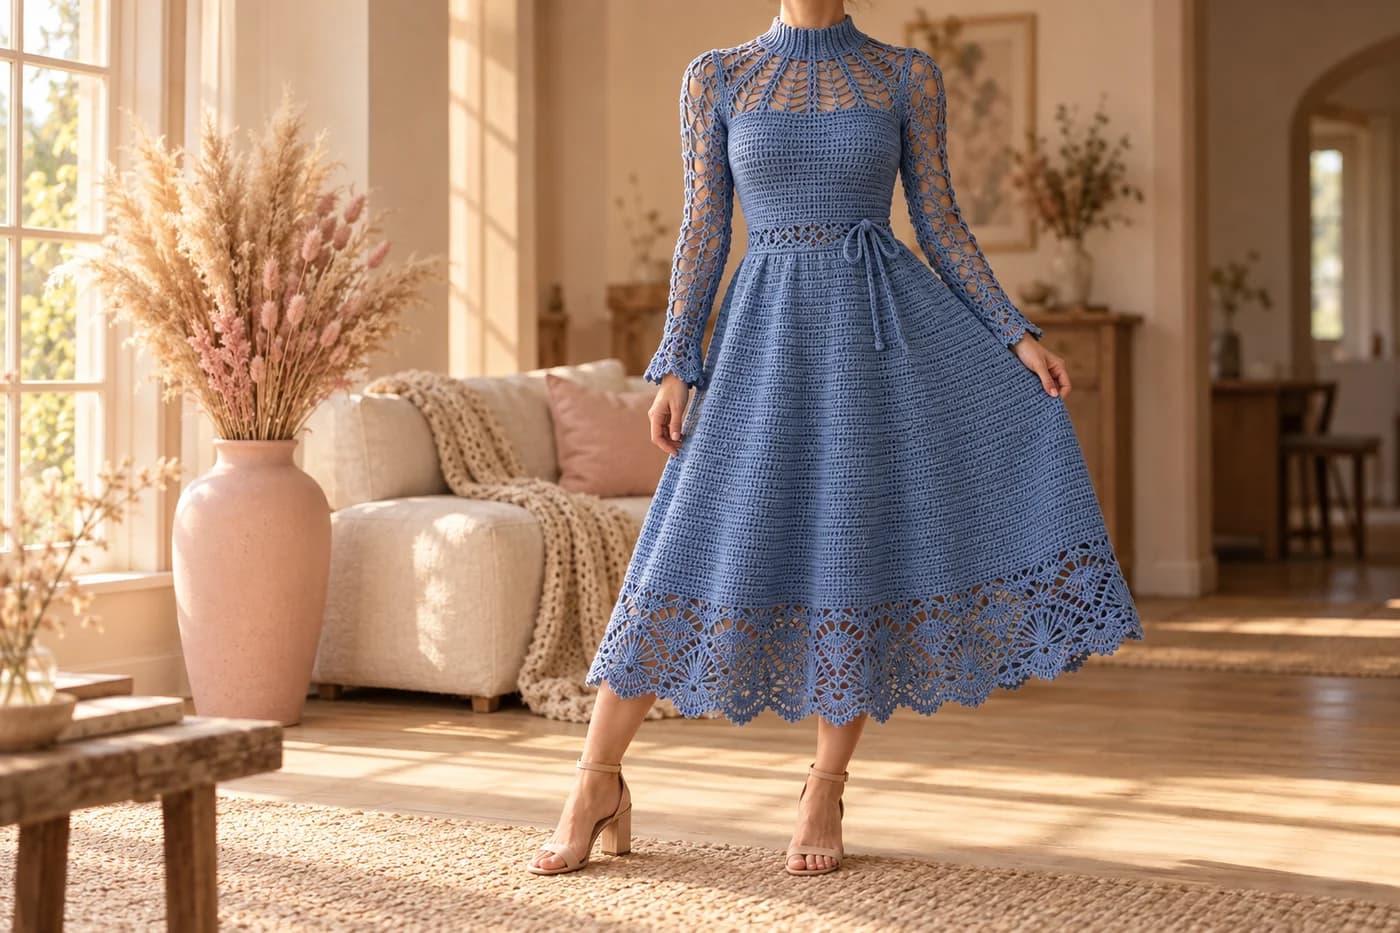
This free sunshine crochet dress pattern makes a butter yellow summer dress with three swingy lace tiers, a fitted basketweave waist and a little garland of flowers along the neckline. Cold-shoulder puff sleeves sit on the upper arms, and thin straps hold everything up. The bodice is worked up from the waist, and the skirt is worked down from the same edge. You'll need DK #3 cotton, a 4 mm hook and about 1,575 yards for size S. It comes in 5 sizes, XS to XL.
Key Takeaways
- One starting chain at the waist: the waistband and bodice grow up from it, and the skirt grows down.
- Each tier is the same ripple lace, with a scalloped frill that hangs over the next tier.
- A buttoned back opening goes from the top of the bodice down to the waist, so the dress slips on easily.
- About 1,400 to 2,175 yd of DK cotton, plus small scraps for the flowers.
Why I love this sunshine crochet dress
Some dresses just feel like summer. This one is pale yellow, light and twirly, with flowers right where everyone looks first. The waist is fitted, and the three tiers swing out below it, so it flatters without clinging.
Every part uses one easy idea. The waistband is a basketweave of front and back post stitches, which pulls in nicely at the waist. The bodice is plain half double crochet. The skirt tiers repeat one ripple lace round, and the zigzags line up all the way down.
The tiers are my favorite trick. Each tier ends with a round of single crochet. You work a scalloped frill in the front loops of that round, then start the next tier in the back loops. The frill hangs over the seam, so each tier really looks layered. Isn't that the sweetest way to hide a join?
Skill level. Intermediate. You need chain, sc, hdc, dc, front and back post dc, dc3tog, granny clusters, working in rows and in rounds, and reading a size table. It's a long project, so take it one part at a time.
What you'll need
Main yarn (DK weight #3 cotton, about 1400 (1575, 1750, 1900, 2175) yd / 1280 (1440, 1600, 1740, 1990) m in one color)
- I used a soft butter yellow. Any light solid color shows the lace and the basketweave well.
- In Paintbox Yarns Cotton DK (137 yd / 125 m per 50 g), that's 11 (12, 13, 14, 16) balls. Rico Essentials Cotton DK works too. Buy all of it from one dye lot.
- I worked these totals out from the stitch count, part by part. They include a margin of about 12% for the swatch and the ends. Most of the yarn goes into the skirt.
Flower yarn (same DK cotton, small amounts)
| Color | Used for | Amount |
|---|---|---|
| Coral pink | 3 flowers | about 6 yd |
| Orange | 2 flowers | about 4 yd |
| Mustard yellow | 5 flower centers | about 3 yd |
| Leaf green | 10 leaves | about 10 yd |
Hook
- 4 mm (US G/6).
Notions
- 6 buttons, ½ in (12 mm), in yellow or pearl.
- 6 locking stitch markers.
- Tapestry needle, measuring tape and scissors.
Gauge
- Half double crochet (bodice): 18 sts × 13 rows = 4 in (10 cm).
- Basketweave (waistband): 20 sts × 9 rows = 4 in (10 cm). Post stitches pull in, so the waistband is narrower than the bodice on the same count.
- Ripple lace (skirt): one 12-st repeat = about 2¾ in (7 cm) wide, and 9 rounds = 4 in (10 cm), after blocking.
- Granny stitch (sleeves): 10 clusters = about 9 in (23 cm).
Check the hdc gauge before you start. If you have more than 18 sts, go up a hook size. If you have fewer, go down one. One stitch per 4 in changes the bust of size M by about 2 in.
Abbreviations (US crochet terms)
- ch: chain
- sl st: slip stitch
- sc: single crochet
- hdc: half double crochet
- dc: double crochet
- fpdc / bpdc: front / back post double crochet
- dc3tog / sc3tog: double / single crochet 3 together
- BLO / FLO: back / front loop only
- MR: magic ring
- sk: skip
- sp: space
- st(s): stitch(es)
- rnd(s): round(s)
- RS / WS: right side / wrong side
The stitches
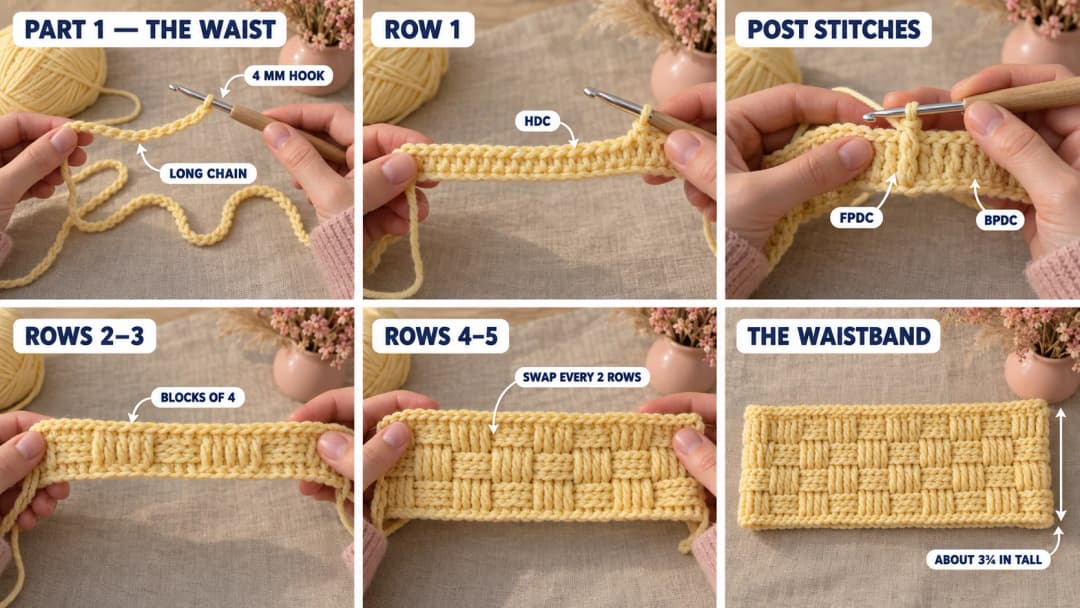
Basketweave (waistband). Blocks of 4 fpdc and 4 bpdc. After every 2 rows the blocks swap, so the raised blocks sit like a woven checkerboard.
Ripple lace (skirt tiers). A 12-st repeat with a peak of (dc, ch 1, dc), a valley of dc3tog, and dc and ch-1 spaces in between. In the ripple rounds, every ch-1 space counts as a stitch. The peaks always go into the peaks and the valleys into the valleys, so the zigzags stack.
Ledge and frill (end of each tier). A round of sc that keeps the zigzag, then a scalloped frill worked in its front loops. The next tier starts in its back loops.
Granny stitch (sleeves). Clusters of 3 dc with a ch 1 between them. Each round, the clusters go into the ch-1 spaces of the round below.
Size chart
| Size | To fit bust | Finished bust | To fit waist | Finished waist | Upper arm band | Length (bodice side to hem) | Yarn |
|---|---|---|---|---|---|---|---|
| XS | 30–32 in | 33¼ in / 84 cm | 24–26 in | 26 in | 11 in | 32½ in | 1,400 yd |
| S | 33–35 in | 36½ in / 93 cm | 27–29 in | 29¼ in | 12¼ in | 32½ in | 1,575 yd |
| M | 36–38 in | 39 in / 99 cm | 30–32 in | 32½ in | 13¼ in | 33 in | 1,750 yd |
| L | 39–42 in | 43 in / 109 cm | 33–35 in | 35½ in | 14½ in | 33 in | 1,900 yd |
| XL | 43–46 in | 47 in / 119 cm | 37–40 in | 40½ in | 15½ in | 33½ in | 2,175 yd |
The dress has about 1 to 3 in of ease at the bust and a snug waist. The skirt measures about 23½ in from the waist to the hem in every size: tier 1 is about 7 in, tier 2 about 7½ in and tier 3 about 9 in. That's around the knee on someone about 5 ft 5 in (165 cm). The tiers are easy to lengthen, see the FAQ.
Instructions are written XS (S, M, L, XL). When only one number is given, it applies to every size.
The pattern, step by step
Part 1: The basketweave waistband
The waistband is worked flat, in rows, from the bottom edge up. The two short edges become the back opening.
Ch 132 (148, 164, 180, 204).
Row 1 (WS): Hdc in the 3rd ch from the hook and in each ch across. Turn. (130 (146, 162, 178, 202) hdc)
Row 2 (RS): Ch 2 (doesn't count, here and on every row). Hdc in the first st. Fpdc around the next 4 sts, bpdc around the next 4 sts. Repeat from * across to the last st. Hdc in the last st. Turn. (16 (18, 20, 22, 25) pairs of blocks)
Row 3 (WS): Ch 2, hdc in the first st. Fpdc around the next 4 sts, bpdc around the next 4 sts. Repeat from * to the last st, hdc in the last st. Turn.
Working the same sequence on the WS keeps the same blocks raised on the RS.
Rows 4–5: Ch 2, hdc in the first st. Bpdc around the next 4 sts, fpdc around the next 4 sts. Repeat from * to the last st, hdc in the last st. Turn. The blocks swap.
Rows 6–7: Work as Rows 2–3.
Rows 8–9: Work as Rows 4–5.
The waistband is about 3¾ in (9.5 cm) tall, with four rows of blocks. Don't fasten off.
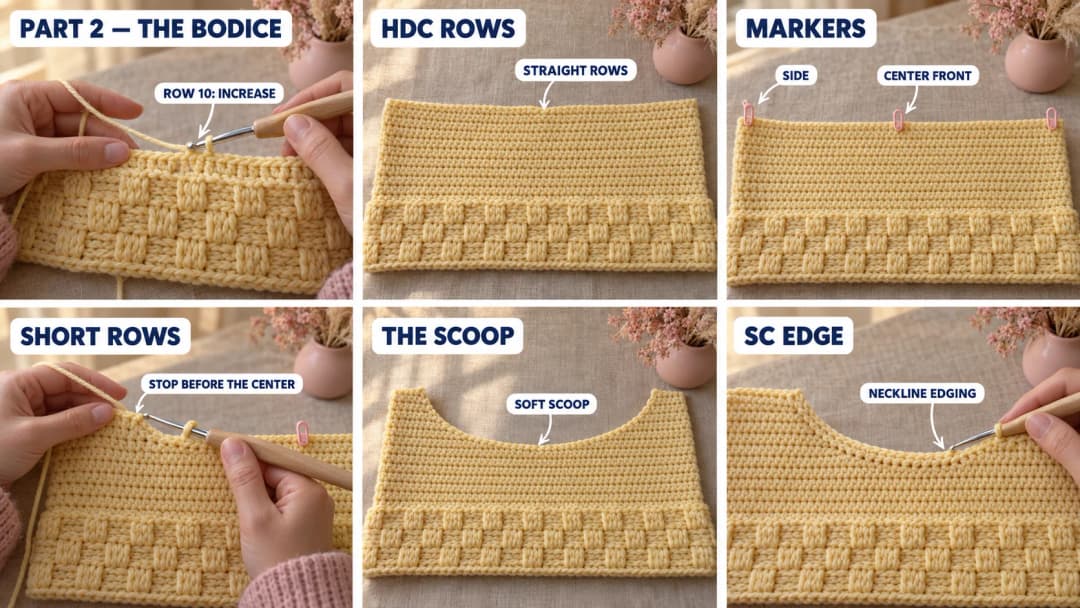
Part 2: The bodice and neckline
Keep working in rows, up from the waistband.
Row 10 (RS): Ch 2, hdc in each st across, increasing 20 (18, 14, 16, 10) sts evenly. Turn. (150 (164, 176, 194, 212) hdc)
Rows 11 to 21 (21, 23, 23, 25): Ch 2, hdc in each st across. Turn. The last row is a WS row.
Mark the dress. On the last row, count the sts from the edge where your RS rows start (I'll call it edge A) and place markers:
- Center front: between st 75 and 76 (82 and 83, 88 and 89, 97 and 98, 106 and 107).
- Sides: in the 38th (41st, 44th, 49th, 53rd) st from each back edge.
Try the bodice on with the opening at your back. The side markers should sit under your arms, at the height of your armpit minus about 1¼ in. Add or remove rows here if you need to (keep an odd number of rows so you end on a WS row).
Shape the neckline with short rows. These raise the back and the sides, so the front dips into a soft scoop.
First side:
- Short Row 1 (RS): From edge A, ch 2, hdc in each st across, stopping 12 (14, 15, 16, 18) sts before the center front marker. Turn.
- Short Row 2 (WS): Ch 2, hdc in each st back to edge A. Turn.
- Short Row 3 (RS): Ch 2, hdc across, stopping 18 (20, 21, 22, 24) sts before the center front marker. Turn.
- Short Row 4 (WS): Ch 2, hdc in each st back to edge A. Fasten off.
Second side: With the WS facing, join the yarn at the top of the other back edge (edge B). Work Short Rows 1–4 the same way, with WS and RS swapped. Fasten off.
Neckline edging: With the RS facing, join the yarn at the top of edge A. Ch 1, sc evenly all along the top edge to edge B: 1 sc in each st, and 2 sc down the side of each short-row step. Fasten off.
The bodice now measures about 8¾ (8¾, 9¼, 9¼, 10) in from the bottom of the waistband at the sides, and about 1¼ in less at the center front.
Part 3: Skirt tier 1
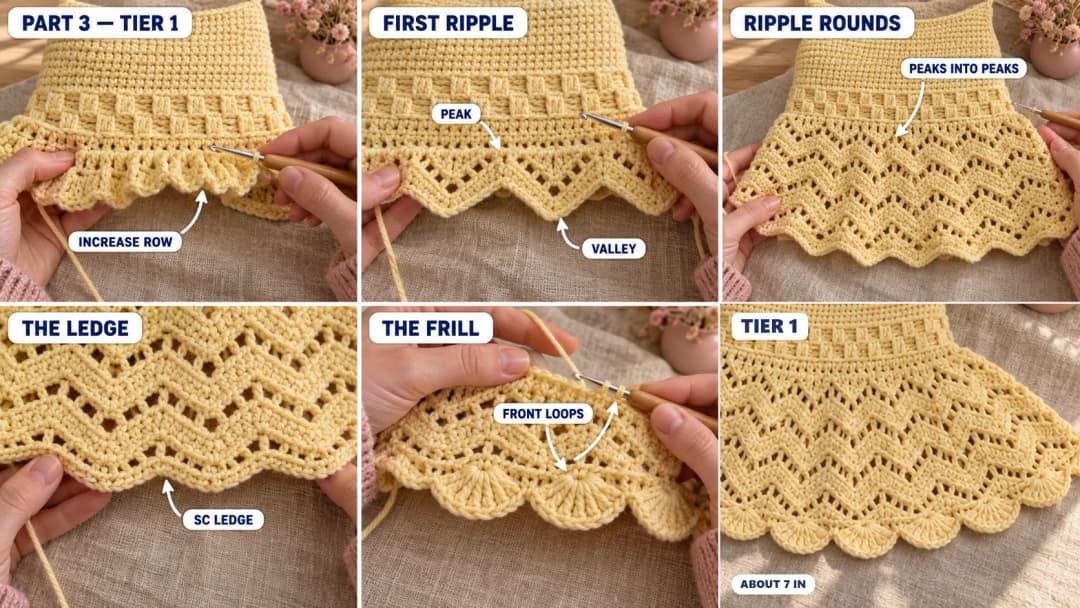
Turn the work upside down. The skirt grows down from the free loops of the foundation chain.
Tier 1, Row 1 (RS, increase): With the RS facing, join the yarn in the first free loop of the foundation ch at one back edge. Ch 1, sc in each free loop across, increasing 62 (70, 78, 86, 98) sts evenly (that's about 2 sc in every other loop). Don't turn. (192 (216, 240, 264, 300) sc)
This row is still flat, so the back opening goes all the way down to here. That's what lets the dress go on over your hips or shoulders.
Tier 1, Round 2 (first ripple round, joins the skirt): Ch 4 (counts as a dc and ch 1), dc in the last sc you made. Then carry on into the first sc of the row, at the other back edge, so you go around in the same direction as Row 1: Ch 1, sk 1 st, dc in the next st, ch 1, sk 1 st, dc in the next st, dc3tog over the next 3 sts, dc in the next st, ch 1, sk 1 st, dc in the next st, ch 1, sk 1 st, (dc, ch 1, dc) in the next st. Repeat from * around, leaving out the last (dc, ch 1, dc). Join with a sl st to the 3rd ch of the beginning ch-4. (16 (18, 20, 22, 25) ripples)
Hold the two ends of the sc row together as you work across the gap, so the round closes without a twist. From here, the skirt is worked in rounds with the RS facing.
Tier 1, Rounds 3–14 (ripple): Sl st in the next ch-1 sp (the peak). Ch 4 (counts as a dc and ch 1), dc in the same sp. Ch 1, dc in the next ch-1 sp, ch 1, dc in the next ch-1 sp, dc3tog over the next 3 sts (the dc, the valley and the next dc), dc in the next ch-1 sp, ch 1, dc in the next ch-1 sp, ch 1, (dc, ch 1, dc) in the next ch-1 sp (the peak). Repeat from * around, leaving out the last peak. Join to the 3rd ch of the beginning ch-4.
Every dc goes into a ch-1 sp, and every ch 1 skips a dc. The count stays at 12 sts per ripple, counting each ch-1 sp as a st.
Tier 1, Round 15 (ledge): Sl st in the next ch-1 sp. Ch 1, 3 sc in the same sp. Sc in each of the next 4 sts, sc3tog over the next 3 sts, sc in each of the next 4 sts, 3 sc in the next ch-1 sp (the peak). Repeat from * around, leaving out the last 3 sc. Join to the first sc. (192 (216, 240, 264, 300) sc)
Tier 1, Round 16 (frill, FLO): Ch 1. Working in the front loops only: sc in the next st, sk 2 sts, 7 dc in the next st, sk 2 sts. Repeat from * around. Join to the first sc. Fasten off. (32 (36, 40, 44, 50) scallops)
The back loops of Round 15 stay free, behind the frill. Tier 2 starts there.
Part 4: Skirt tiers 2 and 3
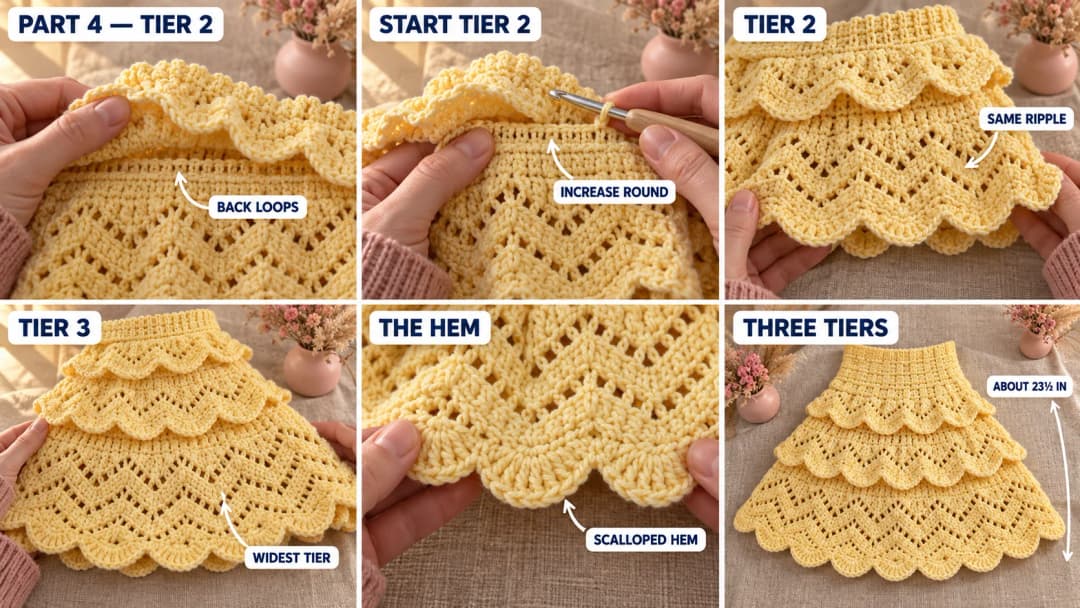
Tier 2, Round 1 (BLO, increase): Hold the frill of tier 1 up out of the way. Join the yarn in the back loop of any sc of tier 1, Round 15, at the center back. Ch 1, sc in the back loop of each st around, increasing 60 (72, 72, 84, 96) sts evenly (about every 3rd st). Join. (252 (288, 312, 348, 396) sc)
Tier 2, Round 2 (first ripple round): Ch 4 (counts as a dc and ch 1), dc in the same st as the join. Ch 1, sk 1 st, dc in the next st, ch 1, sk 1 st, dc in the next st, dc3tog over the next 3 sts, dc in the next st, ch 1, sk 1 st, dc in the next st, ch 1, sk 1 st, (dc, ch 1, dc) in the next st. Repeat from * around, leaving out the last peak. Join to the 3rd ch of the beginning ch-4. (21 (24, 26, 29, 33) ripples)
Tier 2, Rounds 3–15: Work as tier 1, Rounds 3–14 (ripple).
Tier 2, Round 16 (ledge): Work as tier 1, Round 15. (252 (288, 312, 348, 396) sc)
Tier 2, Round 17 (frill, FLO): Work as tier 1, Round 16. Fasten off. (42 (48, 52, 58, 66) scallops)
Tier 3, Round 1 (BLO, increase): Join in the back loop of any sc of tier 2, Round 16, at the center back. Ch 1, sc in the back loop of each st around, increasing 60 (72, 84, 84, 96) sts evenly (about every 4th st). Join. (312 (360, 396, 432, 492) sc)
Tier 3, Round 2: Work as tier 2, Round 2. (26 (30, 33, 36, 41) ripples)
Tier 3, Rounds 3–19: Work as tier 1, Rounds 3–14 (ripple).
Tier 3, Round 20 (ledge): Work as tier 1, Round 15.
Tier 3, Round 21 (scalloped hem): Ch 1. Working through both loops: sc in the next st, sk 2 sts, 7 dc in the next st, sk 2 sts. Repeat from * around. Join to the first sc. Fasten off. (52 (60, 66, 72, 82) scallops)
The hem of tier 3 measures about 71½ (82½, 90¾, 99, 112¾) in around, so the skirt swings when you walk.
Part 5: The cold-shoulder puff sleeves (make 2)
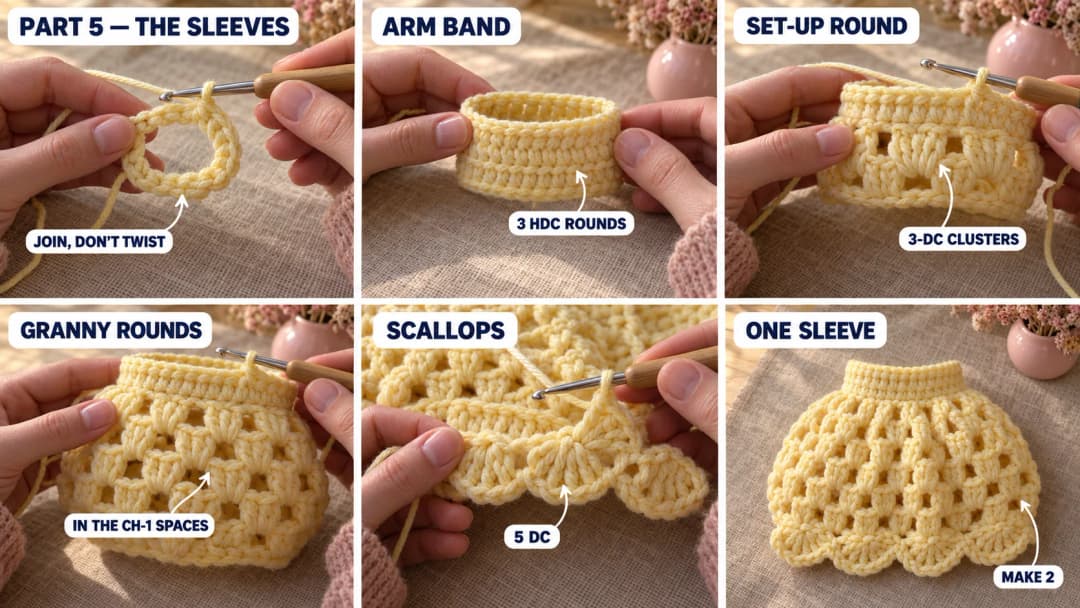
Each sleeve is a tube worked from the upper arm band down to the scalloped edge.
Ch 50 (55, 60, 65, 70). Join with a sl st to the first ch, being careful not to twist the chain.
Rnd 1: Ch 2 (doesn't count), hdc in each ch around. Join to the first hdc. (50 (55, 60, 65, 70) hdc)
Rnds 2–3: Ch 2, hdc in each st around. Join.
The band is about 1 in tall. Slip it over your upper arm: it should sit snug but comfortable. If it's tight, start again with 5 more ch.
Rnd 4 (set-up): Ch 3 (counts as a dc), 2 dc in the same st as the join, ch 1, sk 1 st, 3 dc in the next st, ch 1, sk 2 sts. 3 dc in the next st, ch 1, sk 1 st, 3 dc in the next st, ch 1, sk 2 sts. Repeat from * 9 (10, 11, 12, 13) more times. Join to the top of the ch-3. (20 (22, 24, 26, 28) clusters)
The sleeve puffs out here, to about 1½ times the band.
Rnds 5–15 (granny): Sl st in each of the next 2 dc and in the next ch-1 sp. Ch 3 (counts as a dc), 2 dc in the same sp, ch 1. 3 dc in the next ch-1 sp, ch 1. Repeat from * around. Join to the top of the ch-3.
Rnd 16 (scallops): Sl st in each of the next 2 dc and in the next ch-1 sp. Ch 1, sc in the same sp. 5 dc in the center dc of the next cluster, sc in the next ch-1 sp. Repeat from * around, ending with 5 dc in the center dc of the last cluster. Join to the first sc. Fasten off. (20 (22, 24, 26, 28) scallops)
The sleeve is about 7 in long from the top of the band.
Part 6: The flower garland
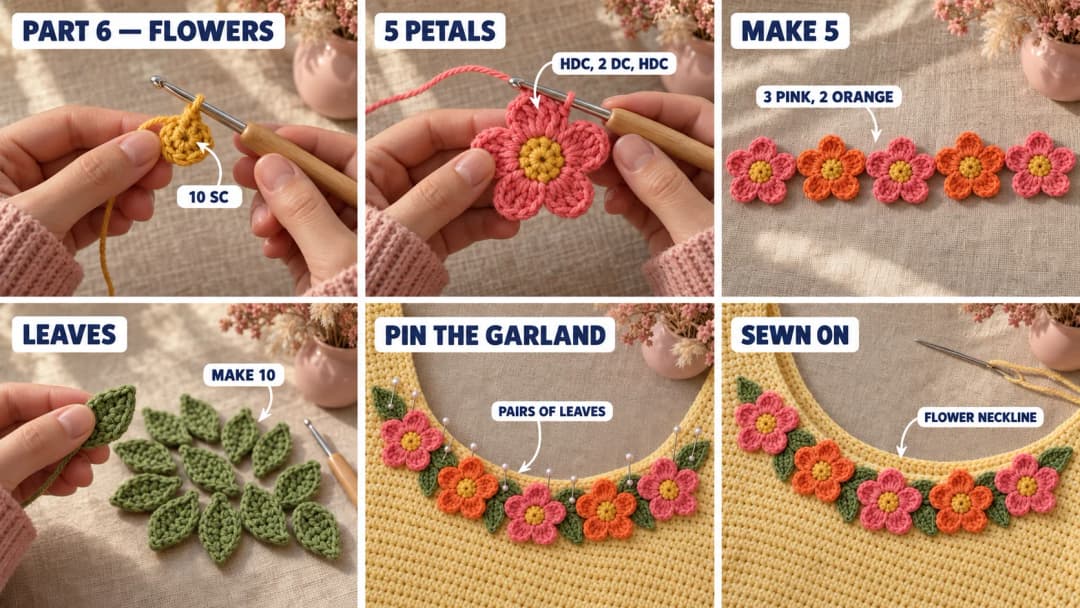
Flower center (mustard, make 5): MR, ch 1, 10 sc in the ring. Pull the ring closed and join to the first sc. Fasten off. (10 sc)
Petals (make 3 in coral pink and 2 in orange): Join the petal color with a sl st in any sc of a center. (Hdc, 2 dc, hdc) in the next st, sl st in the next st. Repeat from * 4 more times. The last sl st lands in the joining st. Fasten off, leaving a 10-in tail. (5 petals)
Each flower is about 1½ in (4 cm) across.
Leaf (green, make 10): Ch 6. Sl st in the 2nd ch from the hook, sc in the next ch, hdc in the next ch, dc in the next ch, sc in the last ch. Ch 1, turn the leaf and work along the other side of the chain, in the free loops: sc in the first loop, dc in the next, hdc in the next, sc in the next, sl st in the last. Fasten off, leaving an 8-in tail.
Lay out the garland along the front neckline, from strap point to strap point (see Part 7): pink, orange, pink in the center, orange, pink. Tuck a pair of leaves between each two flowers, and one leaf at each end. Pin each piece so its top edge just touches the sc edging.
Sew them on with the tails: a few stitches around each flower center and around the edge of each petal, and a line of stitches down the middle of each leaf. Weave in the ends on the WS.
Part 7: Straps, back opening and finishing
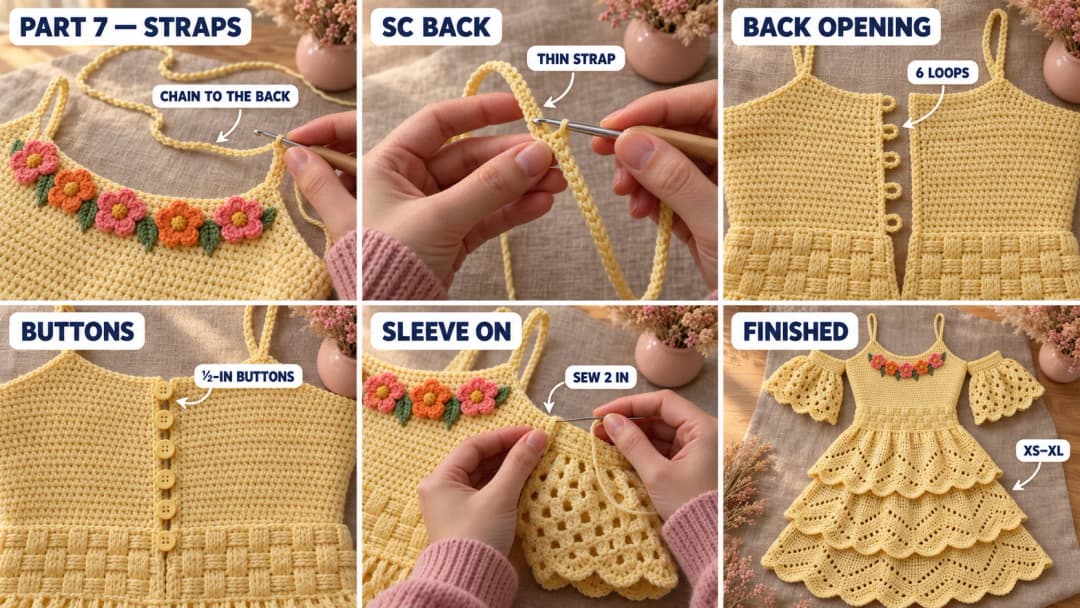
Straps (make 2). Mark the strap points on the sc edging:
- Front: the 21st (23rd, 24th, 25th, 27th) st on each side of the center front marker.
- Back: the 19th (20th, 22nd, 24th, 26th) st from each back edge.
With the RS facing, join the yarn at one front strap point. Ch 75 (75, 78, 80, 82), about 15 in. Try the dress on (pin the back closed) and check that the chain reaches the back strap point on the same side over your shoulder. Add or remove ch as needed. Sl st in the back strap point. Sc in each ch back to the front, then sl st in the front strap point. Fasten off. Make the second strap the same way.
Back opening. The opening runs from the top of the bodice down to tier 1, Row 1.
- Button edge: With the RS facing, join the yarn at the bottom of one edge of the opening (the end of tier 1, Row 1). Ch 1, sc evenly up the edge to the top: 1 sc in the sc row end, 2 sc in each hdc and post st row end. Fasten off.
- Loop edge: With the RS facing, join the yarn at the top of the other edge. Ch 1, sc evenly down to the bottom in the same way, making 6 button loops: one at the top, one at the waist seam (the foundation ch), and four evenly spaced between them. For each loop, ch 4 and sk 2 sts. Fasten off.
Sew the 6 buttons to the button edge, opposite the loops.
Attach the sleeves. Turn each sleeve so the join of the rounds is underneath, at your armpit. Lay that part of the band against the top edge of the bodice, centered on the side marker. Sew about 2 in of the band to the bodice, with small stitches through both. The rest of the band wraps around your upper arm, off the shoulder.
Finishing and blocking.
- Weave in every tail through at least 6 sts, then back the other way. In the ripple tiers, hide tails along the dc, never across the eyelets.
- Wet block the dress. Soak it in cool water, roll it in a towel and lay it flat on a clean sheet. Pull each tier gently down so the ripples open, and pin the scallops of every frill and the hem. Let it dry fully, flat.
- The ripple lace is airy. I like a plain slip underneath, in yellow or close to your skin tone.
Care
Hand wash in cool water. Never hang the wet dress: cotton stretches under the weight of the water, and the tiers would grow longer. Roll it in a towel, lay it flat and reshape the scallops while it's damp. Don't tumble dry, since cotton shrinks in heat. Store it folded in a drawer.
Make it yours — quick variations
| Variation | Change from base pattern |
|---|---|
| Two tiers | Skip tier 2. Work tier 3 straight from tier 1's ledge, increasing 120 (144, 156, 168, 192) sts in its Round 1. |
| Strappy, no sleeves | Skip Part 5. The straps and the flowers carry the look on their own. |
| Longer midi | Add 4 ripple rounds to tier 2 and 6 to tier 3. That's about 4½ in longer. |
| White garden dress | Make the dress in white or cream, with pastel pink and lilac flowers. |
| Peplum top | Stop after tier 1 for a cropped top with a ruffled peplum. With the sleeves, you'll need about 675 (750, 850, 925, 1050) yd. |
Troubleshooting the three things that go wrong
The waistband is too tight to button
Basketweave pulls in more than plain stitches. Check your basketweave gauge: it should be about 20 sts per 4 in. If yours is tighter, go up half a hook size for the post rows, or start the next size up and work the bodice with that size's numbers too.
The ripples don't line up
A peak went into a valley. In every ripple round after the first, check that the (dc, ch 1, dc) goes into the ch-1 sp at the top of a peak, and the dc3tog is centered on the valley. Count 12 sts per ripple, counting each ch-1 sp.
The frill flips up instead of hanging down
The frill is worked in the front loops, so it wants to lie over the next tier. If it flips, block it: pin each scallop pointing down and let it dry. A little steam also helps. Don't press the ripples flat.
Frequently asked questions
How much yarn do I need for this sunshine crochet dress? About 1400 (1575, 1750, 1900, 2175) yd of DK #3 cotton for sizes XS to XL. In Paintbox Cotton DK that's 11 (12, 13, 14, 16) balls of 50 g. The flowers use less than 10 yd of each color, so scraps work.
Can I make the dress longer or shorter? Yes, in tiers 2 and 3. Each ripple round adds or removes about ½ in. Keep at least 8 ripple rounds in each tier so the layers stay balanced. Each extra round in tier 3 uses about 18 (21, 23, 25, 29) yd.
Do I really need the back opening? Yes. The basketweave waist is snug, so it can't stretch over your shoulders or hips. The opening goes all the way down past the waist seam, which lets you step in or pull the dress over your head. Six buttons close it.
Is the dress see-through? The bodice and the waistband are solid. The ripple tiers have small eyelets, so they let some light through, especially in pale yellow. Wear a slip or a short underskirt in a matching color if you'd like more coverage.
Can I use a different yarn? Any DK #3 yarn that matches the gauge works. A cotton blend with linen or bamboo drapes even more nicely in the tiers. Acrylic or wool DK will be warmer and stretchier, so swatch first and wash the swatch.
Can I sell dresses made from this pattern? Yes, you can sell finished dresses you've made yourself. Please credit "Pattern by Wavode" and link back to this page. Please don't republish the written pattern or my photos.
Related patterns on Wavode
- Crochet maxi dress: a long lace yoke dress with a fan lace hem.
- Crochet flower baby sundress: a tiny sundress with flowers for the little ones.
- Crochet halter top: an easy summer top to try before a full dress.
- Crochet summer sweater: an airy cotton pullover with eyelet stripes.
Made a sunshine dress? Tag #wavodecrochet on Pinterest. I re-pin every finished make and credit the maker.
Pattern by Clara Hartwell for Wavode. Questions? Email me at support@wavode.com.