Easy Crochet Baby Booties

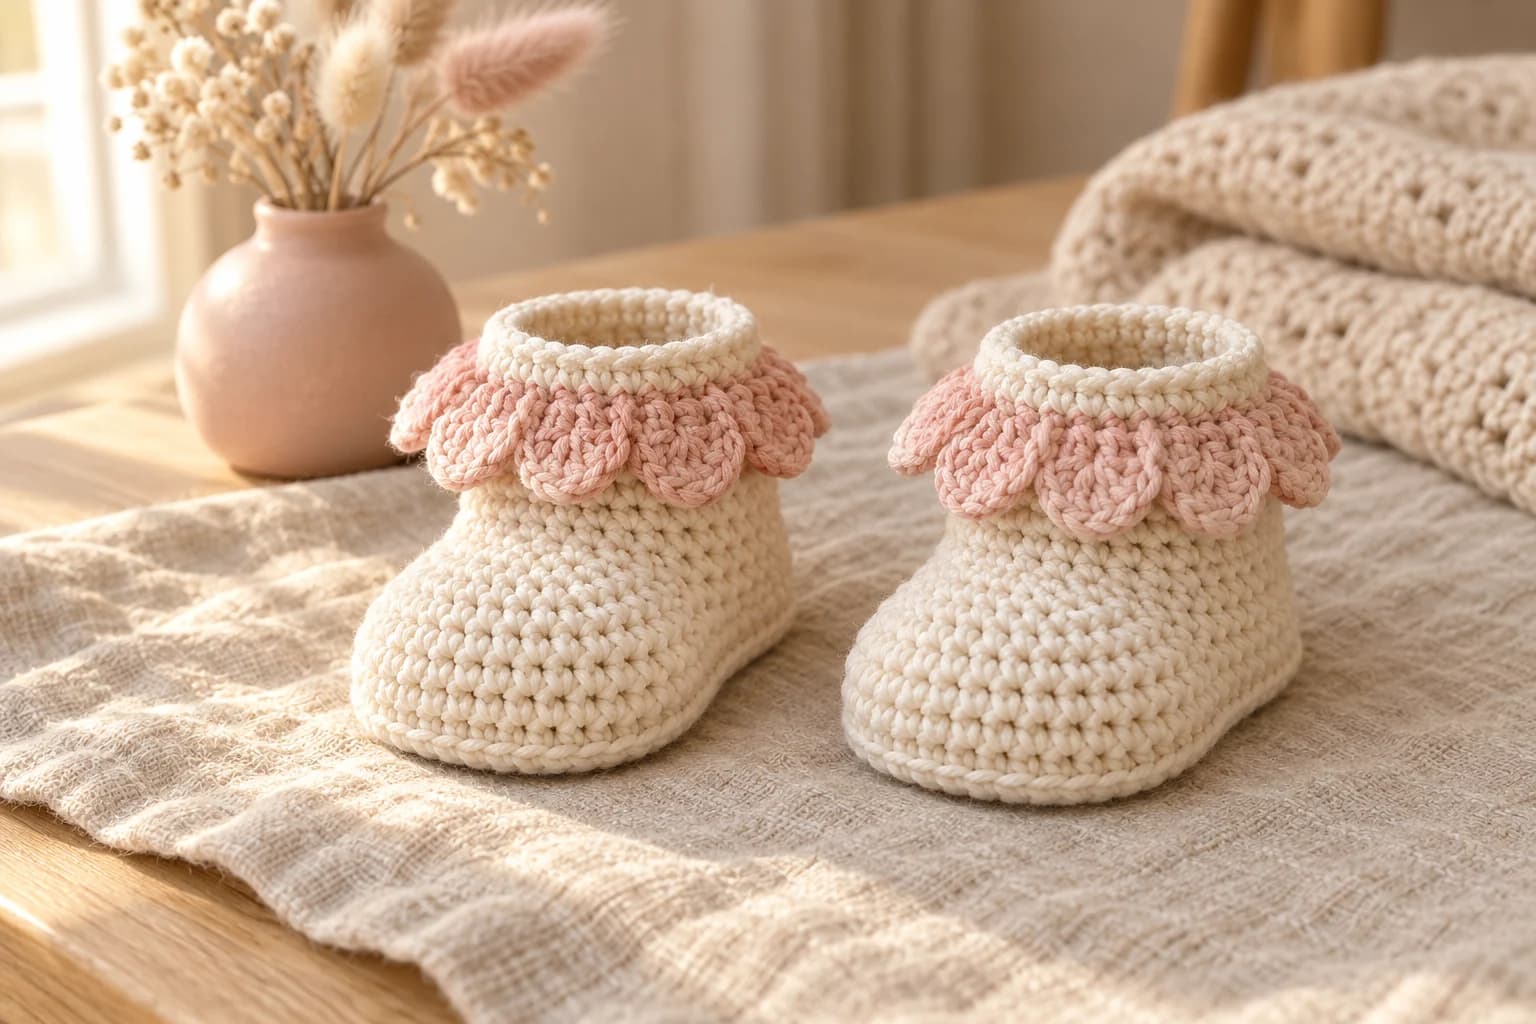
These easy crochet baby booties are cream single crochet slippers with a ring of blush pink petals around the ankle, like a little flower. Each bootie is worked in one piece: an oval sole, straight sides, a rounded toe and a short cuff. The petals are crocheted straight into the cuff, so there's no sewing at all. You'll need worsted cotton in two colors, a 4 mm hook and about 3½ to 4½ hours for the pair. There are 3 sizes, from 0 to 12 months.
Key Takeaways
- One piece, no sewing: sole, sides, toe and cuff are worked in joined rounds, and the petals go into front loops left free on the cuff.
- Only basic stitches: ch, sl st, sc, sc2tog, hdc, dc and tr.
- Small amounts: about 70 (90, 115) yd of cream and 38 (44, 50) yd of blush pink worsted cotton.
- No buttons, ties or sewn-on parts, so there's nothing small to come loose.
Why I love these booties
Do baby booties need to be complicated to look special? These prove they don't. The bootie itself is the plainest shape there is: rounds of single crochet, with a few decreases to round the toe. The petal cuff does all the work. Each petal is a long fan with a crisp outline, and once you fold them down, the pair looks like two little flowers sitting on the blanket.
I like them as a baby shower gift because they're quick, they use leftover cotton and they look lovely in a gift box. The cream and blush pink pairing is my favorite, but they're just as sweet in sage with a cream cuff, or all white for a christening.
Skill level. Easy. You need ch, sl st, sc, sc2tog, hdc, dc and tr. Three techniques may be new, and I walk you through each one below: working an oval around both sides of a chain, placing a run of decreases over the toe, and working into the front loops left free by a back-loop round.
If you'd rather have a bootie with a bow on the toe, my Rosebud baby booties are the classic version with a split ankle opening.
What you'll need
Yarn (worsted or aran weight #4 cotton)
| Color | Used for | Amount for the pair, 0–3 (3–6, 6–12) months |
|---|---|---|
| Cream | Sole, sides, toe and cuff | about 70 (90, 115) yd |
| Blush pink | Petal cuff | about 38 (44, 50) yd |
- I like Paintbox Yarns Cotton Aran (93 yd / 85 m per 50 g): that's 1 (2, 2) balls of cream and 1 ball of pink. The 3–6 size uses almost all of one cream ball, so I'd buy two to be safe. Lily Sugar 'n Cream is also worsted #4 and works well.
- These amounts are worked out from the stitch count, plus a margin of about 15% for the swatch and the ends. They're estimates, so keep a little extra on hand.
Hook
- 4 mm (US G/6). It's a little small for worsted cotton on purpose: the fabric comes out firm, so the booties hold their shape.
Notions
- A stitch marker, a tapestry needle and scissors.
Gauge
18 sc × 20 rnds = 4 in (10 cm) with the 4 mm hook. Easier still: check the sole. When it's finished, aim for about 3½ (4, 4½) in / 9 (10, 11.5) cm long. Measure the swatch and the sole lying flat, without stretching them, and both in the same state (both before washing, or both after). If it's longer, go down half a hook size. If it's shorter, go up half a size.
Size chart
| Size | Baby's foot length | Sole length | Ankle opening, around |
|---|---|---|---|
| 0–3 months | up to 3¼ in / 8.3 cm | about 3½ in / 9 cm | about 5¾ in / 14.5 cm |
| 3–6 months | up to 3¾ in / 9.5 cm | about 4 in / 10 cm | about 6¾ in / 17 cm |
| 6–12 months | up to 4¼ in / 10.8 cm | about 4½ in / 11.5 cm | about 7½ in / 19 cm |
Measure the baby's foot from heel to longest toe and pick the size by foot length, not by age. The sole is a little longer than the foot so there's room to wiggle. Instructions are written 0–3 (3–6, 6–12) months. When only one number is given, it applies to every size.
Abbreviations (US crochet terms)
- ch: chain
- sl st: slip stitch
- sc: single crochet
- sc2tog: single crochet 2 together (a decrease)
- hdc: half double crochet
- dc: double crochet
- tr: treble crochet (yarn over twice)
- BLO: back loop only
- st(s): stitch(es)
- rnd(s): round(s)
How the bootie is built
Before you start, here's the shape in one sentence. The sole is a flat oval, the sides go straight up from its edge, the toe is pulled in with two rounds of decreases, and the cuff rises from what's left. Every round is joined near the heel, a few stitches to one side of its middle, so the join line stays at the back of the bootie.
Both booties are identical. There's no left or right.
The pattern, step by step
Part 1: The sole (cream)
Work in joined rounds. Ch 1 at the start of each round (it doesn't count as a stitch) and join with a sl st to the first sc. Don't turn.
The oval has a heel end and a toe end. You start at the heel, so every round begins and ends near the back.
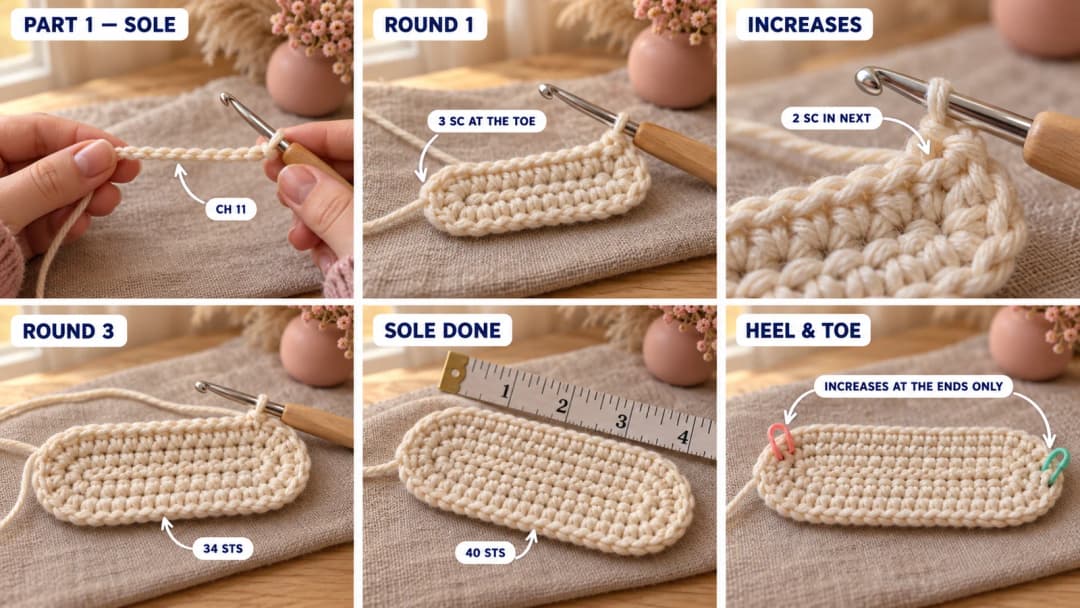
Ch 11 (12, 13).
- Rnd 1: Sc in the 2nd ch from the hook (heel), sc in the next 8 (9, 10) ch, 3 sc in the last ch (toe). Now rotate the piece (don't turn it over) and keep going along the other side of the chain, working into the free loops: sc in the next 8 (9, 10) ch, then 2 sc in the same ch as the first sc. Join. (22 (24, 26) sc)
- Rnd 2: 2 sc in the first st, sc in the next 8 (9, 10) sts, 2 sc in each of the next 3 sts, sc in the next 8 (9, 10) sts, 2 sc in each of the last 2 sts. Join. (28 (30, 32))
- Rnd 3: Sc in the next st, 2 sc in the next st, sc in the next 8 (9, 10) sts, sc in the next st, 2 sc in the next st 3 times, sc in the next 8 (9, 10) sts, sc in the next st, 2 sc in the next st 2 times. Join. (34 (36, 38))
- Rnd 4: Sc in the next 2 sts, 2 sc in the next st, sc in the next 8 (9, 10) sts, sc in the next 2 sts, 2 sc in the next st 3 times, sc in the next 8 (9, 10) sts, sc in the next 2 sts, 2 sc in the next st 2 times. Join. (40 (42, 44))
0–3 months: the sole is done. You have 40 sts.
- Rnd 5, 3–6 and 6–12 months only: Sc in the next 3 sts, 2 sc in the next st, sc in the next 9 (10) sts, sc in the next 3 sts, 2 sc in the next st 3 times, sc in the next 9 (10) sts, sc in the next 3 sts, 2 sc in the next st 2 times. Join. (48 (50))
3–6 months: the sole is done. You have 48 sts.
- Rnd 6, 6–12 months only: Sc in the next 4 sts, 2 sc in the next st, sc in the next 10 sts, sc in the next 4 sts, 2 sc in the next st 3 times, sc in the next 10 sts, sc in the next 4 sts, 2 sc in the next st 2 times. Join. (56)
You now have 40 (48, 56) sts. The sole is a flat oval about 3½ (4, 4½) in long and 1⅝ (2, 2⅜) in wide (9 (10, 11.5) × 4 (5, 6) cm). The increases always sit at the two rounded ends, and the long sides stay straight. Don't fasten off.
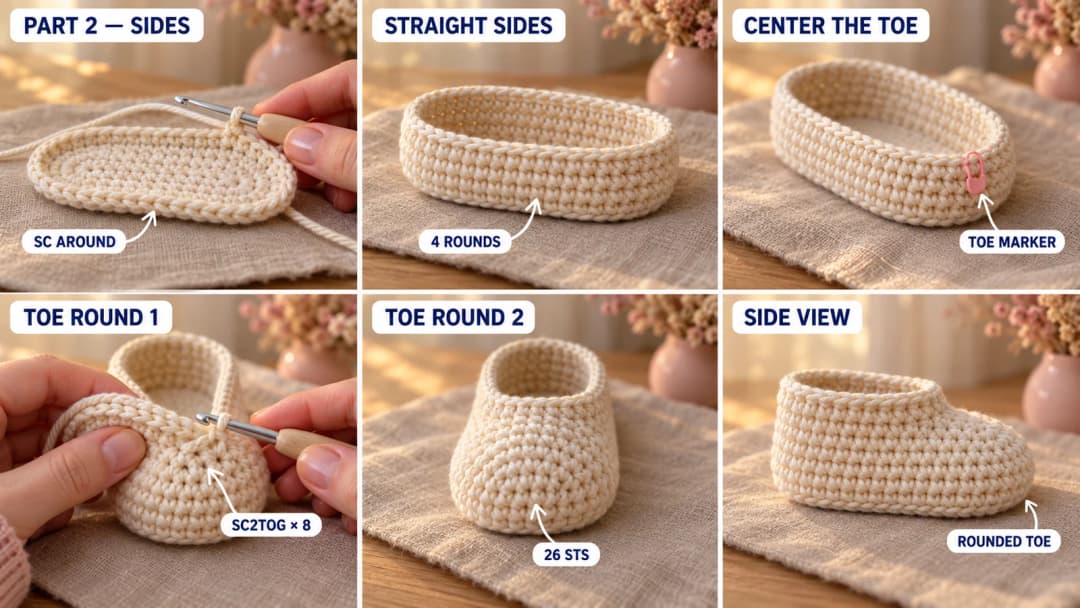
Place a toe marker now. Fold the sole in half lengthwise and put a stitch marker in the middle of the rounded toe end. You'll center the toe decreases on it in Part 2. In the 0–3 and 6–12 sizes the marker falls between the 2 middle stitches of the toe end; in the 3–6 size it sits on the middle stitch.
Part 2: The sides and the rounded toe (cream)
Keep working in joined rounds with ch 1 at the start.
- Rnd 1 to Rnd 4 (5, 5): Sc in each st around. Join. (40 (48, 56))
As you work the side rounds, move the toe marker up each round, keeping it in line with the center of the toe. The sides now stand up from the edge of the sole. Working Rnd 1 in both loops gives a soft, rounded edge like mine. If you prefer a crisp line around the sole, work Rnd 1 in the BLO instead.
Now shape the toe. The decreases sit right at the front, centered on the toe end of the sole.
- Rnd 5 (6, 6), first toe round: Sc in the next 10 (11, 13) sts, sc2tog 8 (10, 12) times, sc in the last 14 (17, 19) sts. Join. (32 (38, 44))
- Rnd 6 (7, 7), second toe round: Sc in the next 8 (8, 9) sts, sc2tog 6 (8, 10) times, sc in the last 12 (14, 15) sts. Join. (26 (30, 34))
Check the position: the run of sc2tog should be centered on your toe marker. (In the 3–6 size, the first run ends up half a stitch to one side, which doesn't show.) The toe pulls in and curves up into a round, closed cap, and the opening moves toward the back, over the heel. That's the classic bootie shape.
Part 3: The cuff and the petals
The cuff (cream). Keep going in joined rounds.
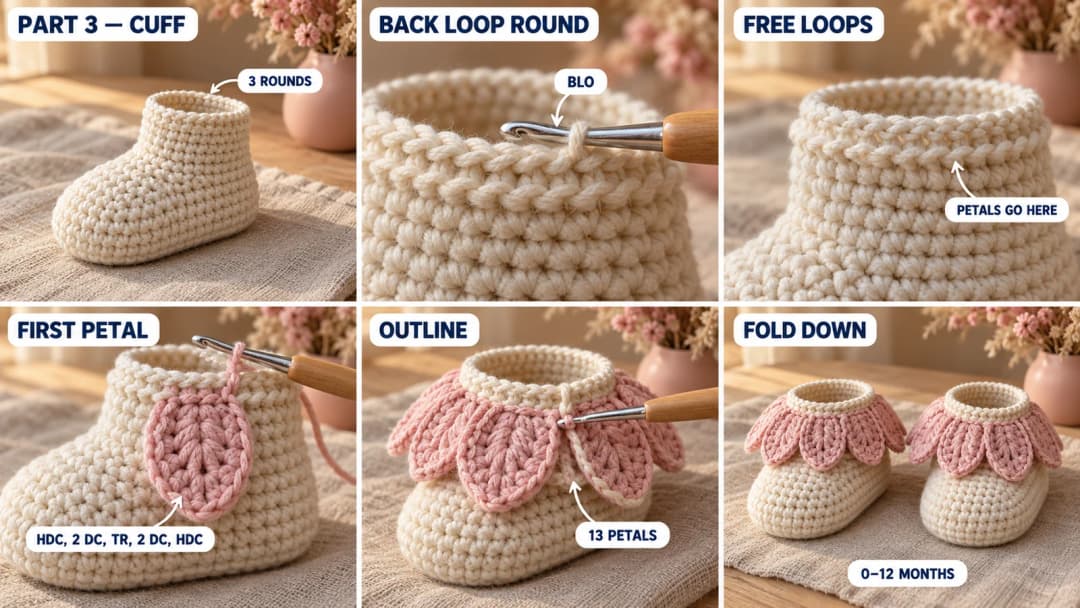
- Rnd 7 to Rnd 9 (8 to 10, 8 to 11): Sc in each st around. Join. (26 (30, 34))
- Rnd 10 (11, 12): Working in the BLO, sc in each st around. Join. (26 (30, 34)) This leaves the front loops of the round below free on the outside. The petals go there.
- Rnd 11 (12, 13): Sc in each st around, in both loops. Join. Fasten off and weave in the end.
This last round is the little cream rim you see inside the petals, around the very top of the opening.
The petals (blush pink). Hold the bootie with the opening toward you. Find the free front loops of Rnd 9 (10, 11): they make a neat ridge of little bars all the way around the outside, just below the rim.
Petal round 1 (the petals).
- Make a slip knot with the pink yarn. Insert the hook in a free front loop at the middle of the back and sl st to join. This counts as the first sl st.
- Work (hdc, 2 dc, tr, 2 dc, hdc) in the next free loop. That's your first petal.
- Work [sl st in the next free loop, (hdc, 2 dc, tr, 2 dc, hdc) in the next free loop] 12 (14, 16) times in total. You're back at the first sl st.
- Join with a sl st to the first sl st. You have 13 (15, 17) petals, each a long fan of 7 sts.
Petal round 2 (the outline). This round gives each petal a crisp edge and makes it a little longer.
- Sl st into the first hdc of the first petal. Your first sc goes into that same hdc.
- For each petal: sc in the first hdc, sc in each of the next 2 dc, 3 sc in the tr, sc in each of the next 2 dc, sc in the last hdc, then sl st into the sl st between the petals. Work this sequence 13 (15, 17) times in total (9 sc per petal).
- Join with a sl st to the first sc. Fasten off and weave in the end on the inside.
The sl st into the base between the petals pulls each petal's sides in, so every petal stands apart from its neighbors instead of merging into a ruffle.
Shape the petals. Because they grow from the outside of the cuff, the petals already lean outward. Gently fold them outward and down with your fingers so they all fall the same way. If they spring back up, block them lightly (see Finishing) to help them settle.
Make a second bootie exactly the same way.
Finishing
- Weave every end in well. Run each tail through at least 6 sts in one direction, then back the other way, on the inside. Little toes catch on loose ends.
- Block lightly (optional). Stuff the bootie with a rolled sock, fold the petals down, mist everything with water and let it dry. The toe gets rounder and the petals stay down. Skip this if your booties already look the way you want.
- Add grip (optional). For a baby who's starting to stand, dot the sole with puffy fabric paint and let it dry fully. Cotton soles are slippery on hard floors.
Safety. There are no buttons, beads, ribbons or ties on these booties, and the petals are crocheted in, not sewn on. Still, check the ends and the petals before every wear. Cotton booties are slippery, so they're best for babies who aren't walking yet, unless you add grip dots.
Make them yours — quick variations
| Variation | Change from base pattern |
|---|---|
| Sage and cream | Work the bootie in sage green and the petals in cream. |
| All white | One color throughout, for a christening or a summer baby. |
| Shorter cuff | Work only 1 (1, 2) plain cuff rounds before the BLO round. |
| Small scallops | Work only petal round 1, as [sl st in the next loop, 5 dc in the next loop], for small round shells. |
| Two-tone petals | Work petal round 1 in pink and the outline round in cream. |
Troubleshooting the three things that go wrong
The sole cups or ruffles
A cupped sole means your increases are too tight, and a ruffled one means your stitches are taller than mine. Check that the increases sit only at the two ends, then change the hook by half a size. The sole should lie flat before you start the sides.
The toe looks off-center
The run of sc2tog has to be centered on the toe marker you placed after the sole. If it lands to one side, your joins may have drifted a stitch over the rounds. Move the decreases so they're centered on the marker, and adjust the plain stitches before and after them, keeping the same number of decreases: 32 (38, 44) sts after the first toe round, and 26 (30, 34) sts after the second.
The opening is too tight for the foot
Cotton doesn't stretch much. If the bootie won't slide over the heel, make the next size up, or work the cuff with a 4.5 mm hook. The petals don't change the fit.
Frequently asked questions
How long do these booties take? About 3½ to 4½ hours for the pair, depending on your speed, so roughly an evening per bootie. The two petal rounds take about half an hour per bootie.
How much yarn do I need? About 70 (90, 115) yd of cream and 38 (44, 50) yd of blush pink worsted or aran cotton for the pair. These are estimates from the stitch count, so keep a little extra.
Are these booties really no-sew? Yes. The sole, sides, toe and cuff are one piece, and the petals are crocheted into the free front loops of the cuff. You only need a tapestry needle to weave in the ends.
Can I use acrylic instead of cotton? Yes. A soft worsted baby acrylic is warmer and a little stretchier, which is nice in winter. Cotton is cooler and keeps the petals crisper. Check your gauge either way.
Can I sell booties made from this pattern? Yes, you're welcome to sell finished booties made from this free pattern at markets, on Etsy or as gifts. Please credit "Pattern by Wavode" in your listing and link back to this page. What you can't do is republish this write-up or my photos as your own pattern.
Related patterns on Wavode
- Rosebud baby booties: cream booties with a little mauve bow on the toe.
- Meadow baby crochet crocs: little clog-style shoes with a heel strap.
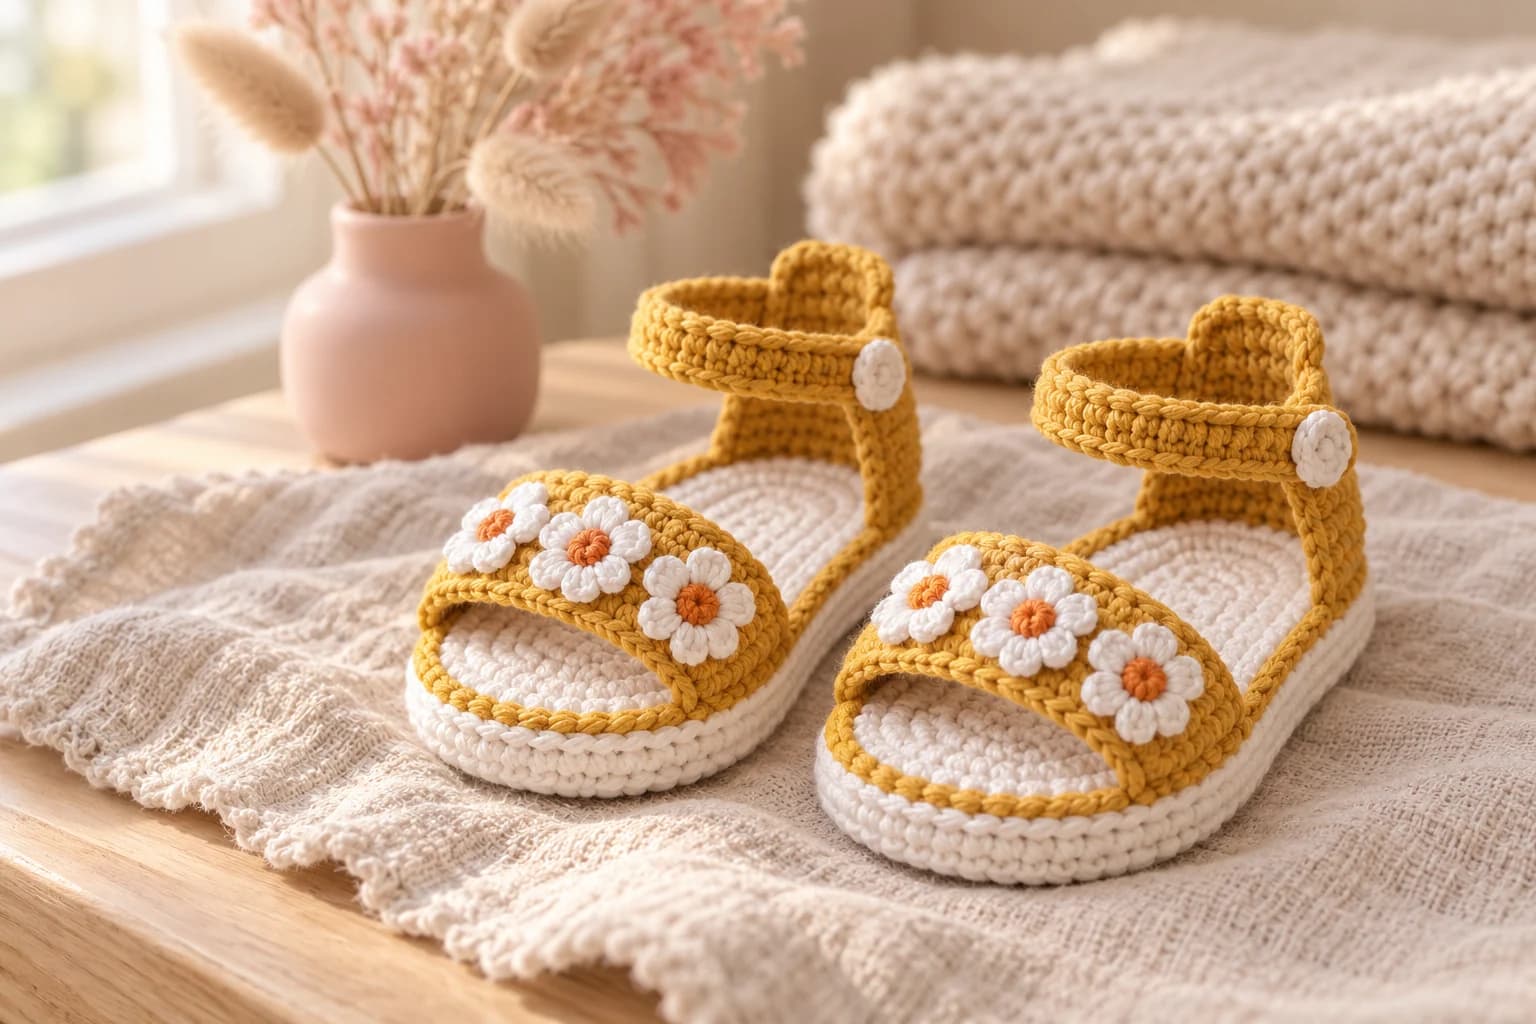
- Crochet baby sandals: cotton sandals with daisy flowers for summer.
- Crochet baby socks: a seamless tube sock with a ribbed cuff.
- Strawberry crochet hat: a red baby beanie with leaves and a curly stem.
Made a pair of flower booties? Tag #wavodecrochet on Pinterest. I re-pin every finished make and credit the maker.
Pattern by Clara Hartwell for Wavode. Questions? Email me at support@wavode.com.