Crochet Highland Cow Pattern

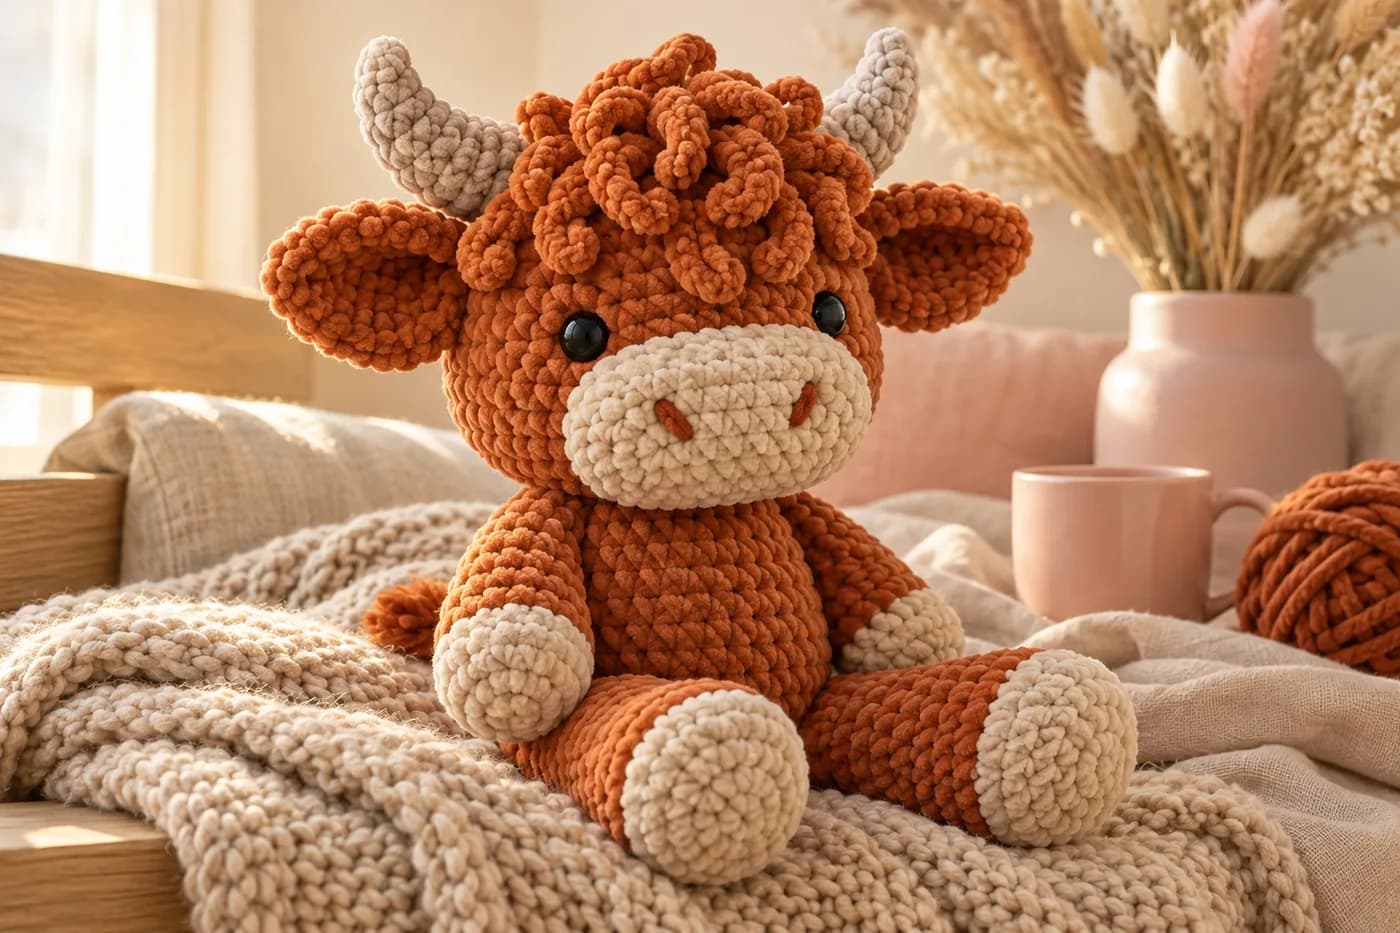
This crochet highland cow pattern makes a sitting plush cow, about 11 inches tall, with a coiled fringe of curls, curved grey horns and big cupped ears. It's worked in velvet chenille on a 5 mm hook, almost all in single crochet rounds. The body has a flat base, so the cow sits up on its own with its legs stretched out in front. Plan on about 320 yards of plush yarn in three colors and 7 to 9 hours.
Key Takeaways
- Thirteen pieces: head, muzzle, 2 ears, 2 horns, a curly fringe, body, 2 legs, 2 arms and a tufted tail.
- The fringe is one strip: 14 chain curls along a base chain, coiled up like a rose and sewn low between the horns, so the curls fall to the eyes.
- A back-loop round gives the body a flat base, so the cow sits without tipping.
- About 320 yd of super bulky chenille: ~250 yd rust, ~50 yd oatmeal, ~20 yd grey.
Why I love this highland cow
Highland cows are pure charm: shaggy fringe, little horns, that sleepy face. This one is the plush I make when I want a gift that gets a reaction the moment the paper comes off. The rust chenille glows like a real highland coat, and the oatmeal muzzle and hooves keep it soft and calm.
What makes it work is the fringe. Instead of brushing out yarn or sewing on dozens of loops, you crochet one strip of curls. Each curl is a short chain worked back with two single crochet in every chain, so it twists on its own. Coil the strip, tack it in place, and you have a full, curly mop in one go.
The rest is classic amigurumi. The head is a big round ball. The body grows up from a flat sitting base. The legs and arms start in oatmeal for the hooves and switch to rust. Then it all comes together with a needle.
Skill level. Easy-intermediate. You need a magic ring, sc, hdc, inc and dec in the round, back-loop stitches and a color change. Chenille is the trickiest part: it's slippery and the stitches are hard to see, so count every round.
Already made my crochet stuffed bunny? This cow uses the same plush yarn and the same tight tension.
What you'll need
Yarn: super bulky #6 plush or velvet chenille, such as Himalaya Dolphin Baby or Bernat Baby Blanket, in three colors:
- Rust (main color): about 250 yd (230 m). That's two balls of most brands.
- Oatmeal (muzzle and hooves): about 50 yd (46 m).
- Light grey (horns): about 20 yd (18 m).
- Rust worsted, about 4 yd: 1 yd for the nostrils and 3 yd for the tail tuft. Worsted embroiders far more neatly than chenille, and it brushes out into a fluffy tuft.
I worked these amounts out from the stitch counts: about 2,050 sc in rust, 400 in oatmeal and 120 in grey, at roughly 4 inches of plush yarn per stitch, plus sewing tails. Treat them as estimates and buy the second rust ball.
Hook and notions
- 5 mm (US H-8) hook. Much smaller than the label suggests. Plush yarn needs a tight fabric, or the stuffing shows.
- Two 12 mm black safety eyes, or black worsted yarn to embroider them.
- About 8 oz (225 g) of polyester fiberfill.
- Stitch markers, a large-eye tapestry needle, pins and scissors.
Gauge and finished size
Gauge isn't critical, but tension is. Your stitches should be tight enough that the stuffing doesn't show through. As a check, Rnd 6 of the head (36 sc) is still a flat circle: it should be about 5 in (13 cm) across. If it's much bigger, go down to a 4.5 mm hook.
Finished cow, approximately: about 11 in (28 cm) tall sitting, to the top of the curls. The head is about 6 in (15 cm) wide, before the ears. These are guide sizes: your yarn, your tension and how firmly you stuff all change them, so measure your first one. The head is wider than the body (42 sts against 36), which gives that big-headed, cuddly look.
Abbreviations (US crochet terms)
- MR = magic ring
- ch = chain
- sl st = slip stitch
- sc = single crochet
- hdc = half double crochet
- inc = 2 sc in the same st
- dec = single crochet two together (the invisible decrease, through the front loops, hides best in chenille)
- BLO = back loop only
- st(s) = stitch(es)
- rnd(s) = round(s)
Work in continuous rounds, without joining. Move your marker up at the start of every round.
Chenille tips. Count by feel: run a fingertip along the round and count the bumps. Don't frog more than you need to, because chenille sheds when you pull it out. If a stitch disappears into the pile, look at the back of the work, where the V's are easier to see.
The pieces at a glance
| Piece | Color | Make | Starts at (MR) | Ends at |
|---|---|---|---|---|
| Head | Rust | 1 | Crown | Neck, closed |
| Muzzle | Oatmeal | 1 | Chain oval | Open edge, sewn on |
| Ears | Rust | 2 | Tip | Base, unstuffed |
| Horns | Grey | 2 | Tip | Base, sewn on |
| Curly fringe | Rust | 1 | Flat strip | Coiled and sewn on |
| Body | Rust | 1 | Sitting base | Open neck |
| Legs | Oatmeal + rust | 2 | Sole of hoof | Hip, flattened |
| Arms | Oatmeal + rust | 2 | Hoof | Shoulder, flattened |
| Tail | Rust + worsted tuft | 1 | Chain cord | Tuft knotted at the tip |
The pattern — step by step
Part 1 — The head and face
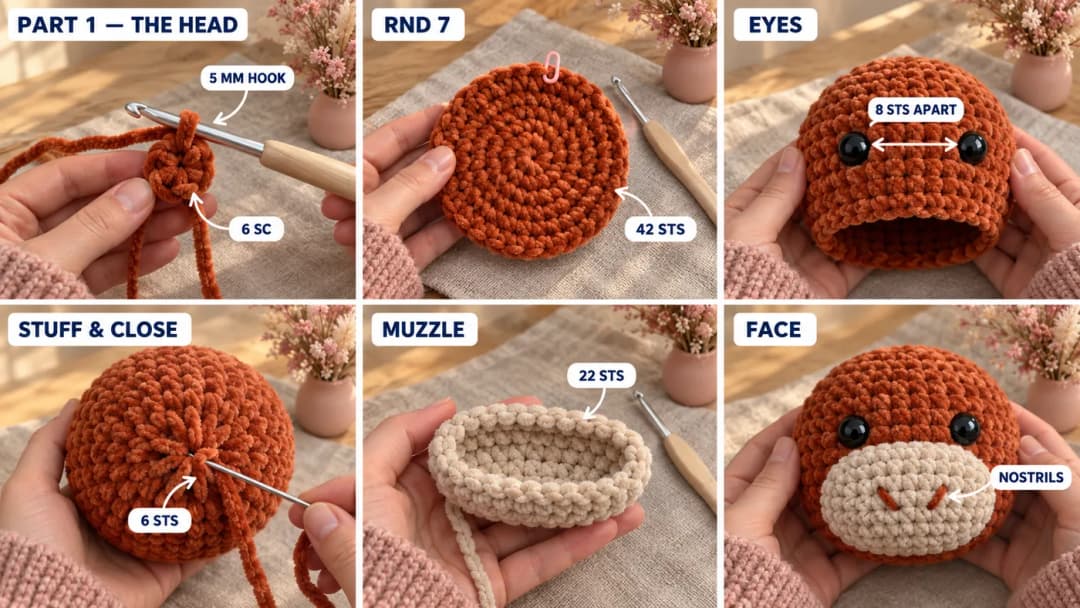
Head (rust). The magic ring is the crown of the head. The last round closes the neck, underneath.
- Rnd 1: MR, 6 sc in the ring. (6)
- Rnd 2: Inc in each st around. (12)
- Rnd 3: (Sc, inc) × 6. (18)
- Rnd 4: (2 sc, inc) × 6. (24)
- Rnd 5: (3 sc, inc) × 6. (30)
- Rnd 6: (4 sc, inc) × 6. (36)
- Rnd 7: (5 sc, inc) × 6. (42)
- Rnds 8–15: Sc in each st around, 8 rounds. (42)
- Rnd 16: (5 sc, dec) × 6. (36)
Eyes. Insert the safety eyes now, while the opening is wide. Place them between Rnds 10 and 11, with 8 sts between them. Don't snap the washers on yet: pin the muzzle under them first (it sits on Rnds 12–18) and check the face. Happy? Snap the washers on firmly from the inside.
- Rnd 17: (4 sc, dec) × 6. (30)
- Rnd 18: (3 sc, dec) × 6. (24)
Stuff the head firmly, shaping it into a round ball as you go.
- Rnd 19: (2 sc, dec) × 6. (18)
- Rnd 20: (Sc, dec) × 6. (12)
Top up the stuffing.
- Rnd 21: Dec × 6. (6)
Fasten off, leaving a 6-in (15 cm) tail. Thread it through the front loops of the last 6 sts, pull tight to close the neck, and hide the tail inside the head.
Muzzle (oatmeal). It's an oval, worked around both sides of a short chain.
- Ch 5.
- Rnd 1: Sc in the 2nd ch from the hook, sc in the next 2 ch, 3 sc in the last ch. Turn to work along the other side of the chain: sc in the next 2 ch, 2 sc in the first ch (the one that already holds your first sc). (10)
- Rnd 2: Inc, 2 sc, inc × 3, 2 sc, inc × 2. (16)
- Rnd 3: (Sc, inc), 2 sc, (sc, inc) × 3, 2 sc, (sc, inc) × 2. (22)
- Rnds 4–5: Sc in each st around, 2 rounds. (22)
Sl st in the next st and fasten off, leaving an 18-in (45 cm) tail.
Nostrils. With the rust worsted, embroider two short slanted stitches at about mid-height of the muzzle, about 6 sts apart, each over one round. Angle their tops slightly away from each other, like a soft V turned upside down. Knot the ends on the back of the muzzle, inside the cup.
Attach the muzzle. Pin it to the face, long side horizontal, with its top edge just under the eyes, over Rnds 12–18. Whipstitch it on with the tail, all the way around. Push a little stuffing into it before the last few stitches, so it stands out round and soft.
Part 2 — Ears, horns and the curly fringe
Ears (make 2, rust). The magic ring is the tip of the ear. Don't stuff them.
- Rnd 1: MR, 6 sc in the ring. (6)
- Rnd 2: Inc in each st around. (12)
- Rnd 3: (3 sc, inc) × 3. (15)
- Rnds 4–5: Sc in each st around, 2 rounds. (15)
- Rnd 6: (3 sc, dec) × 3. (12)
- Rnd 7: (2 sc, dec) × 3. (9)
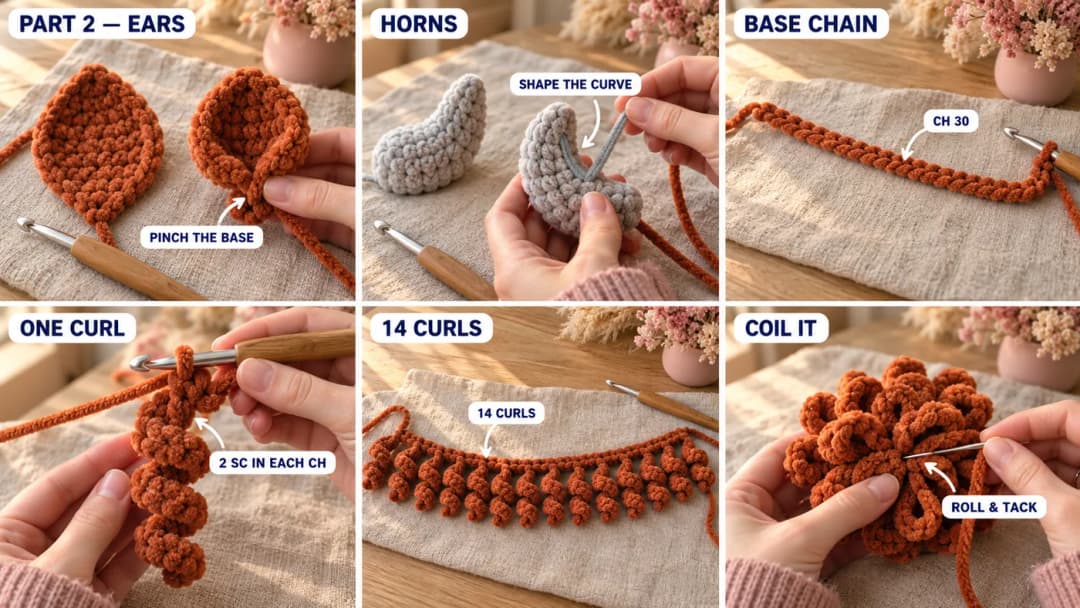
Fasten off, leaving a 12-in (30 cm) tail. Flatten the ear into a cup, then fold the base in half and tack the fold with one or two stitches. That pinch is what makes the ear curl forward.
Horns (make 2, light grey). The magic ring is the tip. The half double crochets on one side make the horn bend.
- Rnd 1: MR, 4 sc in the ring. (4)
- Rnd 2: (Sc, inc) × 2. (6)
- Rnd 3: Sc in each st around. (6)
- Rnd 4: (2 sc, inc) × 2. (8)
- Rnds 5–6: 4 sc, 4 hdc. (8) The taller hdc side becomes the outside of the curve.
- Rnd 7: (3 sc, inc) × 2. (10)
- Rnd 8: Sc in each st around. (10)
Fasten off, leaving a 12-in tail. Stuff the horn firmly, using the back of your hook to push the fiberfill into the tip.
Shape the curve. The hdc rounds start the bend, but a stitch makes it last. Thread a strand of grey on your needle and anchor it at the tip. Run it down the inside of the curve (the sc side) to the base, catching a stitch every round. Pull gently until the horn curves up the way you want, then knot it at the base. Shape the second horn to match, as a mirror image.
Curly fringe (rust). One strip of 14 curls.
- Ch 30. Sl st in the 2nd ch from the hook.
- Repeat these 2 steps 14 times in total:
- Ch 8. Starting in the 2nd ch from the hook, work 2 sc in each of the 7 ch. (14 sc) The chain twists into a curl.
- Sl st in each of the next 2 ch of the base chain.
The 14 curls use the last 28 ch of the base chain exactly. Fasten off, leaving a 24-in (60 cm) tail.
Coil the fringe. Starting at the end without the tail, roll the base chain into a tight spiral, like a rose, with the curls pointing up and out. Stitch through all the layers of the base two or three times with the tail to hold the coil. Keep the rest of the tail for sewing.
Part 3 — The body
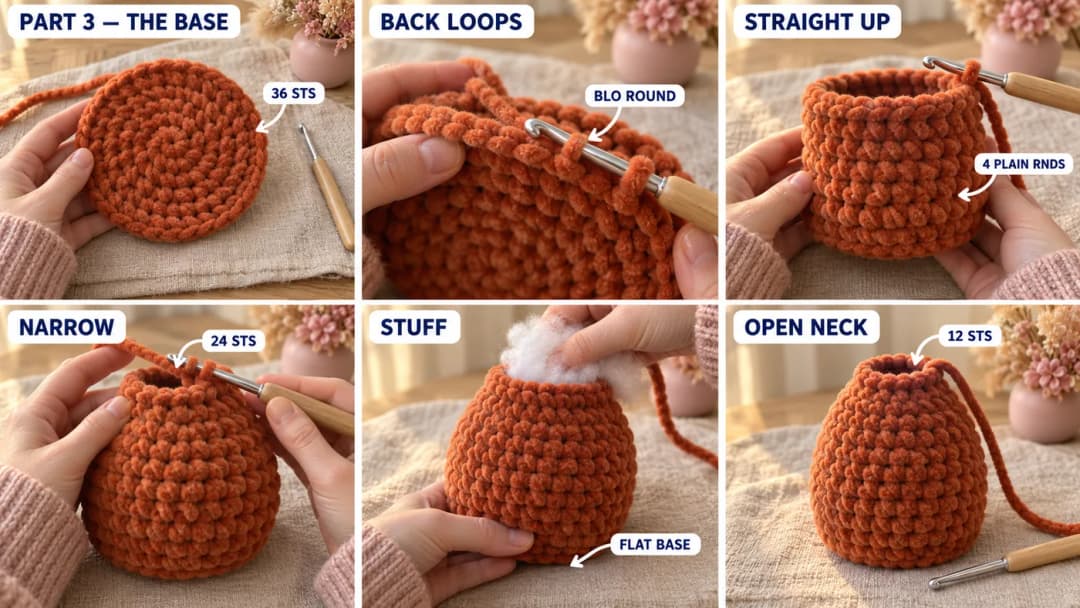
Body (rust). The magic ring is the sitting base. The body grows up and ends at the neck, which stays open.
- Rnd 1: MR, 6 sc in the ring. (6)
- Rnd 2: Inc in each st around. (12)
- Rnd 3: (Sc, inc) × 6. (18)
- Rnd 4: (2 sc, inc) × 6. (24)
- Rnd 5: (3 sc, inc) × 6. (30)
- Rnd 6: (4 sc, inc) × 6. (36)
- Rnd 7 (BLO): Sc in the back loop of each st around. (36) This ridge turns the circle into a flat base.
- Rnds 8–11: Sc in each st around, 4 rounds. (36)
- Rnd 12: (4 sc, dec) × 6. (30)
- Rnds 13–14: Sc in each st around, 2 rounds. (30)
- Rnd 15: (3 sc, dec) × 6. (24)
- Rnds 16–17: Sc in each st around, 2 rounds. (24)
Stuff the body firmly, pressing the base flat with your palm so it sits level.
- Rnd 18: (2 sc, dec) × 6. (18)
- Rnd 19: (Sc, dec) × 6. (12)
Top up the stuffing. Sl st in the next st and fasten off, leaving a 30-in (75 cm) tail for sewing on the head. Leave the 12-st neck open.
Part 4 — Legs, arms, tail and assembly
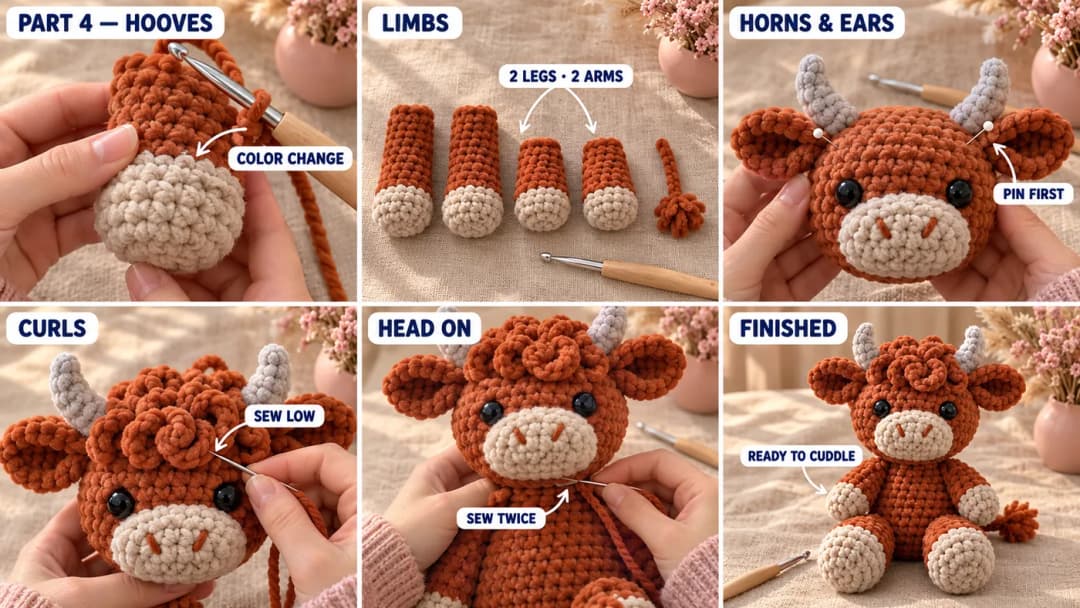
Legs (make 2). The magic ring is the sole of the hoof. Start in oatmeal.
- Rnd 1: MR, 6 sc in the ring. (6)
- Rnd 2: Inc in each st around. (12)
- Rnd 3: (Sc, inc) × 6. (18)
- Rnd 4 (BLO): Sc in the back loop of each st around. (18)
- Rnds 5–6: Sc in each st around, 2 rounds. (18)
Change to rust on the last stitch of Rnd 6.
- Rnd 7: (4 sc, dec) × 3. (15)
- Rnds 8–16: Sc in each st around, 9 rounds. (15)
The leg stays almost as wide as the hoof, so it reads as a chunky, cuddly limb. Stuff the hoof firmly and the rest of the leg a little more lightly. Flatten the opening and sew it closed with the tail, leaving the tail long (about 15 in).
Arms (make 2). The magic ring is the hoof. Start in oatmeal.
- Rnd 1: MR, 6 sc in the ring. (6)
- Rnd 2: Inc in each st around. (12)
- Rnd 3: (3 sc, inc) × 3. (15)
- Rnds 4–5: Sc in each st around, 2 rounds. (15)
Change to rust on the last stitch of Rnd 5.
- Rnd 6: (3 sc, dec) × 3. (12)
- Rnds 7–13: Sc in each st around, 7 rounds. (12)
Stuff the hoof and the lower half firmly, and leave the top soft so the arm can move. Flatten the opening and sew it closed, leaving a 15-in tail.
Tail (rust, with a tuft). The tail is a thin cord with a fluffy tuft at the tip.
- Leave a 10-in (25 cm) starting tail. Ch 11.
- Sl st in the 2nd ch from the hook and in each ch across. (10 sl st) Fasten off.
The tuft. Cut eight 4-in (10 cm) strands of rust worsted. Fold them in half together, pull the fold through the last stitch at the free end of the cord, then pull all the cut ends through the fold and tighten the knot. Untwist each strand into its plies with a needle or a pet brush, then trim the tuft to about 1½ in (4 cm) so it's round and fluffy.
Put the cow together. Sew every piece with its own tail, going deep into the head or body.
- Horns. Pin them on the top of the head, on each side, over Rnds 5–8, about 12 sts apart. Turn them so they curve up and out, with the hdc side on the outside. Whipstitch around the base.
- Ears. Pin each ear just below and slightly behind its horn, at about Rnds 9–11, with the cup facing forward and the ear sticking out sideways. Sew across the pinched base.
- Curly fringe. Set the coil low on the forehead, between the horns, with its center at about Rnd 5. Push it forward so the front curls spill down to Rnd 9, just above the eyes, and the sides tuck against the horns. Sew all around the base of the coil. Then tack the lowest curls to the face, so they frame the eyes without covering them.
- Head on body. Set the head on the open neck, with the neck centered on the head's closing point and the face looking straight ahead. Pin it. With the body's 30-in tail, sew all the way around the neck twice, going deep into both pieces, so the head doesn't wobble. Add a little stuffing into the neck just before the last stitches.
- Arms. Sew each arm to the side of the body at Rnds 15–16, just below the head, with the flattened edge running up and down.
- Legs. Sit the cow down. Sew the legs to the front of the body at Rnds 7–9, about 4 sts apart, with the flattened edge horizontal so the legs stretch straight out in front.
- Tail. With the starting tail, sew the plain end of the cord to the back of the body at about Rnd 9, just above the base, so the tuft rests beside the cow.
Weave in all your ends inside the body, and fluff the curls with your fingers. Your highland cow is ready.
Safety and care. Safety eyes are a choking hazard for babies and toddlers, even when fitted correctly. If the cow is for a child under 3, embroider the eyes with black worsted instead: a small oval of satin stitch, 3 sts wide and 2 rounds tall, in the same place. Sew every seam twice, and tack the curls down well, since little hands love to pull them. To clean it, hand wash in cool water, squeeze it gently in a towel and let it air dry.
Make it yours — quick variations
| Variation | Change from base pattern |
|---|---|
| Classic cream cow | Work the rust pieces in cream and the hooves and muzzle in light brown. |
| Chocolate highland | Dark brown for the main color, oatmeal muzzle, cream horns. |
| Blush cheeks | Stitch a short pink line or add a touch of blush under each eye. |
| Flower crown | Sew a few tiny crochet flowers in front of the curls. |
| Shaggier fringe | Ch 36 for the base and make 17 curls, for an even fuller mop. |
Troubleshooting the three things that go wrong
The curls are flat, not twisted
You probably worked 1 sc in some chains. It's the 2 sc in each ch that forces the twist. Also check you started in the 2nd ch from the hook. Roll each curl between your fingers after you finish it.
The cow tips backward
The head is heavy. Check that the Rnd 7 BLO ridge sits flat on the table, and press the base flat again. Then move the legs a round lower, so they work as a kickstand.
The horns point straight up
Turn them before you sew: the hdc side goes on the outside. If they still look stiff, pull the shaping strand a little tighter on the inside of the curve and knot it again.
Frequently asked questions
How long does this highland cow take? About 7 to 9 hours. The head and face take about 2½ hours, the ears, horns and fringe about 1½, the body about 1½, and the limbs, tail and sewing the rest.
How much yarn do I need? About 320 yd of super bulky plush yarn in total: around 250 yd rust, 50 yd oatmeal and 20 yd light grey. Get two balls of the rust.
Can I use worsted yarn instead of chenille? Yes. With worsted #4 and a 3.5 mm hook, the cow comes out at roughly half the size. You'll need far less fiberfill, and 9 mm safety eyes suit it better.
Is it safe for a baby? Not with safety eyes. For a child under 3, embroider the eyes, sew every seam twice and tack the curls down firmly.
Can I sell cows made from this pattern? Yes, you're welcome to sell finished cows made from this free pattern at markets, on Etsy or as gifts. Please credit "Pattern by Wavode" in your listing and link back to this page. What you can't do is republish this write-up or my photos as your own pattern.
Related patterns on Wavode
- Crochet stuffed bunny: a big plush bunny in the same chenille.
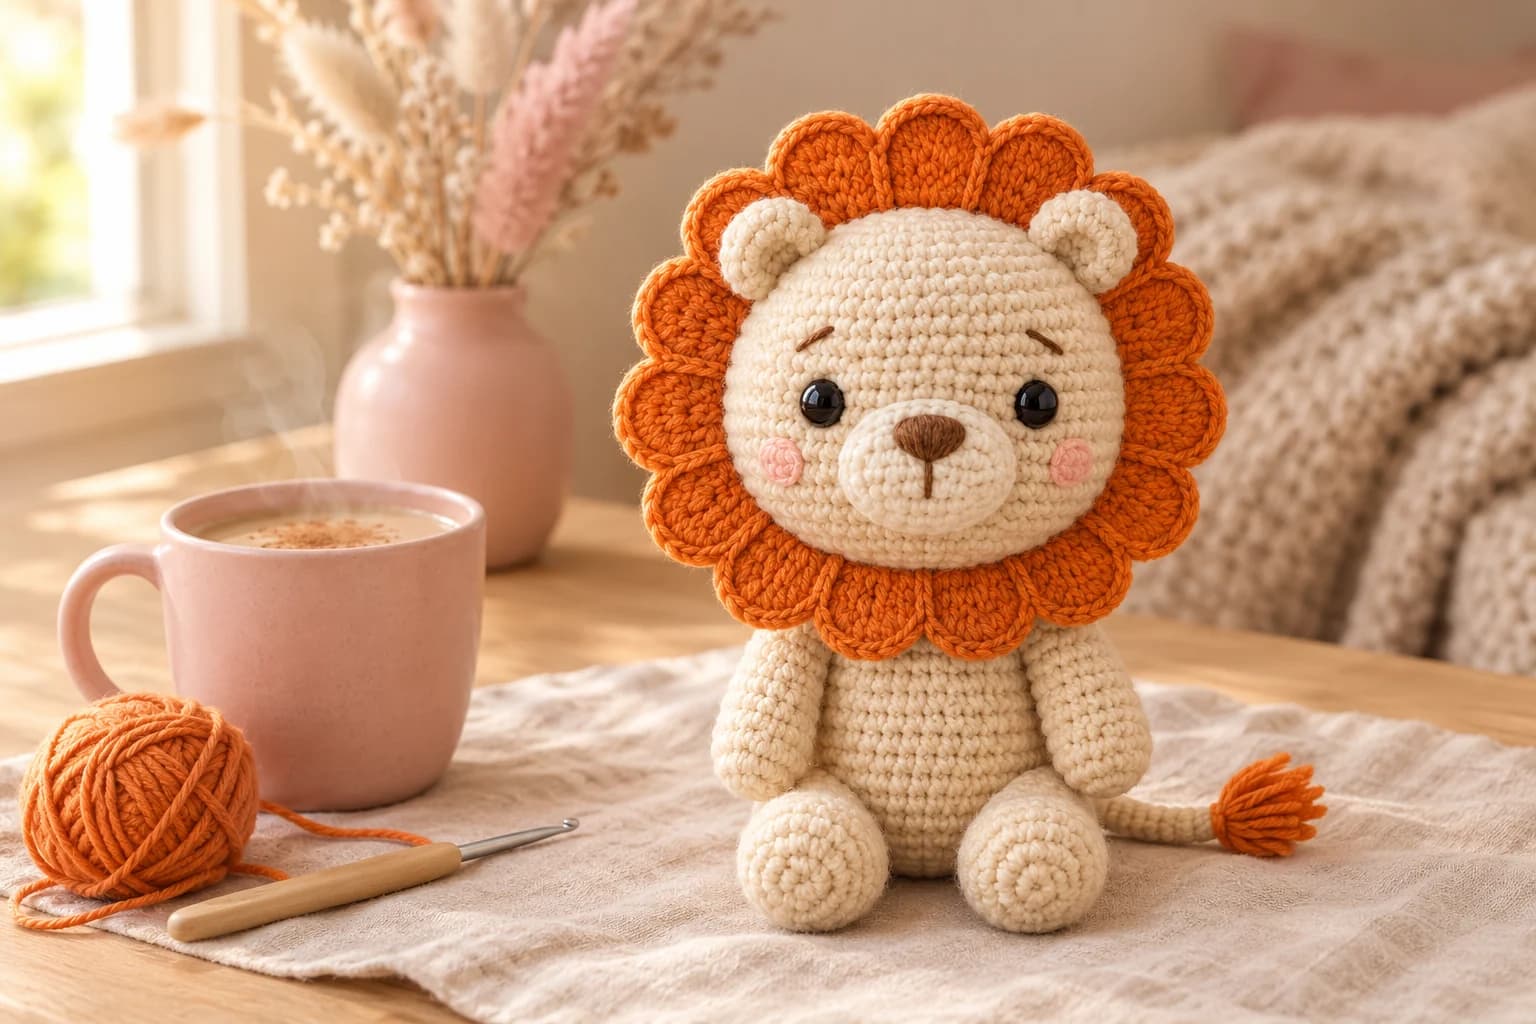
- Crochet lion plush: a cream lion with a scalloped mane.
- Chunky lamb plush: another farm friend to sit beside it.
- Pippa the little elephant: a sweet nursery classic.
Made a highland cow? Tag #wavodecrochet on Pinterest. I re-pin every finished make and credit the maker.
Pattern by Clara Hartwell for Wavode. Questions? Email me at support@wavode.com.