Ghost Cat Crochet Keychain

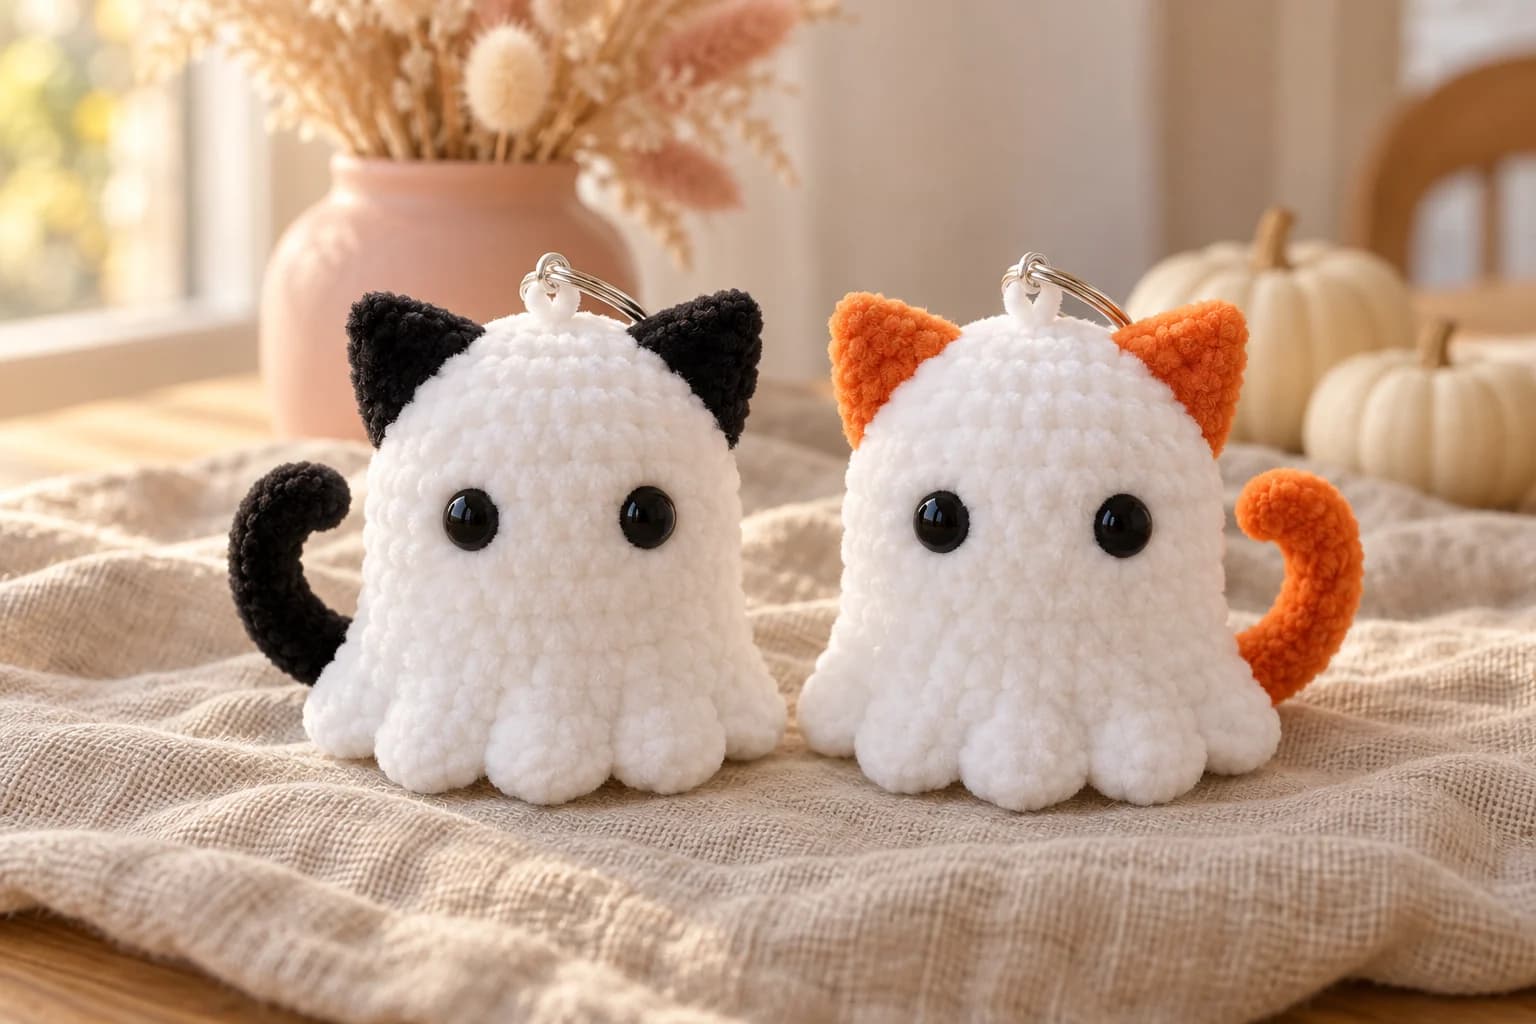
This ghost cat crochet keychain is a plush little white ghost with pointed cat ears, a curled tail and a scalloped hem, worked in soft velvet yarn. The body is one piece: a dome worked from the top down, with a closed base and a scalloped hem that grows out of the same round. The ears and tail are tiny pieces in black or orange. It takes about 35 yards of white bulky chenille, a 4 mm hook and about 1½ hours.
Key Takeaways
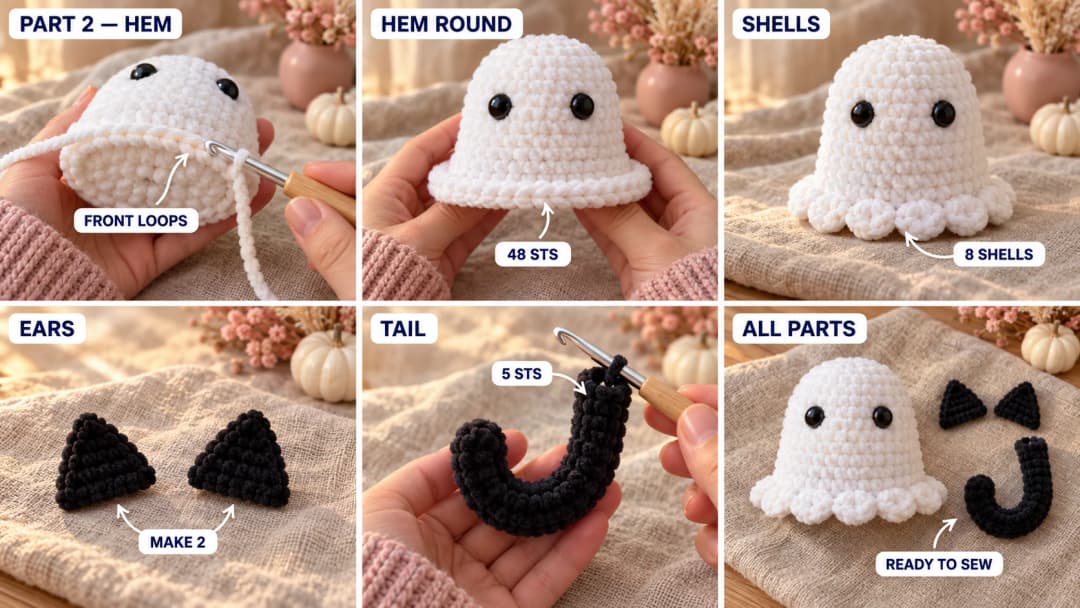
- One round, two directions: the base is worked in the back loops of R11, and the scalloped hem in its front loops.
- The hem is 8 shells of 5 dc, worked on a round of 48 sts, like the lobes of a sheet ghost.
- The loop isn't velvet. It's a double strand of smooth yarn, anchored through the whole ghost and knotted under the base.
- About 35 yd of white bulky #5 velvet yarn and about 9 yd of black or orange.
Why I love this ghost cat
Is it a ghost? Is it a cat? It's both, and that's the charm. The velvet yarn makes it feel like a tiny plush toy, and the scalloped hem makes it look like a sheet ghost that's just landed. The tail curls up at the back, the way a cat's tail does when it's happy. Black ears give you a spooky little tuxedo cat; orange ears give you a ginger one. Make one of each and they look like a pair.
It's sized like a bag charm, so it's just as cute clipped to a backpack as it is sitting on a desk. The base is closed, and if you keep it flat (see Part 1), the ghost sits up on its shells when it isn't on your keys.
Skill level. Easy. You need a magic ring, sc, increases and invisible decreases in continuous rounds, and working in the back or front loops only. If velvet yarn is new to you, read the tips in the next section first.
If you'd like more Halloween minis, my pumpkin keychain is a little ribbed pumpkin with a curly vine.
What you'll need
Yarn (bulky #5 velvet or chenille yarn, the plush kind sold for amigurumi)
| Color | Used for | Amount |
|---|---|---|
| White | Body, base, scalloped hem | about 35 yd |
| Black or orange | Ears and tail | about 9 yd |
| Smooth white worsted (acrylic or cotton) | Hanging loop | about 2 yd |
I worked these amounts out from the stitch count, plus a margin for tails. Velvet yarns vary a lot in thickness, so treat them as an estimate and keep a little extra.
Hook and notions
- 4 mm (US G/6) hook. Go down to 3.5 mm if the stuffing shows between the stitches.
- 2 black safety eyes, 10 mm.
- Polyester fiberfill, a stitch marker, a tapestry needle with a large eye and scissors.
- A 25 mm (1 in) split key ring, or a keychain ring with a short chain and a lobster clasp.
Tips for velvet yarn
- Count by feel, not by sight. The pile hides the stitches. Move your marker every round and run your finger along the tops to find each stitch.
- Don't frog more than you have to. Velvet yarn sheds and can "worm" (pull loops out of the fabric) if you rip back several times. Undo a few stitches, not a whole round, whenever you can.
- Keep your tension firm and even. Velvet stretches a little as you pull, so tight stitches are what keep the stuffing in.
Gauge and finished size
Gauge isn't critical. With bulky velvet yarn and a 4 mm hook, the body is about 2¾ in (7 cm) across at R11. The finished ghost should be about 3 in (7.5 cm) tall to the top of the head (the ears add about ¾ in) and about 3¼ in (8 cm) across the scalloped hem. These are estimates: velvet yarns differ a lot, so measure your first one.
For a mini ghost, use DK cotton and a 2.5 mm hook with the same counts: it'll be much smaller. Measure it, as the exact size depends on your yarn.
Abbreviations (US crochet terms)
- MR: magic ring
- ch: chain
- sl st: slip stitch
- sc: single crochet
- dc: double crochet
- sk: skip
- inc: 2 sc in the same st
- dec: invisible decrease (sc 2 together through the front loops)
- BLO / FLO: back loop only / front loop only
- st(s): stitch(es)
- R: round
Work the body, base, ears and tail in continuous rounds: don't join, and move a marker to the first st of each round. The two hem rounds are the exception: they're joined rounds, closed with a sl st, and the ch 1 at the start of each one doesn't count as a stitch.
The pattern, step by step
Part 1: The body and base (white)
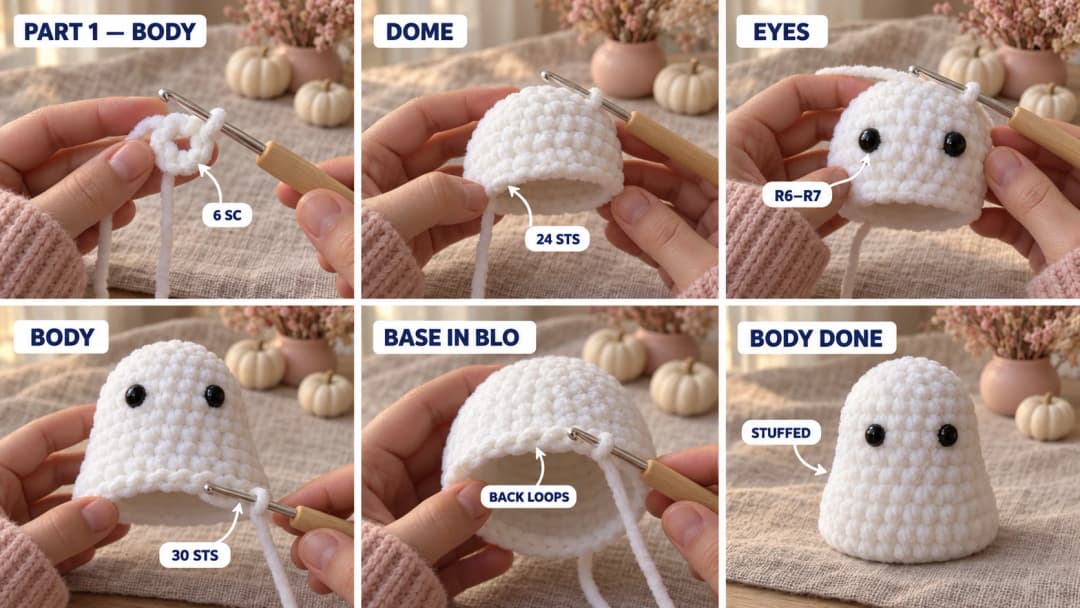
The magic ring is the top of the head. The body is worked down to R11, then the base closes the bottom.
- R1: 6 sc in a MR. (6)
- R2: inc × 6. (12)
- R3: (sc, inc) × 6. (18)
- R4: (sc 2, inc) × 6. (24)
- R5–R9: sc around. (24) 5 rounds.
Eyes. Insert the safety eyes between R6 and R7, with 5 sts between them. Check that they're level and centered before you fix the backs: that side is the front.
- R10: (sc 3, inc) × 6. (30)
- R11: sc around. (30) This round is the bottom edge of the body. Its back loops will hold the base, and its front loops the scalloped hem.
Base.
- R12 (BLO): working in the back loops only, (sc 3, dec) × 6. (24) The front loops of R11 stay free, as a little ridge all around the outside.
- R13: (sc 2, dec) × 6. (18)
- Stuff the body firmly, especially the top of the head, so the ears have something to sit on. Keep the stuffing light at the bottom: a firmly stuffed bottom bulges and the ghost rocks.
- R14: (sc, dec) × 6. (12) Add a little more stuffing.
- R15: dec × 6. (6) Before you close the hole, press the base flat against the table with your palm and shape it, pushing any extra stuffing up into the head.
Fasten off. Thread the tail through the front loops of the last 6 sts, pull the hole closed and weave the end into the base. A flat, lightly stuffed base keeps the ghost from wobbling.
Part 2: The scalloped hem, ears and tail
Scalloped hem (white). Turn the ghost upside down. Join white with a sl st in the free front loop of R11 at the center back.
- Hem R1: ch 1 (doesn't count), working in the front loops of R11: (inc, sc, inc, sc, inc) × 6. (48) Join with a sl st in the first sc.
- Hem R2 (shells): ch 1 (doesn't count), sc in the same st as the sl st. Sk 2 sts, 5 dc in the next st, sk 2 sts, sc in the next st. Repeat from * 7 more times, but on the last repeat, replace the final sc with a sl st in the first sc. (8 shells)
Fasten off and weave the end in on the inside of the hem. Each shell uses 6 sts, so the 48 sts make exactly 8 shells. They hang down around the base like the soft lobes of a sheet ghost, and the ghost stands on them.
Ears (make 2, black or orange).
- R1: 4 sc in a MR. (4)
- R2: (sc, inc) × 2. (6)
- R3: (sc 2, inc) × 2. (8)
- R4: (sc 3, inc) × 2. (10)
- R5: sc around. (10)
Fasten off with a 10-in tail. Don't stuff. Flatten each ear so the opening is a straight line about 5 sts wide: the ear is a wide cone that flattens into a triangle. Pinch the magic ring between your fingers to sharpen the point, and pull the starting tail inside to tighten it.
Tail (black or orange).
- R1: 5 sc in a MR. (5)
- R2–R8: sc around. (5) 7 rounds.
Fasten off with a 10-in tail. Stuff the tail lightly, just enough to hold a curve: push small bits of fiberfill in with the back of your hook. The tail is a little tube about 2 in long, rounded at the tip. Some velvet yarns are too soft to hold a curve. Optional: slide a pipe cleaner folded in half (ends turned in) into the tube before stuffing, so you can bend it into shape. Skip it on anything for a child.
Part 3: Ears, tail and the keychain loop
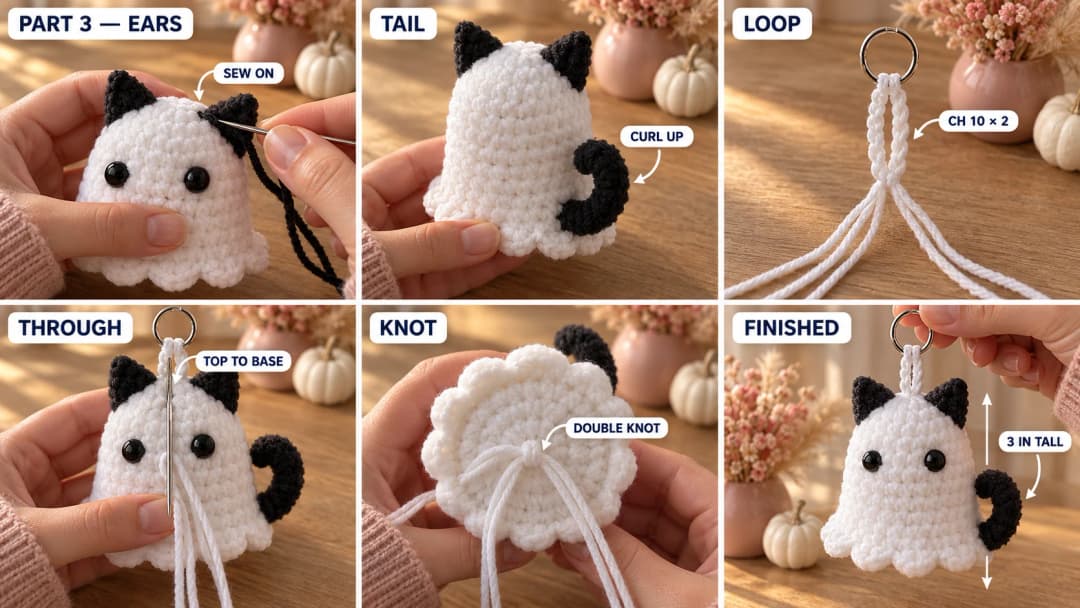
Ears. Pin the ears at the two top corners of the head, along R3–R5, with about 6 sts between them, centered above the eyes. They're wide, so they nearly meet the curve of the head on the outer side. The flat opening sits on the head, with the point standing up and tilted slightly outward. Sew each one all along its opening with its tail, going through both layers of the ear and deep into the head, then sew around the base once more. Hide the tails inside the body.
Tail. The tail comes out at the back, low on one side, and curls up. Sew the open end to the body at R10, about a quarter of the way around from the center back, just above the hem, with the tube pointing out to the side. Sew all around the opening, twice. Then bend the tail upward into a soft J, so the tip rises to about R6, a little away from the body. Tack only the inside of the bend to the body, with 2 small stitches at R8, so the tail keeps its curve. The top third of the tail stays free, with its tip curling away from the body. Hide the end inside. Put the tail on the left side of one ghost and the right side of the other, and a pair will mirror each other.
Keychain loop. A velvet chain stretches and sheds, so the loop is made with smooth yarn, doubled, and anchored through the whole ghost.
- Make the loop. Hold two strands of smooth white worsted together. Leave 8-in (20 cm) tails, ch 10, then fasten off, leaving another pair of 8-in tails. You now have a short double chain with 2 tails at each end.
- Put it on the ring. Slide the chain onto the split ring and fold it in half, so the ring sits at the fold. All 4 tails now hang together.
- Go through the ghost. Thread the 4 tails onto the tapestry needle (2 at a time if they don't fit). Insert the needle at the top center, in the middle of the magic ring between the ears, and push it straight down through the stuffing to the center of the base. Pull until the folded chain sits snugly on top of the head.
- Knot under the base. Bring 2 tails out at the center of the base, and take the other 2 back in and out again 2 sts away. Tie the two pairs together in a double knot across that stitch, so the knot sits on top of a stitch and can't slip back into the center hole. Pull it snug but don't squeeze the body: the head shouldn't dent. Take each tail back into the body, bring it out at the side, under the hem, and trim it. The flat knot sits under the base, hidden by the shells.
- Lock it at the top. With a short length of white velvet, sew 4 or 5 stitches through the base of the folded chain and the top of the head, so the loop doesn't twist.
Give the loop a few firm tugs. It shouldn't slide at all at the top.
Safety. This keychain has safety eyes and a metal split ring, so it isn't a toy for children under 3 (nor is a tail with a pipe cleaner inside). For a little one's toy, leave off the ring and loop, and embroider the eyes with black yarn instead (a few stacked straight stitches each).
Make it yours — quick variations
| Variation | Change from the base pattern |
|---|---|
| Ginger ghost cat | Orange ears and tail, as in the second ghost. |
| Calico | One black ear, one orange ear, and a black tail. |
| Rosy cheeks | Sew two small blush pink French knots, or brush on a little pink, just under the eyes. |
| Shelf ghost | Skip the loop and ring: it stands on its flat base. |
| Bat ghost | Swap the ears for two little black wings: ch 6, sc in the 2nd ch from the hook and across, sew one to each side. |
Troubleshooting the three things that go wrong
The shells don't fit evenly
Count the hem round before the shells: it must be exactly 48 sts, because each shell uses 6. If you have 47 or 49, fix it with one extra inc or one fewer before you start Hem R2.
The ghost won't stand up straight
The base isn't flat, or the stuffing is lumpy at the bottom. Press the base flat with your palm before R15, and push the stuffing up into the head. The shells should hang down around the base, not fold under it.
I've lost count in the velvet
It happens to everyone. Count the sts of the last round by feel, from the marker, before you start the next one. If one round is off by one, fix it in the next increase or decrease round: nobody will see it in the pile.
Frequently asked questions
How long does it take? About 1½ hours: about 45 minutes for the body and base, 20 minutes for the hem, ears and tail, and 20 to 25 minutes for sewing and the loop.
How big is it? About 3 in (7.5 cm) tall to the top of the head, plus the ears and loop, and 3¼ in (8 cm) across the scalloped hem in bulky velvet yarn. Velvet yarns vary, so measure your first one. It's a big keychain, closer to a bag charm. For a small one, use DK cotton and a 2.5 mm hook.
Can I use regular yarn instead of velvet? Yes. A worsted acrylic with a 3.5 mm hook works with the same counts. The ghost will be a little smaller and less plush, but the stitches are much easier to see.
Why isn't the loop made in velvet yarn? Velvet yarn stretches and sheds when it's pulled, and a keychain loop is pulled all day. A double strand of smooth yarn, anchored through the body, stays strong.
Can I sell ghost cats made from this pattern? Yes, you're welcome to sell finished ghost cats made from this free pattern at markets, on Etsy or as gifts. Please credit "Pattern by Wavode" in your listing and link back to this page. What you can't do is republish this write-up or my photos as your own pattern.
Related patterns on Wavode
- Pumpkin keychain: a mini ribbed pumpkin with a leaf and a curly vine.
- Pumpkin cat: a sleepy black cat peeking out of a pumpkin.
- Mini vampire amigurumi: a 3½-inch Dracula with a cape and a bow tie.
- Snowman keychain: for when Halloween is over.
Made a ghost cat? Tag #wavodecrochet on Pinterest. I re-pin every finished make and credit the maker.
Pattern by Clara Hartwell for Wavode. Questions? Email me at support@wavode.com.